Overview
The Employee Profile is used to enter the employees who are considered when processing payroll. This
The Country field in the Country section of the screen defaults from the country of the company selected in the US Payroll - User Defaults screen, but can be changed as required.
Personal – Tab
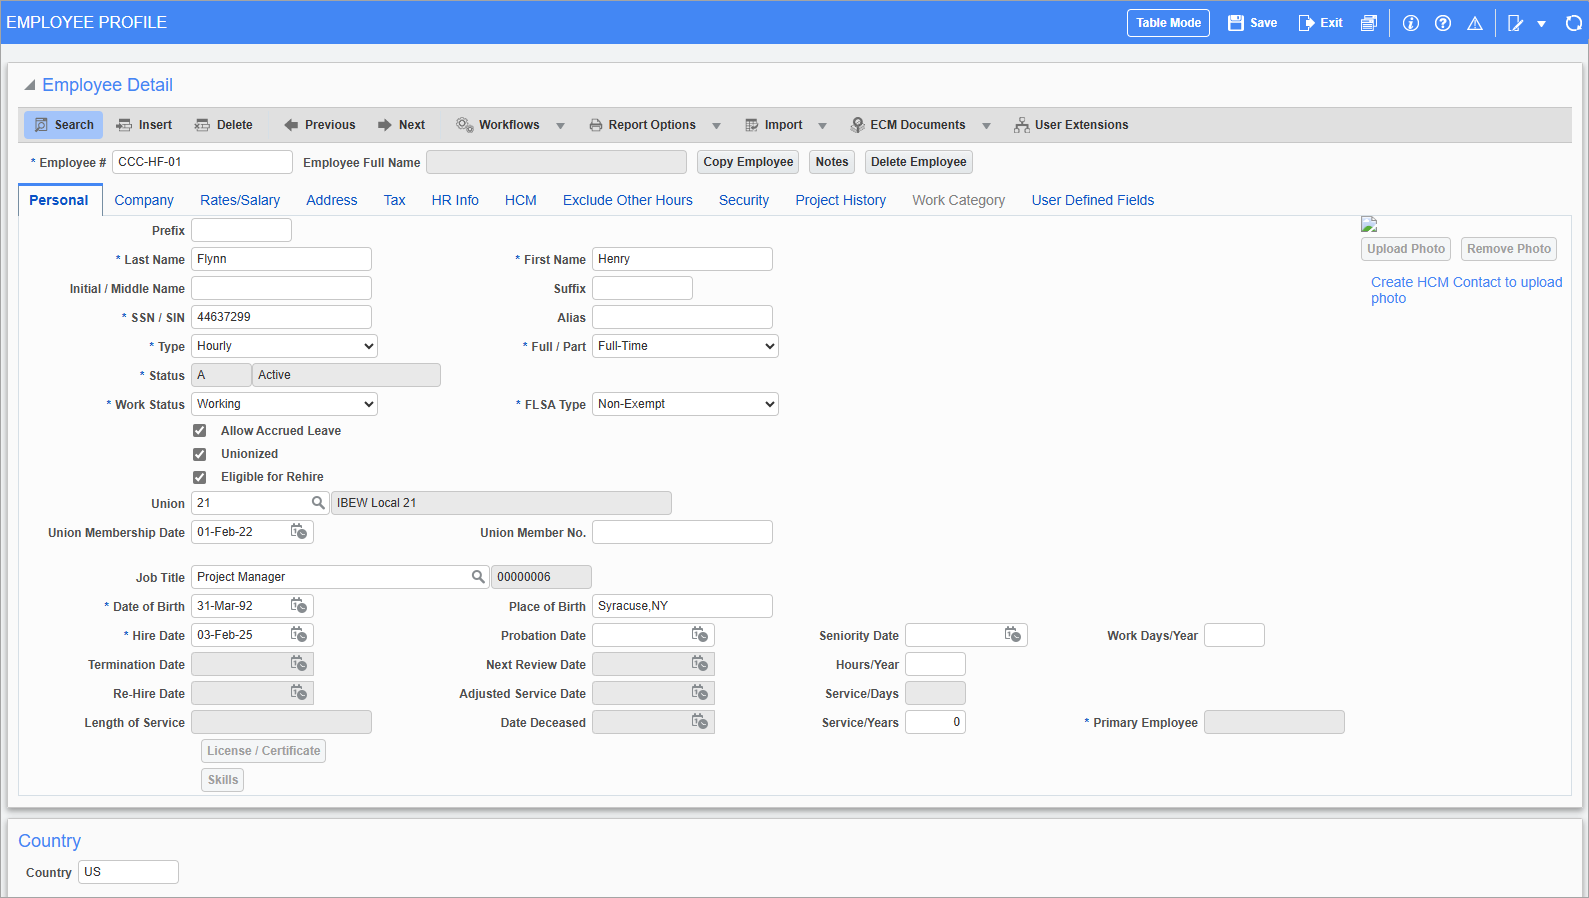
Pgm: PYEMPLOY – Employee Profile; standard Treeview path: US Payroll > Setup > Employees > Employee Profile – Personal tab
This screen is used to enter general and personal information about the employee, such as their name, date of birth, SSN/SIN, and union membership.
Employee Code
Enter the code for the employee. This code is used throughout the Payroll module to reference the employee.
NOTE: If the 'Payroll/HR Auto Numbering' box has been checked in the Payroll tab of System Options (standard Treeview Path: System > Setup > System Options – Payroll tab), this field will not be accessible and the system will automatically number any new employees with the next available, sequential number.
[Delete Employee] – Button
Press this button to delete the employee profile. The system will check for child records and transactions associated with the employee.
NOTE: This field requires the system privilege ‘PYEMPDEL – PY: Allows User To Delete an Employee Profile’ to be assigned on the System Privilege tab on the User Maintenance screen in the System Data module. For more information, please refer to System Data - Define Roles.

If there are related child records associated with the employee, the system will warn the user that all setup and child records will be removed and that changes cannot be undone, as shown in the screenshot above. Press the [Delete] button to delete the employee profile.

If transaction records exist for the employee, the system will alert users that deletion is not possible, as shown in the screenshot above.

If deletion is allowed, the system will alert the user that changes cannot be undone. Press [Yes] to delete the employee profile.
Last Name, First Name, Initial, Prefix, Suffix, Alias
Enter the first and last name of the employee, along with their middle initial or name and any prefixes, suffixes, or aliases they may have.
SSN/SIN No.
Enter the SIN/SSN for the employee. Depending on the settings on the Company Control screen, the uniqueness of this SSN may be verified.
Type
Select the employee type from the following options:
-
Hourly: Employees are paid based on hours entered in timesheets for the payroll period. Date sensitive pay rates, charge out, and billing rates for hourly employees can default from the Customer, Job, Trade, Union, or Employee Pay Rate screens (see the Pay Rates section for further details). If date sensitive pay rates are not required then static hourly, charge out, and billing rates can be entered in the Rates/Salary tab.
-
Salaried: Timesheets are not required and employee wages are based on the annual salary entered on the Rates/Salary tab divided by the number of periods in the pay run. Timesheets can still be entered if payroll costs must be transferred to a job.
Full/Part
Select whether the employee works full or part-time.
Status
When setting up a new employee, this field is marked “Active” by default. If the employee is terminated, deceased, or retired, then this information can be entered in the Employment History screen and this field will reflect any changes made.
Work Status
Select the working status of the employee. “Working” is entered by default for all new employees.
Working status codes are maintained on the US Payroll - Employee Work Status screen.
Allow Accrued Leave – Checkbox
Check this box to allow the employee to accrue leave from previous years.
FLSA Type
Select whether the employee is exempt or not from the Fair Labor Standards Act. Employees are non-exempt by default. Non-exempt employees are entitled to work overtime and their timesheets are included when processing overtime.
By contrast, all timesheets for exempt employees validate the hours based on the employee pay run frequency and overtime hours are disallowed. For example, if the employee belongs to a weekly pay run, then timesheets do not allow entry of more than 40 normal working hours per week.
Eligible for Rehire – Checkbox
Check this box to allow the employee to be rehired in the event of termination.
Unionized – Checkbox
Check this box if the employee belongs to a union. Checking this box gives access to the Union Membership Date, Union, and Union Mem. No. fields.
Union Membership Date
Select the date the employee gained membership to the union.
Union
Enter/select the code of the union the employee belongs to. If the employee belongs to more than one union, enter union they work for most often.
Union Membership Number
Enter the union membership number for the employee.
Enter/select a description of the position for the employee. Position codes are maintained in the Position Types screen in the Human Resources module (standard Treeview path: Human Resources > Setup > Local Tables > EEO Positions > Positions).
NOTE: The system privilege 'PYEDITPOS – PY: Allows User to lock the editing of Job Title' on the System Privileges tab of the User Maintenance screen in the System Data module controls whether users can enter free-form values in the Job title field.
-
When the Job Title field is locked (i.e., the privilege is assigned), users can only select a predefined position from the Position LOV.
-
When the Job Title field is unlocked (i.e., the privilege is not assigned), users can enter a free-form value or select a position from the Position LOV. For example, while the company may have a generic position of "Engineer", users can enter a more specific job title such as "Senior Software Engineer". Any value entered will not be validated against the Position LOV and will not be added to the Position Types screen.
For more information, please refer to System Data - Define Roles.
Place of Birth, Date of Birth
Enter the place and date of birth for the employee.
Hire Date
Enter/select the date on which this employee was hired by the company.
Seniority Date
Enter/select the seniority date of the employee.
Work Days/Year
Enter the days worked per year for the employee where they differ from the value specified on the Company Profile. The number of workdays is used to calculate the daily wage for a salaried employee.
Termination Date, Re-Hire Date, Date Deceased, Next Review Date, Adjusted Service Date
When setting up an employee for the first time, these fields are not accessible for entry. Upon the termination, re-hiring, or death of an employee, the appropriate field should be edited in the Employee History screen. The corresponding field on this screen reflects this information.
NOTE: The Employee Profile screen only displays present details and does not accommodate future date values. As a result, if an employee's termination or re-hire is entered for a future date in the Employee History screen, the corresponding fields on the Employee Profile screen will not update until the actual day of termination or re-hire.
This does not apply to future termination dates entered in the US Payroll - Terminate Employees screen.
Hours/Year
Enter the hours worked per year for the employee where they differ from the value entered on the Company Profile. This value is used to calculate the hourly wage for a salaried employee.
Service/Days
This field is read-only and displays the employee’s total amount of service in days. Similar to the Length of Service field, it calculates the total number of days of service, from the employee hire or re-hire date to the current date. The difference is that the Length of Service field breaks the time of service down into years, months, and days, but the Service/Days field only displays the total length of service in days.
NOTE: The Service/Days field requires that the ‘Nightly Payroll Days of Service Update (special rules)’ job process is checked in the Job Queues pop-up window, launched from the [Job Queues] button located on the General tab of the System Options screen in the System Data module. For more information, please refer to the [Job Queues] button in System Data - System Options - General - Tab.
Length of Service
This field is read-only and displays the employee's service in years, months, and days. This field calculates the total number of days of service, from the employee hire or re-hire date to the current date.
NOTE: The Length of Service field requires that the ‘Nightly Payroll Days of Service Update (special rules)’ job process is checked in the Job Queues pop-up window, launched from the [Job Queues] button located on the General tab of the System Options screen in the System Data module. For more information, please refer to the [Job Queues] button in System Data - System Options - General - Tab.
Service/Years
Enter the years of service for this employee. This field can be manually set here and can be automatically updated depending on the method selected in the Update Method For Years Of Service field on the General tab of the Human Resources Control File screen in the Human Resources module (standard Treeview path: Human Resources > Setup > Local Tables > Control – General tab). For more information, please refer to Human Resources - Human Resources Control File. There are two update options:
-
Using the Year-End Update screen. This is the original method using the 'Increment the Years of Service Count' checkbox on the Year-End Update screen in the Human Resources module (standard Treeview path: Human Resources > Utility > Year-End Update). For more information, please refer to Human Resources - Year-End Update.
-
Using the Seniority Date via the Nightly Years of Service Update found in System Options (standard Treeview path: System > Setup > System Options – General tab – [Job Queue] button). In order to use this option:
-
The "Daily Process Based on Seniority Date" option must be selected in the Update Method For Years Of Service field and the Hours To Qualify For Years Of Service field must be set to "160" on the General tab of the Human Resources Control File screen in the Human Resources module (standard Treeview path: Human Resources > Setup > Local Tables > Control – General tab).
-
The Seniority Date must be populated on the Personal tab of the Employee Profile.
The Years of Service field is incremented based on seniority date and hours worked in the prior twelve months as of the current date. For more information, please refer to the [Job Queues] button in System Data - System Options - General - Tab.
NOTE: The Service/Years field requires that the ‘Nightly Payroll Years of Service Update (special rules)’ job process is checked in the Job Queues pop-up window, launched from the [Job Queues] button located on the General tab of the System Options screen in the System Data module. For more information, please refer to the [Job Queues] button in System Data - System Options - General - Tab.
-
The Service/Years field calculates the total number of years in service starting from the employee's hire date, regardless if they have been re-hired. To view a re-hired employee's years in service from the re-hire date, please refer to the Length of Service field.
Primary Employee
If the employee profile is for a secondary employee (i.e., if it has been copied – see the [Copy Employee] section below) this field displays the employee code of the primary employee.
Valid
This field displays “Y” when the profile is saved unless mandatory user extensions are being used and an extension has not been entered for the employee. In this case it displays “N” and the employee will not be available for entry until a user extension has been entered.
[License/Certification], [Skills] – Buttons
These buttons enable the entry of licensing and skills information for use in the Human Resources module. These functions are not available until the employee profile has been saved.
[Copy Employee] – Button
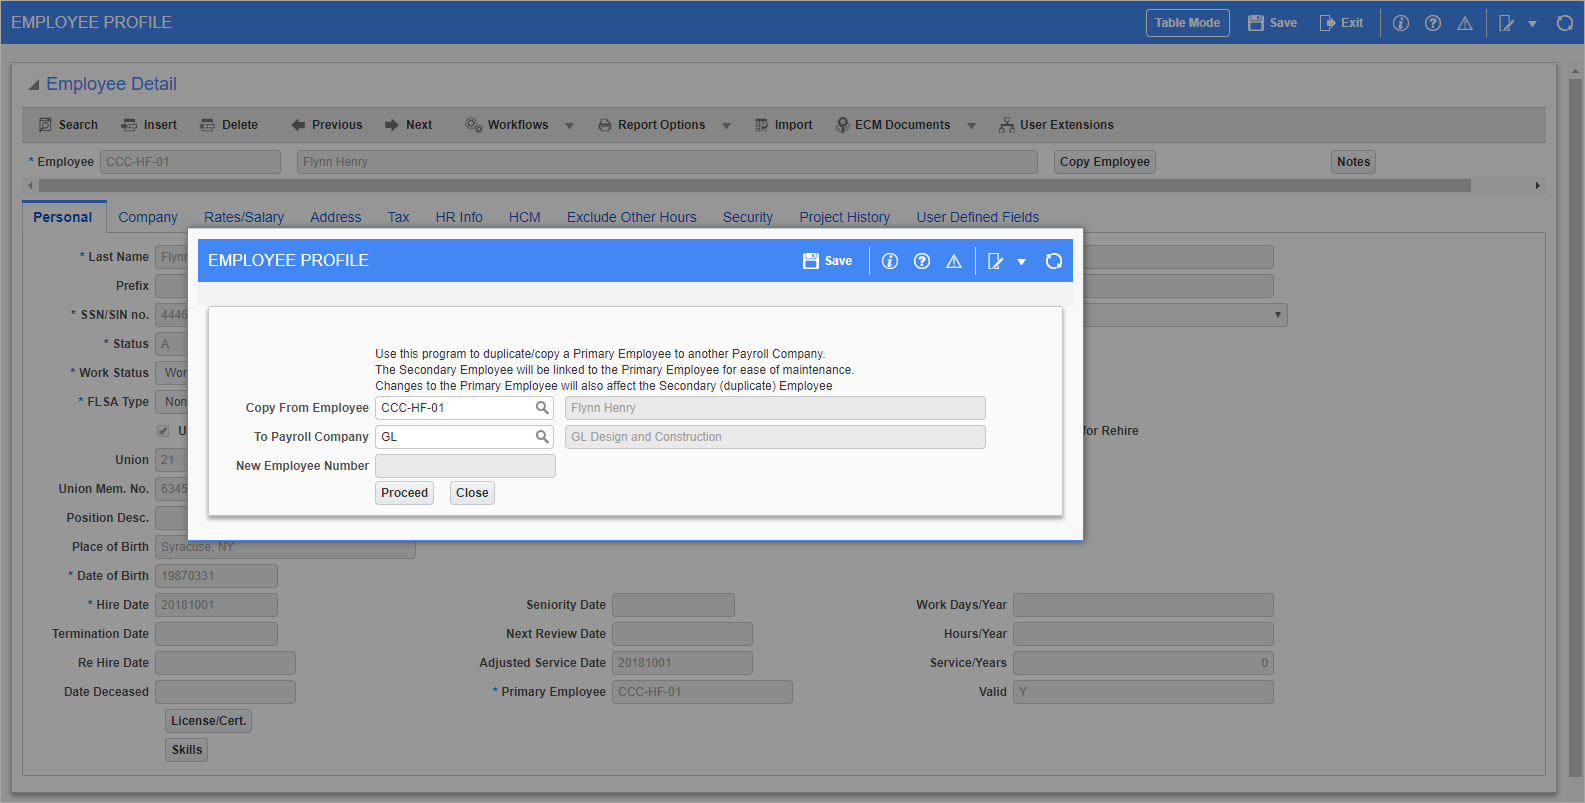
Pgm: PYEMPLOY – Duplicate Employee; standard Treeview path: US Payroll > Setup > Employees > Employee Profile – Copy Employee button
Press the [Copy Employee] button to copy an employee to other companies. The employees to be copied from and copied to are referred to as the primary and secondary employee, respectively. All changes are made at the primary employee level and automatically reflect in the profile of the secondary employee.
NOTE: The Copy Employee feature is not available for salaried employees. The Employee List LOV will only display hourly employees. The employee type is set in the Type field on the Personal tab of this screen.
The Employment History screen allows editing of primary employees only.
Direct deposit information is copied to secondary employees whereas loans, advances, and deductions are not. If the primary employee is created as a vendor the bank information is not copied to the secondary employee. Tax exemption overrides done in Employee Profile are not accessible for secondary employees and must be made in the primary employee profile.
Pressing the [Proceed] button brings the user to the Employee Profile screen for the secondary employee.
Certain fields are validated that must exist in both companies. When a field is not found in the secondary employee file the user can either leave the Employee Profile screen or add the missing field and return to continue the copy. The validated fields are:
-
Departments
-
GL Accounts
-
Pay Group
-
Work Location or SUI Location
-
Workers’ Compensation Code
-
Public Liability Code
-
Job/Equipment Phase and Job Category
-
Reason Text Type and Reason Text Code
This button can only be pressed when the employee profile has been saved.
[Notes] – Button

Notes pop-up launched from [Notes] button
Press this button to launch the Notes pop-up to view and/or add notes to the employee profile. The 'Show Closed Notes' checkbox is available to include closed notes (e.g., notes set as "Closed" to indicate that they are no longer current or relevant).
Notes can only be added when the employee profile has been saved.
[Upload Photo] - Button
Press this button to upload a picture to the employee profile. For more information on uploading photos to this screen, please refer to the US Payroll - Uploading Employee Profile Photos .
[Remove Photo] - Button
If a photo has already been uploaded, press this button to remove it.
Company – Tab
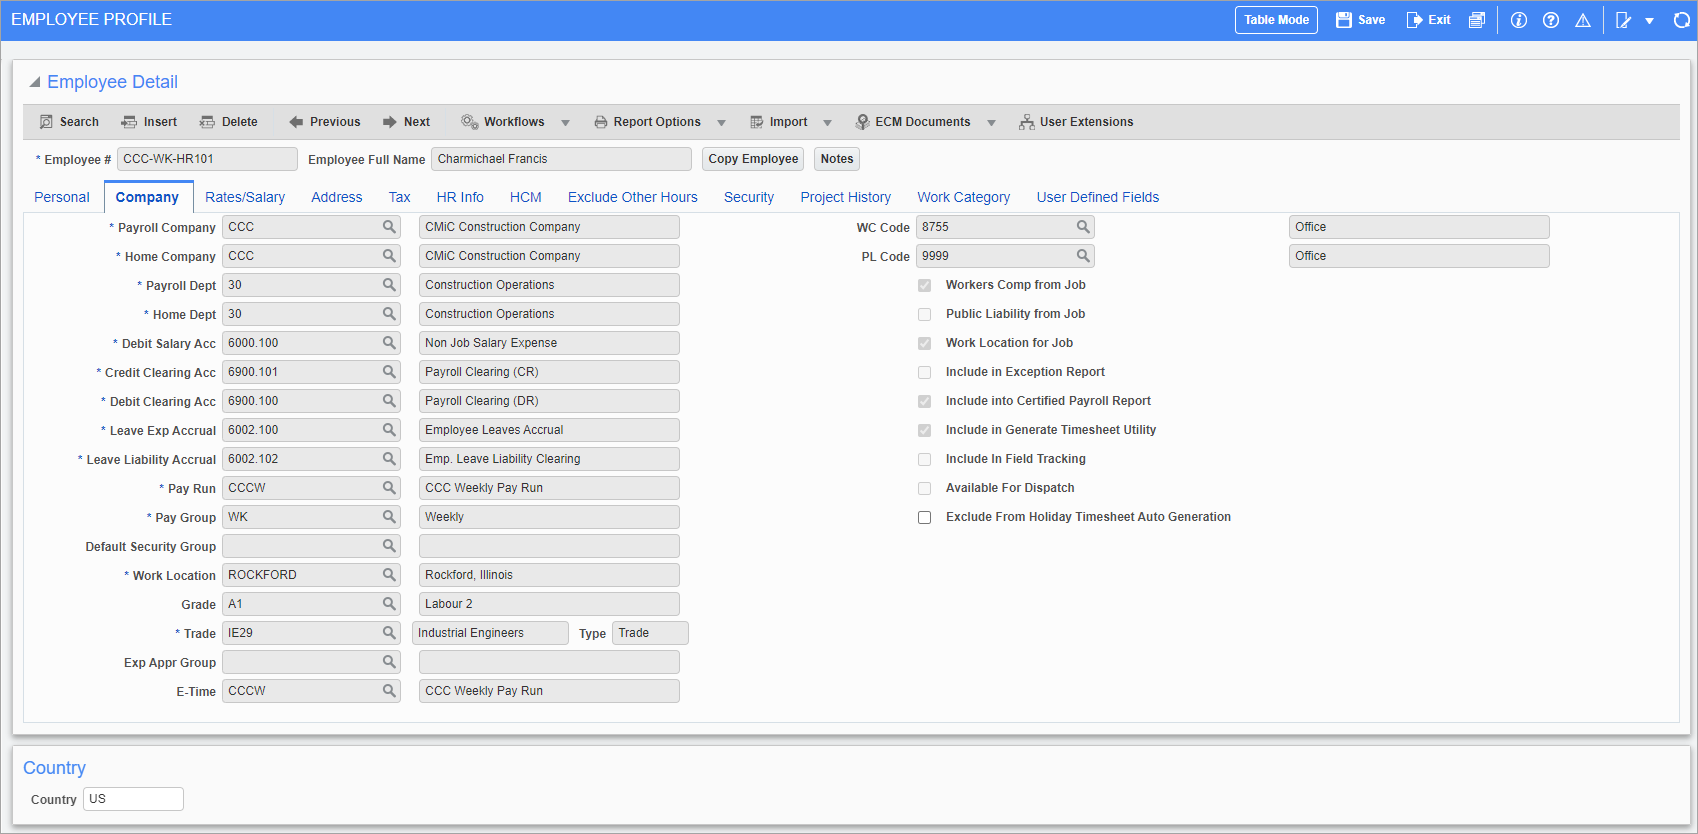
Pgm: PYEMPLOY – Employee Profile; standard Treeview path: US Payroll > Setup > Employees > Employee Profile – Company tab
Payroll Company
Enter/select the payroll company from which employee wages are paid. The company code determines such things as taxes, benefits, deductions, locations, and pay groups.
Home Company
Enter/select the company to which the employee belongs on a day-to-day working basis. This company code determines when inter-company and inter-branch transactions should be created. The home and payroll companies may be the same.
Payroll Department
Enter/select the department used for posting any non-job cost transactions for the employee.
Home Company Department
Enter/select the department that this employee belongs to in the home company.
Debit Salary Account
Enter/select the default General Ledger account that the system uses to post the debit associated with the direct labor costs after the posting of timesheets. The default account comes from the Company Control screen (standard Treeview path: US Payroll > Setup > Company > Control).
Debit and Credit Clearing Accounts
Enter/select the default General Ledger account that the system uses to post the debit/credit associated with the clearing of the accrued payroll liability during the payroll update. The default account comes from the Company Control screen.
Leave Expense Accrual Account
Enter/select the account that to be used when leave is accrued by the employee. This account defaults from the Company Control screen.
Leave Liability Accrual Account
Enter/select the leave liability clearing account. This account is used when accrued leave is either taken or accumulated as the offset account.
Pay Run, Pay Group
Enter/select the pay run and group in which the employee is processed.
Default Security Group
Enter/select a code for the default security group for the employee. Security groups are groupings of employee information access. Each employee must be assigned to a security group in order to be seen when a user accesses the system and is working with that group. Once assigned to a security group, they can then be seen in the group in timesheets and Payroll processing, as well as all other Payroll, HR, and related module screens. Employees can be assigned to more than one security group in the Security – Tab.
Work Location
Enter/select the default work location for the employee. The default work location determines where taxes are calculated.
Grade
Enter/select the grade code for the employee. Company grades are user-defined classifications that can be assigned to employees to indicate the scale or grade in which they belong. Grades are typically set up in terms of length of service and pay scales, and are used for reporting purposes only.
Trade
Enter/select the trade of the employee.
E-Time Expense Approval Group
If using E-Time, expenses must be approved and each employee who submits expenses must belong to an expense approval group. Enter/select the group code here.
E-Time
Enter/select the timesheet code the employee uses to enter Timesheets via E-Time. This defaults from the Pay Run field, but may be changed.
Workers’ Compensation Code
Enter/select the workers’ compensation code associated with the employee. If the ‘Calculate Workers’ Compensation’ box is checked in the General tab of the Company Control screen this field is mandatory. If the ‘New Employees Workers’ comp from Job’ box is checked in the Rules tab of the Company Control screen, this field is filled automatically.
Public Liability Code
Enter/select the public liability code associated with the employee. If the ‘Calculate Public Liability’ box is checked in the General tab of the Company Control screen this field is mandatory. If the ‘New Employees Public Liability from Job’ box is checked in the Rules tab of the Company Control screen, this field is filled automatically.
Workers’ Comp from Job – Checkbox
If the ‘New Employees Workers’ comp from Job’ box is checked in the Rules tab of the Company Control screen, this box is checked automatically.
If the ‘Calculate Workers’ Comp by Job’ box is unchecked on the Company Control and this box is checked the workers’ compensation code on the job defaults during timesheet entry. If this box and the ‘Calculate Workers’ Comp by Job’ box are both unchecked then the workers’ compensation code on the employee profile defaults during timesheet entry.
Public Liability from Job – Checkbox
If the ‘New Employees Public Liability from Job’ box is checked in the Rules tab of the Company Control screen, this box is checked by default.
If the ‘Calculate Public Liability by Job’ box is unchecked on the Company Control and this box is checked the public liability code on the job defaults during timesheet entry. If this box and the ‘Calculate Public Liability by Job’ box are both unchecked then the public liability code on the employee profile defaults during timesheet entry.
Work Location for Job – Checkbox
Check this box to default the job work location as specified on the Job Work Location screen during timesheet entry.
Leave this box blank to have timesheet entry default the work location as specified on the Employee Profile.
Include in Exception Report – Checkbox
If this box is checked, the employee appears on the Missing Employees report (standard Treeview path: US Payroll > Timesheet > Reports > Missing Employees Report). This box is only visible if the employee is salaried.
Include Into Certified Payroll Report – Checkbox
If this box is checked, the employee will be included in the US Payroll - Federal Certified Payroll Report. This will override the default value set in the US Payroll - Timesheet Entry screen via the 'Incl in Cert Rep' checkbox.
In addition to this checkbox, the US Payroll - Update Certified Rep Flag screen is a custom utility screen which can also be used to enable or disable the ‘Include in Cert Rep’ checkbox on posted timesheets.
NOTE: This is a custom alternate feature which is disabled by default and needs to be enabled in the da.SYS_ALTERNATE_FEATURE table. Please contact your CMiC consultant if you wish to use this alternate feature.
Include In Generate Timesheet Utility – Checkbox
If this box is checked, timesheets can be automatically generated for the employee.
Include In Field Tracking – Checkbox
If this box is checked, the employee may transfer between jobs. In addition, the information processed in the screen adds records/entries to the Project History Tab and related project tables.
Available for Dispatch – Checkbox
This field refers to custom functionality.
Exclude From Holiday Timesheet Auto Generation – Checkbox
If this box is checked, the employee is excluded from the automatic insertion of holiday hours in their timesheet. This box is unchecked by default. For more information, please refer to E-Time - Automatically Insert Holiday Hours.
Rates/Salary – Tab
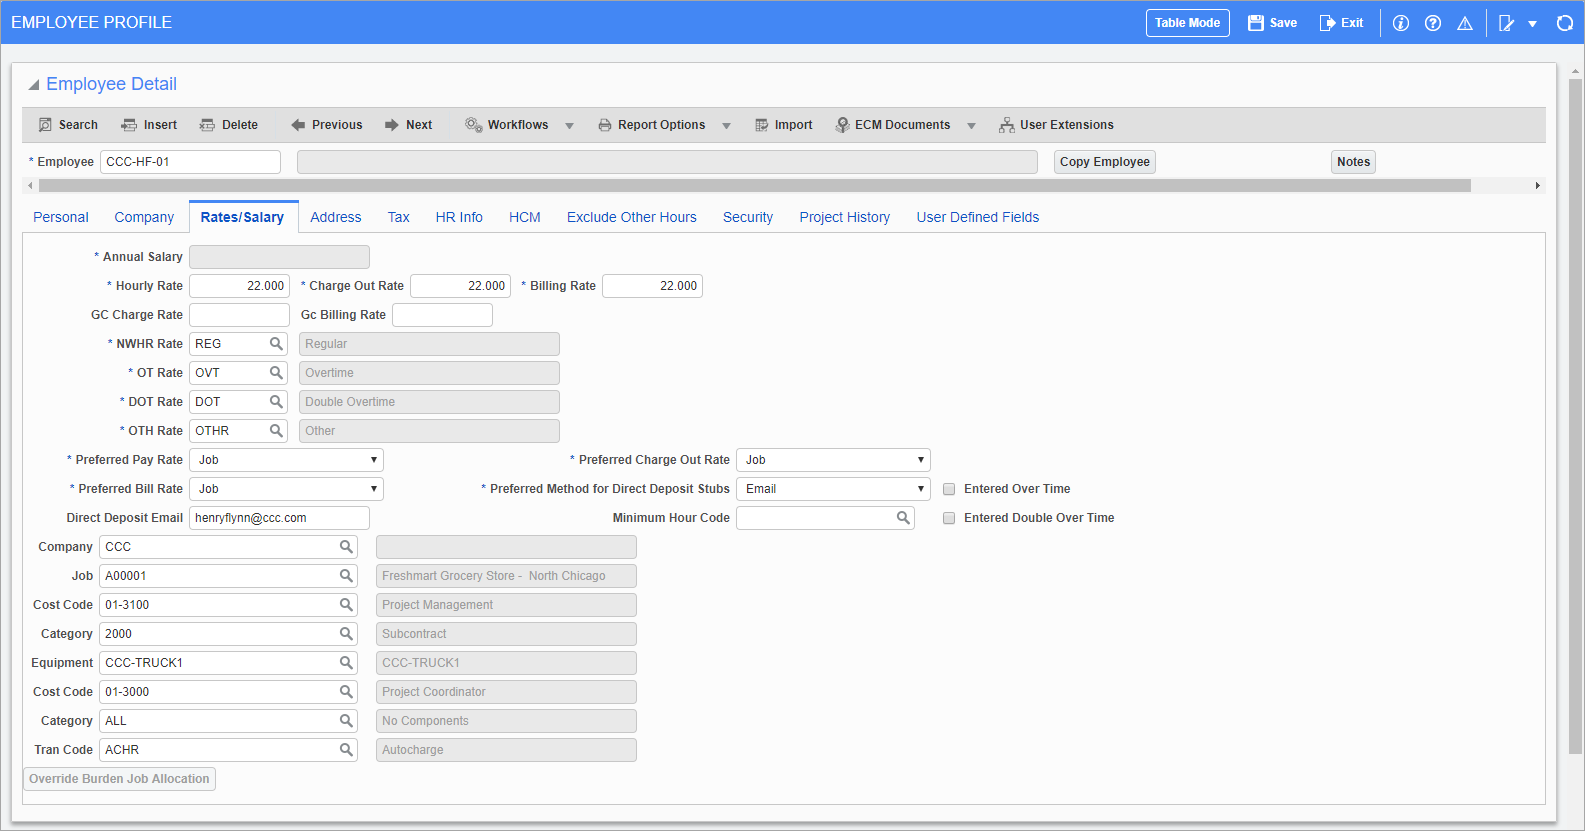
Pgm: PYEMPLOY – Employee Profile; standard Treeview path: US Payroll > Setup > Employees > Employee Profile – Rates/Salary tab
Annual Salary
If the employee is salaried, then enter their annual salary here. Wages are calculated by dividing this value by the number of pay periods. Please note that the salary amount entered in this field is not date sensitive.
Hourly Rate
If the employee is hourly, then enter their base hourly rate of pay here. When determining overtime, double overtime, and other hour types, the system uses this rate multiplied by the relevant factor.
This rate is not date sensitive. For date sensitive rates enter the employee pay rates in the Customer, Job, Trade, Union, or Employee Pay Rate screens. The Preferred Pay Rate selection on this screen determines where the pay rates default to in timesheet entry. This applies to the charge out rate and billing rate (see below).
Charge Out Rate
Enter the rate used to post costs against jobs for the hours worked on those jobs. The hourly rate defaults into this field, but it can be modified.
Billing Rate
Enter the rate used to post billing amounts against jobs for the hours worked on those jobs. The hourly rate defaults into this field, but it can be modified.
GC Charge Rate, GC Billing Rate
These fields allow forecasting rates to be entered, which are applied when using GC Monitor for labor forecast. For more information on how these fields are used, refer to GC Monitor - R12.
NWHR Rate, OT Rate, DOT Rate, OTH Rate
Verify/modify the rate codes for normal working hours, overtime hours, double overtime hours, and other hours. These codes default from the Company Control screen.
Preferred Pay Rate, Preferred Charge Out Rate, Preferred Bill Rate
Select where employee pay/charge/bill rates default from in timesheet entry.
-
Pay Rate: The rate per hour that the employee is paid for the hours entered on timesheets.
-
Charge Out Rate: The rate used to post costs to jobs.
-
Billing Rates: The rate per hour on the job timesheets that are eventually billed to the customer.
The system provides for the following options:
-
Customer: The default timesheet pay rates come from the customer code. The customer assigned to the job is given by the Customer field on the Job Maintenance screen (standard Treeview path: Job Costing > Job > Enter Job). Pay rates for customers are defined in the Customer Pay Rates screen (standard Treeview path: US Payroll > Setup > Pay Rates > Customer).
-
Employee: The default timesheet pay rates come from the employee. If pay rates from a specific time period are required then these are taken from the Employee Pay Rates screen (standard Treeview path: US Payroll > Setup > Pay Rates > Employee). If date sensitive pay rates are not required, the desired employee pay rate can be entered in the hourly rate field on this screen.
-
Job: The default timesheet pay rates come from the job codes entered on the timesheet. Pay rates for jobs are defined in the Job Pay Rates screen (standard Treeview path: US Payroll > Setup > Pay Rates > Job).
-
Trade: The default timesheet pay rates come from the employee’s trade code. These codes come from the employee profile but can be changed on a line-by-line basis during timesheet entry. Pay Rates for trades are defined in the Trade Pay Rates screen (standard Treeview path: US Payroll > Setup > Pay Rates > Trade).
-
Union: The default timesheet pay rates come from the employee’s union code. These codes come from the employee profile but can be changed on a line-by-line basis during timesheet entry. Pay Rates for unions are defined in the Union Pay Rates screen (standard Treeview path: US Payroll > Setup > Pay Rates > Union).
-
Job/Trade: The default timesheet pay rates come from the job codes entered on the timesheet or, if no job codes exist, from the employee’s trade code.
-
Job/Union: The default timesheet pay rates come from the job codes entered on the timesheet or, if no job codes exist, from the employee’s union code.
-
Job/Union/Employee The default timesheet pay rates come from the job codes entered on the timesheet or, if no job codes exist, from the employee’s union code. If no job codes or union codes exist, the pay rate defaults from the Employee Pay Rates screen.
If “Customer”, “Job”, “Trade”, “Union”, or “Job/Trade” are selected and the required pay rate can’t be found, it will default from the Employee Pay Rate screen. If there is still no pay rate found the static information from the Employee Profile is used.
If any option involving "Trade" or "Union" is selected, a pop-up will appear if no pay rate has been defined for that trade or union. Pressing the [OK] button will navigate the user to the next field.
Preferred Method For Direct Deposit Stubs
Select whether direct deposit stubs should be sent via email, mail, or not at all.
If the employee wishes to receive their stubs by email then they will receive the below email when they receive their deposit. The email is personalized with information from the employee's profile, indicated by the terms within angle brackets.
Subject line: <employee company name> Paystub for Pay Date <Payroll Period Pay Date>
Email body: Dear <employee first name> <employee last name>
Attached, you will find your Paystub for the pay date <pay run pay date>.
To view your pay stub, please open the attached file and enter your unique password (if required). We encourage you to
save this document in a secure/private location for your future reference.
If you have any questions regarding the contents of the attached, please contact <From email Address>
Thank you,
<Company Name> Payroll Department
Direct Deposit Email
Enter a valid email address when the preferred method for direct deposit stubs is email.
Minimum Hour Code
Enter the minimum hour code for the employee. This is used for salaried employees. The system uses the Working Hours/Year and the Working Days/Year fields from the Personal tab to calculate the number of working hours per day. This is multiplied by the number of normal working days in the E-Time period (e.g. Monday to Friday). This is then multiplied by the minimum code percentage to get the minimum hours required for the individual employee for that period. The minimum hours required is rounded to a whole number and is applied in E-Timesheet entry.
Entered Overtime, Entered Double Overtime – Checkboxes
Check these boxes to allow employees to enter their own overtime and double overtime in E-Time.
Job, Cost Code, Category
Enter any job, cost code, or category values to default into timesheets for this employee. These values can be changed in the Timesheet Entry screen as required (standard Treeview path: US Payroll > Timesheet > Timesheet Entry).
Equipment Number, Cost Code, Category, Tran Code
Select any equipment values to default into the of the Timesheet entry screen for this employee. These values can be changed in the Timesheet Entry screen as required.
Time for equipment is automatically inherited from the hours recorded in the timesheet for this equipment, but this can be modified through the Additional Values option.
[Override Burden Job Allocation] – Button
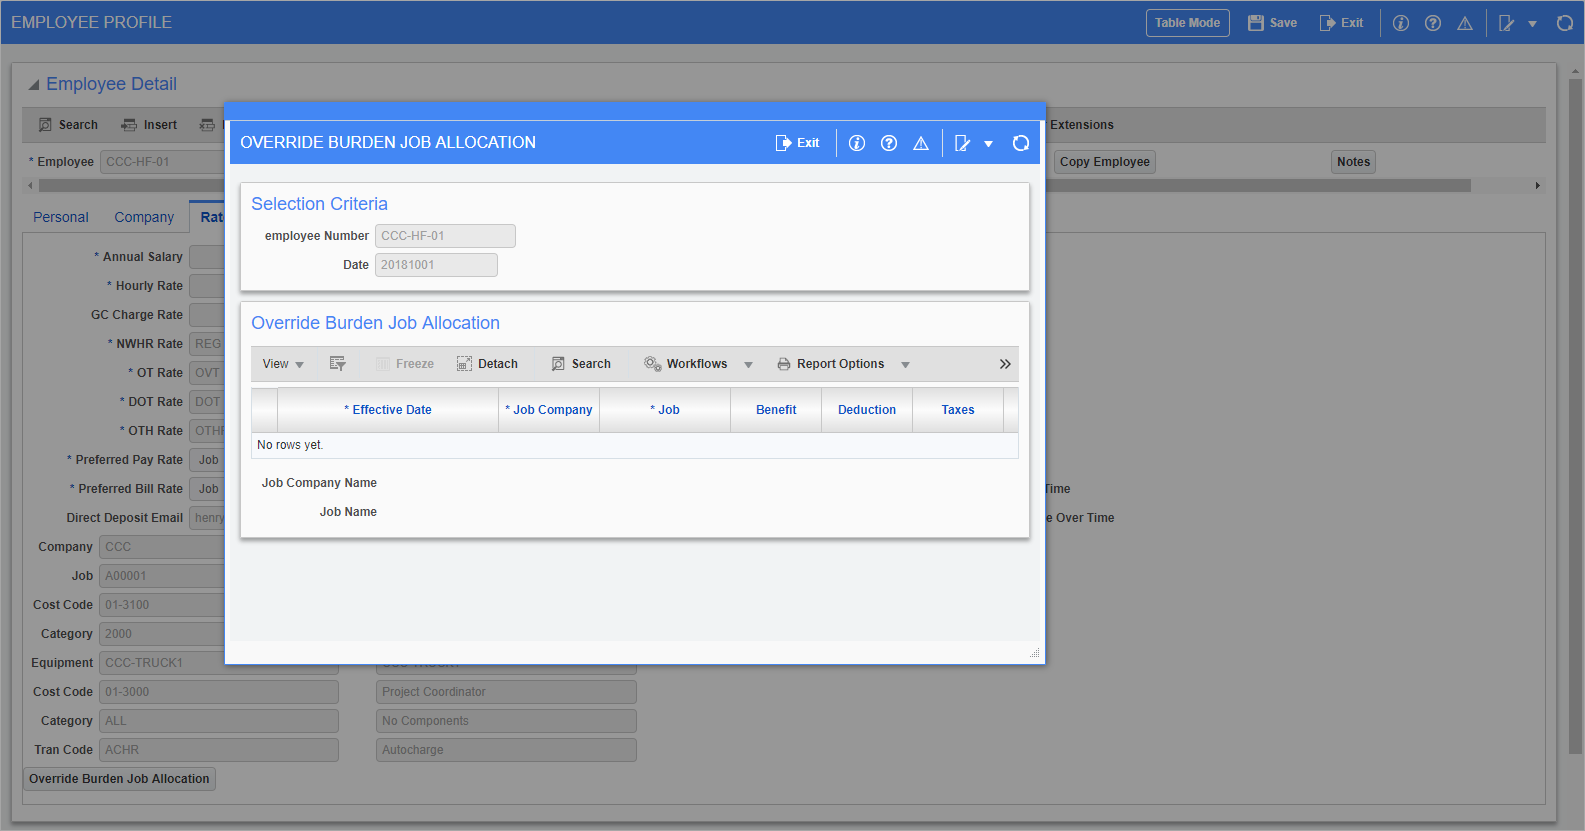
Pgm: PYEMPLOY – Employee Profile; standard Treeview path: US Payroll > Setup > Employees > Employee Profile – Rates/Salary tab – Override Burden Job Allocation button
Use this button to exclude certain types of benefits from job allocation for this employee. This includes benefits, deductions, taxes, workers’ compensation, and public liability. When the burdens are created, the date identifies the period from which they are excluded (it is not specific to the date itself, but the period in which the date is found). Enter “ALL” in either the Job or Company fields to set these values for all jobs or companies.
Effective Date
Select the date which lies in the desired period of exclusion.
Job Company, Job
Select the job and the company subject to the burden exclusion.
Benefit, Deduction, Taxes, Workers’ Compensation, Public Liability – Checkboxes
Check the boxes for transactions that should not be allocated to the job.
Address – Tab
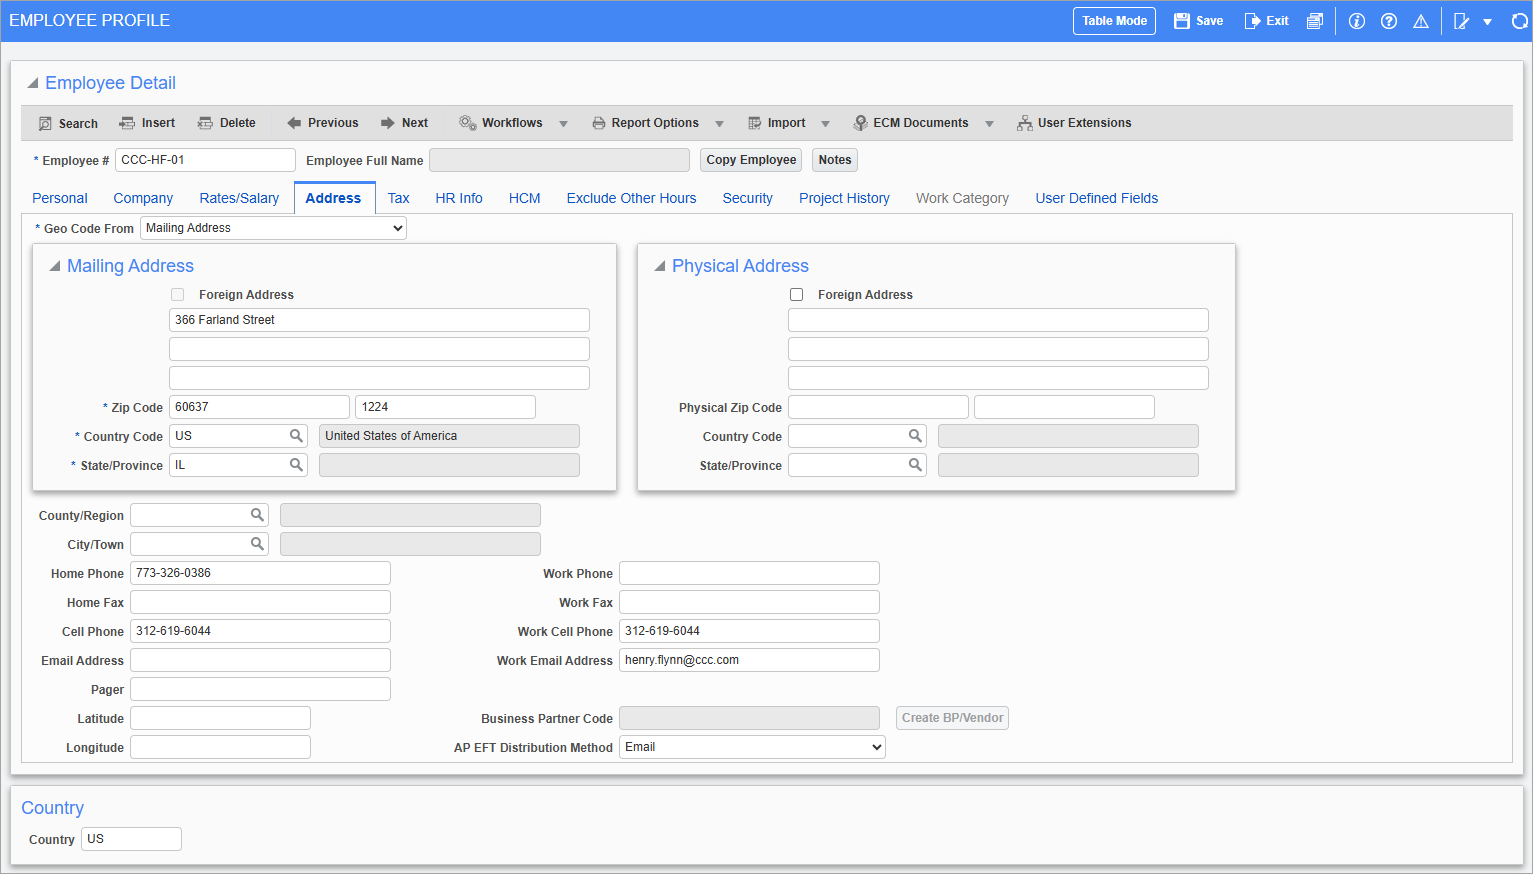
Pgm: PYEMPLOY – Employee Profile; standard Treeview path: US Payroll > Setup > Employees > Employee Profile – Address tab
Geo Code From
Select whether the Vertex Geo Code in the Tax tab is inherited from the mailing address or the physical address. The Geo Code is used to calculate local and state taxes based on any reciprocity between states.
Mailing Address
Enter the mailing address for the employee. This is the address used when printing checks or W-2 forms for the employee.
A valid zip code must be given as Vertex uses this field to determine valid Geo codes. The Vertex Geo codes in turn determines the appropriate residential tax rates.
Physical Address
Enter the physical address for the employee if it differs from that of the mailing address.
Country Code, State/Province Code
These are populated automatically based on the zip code entered for the mailing address.
County/Region Code, City/Town
Enter the county and city codes of the employee residence.
Email Address, Work Email Address
Enter the personal and work email address for the employee. Which email address is used for ESS notifications is governed by the Email to Use for ESS Notification field in ESS Employee - System Options for ESS.
Home Phone, Work Phone, Home Fax, Work Fax, Cell Phone, Work Cell Phone, Pager
Enter any additional contact information for the employee.
Latitude, Longitude
Enter the residential latitude and longitude values of the employee residence.
[Create BP/Vendor] – Button
When this button is pressed, a vendor is created in the Accounts Payable module with code “ZEMPxxxx” where “xxxx” is a system generated number. The mailing address of the employee becomes the vendor’s address. The 1099 code and vendor class of the vendor are defaulted from the values defined in the Payroll tab of System Options screen (standard Treeview path: System > Setup > System Options). The Business Partner Code and AP EFT Distribution Method fields fill when this button is pressed.
NOTE: After the maximum BP code is reached (ZEMP9998), the next BP code will be EMP09999. After that, the format will change to the ZENxxxxx format, and the next record will be ZEN10000. For example, the numbering sequence of the BP codes would be as follows: ZEMP9998, EMP09999, ZEN10000, ZEN10001, etc.
Tax – Tab
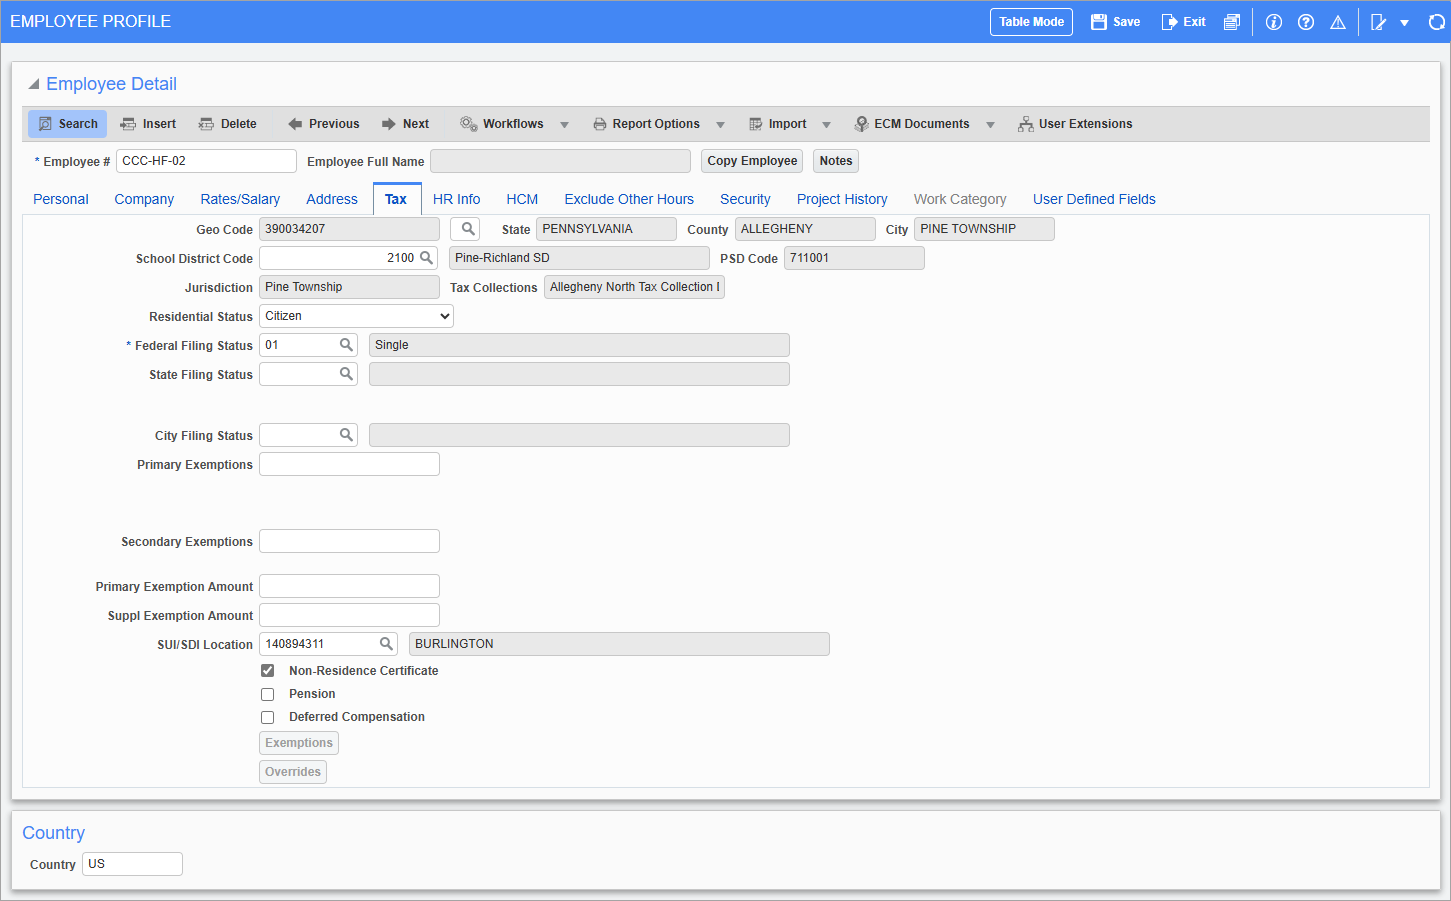
Pgm: PYEMPLOY – Employee Profile; standard Treeview path: US Payroll > Setup > Employees > Employee Profile – Tax tab
As the Vertex system uses the values set here to calculate the appropriate taxes (in combination with the tax setups made in Payroll such as the codes and rates), it is vital that the information here is accurate.
Geo Code
Select the Vertex geographical code associated with the residential location of the employee. This field is filled depending on whether the mailing address or physical address was chosen in the previous tab.
School District Code
Enter/select the Vertex school district code associated with the residential location of the employee. This code defaults from the Vertex geo code entered in the field above but can be changed.
PSD Code, Jurisdiction, Tax Collections
These fields are read-only and display the political subdivision, jurisdiction, and tax collection district for the selected school district.
Residential Status
Select whether the employee is a citizen, an immigrant or resident alien, a refugee, or is in the country on a work permit.
Federal Filing Status
Select whether the employee is single, married and filing jointly, head of household, or married and filing separately.
State Filing Status
Enter/select the state filing status of the employee. The LOV available changes depending on the state code selected in State/Province field on the Address – Tab. Please note, not all states require entry into this field.
NOTE: If a value is selected in the State Filing Status field and the user changes the state code in the Address tab, the State Filing Status field will be cleared to allow the user to make a new selection based on the new state (if applicable).
City Filing Status
Select the city filing status of the employee. This field may not be required depending on the employee Geo code.
Primary Exemptions, Secondary Exemptions
Enter the number of primary and secondary exemptions for this employee based on their place of residence. Each exemption (personal or dependency) reduces the income subject to tax. For example, an employee with two dependents may claim a personal exemption in addition to two dependency exemptions. They would enter "3" as the exemption.
These values are passed to Vertex with the amounts in the Primary Exemption Amount and Supplementary Exemptions Amount fields. As employee taxes are processed, the Employee Exemptions screen is checked first for state specific Vertex values. If none are found or a work location is found where the state information has not been defined, the Vertex values entered in the employee profile are used.
Primary Exemption Amount, Supplementary Exemptions Amount
Enter the primary and supplementary exemption amounts for the employee if applicable.
SUI/SDI Location
Enter/select the default location to be used for the state unemployment insurance and state disability insurance calculation for the employee. This field should only be used to calculate SUI/SDI from the location specified by this entry rather than from the work locations on the employee timesheets.
Refer to US Payroll - Multi-State SUI Tax Calculation for more information.
Non-Resident Certificate – Checkbox
Check this box if the non-resident certificate for tax reciprocity has been given for the work location state for this employee.
Pension – Checkbox
Check this box to have the Pension box checked on the employee's W-2 screen.
Deferred Compensation – Checkbox
Check this box to have the ‘Deferred Compensation’ box checked on the employee's W-2 screen.
[Exemptions] – Button
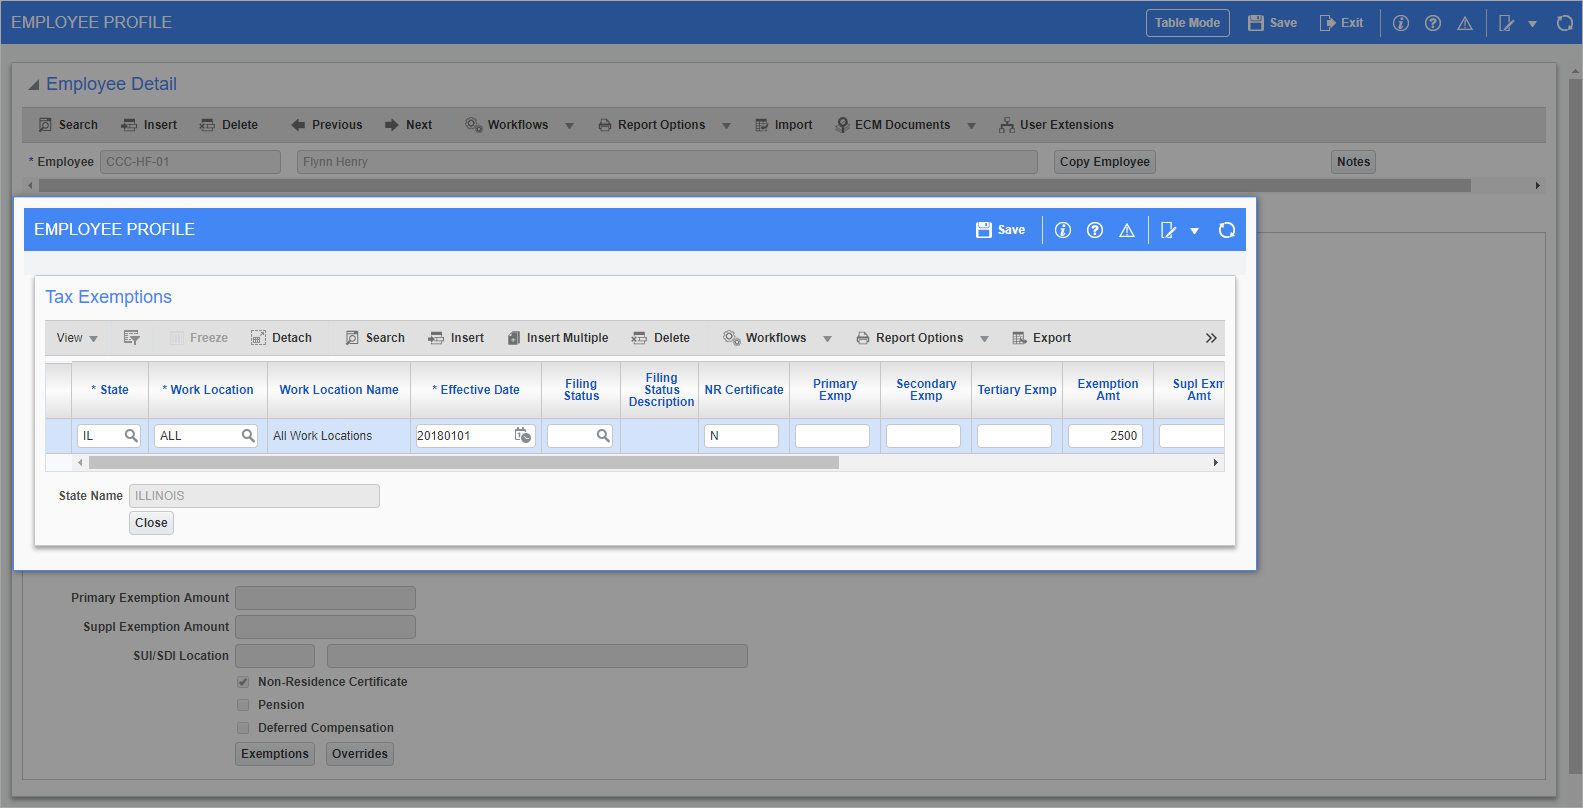
Pop-up window launched from [Exemptions] button on Tax tab of Employee Profile screen
Tax exemption refers to a monetary exemption which reduces taxable income. Use this screen to set up different exemptions for each state in which the employee must file tax information.
As employee taxes are processed, the Employee Exemptions screen is checked first for state specific Vertex values. If none are found or a work location is found where the state information has not been defined, the Vertex values entered in the employee profile are used.
The following fields on this button's pop-up screen are used to enter/edit post-2020 W-4 employee amounts: 'Multi Jobs' checkbox, Dependents Tax Credit, Other Income, and Other Deductions.
State
Enter/select the state associated with the employee exemptions.
Work Location
Enter/select the work location.
Effective Date
Enter/select the starting effective date for this exemption.
Filing Status
Enter/select whether the employee is single, married and filing jointly, head of household, or married and filing separately.
NR Certificate – Checkbox
Check this box if the non-resident certificate for tax reciprocity has been given for the work location states for this employee.
Primary Exemptions, Secondary Exemptions, Tertiary Exemptions
Enter the number of primary, secondary, and tertiary exemptions for this employee based on their place of residence.
Primary Exemption Amount, Supplementary Exemptions Amount
Enter the primary and supplementary exemption amounts for the employee.
Residence Location
Enter/select where the employee claims residence. This field is used for local county tax calculations in the state of Indiana. For more information, please refer to US Payroll - Indiana Special County Tax Rules and Setup in CMiC.
NOTE: This field is only enabled when "IN – Indiana" is selected in the State Code field and "All" is selected in the Work Location field.
Primary Work Location
Enter/select the primary work location for the employee. This field is used for local county tax calculations in the state of Indiana. For more information, please refer to US Payroll - Indiana Special County Tax Rules and Setup in CMiC.
NOTE: This field is only enabled when "IN – Indiana" is selected in the State Code field and "All" is selected in the Work Location field.
Multi Jobs – Checkbox
Check this box if the employee has multiple jobs.
Dependents Tax Credit
Enter the amount of the employee's W-4 dependent tax credit.
Other Income
Enter the amount of the employee's other income (not job related), such as income from interest, dividends, and retirement income.
Other Deductions
Enter the amount of employee's other deductions (other than the standard deduction).
[Overrides] – Button
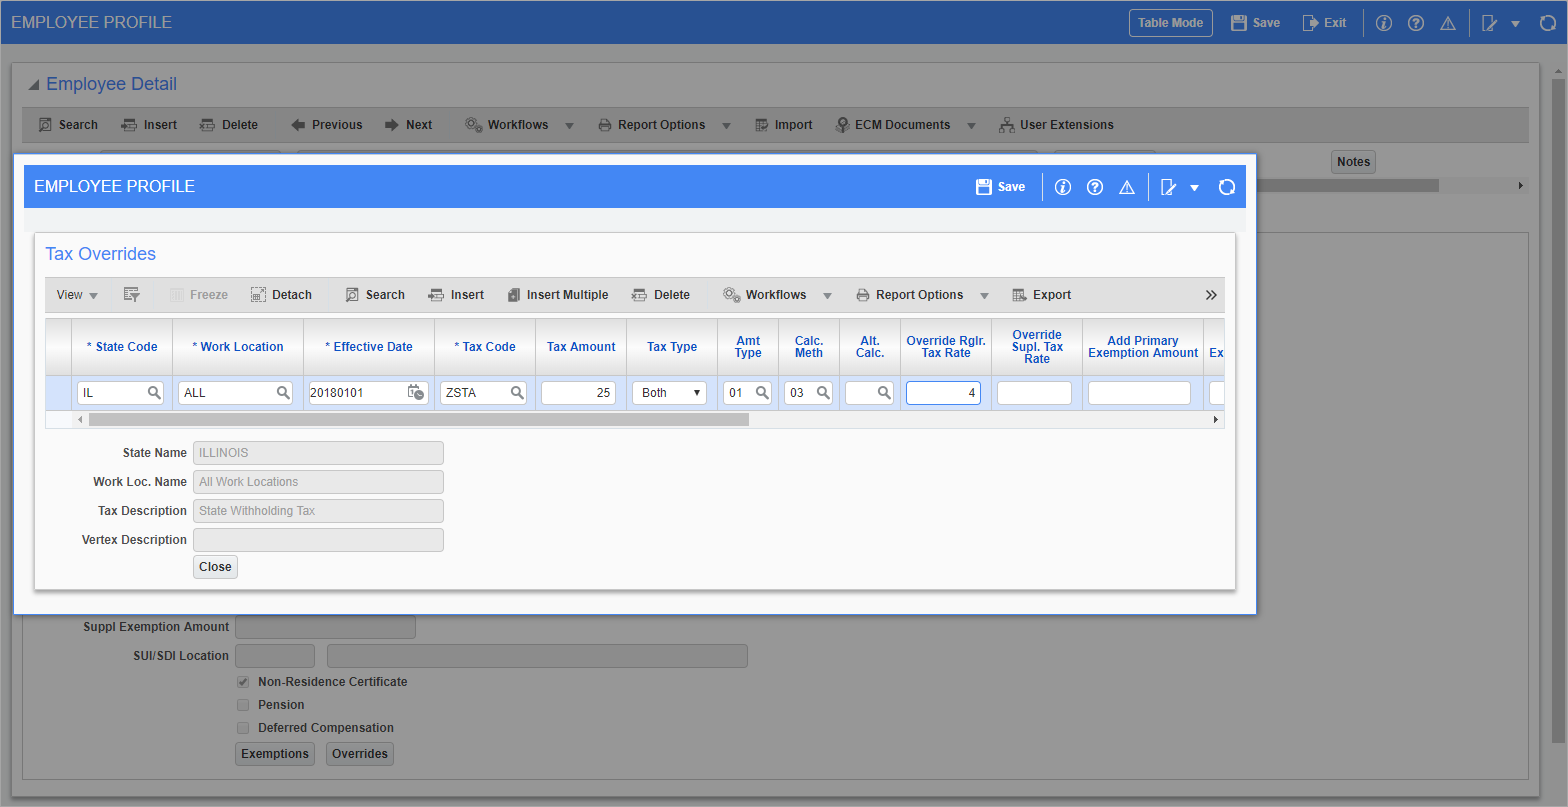
Pop-up window launched from [Overrides] button on Tax tab of Employee Profile screen
This screen is used to override the employee’s standard federal tax calculations.
State Code
To modify federal tax calculations enter the code “ALL”. To modify state or local tax calculations enter the appropriate state code.
Work Location
Enter/select the work location.
Effective Date
Enter the effective date for the tax code being modified. The system calculates the overrides for this tax for the employee from the date specified in this field.
Tax Code
Enter/select the tax code for the tax being modified. The tax code can be set up in the Taxes Master Maintenance screen.
The available taxes depend on the level at which they are being modified. For example, if “ALL”/”ALL” are in the State/Work Location fields, only federal taxes are displayed.
Tax Amount
Enter the applicable tax amount. This is a flat dollar amount. The way in which this amount is processed with the standard tax depends on the selection in the Amount Type field.
Tax Type
Select the tax type for the tax being modified. The system allows for the following options:
-
Both: The tax being modified requires the calculation of taxes at the employee's location of residence as well as the individual work locations as indicated by the employee timesheets.
-
Resident: The tax being modified only requires the calculation of taxes at the employee's location of residence.
-
Work: The tax being modified only requires the calculation of taxes at the employee’s work location. In this situation the taxes are pro-rated based on the hours worked in individual work locations.
Amount Type
Vertex requires the definition of the type of tax amount being added to the tax code.
Calculation Method
Verify/modify the calculation method that applies to the tax amount being modified. The list of available methods changes depending on the amount type code selected in the previous field.
Alternative Calculation Code
Verify/modify the appropriate tax code associated with the tax being modified. This code is “Null” by default. Check the Vertex Calculation guide for situations where a different code is required.
Additional Primary Exemption Amount, Additional Supplemental Exemption Amount
Enter any additional primary or supplemental exemption amounts to be added to the primary or supplemental exemption amounts calculated for this tax.
Override Regular Exemption Amount, Override Supplemental Exemption Amount
Enter the primary or supplemental exemption amounts to be used instead of the primary or supplemental exemption amounts calculated for this tax.
Additional Regular Tax Rate, Additional Supplemental Tax Rate
Enter any additional rate of tax to be added to the standard or supplementary tax rates in order to calculate this tax.
Override Regular Tax Rate, Override Supplemental Tax Rate
Enter the rate to be used on this tax instead of the standard or supplementary rates listed on the Company Tax Maintenance screen.
Maximum Wage Limit
Enter the maximum wage limit set for this tax.
Max. Deduction Override Amount
Enter the maximum deduction amount to be used instead of the maximum deduction amount listed on the Company Tax Maintenance Screen.
Jurint Type
Enter/select a jurisdiction integer type to override reciprocities or enable volunteer form withholding at both the state and employee levels. The description will default in the Jurint Type Description field. The available jurint types include:
-
2: Credit the resident tax by the amount of work tax withheld. Always accumulate wages.
-
3: Credit the resident tax by the amount of work tax withheld. Accumulate wages only if resident tax is withheld.
-
4: Eliminate the resident tax if the work tax is > zero. Always accumulate wages.
-
5: Eliminate the resident tax if the work tax is > zero. Accumulate wages only if resident tax is withheld.
-
6: Eliminate the resident tax if work tax is imposed on nonresidents. Always accumulate wages.
-
7: Eliminate the resident tax if work tax is imposed on nonresidents. Accumulate wages only if resident tax is withheld.
-
8: Calculate work taxes only.
-
9: Misc Behavior Maryland.
-
10: Credit the resident tax by the amount of the work tax withheld. Accumulate wages only if out of state tax is not withheld.
-
99: Calculate the tax for this jurisdiction independent of all other jurisdictions.
These types are not dependent on the particular taxing jurisdiction and the options vary between taxing jurisdictions. If the user sets a jurint type to a value in the range of 2-8 that differs from the default value, the system will use the selected value only if it is available in the Vertex Payroll Tax database. Otherwise, the default value is used. Users can verify the value on the employee Vertex report.
This field is also available on the Payroll Tax Accounting screen. When the Jurint type is configured in both screens, this screen will take precedence.
NOTE: This field requires the tax setup type "VPRTSETTAXHDL29 – Vertex NEW Reciprocal Treatment Initiation" to be set to "Y" in the Tax Settings screen. For more information, please refer to US Payroll - Payroll Taxes - Overview.
Exclude – Checkbox
Check this box if this tax should be excluded from the standard tax calculations for this employee.
AZA4V Form Signed – Checkbox
Check this box if the employee has provided the Arizona Form A-4V: Voluntary Withholding Request for Arizona Resident Employed Outside of Arizona. The system will calculate and withhold the Arizona state tax and details will be included in the employee's W-2 file.
HR Info – Tab
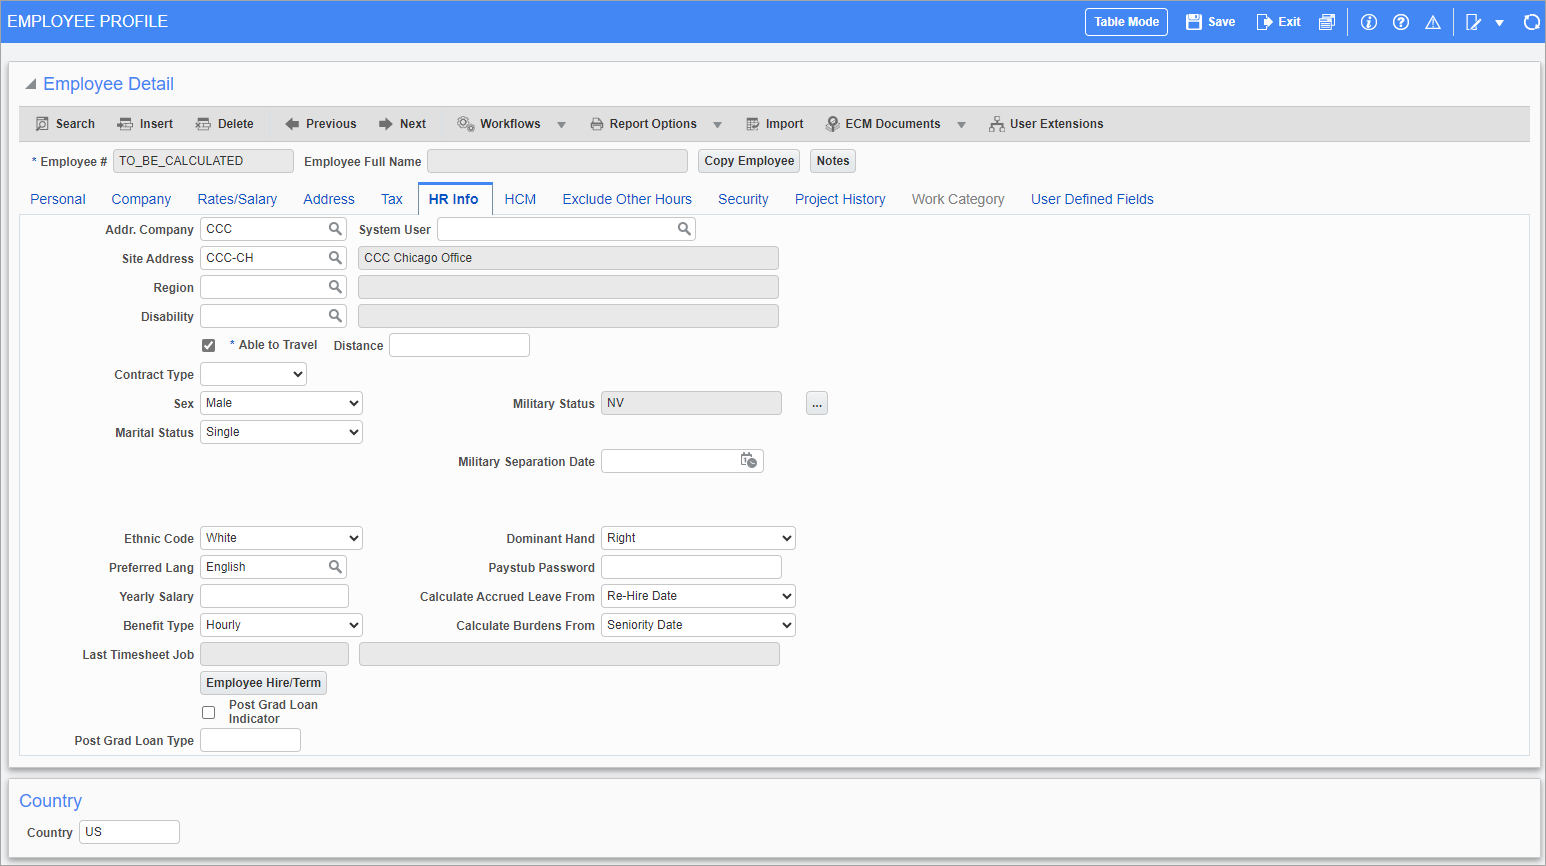
Pgm: PYEMPLOY – Employee Profile; standard Treeview path: US Payroll > Setup > Employees > Employee Profile – HR Information tab
The fields in this screen are related to the local tables in Human Resources. If using the HR module, the values in this screen may be required to ensure accuracy in HR systems and reporting. For example, the Position field in this screen is used to determine the position of the employee in EEO reporting.
Address Company
Enter/select the company from which to select possible site addresses.
System User
Enter/select a system user ID for the employee.
Site Address
Enter/select the default site address for the employee. Both the company code and the address code must be entered. The address can be set up in the Address Maintenance screen (standard Treeview path: US Payroll > Setup > Local Tables).
Region
Enter/select the default region code for the employee. The address must have been set up previously in the Region screen in the HR Local Tables menu (standard Treeview path: Human Resources > Setup > Local Tables > Regions).
Disability
Enter/select a disability code for the employee. The disability code must have been set up previously in the Human Resources module (standard Treeview path: Human Resources > Setup > Codes > Disability Codes).
Ability to Travel – Checkbox
Check this box if the employee is able to travel for work purposes.
Distance
Enter the agreed maximum traveling distance for the employee.
Contract Type
Select whether the contract is a single, married, or family type. This field is used in the calculation of flight benefits in the International Payroll module. For more information, please refer to
Preferred Language
Select the preferred language for the employee. The language option can be set up in the Human Resources module (standard Treeview path: Human Resources > Setup > Codes > Languages).
Sex, Marital Status, Ethnic Code
Select the sex, marital status, and ethnicity of the employee.
Military Status
Select the military status of the employee.
Military Separation Date
If the employee is a veteran, enter their date of discharge or release from active duty. This date is used in the VETS-100 HR report to display employees hired in twelve months of their release date.
Dominant Hand, Preferred Language
Select the dominant hand and preferred language of the employee.
Paystub Password
Enter the paystub password for the employee.
Yearly Salary
Enter the yearly salary for the employee. This field is used to enter an annual salary for hourly employees (i.e., with "Hourly" selected in the Type field on the Personal tab). If there is a change to the hourly rate in the Rates/Salary tab, this field will require a manual update as well.
Calculate Accrued Leave From
Select whether to start calculating accrued leave from the employee's adjusted service date, hire date, re-hire date, or seniority date. For example, an accrued leave policy based on years of service would require this date value. Accrued leave is set up and calculated in the US Payroll module. For more information, please refer to US Payroll - Leave Administration.
Benefit Type
Select which type of benefits the employee is eligible for. This field defaults from the Type field on the Personal tab of the Employee Profile screen but may be changed here if required. This field is used with benefit administration, such as when creating coverage rules in the Human Resources - Rules screen in the Human Resources module (standard Treeview path: Human Resources > Benefit Administration > Benefit/Deduction Administration > Rules). For more information, please refer to US Payroll - Benefit Administration.
NOTE: This field is listed as "EMP_HEMPL_TYPE - Employee Type" in the Rule Field Name field's LOV in the Rules screen.
Calculate Burdens From
Select whether to start calculating burdens from the employee's adjusted service date, hire date, re-hire date, or seniority date. Employee burdens (e.g., employer paid benefits, deductions, insurance, worker's compensation, etc.) are calculated in the US Payroll module and may be allocated to the Job Costing and General Ledger modules depending on the setup in Payroll Control. For more information, please refer to US Payroll - Payroll Control and US Payroll - Job Burden Allocation.
[Employee Hire/Term] – Button
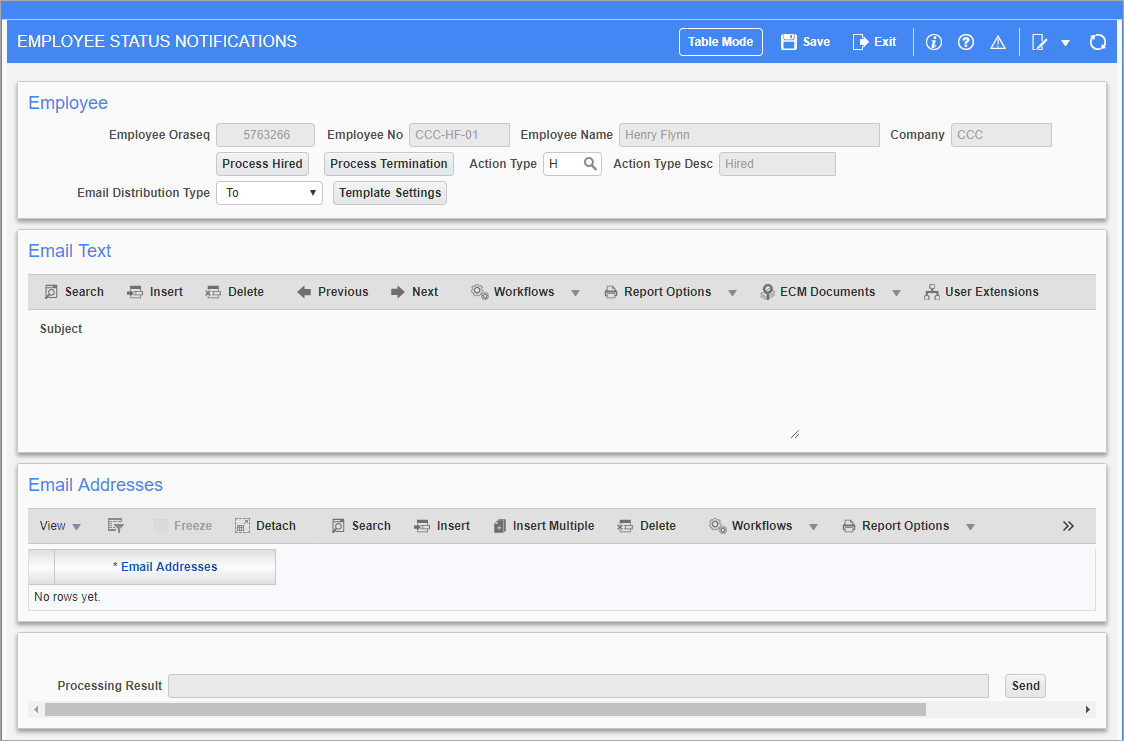
Pgm: PY_EMP_HIRE_TERM_INFO – Employee Profile; standard Treeview path: US Payroll > Setup > Employees > Employee Profile – HR Information tab – Employee Hire/Term button
This button can be used to hire or terminate employees as well as send emails detailing the change in employment.
Post Grad Loan Indicator– Checkbox
Check the 'Post Grad Loan Indicator' box to post the grad loan. This field is used when generating UK FPS reports in the International Payroll module. For more information, please refer to International Payroll - UK RTI Feeds.
Post Grad Loan Type
Enter the type of post grad loan plan. This field is used when generating UK FPS reports in the International Payroll module. For more information, please refer to International Payroll - UK RTI Feeds.
HCM – Tab
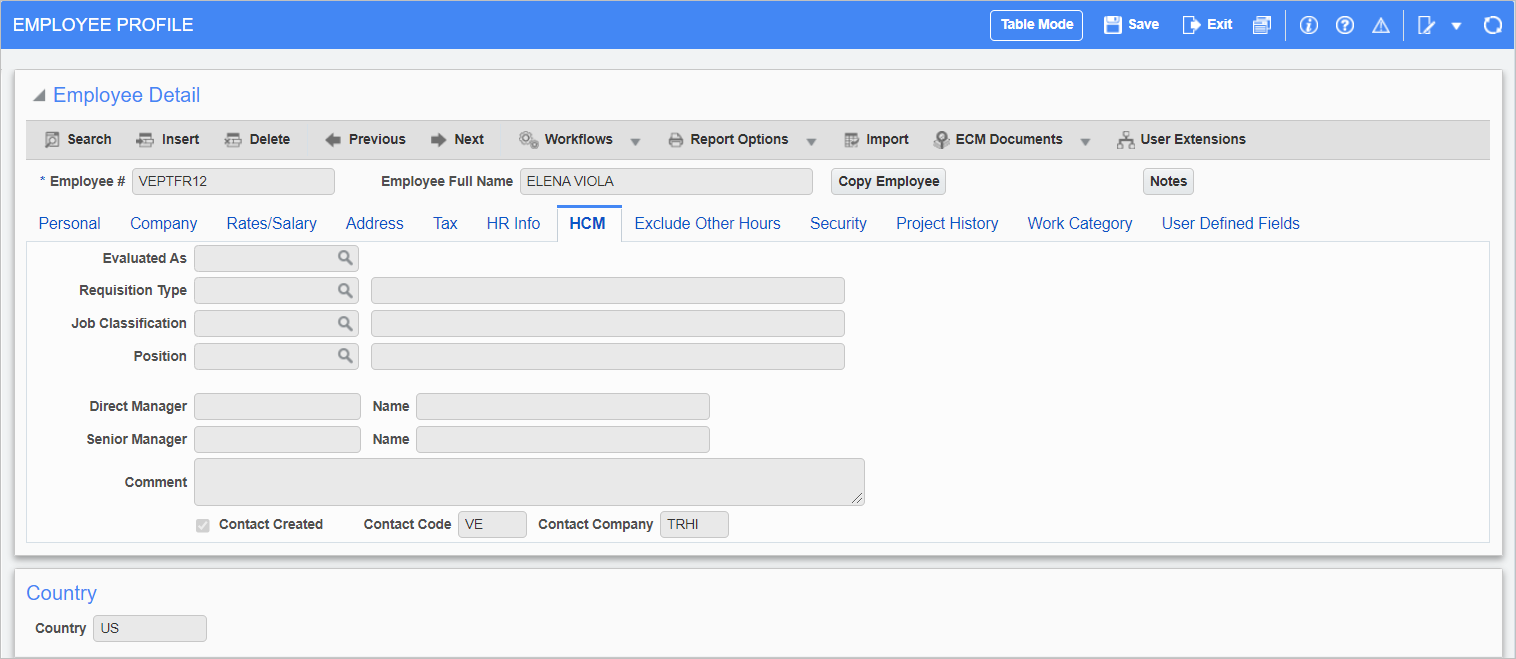
Pgm: PYEMPLOY – Employee Profile; standard Treeview path: US Payroll > Setup > Employees > Employee Profile – HCM tab
Evaluated As
Enter/select the application number of the employee. The application must have been previously entered in the Human Resources module.
Requisition Type, Job Classification, Position
The Payroll/HCM modules allow for the automatic synchronization of employees with a corresponding position code in the organization. Once the Job Classification field is filled, employees can be assigned positions. Only open positions are displayed from the Position Table for the specified job classification. The filled positions are not available for assignment.
The Position field is only available if the 'HCM Position Synchronize From Payroll' box is checked on the Human Resource tab of the System Options screen. For more information, please refer to System Data - System Options - Human Resource - Tab.
NOTE: Only those positions with the 'Active' box checked on the Position Types screen in the Human Resources module will be available for selection in the Job Classification field’s LOV. For more information, please refer to Position Types.
Direct Report To
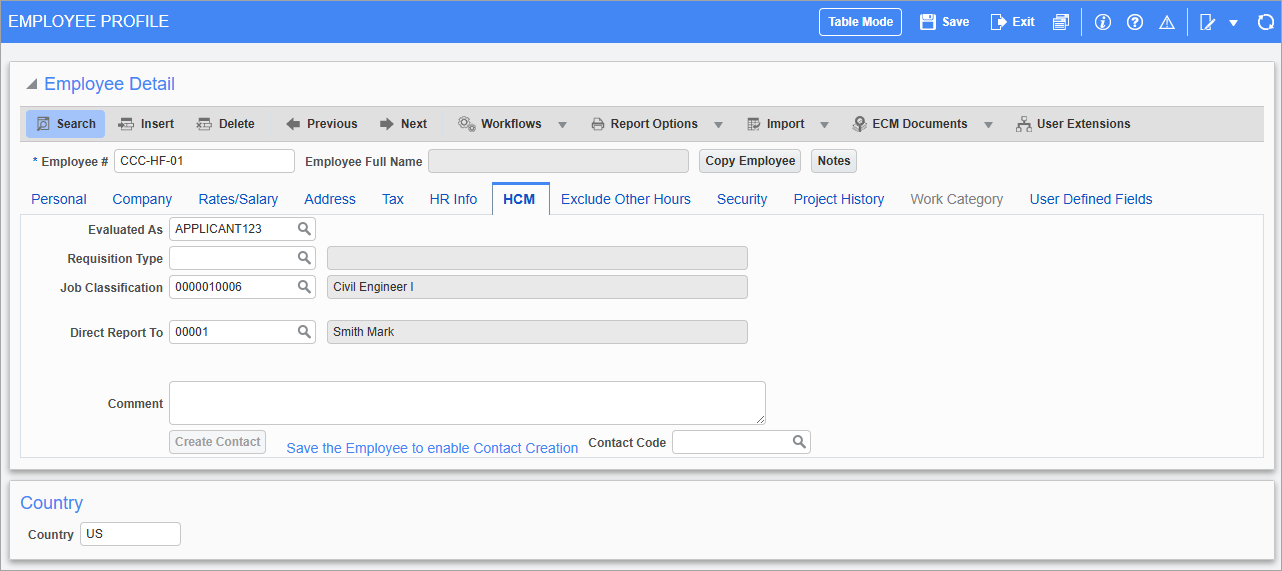
Enter/select who the employee will report to (e.g., direct manager).
This field is only available if the 'HCM Position Synchronize From Payroll' box is unchecked on the Human Resource tab of the System Options screen. For more information, please refer to System Data - System Options - Human Resource - Tab.
Direct Manager, Senior Manager
These fields are filled based on the controlling position ID setup in the Reports To field in HCM Position.
These fields are only available if the 'HCM Position Synchronize From Payroll' box is checked on the Human Resource tab of the System Options screen. For more information, please refer to System Data - System Options - Human Resource - Tab.
Comment
Enter any comments about the employee.
Contact Created – Checkbox
This checkbox indicates whether a contact has been created for the user.
[Create Contact] – Button
Press this button to create a new contact code for the employee, using their first name, last name, and payroll company code. This button is only available after the employee profile record has been saved. This button does not appear if the 'Contact Created' box is checked.
Contact Code, Contact Company
These fields show the contact codes for the user and their company if these have already been assigned.
Exclude Other Hours – Tab

Pgm: PYEMPLOY – Employee Profile; standard Treeview path: US Payroll > Setup > Employees > Employee Profile – Exclude Other Hours tab
This table is enabled if the ‘Allow All Allocations When Access Code Allows None’ box is checked in the E-Timesheet tab of the Company Control screen. This tab allows users to restrict NWHR, OVHR, DTHR, and other hour types in E-Timesheets. Other hours include JCHR, NBHR, and those hour types in the Hour Types Maintenance screen not associated with a leave code.
When the Hours Type Code column is empty, the employee can see all hour types in E-Timesheets and any hour types entered are excluded from the list of values. NBHR and JCHR are available only if the ‘Allow Nonbillable Hours Timesheet’ and ‘Allow Job Cost Hours Timesheet’ boxes are checked in the Company Control screen.
Security – Tab

Pgm: PYEMPLOY – Employee Profile; standard Treeview path: US Payroll > Setup > Employees > Employee Profile – Security tab
This screen is used to link employees to payroll access groups. Please see the section on Assigning Employee Security Groups for further details.
Each employee must be assigned to a security group in order to be seen when a user accesses the system and is working with that group. For example, if left blank and not assigned to a security group, the employee will not appear in payroll even after setup. Once assigned to a security group they can then be seen in the group in timesheets and Payroll processing, as well as all other Payroll, HR, and related module screens.
Project History – Tab

Pgm: PYEMPLOY – Employee Profile; standard Treeview path: US Payroll > Setup > Employees > Employee Profile – Project History tab
This tab is used to track what projects an employee has worked on, including what current and future projects the employee is assigned to. The ‘Assigned’ box indicates that the employee is assigned to either a current or future project.
Project history entries can be added and removed directly on this tab, without having to use the Employee History screen.
Work Category – Tab
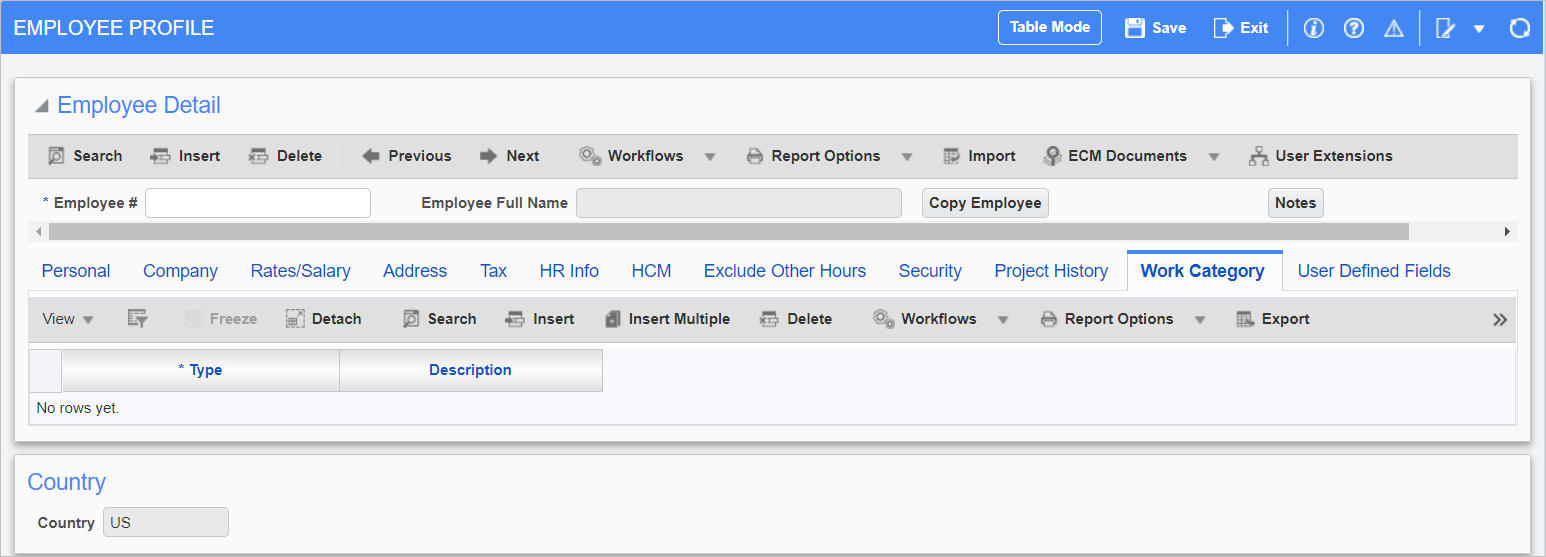
Pgm: PYEMPLOY – Employee Profile; standard Treeview path: US Payroll > Setup > Employees > Employee Profile – Work Category tab
This tab can be used to associate employees with work category codes which can than be used to filter timesheet entry. Please see Work Category for further details.
User Defined Fields – Tab

Pgm: PYEMPLOY – Employee Profile; standard Treeview path: US Payroll > Setup > Employees > Employee Profile – User Defined Fields tab
This tab shows any user-defined fields for the employee. These are populated in the HR Information program of Employee Self Service, and are display-only in this screen.