Overview
The Payroll module in Enterprise allows for the automation of benefits calculation and payments. If the Human Resources module is used in conjunction with Payroll, there is an additional method for maintaining and electing employees for benefits. For further information, see
For further information about setting up benefits, please refer to Benefits Setup.
Master Benefits
Pgm: PYBENFIT – Benefits Master; standard Treeview path: US Payroll > Administration > Benefits > Master
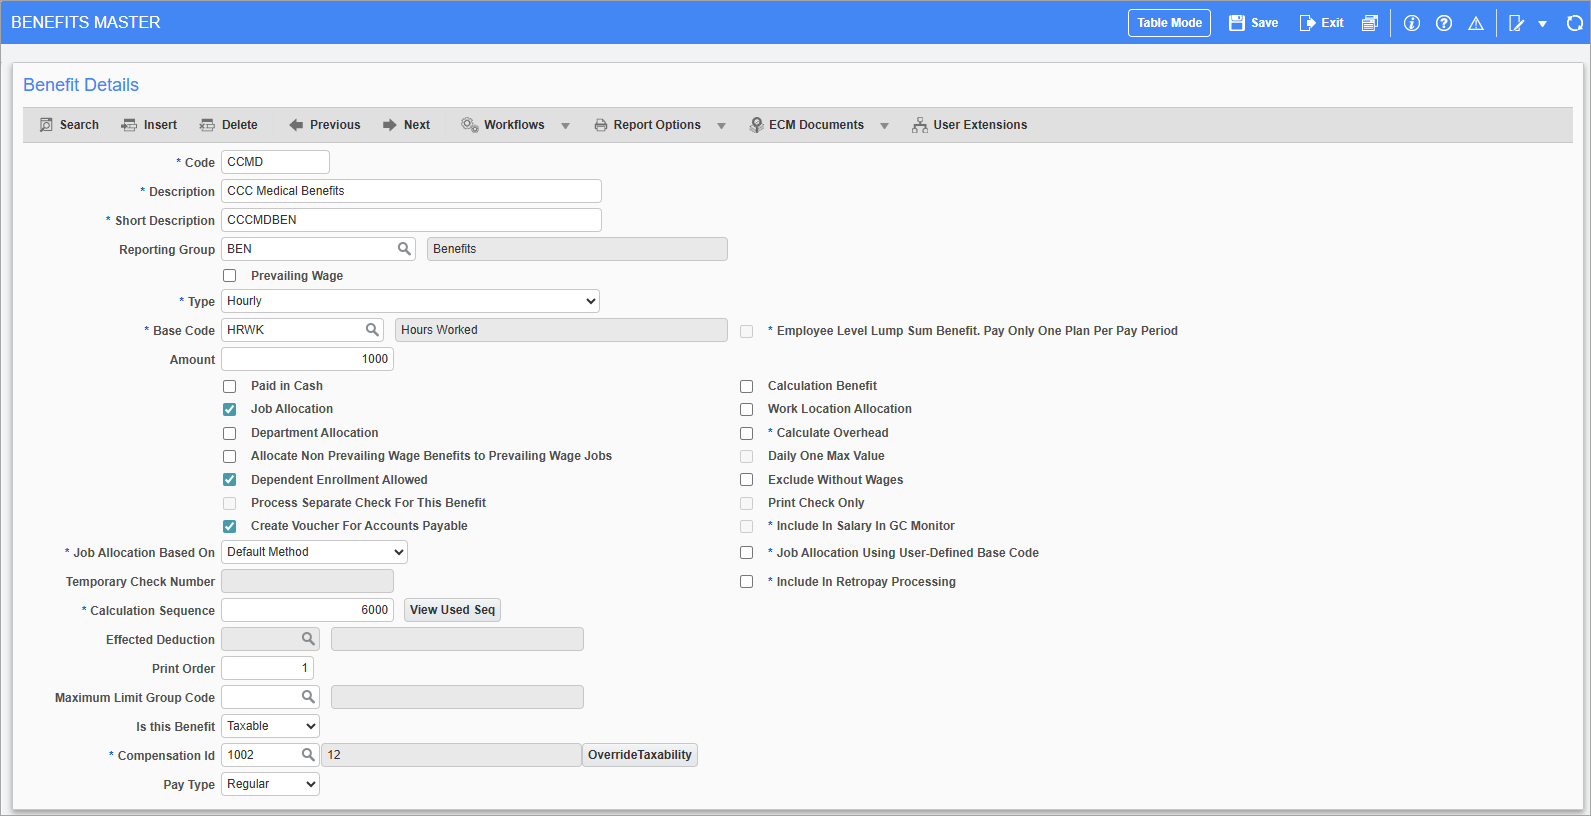
The Benefits Master screen is used to enter the master set of benefits from which to assign individual sets of benefits to companies, employees, jobs, and unions.
Benefit Code
Enter the code for the benefit.
Description, Short Description
Enter the full and short description for the benefit.
Reporting Group
Enter/select the reporting group code for the benefit. These codes allow different types of payroll deductions and benefits to be grouped together for reporting purposes. This code must have been set up previously in the Reporting Groups screen (standard Treeview path: US Payroll > Setup > Local Tables > Reporting Groups).
Prevailing Wage – Checkbox
Check this box if the benefit is subject to the prevailing wage rule. The benefit is only used if the job associated with the time is a prevailing wage job.
The prevailing wage rule is a U.S. requirement based on the Davis-Bacon Act, whereby some government jobs are subject to minimum wage rates and mandatory benefits.
Checking this box denies access to the Job Allocation Based On field but grants access to the Effected Deduction field.
Type
Select the type of the benefit. The system allows selection from the following:
-
Lump Sum: This indicates that the benefit is a flat amount no matter how much the employee earns or how many hours are worked. Choosing this type grants access to the ‘Employee Level Lump Sum Benefit’, ‘Pay Only One Plan Per Pay’, and ‘Include In Salary In GC Monitor’ checkboxes.
-
Percentage: This indicates that the benefit is based on a percentage of wages earned.
-
Hourly: This indicates that the benefit is based on the number of hours worked. Most prevailing wage benefits are hourly.
-
Daily: This indicates that the benefit is based on days worked.
-
Percent of Union Pay Rate: This indicates that the benefit is based on the union pay rate.
Employee Level Lump Sum Benefit. Pay Only One Plan Per Pay Period – Checkbox
Check this box to make the benefit a lump sum type at the employee level only.
Base Code
Select the code upon which the benefit is based. The options available in this field come from the Benefit and Deduction Base Maintenance screen (standard Treeview path: US Payroll > Administration > Benefits > Bases).
This field works in conjunction with the Type field to determine how the benefit is calculated. For the following types, select the corresponding base codes:
-
Lump Sum: Select “None”.
-
Percentage: Select “Base Wage”.
-
Hourly: Select “Hours Worked” or “Hours Paid”.
-
Daily: Select “Daily”.
-
Percent of Union Pay Rate: Select “Hours Worked”.
NOTE: The benefit type selected for a custom base option is determined by the desired calculation against that base.
Amount
Enter the amount or value for the benefit. This amount is a dollar amount or a percentage depending on the type of benefit selected in the previous fields.
This field may be left blank in the master list if the amount that is required for this benefit is specific to each company, union, or employee to which it will be assigned.
Paid in Cash – Checkbox
Check this box if the benefit is a receivable benefit such that the employee is paid monies directly. An example of this is a car allowance.
Leave this box blank if this benefit is not receivable and the employer pays a third party on behalf of the employee. An example of this is group life insurance.
Checking this box grants access to the ‘Process Separate Check For This Benefit’ box.
Calculation Benefit – Checkbox
Check this box if this benefit is only used in the calculation of other benefits. When this box is checked, this benefit does not appear in the employee history or on any reports.
Leave this box blank if this is a standard benefit and should be recorded in the employee history and on the relevant reports.
Checking this box denies access to the ‘Paid in Cash’, ‘Job Allocation’, and ‘Allocate Non Prevailing Wage Benefits to Prevailing Wage Jobs’ boxes.
Job Allocation – Checkbox
Check this box if this benefit should be charged as a payroll burden to the job on which the employee is working during the pay periods for which this benefit is calculated.
The payroll burden associated with this benefit is pro-rated by the total wages calculated for the pay period. The calculated amount is divided amongst the timesheet entry lines in relative proportion to the total wages represented on each line.
Work Location Allocation – Checkbox
Check this box if the benefit should be allocated to the employee's work location to be included in the taxable income in that location.
Leave this field blank if the benefit should be included in the taxable income in the employee's home location.
NOTE: This box only pertains to the appropriate allocation of benefits that are not job allocated. When the benefit is allocated to the job it is automatically allocated to the job work location.
Department Allocation – Checkbox
Check this box if the benefit should be charged as a payroll burden to the department entered on the timesheet.
Calculate Overhead – Checkbox
Check this box to calculate payroll job costing overhead.
Daily One Max Value – Checkbox
Check this box to restrict the daily benefit calculation to once per day during processing, regardless of the number of jobs or cost codes entered.
NOTE: This box is only enabled for benefits of type "Daily".
Allocate Non Prevailing Wage Benefits to Prevailing Wage Jobs – Checkbox
To avoid having to set up a benefit twice, once as a prevailing wage benefit and once as not a prevailing wage benefit, check this box if the benefit is applicable to both types of jobs.
Dependent Enrollment Allowed – Checkbox
Check this box if dependents are allowed on the benefit.
This field is used in conjunction with the Human Resources module. Please refer to the Human Resources manual for further details.
Exclude Without Wages – Checkbox
Check this box to not calculate this benefit for employees with no wages (basic wage or paid leave) in the processing period. This is only applicable for lump sum benefits.
Process Separate Check for this Benefit – Checkbox
Check this box to process the benefit as a separate check. This option is only available if the benefit is set up as a lump sum cash benefit and it can’t be overridden at the company or employee level.
This box is only available if the benefit is a Lump Sum type and the ‘Paid in Cash’ box is ticked.
Checking this box grants access to the ‘Print Check Only’ box and the ‘Temporary Check Number’ field.
Print Check Only – Checkbox
Check this box to print a check for the benefit regardless of the employee’s direct deposit setup.
Create Voucher for Accounts Payable – Checkbox
Check this box to create the vouchers for this benefit through the Generate AP Voucher screen (standard Treeview path: US Payroll > Processing > Generate AP Voucher).
Include in Salary in GL Monitor – Checkbox
Check this box to automatically assign an employee to a GC Employee Group linked with the employee department (if found).
Job Allocation Based On
Select the appropriate option from the drop-down list. The system provides for the following options: Default Method, Base Wage, Hours Worked, and Hours Paid.
This field works in conjunction with the Base Code field to determine how the benefit is calculated. For the following base options, select the corresponding base codes:
-
Default Method: Select “None”.
-
Base Wage: Select “Base Wage”.
-
Hours Worked: Select either “Hours Worked” or “Hours Paid”.
Job Allocate Using User-Defined Base Code – Checkbox
Check this box to only allocate jobs to benefits with the same base code.
Temporary Check Number
Enter a number, equal to or greater than 100, to appear on the separate checks processed for the benefit.
Include In Retropay Processing – Checkbox
Check this box to include the benefit in retroactive pay processing.
Calculation Sequence
The calculation sequence number is a 38-digit number which indicates the numeric order of the benefit relative to all other benefits and deductions. The system uses the sequence number of each benefit and deduction to determine the correct processing order for all the payroll calculations. All sequence numbers that are already in use can be seen via the [All Used Sequences] button.
This can be critical when a benefit requires the prior calculation of another benefit or deduction to process its amount.
For example, 401K deduction may be calculated as the base wage plus the benefit car allowance minus the deduction union dues. In this case, the 401K deduction must have a calculation sequence number larger than the car allowance benefit and the union dues deduction.
Effected Deduction
Enter/select the deduction affected by the benefit. When a deduction is assigned in this field the system excludes the amount of wages used for the benefit when calculating this deduction.
Take for example the situation where defining a prevailing wage benefit such as a pension trust. In this case, enter the 401K deduction into this field so that when it is calculated it would exclude the portion of wages that were used to calculate the pension trust benefit.
This would mean that if $40 of a total $100 week were earned working on a prevailing wage job, the associated 401K deduction would only be calculated on the remaining $60.
Print Order
Enter the print order number for the benefit. This determines where the benefit appears on the payroll journal.
Maximum Limit Group Code
Enter the maximum limit group code. This includes the benefit in that group when processing payroll.
The following fields are used to capture information for Vertex tax calculations.
Is this Benefit
Select whether the benefit is exempt or taxable. The default value is null.
Compensation ID
Enter/select the compensation ID. This field is only enabled when the benefit is set as "Taxable" in the Is This Benefit field. If left blank, the system will default to the Vertex-defined value.
The Compensation ID LOV displays system and user-defined compensation codes. User-defined codes are maintained in the US Payroll - Vertex User-Defined IDs (Beta) screen.
NOTE: The 'Use Vertex API' box must be checked on the Payroll Processing screen prior to processing. For more information, please refer to US Payroll - Processing, Checks and Postings.
NOTE: This field is part of ongoing Vertex enhancements and is currently in Beta testing.
[Override Taxability] – Button
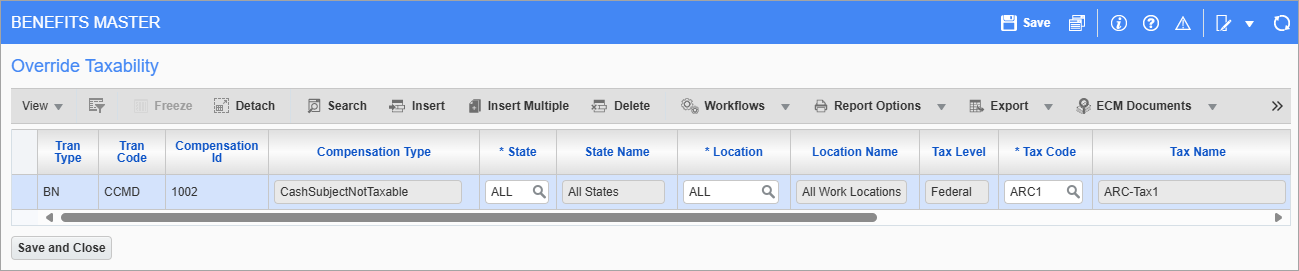
Press this button to launch the Override Taxability pop-up to modify tax rules at the federal, state, and local levels. This button is only enabled when a user-defined compensation code (between 1001 and 1099) is selected in the Compensation ID field.
NOTE: This field is part of ongoing Vertex enhancements and is currently in Beta testing.
Pay Type
Select whether the pay type is regular or supplemental. This field is only enabled when the benefit is set as "Taxable" in the Is This Benefit field. By default, this field is set to "Regular".
NOTE: This field is part of ongoing Vertex enhancements and is currently in Beta testing.
Company Benefits
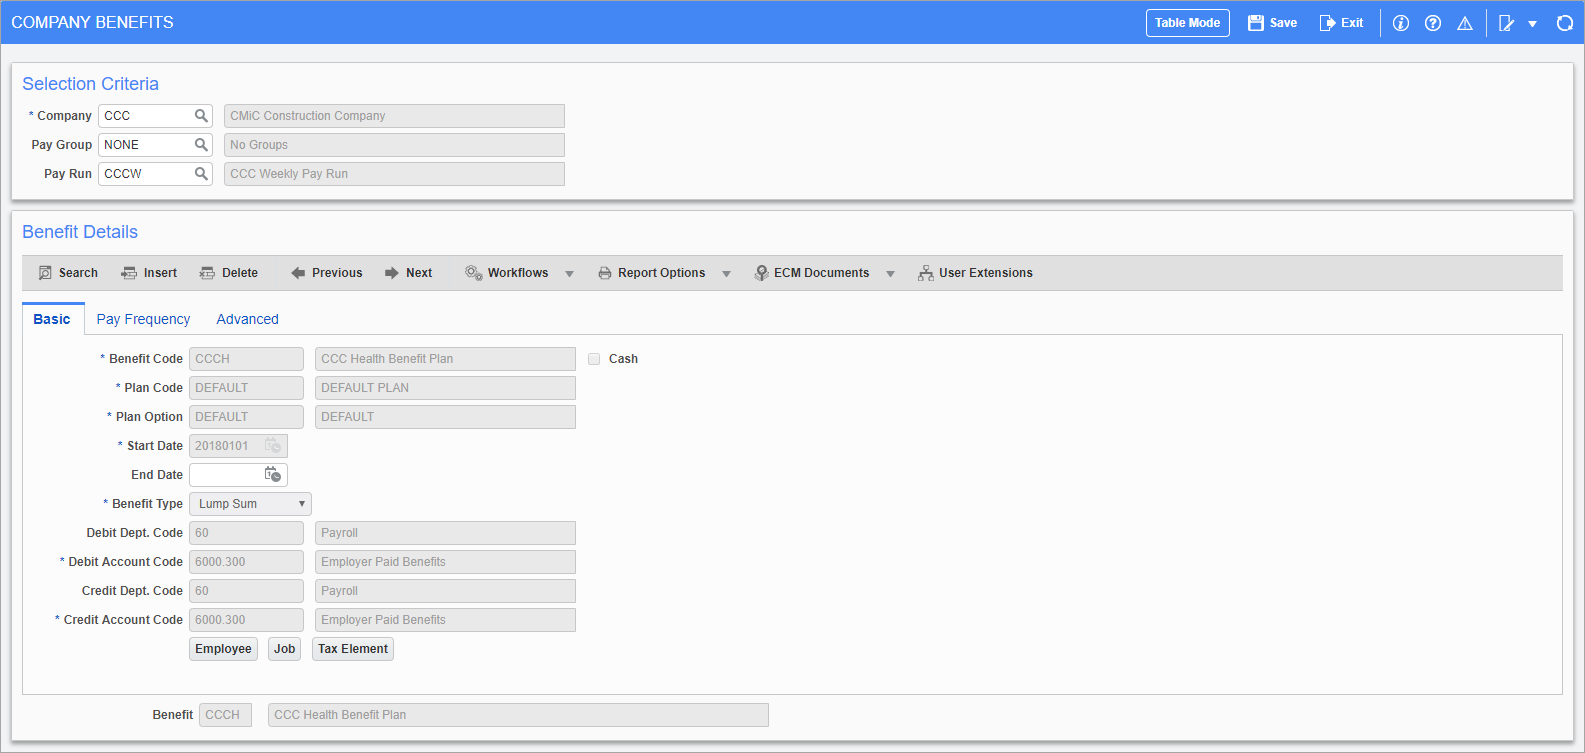
Pgm: PYCOMBEN – Company Benefits Maintenance; standard Treeview path: US Payroll > Administration > Benefits > Company
This screen is used to assign benefits to companies. It is possible to change the frequency and amount of the benefit, declare eligible amounts for a particular pay run, and assign the debit and credit accounts that are used. Benefits can also be connected with plans and options.
Pay Groups
The manner in which company benefits are assigned to pay groups is vital in terms of how those benefits apply to employees. Before assigning them, map out the required benefits by determining whether they belong to one of the following categories:
-
Benefits that belong to all (or most) employees in a pay run: Enter/select “ALL” in the Pay Group field to have all employees receive this benefit regardless of their individual pay group. Benefits can be customized at the employee level in the Employee Benefit screen. If certain employees do not require a benefit, the amount of the benefit for that employee can be reduced to zero and the benefit is not calculated.
-
Benefits that belong to specific employees in a pay run: Enter/select “NONE” in the Pay Group field. This automatically excludes this benefit from all employees in the pay run. In order for this benefit to apply to an employee it must be assigned directly to the employee in the Employee Benefit screen.
-
Benefits that belong to a specific pay group: Enter/select the pay group code in the Pay Group field. This automatically assigns this benefit to all employees in that pay group and excludes that benefit from employees in other pay groups. In order for this benefit to apply to an employee outside of the pay group it must be assigned directly to the employee in the Employee Benefit screen.
-
Benefits that belong to unions: Enter/select “NONE” in the pay group field. This automatically excludes this benefit from all employees. Once unions are defined, union benefits can be assigned in the Union Benefits screen. Any employee that is a member of that union automatically receives that benefit. All other employees will not have this benefit assigned.
-
Benefits that are connected to plans and options: Enter/select “NONE” in the pay group field. Benefits connected to a plan or option must be excluded from all employees and assigned individually at the employee level in the Employee Benefit screen or at the Union level in the Union Benefit screen.
Benefit Code
Enter/select the benefit code for the company pay run.
Cash – Checkbox
This box is checked if the ‘Paid in Cash’ box on the Benefits Master screen is checked. This can’t be changed at the company level.
Plan Code, Plan Option
Enter/select the plan code and option associated with the benefit.
The plan code and option field fills with the code “DEFAULT” when a company benefit is defined under a specific pay group or the pay group “ALL”. When defining a benefit under the pay group “NONE”, a plan code or option may be selected from the available list. Only those plan codes or options previously defined in the Plans and Plan Options screens can be used.
Start Date, End Date
Enter/select the start and end date for the benefit. During payroll processing this benefit is only calculated if the pay run period processing date is on or after this date. To have this benefit active indefinitely, leave End Date field blank.
Benefit Type
The benefit type defaults from the Benefit Master screen and can’t be changed at the company level.
The system allows for the choice between the following:
-
Lump Sum: The benefit is a flat amount no matter how much the employee earns or how many hours he works.
-
Hourly: The benefit is based on the number of hours worked.
-
Percentage: The benefit is based on a percentage of wages earned.
Debit Department Code, Debit Account Code
Enter/select the department and account that are debited when this benefit is processed. If the department is left blank the employee department code is used.
If the ‘Job Allocation’ box is checked on the Benefit Master screen, the system debits the job/cost code/category department and account as defined by the timesheet entry line.
Credit Department Code, Credit Account Code
Enter/select the department and account that are credited when this benefit is processed. If the department is blank the system uses the employee department code.
Leave this field blank if the ‘Paid in Cash’ box is checked on the Benefit Master screen, as the system credits the cash/bank account (as defined by the pay group associated with the employee) for the amount of the receivable benefit.
[Employee] – Button
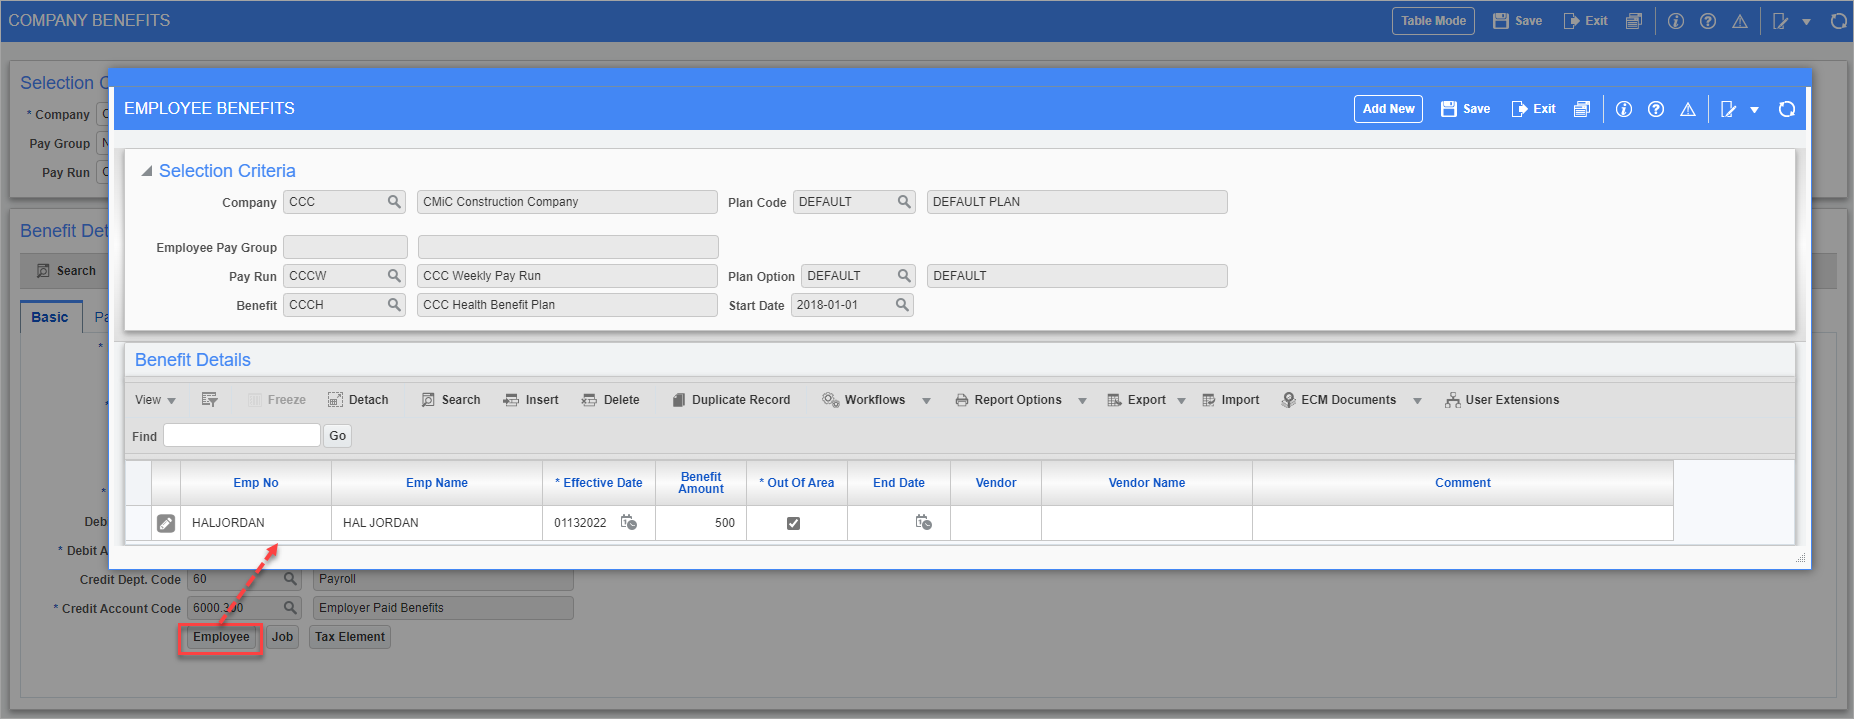
Pgm: PYEMPBEN – Employee Benefits; standard Treeview path: US Payroll > Administration > Benefits > Company – Basic tab – [Employee] button
Press this button to see all employees who are eligible for the benefit.
[Jobs] – Button
Press this button to launch the Job Benefits/Deductions Maintenance screens in order to add benefits or deductions by jobs.
[Tax Elements] – Button
Press this button to assign taxes to the benefit.
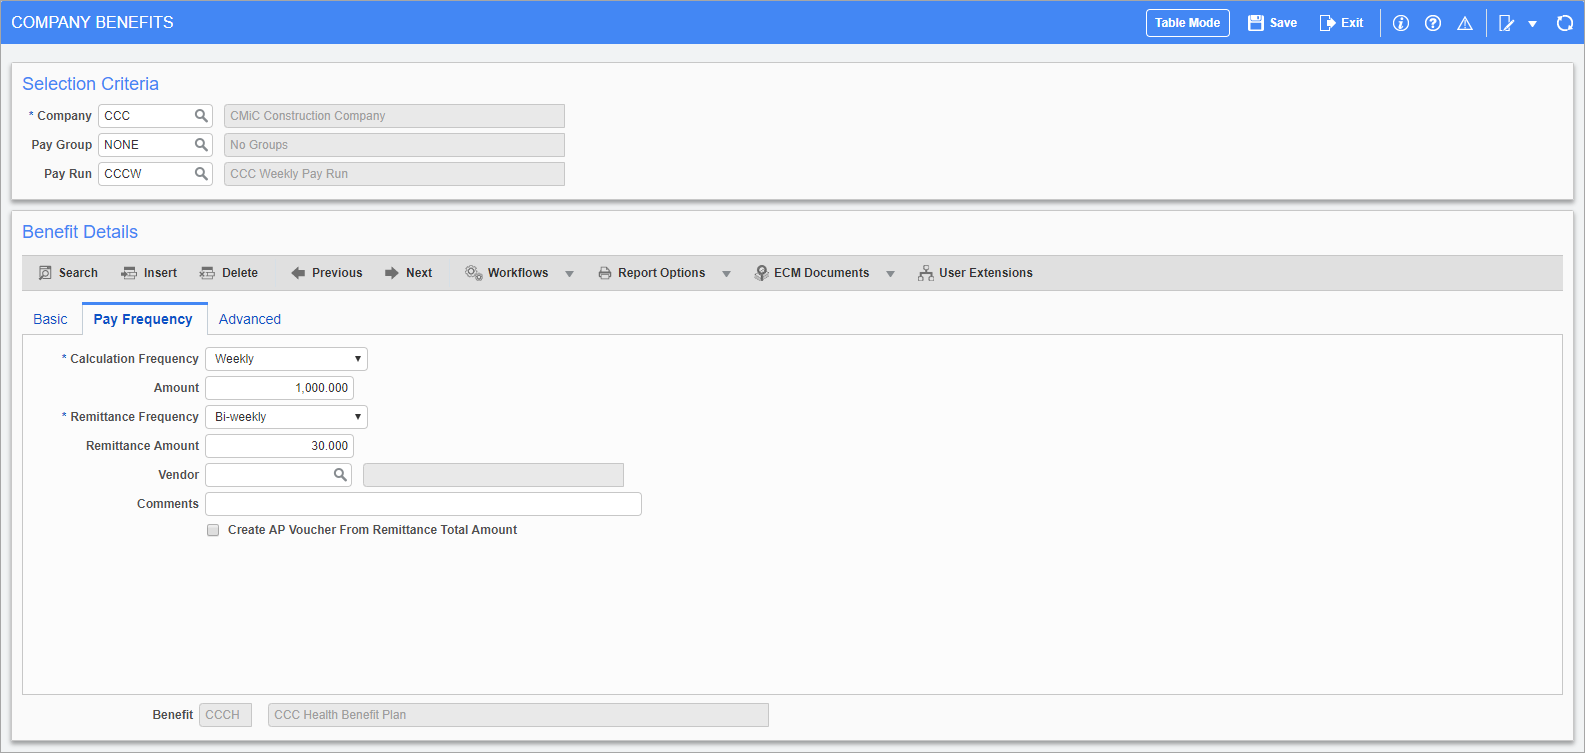
Pgm: PYCOMBEN – Company Benefits Maintenance; standard Treeview path: US Payroll > Administration > Benefits > Company – Pay Frequency tab
Calculation Frequency
Select the frequency with which this benefit is calculated. The Frequency type defaults from the Pay Run type but can be changed.
Amount
Verify/modify the amount for the benefit. The value entered on the Benefits Master screen is defaulted but may be changed.
The amount field is a dollar amount or a percentage depending on the type of benefit selected in the previous fields.
NOTE: This amount must be zero if using the Remittance Amount and Frequency fields to define the payments for this benefit, or if the benefit is defined at the employee or union levels.
Remittance Frequency
Select the frequency with which payments are made to the vendor for this benefit. This value should differ from the Calculation Frequency.
Remittance Amount
Specify the remittance amount to be paid to the vendor based on the remittance frequency. This is typically used in cases where the payment is a fixed amount per period.
NOTE: This amount is zero if the benefit is defined at the employee or union levels.
Vendor
If the ‘Generate AP Voucher’ box is checked on the Benefit Master screen, enter/select the vendor code for the vendor that represents the benefit.
Comments
Enter any comments here to print on the AP check stub depending on the check format used.
Create AP Voucher From Remittance Total Amount – Checkbox
Check this box to use the Remittance Amount field to generate a voucher for Accounts Payable.
In order to use this box, the pay group should be “NONE” and the type should be “Lump Sum”. The ‘Create Voucher For Accounts Payable’ box should also be checked on the Benefit Master screen. The Amount field should be zero, the Remittance Frequency field should be set to a different value than the Calculation Frequency field, and some amount should be entered into the Remittance Amount field.
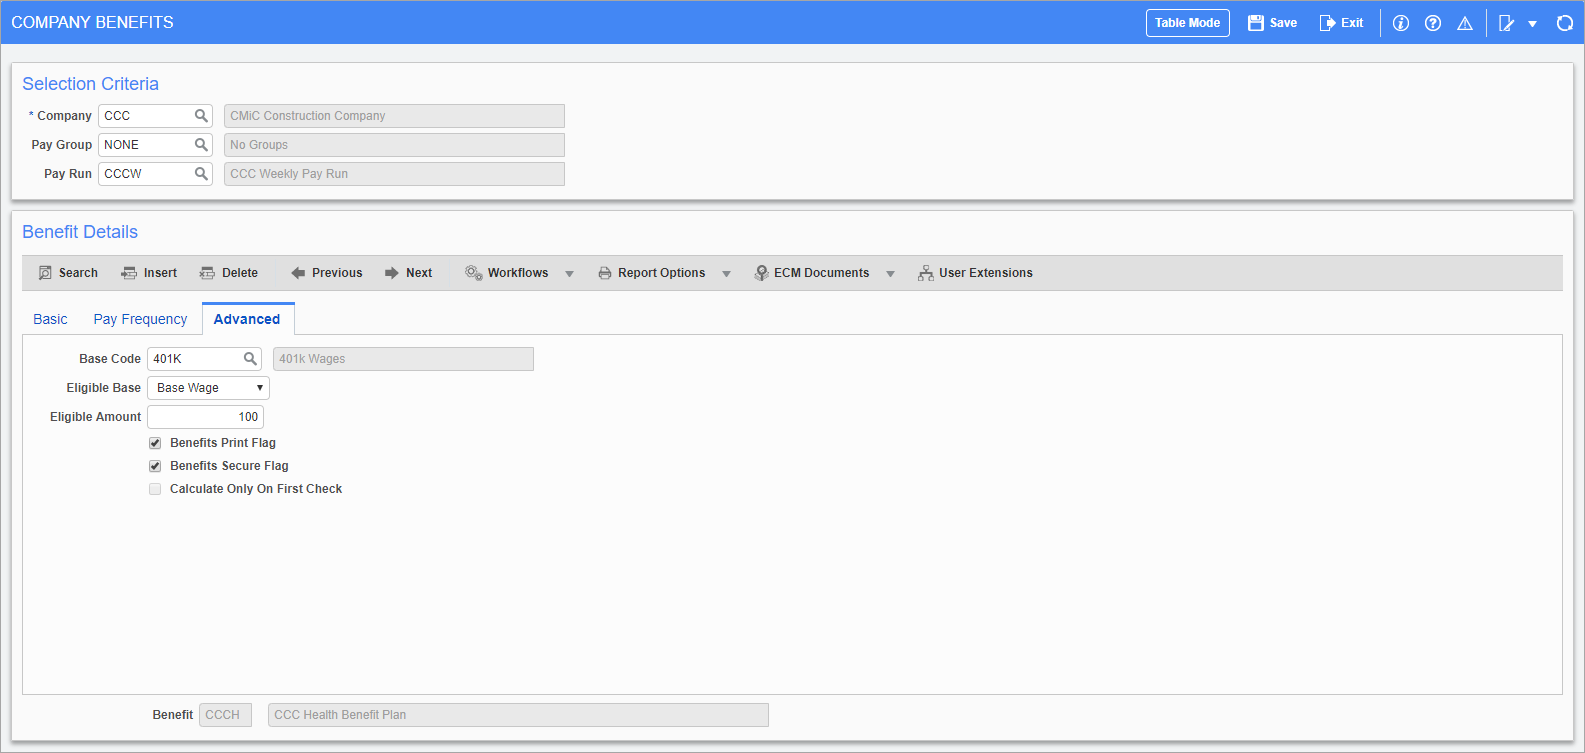
Pgm: PYCOMBEN – Company Benefits Maintenance; standard Treeview path: US Payroll > Administration > Benefits > Company – Advanced tab
Base Code
Enter/select the base code for the benefit. This field is only used to define a different base from the one defaulted in this screen. This field is not available for lump sum benefits.
Base codes are combinations of hours and benefits or deductions that are used to calculate other benefits and deductions. Base elements are required when a benefit or deduction calculation is nonstandard. Please refer to the section on Benefit and Deduction Base Elements for more details.
The base code must have been defined previously in the Benefit and Deduction Base Elements screen.
Eligible Base
Select the eligibility base for the benefit. Used in conjunction with the Eligible Amount field, a base amount can be established under which this benefit is not calculated. The value entered in this field is based on the previously selected base code.
Eligible Amount
Enter the eligibility amount for the benefit. The eligibility amount is a minimum restriction on the base from which this benefit is calculated. This is used in conjunction with the choice of eligible base:
-
Base amount: The eligible amount is the minimum gross wages earned before this benefit is calculated.
-
Hours Worked/Hours Paid: The eligible amount is the minimum number of hours worked before this benefit is calculated.
Benefits Print Box – Checkbox
Check this box to have this benefit appear on relevant payroll reports. Leave this field blank if this benefit is used for calculation purposes and should not be reported.
NOTE: The ‘Benefits Print Box’ checkbox determines whether company-provided benefits are displayed on an employee’s pay stub. It gives the company the option to include or exclude these benefits from view. However, if a benefit is paid in cash or processed as a deduction, it will appear on the pay stub regardless of the checkbox selection. This is because cash payments and deductions directly impact the Net Pay calculation and must be shown.
Benefits Secure Box – Checkbox
Check this box to have this benefit appear in the relevant queries. Leave this field blank if this benefit is used for calculation purposes and should not be reported.
Calculate Only On First Check – Checkbox
Check this box if the benefit should only be calculated and processed once per pay period regardless of how many checks are processed for the employee during the pay run. For example if the benefit is for group term life, this box should be checked. This option only applies when the benefit is a percentage or hourly type.
Employee Benefits
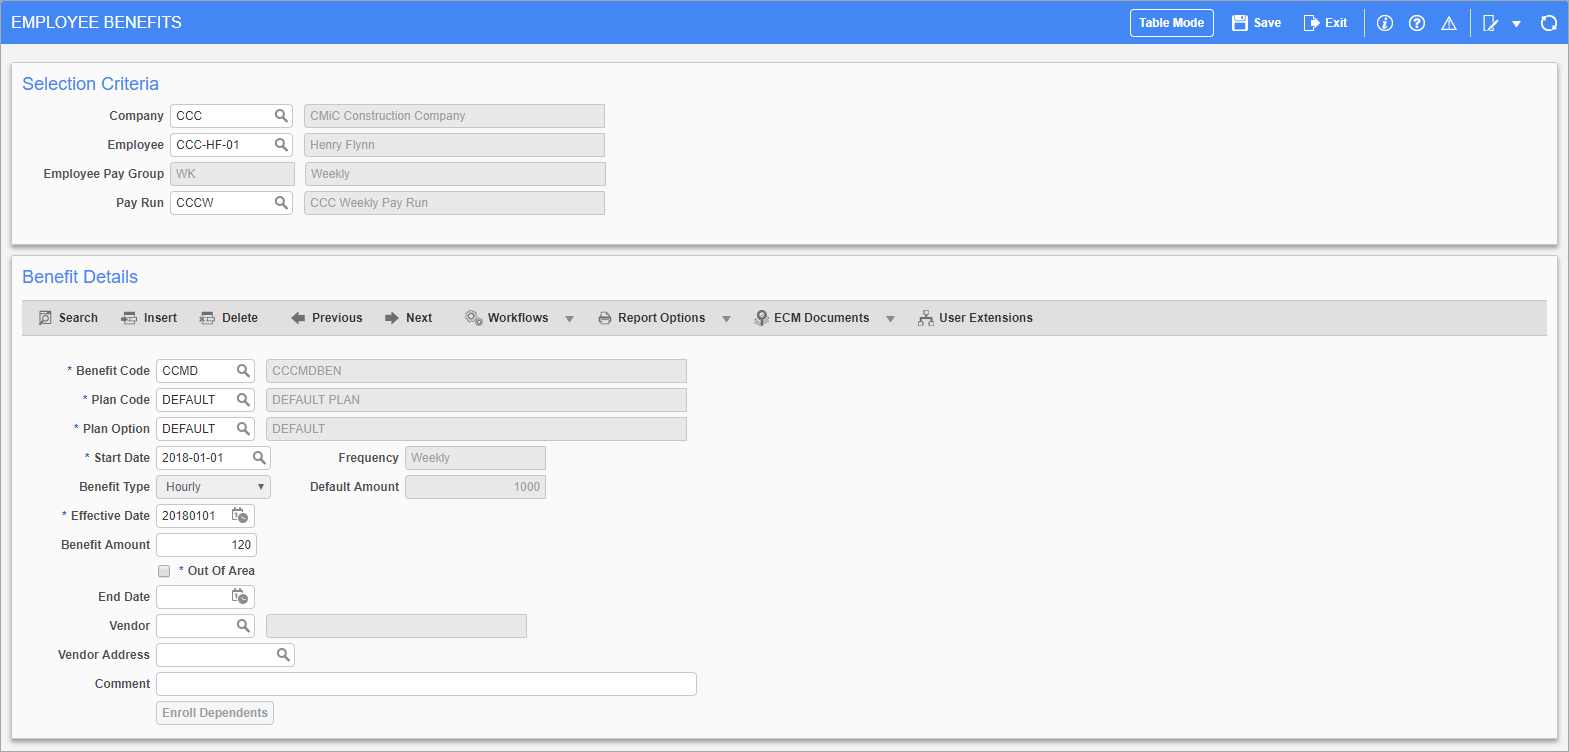
Pgm: PYEMPBEN – Employee Benefits Maintenance; standard Treeview path: US Payroll > Administration > Benefits > Employee
The Employee Benefits screen is used to enter any nonstandard company benefits against a particular employee. This screen allows for the override of benefit amounts as well as the default effective and end dates. The benefit information is defaulted from the Company Benefits screen.
Benefit Code, Plan Code, Plan Option
Enter/select the benefit code, plan code, and plan option.
Start Date, End Date
Enter/select the dates when the benefit starts and ends.
Frequency
Select how often the benefit is applied.
Benefit Type
Select the type of the benefit.
Default Amount
This field is read-only and displays the default amount based on the combination of the latest open period and the amount in the Company Benefits screen.
For example, if the latest open period is period 47 in 2026, and the amount in this period (i.e., the amount in the Amount field on the Pay Frequency tab) on the Company Benefits screen is 1000, the Default Amount field will display as 1000. If future open pay periods exist and there are no corresponding amounts in the Company Benefits screen, the Default Amount field will be blank.
Effective Date
Modify the effective date for this benefit if the employee requires a different date than the company default.
Benefit Amount
Modify the amount of this benefit if the employee requires a different amount than the company default.
Out of Area – Checkbox
Check this box if the employee lives out of the area covered by the plan option.
Vendor
Enter/select the vendor code for the vendor that represents the benefit. This field is a reference field used by the Human Resources module.
Vendor Address
Enter/select an alternate address code for the vendor specified if necessary. This address is used when generating AP vouchers. Multiple vouchers are generated if the benefits and deductions have different vendor address codes. The vendor address can be entered for existing records but is only applicable when processing of new records.
Comment
Enter any comments related to the benefit that being customizing for this employee.
[Enroll Dependents] – Button
If the benefit being applied to the employee allows dependent enrollment this button can be used to add the required dependents.
Job
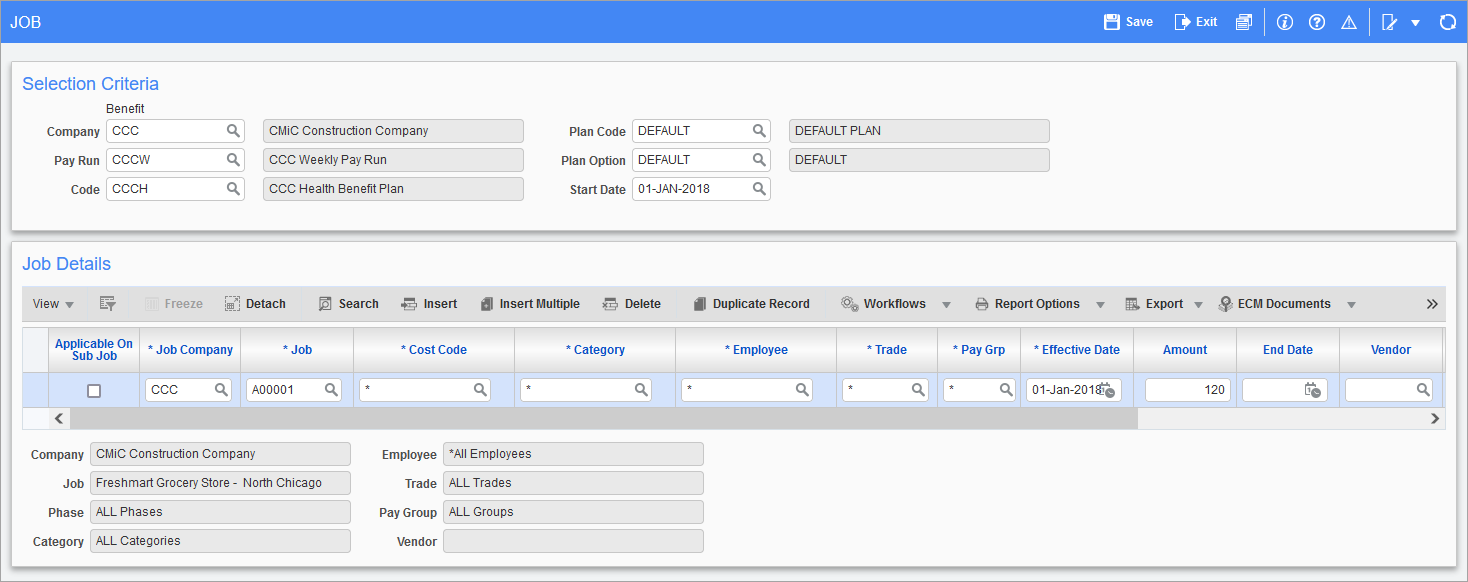
Pgm: PYJOBBEN – Job; standard Treeview path: US Payroll > Administration > Benefits > Job
The Job screen allows benefits or deductions to be added to jobs. Benefit amounts, as well as the default effective and end dates, can be overridden. The benefit information is defaulted from the Company Benefit Maintenance screen.
NOTE: For any employees who are not entitled to the benefit/deduction on a particular sub-job, a new record can be created for that sub-job with a zero amount. The processing will not calculate the benefit/deduction for the specific sub-job as the amount is zero. This can also be used if the sub-job has a different amount than the controlling job.
To apply a benefit to all jobs of a particular type, enter “*” in any or all of the Job, Cost Code, Category, Employee, Trade, and Pay Group fields.
To learn more about how this screen is used, please see US Payroll - Calculate Benefits and Deductions for Sub-Jobs on a Controlling Job.
NOTE: Only benefits assigned to the “NONE” pay group are available here.
Union Benefits Maintenance
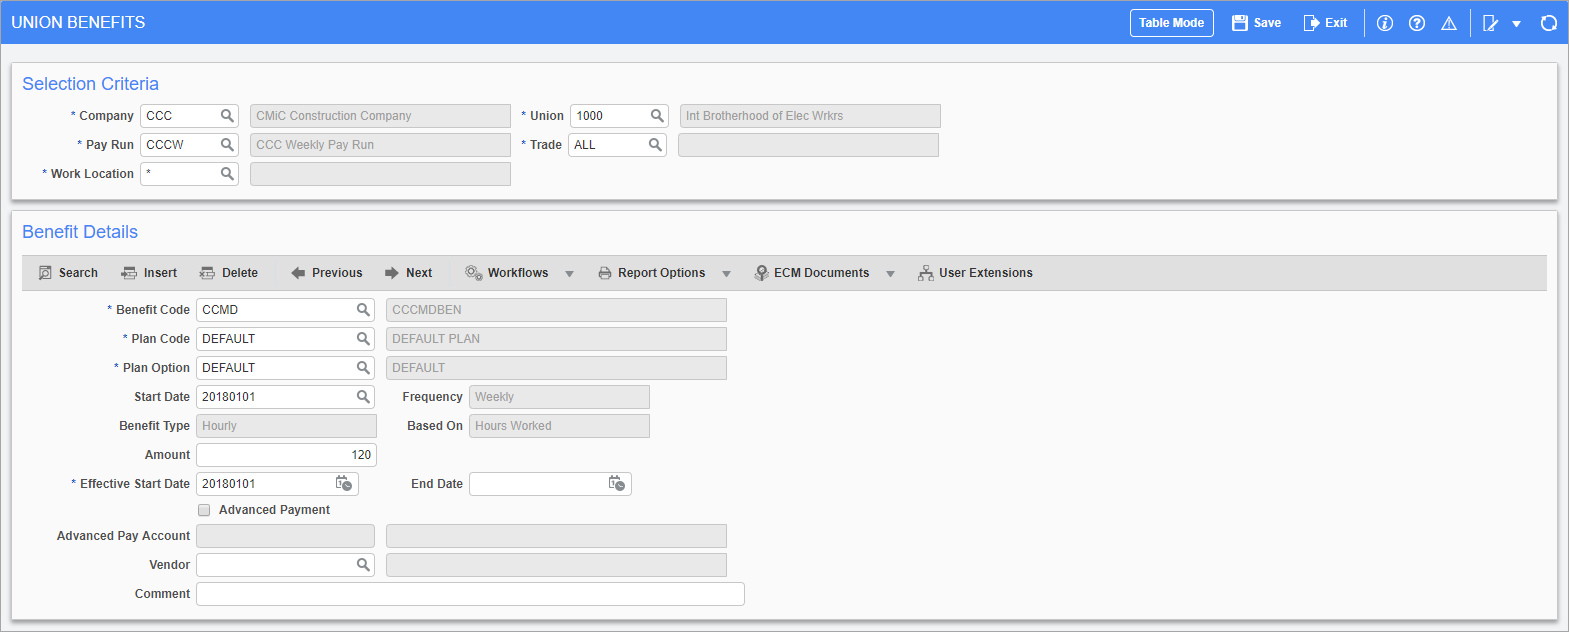
Pgm: PYUNIBEN – Union Benefits Maintenance; standard Treeview path: US Payroll > Administration > Benefits > Union
The Union Benefits screen is used to set different rates for union benefits by trade. Once the company, pay run, and union are selected benefits can be designated to a specific trade or to all trades in that union. The desired benefits are then selected and rates can be modified by union as well as trade. In each benefit assigned to a union and trade, benefit rates can be further separated into specific plans and options.
This screen is highly similar to the Employee Benefits screen. Please refer to the Employee Benefits section above for any further assistance.
Advance Payment – Checkbox
Check this box if this union benefit is an advanced payment benefit where a pre-payment has already been recorded on the company’s books. During payroll processing the system calculates the benefit amount for the period, and reduces the payment by the amount in this field rather than credit the accrued liability account as specified by the Company Benefit Maintenance screen.
Leave this field blank if this benefit should be paid directly to the employee.
Advance Pay Account
If the ‘Advance Payment’ box has been checked, enter/select the advance pay account associated with this benefit. A credit is posted to this liability account for the amount of the benefit sent to the union.
Control Union Benefits Maintenance
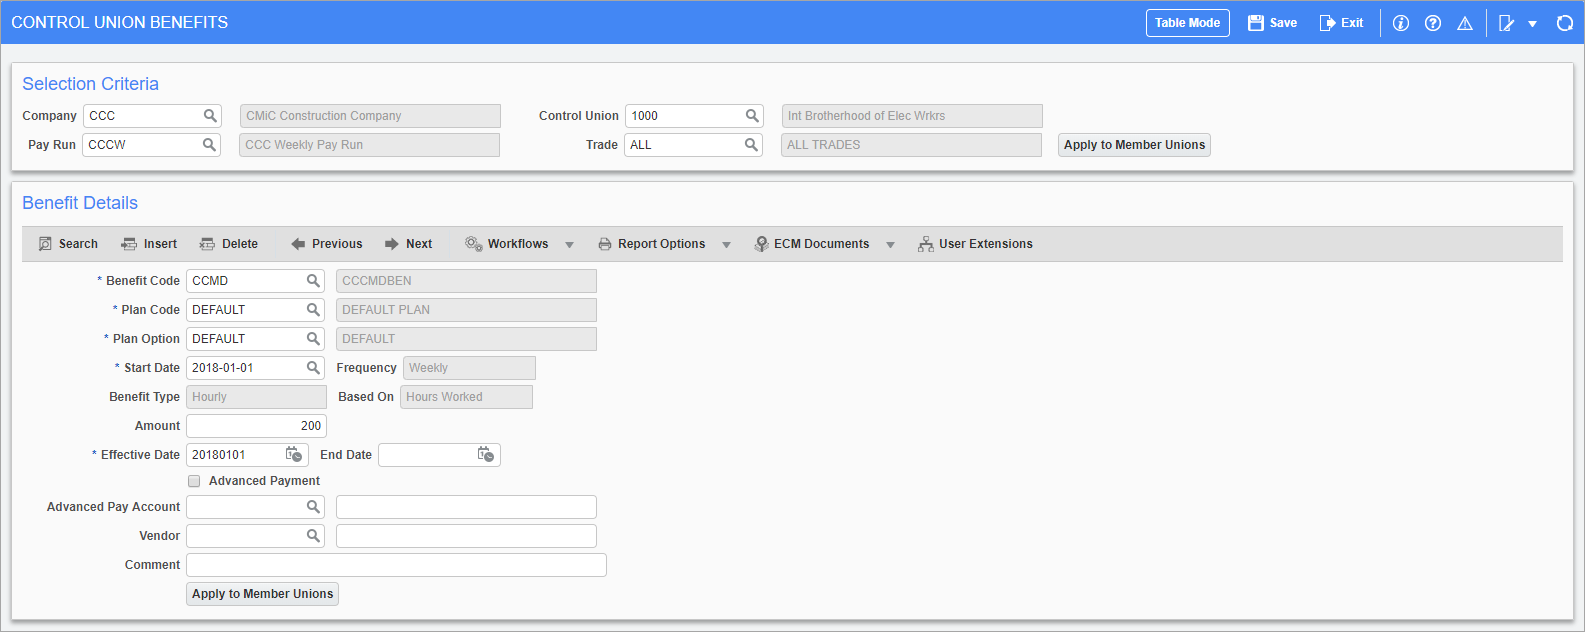
Pgm: PYUNIBENCTRL – Control Union Benefit Maintenance; standard Treeview path: US Payroll > Administration > Benefits > Control Union
In this screen, benefits can be set up at the controlling union level and then applied to member unions using the [Apply to Member Unions] button. This screen is similar to the Union and Employee Benefits screens. Please refer to those sections for any additional assistance.
PW Rate Codes
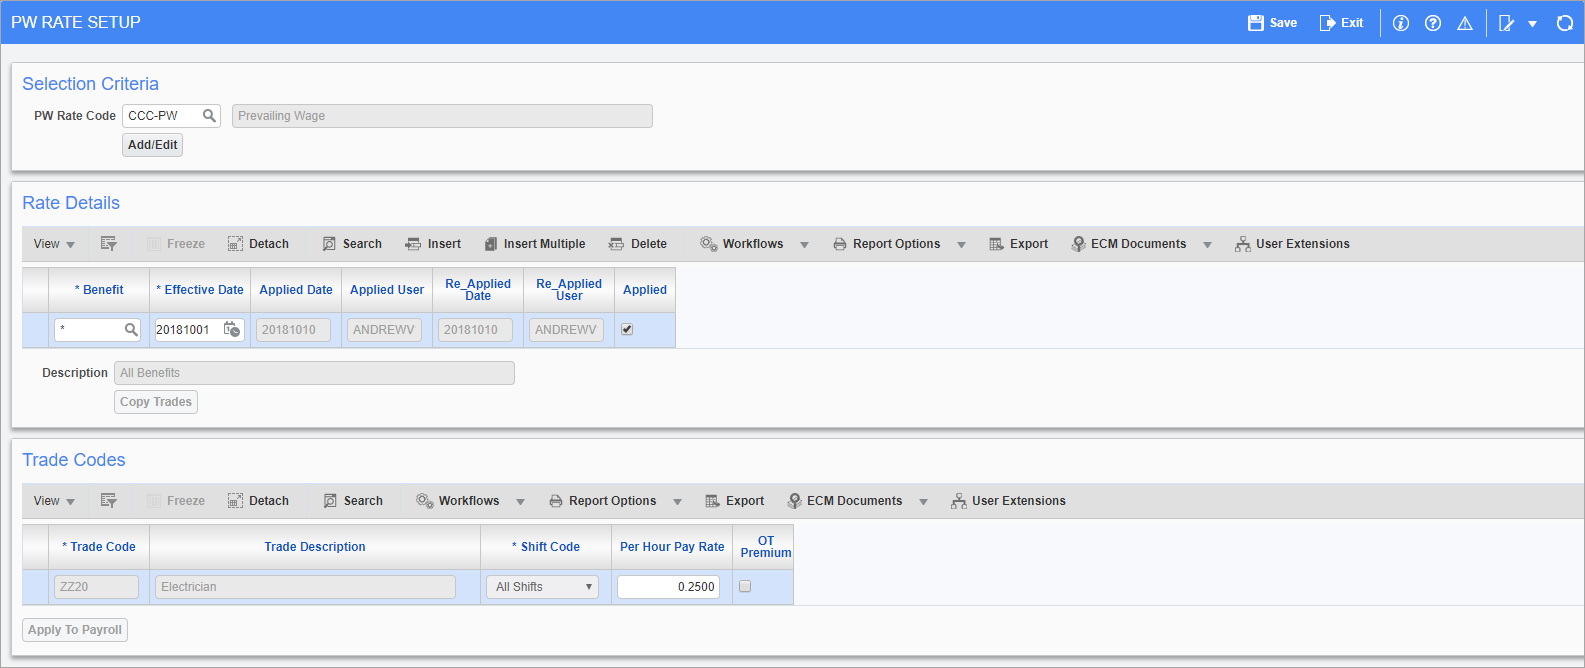
Pgm: PYPWCODE – PW Rate Setup; standard Treeview path: US Payroll > Administration > Benefits > PW Rate Codes
This screen is used to define prevailing wage rates which can then be assigned to a job for the calculation of prevailing wage benefits. The rates dynamically change for the job when the prevailing wage rate codes are changed and are updated to payroll. These rates can be overridden when setting up a job in the Job Costing module (standard Treeview path: Job Costing > Job > Enter Job – Payroll tab – Prevailing Wage Override Rate). An audit is kept of the applied date, applied user, re-applied date, and re-applied user.
PW Rate Code
Enter/select the rate code for the prevailing wage. New rate codes and their corresponding descriptions can be made by pressing the [Add/Edit] button.
Benefit
Enter/select the benefit code. To apply this rate code to all benefits select “*”.
Effective Date
Enter the effective date for the benefit. Once the rates have been applied, new rates can be entered with a new effective date.
Applied – Checkbox
This box becomes checked when the [Apply To Payroll] button is pressed and the rates have been updated in the PW Benefit by Trade screen (see below). This box can be unchecked up until the latest effective date so that changes can be made and then re-applied to payroll.
[Copy Trades] – Button
This button copies all trades entered in the Trade Codes section with a rate of “0”.
Trade Code
Enter the trade code. If using the [Copy Trades] button, all trades are listed here.
Shift Code
Select the shift types to which the prevailing wage rate applies.
Per Hour Pay Rate
Enter the rate associated with the trade.
OT Premium – Checkbox
Check this box to apply the overtime and double overtime multipliers, as defined in the Rate Codes Maintenance screen (standard Treeview path: US Payroll > Setup > Local Tables > Rate Codes), to the calculation of the benefit for that trade.
[Apply To Payroll] – Button
This button overwrites the rates on the job defined in the PW Benefit By Trades screen with the new rates.
PW Benefit by Trades
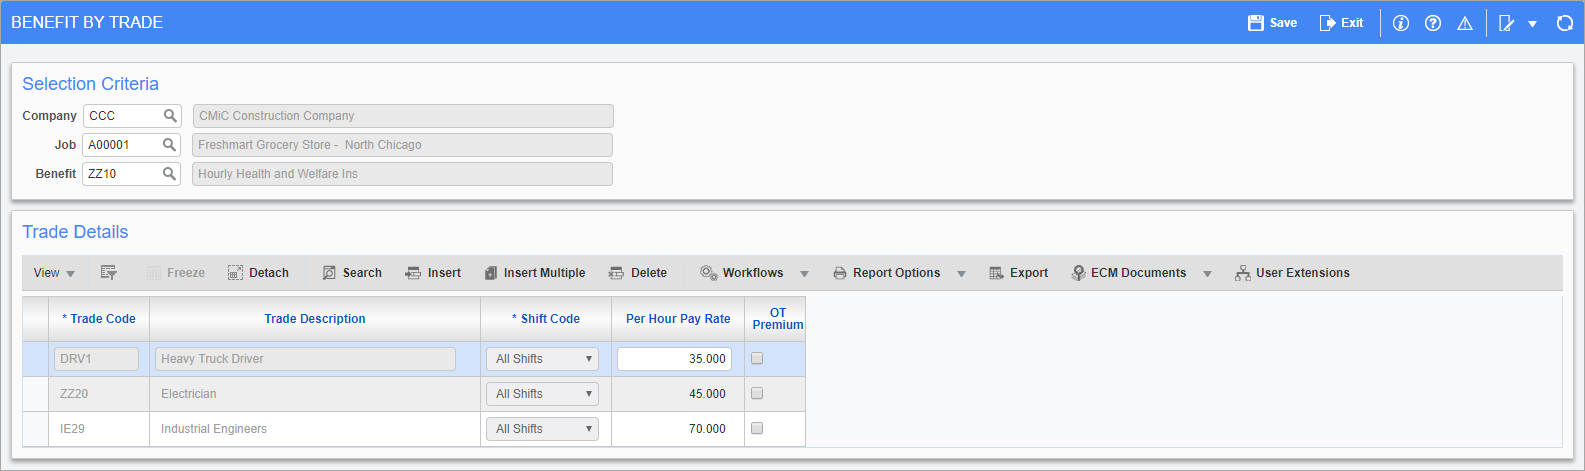
Pgm: PYBENTRD – Benefit by Trade; standard Treeview path: US Payroll > Administration > Benefits > PW Benefits by Trade
This screen is used to define pay rates used in the calculation of prevailing wage benefits subject to specific trades on prevailing wage jobs. This is most commonly used for calculating pension trust benefits on a prevailing wage job. In this case, the rates that are used to determine this calculation are set by the government and differ from the actual pay rate, charge out rate, and billing rates.
In order for the proper calculation to be processed the job must be flagged as a prevailing wage job on the Job Work Locations screen (standard Treeview path: US Payroll > Setup > Jobs > Job Work Locations) and the benefit, a prevailing wage benefit on the Benefits Master screen. When the system processes this benefit, it uses the rates defined in this screen in the calculation.
Trade Code
Enter/select the trade code that requires a different pay rate under the prevailing wage job.
Shift Code
Select the shift types to which the new pay rate applies.
Per Hour Pay Rate
Enter the per hour pay rate used when employees with this trade code work on this job and receive the benefit listed above. Rates can also be copied from the PW Rate Setup screen by pressing the [Apply To Payroll] button.
OT Premium – Checkbox
If this box is checked, the overtime and double overtime multipliers as defined in the Rate Codes Maintenance screen are applied in the calculation of the benefit for that trade.
PW Differential Setup
The difference between the prevailing wage rate and the employee’s pay rate is calculated and paid to the employee by the PW differential. If the pay rate is higher than the prevailing wage rate, a credit for the difference is applied against the prevailing wage fringe rate. In addition to the pay rate determination, fringes assigned to an employee and the fringes associated with the prevailing wage job are also compared.
This combined differential between the pay rates and fringes can be allocated to the employee through either a paid-in-cash or a non-cash benefit. Which benefit the difference gets allocated to is based on the employee’s pay group.
a) Employee Pay Rate > PW Rate
Rate difference -> credit against PW Fringe Rate
b) Employee Fringes compared with PW Job Fringes
Combined differential of a) and b) -> paid-in-cash benefit or non-cash benefit.
PW Payroll Fringes
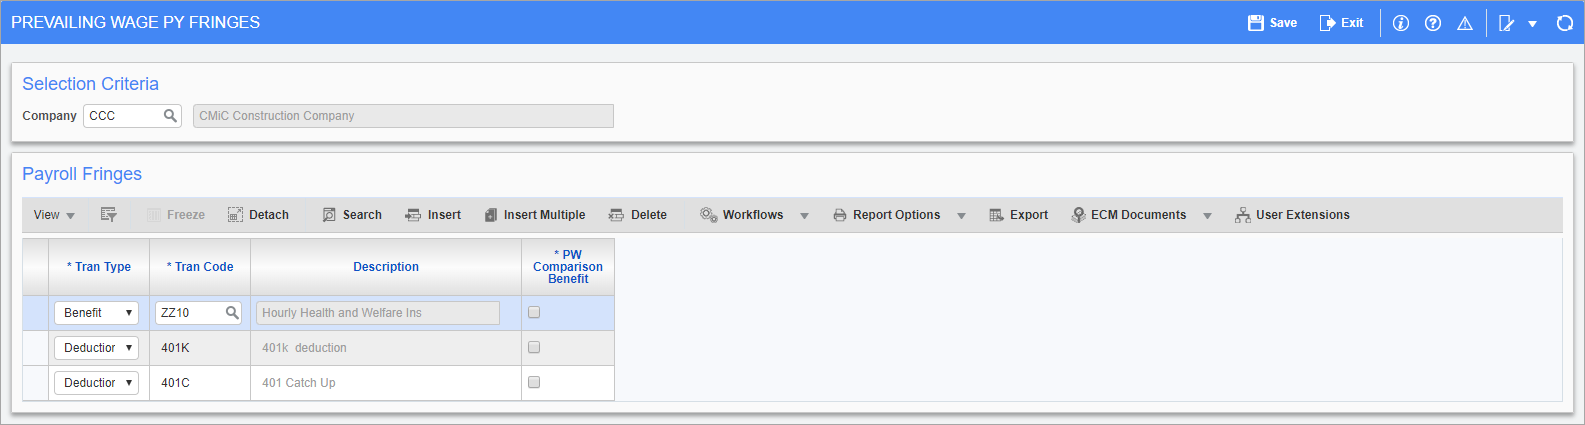
Pgm: PYPWFRINGE – Prevailing Wage PY Fringes; standard Treeview path: US Payroll > Administration > Benefits > PW Differential Setup > PW Payroll Fringes
Payroll fringes and the comparison benefit needed for the calculation of prevailing wage differentials are set up in the Prevailing Wage Payroll Fringes screen.
A dummy PW fringe benefit used to get the prevailing wage fringe rate is entered here. It should only be set up in the Benefit Master. There can only be one benefit designated as this type of benefit. When the ‘PW Comparison Benefit’ checkbox is checked for a benefit, it indicates that the defined fringe is for PW comparison benefit.
The contractual fringe rate/hr is stored under this benefit in the PW Benefit by Trade table.
PW Differential Destination
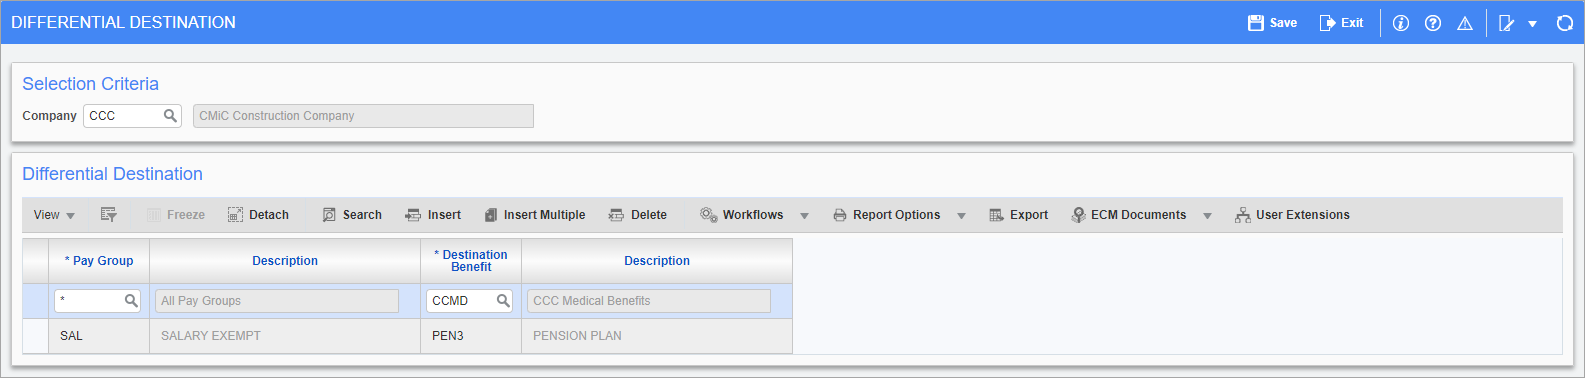
Pgm: PYPDIFFDEST – Prevailing Wage Differential Destination; standard Treeview path: US Payroll > Administration > Benefits > PW Differential Setup > PW Differential Destination
A destination benefit for the differential needs to be set up for pay groups in the Prevailing Wage Differential Destination screen. Destination benefits must be assigned to pay groups in the Company Benefits screen.
Timesheet posting determines the base pay rate for each time entry for hourly employees. The base pay rate is defined as the employee’s standard regular hour pay rate for that job and trade. The job should be a PW job with the ‘Davis-Bacon’ box checked. The calculation of the base pay rate is the time entry’s actual pay rate minus the rate code premium minus the rate code factor increase, rounded to two decimal places. The calculation on the pay rate differential is always relative to the base pay rate even for overtime and double overtime.
The Process Payroll function is run in two passes:
-
First pass – For each hourly employee the payroll fringes are first calculated to determine if there is a nonzero differential.
-
Second pass – The fringes calculated from the first process are included if a nonzero differential amount is calculated on any time entry line and the differential taken into the processing run.
Calculation of the PW Differential follows certain rules and conditions:
-
It is applicable only to hourly employees on prevailing wage jobs and prevailing wage trades.
-
The job trade must have a nonzero fringe rate set up for the PWF benefit for it to be considered as a prevailing wage trade.
-
All wages (including other hours) and leave time entries are subject to the same prevailing wage rule, except for adjustments.
-
Wages and leaves entered through the adjustment screen are excluded from all areas of the calculation since they do not carry the associated hours and pay rates – values necessary in the differential calculation.
-
Differential calculation is determined and calculated line-by-line for each wage/leave time entry. Each line is determined based on its own merits independent of any other hours for the week.
-
The calculated differential amount and the components used in the calculation are stored against each time line.
-
Negative hours are subject to the same differential calculation and result in a negative differential amount.
For each prevailing wage job and trade:
Payroll Fringe Rate = the sum of all payroll fringe amounts for that job-trade / the sum of all wage and leave hours worked (for that job-trade rounded to two decimal places).
The payroll fringe rate is one single rate determined for the whole job-trade.
The calculation process makes a determination based on a comparison of the pay and fringe rates. If it is determined that a positive rate differential exists for that time entry line, then the differential rate is multiplied by the hours worked to get the differential amount.
-
Payroll Package Rate = Base Pay Rate + Payroll Fringe Rate
-
Prevailing Wage Job Rate = Prevailing Wage Pay Rate + Prevailing Wage Fringe Rate
-
Differential Rate = Prevailing Wage Job Rate – Payroll Package Rate (0 if negative)
-
Differential Amount = Differential Rate x Hours Worked (rounded to two decimal places)
On the prevailing wage benefit trade screen, if the ‘PWF OT Premium’ checkbox is checked then the PWF Fringe Rate will be multiplied by the pay rate factor used for that time line.
It is assumed here that the wage pay and payroll fringes are not split across multiple-checks (e.g. a fringe that is a lump sum cash benefit paid in a separate check).
Accrual Benefits
Overview
The Accrual Benefits submenu allows the summation of all benefit amounts based on the parameter screen. The values are inserted into the table on the Payroll Adjustment screen in order to pay the accrued amount to employees.
Benefit Accrual Setup
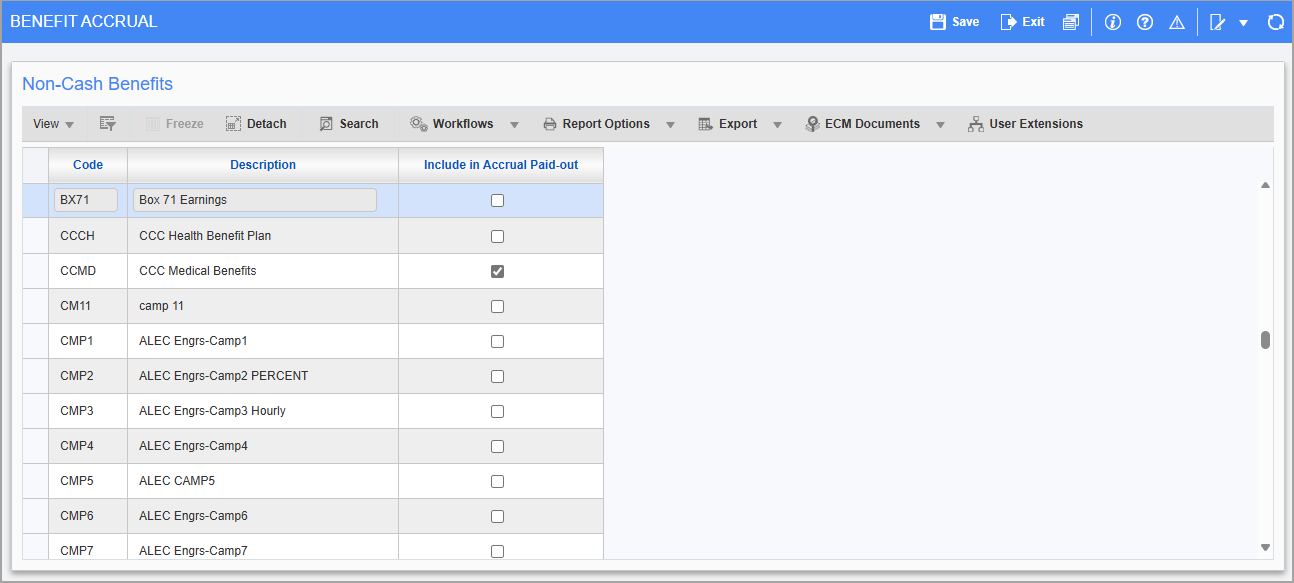
Pgm: PYBEN_ACCRUAL_SETUP – Benefit Accrual Setup; standard Treeview path: US Payroll > Administration > Benefits > Accrual Benefit > Benefit Accrual
This screen lists the non-cash benefits from the Benefits Master screen.
Include in Accrual Paid-out – Checkbox
Check this box to include the non-cash benefit when the benefit accrual is paid out via the Benefit Accrual Paidout Utility screen.
Benefit Accrual Paidout
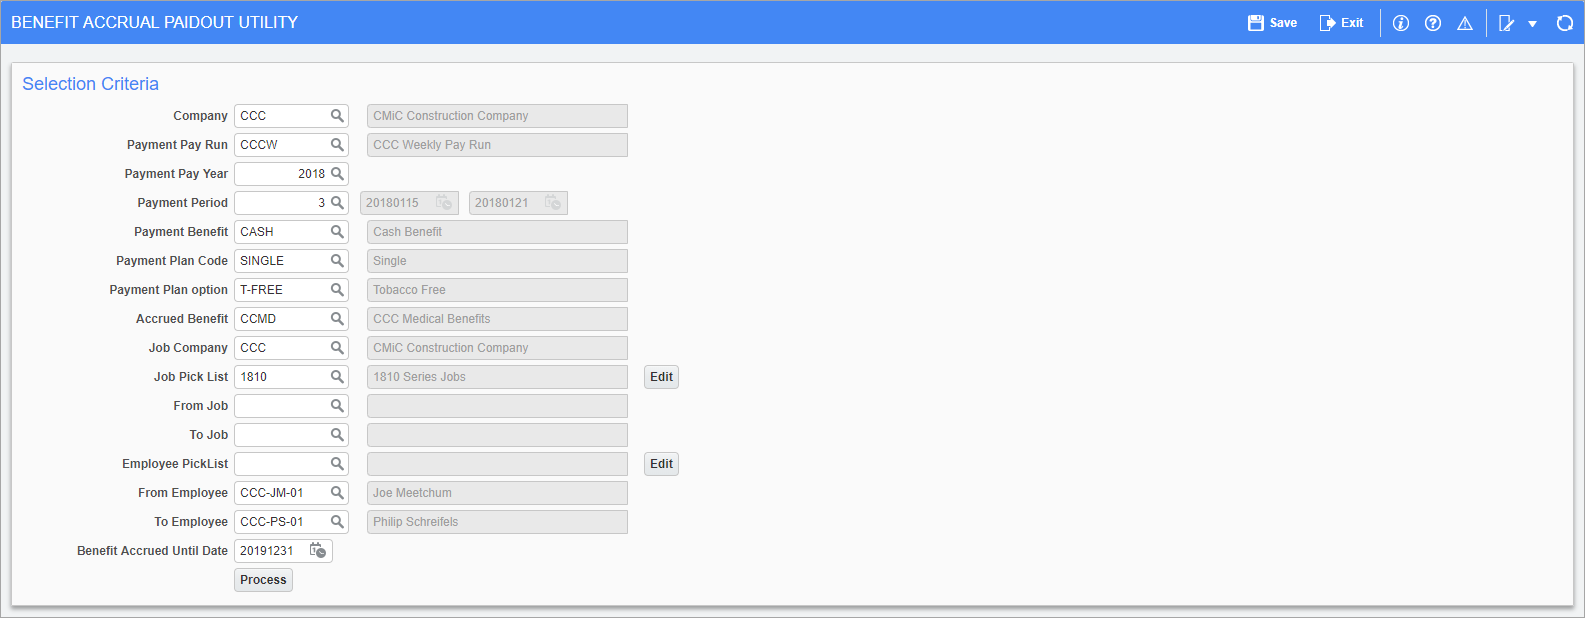
Pgm: PYBEN_ACCRUAL_PAIDOUT – Benefit Accrual Paidout; standard Treeview path: US Payroll > Administration > Benefits > Accrual Benefit
This screen is used to enter benefit details, and to create a transaction in the Salary Adjustment table (see below).
Company
Enter/select the company code.
Payment Pay Run, Payment Pay Year, Payment Period
Enter/select the pay run, pay year, and period in which the accrued benefit will be paid.
Payment Benefit
Enter/select the cash benefit. These are benefits for which the ‘Paid in Cash’ box is checked on the Master Benefits screen (standard Treeview path: US Payroll > Administration > Benefits > Master).
Payment Plan Code, Payment Plan Option
Enter/select the plan code and plan option associated with the payment benefit.
Accrued Benefit
Enter/select the non-cash benefit. These are benefits for which the ‘Include In Accrual Paid-out’ box is checked on the Benefit Accrual Setup screen.
Job Company
Enter/select a job company code.
Job Pick List, From Job, To Job
Enter/select a job pick list or use the From Job and To Job fields to select a range of jobs. The [Edit] button launches the Pick List Selection Criteria pop-up to edit the selected pick list.
Employee Pick List, From Job, To Job
Enter/select an employee pick list or use the From Employee and To Employee fields to select a range of employees. The [Edit] button launches the Pick List Selection Criteria pop-up to edit the selected pick list.
Benefit Accrued Until Date
Enter/select an end date for the benefit accrual.
[Process] – Button
Click this button to create the benefit accrual paid out transaction in the salary adjustment table.
Implementation
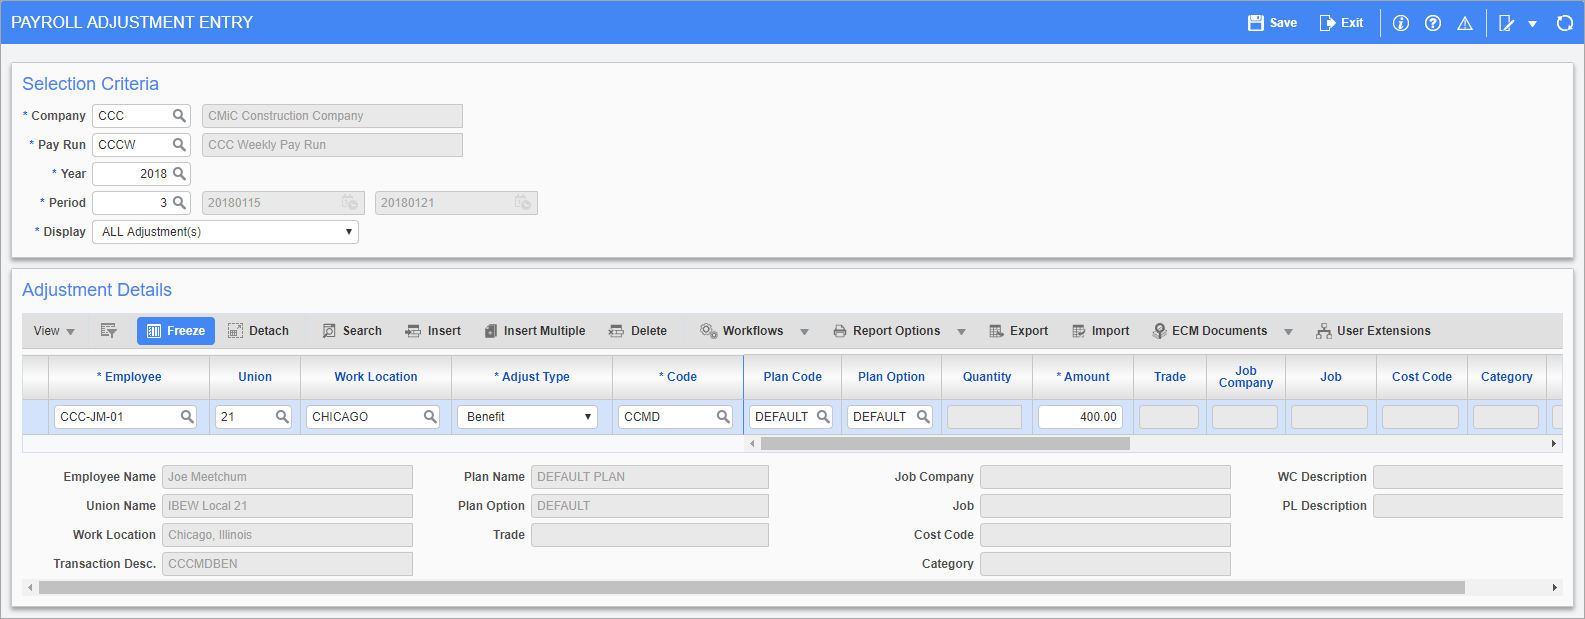
Pgm: PYPAYADJ – Payroll Adjustment Entry; standard Treeview path: US Payroll > Processing > Adjustments > Entry
In this screen, enter the details of the employees that are to be paid the accrued benefits set up above. After processing payroll, the number in the Amount field is included in the pay check and can be viewed in the Employee Pay History screen.
NOTE: Salary adjustments can be deleted before processing, which removes the salary adjustment link from the employee pay history table so that it can be re-processed.