Overview
The Payroll Control screen is used to store default company information required for processing a payroll. The control file maintains such information as the default pay rate types, GL accounts, and workers’ compensation and public liability rules.
Selection Criteria
Company
Enter/select the company code.
[Copy Control File] – Button
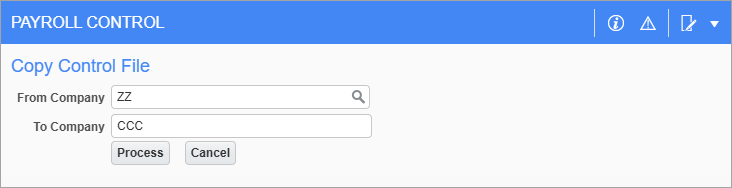
This button’s pop-up is used to copy the Payroll Control File from the company selected via the From Company field to the company selected on the main screen.
NOTE: The companies available in the From Company field's LOV are maintained in the General Ledger module. The chart code and country of both selected companies should match.
General – Tab

Pgm: PYCOMPRO – Payroll Control; standard Treeview path: US Payroll > Setup > Company > Control – General tab
Company information can be entered in the General tab, such as default location (which impacts tax calculations), company default hours, and days of work per year.
FEIN
Enter/select the FEIN associated with the company.
This number is crucial if minimums and maximums have been assigned to the benefits, deductions, taxes, or expenses. As processing occurs, the system looks to verify whether minimum and maximums need to be applied.
NOTE: More than one company setup can be associated with the same Federal Employer's Identification Number (FEIN).
Country, State/Prov, County/Region, City
Enter/select the country, state, county, and city codes for the company.
Work Days/Year, Work Hours/Year
Enter the default number of work days and work hours per year for the company.
The system enters 260 days and 2080 hours to these fields by default, based on a five day, 40 hour work week. These fields are used for calculating the daily wage of a salaried employee.
Job Summary By
Select how to organize the timesheet entry data to the Job Costing module. The system provides the following options:
-
Job/Cost Code/Category: Interfaces one line per job/cost code/category per pay run to the Job Costing module. Inter-branch charges are applied if possible. This option must be used in order to use the Labor Detail Report screen (standard Treeview path: Job Billing > Reports > Labor Detail Report).
-
Job by Employee: Interfaces one line per job/cost code/category per employee per pay run.
-
Job by Date: Interfaces one line per job/cost code/category per date per pay run.
-
Employee by Date: Interfaces one record per job/cost code/category per day per employee per pay run.
-
Timesheet: Interfaces one record for each timesheet type entered on a timesheet line.
-
Job/Cost Code/Category Without Inter-branching: Interfaces one line per job/cost code/category per pay run with no inter-branch charges.
Default Journal, Default ADJ Journal
Enter/select the default journal codes to be used for the posting of General Ledger transactions generated by the company and payroll timesheet adjustments.
These codes can be set up in the GL Journal Names screen (standard Treeview path: General Ledger > Global Tables > Journal Names).
Text Type
Enter/select the text type code to be used when assigning reasons for changes in the employment history.
Use Charge Rate Multiplier, Use Billing Rate Multiplier
Select whether to multiply the base rate by the charge or billing rate multipliers associated with the type of hours entered on the timesheet, including:
-
Normal Hours Only
-
All Hour Types
-
None: Select this option to use the straight charge out or bill rate regardless of the rate multiplier associated with the type of hours being charged.
Calculate Workers’ Compensation – Checkbox
Check this box to calculate workers’ compensation for the company.
Checking this option validates the entry of all workers’ compensation information and runs the required workers’ compensation processing.
Calculate Workers’ Comp by Job – Checkbox
Check this box if workers’ compensation rates are to be calculated based on the job detail entered in timesheet entry.
If this box is checked, workers’ compensation codes must be set up for all jobs or for each job individually in the Job screen in the Workers’ compensation sub-menu (standard Treeview path: US Payroll > Administration > Workers’ Compensation > Job). If checked, then this setting takes precedence over the workers’ compensation from job settings at the employee level on the Employee Profile and the workers’ compensation code on the job defaults on the timesheet.
Leave this box blank to apply the workers’ compensation settings on the Company tab of the Employee Profile screen.
Calculate Public Liability – Checkbox
Check this box to calculate public liability for the company.
If this box is checked the system validates the entry of all public liability information and runs the required public liability processing.
Public Liability by Job – Checkbox
Check this option if public liability rates are to be calculated based on the job detail entered in timesheet entry.
If this box is checked, the public liability codes must be set up for all jobs or for each job individually in the Job screen in the Public Liability sub-menu (standard Treeview path: US Payroll > Administration > Public Liability > Job). If this box is checked, then this setting takes precedence over the public liability from job settings at the employee level on the Employee Profile and the public liability code on the job defaults on the timesheet.
Leave this box blank to apply the public liability settings on the Company tab of the Employee Profile screen.
Post Transaction by Hour Type in Job Cost – Checkbox
Check this box if the operation is going to be using the Job Billing module, because each hour type should be a unique transaction when posting timesheets to the Job Costing module. This means that bill rates are unique by regular, overtime, and double overtime.
If this field is not checked all hour types are summed together and the bill rate is a merged rate.
Post Transaction by Shift Type in Job Cost – Checkbox
Check this box if the operation is going to be using Job Billing because when posting timesheets to job cost, each shift type should be a unique transaction. This means that bill rates are unique by day, evening, and night.
Posted Based on Daily Timesheet – Checkbox
NOTE: This checkbox is only enabled via Lite Editor and when the Job Summary By field is set to "Job by Employee", "Employee by Date" or "Timesheet".
This checkbox can be enabled when the user needs to be able to charge calculated burdens back to the job daily. That is, each day that the timesheet gets posted to the job, the proportionate amount of burden for that day needs to be charged to the job for that day. The daily cost report can be added from the Treeview Builder using the target name of “JC - JCDetail Daily Cost Report”.
This can be used in case of a pay period that crosses months. For example, the user can select the timesheet for September and October and post them separately. This will allow Payroll posting to post the timesheet based on the daily timesheet entries instead of posting the entire payroll to one posting date.
Payroll processing and mid year pay history will stay the same.
The final posting will add values into a new table where the burden splits into days.
Calculate Overhead – Checkbox
Check this box if using the Overhead Codes sub-menu (standard Treeview path: US Payroll > Setup > Jobs > Overhead Codes). If checked, then the Calculate Overhead field in the Timesheet Posting screen will have “Yes” selected by default (standard Treeview path: US Payroll > Timesheet > Timesheet Posting).
Check this box to make the ‘Overhead Summary’ checkbox available.
Create Vendor From Employee – Checkbox
Check this box to enable the [Create BP/Vendor] button on the Employee Profile screen. The AP EFT Distribution Method field in the Direct Deposit tab is visible when this box is checked.
Overhead Summary – Checkbox
Check this box to print a summary of all overheads as part of timesheet processing.
Post Burdens By
Select the burden transaction type by which timesheet posting should be ordered. The options include:
-
Transaction Type: The system will summarize and post one line per transaction type for the burdens.
-
Transaction Type and Code: The system will summarize and post one line for each transaction code for the burdens.
-
None: The system will summarize and post one entry for the burdens.
NOTE: If the Post Burdens By field is set to "Transaction Type" and the 'Post Transaction by Hour Type in Job Cost' box is checked, the labor cost transaction lines will display individual lines for each transaction type, as opposed to single lines for base wage and burdens lump sum amount.
NOTE: This field is only enabled when the Job Summary By field is set to "Job by Employee", "Employee by Date" or "Timesheet".
Rate Codes – Tab
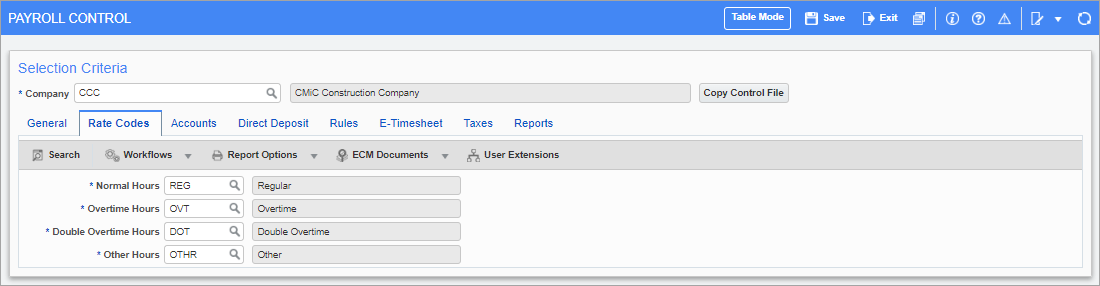
Pgm: PYCOMPRO – Payroll Control; standard Treeview path: US Payroll > Setup > Company > Control – Rate Codes tab
The rate codes entered here determine the default codes used for each of the four types of standard hours. These values are used to identify hour types in various timesheet screens. The Other Hours field is also used when recording leave time.
Normal Hours, Overtime Hours, Double Overtime Hours, Other Hours
Enter/select the default codes for normal, overtime, double overtime, and other hours.
NOTE: Available rate codes can be created in the Rate Code Maintenance screen (standard Treeview path: US Payroll > Setup > Local Tables > Rate Codes).
Accounts – Tab
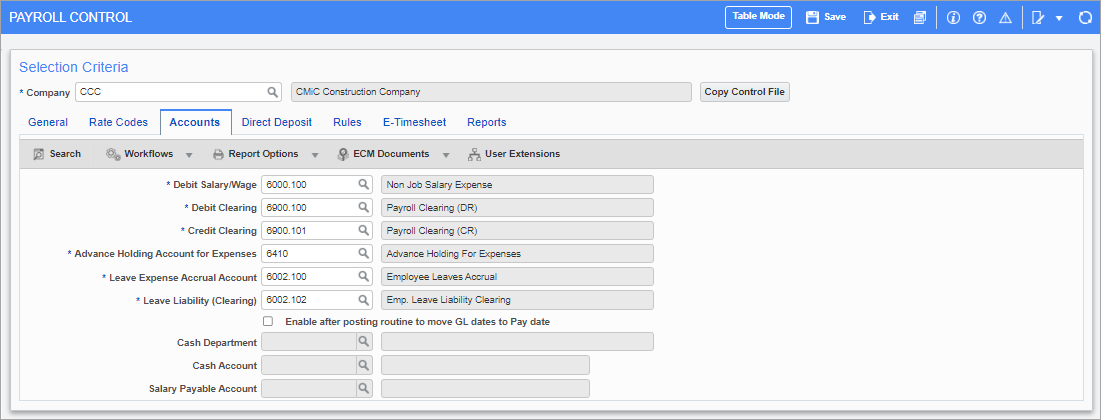
Pgm: PYCOMPRO – Payroll Control; standard Treeview path: US Payroll > Setup > Company > Control – Accounts tab
Use this screen to set the default accounts for each labor-related transaction that can be posted. It can be declared which accounts are used for debit wages, debit clearing, credit clearing, advanced holding accounts for expenses, leave expense accrual accounts, and leave liability.
Available account codes can be created in the Maintain Accounts screen (standard Treeview path: General Ledger > Setup > Maintain Accounts).
Enable after posting routine to move GL dates to Pay date – Checkbox
If this box is checked the Cash Department, Cash Account, and Salary Payable Account fields become available. Checking the box and filling these fields will supplement the cash account and department entered in the company General Ledger with the department and account entered in the fields below this box. On the payment date money is moved to the account entered in the Salary Payable Account field.
In other words, on the posting date this routine debits the cash account and credits the salary payable account.
Direct Deposit – Tab
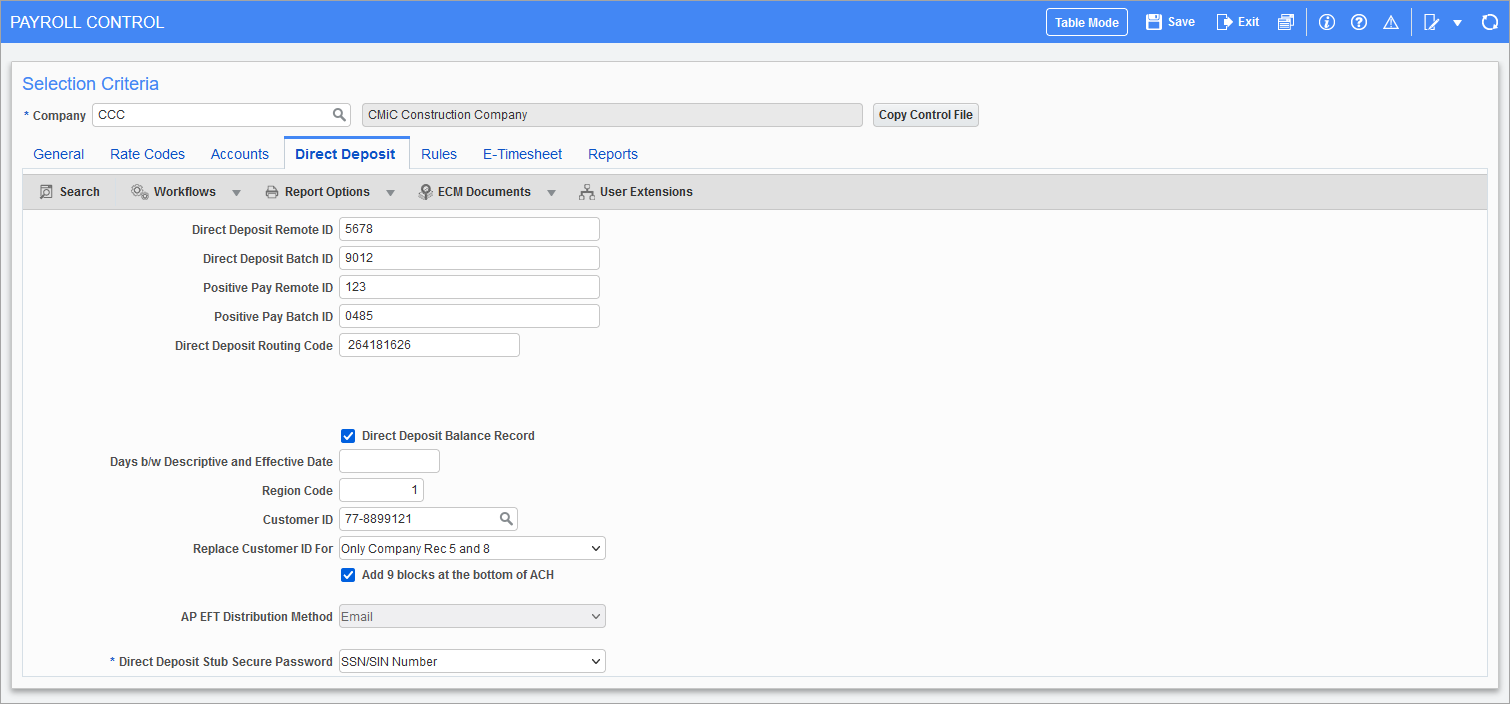
Pgm: PYCOMPRO – Payroll Control; standard Treeview path: US Payroll > Setup > Company > Control – Direct Deposit tab
This screen is used to enter the direct deposit information provided by the company’s bank. If no direct deposit payments are planned, then these fields can be left blank.
Direct Deposit Remote ID, Direct Deposit Batch ID
Enter the direct deposit remote and batch identification codes.
Positive Pay Remote ID, Positive Pay Batch ID
Enter the positive pay remote and batch identification codes.
Direct Deposit Routing Code
Enter the direct deposit routing code.
Direct Deposit Balance Record – Checkbox
Check this box to include a transaction type 27 offset record in the direct deposit file.
Days Between Descriptive and Effective Date
Enter the number of days between the descriptive date and the effective date of the deposit.
Region Code
Enter the region code.
Customer ID
Enter/select the customer identification code provided by the company’s financial institution.
Replace Customer ID For
If the Customer ID is different from the FEIN, select where the customer ID should appear by selecting from the options in the drop-down list.
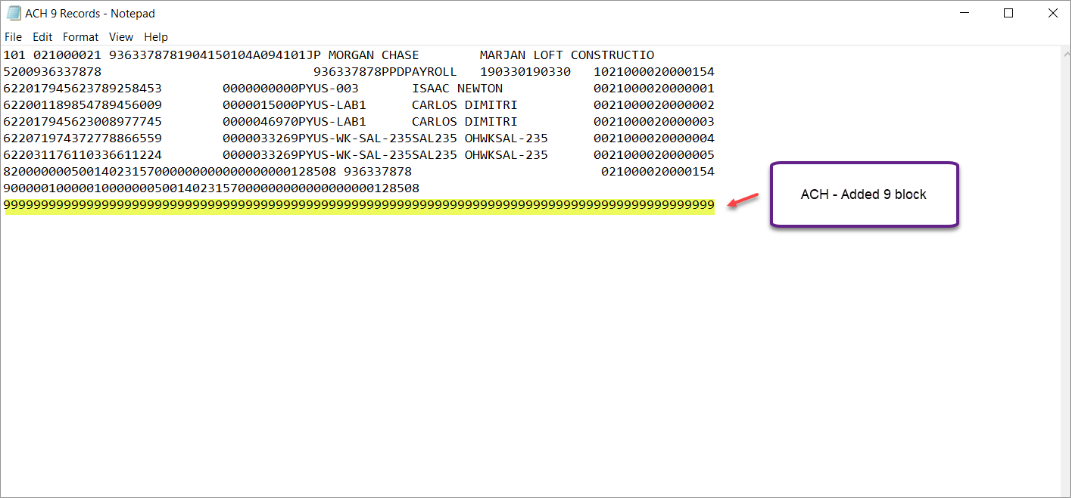
Add 9 blocks at the bottom of ACH – Checkbox
If this is checked, a line of 9s will be added at the bottom of the ACH bank format file that's generated from the Check EFT Register screen. If this is unchecked, the ACH bank format file will be created without a line of 9s.
AP EFT Distribution Method
Select whether Accounts Payable electronic fund transfers should be distributed by email or mail. This determines how new employees and vendors receive their checks.
NOTE: This choice can only be made if the ‘Create Vendor From Employee’ checkbox is checked in the General tab.
Direct Deposit Stub Secure Password
From the drop-down menu, select the format for the password used when emailing a secure PDF Direct Deposit Stub.
Rules – Tab
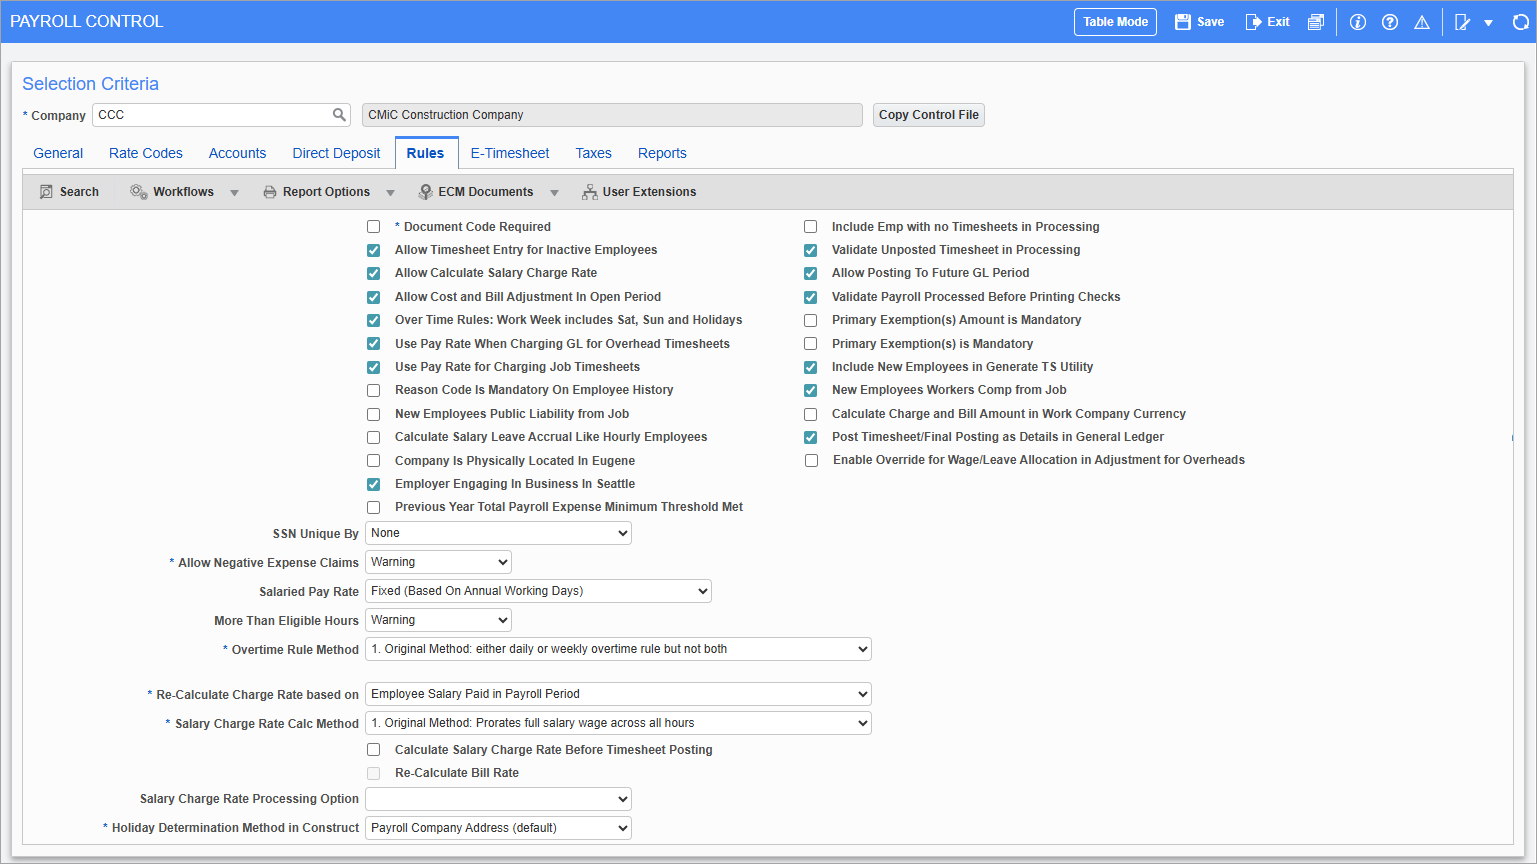
Pgm: PYCOMPRO – Payroll Control; standard Treeview path: US Payroll > Setup > Company > Control – Rules tab
The Rules tab allows for the customization of data entry, processing, and cost/billing processes, as well as impacting on the Human Resources module.
Document Code Required – Checkbox
Check this box to make document code entry mandatory in timesheet entry screens as well as for expenses, benefits/deductions, and tax overrides.
Allow Timesheet Entry for Inactive Employees – Checkbox
Depending on payroll rules, timesheets may need to be entered for inactive employees. If this is required, then check this box.
If checked, timesheet data may be entered for employees prior to their hire date, after a layoff/termination, or after their death.
If this box is unchecked, terminated employees will be prevented from logging time in the Timesheet Entry screen (in the JSP E-Time module and the Construct ESS app) and from being paid for days beyond their termination date. Payroll administrators can record time for inactive employees via the Timesheet Entry screen in the US Payroll module.
In Crew Time, time is entered by the foreman or project manager and not by the employee directly. To assist with visibility, the employee’s inactive status is already displayed on the screen so that the foreman or PM can easily identify inactive employees.
Allow Calculated Salary Charge Rate – Checkbox
If this is checked the system allows for the re-allocation of charge rates to job cost according to the actual hours worked instead of the standard hourly rate.
For example, a salaried employee gets paid $400 per week for a 40 hour week at a rate of $10 per hour. However, when the timesheets were entered for this employee 42 hours were charged to a job. This means that the job was charged $420 while the employee only made $400.
By checking this box, the system pro-rates the salary charges to the job and re-allocate the job at $9.52 per hour.
Allow Cost and Bill Adjustments in Open Periods – Checkbox
If this box is unchecked cost and billing adjustments may only be done in fully processed and posted pay periods that are considered to be closed. Adjustments to current timesheets must be done by reversing the original transaction.
Over Time Rules: Work Week includes Sat, Sun and Holidays – Checkbox
If this box is unchecked, overtime rules are only applied to time worked Monday through Friday. If checked, time worked on Saturdays, Sundays, and holidays is included in regular overtime calculation, and special rules for Saturdays, Sundays, and holiday overtime are ignored.
NOTE: The 'Over Time Rules: Work Week includes Sat, Sun and Holidays' box must be checked whenever the work week includes a weekend, even if the company has no weekend or holiday rule to ignore. Otherwise, the system will exclude weekend hours when applying overtime rules.
Use Pay Rate When Charging the General Ledger for Overhead Timesheets – Checkbox
If checked, the employee’s pay rate is used when processing overhead timesheets through GL. Otherwise, the system uses the default charge rate.
Use Pay Rate For Charging Job Timesheets – Checkbox
If checked, an employee’s pay rate will be used when posting job timesheets. Otherwise, the system uses the default charge rate.
Reason Code Is Mandatory On Employee History – Checkbox
If this box is checked, a reason code is required when adding a history record in the Employment History Maintenance screen.
New Employees Public Liability from Job – Checkbox
If this box is checked, the ‘Public Liability from Job’ box is checked on the Employee Profile by default.
Calculate Salary Leave Accrual Like Hourly Employees – Checkbox
Check this box to calculate leave accrual for salaried employees as if they were hourly employees.
Company Is Physically Located In Eugene – Checkbox
Check this box if the company is physically located in Eugene, OR to allow Vertex to calculate Eugene payroll taxes (e.g., the Eugene Community Safety Payroll Tax). By default, this box is unchecked.
This field requires the 'Use New Vertex Section When Calculating Taxes' box to be checked on the Payroll tab of the System Options tab in the System Data module. For more information, please refer to System Data - System Options - Payroll - Tab.
Employer Engaging In Business In Seattle – Checkbox
Check this box if the employer engages in business in Seattle, WA to allow Vertex to calculate Seattle payroll taxes (e.g., the Seattle Payroll Expense Tax). By default, this box is unchecked.
This field requires the 'Use New Vertex Section When Calculating Taxes' box to be checked on the Payroll tab of the System Options tab in the System Data module. For more information, please refer to System Data - System Options - Payroll - Tab.
Previous Year Total Payroll Expense Minimum Threshold Met – Checkbox
Check this box when the previous year's total payroll expense minimum threshold is met. This checkbox is only enabled when the 'Employer Engaging In Business In Seattle' box is checked and is used in the calculation of the Seattle Payroll Expense Tax.
NOTE: For more information on the Seattle Payroll Expense Tax thresholds, please visit Seattle Payroll Expense Tax.
This field requires the 'Use New Vertex Section When Calculating Taxes' box to be checked on the Payroll tab of the System Options tab in the System Data module. For more information, please refer to System Data - System Options - Payroll - Tab.
Enable Override for Wage/Leave Allocation in Adjustment for Overheads – Checkbox
Check this box to manually override department and account values instead of using the default values from wages (i.e., from the Employee Profile screen) or leaves (i.e., from the Company Leaves screen). The default value is unchecked. This field is hidden by default and can be added using the Lite Editor.
When checked, the leave department and account (for a G-line entry) in the Adjustment Details section of the Adjustment Entry screen will default from the Timesheet Entry screen and can be overriden if required. When disabled, the leave department and account (for a G-line entry) in the Adjustment Details section will default from the Company Leaves screen. This also applies to the Mid-Year Pay History screen and final postings.
Include Employees who have no Timesheets in Processing – Checkbox
Check to allow processing of employees, including those on salary, with no timesheets for the current period. This can be overridden in the Payroll Processing screen to include/exclude employees with no current timesheets.
Validate Unposted Timesheet In Processing – Checkbox
If this box is checked, payroll is not processed if unposted timesheets are found for the period.
Allow Posting in Future GL Period – Checkbox
Check this box to allow posting in future GL periods.
Validate Payroll Processed Before Printing Checks – Checkbox
If this box is checked the system does not allow checks for salaried employees to be printed without processing the payroll first. If unchecked, checks can be printed right after timesheet posting.
Primary Exemption(s) Amount Is Mandatory – Checkbox
If this box is checked the primary exemption amount must be entered in the Tax tab of the Employee Profile or when updating a history record. The exemption amount is also mandatory when updating exemptions in the Tax Exemptions pop-up in the Employee Profile.
Primary Exemption(s) Is Mandatory – Checkbox
If this box is checked, the number of exemptions amount must be entered in the Tax tab of the Employee Profile or when updating a history record.
Include New Employees in Generate TS Utility – Checkbox
If this box is checked, new employees are included in the generate timesheet utility by default and the ‘Include In Generate Timesheet Utility’ box is automatically checked for new employees.
New Employees Workers’ Comp from Job – Checkbox
If this box is checked, the ‘Workers’ Comp from Job’ box is checked on the Employee Profile by default.
Calculate Work and Bill Amount in Work Company Currency – Checkbox
Check this box to calculate all entered or charged company time in the currency selected in the Company Currency field in the Company Setup screen in the General Ledger module
Post Timesheet/Final Posting as Details in General Ledger – Checkbox
Check this box to group timesheet details by job in the General Ledger Final Posting Report.
SSN Unique By
Depending on how payroll should be run, employee SSN numbers may be unique in certain circumstances. Select the required validation. The default option of “None” means that there is no verification that an employee does not already exist in the database in any company.
SSN Unique By settings impact both Payroll and Human Resources in determining whether a SSN can exist in more than one place. This may impact companies that use more than one company code.
NOTE: There also exists a ‘SSN Unique by Employee Table’ checkbox in System Options (standard Treeview path: System > Setup > System Options – Payroll tab – Other section). If this box is checked then no two employee profiles for the selected company may have the same SSN.
Allow Negative Expense Claims
Select “Yes” if negative expense claims by employees are allowed, select “No” if they are not, and select “Warning” to receive a warning if a negative expense claim exceeds one quarter of the employee’s gross pay.
Salaried Pay Rate
Select the formula to be used when calculating the pay rate in timesheets for salaried employees belonging to semi-monthly pay runs. Select “Variable” to change the hours in the formula to match the hours in the current pay period and select “Fixed” to change the hours in the formula to match the hours in the current year.
NOTE: If converting from mPower 2000, this should be set to “Fixed”, while users converting from mPower 2002 should select “Variable” in order to maintain the previous processing functions.
More Than Eligible Hours
Select warning levels for employee timesheet entry of leave hours (for example, sick time or vacation time) that exceed their allowances.
Select “Yes” to allow entry of leave time that exceeds allowance, select “No” to prevent entry of leave time that exceeds allowances, and select “Warning” to allow entry with a warning when leave time exceeds allowance.
NOTE: This setting will be overridden by the Allow More than Eligible Hours field on the Advanced Setup – Tab of the Company Leaves screen.
Overtime Rule Method
Select the way overtime rules are calculated for the company. The available options are:
-
Method 1 (Original Method): Overtime can be calculated based on daily or weekly hours, but not both.
-
Method 2 (Advanced Method): Overtime can be calculated based on daily and weekly hours worked. Overtime is applied to the most recently entered hours first.
-
Method 3 (Expanded Method 2): Similar to the advanced method. In this case, multiple layers of overtime rules can be applied at once. For example, there could be separate job, union, and company layers, all with their own methods of overtime calculation. This method takes longer to process and may require several passes depending on the setup of the component rules.
-
Method 4 (Expanded Method 3): Similar to the advanced method. In this case, multiple layers of overtime rules can be applied at once. For example, there could be separate job, union, and company layers, all with their own methods of overtime calculation. As well, shift layers of overtime rules can be applied to order timesheets by shift hierarchy before overtime is calculated. This method will handle situations where multiple timesheets exist for the same employee on the same date but with different shifts. This method takes longer to process and may require several passes depending on the setup of the component rules.
Re-Calculate Charge Rate based on
Select which option to use when re-calculating the salary charge rate. The available options are:
-
Employee Salary Paid in Payroll Period: This is the original option which is based on an existing calculation and on employee salary paid in the payroll period.
-
Employee Total Cost Charge Per Period by Default Charge Rate (Profile): This option is based on the total cost for the period based on the employee default charge rate set up in the Employee Profile. This allows the charge out rate set on the Employee Profile to be used.
Salary Charge Rate Calc Method
Select the overtime rule and salary charge rate calculation methods. The available options are:
-
Original Method: The full salary wage is prorated across all hours worked.
-
Advanced Method: Wages and hours are adjusted based on types of leave taken by the employee.
Calculate Salary Charge Rate Before Timesheet Posting – Checkbox
Check this box to calculate the charge rate for salary employees before the timesheet is posted. Checking this box grants access to the ‘Re-Calculate Bill Rate’ checkbox and the Salary Charge Rate Processing Option field directly below.
Re-Calculate Bill Rate – Checkbox
Check this box to re-calculate the bill rate.
Salary Charge Rate Processing Option
Select further salary charge rate processing options, if applicable. Options include:
-
Calculate Pro-Rated Salary Charge Rates: This option calculates salary charge rates only.
-
Calculate Pro-Rated Salary Charge/Pay Rates: This option calculates salary charge and pay rates.
Holiday Determination Method in Construct
Select the holiday determination method for Construct ESS for employees whose statutory holiday entitlements are governed by employment standards legislation based on where they work. The holiday schedule will be based on the following location options:
- Payroll Company Address: This is the default option.
- Work Location or Work Province (CA): This option uses the employee's work location or work province (for employees of Canadian companies), as defined in the Company – Tab of the Employee Profile screen.
- Employee Address: This option is based on the Vertex geo code from the employee's mailing or physical address, as defined in the Address – Tab of the Employee Profile screen.
E-Timesheet – Tab

Pgm: PYCOMPRO – Payroll Control; standard Treeview path: US Payroll > Setup > Company > Control – E-Timesheet tab
This screen need only be used if the E-Time application is being used for timesheet data entry, either for employees, or for supervisors/administrators.
The settings on this screen offer administrator control over what employees may enter into their timesheets. Additionally, the requirement of whether to automatically or manually approve timesheets is controlled here. Entry of data that impacts job cost, but not job billing, is also controlled by this screen.
Maximum Normal Working Hours
Enter the maximum number of normal working hours that each employee can enter via E-Time. Time exceeding this limit is not allowed in E-time, however it can be entered through the normal timesheet entry in Payroll.
Maximum Job Hours
Enter the maximum hours allowed for a job that each employee can enter via E-Timesheets.
Filter Phases For Default Category – Checkbox
This checkbox is used in conjunction with the Default Category field, which is also located on the E-Timesheet tab. When this box is checked, the Cost Code field's LOV (i.e., phases) on E-Timesheets will be filtered to show only those cost codes that have the default category specified in the Default Category field. When this box is checked, the Default Category field is mandatory.
Default Category
Enter/select the default category for the Category field in E-Timesheets. This field is used in conjunction with the 'Filter Phases For Default Category' checkbox, which is also located on the E-Timesheet tab. When this box is checked, the Default Category field is mandatory. When a default category is specified in this field, the Cost Code field's LOV (i.e., phases) on E-Timesheets will be filtered to show only those cost codes that have the specified category.
If this field is left empty, Enterprise will retrieve all cost codes (i.e., phases) for all categories with the ‘E-Time’ box checked in the
Default Current Period From Company Pay Period – Checkbox
If this box is unchecked, the current calendar year and period from the system date are defaulted to those fields. If it is checked the first open year and period in the Company Pay Period screen are the default values.
Automatic Timesheet Approval – Checkbox
Check this box if the company requires specific approval for the timesheets entered via E-Time.
Non-Billable Hours Post to Job Cost – Checkbox
In E-Time it is possible to pass entered nonbillable hours through to jobs. The E-Time nonbillable hours type can be used as a memo transaction in the Payroll system or the nonbillable hours can be posted through to the Job Cost module, thereby updating the quantities on the job.
When this box is checked the quantity of hours that are nonbillable is reflected in the job cost. If this is not checked the only reporting on nonbillable hours is via Payroll Timesheet reports.
Allow E-Expense Posting Through Timesheet Posting – Checkbox
If this box is checked all approved E-Expenses are available for posting in the Timesheet Posting screen. A document code, created at the time of the E-Expense entry containing the prefix EXP, the employee code, and the year/period can be selected from the LOV and posted. Also, if this box is checked all tax fields become available in the E-Expense screen, giving the user an option to enter up to three taxes for each line.
If this box is left unchecked E-Expenses are posted at the time of the final payroll posting.
Allow Non-Billable Hours Timesheets – Checkbox
If this box is checked, the nonbillable hour type can be entered in timesheet entry.
Allow Job Cost Hours Timesheets – Checkbox
If this box is checked, the job cost hour type can be entered in timesheet entry.
Job Cost Hours for Billing Only – Checkbox
If this box is checked, job cost hours will be used for billing only.
Allow All Allocations When Access Code Allows None – Checkbox
If this box is checked, all allocations are allowed even when the Access Code Administration screen does not allow any allocations.
Allow Other Hours Entry on E-Timesheet Screen – Checkbox
If this box is checked, then other hour types including normal working hours can be entered in JSP E-Timesheet entry.
Consider OT and DOT Regular Work Week Hours – Checkbox
Check this box to consider overtime and double-overtime as regular work week hours.
Comments – E-Expense – Checkbox
If this box is checked, comments are mandatory when entering E-expenses.
Comments – E-Time – Checkbox
If this box is checked, comments are mandatory when entering timesheets.
Overhead Time Account – Checkbox
If this box is checked, then the department and account specified on the Employee Profile screen that defaults in overhead lines in E-Time timesheet entry are not editable.
Allow Shift Selection – Checkboxes
Select the shifts allowed in the Job Pay Rates Maintenance screen and Timesheet Entry screen. Select the shift type to default in Timesheet Entry from the Default Shift drop-down list.
Default Shift
The Default Shift field controls what shift will appear automatically in the Shift Code field during timesheet entry. Leave this field blank to have that automatic value be “All Shifts”.
Audit Timesheet – Checkbox
Check this box to store all audit history of employee timesheet activities in an audit table. The audit stores the E-Timesheet user access code, action, date, time, and comments.
Check this box to allow access to the Reason for E-Time Change Entry field's drop-down list.
NOTE: If the 'Audit Timesheet' box is checked, the employee is not allowed to enter/save time in future dates within the same pay period. This only applies to NWHR, OVHR, and DTHR hour types. If the employee is entering vacation hours, the future dates will be open to enter hours.
NOTE: The 'Audit Timesheet' checkbox is only available in the US Payroll module for companies with a "US" country code.
Reason For E-Time Change Entry
Select whether or not the user has to specify a reason for change. Options available are "No", "Optional", and "Mandatory".
Approver Email
Select whether a personal email or work email address should be used during the timesheet/expense approval process. Options available are "Email" and "Work Email". The option selected here will determine which employee email address will default from the Address tab of the Employee Profile screen when timesheets and expenses are being approved/unapproved. The email address will default the Access Code screen of the E-Time module. Refer to E-Time - Access Codes for more information.
Minimum Hours Code
Enter/select the minimum hours code. This is used for salaried employees. The system uses the Working Hours/Year and the Working Days/Year fields from the Personal tab of the Employee Profile to calculate the number of working hours per day. This is multiplied by the number of normal working days in the E-Time period (e.g. Monday to Friday). This is then multiplied by the minimum code percentage to get the minimum hours required for the individual employee for that period. The minimum hours required is rounded to a whole number and is applied in E-Timesheet entry.
Hours Offset
Enter the number of hours by which to offset timesheet entry. For example, if timesheet entry becomes available at midnight, set this value to “-4” to change the initial entry time to 8 PM.
Reports – Tab
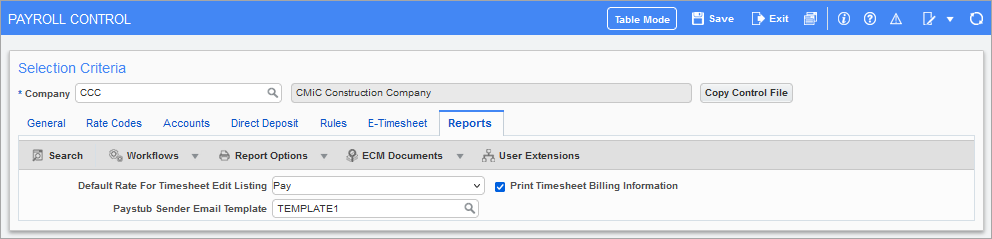
Pgm: PYCOMPRO – Payroll Control; standard Treeview path: US Payroll > Setup > Company > Control – Reports tab
Default Rate for Timesheet Edit Listing
Select the default rate for timesheet edit listing reports.
Print Timesheet Billing Information – Checkbox
Check this box to specify if details of the bill, pay, and charge rate should print on the timesheet edit list and the adjustment edit list.
Paystub Sender Email Template
Enter/select a paystub email notification template. These templates are created and maintained in the US Payroll - PY Email Templates screen. When a template is selected, it will be used for the email notification when emailing paystubs to direct deposit employees using the US Payroll - Pay Stub Printing screen.