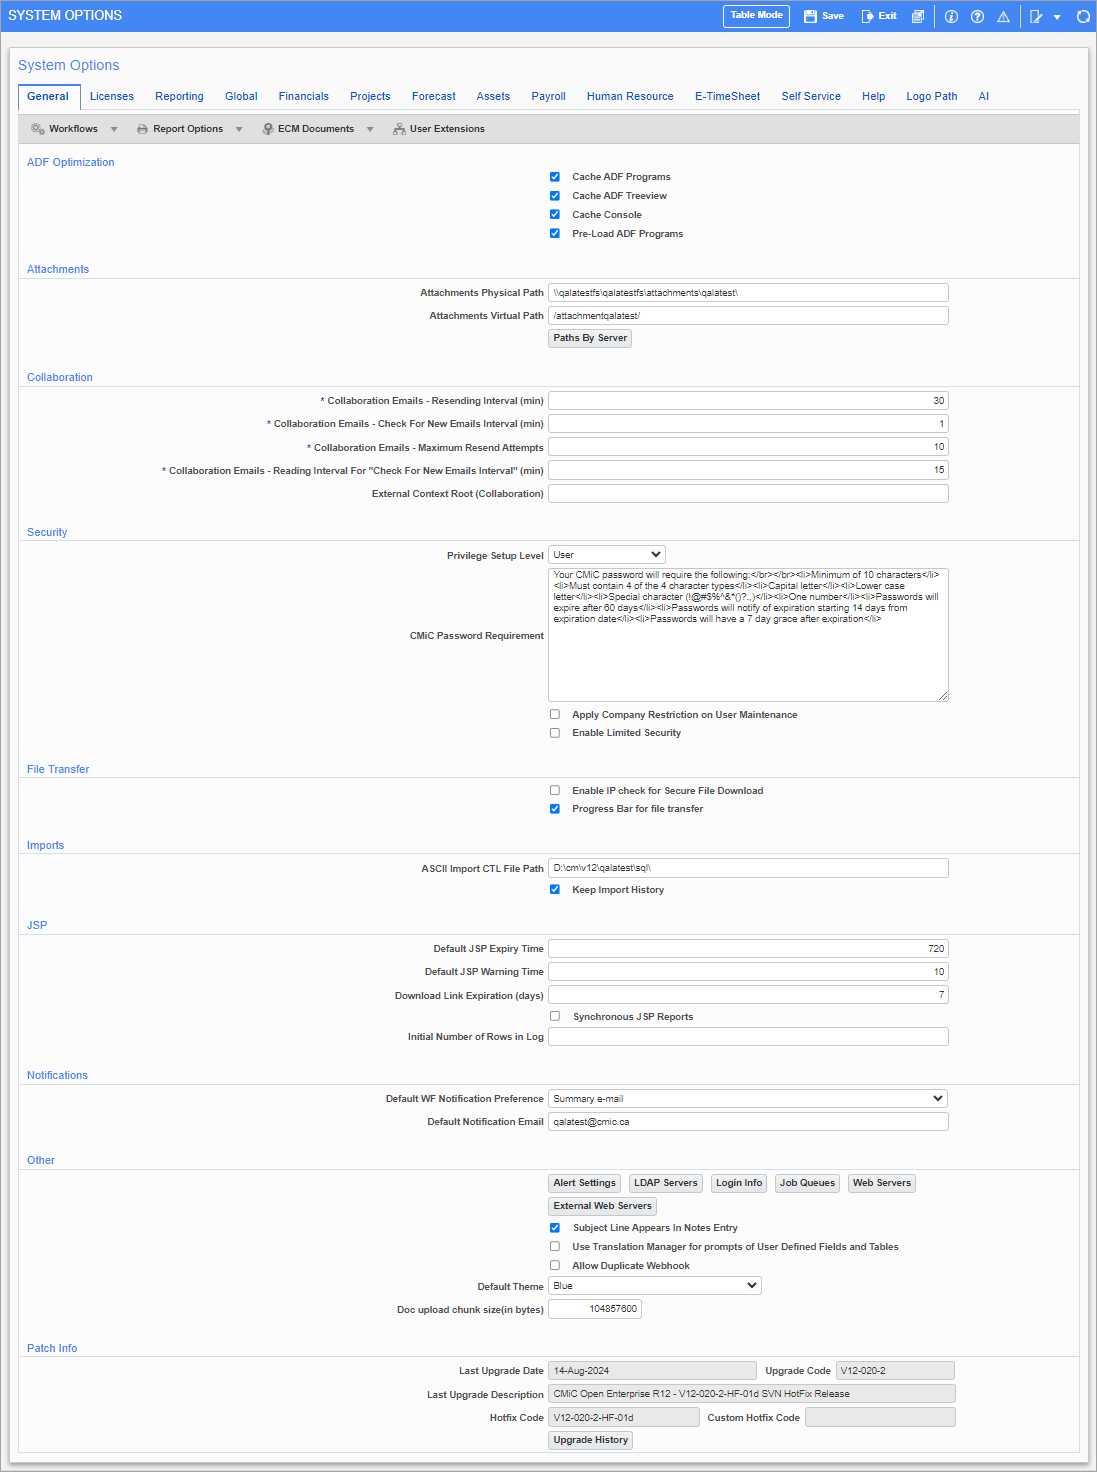
Pgm: SYSOPT – System Options; standard Treeview path: System > Setup > System Options – General tab
ADF Optimization
Cache ADF Programs - Checkbox
If checked, loaded ADF screens will be cached on the user’s computer, so that they load quicker upon subsequent launches.
Cache ADF Treeview - Checkbox
If checked, the ADF Treeview loaded for a user’s Enterprise Console will be cached on their computer.
Cache Console - Checkbox
If checked, a user’s Enterprise Console will be cached on their computer.
Preload ADF Programs - Checkbox
If checked, ADF screens will be pre-loaded.
Attachments
Attachments Physical Path, Attachments Virtual Path
These fields should contain the physical path and the virtual path mapped to the physical path. Ensure that this path is entered with an ending slash.
The [Paths by Server] button allows the user to define attachment paths from different servers. If the user is using more than one type of server, (i.e. Windows and Linux), then the attachment path for the Linux server should be set up in this window.
[Paths by Server] - Button
This button’s pop-up is used to define attachment paths from different servers. If more than one type of server is being used (i.e., Windows and Linux), then the attachment path for the Linux server should be set up in this pop-up.
Collaboration
Collaboration Emails - Resending Interval (min)
Resending interval for failed emails/notifications in CMiC Field module, in minutes.
Collaboration Emails - Check For New Emails Interval (min)
Indicates how often to check for new emails/notifications in CMiC Field module, in minutes.
Collaboration Emails - Maximum Resend Attempts
Maximum attempts to resend an email/notification in CMiC Field module.
If “-1” is entered (without quotes), emails/notifications will not be resent if failed.
Collaboration Emails - Reading Interval For "Check For New Emails Interval" (min)
Relevant to the CMiC Field module; indicates how often to read the “Collaboration Emails - Check For New Emails Interval” setting.
External Context Root (Collaboration)
This field is used to specify the context root URL that should be accessed by external collaborators for responding to PM emails/notifications.
When entered, it will be used when generating the download link in the e-mail that goes out to vendors. When the field is left blank, the system will behave as it currently does.
Generic URL Format:
<Collaboration Server URL>/<Environment>
Ex. https://somecompany-projects.com/cmicprod/
Security
Privilege Setup Level
This field provides functionality to set up privilege at user level and role level.
Privilege Setup Level as “User”
When a role is assigned to a user, a set of role level privileges (System/Configuration) are inherited by the user. When a role is removed from the user, the privileges are not removed, and they always stay with the user.
Privilege Setup Level as “Role”
When the option is set as “Role”, the users inherit the privileges from the role and the privileges are not updateable, as the column is locked down in the screen. Upon removal of any role, all the privileges are removed from the user as well. If there is more than one role with common privileges, then the removal of a role will not remove the common privilege, as they are associated with other roles.
CMiC Password Requirement
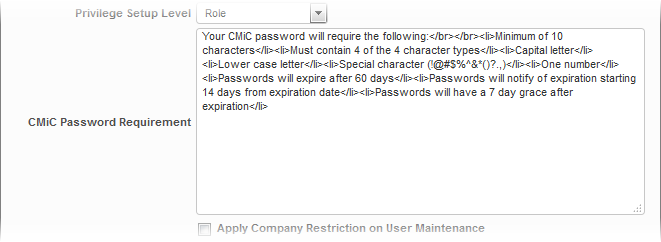
Example of CMiC Password Requirement text
The CMiC Password Requirement field is used to enter password requirements that will appear on the Change Password screens. Users can add a customized message to this screen, and it will not influence the rules set in LDAP.
HTML text should be entered in this field; otherwise, the text will appear in plain text all in one line.
For example, enter HTML text as shown framed in red in the screenshot above. Click on the user name in the top right-hand corner of the console to launch the User Settings pop-up window. In the User Settings pop-up window, click on the ‘Change Password’ link to open a second pop-up window where the specified password requirements will be displayed.
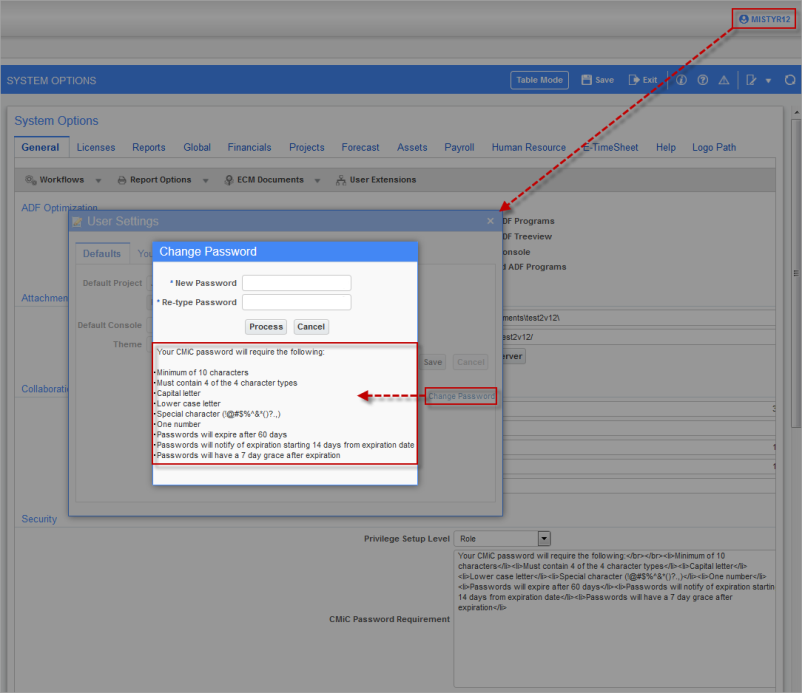
Example of CMiC Password Requirement message displaying on the Enterprise Change Password pop-up window
The password requirements are a message indicating the rules the user should follow when creating a new password. No validation is performed on the password requirements.
The user should insert a new password and save it by clicking on the [Process] button.
NOTE: In JSP programs, the password requirements will appear on the User Maintenance screen in the Security menu.
Apply Company Restriction on User Maintenance - Checkbox
If checked, prevents users from seeing companies they do not have access to in the User Maintenance screen (standard Treeview path: System > Security > Users > User Maintenance – Company Access tab).
Enable Limited Security - Checkbox
When checked, this option will modify the security setting so that only a user with ASSIGNROLE privilege may modify their own user account, or make any changes related to any role that is assigned to them. When unchecked, the ASSIGNROLE privilege is not used in determining security locks related to users or roles.
File Transfer
Enable IP Check for Secure File Download - Checkbox
Deprecated.
Progress Bar for File Transfer - Checkbox
If checked, whenever a user invokes the ‘Send to Spreadsheet’ function, the system will display a progress bar indicating to the user that the data transfer is in progress.
Imports
ASCII Import CTL File Path
This field should contain the full path where all the ‘CTL’ files reside. CTL files are used in all the CMiC data import routines. The CTL files are installed in the SQL directory. Ensure that this path is entered with an ending slash.
Keep Import History - Checkbox
If this field is checked, the system will automatically keep a log of all foreign batch imports and batch deletes. This only applies to importing data via the CMiC Import Utilities. The default for this field is unchecked.
JSP
Default JSP Expiry, Default JSP Warning Time
These fields indicate in minutes, the amount of time a JSP page can be inactive before it expires. If a page expires, the user will need to re-login. You should also specify how long before a page expires. Users should receive a warning that it is about to expire.
Download Link Expiration (days)
This field is used for controlling when the document download link expires when downloading documents in the Document log in CMiC Field. The number of days entered here in this field is used to set the date that defaults in the Set Expiration Date in the Download Selected Documents pop-up window which is launched when downloading documents.
Synchronous JSP Reports - Checkbox
If this field is checked, the printing of reports in JSP will utilize ‘synchronous’ mode.
NOTE: The 'Synchronous JSP Reports' checkbox is no longer supported and should be left unchecked.
Initial Number of Rows in Log - Checkbox
This field is used to set the number of rows initially displayed in a log in CMiC Field at the system level. This number can be changed at the user level in the User Defaults tab of the CMiC Field - Contacts screen in CMiC Field. If an initial number of rows is set at the user level, then it will take precedence over the limit set at the system level.
Notifications
Default WF Notification Preference
Selection options for which type of Workflow Notification emails will be sent from the system. Options include:
-
Summary e-mail
-
HTML e-mail with attachments
-
HTML e-mail with no attachments
-
Plain Text e-mail
-
Plain Text e-mail with HTML attachments
Default Notification Email
This is the email to send GL Balances notification to if there are any errors during the Nightly Recalculation of GL Balances set up in the Job Queues screen.
Other
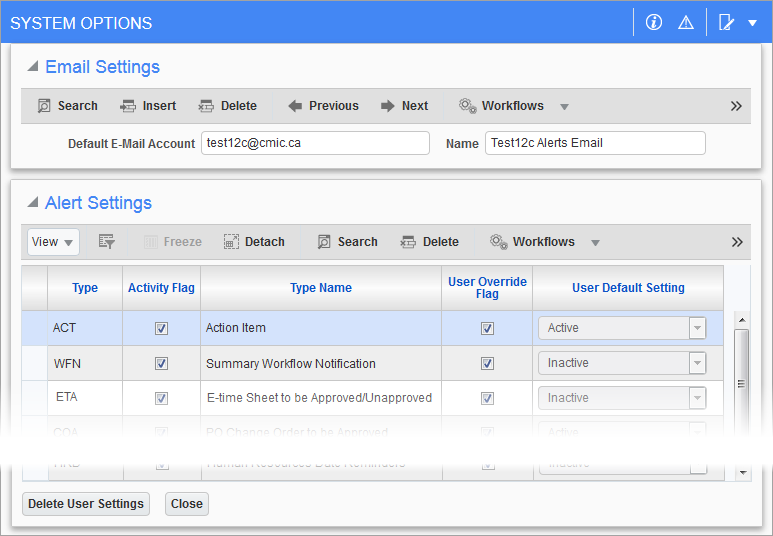
Pop-up window launched from [Alert Settings] button on System Options screen; standard Treeview path: System > Setup > System Options – General tab
The pop-up window launched from the [Alert Settings] button on the System Options screen allows users to define alert settings for Action Items (ACT), E-Time Timesheet Approvals (ETA), and Workflow Notifications (WFN).
Please refer to Alerts for more detailed information.
[LDAP Servers] - Button
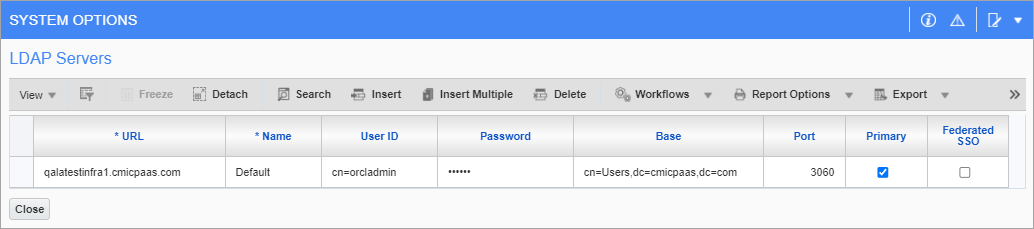
Pop-up window launched from [LDAP Servers] button on System Options screen; standard Treeview path: System > Setup > System Options – General tab
NOTE: The [LDAP Servers] button is for Enterprise clients only and is not available for Cloud clients.
The CMiC system infrastructure allows more than one LDAP server to access a single database. This allows for the separation of different types of users. For example, external collaborators and/or HR applicants may be connecting via Server A, while Enterprise users could be set up to user Server B. This window is where the LDAP servers are defined. There must be at least one entry in this window.
The following table describes the fields on this screen.
| Field | Description |
|---|---|
|
URL |
This is the URL for the LDAP server being defined. Depending on your system setup, this may need to be the IP Address. Check with your System Administrator. This is a required field. |
|
Name |
This is a unique name for the server. This is for reference only and is used for LOVs whenever an LDAP server is required. |
|
User ID |
This is the KEY for LDAP Administrator - if you are unsure what to put here, contact your System Administrator or CMiC Technical Services. |
|
Password |
This is the password for the LDAP Administrator. Normally, ORCLADMIN. |
|
Base |
This is the KEY for the LDAP server. If you are unsure what to put here, contact your System Administrator or CMiC Technical Services. |
|
Port |
This is the HTTP port used to contact the LDAP server. |
|
Primary - Checkbox |
If this field is checked, then this LDAP server will be the default value that is shown when a new user is created. There can only be one Primary LDAP server. |
| Federated SSO - Checkbox | Used to indicate if the server is using Federated SSO. |
[Login Info] - Button
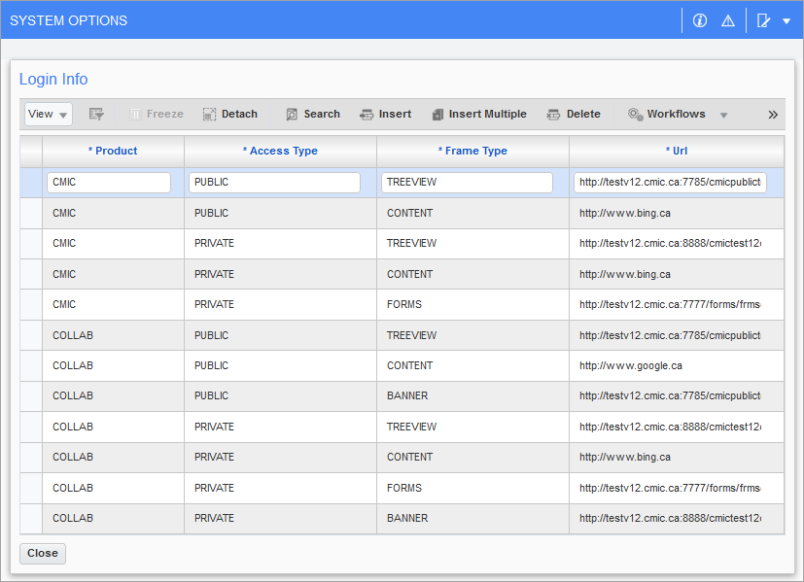
Pop-up window launched from [Login Info] button on System Options screen; standard Treeview path: System > Setup > System Options – General tab
NOTE: The [Login Info] button is for Enterprise clients only and is not available for Cloud clients.
This button opens a pop-up window where the user defines what displays within the frames of the CMiC applications and the matching URL for both public and private access. Public access is before a user has entered their single sign-on user name and password. Private is for what they see after having logged in. For example, before the user signs on, the content frame might display the user’s company webpage, while after the user has logged in, it may be a CMiC dashboard page.
The data in this screen is pre-configured when the user’s system is set up. The only rows that can/should be changed by anyone but CMiC are the “CONTENT” type records. This allows the user to change what is displayed on the “Content” area for both the public and private pages.
One of the entries in this pop-up is used to obtain the root URL when creating links to programs from other programs, so it needs to point to the application server or load balancer, depending on your configuration. The record used will be one of the records for product COLLAB and access type PRIVATE that contains SDMENU (not case sensitive) in its URL. If none or more than one of the COLLAB/PRIVATE records contains SDMENU, one will be picked randomly.
NOTE: Depending on the user’s configuration, URLs can be either relative or absolute.
![Screenshot of pop-up window launched from [Job Queues] button on System Options screen.](../../../../Resources/Images/SD_12c/SD_SystemOptionsJobQueuesButton_800x525.png)
Pop-up window launched from [Job Queues] button on System Options screen; standard Treeview path: System > Setup > System Options – General tab
NOTE: The [Job Queues] button is for Enterprise clients only and is not available for Cloud clients.
This Job Queues pop-up window lists all the jobs that are defined in the database as an Oracle job. For each job, the user has the ability to change/set the required interval and to enable/disable the job. The interval defines the repetition cycle of the job. Some jobs are defined to run once a day, others more frequently.
Please refer to the Oracle Manual – DBMS Scheduler for more information on how to configure the frequency of jobs.
The following are details about the clauses used to configure the frequency of jobs from the following webpage about Oracle’s DBMS Scheduler: https://docs.oracle.com/database/121/ARPLS/d_sched.htm#ARPLS72235.
|
Clause |
Description |
|---|---|
|
FREQ |
This specifies the type of recurrence. It must be specified. The possible predefined frequency values are YEARLY, MONTHLY, WEEKLY, DAILY, HOURLY, MINUTELY, and SECONDLY. Alternatively, specifies an existing schedule to use as a user-defined frequency. |
|
INTERVAL |
This specifies a positive integer representing how often the recurrence repeats. The default is 1, which means every second for secondly, every day for daily, and so on. The maximum value is 99. |
|
BYMONTHDAY |
This specifies the day of the month as a number. Valid values are 1 to 31. An example is 10, which means the 10th day of the selected month. The user can use the minus sign (-) to count backward from the last day, so, for example, BYMONTHDAY=-1 means the last day of the month and BYMONTHDAY=-2 means the next to last day of the month. |
|
BYDAY |
This specifies the day of the week from Monday to Sunday in the form MON, TUE, and so on. Using numbers, the user can specify the 26th Friday of the year, if using a YEARLY frequency, or the 4th THU of the month, using a MONTHLY frequency. Using the minus sign, the user can say the second to last Friday of the month. For example, -1 FRI is the last Friday of the month. |
|
BYHOUR |
This specifies the hour on which the job is to run. Valid values are 0 to 23. As an example, 10 means 10 a.m. |
|
BYMINUTE |
This specifies the minute on which the job is to run. Valid values are 0 to 59. As an example, 45 means 45 minutes past the chosen hour. |
|
BYSECOND |
This specifies the second on which the job is to run. Valid values are 0 to 59. As an example, 30 means 30 seconds past the chosen minute. |
The following are details about some of this screen’s options:
Compliance Related Nightly Database Scheduled Jobs
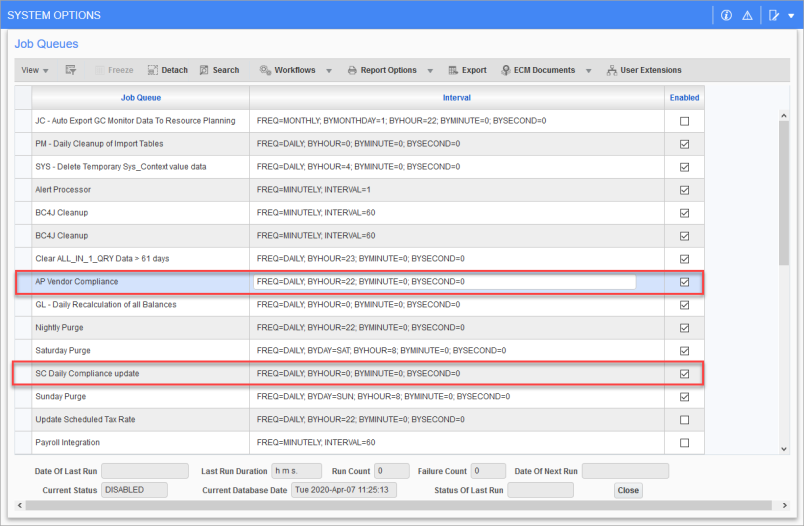
There are two compliance related, nightly database scheduled jobs in the system:
-
AP Vendor Compliance
-
SC Daily Compliance Update
To enable these backend nightly processes, check the 'Enabled' checkbox as shown in the screenshot above. In multi-tenancy environments, in addition to checking the job’s 'Enabled' checkbox, the 'Automatically Update Compliances' checkbox on the Financials tab of the System Options screen must also be checked, as shown in the screenshot below.
NOTE: The 'Automatically Update Compliances' checkbox is not relevant to single-tenancy Enterprise clients.
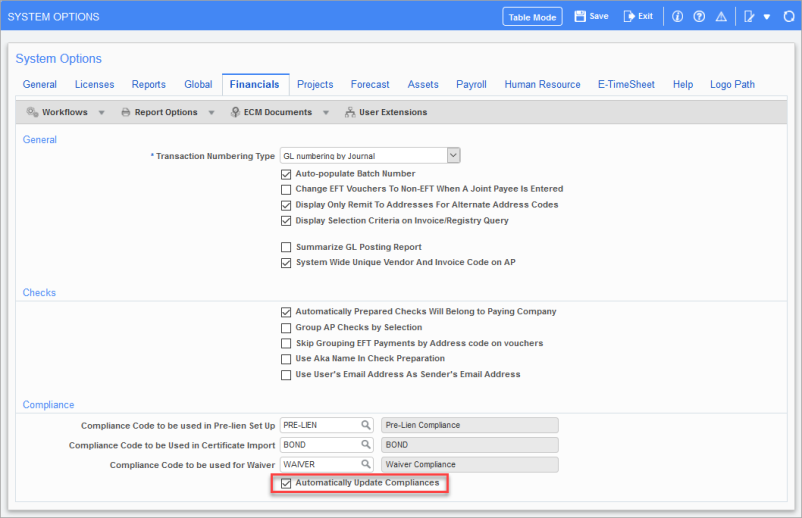
Pgm: SYSOPT – System Options; standard Treeview path: System > Setup > System Options – Financials tab
Once the settings have been enabled, the nightly processes will update compliances as described below.
AP Vendor Compliance: If enabled, updates all date-sensitive compliances at voucher level and voucher payment status where applicable. (Note: Only voucher level compliance status is updated.)
SC Daily Compliance Update: If enabled, updates all date-sensitive compliances at vendor level (if related to SC), SC level, and updates SC status. (Note: Voucher level compliance status is not updated, and voucher payment status is not updated.)
Payroll ACA Build Monthly Utility
If checked, an automatic monthly process builds ACA compliance data for each employee, for the previous month, using relevant employee information.
For details about this utility, please refer to the ACA Compliance (1095-C, 1094-C) Reporting Setup section in the Greenshades reference guide.
Concurrent License Audit
If checked, a job will run hourly and store audit information about the average hourly use of concurrent licenses. Every 15 minutes, a snapshot will be taken to compile an average, showing the user which clients are holding temporary licenses. The audit information is stored in a database table named DA.SYSCONCURRENT_LIC_AUDIT_TN. To learn more about using this job feature, refer to System Data - Auditing Concurrent License Usage.
[Web Servers] - Button
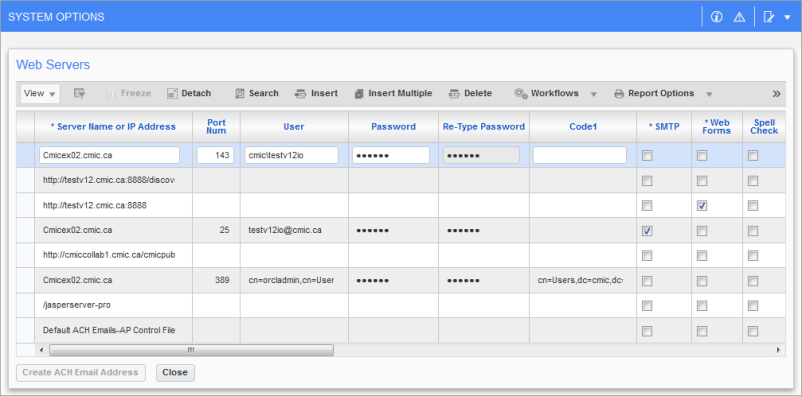
Pop-up window launched from [Web Servers] button on System Options screen; standard Treeview path: System > Setup > System Options – General tab
NOTE: The [Web Servers] button is for Enterprise clients only and must not be accessed by Cloud clients.
This pop-up window is used to define the various servers used by CMiC software, except LDAP servers.
In order for CMiC software to communicate with the different applications, the system needs to know server names and which functions the servers support. This screen is where this setup is done. Indicate next to each server, the type of task associated with the server.
For example, in order to have links in notification emails to Gateway users work properly, you must enter the URL to the CMiC Collaborate server appropriate to your environment in this pop-up window. If your environment is working with the Test environment of CMiC Collaborate, you must create a record with URL https://cmiccollaborate.com/cmictest/ with the 'GCS Server' box checked. If your environment is working with the Prod environment of CMiC Collaborate, you must create a record with URL https://cmiccollaborate.com/cmicprod/ with the 'GCS Server' box checked.
Each server can only be assigned one type of task. The following table describes the fields on this screen.
|
Field |
Description |
|---|---|
|
Server Name or IP Address |
This is a required field, and the information required will depend on the type of server being entered and the system configuration. |
|
Port Number, User |
These fields are only applicable to a Mail Server record. |
|
Password, Re-Type Password |
Enter a password for the server and re-type to confirm. |
|
Code 1 |
This field is currently used for Workflow Email and IO email authentication that uses Microsoft Graph. |
|
Server Type – Checkboxes |
Select the type of task associated with the server. Only one task can be checked (active) per server. Options for the type of tasks are as follows: SMTP, Web Forms, Spell Check, Discoverer, Remote Collab, Proxy, Brava, IMAP, RTI IMAP, Jasper, Live Cycle, Dashboard, Collab Server, Mobile Server, RTI Server, GCS Server, BIM Server NOTE: Proxy and Remote Collab are no longer required. |
|
[Create ACH Email Address] - Button |
This button becomes enabled when a row with the server type 'SMTP' checkbox is selected. The pop-up window launched from this button enables the creation of email addresses which become available in the Default ACH Email field on the AP Control File screen (standard Treeview path: Accounts Payable > Setup > Local Tables > Control File Options – Check tab). NOTE: Cloud clients may have to contact CMiC Support for setting up the ACH email address. |
[External Web Servers] - Button
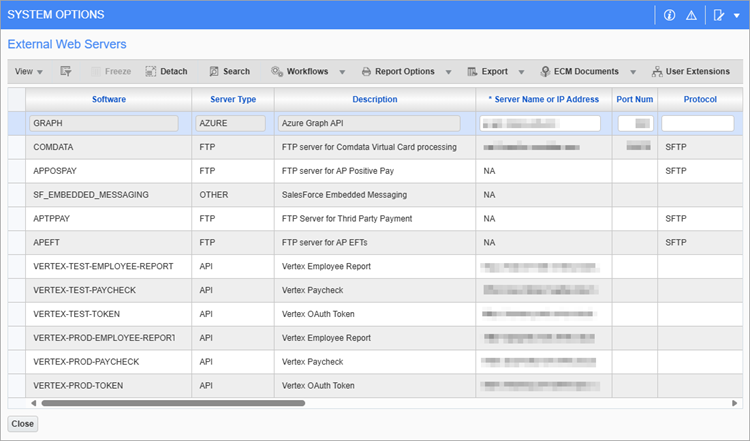
Pop-up window launched from [External Web Servers] button on System Options screen; standard Treeview path: System > Setup > System Options – General tab
NOTE: The [Web Servers] button is for Enterprise clients only and must not be accessed by Cloud clients.
This pop-up window is used to define the various external servers used by CMiC software. Each server can only be assigned one type of task. These records are normally updated by IT/DB admins only. The following table describes the fields on this screen.
|
Field |
Description |
|---|---|
| Software | This field is read-only and displays the type of software used for upload/download (e.g., COMDATA). |
| Server Type | This field is read-only and displays the usage type (e.g., FTP). |
| Description | This field is read-only and displays the server description. |
| Server Name or IP Address | This is a required field, and the information required will depend on the type of server being entered and the system configuration. |
| Port Number, User | These fields are only applicable to a Mail Server record. |
| Protocol | Enter the file transfer protocol (e.g., STFP). This is only applicable if the server type is "FTP". |
| Password, Re-Type Password | Enter a password for the server and re-type to confirm. |
| Directory Path | Enter the folder path to upload the file on the FTP server. If left blank, the file will be uploaded on the root folder. This is only applicable if the server type is "FTP". |
| Code 1, Code 2 | Enter the relevant codes, if required. |
| Encryption | Select the encryption type to be used for transferring data to this server. The drop-down menu contains two options: Null and PGP. This specifies the encryption type to be used when transmitting data to the server. Currently, only PGP is supported as a non-null value. |
| Public Key File | Enter the path to the public key file if the transmitted data needs to be encrypted. The text input field displays the path of the uploaded file selected via the Attachment pop-up window. This field supports up to 4,000 characters. |
| [Upload] - Button | Clicking this button opens the Attachments pop-up window allowing users to upload a file. The uploaded file’s path is then stored in the Public Key File field. |
NOTE: Only one server can be used at a time for uploading EFTs.
Vertex credentials and endpoints are configured in the External Web Servers pop-up, allowing users to define distinct configurations for multiple environments and integration types. Each entry includes the environment name, purpose (e.g., token retrieval, paycheck processing, address cleansing, and Geocode load), Client ID, Client secret, and an API endpoint URL.
Subject Line Appears in Notes Entry - Checkbox
The subject line for notes, system wide, can be enabled or disabled by this option. When checked, notes will have a subject line, up to 20 characters in length, to enter the note’s subject. If unchecked, notes will not have a subject line.
Use Translation Manager for Prompts of User Defined Fields and Tables - Checkbox
This field is relevant if using the Translation Manager tool. It is an option used for the translation of prompts for user extension fields and tables. If checked, the User Extension prompts will be available in Message Mode of the Translation Manager tool and can be translated and installed the same way as any other text available in the Message Mode. For more information,
Default Theme
The Default Theme field is used to set the default screen color (theme) at the system level. If a default theme is not chosen at the system level, and this field is left empty, then the CMiC default theme will apply.
It can be overridden at the user level. Click on the user name in the top right-hand corner of the console to modify the screen color in the User Settings pop-up window.
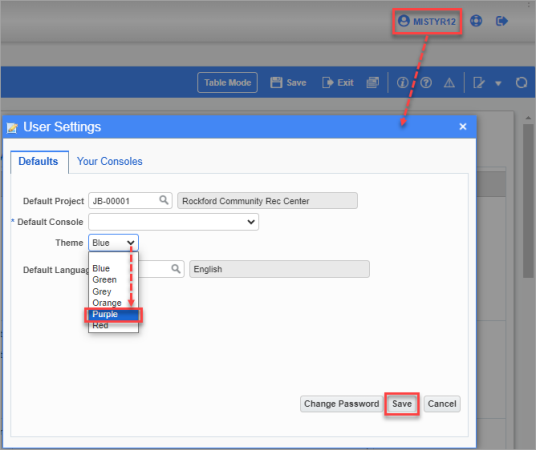
Example of pop-up window launched from User Settings icon
Save the new theme and refresh the screen. If a default theme is not chosen at the user level and this field is left empty, then the system level default theme will apply.
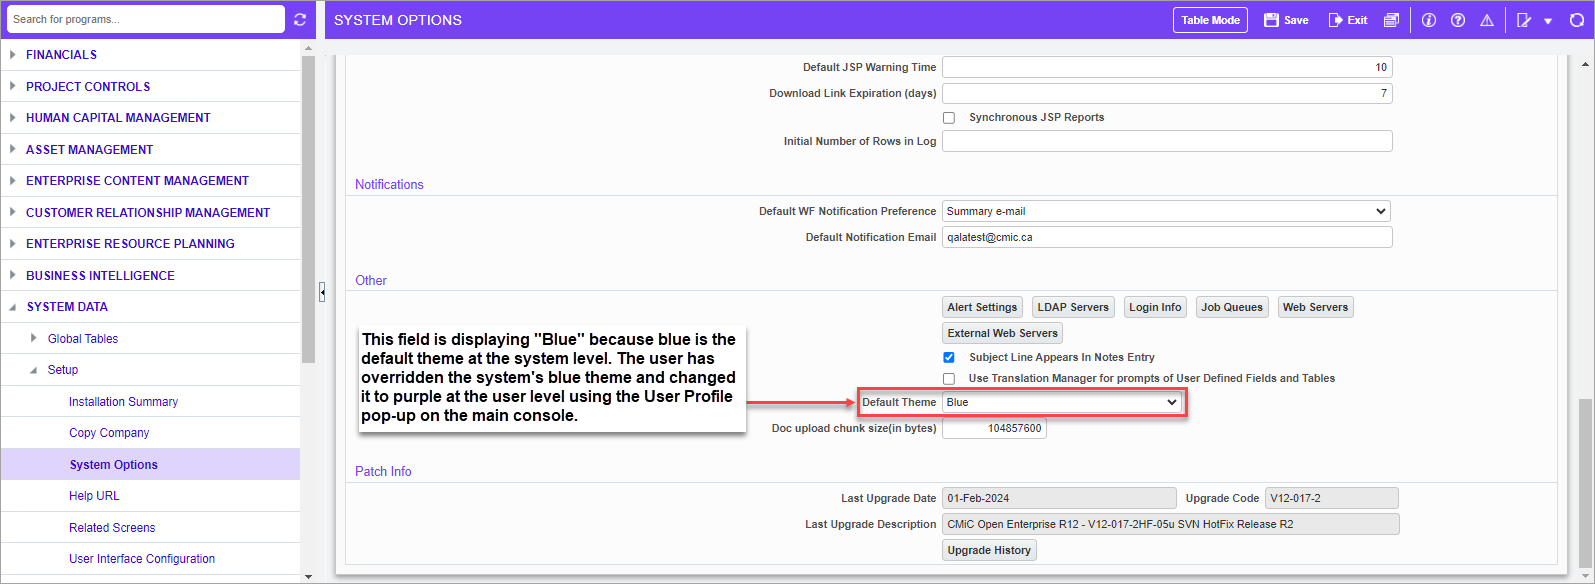
Example of purple theme set at the user level using the User Settings pop-up window
Doc upload chunk size (in bytes)
This field is used to indicate the chunk size for uploading drawing management documents. Size must be entered in bytes. If no value is entered then the default chunk size is 100MB.
Patch Info
Last Upgrade Date, Upgrade Code, Last Upgrade Description, Hotfix Code, Custom Hotfix Code
These fields are display-only and are updated every time a new CMiC version is installed. The actual history of all version updates including Vertex updates is shown in the pop-up window launched by the [Upgrade History] button.
[Upgrade History] - Button
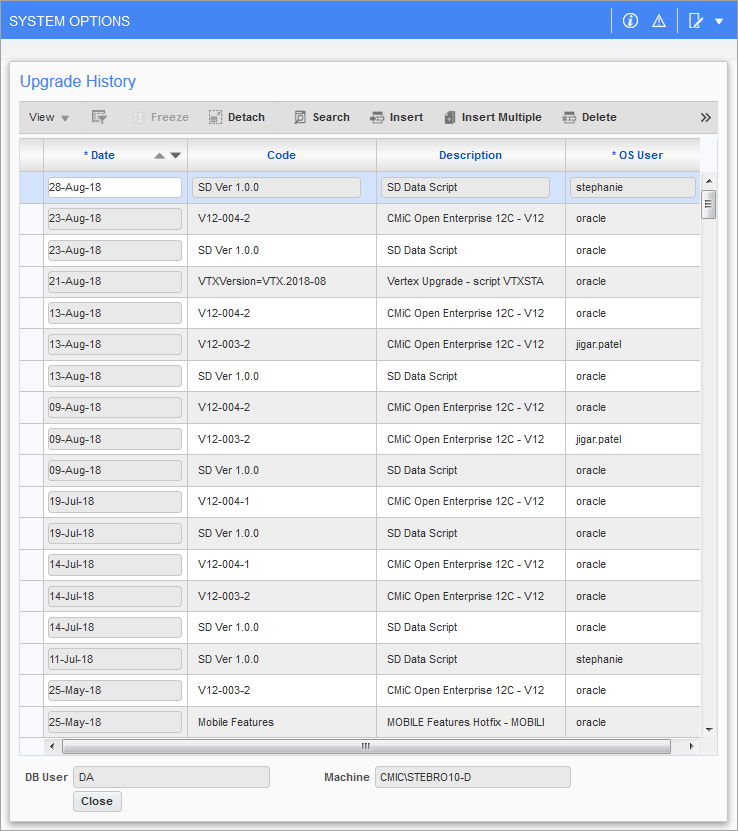
Pop-up window launched from [Upgrade History] button on System Options screen; standard Treeview path: System > Setup > System Options – General tab
This pop-up window shows all updates to CMiC, including CMiC version/patches and Vertex updates. Every time a CMiC software patch or Vertex update is installed, this information is updated. This pop-up window shows the complete list of what has been done to the system, including the date installed and the user who installed it.