Overview
Subcontracts; standard Treeview path: CMiC Field > Budget & Cost Management > Subcontract
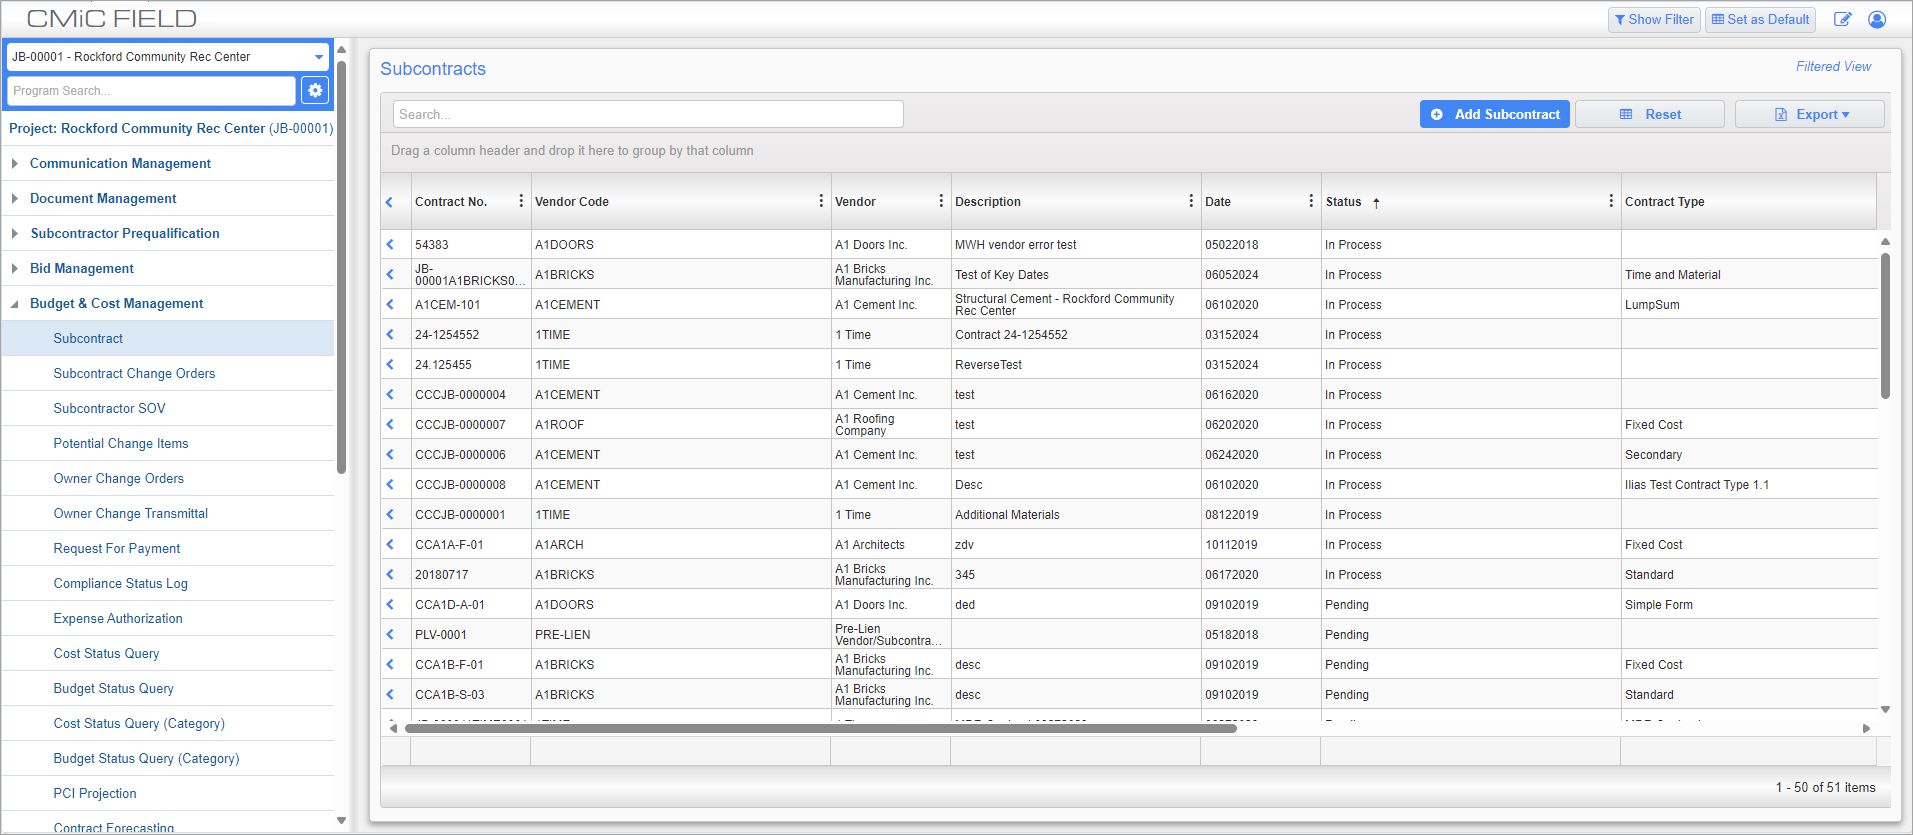
The Subcontracts screen can be used to enter and manage subcontracts for a given project. Here, subcontracts are linked to vendors and can be further linked to change orders and other PM objects.
The Subcontract Log screen displays all previously created subcontracts along with their basic information, status, original amount, posted and pending changes, and remaining to be paid amounts.
The Remaining To Be Paid columns in this screen are calculated as:
Remaining To Be Paid = Posted subcontract + Posted change orders - Posted requests for payment (gross) - Pending request for payment (gross)
Remaining To Be Paid (2) = Posted subcontract + Posted change orders - Posted requests for payments (gross)
Remaining To Be Paid Including Retainage = Total contract amount – Total amount paid + (Total retainage amount – Total release amount)
Therefore: Remaining To Be Paid (2) = Remaining To Be Paid + Pending requests for payment
Subcontract Detail – Tab
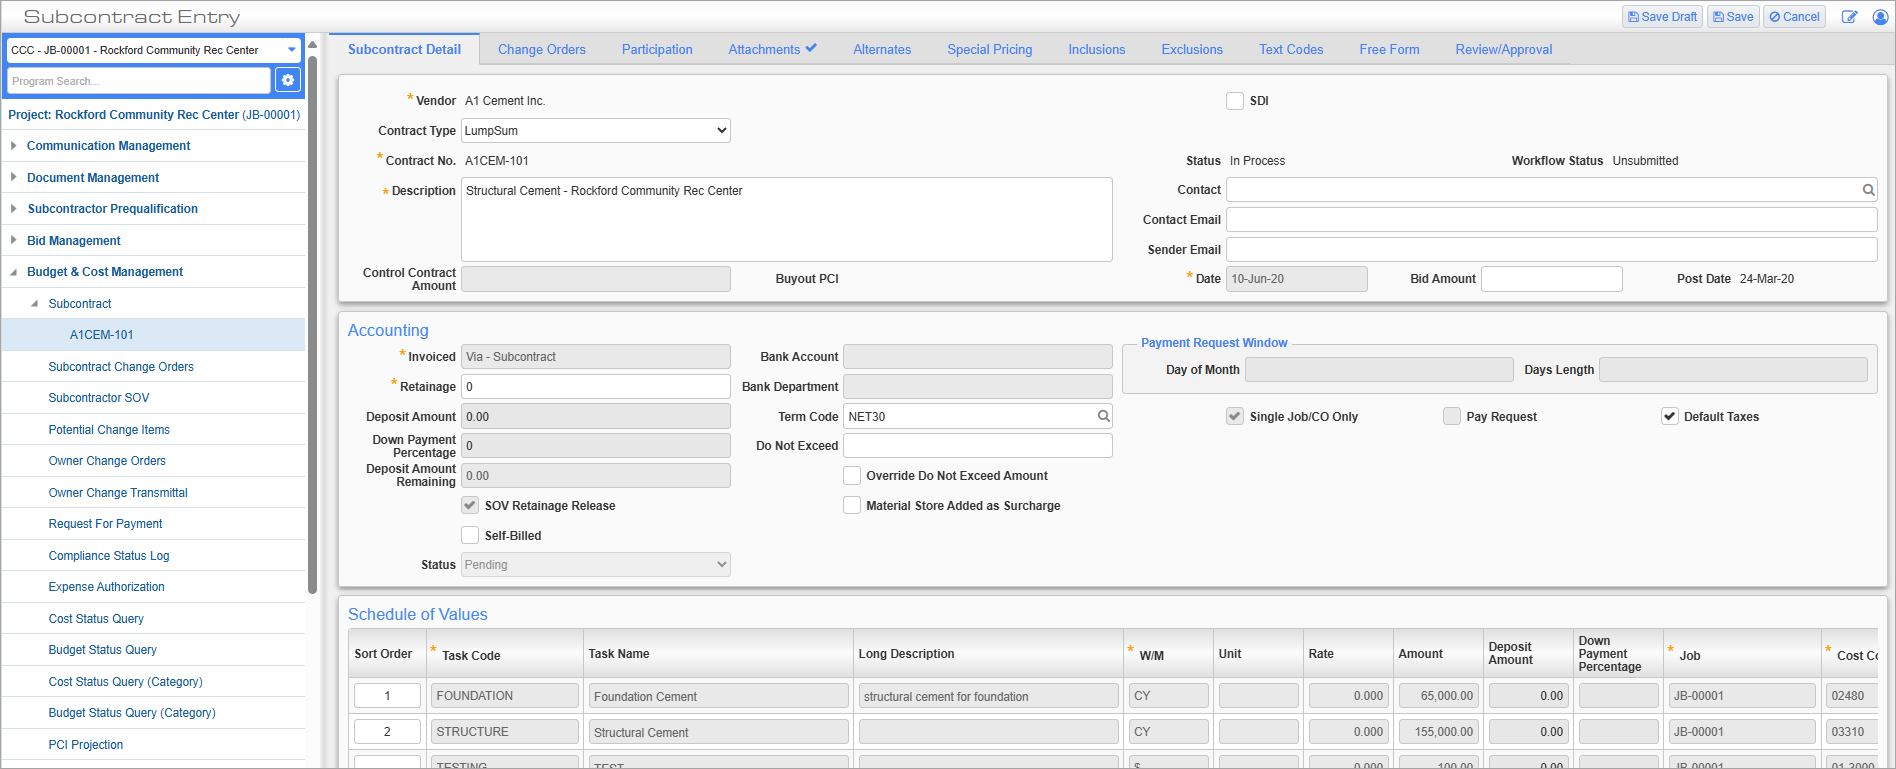
Subcontracts; standard Treeview path: CMiC Field > Budget & Cost Management > Subcontracts – [Add Subcontract] button
Use this tab to enter all basic information concerning a subcontract. Press the [Save Draft] button to save any changes to the current record and press the [Save] button to save the record to the system.
NOTE: There is no [Submit] button for this screen as subcontracts are added directly to the system when the [Save] button is pressed.
Subcontract ID
Vendor
Enter/select the vendor being sent the subcontract. Once the record has been saved this field can no longer be edited.
SDI – Checkbox
This checkbox controls whether the subcontract is linked to the default insurance.
Contract Type
Select the type of contract being sent to the vendor. These codes are maintained in the Contract Type Maintenance screen.
Check the ‘Default SC Settings From Contract Type’ box in the Project System Options screen to default the subcontract settings for the selected contract type. By default, company-level settings will be populated but changes can be made at the project level as required.
NOTE: Contract type settings are initially defined at the company level in the Contract Type Maintenance screen launched from the Treeview under the File Maintenance menu, but can be modified as required using the [Contract Types] button on the Project Maintenance screen.
Contract No.
Enter the ID code for this subcontract. Once the record has been saved this field can no longer be edited. If auto-numbering is enabled, this ID will be generated after saving the record.
Status
This field shows the status of the subcontract and its value is “Pending” by default. Posted subcontracts will display "In Process".
Workflow Status
This field displays the workflow status for subcontracts using CMiC Workflow. If the subcontract is not using an approval workflow, this field will display "Unsubmitted". For more information, please refer to Subcontract Integration with Workflow.
Description
Enter a brief description of the subcontract. A more thorough description should be given in the Scope section.
Contact, Contact Email
Enter/select the name and email address of the employee to whom the subcontract is sent when the record is saved.
Sender Email
Enter the email address from which the subcontract is being sent.
Control Contract Amount
Enter the control contract amount.
Buyout PCI
This field is enabled after the subcontract has been posted and contains a link if a PCI record has been created with buyout allocation details. For more information, please refer to [Buyout Allocation] – Button.
Date
Enter/select the date on which the subcontract was created. This value defaults to the date the record was added.
Accounting
Invoiced
Select whether the subcontractor is invoiced via the subcontract or via accounts payable.
Currency
Select the currency stated in the subcontract. These codes can be set in System Data - Currencies.
Default Retainage
Enter the default retainage as a percentage. This will be used when creating SOV lines.
SOV Level Retainage Release – Checkbox
Check this box if retainage is to be released uniquely against each SOV line. If this is not checked, retainage will be released against the complete subcontract pay request.
This box can only be unchecked when the ‘Single Job/CO Only’ box is also unchecked.
NOTE: Once the subcontract record is posted, this checkbox cannot be updated. For example, if the subcontract needs to allow SOV level retainage release and the 'SOV Level Retainage Release’ checkbox was not checked before the record was posted, then the subcontract would need to be voided and created again.
For information on releasing retainage on a non-detail level, please refer to Subcontract Management - Releasing Retainage - Non-Schedule Detail Release.
Bank Account, Bank Department, Term Code
Enter the banking information for the account being used for the subcontract.
Bank Account Detail Fields
The Bank Code, Bank Name, Bank Transit, Account Number, Suffix, Paymode ID, IBAN Number, and Swift BIC Code fields are hidden by default and can be made visible using field security. The bank account detail fields that are in the Maintain Vendors screen are available in the Subcontract Maintenance screen (PMSCFM) so that users can specify a bank account to be used when paying a vendor for specific subcontracts in both Subcontract Management and CMiC Field. For further information on each individual field, see
Upon creating a subcontract, the vendor bank information will be defaulted if it exists. Otherwise, it will be null. If no bank account is specified on a subcontract, the default payment is made to the business partner's bank account. The fields can be modified after posting the subcontract and payments have been made.
Any invoices for that subcontract that are to be paid via EFT would then be paid from the account setup at the subcontract level. This only works for a custom EFT format to use a subcontract vendor's banking details when populated. All existing EFT formats will function as normal, using the vendor's banking information.
Reference Number
Enter the reference number for the payment.
Address, Corresp. Address
Enter the address registered to the account and, if it differs, the account to which correspondence should be sent.
Single Job/CO Only – Checkbox
Check this box to disallow contract level release of retainage. This may be desirable due to the possibility of multiple invoices produced for the same RFP.
Checking this box automatically checks the ‘SOV Level Retainage Release’ box.
Days of Month, Days Length, and Pay Request – Checkbox
These fields are related to the CMiC Collaborate Pay Request screen. For more information, refer to Pay Request - Create Subcontract Tied to Pay Request.
Default Taxes – Checkbox
Check this box if default taxes apply to this subcontract. If checked, the Tax1, Tax2, and Tax3 fields will be displayed. The Tax1 field must be populated when the 'Default Taxes' box is checked.
Tax1, Tax2, Tax3
These fields are displayed when the 'Default Taxes' box is checked.
Enter/select tax codes to apply to this payment if not already contained within the system’s default taxes. Any tax codes assigned here should populate the tax fields in the Subcontract screen's Schedule of Values section. If the 'Default Taxes' box is checked, the Tax1 field must be populated.
NOTE: If these tax fields are not visible when the 'Default Taxes' box is checked, ensure that the Tax Codes item is set to "Unrestricted" in field security.
Deposit Amount
Enter the deposit amount. See CMiC Field - Down Payment and Amortization for more information.
Down Payment %
Enter the down payment percentage.
Deposit Amount Remaining
This is a display-only field, showing the deposit amount remaining that has not been allocated to invoices.
Self-Billing Process
The following fields are used to support self-billing processes in markets where the Construction Industry Scheme (CIS) or Relevant Contract Tax (RCT) is used. Self-billing is an arrangement between a subcontractor and a General Contractor (GC) in which the GC prepares the subcontractor’s invoice and forwards a copy to the subcontractor with the payment.
NOTE: Self-billing fields are disabled by default and are controlled by field security privileges.
Self-Billed – Checkbox
This checkbox is used to indicate whether the subcontract’s pay request process is self-billed or not. This value defaults from the ‘Default Contract to Self-Billed’ checkbox located on the Contract Defaults tab of the
Status
This field indicates the subcontract's status. The following status settings are available:
-
Pending: Defaults to “Pending” when a new subcontract is created. Used for a subcontract that is self-billed, as well as not self-billed. Displays “Pending” when the subcontract is not yet posted.
-
Posted: Used for a subcontract that is self-billed, as well as not self-billed. When a subcontract is posted using the [Post SC] button, the Status field will be updated to “Posted”, and the [Post SC] button will be disabled.
-
Instructed: Used for a self-billed subcontract that is not yet posted and the status is still “Pending”. When the status is changed to “Instructed”, pay requests can be entered and posted against unposted subcontracts and unposted change orders. A pay request cannot be created for any other status, while the subcontract is unposted. This status has no impact on a subcontract/subcontract change order that is not self-billed.
NOTE: This status will prevent deletion of a subcontract change order if a created (or posted) RFP has been issued against the instructed subcontract/subcontract change order.
Do Not Exceed
Enter the maximum monetary value the subcontractor can receive. This is the amount the self-billed pay request amount should not exceed. The total of all previous pay amounts plus the current pay amount should not exceed the Do Not Exceed field’s amount on the subcontract header or in the subcontract change order header. Posting is not allowed unless the amount is adjusted appropriately. The value in this field is only applicable when the status of the subcontract or subcontract change order is "Instructed" and the ‘Allow Payment Request Against Instructed Contracts’ box is checked on the RFP Defaults tab of the
Override Do Not Exceed Amount – Checkbox
Check this box to override the amount in the Do Not Exceed field. When checked, payment amounts can be entered against an “Instructed” subcontract or subcontract variation. Once the pay request for that subcontract or subcontract variation is posted, this override flag is automatically unchecked and the value in the Do Not Exceed field will be increased by the posted pay request amount.
NOTE: This checkbox is only applicable to an unposted subcontract with the status of “Instructed”.
Schedule of Values
This section can be used to enter the values for each action of a subcontract. Add a detail line by pressing the Plus icon ( ) and enter values into, at a minimum, the Task Code, W/M, Job, Phase, and Category fields.
For details on adding PCIs and bid items to detail lines, refer to [Select PCIs] – Button and [Select Bid Items] – Button.
If necessary, the relevant taxes can be added to the action items. Tax codes can be set in the System Data - Tax Codes.
WBS codes can be linked to subcontracts using the WBS Code columns. For more information on WBS codes and linking them to subcontracts, see Subcontract Management - Schedule of Values - Tab.
For details about using the JB Bill Code field, please refer to:
For more information, please refer to CMiC Field - Subcontract Schedule of Values.
Scope
Scope of Work
Enter a broad description of the extent of the work involved in the subcontract.
Scope of Work Details
Enter details outlining the work involved in the subcontract.
Bid Package Description
Enter a description of the vendor bid package.
Accounting Description
Enter a description of the necessary accounting practices regarding the subcontract.
Summary
This section displays the total cost for the subcontract, both with and without taxes. These total costs are further broken down to show the difference between the original and current contract value. This section is display-only and reflects the values entered in the Schedule of Values section.
The Total Taxes field will display a zero value if the ‘Tax Credit’ box is checked for a tax code in the Tax Table Maintenance screen (available in the Accounts Payable, Accounts Receivable, and System Data modules) and this same tax code is being used in the Subcontract record. This box is checked if you will receive a tax credit for any taxes your company has paid on the purchase of goods and services (e.g., VAT type taxes and GST). If the ‘Tax Credit’ box is unchecked for a tax code, then the tax will be displayed. For more information, please refer to System Data - Tax Codes.
NOTE: To show the amount of total taxes included in vouchers, check the ‘Included In Voucher Amount’ box in the Tax Table Maintenance screen in the System Data module.
Key Dates
This section is used to manually enter or edit the key dates pertaining to the subcontract, if desired.
Start Date, End Date
Enter/select the start and end dates for the subcontract.
Issued Date, Received Date
Enter/select the dates the subcontract is issued to and received by the vendor.
Executed Date
Enter/select the date the vendor begins work on the subcontract.
Payments
Pay When Paid – Checkbox
Check this box if the subcontractor is only to be paid when the contractor is paid.
Hold Payment For
If the ‘Pay When Paid’ box has been checked, enter the number of days subcontractor pay is held after contractor payment is received.
Check Hdl
Enter the check handling code for this record.
Calculate Tax On Net Amount – Checkbox
Check this box to calculate tax on the total subcontractor pay amount, as opposed to only calculating tax on individual action items.
CDI – Checkbox
Check this box to calculate contractor default insurance for this subcontract. CDI is calculated based on the rate that has been set for the CDI Risk Management codes that are on the job.
Compliant – Checkbox
This field is read-only and indicates whether the subcontract complies with all relevant compliance codes and standards of behavior. For more information, please refer to the CMiC Field - Compliance Status Log.
To make any adjustments, please refer to
Prequalification
Prequal Status
This field is read-only and upon populating the vendor into the header, the information from the Subcontractor Prequalification record is used to provide the prequal status of the subcontractor in this field.
EMR
This field is read-only and upon populating the vendor into the header, the information from the Subcontractor Prequalification record is used to provide the experience modification rate (EMR) of the subcontractor in this field. This field defaults from the EMR value for the latest year on the Safety tab of the Subcontractor Prequalification screen. For more information, please refer to Safety – Tab.
Approval Status
This field is read-only and upon populating the vendor into the header, the information from the Subcontractor Prequalification record is used to provide the approval status of the subcontract in this field.
Rating
Enter the rating for the subcontractor.
Single Project Limit
This field is read-only and upon populating the vendor into the header, the information from the Subcontractor Prequalification record is used to provide the total amount on all subcontracts and change orders for the specific vendor under the current project in this field.
Aggregate Project Limit
This field is read-only and upon populating the vendor into the header, the information from the Subcontractor Prequalification record is used to provide the total amount on all subcontracts and change orders for the specified vendor under all projects in this field.
Single Project Limit Remaining
Upon populating the vendor into the header, this read-only field is calculated as the SPL minus the sum of all contracts and change orders for the current vendor in the current project.
Aggregate Project Limit Remaining
Upon populating the vendor into the header, this read-only field is calculated as the APL minus the amount remaining to be billed across all projects.
Change Orders – Tab
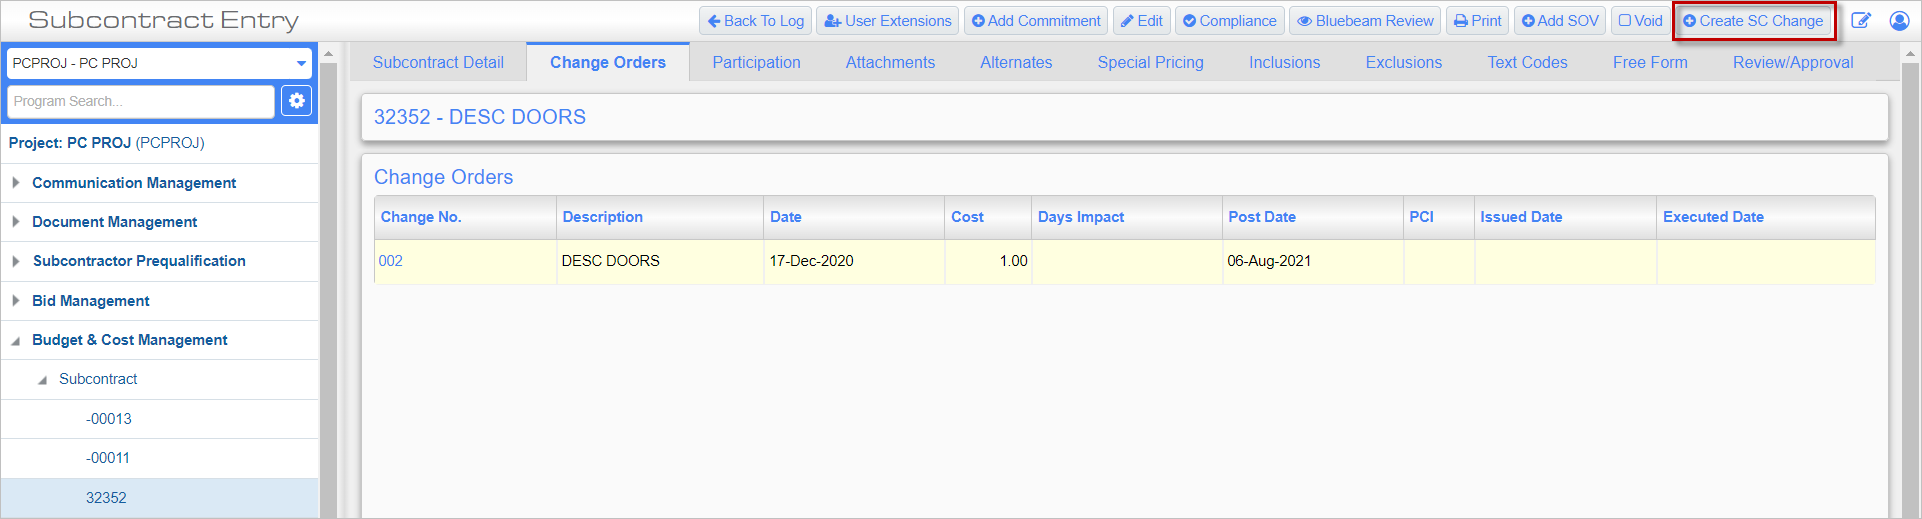
Subcontracts; standard Treeview path: CMiC Field > Budget & Cost Management > Subcontracts – Change Orders tab
This tab displays any change orders associated with the subcontract record. Change orders can be created for posted subcontracts by pressing the [Create SC Change] button (highlighted above) and linked to subcontracts in the Subcontractor Change Order screen. For more information, please refer to Subcontract Change Orders.
The PCI column on the Change Orders tab of the Subcontract screen is a link opening a pop-up which lists all PCIs that are linked with the Subcontract Change Order, with the ability to drill down into those PCIs. The text of the link is the PCI number if there is only one PCI, or a comma-separated list if there are two, and a ‘PCI1, PC2, more…’ link if there are more than two PCIs.
NOTE: This functionality does not apply when the CM Control box 'Rollup Change Item Lines In SC Change Orders' is checked.
Participation – Tab

Subcontracts; standard Treeview path: CMiC Field > Budget & Cost Management > Subcontracts – Participation tab
If a Subcontract is going to be handled by more than one vendor, use this tab to enter participant percentages for the different vendors.
Vendor
Enter/select a first tier vendor and any second-tier vendors. Second-tier vendors must first be entered in the system as either business partners or project partners. The vendor need not be the one entered in the Subcontract Detail tab.
Participation %, Participation Amount
Enter the actual participation of the vendor, either as a percentage of total time worked or as an amount in hours.
Original Participation %, Original Participation Amount
Enter the originally estimated participation of the vendor.
Classification
Enter/select a business partner classification code.
Action
Use the Add/Delete icons (![]() or
or ![]() ) in the Action column to insert/delete a record.
) in the Action column to insert/delete a record.
Attachments – Tab
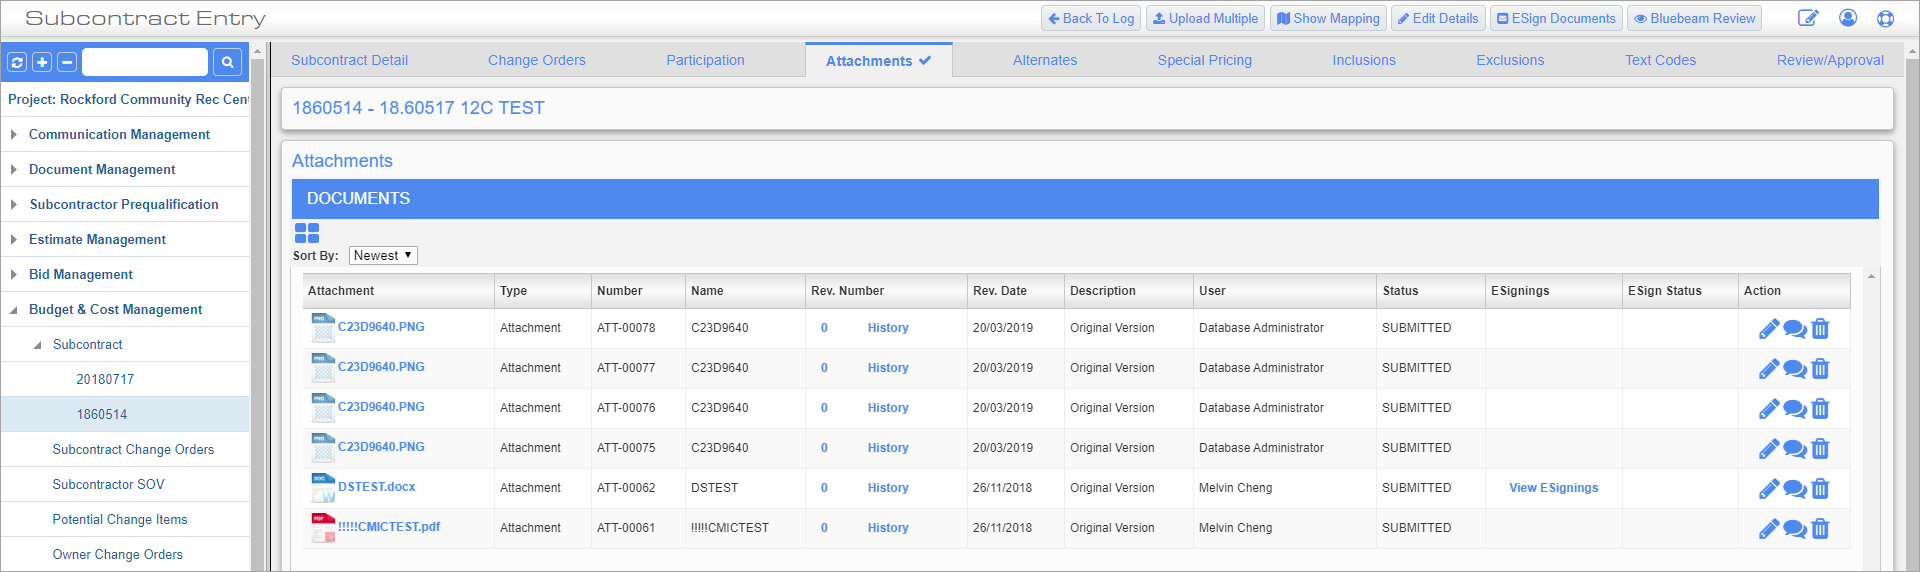
Subcontracts; standard Treeview path: CMiC Field > Budget & Cost Management > Subcontracts – Attachments tab
This is one of many Attachments tabs throughout CMiC Field. Please refer to Notes, Attachments, and Documents.
Press the [ESign Documents] link in the E Signings column to view all E Sign submissions for that attachment.
Alternates – Tab

Subcontracts; standard Treeview path: CMiC Field > Budget & Cost Management > Subcontracts – Alternates tab
The Alternates tab can be used to enter alternate information for the subcontract. Alternates can only be added to un-posted subcontracts and can’t be edited after posting. The values for the Type field can be set in the Contract Alternate Type Maintenance screen.
Please note that amounts entered on this tab will not create an SOV line on the Subcontract Detail tab as these amounts are already included in the SOV Lines.
Special Pricing – Tab
This tab can be used to enter any pricing exceptions which are not covered by the regular SOV lines in the Subcontract Detail tab. Special Pricing lines can only be entered for un-posted subcontracts and can’t be edited after posting.
NOTE: Users have the option of line re-numbering for the records in Inclusions, Exclusions and Special Pricing. Depending on the security for the Line Number field the entered lines will be re-numbered automatically (when security is set to ‘Read Only’) or by request (when ‘Unrestricted’) upon pressing [Save] or [Save Draft]. In the resulting pop-up, press "Yes" to re-number the records, starting from the first one. Press "No" to keep the user's numbering.
Inclusions – Tab
Use this tab to make note of any items included on the subcontract which have gone unmentioned elsewhere on this screen.
Exclusions – Tab
Use this tab to make note of any items excluded on the subcontract which have gone unmentioned elsewhere on this screen.
Text Codes – Tab
This tab can be used to set the text code for the subcontract. Default text codes can be set in the Defaults tab of the Company Control screen.
Text types and text codes can be set in the
Review/Approval – Tab
The Review/Approval tab appears if CMiC Workflow is being used with the Subcontract screen. It works with the [Workflow] button which is used to establish integration between CMiC Field and Workflow, if the appropriate workflows are configured for subcontract approval.
For more information, please refer to Subcontract Integration with Workflow.
Other Buttons
[Compliance] – Button
To add compliances to the Subcontract, use the [Compliance] button at the top of the screen. This opens a window where you can add, remove, or update compliances associated with this subcontract. This button affects what appears in the CMiC Field - Compliance Status Log for that subcontract.
For more information on compliance setup, please refer to Subcontract Management - Compliance (Defaults Setup).
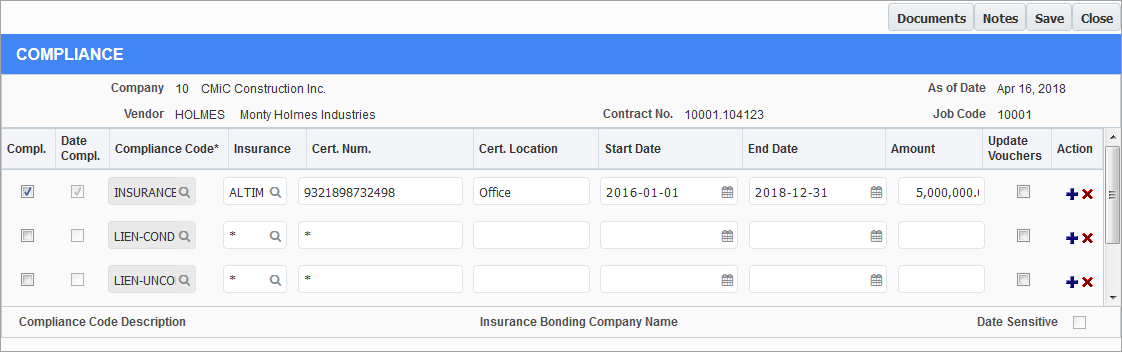
Compl – Checkbox
Check this box to mark a code as compliant. This box can be set to be checked by default if the 'Default Compliant' box is checked in the Compliance Codes screen (standard Treeview path: Subcontract Management > Local Tables > Compliance > Compliance Codes). For more information, please refer to
Date Compl – Checkbox
This checkbox is read-only and is automatically checked if the compliance code is compliant between the set start and end dates.
Cert. Num.
This field allows users to enter certificate numbers for each compliance added to the subcontract. This field is Unrestricted by default, see Role Maintenance for information on changing field security.
NOTE: A pop-up message will appear to prompt users if compliance records should be updated or new records inserted when:
1. Certificate number has been changed, and
2. 'Update Voucher' box checked on at least one line.
Users can click [OK] to update the existing records or click [Cancel] to insert new Compliance records.
Update Vouchers – Checkbox
Check this box to apply updates made to a compliance code to all vouchers associated with this subcontract. Leave this box unchecked if the updates only apply to future invoices.
Pressing the [Save] button launches an additional pop-up window, where the [OK] button is used to apply the changes. Pressing the [OK] button updates the compliance on the subcontract, as well as any voucher records, and resets the state of the ‘Update Voucher’ checkboxes to unchecked, so they are available to be checked again for any subsequent updates.
NOTE: The same functionality exists when updating compliance codes using the Change Compliance Status screen located in the Subcontract Management module. Refer to Subcontract Management - Change Compliance Status - Pop-up for more information.
When deleting one or more compliance codes from a subcontract a message reading, “Would you like to delete the corresponding compliance record(s) from all vouchers?” appears upon saving. Pressing “Yes” will delete the compliance codes with same certificate number, if applicable from all vouchers for that subcontract. Pressing “No” deletes the compliance codes only from the subcontract and the vouchers are not affected.
NOTE: Changes to compliance codes (e.g., updates or deletions) are applied to existing vouchers only when both the compliance code and certificate number match the corresponding values on the contract and vouchers. If the certificate number was modified and no longer aligns with the voucher, subsequent changes will be associated with a new compliance code (i.e., duplicate line) that the system will add on all vouchers.
NOTE: The [Documents] button in this pop-up is used to record reference details of compliance code-related documents attached to the subcontract rather than to attach the documents themselves. The details noted in this pop-up are for reference purposes only and do not impact whether the codes in this pop-up are compliant or not. This button functions the same for both Enterprise and Field.
[Copy From] – Button
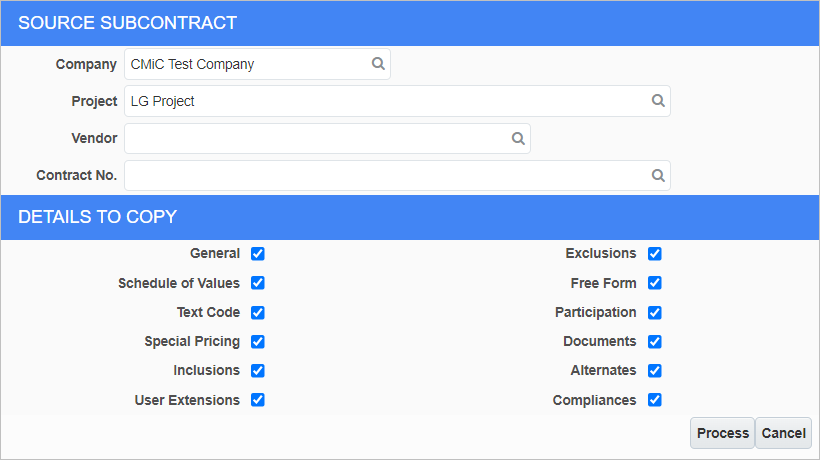
Users can copy from one subcontract to another (the base contract only) by using the [Copy From] button. This is available in the ‘Add Subcontract’ screen once the mandatory fields are filled in. A popup box will show a list of the kind of data that can be copied.
Copy can occur across companies but in such cases, tax codes, text codes, contract types, phases, and categories are only copied if the same code is defined in the target company, even though the underlying description and/or ‘Default Taxes’ rule may be different from the source company. Documents are not copied across companies.
[Print] – Button
Press this button to print the subcontract.
If the 'Default SC Settings From Contract Type' checkbox is not checked in the General tab of the Project System Options screen, users can select from all reports options. If the system option is enabled, the system will automatically generate a single PDF that merges all reports selected for the contract type in the pop-up launched from the [Documents] button on the Contract Type Maintenance screen, and users will not be able to select which report to print.