Notes and attachments can be added to almost any CMiC Field object by anyone with access to that object. To add a note or attachment, open the item and select the Note or Attachment tab.
Notes
There are two ways to enter a note in CMiC Field: they can be added to the bottom of the screen as a reviewer note or entered via the Notes tab.
Reviewer Notes
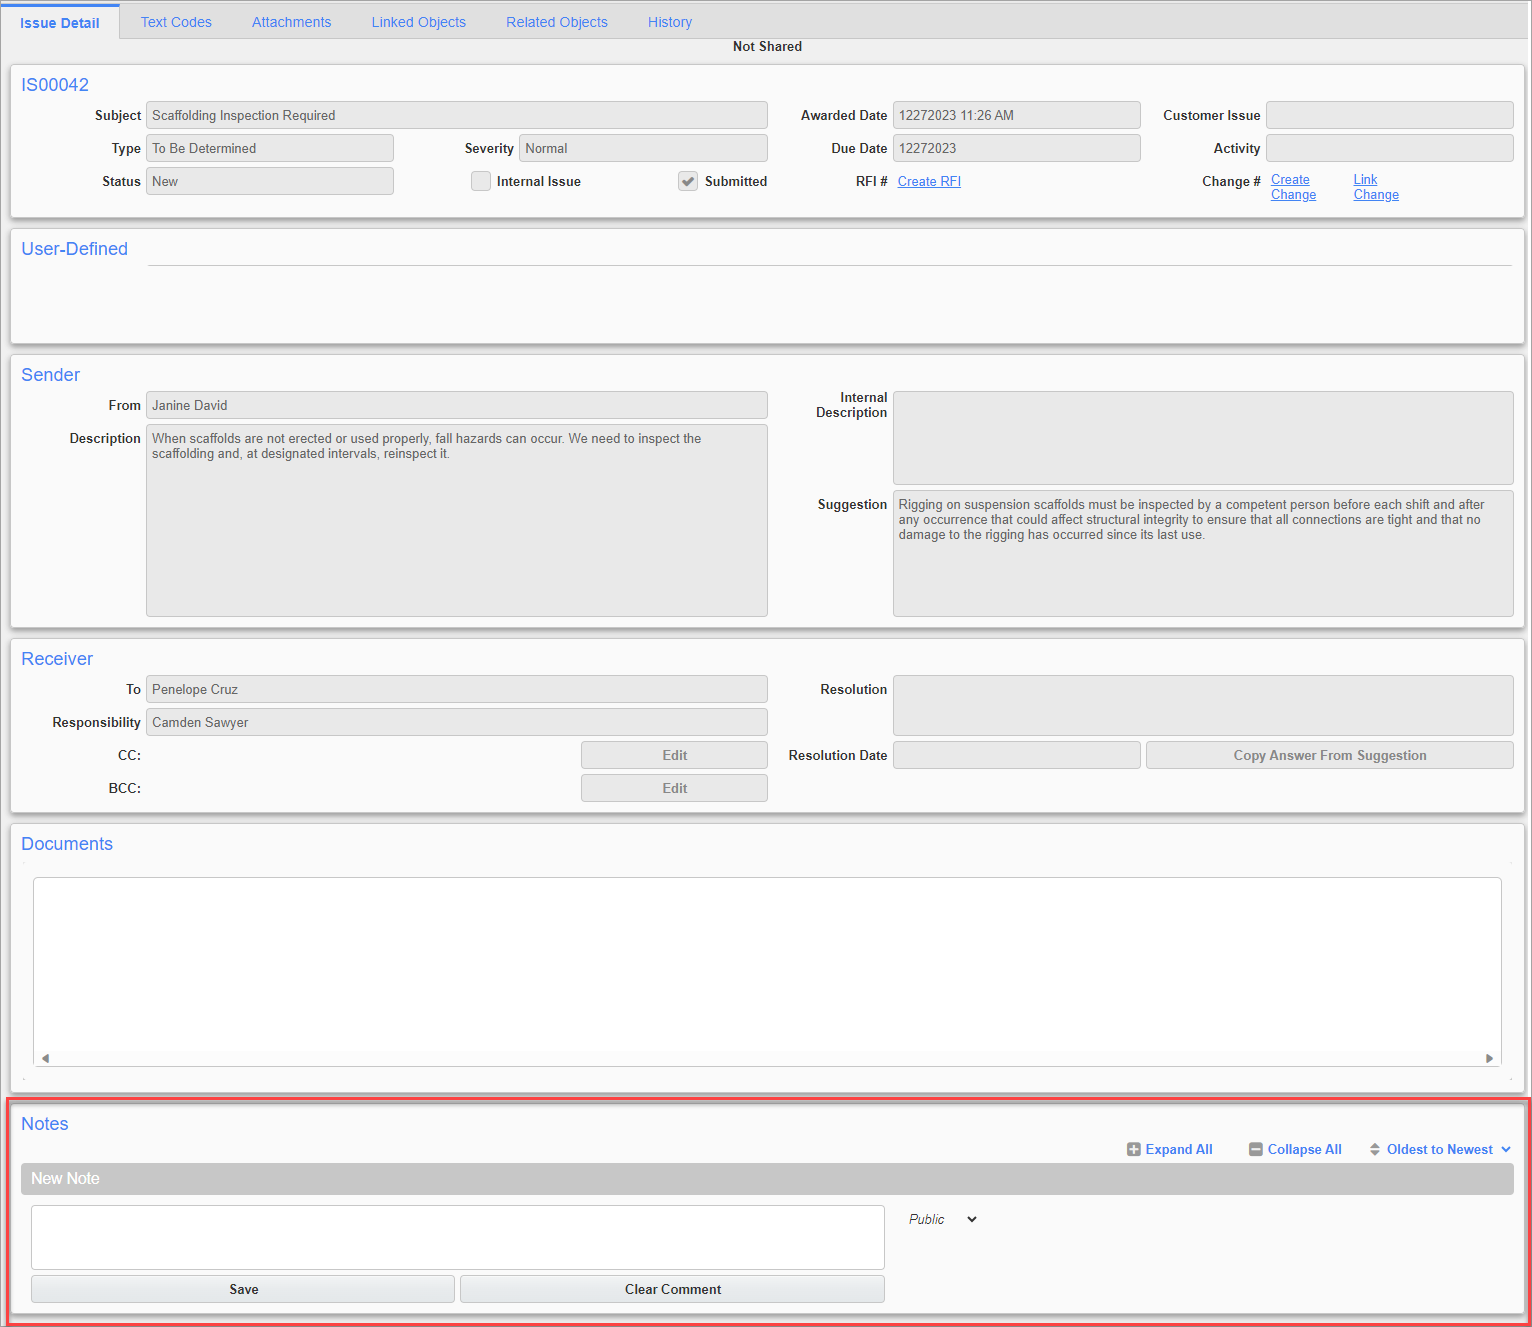
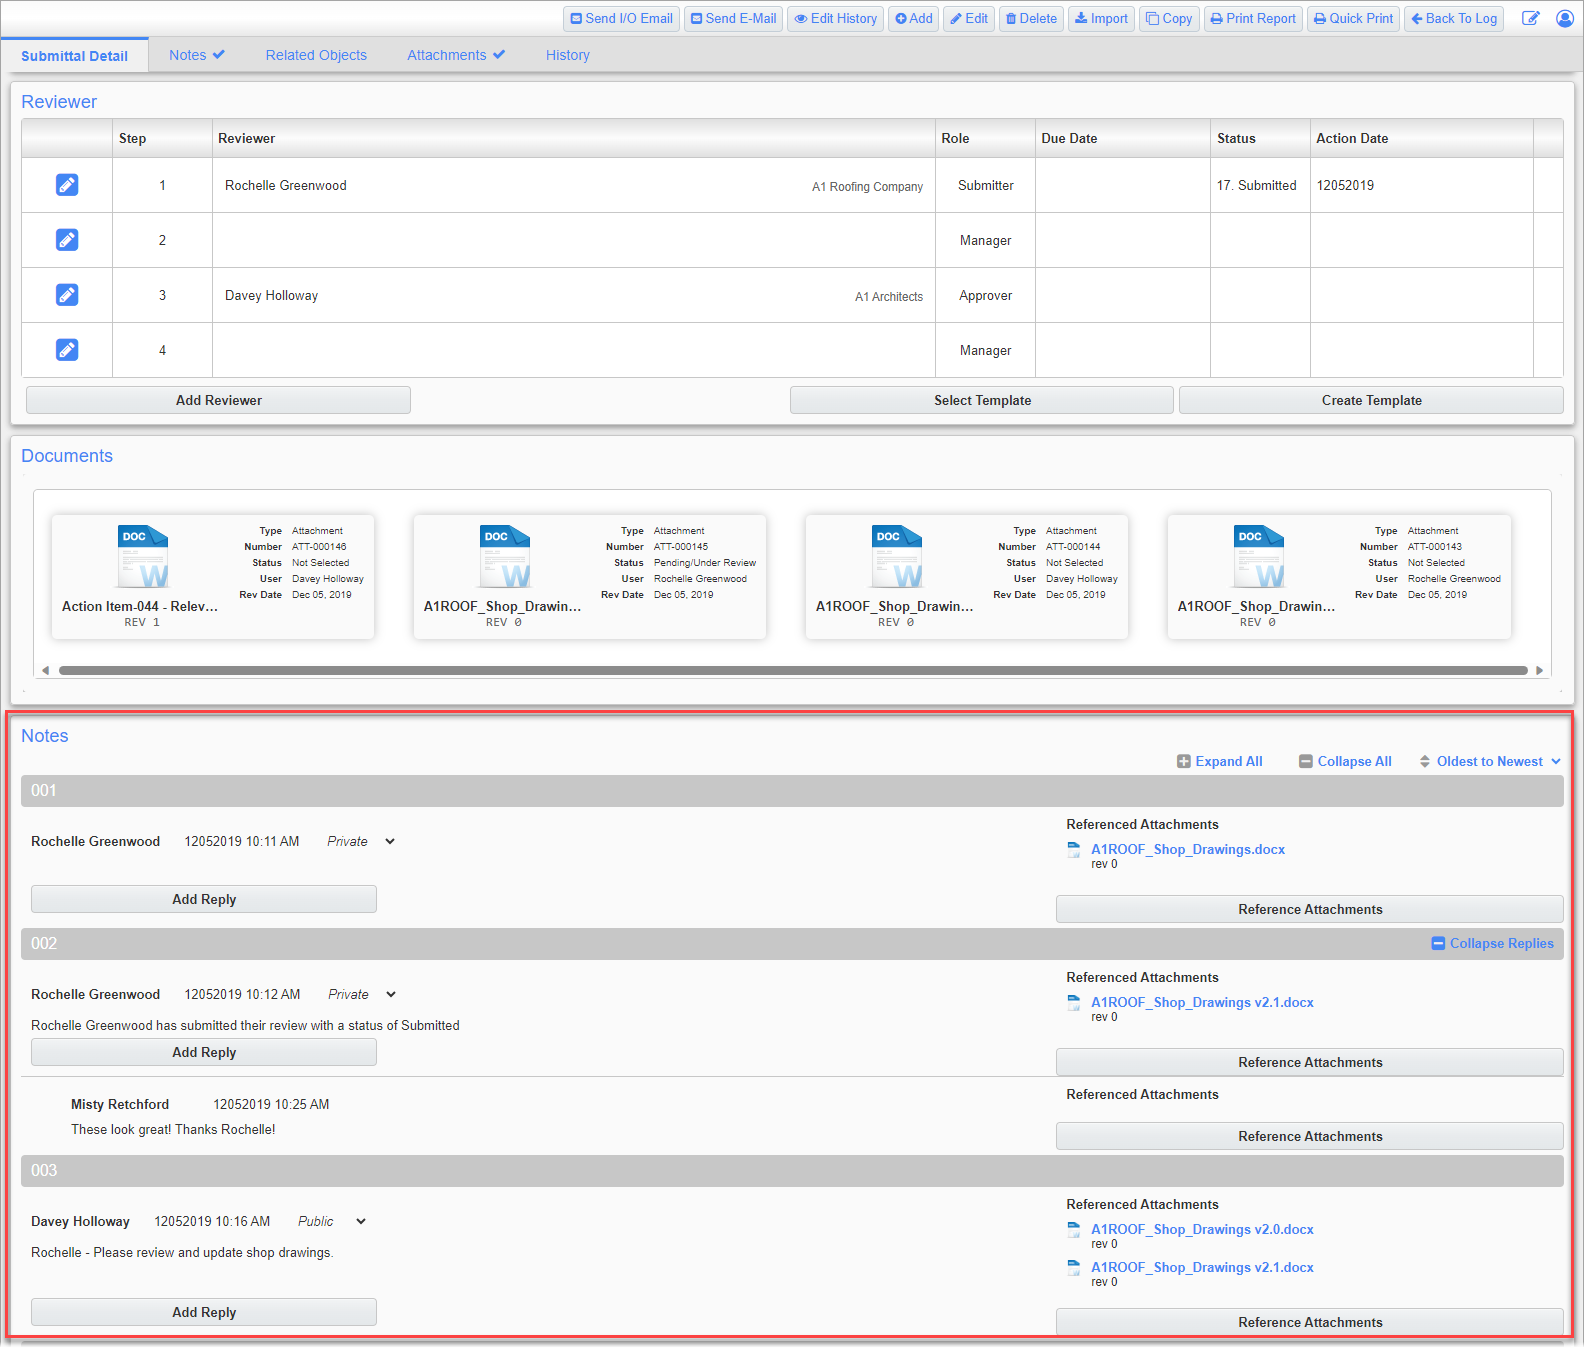
An example of the Notes section on the Issue Detail tab of the Issues screen (standard Treeview path: CMiC Field > Communication Management > Issues)
When a note is added to the Notes section at the bottom of a screen, it is considered a reviewer note. If the screen also contains a Reviewer's section then notes are directly tied to the reviewers table.
A reviewer note can be added by entering text in the Notes section of the screen and pressing the [Save] button. New objects must be saved before they can have notes added. Before a note has been saved press the [Clear Comment] button to clear any text.
Once the note is saved press the [Edit Note] button to make any updates or the [Delete Note] button to remove the note.
The username, date, and time are automatically saved for each note. Any notes added to the Notes section are also added to the Notes tab of the object.

Reviewer notes can be set as public or private. A private note is not visible to the contractor who created the object but is for all internal C-Type users, as well as project contacts listed in the object’s reviewer’s table, if one exists.
Only C-Type users can make a reviewer note public. The following project role privileges can also be applied to manage a P-Type user’s access to notes: ‘Allow P-Type collaborators to view all notes’ and ‘Allow P-type collaborators to make a note public’ (standard Treeview path: CMiC Field > Security > Project Roles).
If a note is marked as Private, any sub-notes or in-line replies will default to private as well, as shown below.

For objects using a reviewer’s table, after a reviewer submits their reviewer’s note, the Action Date and Status fields are automatically updated beside their contact in the Reviewer’s section of the screen. The Completed Date field is also populated on the matching Action Item record. This closes the action item and removes it from their court.
Any in-line replies to a note can be collapsed or expanded with the Expand All and Collapse All icons.
Adding a reply can automatically send an email notification, based on the user settings in the Email Notification tab of the Project Contact screen.
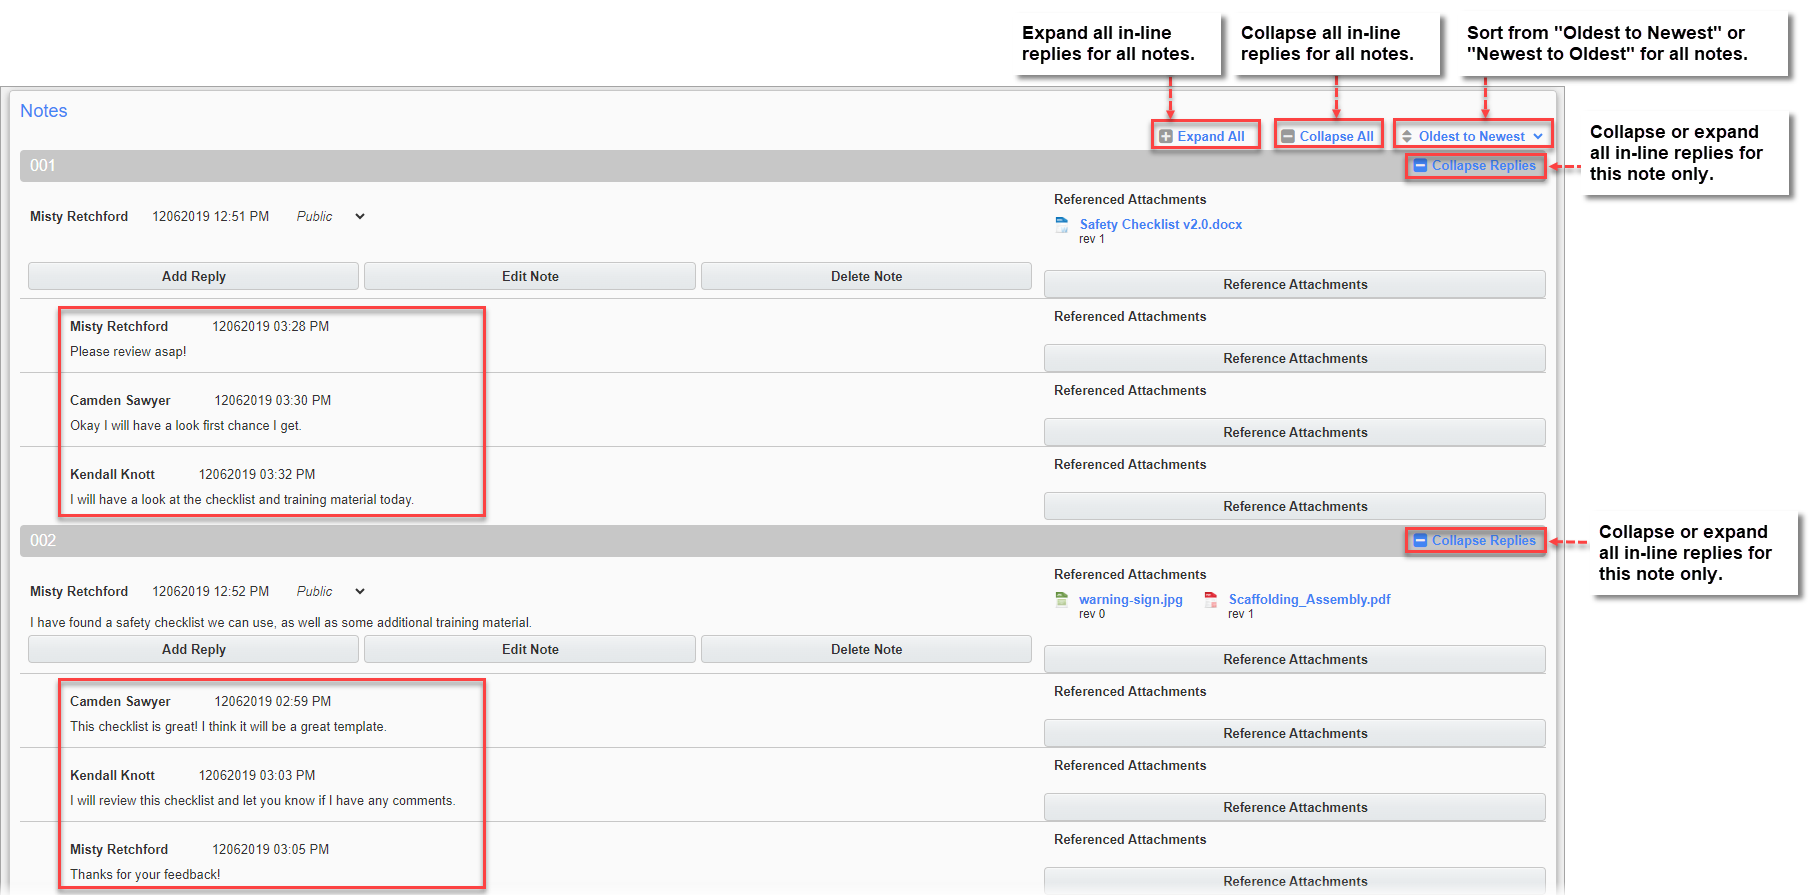
In-line replies expanded for all notes
Each note has a Referenced Attachments section. Documents inserted via I/O email will populate here and in the Document Strip. The [Reference Attachments] button launches the Related Documents pop-up screen which allows users to select/deselect attachments. This only affects the visibility of documents in the Referenced Attachments section and has no impact on the Document Strip or Attachments tab.
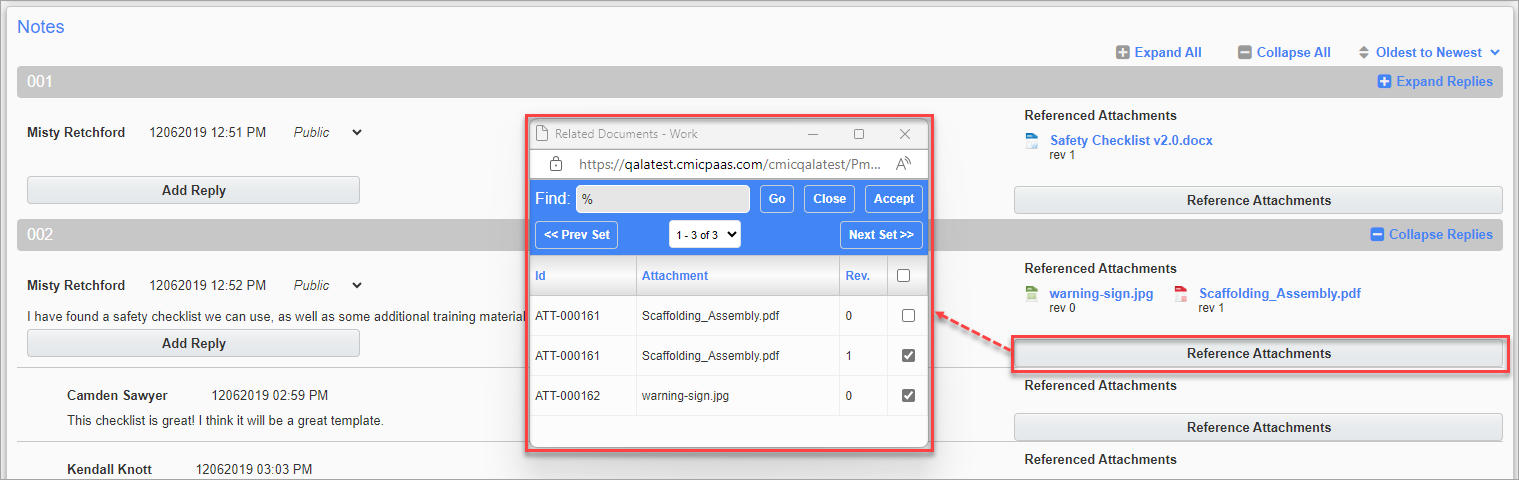
Related Documents pop-up launched from [Reference Attachments] button
Notes Tab
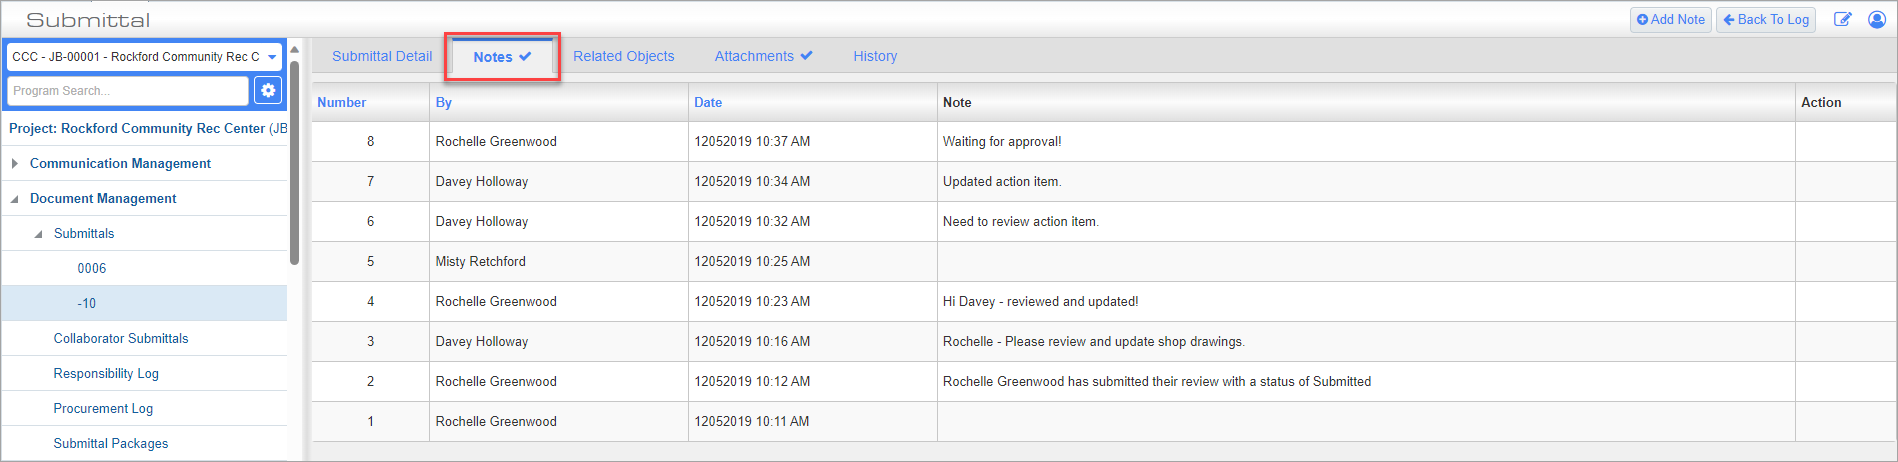
Adding a note using the Notes tab on the Submittals screen
To add a note to a screen with a Notes tab, open the Notes tab and then use the [Add Note] button to open a text area where the note text can be entered. Any screen that has notes already entered will display a checkmark next to the title of the Notes tab.
Enter the text of the note, then press the [Submit] button to save the note.
Notes entered via the Notes tab can be deleted by the user who created the note by using the Delete icon ( ) when viewing data on the Notes tab.
Notes added on the Notes tab will also display in the Notes tab of the screen if one exists.
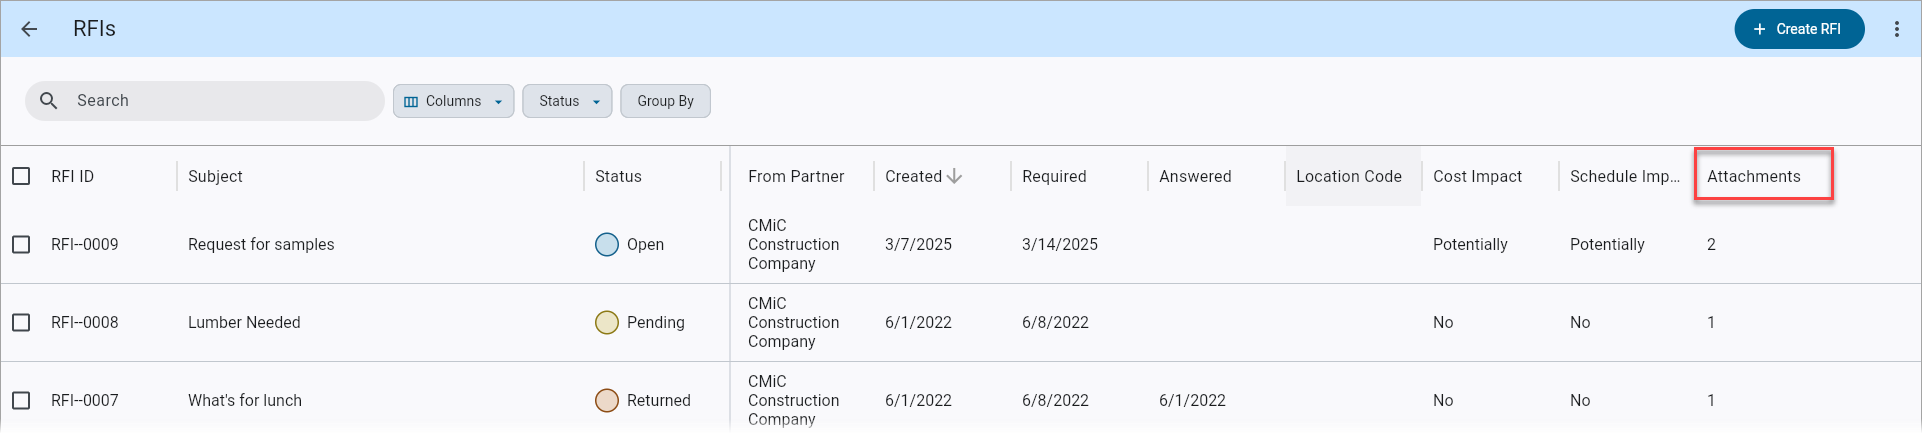
Attachments
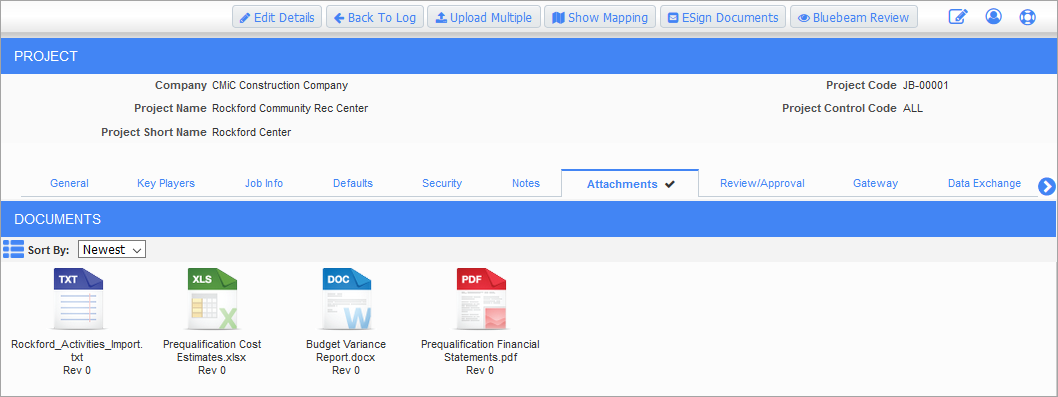
An example of the Attachments tab in CMiC Field
To add an attachment, open the Attachment tab. Press the [Upload Multiple] or [Copy From Object] button to upload or copy documents. Press the [Edit Details] button to edit or add existing documents.
Any object where attachments have been added shows a checkmark on the Attachments tab when the object is opened. To view the attachments, open the attachment tab and the system will show a list of all the related attachments. To open a specific attachment, press the Attachment link.

Use the Sort By icons ( and
and  ) to toggle between displaying the attachments in a document strip or a row format.
Uploading Attachments
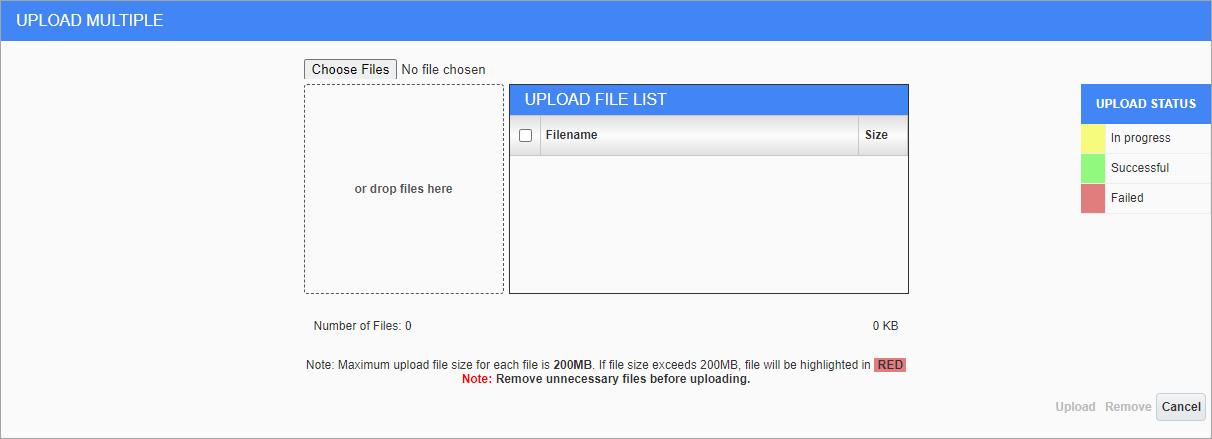
Upload Multiple pop-up window launched from the [Upload Multiple] button
Press the [Upload Multiple] button to display a pop-up which is used to select the documents to be uploaded.
In addition to uploading files with the [Choose Files] button, the user can drag and drop files from an open file folder into the area shown.
The Upload Status section shows a legend to show the status of the files while they are loading and at the end of the initial load.
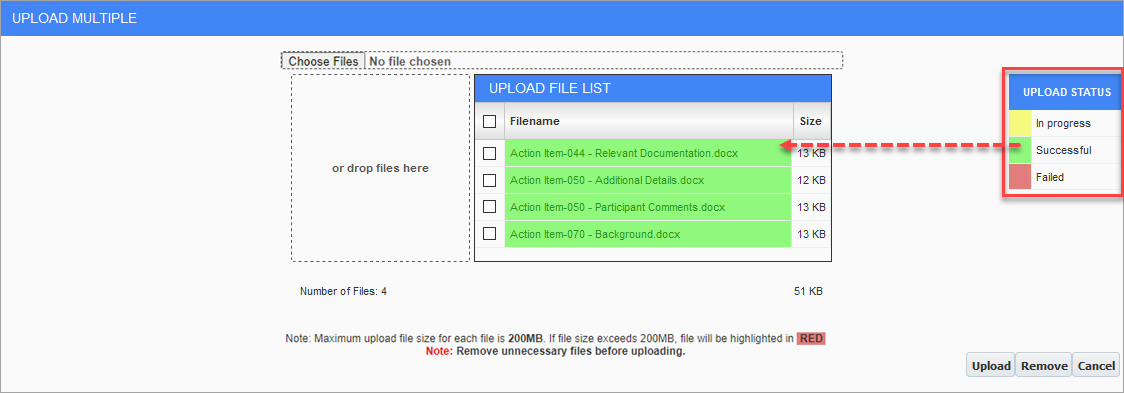
To remove a file, check the box beside the filename and press the [Remove] button.
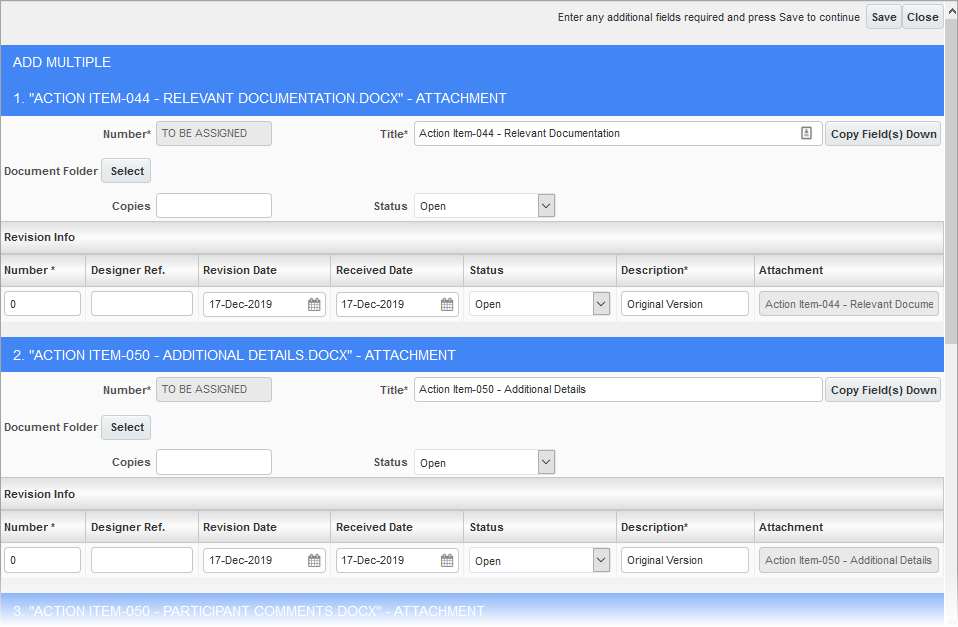
Click the [Upload] button to bring the files into the next display window where the document type can be modified, as well as the values of the document records to be created. A record can also be deleted here.

If any document record has mandatory fields, the [Proceed] button is inactive and the ‘Has Mandatory Fields’ box is checked. Use the [Enter Additional Fields] button to edit the upload and make any adjustments before proceeding.
Use the Delete icon ( ) to remove any record from the current upload. It does not remove the file that was initially uploaded – use the [Remove] button on the Upload Multiple pop-up screen to do this.
Pressing the [Proceed] button will complete the upload process.
[Enter Additional Fields] – Button
Use the [Enter Additional Fields] button in the Select Document Types pop-up window to display the interface for modifying the fields:
Example of the window launched from pressing the [Enter Additional Fields] button
Make any necessary corrections and then press the [Save] button. The saving procedure completes the upload.
NOTE: Documents brought in with the [Upload Multiple] button are not cleared from the ‘Select Document Types’ pop-up box unless the documents are posted to the PM object with either [Proceed] or [Save], or until the Attachments tab is refreshed.
[Copy Field(s) Down] – Button
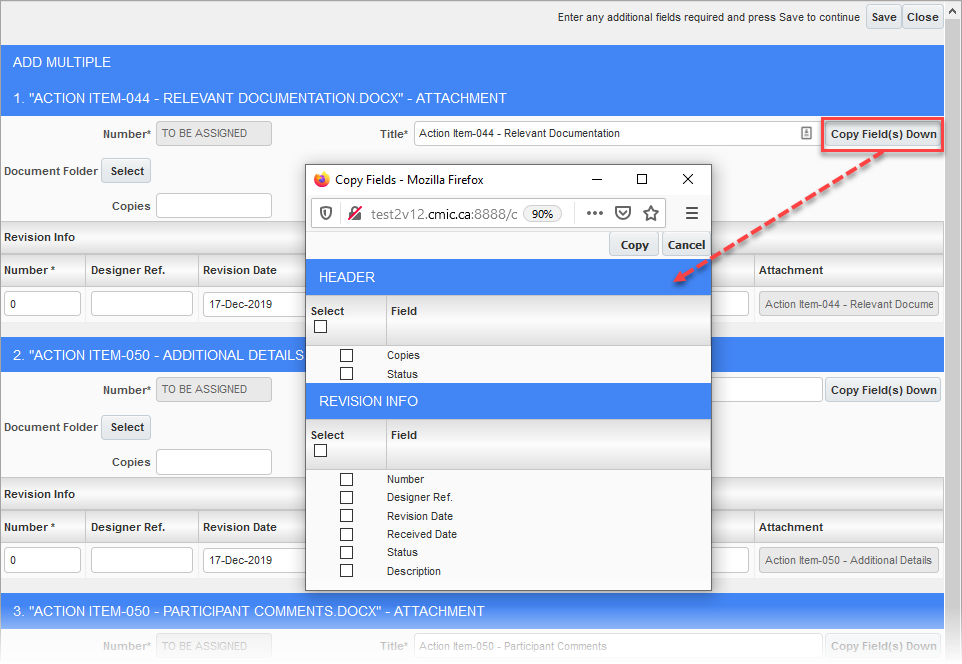
CMiC has added the ability to copy down from one document record to other records of the same document type in the Copy Fields screen:
Example of pop-up window launched from the [Copy Field(s) Down] button
When the [Copy Field(s) Down] button is clicked, a pop-up window is displayed with checkboxes against every field in the header and detail section for the document type where the user is. The user selects the fields to be copied and clicks the [Copy] button. The system will then perform the copy down function for all selected fields for the same document type records below the current record.
During the copy process, any fields that are being copied are overridden if the field has a value.
All fields except for the file name and the document number (for any selected document type) will be able to be selected and to be copied.
The descriptions that show for the fields on the copy screen are the names as defined by the user (if the standard labels are changed via Prompt Maintenance). For example, if the user renames “Designer Ref” to “SB Designer Ref” then the latter is the name that will show in the Copy window.
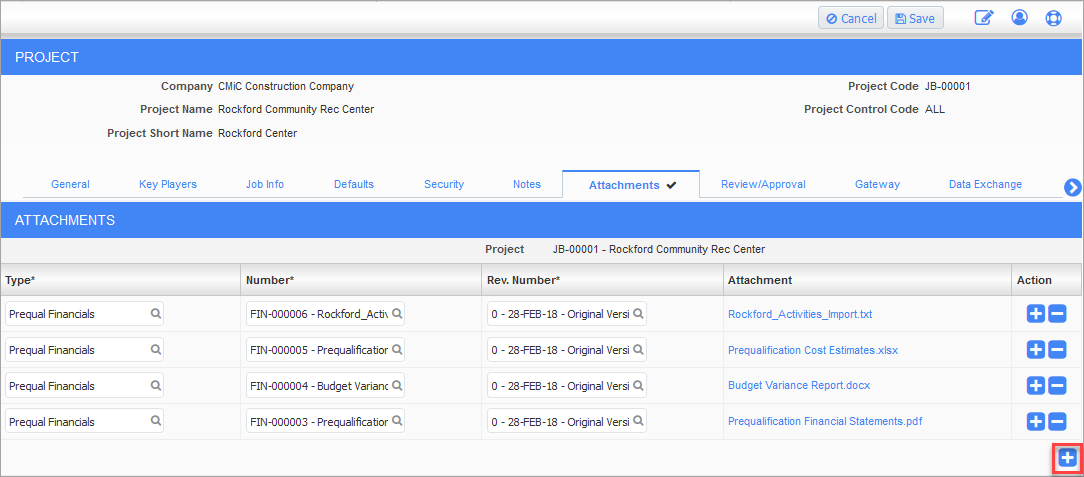
[Edit Details] – Button
Example of screen launched from clicking on the [Edit Details] button on an Attachment tab
Use the [Edit Details] button to edit current attachments or add existing documents that reside in the Document Management repository.
To add an existing document to the object, use the Add icon ( ) to open a new line. Enter/select the document type and the document number. The revision number will automatically default to the latest revision, but a different revision can be selected, if required.
Press the [Save] button when done.
NOTE: Field security can be assigned to the [Edit Details] button when in the Document Entry screen (standard Treeview path: CMiC Field > Security > Role Maintenance – Programs/Documents). The possible settings are “Unrestricted” or “Read-only”. When set to “Read-only”, the [Edit Details] button is disabled.
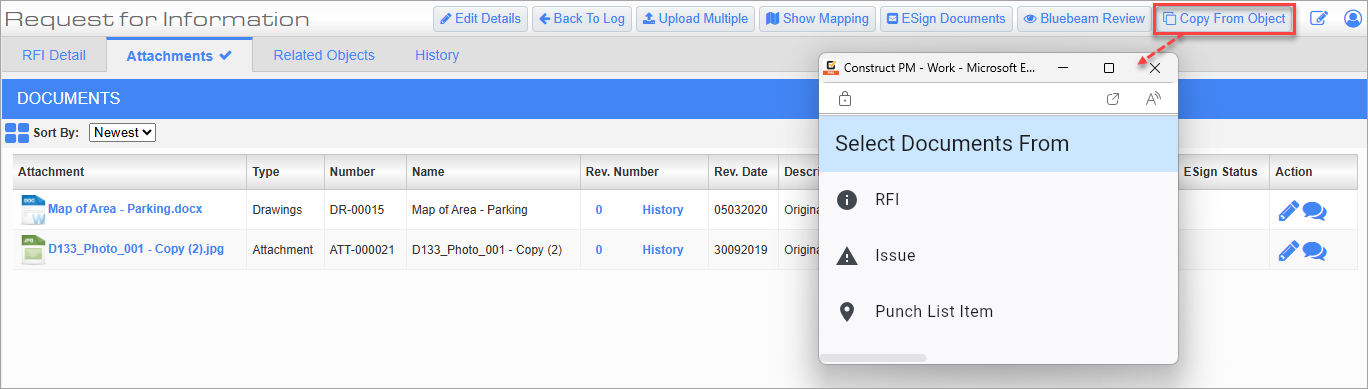
[Copy From Object] – Button
This button is available on the Attachments tab for applicable PM objects.
Example of screen launched from clicking on the [Copy From Object] button on an Attachment tab
Use the [Copy From Object] button to display the Construct PM pop-up and select from the following PM objects to copy attachments : RFIs, Issues, and Punch List Items.
Users will be able to view records with attachments. If there are no documents with attachments available, the screen will display "No Records Found".
Select a single record by clicking on its row. The checkboxes on the left side of the screen are used for batch edits and can not be used to select records to copy attachments from.
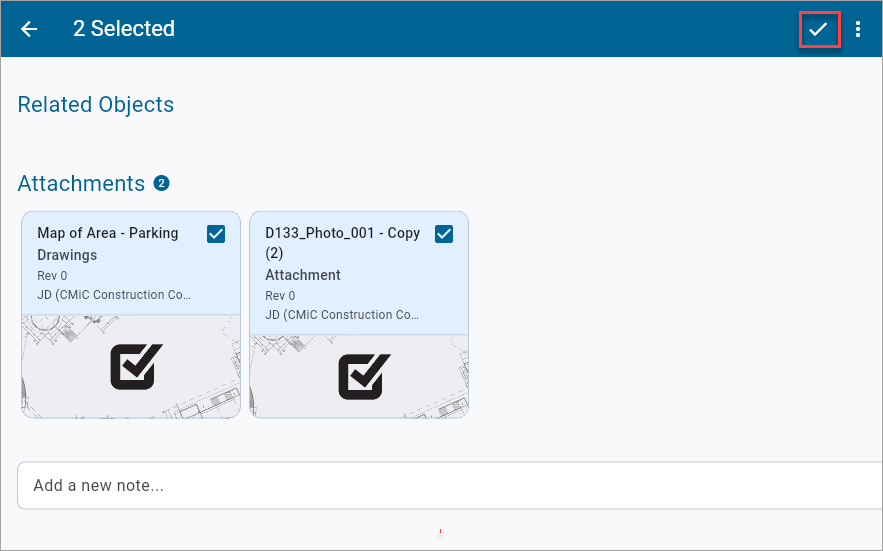
Press the checkmark icon in the top right corner to copy the selected attachments. By default, all the attachments will be selected, and users can deselect items in the Attachments section. The documents will appear in the Attachments tab (a screen refresh may be required).
Changing Attachment Type
Users can change an attachment's type by editing the folder where the document is stored.
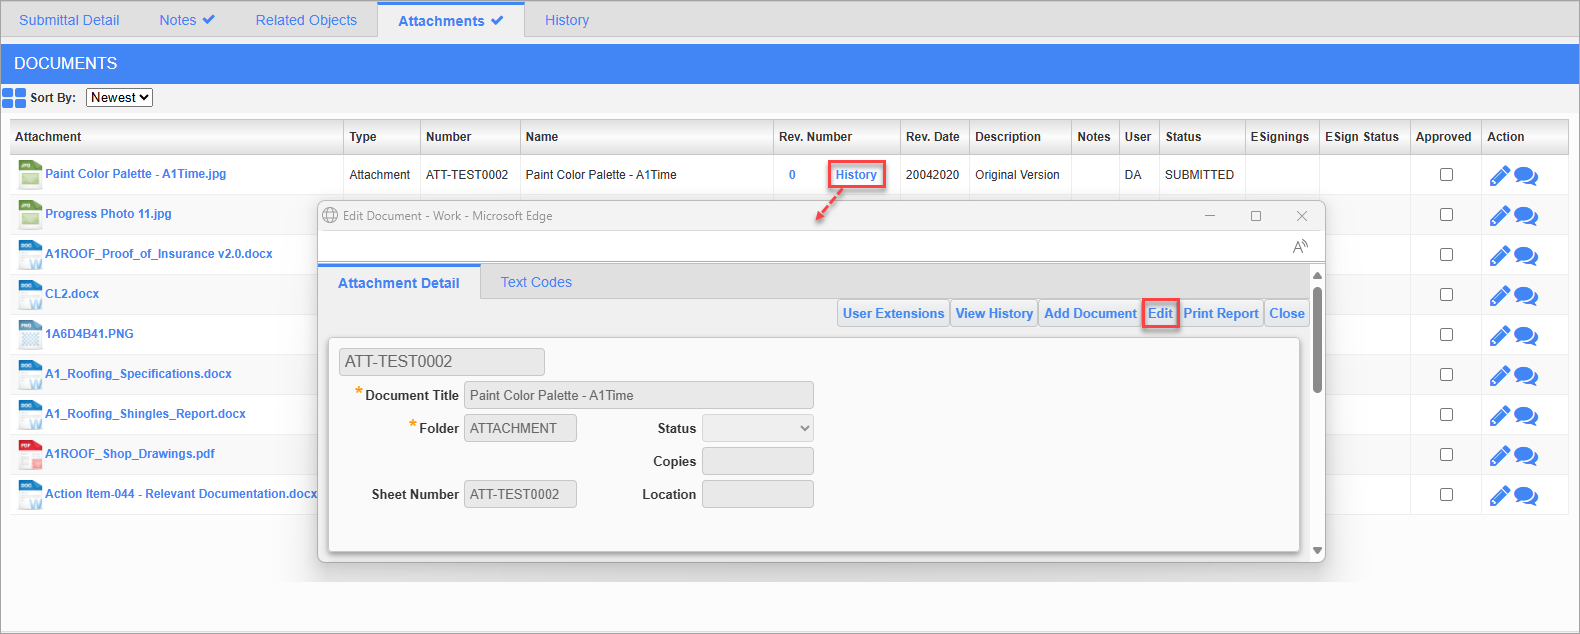
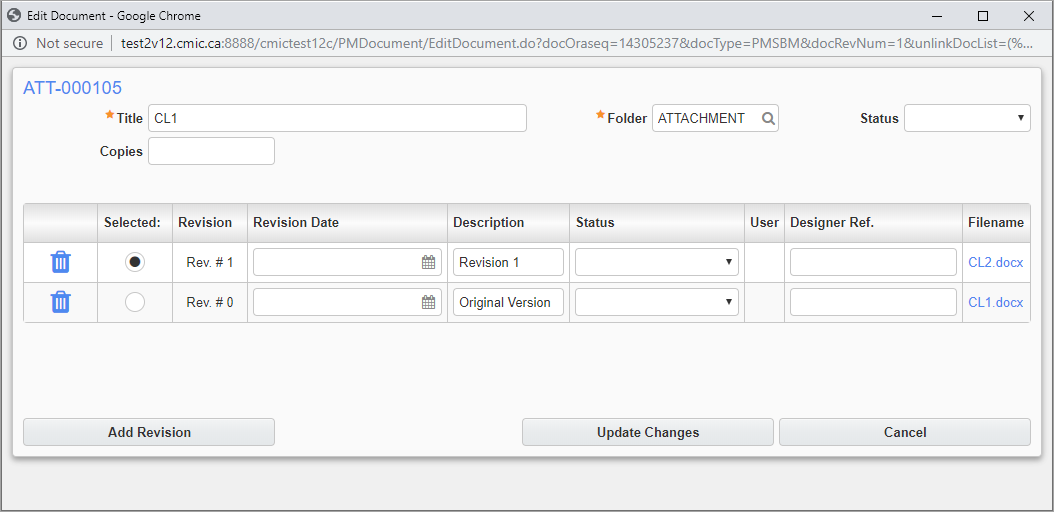
Edit Document pop-up launched from History link on Attachment tab
Press the History link in the Revision Number field to launch the Edit Document pop-up. Press the [Edit] button to enable the Edit mode and then enter/select a new document type in the Folder field. Press [Save] when done and reload the record to view the changes.
Auto-Indexing
Auto-Indexing automatically transfers object metadata to attachment metadata for uploads where document classifiers and meta-data are blank and need to be filled in. Initially, mapping must be done for binding the object to the document type and their fields. The mapping functionality can be accessed by clicking on [Show Mapping] when in the Attachments tab of any existing object type that needs to be mapped. Please refer to CMiC Field - Auto-Indexing for more information on how to use and implement this feature.
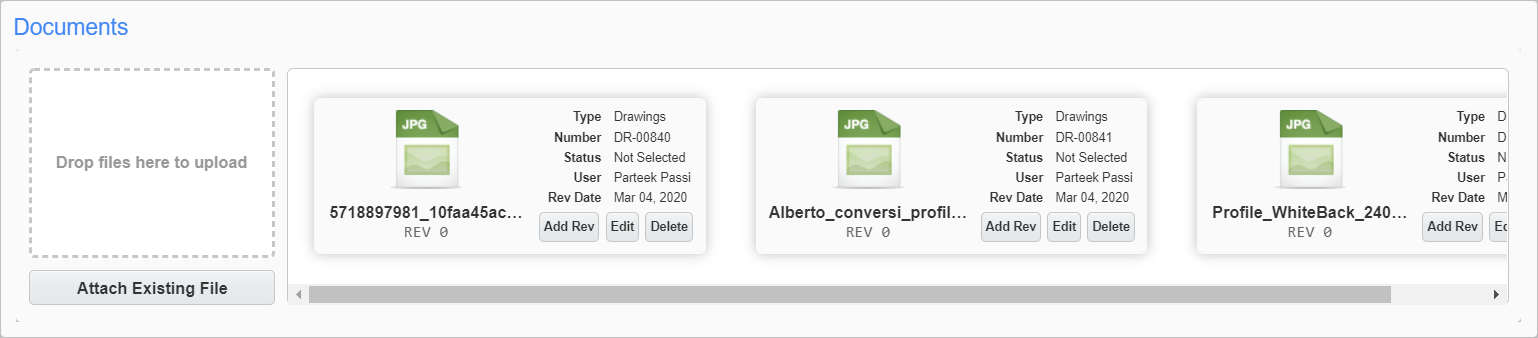
Document Strip
The Document Strip is a way of attaching files and documentation to object records. The strip is available in the Communications, RFIs, Issues, Submittals, Daily Journals, Field Work Directives, and Notices screens.
NOTE: The object record must be saved before documentation can be added. As such, the Document Strip does not appear until the [Save] button has been pressed successfully for the current object.
An example of the Document Strip taken from the RFI screen
Documents can be added by dragging and dropping files into or clicking within the dashed area. Clicking on a document icon downloads and opens the document.
Documents that are added in this section also then appear in the object’s Attachments tab.
Documents appear in the order in which they were attached. New and revised documents are shown with banners that read “new” and “rev”, respectively. The number of times a document has been revised appears under its thumbnail.
[Attach Existing File] – Button
Press this button to attach a file that has already been attached to some other CMiC Field object. Documents that are available through this button also appear in the general look up in the Attachments tab.
[Add Rev] – Button
Press this button to add a new revision of the document. The revised version will appear in the Document Strip in place of the original version.
[Edit] – Button
Press this button to edit the title of the upload, how many copies should be distributed for review, and which revision of the document to include. If the user has the 'Allow To Delete Document Revision' assigned to their Project Role, then they may delete individual revision numbers from this screen.
[Delete] – Button
Press this button to delete the document from the document strip.
Document Security – Attachments
Linking Privilege by Document Type

Project Roles; standard Treeview path: CMiC Field > Security > Project Roles
Use the Project Roles screen to assign linking privileges by document type, for users with the project role. Check the ‘Show in Menu/View/Create/Update/Delete/Unlink All Document Types’ box to allow linking privileges for all document types.
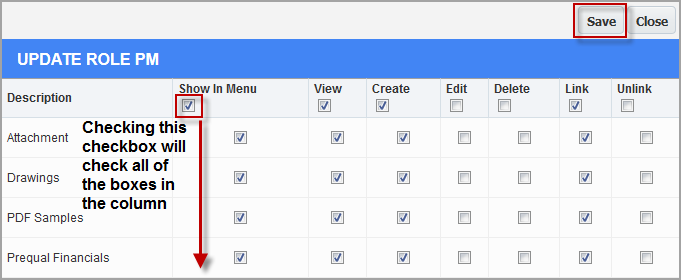
Example of the pop-up window launched from the ‘Show in Menu/View/Create/Update/Delete/Unlink All Document Types’ link in the Project Roles screen
Click the link provided by the ‘Show in Menu/View/Create/Update/Delete/Unlink All Document Types’ checkbox to open the pop-up window to assign privileges for each document type.
If the ‘Link’ box is unchecked for a role’s document type, the user with that role will not be able to add existing document attachments of that document type to any PM objects, even though they might still be able to do so for other types, as per the settings for the other document types.