Releasing retainage at a non-detail level is done via this screen accessed via the Payments Treeview node, or directly in the Enter Request for Payment screen, depending on the Contract setup.
NOTE: Pay When Paid functionality is not available on Releasing Retainage in this way.
If using the non-schedule release method, there are three steps in release of retainage including:
-
Enter Retainage Release details.
-
Verify via the Edit Listing.
-
Post Retainage Release.
Releasing Subcontract Retainage
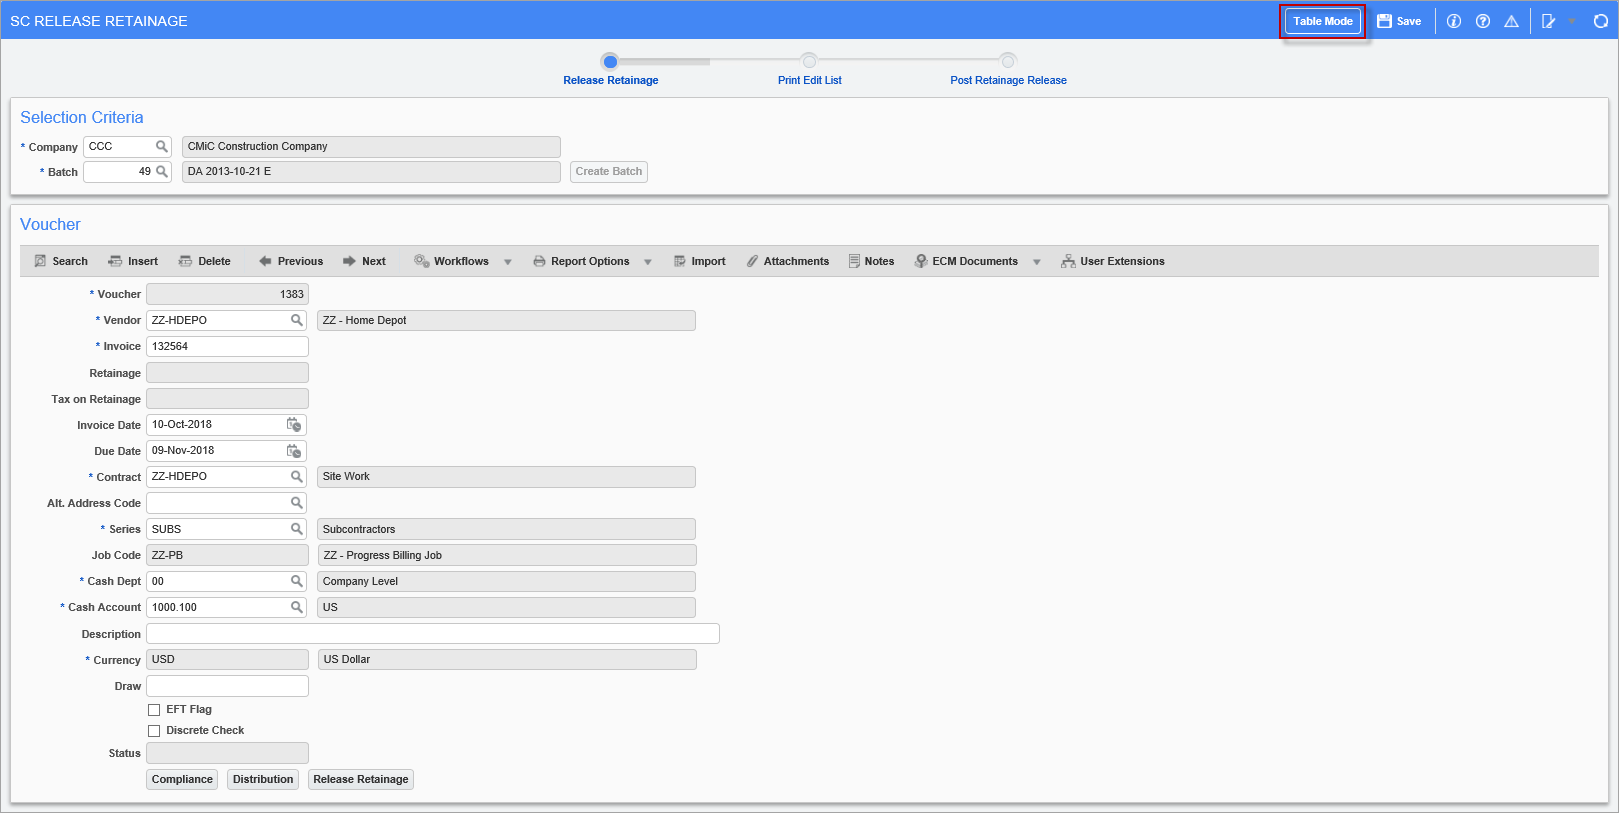
Pgm: SCRELRET – SC Release Retainage; standard Treeview path: Subcontract Management > Payments > Release Retainage
The Subcontract Retainage Release screen allows the user to release retainage from several invoices via a batch. During retainage release, a single invoice with a zero invoice amount and a negative retainage amount is generated. Invoices that have been selected for retainage release will subsequently have the retainage released amount updated so that they cannot be reduced further.
Note, this screen can be used in Table Mode or Form Mode. In the above screenshot, the screen is in Form Mode, and it can be switched to Table Mode by clicking the framed [Table Mode] button.
In Form Mode (shown above), to add a new voucher to the batch, click the Block Toolbar’s [Insert] button. In Table Mode, either click the [Add New] button to add it via the screen in Form Mode, or click the Block Toolbar’s [Insert] button to add it via the screen in Table Mode.
Once the Voucher for the retainage release payment have been entered and filled out, click [Release Retainage] to enter the release amount.
Voucher (Details) – Section
Vendor
Select vendor who has requested payment on the retainage portion of their invoice(s).
Invoice Number
Enter the vendor's invoice number for the retainage release being entered.
Invoice Date
Enter the date of the invoice to be generated for the retainage release being entered.
Due Date
The due date will default to this field based on the term code defined for the vendor. The user may change this date as required.
Contract
Select Subcontract Contract that applies to the invoices from which retainage should be released.
Series
(Optional) Enter the series code that will apply to the invoice generated from this Request for Payment. The series code will default from the Contract Defaults tab of the Subcontract Control file if entered.
Job Code
The job code will default from the contract number entered in the previous field. Verify that the job code applies to the contract to which retainage is being released.
Cash Dept, Cash Account
Verify/modify the bank department and account from which the invoice generated by this retainage release will be paid.
The cash department and account will default from the cash account specified by the selection of “Default AP Accounts”. The system allows for the selection of default AP accounts by Vendor, Invoice Series and Currency.
If the Job Bank Account feature has been activated in this module (‘Use Bank Accounts By Job’ checkbox is checked on the RFP Defaults tab of the Subcontract Control file screen), the bank department and account will default from the default bank account specified for the Job via the Enter Job screen. For details about this feature, please refer to Subcontract Management - Job Bank Account - Feature.
Description
Enter a description for the retainage release being processed.
Draw (Number)
Enter the billing draw number with which this retainage release is associated.
EFT Flag – Checkbox
This checkbox’s default state comes from the ‘EFT Payments’ checkbox on the vendor record’s Accounting tab (standard Treeview path: Accounts Payable > Setup > Maintain Vendors). If this checkbox is checked, it indicates that this payment is to be paid electronically instead of by check.
In order to use this payment method, the vendor’s banking and EFT information must have been set up on the vendor’s record.
Discrete Check – Checkbox
The checkbox’s state defaults from the vendor record’s Accounting tab setup (standard Treeview path: Accounts Payable > Setup > Maintain Vendors).
During payment processing, all outstanding payments for a vendor are processed together and paid via a single check. If the ‘Discrete Check’ feature is used, each Voucher for the vendor is paid via separate checks.
[Compliance] – Button
To modify or view the compliance for the related retainage, click the [Compliance] button and make any changes as required.
[Distribution] – Button
To view the distribution of items in retainage, click the [Distribution] button. This is a display-only option.
[Release Retainage] – Button
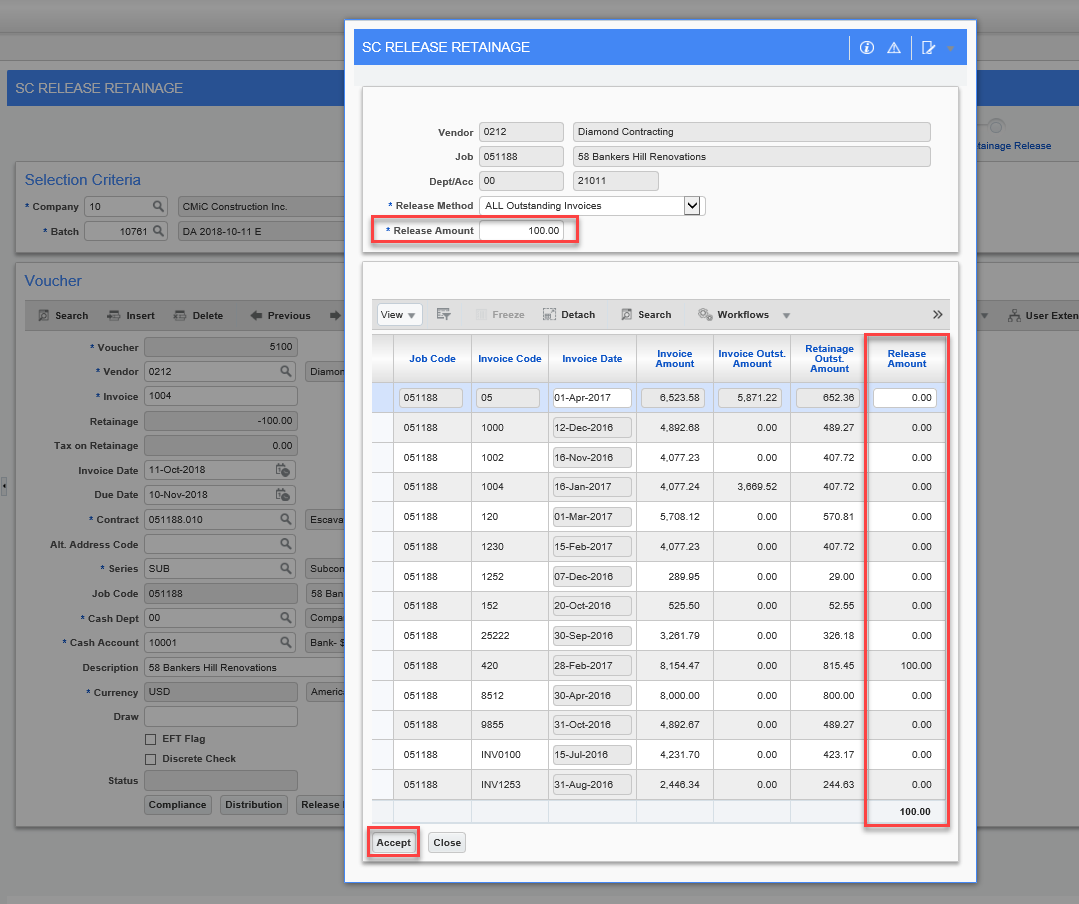
Pop-up window launched from the [Release Retainage] button on the SC Release Retainage screen
Once the Voucher for the retainage release payment has been created, the next step is to enter the release amount via this button’s pop-up.
Release Amount
Enter the total amount of retainage to be released on this Subcontract. The release amount entered within this field cannot exceed the total outstanding retainage on all the invoice vouchers applicable to the contract specified on the first screen.
Release Method
Select the release method that pertains to the retainage release being generated. The system allows the user to select from two different release methods:
-
Select “Retainage Outstanding Invoices” to select only invoices with outstanding retainage.
-
Select “ALL Outstanding Invoices” to select all outstanding invoices.
Verify/Modify Release Amounts
The system will automatically release amounts from the oldest to the newest invoice up to the amount entered in the Release Amount field in the pop-up window’s header.
Verify/modify the amounts so that they are consistent with how retainage should be released on the invoices displayed.
Press the [Accept] button to accept the release and commit the entry.
Edit Listing
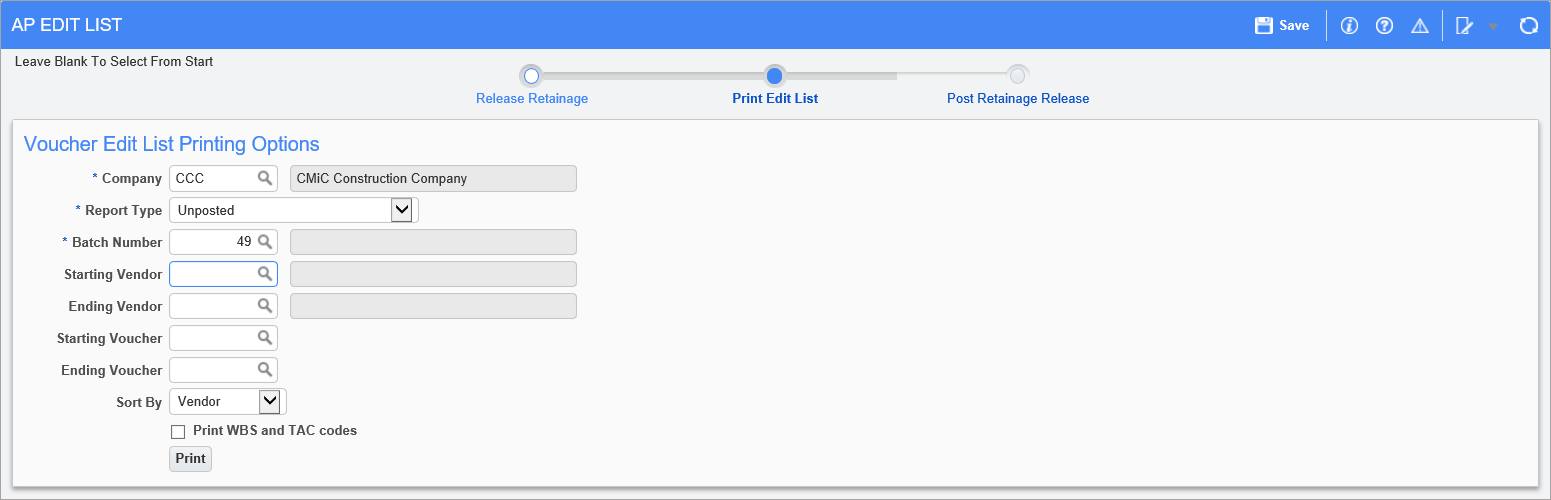
Pgm: APEDITLIST – AP Edit List (Retainage Release)
Use the Voucher Edit List to check the unposted retainage Vouchers created through the process of retainage release. The listing can be printed for the complete batch or be limited to specific Vouchers and or Vendors.
Company
Company for which batch of Vouchers for release payments is being created.
Batch Type
Batch type of batch for which the list is to be printed.
Batch Number
Batch number of batch for which the list is to be printed.
Starting Vendor, Ending Vendor (Range of Vendors)
If both fields are left blank, the range includes all Vendors.
If the Starting Vendor field is left blank, the range starts with the first Vendor, by code.
If the Ending Vendor field is left blank, the range ends with the last Vendor, by code.
Starting Voucher, Ending Voucher
If both fields are left blank, the range includes all Vouchers.
If the Starting Voucher field is left blank, the range starts with the first Voucher, by code.
If the Ending Voucher field is left blank, the range ends with the last Voucher, by code.
Sort by
Select the list’s sort order (Vendor/Transaction Number).
Print WBS and TAC Codes
If checked, WBS and TAC Codes will be included in report.
[Print] – Button
Click to print the report.
Posting Retainage Release
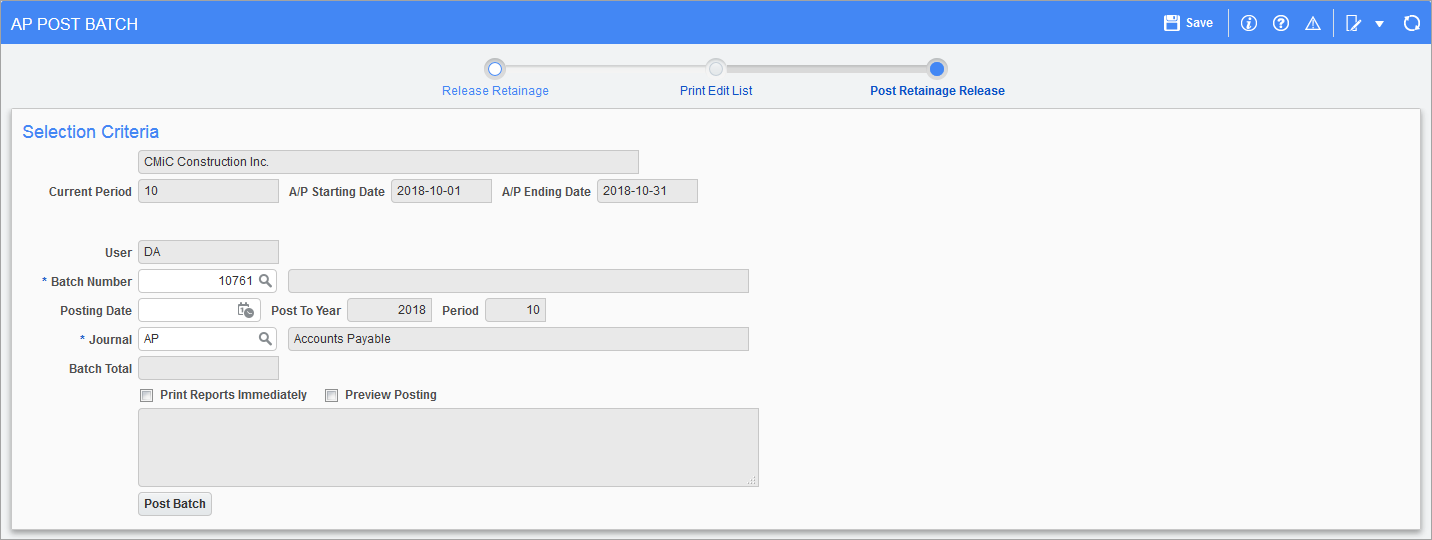
Pgm: APPST – Post Retainage Releases (Retainage Release)
Use this screen to post the retainage release batch. In addition to posting the retainage release within the Subcontract Management, the batch-posting program will update the Accounts Payable, General Ledger and Subcontract applications.
Company
Select the company for which batch will be posted.
Current Period – Display-Only
Current AP Period for post date.
A/P Starting Date field displays start date of current AP Period.
A/P Ending Date field displays end date of current AP Period.
A/P Period – Display-Only
AP Period after the current AP Period.
A/P Starting Date field displays start date for this AP Period.
A/P Ending Date field displays end date for this AP Period.
A/P Period – Display-Only
AP Period after the AP Period displayed by the previous A/P Period field.
A/P Starting Date field displays start date for this AP Period.
A/P Ending Date field displays end date for this AP Period.
User
User ID of user posting the batch.
Batch Number
Enter the required batch number, or use the LOV that is available, to display all unposted batches for the current user. A valid batch number must be entered.
Posting Date
The last day of the current Account Payable year and period is defaulted into this field. The display-only fields to the right display the corresponding year and period for the date.
Post To Year – Display-Only
Year of post date.
Period – Display-Only
AP Period of post date.
Journal
The system will default the journal code from the Accounts Payable Control File.
Print Reports Immediately – Checkbox
Check this box to print the posting report immediately after posting.
If unchecked, the posting report will not be printed, but can it be printed later using the Print Posting Reports utility (standard Treeview path: Subcontract Management > Utilities > Print Posting Reports).
Preview Posting – Checkbox
This option is used to preview the posting report without actually posting.
[Post Batch] – Button
Click to begin posting process.