Overview
Company Control; standard Treeview path: CMiC Field > File Maintenance > Company Control
The Company Control screen is used for setting company-level mask codes for auto-numbering of projects and related items, and setting other defaults which are then populated in a new project on creation, but which can be overridden at the project level.
[Copy Masks To Project] – Button
This button is used to copy the company-level masks to all existing projects. This feature is useful when changes are made to masks at the company level, and you would like those changes applied across all existing projects.
NOTE: Using this feature will overwrite any project-specific mask codes that have been set up.
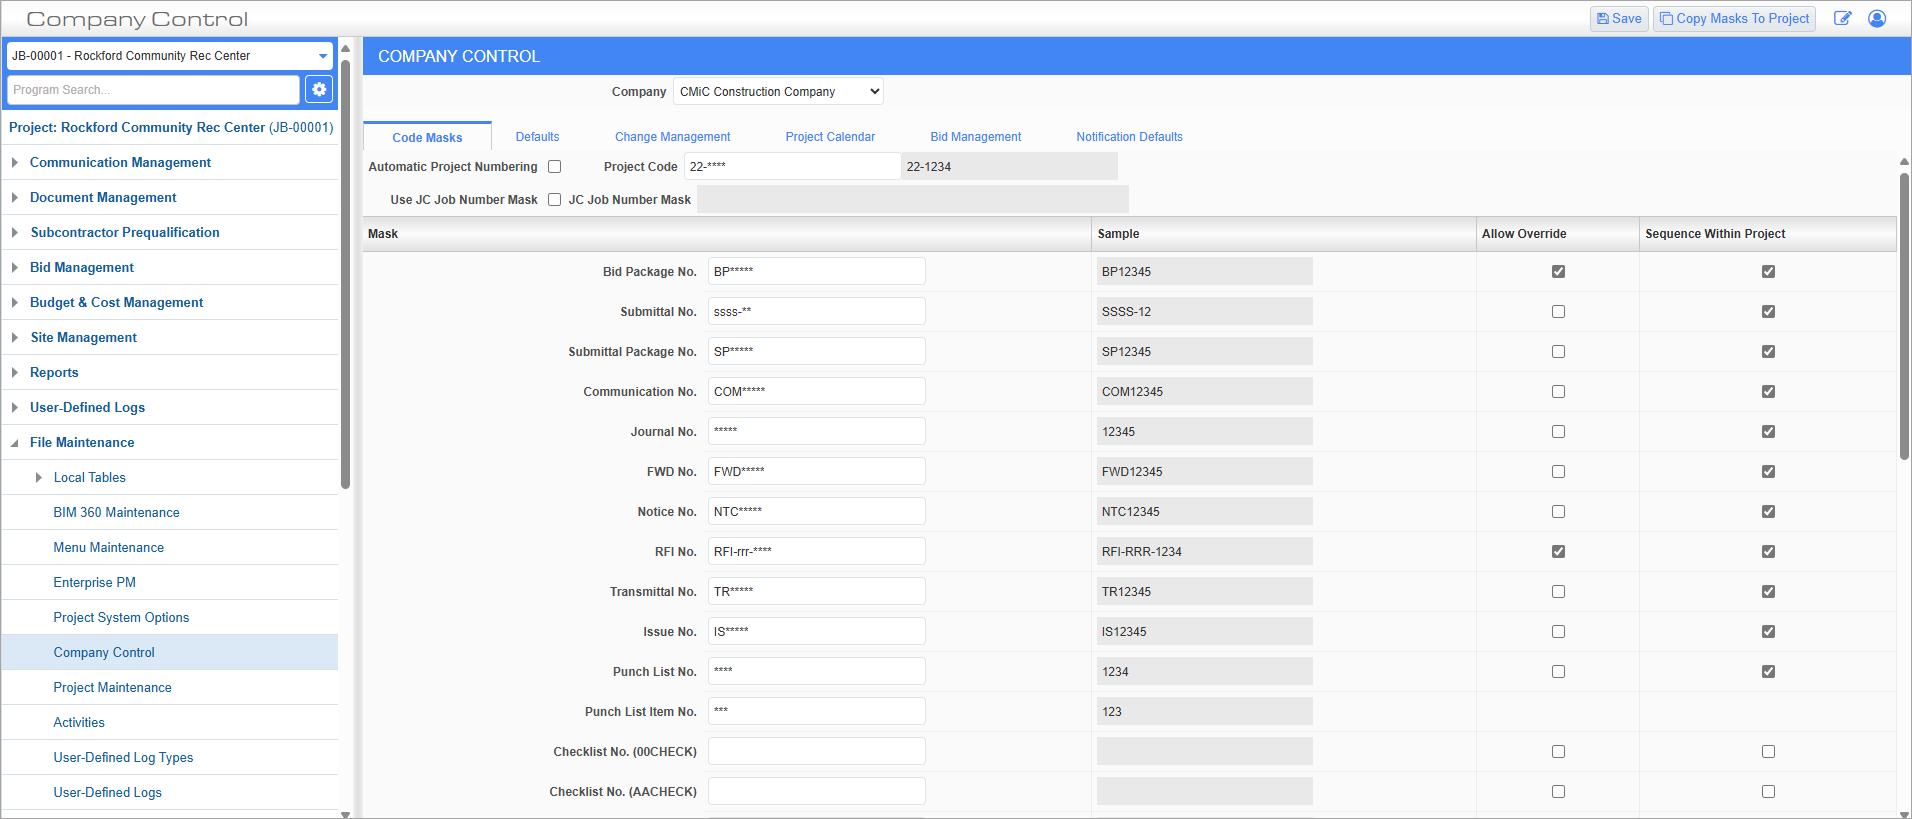
Code Masks – Tab
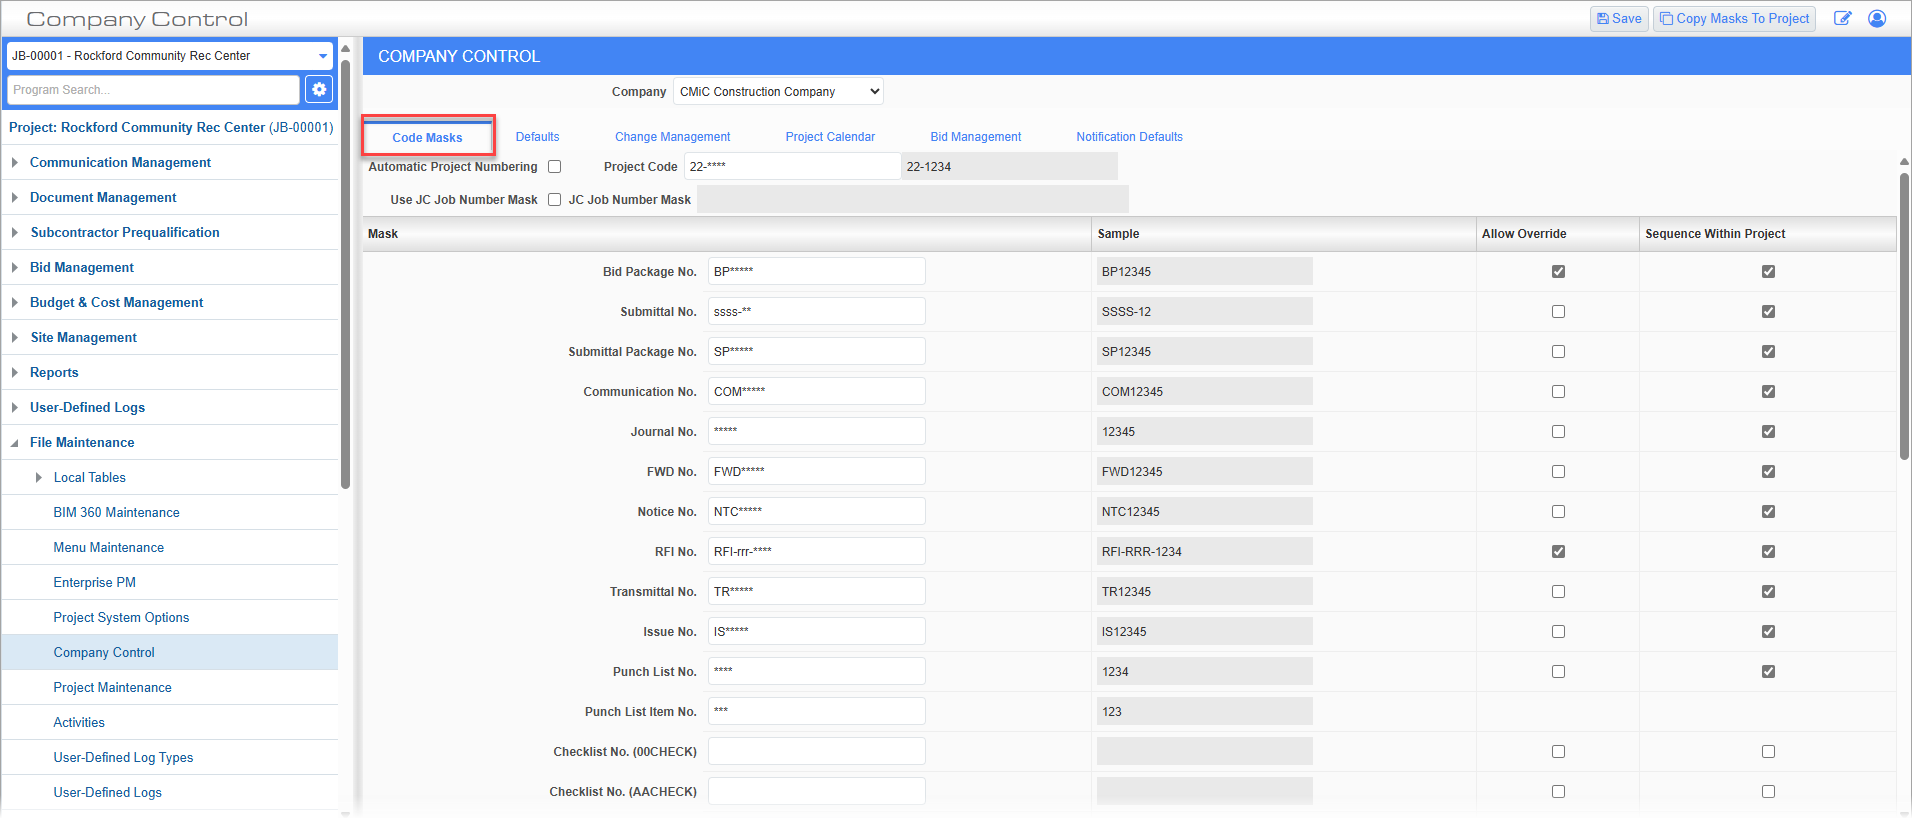
Standard Treeview path: CMiC Field > File Maintenance > Company Control – Code Masks tab
This tab is used to set company-level mask codes for auto-numbering of projects and related items.
Automatic Project Numbering – Checkbox
Check this box to number all new company projects automatically.
Project Code
Enter the project code. If the 'Automatic Project Numbering' box is checked, when entering new projects the Project Code field will be display-only as the project code is automatically generated using the project code mask. The display-only field to the right of the Project Code field shows a sample generated project code using the project code mask.
Use JC Job Number Mask – Checkbox
Check this box to number new company jobs using the JC Job Number Mask. The JC Job Number Mask field is read only and defaults from the Job Mask field on the Job Setup tab of the Job Cost Control File screen in the Job Costing module. This field is enabled via the 'Automatic Numbering of Jobs' checkbox. For more information, please refer to Job Costing - Job Cost Control File - Job Setup - Tab.
In the Job Costing module, auto-numbering is applied when jobs are created automatically (i.e., when the 'Automatically Create Job for a New Project' box is checked on the Jobs tab of the Job Cost Control File in the Job Costing module). In CMiC Field, auto-numbering is applied when users create jobs on the fly on the Job Info – Tab of the Project Maintenance screen (with the appropriate privilege).
NOTE: When job auto-numbering is in effect, the job code may not be the same as the project code, even if both the project and job are created at the same time and use the same type of mask. In order for the job code and project code to match, one of the following conditions must be met:
-
The project and job masks are used for the first time.
-
The number of existing projects and existing jobs are the same.
As well, the job mask may not align with the project mask if projects are created and associated with other jobs not following the mask pattern.
Mask
Enter the code mask here. The first half of the mask relates to the object being numbered and is the same for all auto-numbered objects. The second half is the number of that object, the length of which is determined by the number of asterisks. Either enter a code manually or link it to the object type directly by using the codes shown below.
c=Company Code, p=Project Code or j=Job Code, y=Year, m=Month, d=Day, *Next Available Number
NOTE: The object type code can be linked to the object type (for example, RFIs can be auto-numbered according to their RFI type codes, projects according to their project codes, and so on) which allows for easier identification and organization of object records within CMiC Field log screens.
Allow Override – Checkbox
Check this box to allow the code mask to be overridden at the project level. This is done on the Default tab of the Project Maintenance screen.
Sequence Within Project – Checkbox
Sequencing within a project is set by the individual items. To select this option, check the ‘Sequence Within Project’ box for the particular object type to have the auto numbering sequenced within the project.
Defaults – Tab
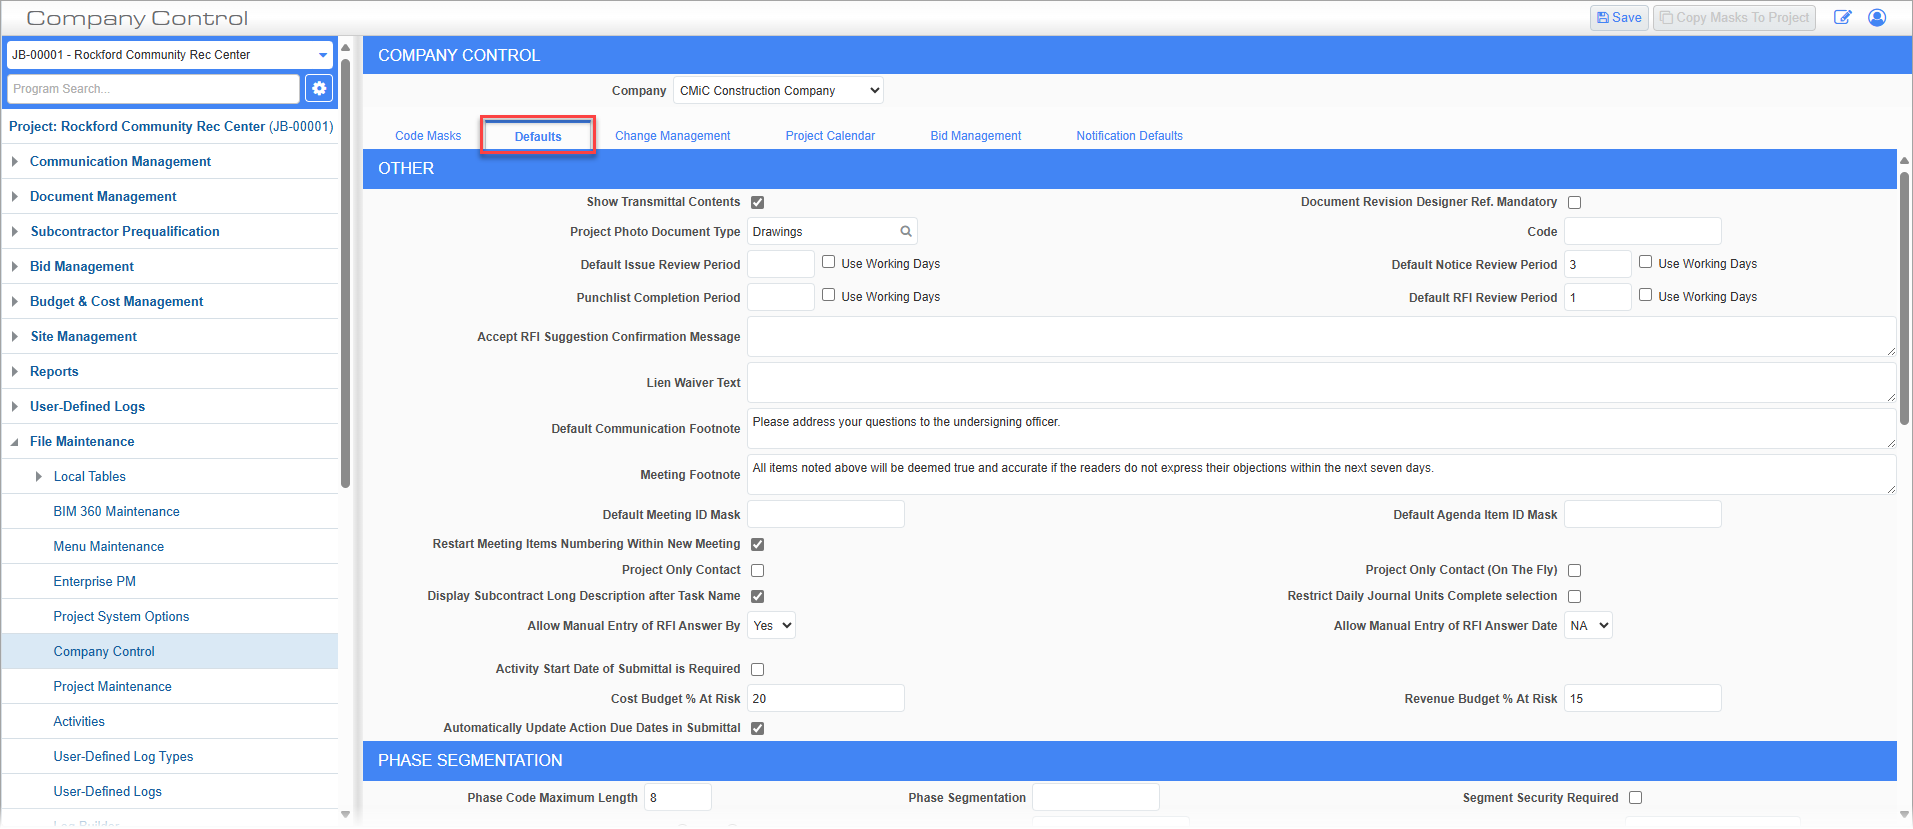
Standard Treeview path: CMiC Field > File Maintenance > Company Control – Defaults tab
This tab is used to set default values including meeting and communication footnotes, markup rules, lien waiver text (which displays when a payment request is submitted), submittal lead times, and daily journal defaults for ‘Copy From’ and Text Types.
Other
Show Transmittal Contents – Checkbox
When entering a transmittal, the Contents section will only be displayed when this box is checked.
Document Revision Designer Ref. Mandatory – Checkbox
When adding a new document, the Designer Ref. field under Revision Info is only mandatory if this box is checked.
Project Photo Document Type, Code
The project photo document type and code defined here are for clients who also have the Dashboard module. It allows you to define what type of document the project photo is and the associated document code for the record (will be stored in Document Management).
When specified and configured for Dashboard, the project photo will be picked up when the user logs into CMiC Collaborate.
Use Working Days – Checkbox
This checkbox is used to indicate whether working days set in the Project Calendar screen should be used in determining the required date for Notices, RFIs, Punch Lists, Submittals and Issues, as opposed to using calendar days. A checkbox is positioned beside the related fields (Default Review Period) for RFIs, Issues, Punch lists and Notices, and in the Submittal Lead Times section for Submittals.
Accept RFI Suggestion Confirmation Message
When answering an RFI, the [Accept Suggestion] button is used to accept a suggestion which was made when the RFI was created without re-typing the text. The button will copy the suggestion into the answer.
It is possible to have a confirmation message displayed prior to accepting a suggestion, so that greater care is taken with the answer that is selected. The confirmation is set up in this field. This message will pop up when the [Accept Suggestion] button in any RFI for that company is pressed.
Lien Waiver Text
The text entered in this field is the lien waiver text which displays when a payment request is submitted.
Default Communication Footnote
Enter a unique footnote to be used on all communication reports.
Meeting Footnote
Enter a unique footnote to be used on all meeting minute reports.
Default Meeting ID Mask / Default Agenda Item ID Mask
Users can define both the Meeting ID and Agenda Item ID masks here, as well as in the Defaults tab of the Project Maintenance screen. The values entered here will be used as defaults for the Project level, which in turn will be used as defaults at the Meeting Track level.
Restart Meeting Items Numbering Within New Meeting – Checkbox
Check this box to restart the numbering for meeting items for new meetings from the number 1.
Project Only Contact – Checkbox
This checkbox is used to create one-time contacts directly on a specific project. It is used to help control the population of system contacts, as these contacts will not appear in the system contact list and cannot be added to other projects. If checked, the 'Project Only Contact' box will be checked by default when creating contacts using the Project Contacts screen. This checkbox can’t be disabled once the Contact record is saved. To remove the project-only state of the Contact record, you will need to convert the contact using the CMiC Field - Convert Partners and Contacts screen.
Project Only Contact (On The Fly) – Checkbox
This checkbox is similar to the 'Project Only Contact' checkbox, in that it is used to create one-time contacts directly on a specific project. It is used to help control the population of system contacts, as these contacts will not appear in the system contact list and cannot be added to other projects. If checked, the 'Project Only Contact' box will be checked by default when creating contacts in the Project Contacts On-The-Fly screen. This checkbox can’t be disabled once the Contact record is saved. To remove the project-only state of the Contact record, you will need to convert the contact via the CMiC Field - Convert Partners and Contacts screen. Field security for the 'Project Only Contact (On The Fly)' checkbox can be applied, if desired. By default, it is set to "Hidden" on the *ALL* role.
Display Subcontract Long Description after Task Name – Checkbox
Check this box to display the Long Description field in PM Subcontract directly after the Task Name field.
Restrict Daily Journal Units Complete selection – Checkbox
This checkbox applies to the Units Complete program. Uncheck this box to allow units complete to be entered via the Daily Journal for A types, as well as P and U types.
Allow Manual Entry of RFI Answer By/Answer Date
(EXTENDED FUNCTIONALITY) Previously coded with only "Y" or "N" values, when these fields are set to "Y", this allows the user to enter the RFI answer by/answer date, regardless of the setting of the privilege ‘No RFI Answer Entry’ (standard Treeview path: CMiC Field > Security > Project Roles) or field security (standard Treeview path: CMiC Field > Security > Role Maintenance – Programs/RFI).
When set to "N", the fields are closed to user input but the default rules (privileges, field security) apply.
When set to "NA" (not applicable), the fields are open to user input but the rules for related privileges /field security apply.
The settings of these fields at the Control File level are inherited by any new projects and can be overridden.
Activity Start Date of Submittal is Required – Checkbox
The start date of the submittal activity can be set as mandatory for submittals (standard Treeview path: CMiC Field > Document Management > Submittals). The initial setting is made here in the Company Control screen. This setting will then default to the Project Maintenance screen of any newly created projects but can be overridden at the project level (standard Treeview path: CMiC Field > File Maintenance > Project Maintenance – Defaults tab).
Cost Budget % At Risk, Revenue Budget % At Risk
Enter the default cost budget and revenue budget percentages. These values automatically populate the Defaults tab of the Project Maintenance screen when a new project is created but can be overridden, as needed. From the Project Maintenance screen, the risk percentages will default to the PCI Projection screen (standard Treeview path: CMiC Field > Budget & Cost Management > PCI Projection) but can be overridden there as well.
If a PCI is pending and unposted, the value is populated from the Project Maintenance screen. If a PCI is approved but remains unposted in a period, then upon refresh, the defaulted or overridden risk percentage will be retained. Only newly created PCIs with a status of "Approved", when included in a PCI Projection period, will have the risk percentage automatically set to zero. A PCI posted in the current period is not shown in the PCI Projection report. If a PCI is posted in a future period, it is considered as a pending PCI (even if the status is "Approved").
For more information, please refer to Contract Forecasting - PCI Projection.
Automatically Update Action Due Dates on Submittal – Checkbox
If checked, the system automatically updates the due dates for each stage in the submittal workflow, based on the user entering an action date. When an action date is entered, the system adds that date to the remaining lead times between each step to update the due dates.
Phase Segmentation

Phase Segmentation section on Defaults tab
Phase Segmentation can be used to automatically build a hierarchy of phases within the Phase Master. This feature is applicable to both the Bid Items and the Potential Change Item (detail section) screens via the Create On-The-Fly Phase pop-up feature in both screens.
The configuration fields related to phase segmentation are entered here. These fields are used in combination to direct the system how to break up the phase codes into segments and the maximum length of the total phase code.
The sum of all the numbers in the Phase Segmentation field must equal the Phase Code Maximum Length field, and the segmentations are defined by a comma.
Enforce Cost Code Segmentation – Checkbox
This checkbox allows users to add cost codes on-the-fly with segmentation. Its functionality is similar to the 'Segment Security Required' checkbox, however the 'Segment Security Required' checkbox only allows users to enter numerical segment values. The 'Enforce Cost Code Segmentation' checkbox validates cost codes against a mask that allows alphanumeric values.
The following rules apply:
-
When checked, users can add cost codes with segmentation on-the-fly. The cost code must already exist in the master list (i.e., the Enter Cost Code screen in the Job Costing module), and new cost codes cannot be entered.
-
When checked, the segmentation rules set in the Phase Code Maximum Length, Enterable Segment Position, Phase Segmentation, Enterable Segment Mask, and Controlling Phase For New Segments will
-
The cost code plus the segment code will be concatenated and displayed as a single cost code.
Segment Security Required – Checkbox
Segment security can be applied so that any segment other than the Last segment can be made non-updateable.
The following rules apply to phase segment security:
-
If segment security is checked, when the user is in the Add Phase On-The-Fly program, any segment other than the Last segment will not allow direct entry into the field by keyboard; the user must select the segment value from the list of values. If segment security is not active, the segment values can be selected from the LOV, as well as typed in from the keyboard.
-
If segment security is checked, the Bid Item program will only allow the user to select from the list of values when entering all segments except the Last segment. In the latter case, the user can type in or select a value from the LOV. This will apply on the Add Bid Item pop-up window and the Bid Item screen itself. If segment security is not active, the segment values can be selected from the list of values, as well as typed in from the keyboard.
-
If segment security is checked, the controlling phase on the Add Phase On-The-Fly program will automatically populate and not be accessible to the user. Otherwise, the phase can be selected or typed in for the applicable segments.
-
When in the Add Phase On-The-Fly program, the WM Code and WC codes will automatically populate from the controlling phase if creating a new phase.
-
The Last segment of a phase code being created is validated to check that the length of the segment matches the Last segment definition in the PM Control and that the value entered is only numeric when segment security is on. If the Last Segment option is set, with the mask for the last segment being set as non-numeric, and Segment Security is checked, then Segment Security overrides the Last segment mask setting, meaning that when creating the phase, the system will insist that the Last segment must be numeric.
Enterable Segment Position (Options) – Radio Buttons
The user can either select the First or Last Segment as the "enterable" segment, meaning that depending on the choice, the user can type in a prefix or suffix to the remaining segments that make up the Phase (Cost Code). The enterable segment does not have an LOV to select from.
First Segment = prefix; Last Segment = suffix
If the Last Segment is selected as enterable, the system behaves in the standard way.
If the First Segment is selected as being enterable, the following setup and rules apply. This functionality requires that the user enter all required "CSI Master" Phase Codes (Cost Codes) where the highest level is controlled by “ALL”, in the Enter Cost Code screen of the Job Costing module.
Outlined below is the necessary setup procedure for the First segment option.
1. Set Company Control – Defaults Tab
In the Phase Segmentation section of the Company Control screen, set the ‘Enterable Segment Position’ radio button to "First" to indicate this segment can be edited.
Set the Enterable Segment Mask field to indicate the format for the first. The user is not allowed to enter more characters than the segment can accommodate. Moving the mouse-pointer over the field will show a hint line of the possible mask characters (“Allowed mask characters are [X][9][.][-]”):

2. Bid Item Entry
Once the Company Control settings are in place, the user can create a new phase structure by entering the prefix (Pay Item) in the first segment, and then selecting the phases (cost codes) for the remaining segments from the LOV in each:

An example on how the Phase structure can look depending on whether you enter in the first segment or not is shown below.
Example:
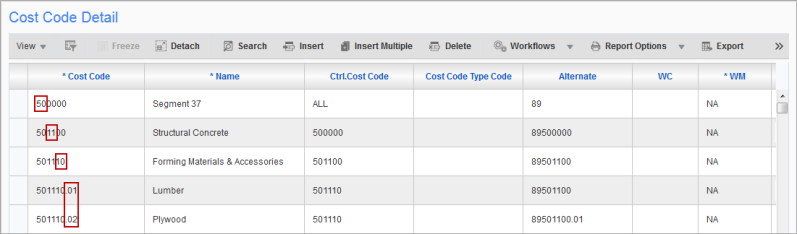
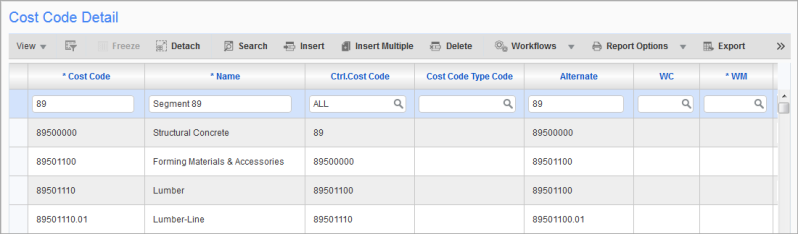
1. The following Phases were first defined in the Enter Cost Codes screen of Job Costing:
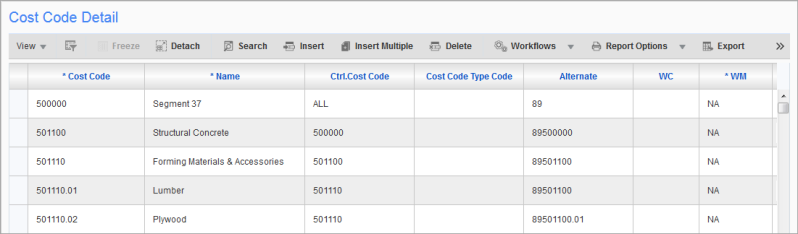
When in edit mode, notice that the Phs Code field is now split into segments as defined on the Company Control screen.
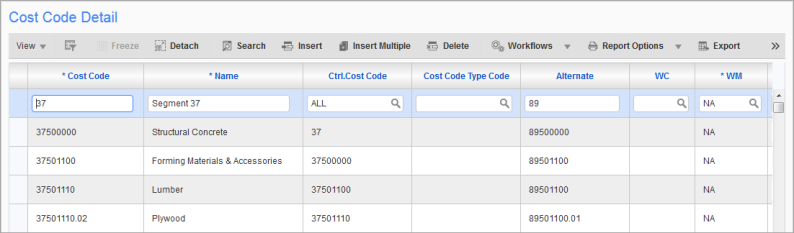
To build a phase structure with the pay item 37 prefixing the phases, enter “37” in the First Segment on the Bid Item Entry screen for the line item concerned.
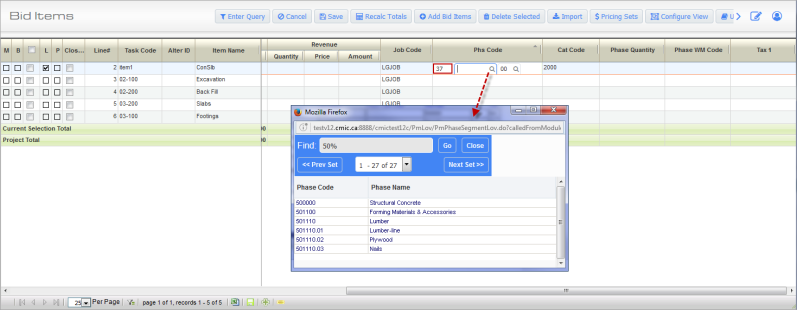
Then select the phase from the LOV from each of the remaining segments:

That is:
Segment 1 = 37
Segment 2 LOV - the first two characters of the lowest level phases ‘50’
Segment 3 LOV - the next two characters of the lowest level phases ‘11’
Segment 4 LOV - the 3rd set of two characters of the lowest level phases ‘10’
Segment 5 LOV – The last 3 characters of the lowest level phases ‘.01, .02,.03’
On clicking [Save], the hierarchy is created:
3. Updating JC Budget with New Phases
To create the phases at the job level, use the [Update Budget] button in the Bid Items screen.
4. PCI Entry – Adding Phases via On-The-Fly Popup
The functionality works the same as in the Bid Item screen. The new phase hierarchy is created in the same way as described above.
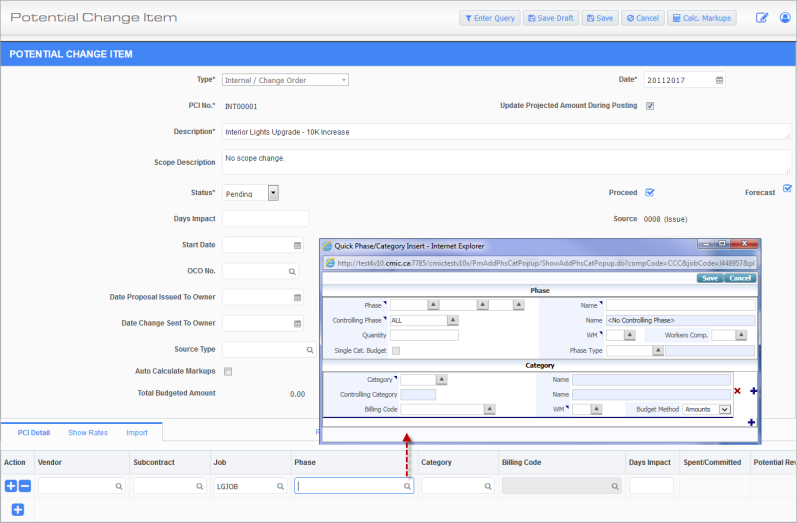
In the PCI Detail, the Phase popup’s [Add New] button launches the Add Phase On-The-Fly popup, showing the phase in the segments defined in the Company Control screen. Enter the pay item in the first segment, and select the remaining segments from the LOVs.
When segmentation is in use the Phase LOV is separated into two sections: Phases Assigned to Project (Via Job), and Master Phases.
Complete the popup and [Save]. Saving builds the hierarchy, which can be verified in the JC Enter Cost Codes screen:
Submittal Lead Times In Days
Define the project submittal process lead times. These are defaults when entering a submittal but can be overridden.
Submittal – Automatic Notifications
The two fields ‘Send Reminder Email’ checkbox and the numeric field ‘Days Prior to Preparation Start’ (found here on the PM Control –Defaults tab, as well as Project Maintenance –Defaults tab, and Submittal Entry screen), allow reminder email notifications to be sent to the external collaborator during the Submittal Preparation stage.
When the checkbox is checked, it indicates that a reminder email must be sent. A value in ‘Days Prior to Preparation Start’ indicates the number of days prior to the preparation start date that the email notification must be sent.
When these fields are set in the PM Control screen (here), their value will be inherited by any new projects.
Copy From Previous Daily Journal Defaults
Phase units must be selected if the phase units from the Units Complete tab of the Daily Journal are to be copied. The default value is "On".
Text Types

The Text Types section allows you to select default Text Types for subcontracts, owner change orders, issues and document types. A Text Codes tab has been added to both the Issues and Documents. The default text types for issues and documents have to be set in the PM Control before the associated text codes can be available in the Text Codes LOV of each object named.
Change Management – Tab
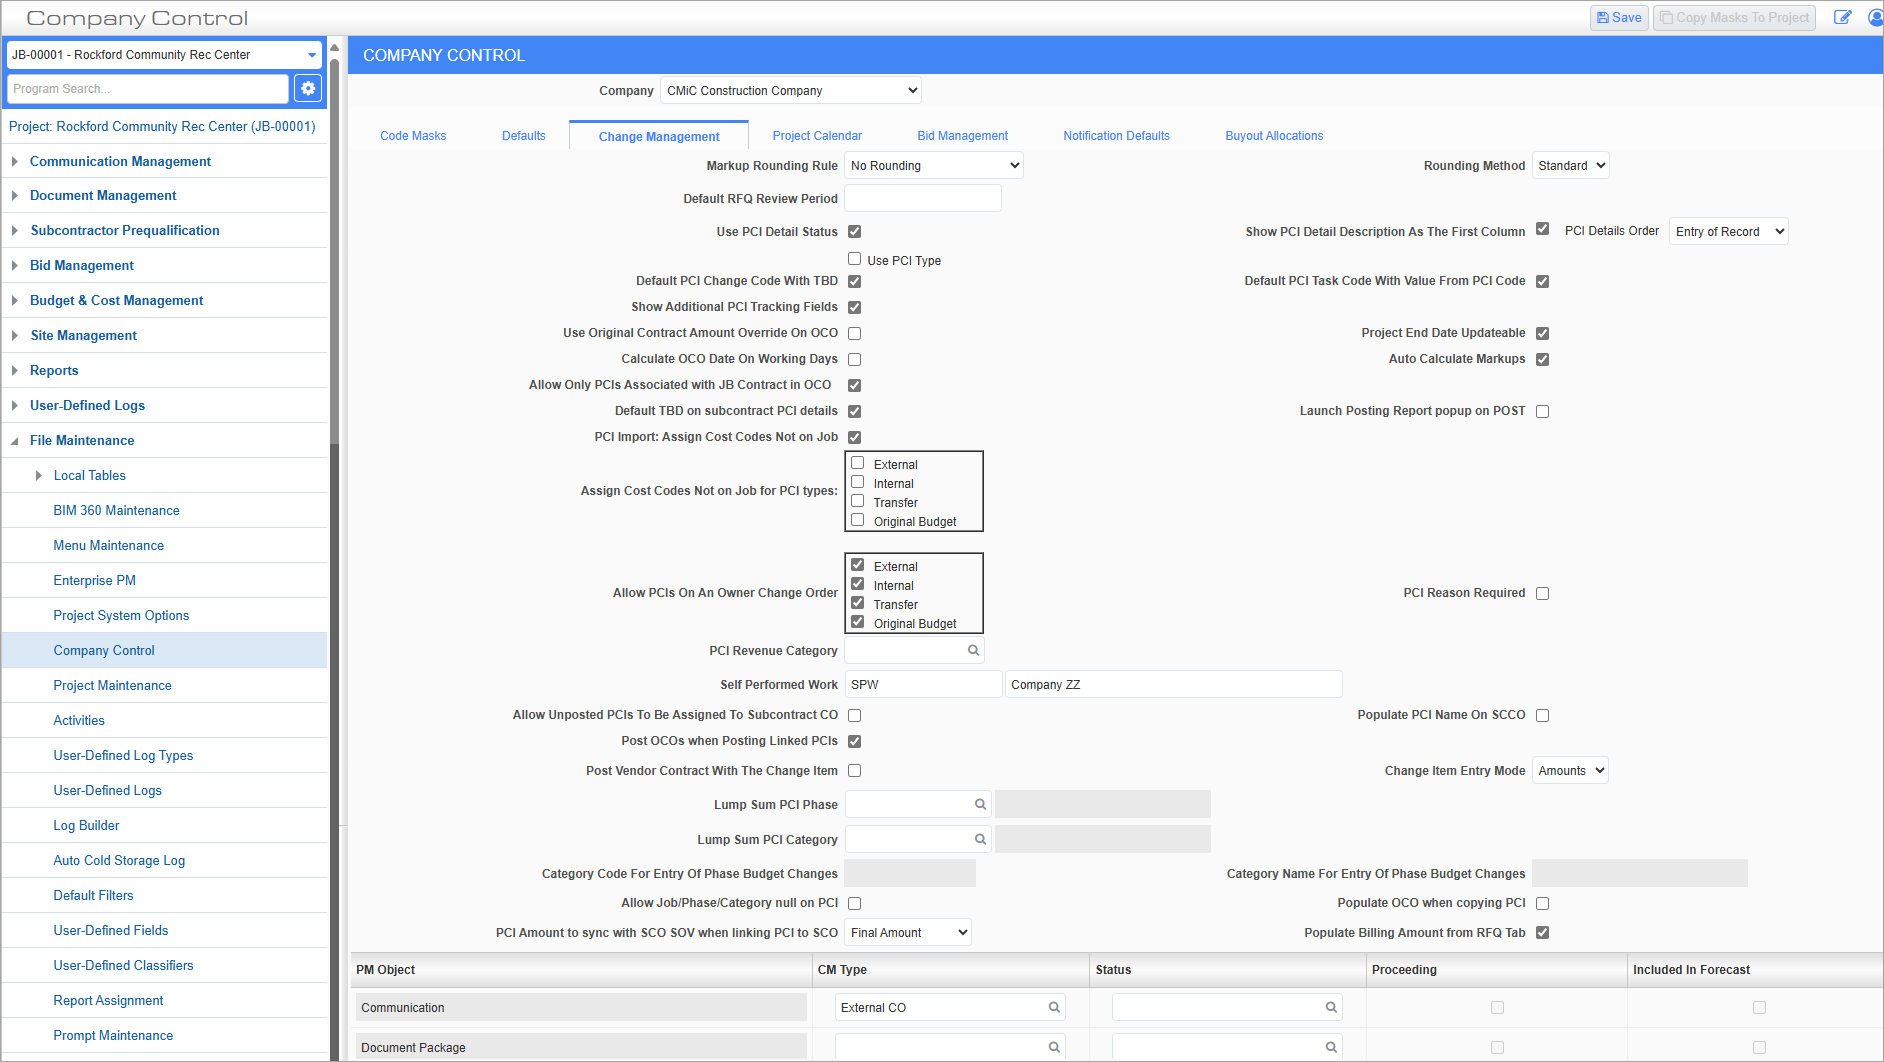
Standard Treeview path: CMiC Field > File Maintenance > Company Control – Change Management tab
This control level tab is used to set defaults relating to change orders. These defaults are carried to the project when it is being created, but they can be overridden.
Markup Rounding Rule
Select the default markup rounding rule. A markup rule is used to mark up the amounts on a change item based on certain criteria. Markup calculation lines use a rounding rule. Options are "No Rounding", "Round to nearest dollar", "Round to nearest ten dollars", and "Round to nearest hundred dollars".
Rounding Method
Select the default rounding method. Options are "Standard", "Up" and "Down". In the standard rounding method, standard 5's are rounded up and 4's down. For example, .50 would round up and .49 would round down.
Default RFQ Review Period
The default RFQ review period is added to the sent date to automatically update the due date in the RFQ tab of PCIs. If the default value is null at the project -level, then the system will then check the company-level default and use that value if it is not null as well. The due date that is calculated is based on the project calendar working days.
Use PCI Detail Status – Checkbox
This box applies to both the Status and the OCO Number fields at the PCI Detail level. When it is checked, the Status and the OCO Number fields at the PCI detail level are both available, and the user has the ability of setting the status and OCO number for individual PCI lines. Those that are approved at the time of posting are moved to a new PCI (with the extension’-nnn’), and the unapproved lines remain in the original PCI.
NOTE: This checkbox can be used with WBS codes (especially PCI) and WBS mapping. The previous restriction has been removed. The Copy PCI restriction for a posted PCI was also removed.
When the 'Use PCI Detail Status' box is checked, markup lines will be grouped by PCI line status and OCO number. The Status and OCO Number columns of the markup lines will reflect the status of the base lines and will be read-only (i.e., non-editable). If the amount, status, or OCO number of the base lines are modified or updated and the user selects to recalculate the markups upon saving, the markup lines will be recalculated. In this case, the system will synchronize the status and OCO number of the markup lines with the base lines. If the user chooses not to recalculate, the markups will remain unchanged. Please note that it is the user’s responsibility to recalculate the markups if there are any changes in the amounts, statuses, or OCO numbers to ensure the generated markup lines are accurate.
For more information, please refer to Linking PCI Details to OCO.
Use PCI Type – Checkbox
This checkbox is enabled when the 'Use PCI Detail Status' box is checked.
When the 'Use PCI Type' box is checked, the Use PCI Detail Status feature will only be applied to PCI types with the 'Use PCI Detail Status' box checked on the Maintain PCI Types screen. For more information, please refer to Change Management - PCI Types.
NOTE: If a PCI type does not have the 'Use PCI Detail Status' box checked on the Maintain PCI Types screen, the Use PCI Detail Status feature will not be enabled, even though the 'Use PCI Detail Status' box is checked on this screen. The Status and OCO Number fields will be disabled at the PCI detail level.
If a user changes the PCI type (using the [Modify] button on the PCI Detail tab) to a type that does not have the 'Use PCI Detail Status' box checked on the Maintain PCI Types screen, the system will display a warning that data entered in the Status and OCO Number fields will be lost.
For more information, please refer to Linking PCI Details to OCO.
Show PCI Detail Description As The First Column – Checkbox
This checkbox indicates whether the Description field for Potential Change Item details (PCI or change orders as they are commonly called), occurs as the first column in the details section of the change order or remains in the original position (i.e. as the last field).
PCI Details Order
This drop-down box allows the user to choose the sort option for PCI details, when the PCI detail description is selected as the first column. By default, the details are listed according to the entry of the record (Entry of Record), but can be sorted by the Long Description field as well.
Default PCI Change Code With TBD – Checkbox
When checked, the PCI detail will default “TBD” in the subcontract change code field for the line that has the vendor and contract entered (including “TBD” in the contract field). The default state of the is un-checked.
NOTE: If “TBD” is entered as the subcontract code, the subcontract change code will default to “000”, as per standard functionality.
Default PCI Task Code With Value From PCI Code – Checkbox
When checked, the PCI detail will default with the PCI# in the Task ID field. This is a default value and can be overridden. The default state for the box is un-checked.
If the type of the PCI is modified (using Modify Type), the task ID of the new PCI detail is updated with the new PCI number.
Show Additional PCI Tracking Fields – Checkbox
This box determines if additional fields are shown in the PCI Details. The additional fields include Owner Reference Number and Subcontractor Reference Number. It also controls the display of the Subcontractor Pricing Status Code field which is located on the RFQ tab, and has an LOV which allows the user to maintain the entries (Add, Edit, Delete). The project role privilege ‘Maintain Subcontractor Pricing Status LOV’ can be applied to the user’s project role to limit the ability to maintain the LOV.
The Subcontractor Reference # and the Owner Reference # fields can be made editable for a POSTED PCI. This is done using field security:


Use Original Contract Amount Override On OCO – Checkbox
The ‘Use Original Contract Amount Override On OCO’ checkbox indicates whether owner change orders should use the original contract override amount.
Project End Date Updateable – Checkbox
The ‘Project End Date Updateable’ checkbox indicates whether the project end date is updateable when an owner change order is posted.
The default value of these two boxes is "Off" and "On" respectively, to retain original functionality. The values will default to any new projects (Defaults tab of Project Maintenance) created for that company.
Calculate OCO Date on Working Days – Checkbox
The ‘Calculate OCO Date on Working Days’ checkbox indicates whether calendar or business days are used to determine the day impact calculations in the OCO screen. The project palendar is used in the calculations. Field security can be applied to this checkbox, if needed.
Auto Calculate Markups – Checkbox
By default, the box is unchecked. The value (checked or un-checked) is inherited by any new projects for that company and can be overridden.
The value (checked or un-checked) on the project is inherited by any new PCIs for that project within the company and can be overridden.
When the is checked in the PCI header, after entering the PCI details and pressing [Save Draft] or [Save], markup lines will be automatically generated without the user having to press the [Calculate Markups] button. This applies to all PCI class types.
Field security can be applied to the ‘Auto Calculate Markups’ checkbox in PCI, if desired (standard Treeview path: CMiC Field > Security > Role Maintenance – Programs/Potential Change Item).
Allow Only PCIs Associated with JB Contract in OCO – Checkbox
This function allows users to filter out available PCIs in an Owner Change Order (OCO) record based on the contract selected in the JB Contract field in the OCO header. Field security is available for this (standard Treeview path: CMiC Field > Security > Role Maintenance – Programs/Project Control).
If the is checked, when a user is in the OCO entry screen, only the PCIs that have details that are associated with the contract selected in the JB Contract field in the OCO header are available for selection in the PCI LOV of the OCO. If the control is not checked, then the availability of the PCIs in the LOV does not include consideration of the JB Contract field in the OCO header, regardless of whether a contract is selected in the JB Contract field or not (this is original functionality).
Default TBD on Subcontract PCI Details – Checkbox
When this box is checked, for all external, internal, and transfer PCIs, if the vendor field is left blank on a PCI detail line where the category is flagged as "Available in SC", the system will default TBD as vendor and TBD as subcontract. The change code is automatically set to ‘000’.
PCI Import: Assign Cost Codes Not on Job – Checkbox
When this box is checked, users can import segmented cost codes that are not already assigned to the job. Segmentation rules are defined in the Phase Segmentation section of the Defaults – Tab. The imported cost codes will be available in the Assign Job Cost Codes screen in the Job Costing module once assigned to the job.
NOTE: The segment's base code must be assigned at the master level in the Enter Cost Code screen in the Job Costing module. For more information, please refer to Job Costing - Enter Cost Code.
Users can select specific PCI types via the 'Assign Cost Codes Not on Job for PCI Types' checkboxes. When unchecked, specific PCI types cannot be selected.
Assign Cost Codes Not on Job for PCI types: External, Internal, Transfer, Original Budget – Checkboxes
These options are enabled when the 'PCI Import: Assign Cost Codes Not on Job' box is checked.
NOTE: At least one PCI type must be selected.
Launch Posting Report popup on POST – Checkbox
When this box is checked for the company, the Posting Report window will appear upon posting Subcontract, PCI, Request For Payment, Subcontract Change Order, and Owner Change Order records. By default, this is set to "Off".
Allow PCIs on An Owner Change Order – Checkboxes
There is now more flexibility in the types of PCIs (external, internal, transfer, original budget) that can be selected for inclusion in an owner change order (no longer restricted to only external and original budget).
PCI Reason Required – Checkbox
When this box is checked for the company, the Reason field is mandatory on the PCI Detail tab of the CMiC Field - Potential Change Items screen.
PCI Revenue Category
This field is used to suppress calculation of billing amounts for a selected category set in the Project Maintenance screen. The value is inherited from the PM Control screen, but can be overridden.
Initially the value is null to preserve standard functionality, but the user can select a value from the LOV, which lists only the categories which allow billing.
This default value set for the company will default to new projects created in that company. At the project level, the value can be set/overridden in the PCI Revenue Category field in the Defaults tab of the Project Maintenance screen.
When the value is set for the project, PCI detail records created using any category other than the designated revenue category will have the Billing Qty, Billing Price and Billing Amount fields suppressed (i.e. these values will be zero). For the PCI detail lines using the revenue category, the Billing Qty, Billing Price, and Billing Amount fields will be determined in the standard way (i.e. the rightmost-value from Estimated, Quoted and Final fields).
Self-Performed Work
This is the self-performed vendor code for work to be carried out by the company itself, instead of using outside vendors/subcontractors.
Allow Un-posted PCIs to be Assigned to Subcontract CO – Checkbox
When checked, un-posted potential change items will be available to be assigned to subcontract change orders.
Populate PCI Name On SCCO – Checkbox
When checked, use the PCI Name as the subcontract change order Task Description. When un-checked, it will use the PCI Long Description if it exists.
Post OCOs when Posting Linked PCIs – Checkbox
By default, it is checked to maintain standard functionality, whereby if a posted PCI is linked to an unposted OCO, the entire OCO gets posted as long as every other PCI linked to the OCO has already been posted.
When unchecked, the OCO will not be posted if a posted PCI is linked to the unposted OCO, even though every other PCI linked to the OCO is already posted.
Field security can be applied to this checkbox, if required.
Post Vendor Contract with the Change Item – Checkbox
When checked, any unposted vendor contract that is part of the PCI detail will be posted when the change item is posted, provided all the necessary data is completed.
Change Item Entry Mode
This indicates the mode of entry for PCI details – whether they are entered as amounts or quantities.
Lump Sum PCI Phase
This is the phase code that is to be used for internal lump sum PCIs.
Lump Sum PCI Category
This is the category code that is to be used for internal lump sum PCIs.
Category Code For Entry of Phase Budget Changes
This is the category code that is to be used in bid items entry and PCI entry when entering phase budgets. The value is defaulted from the Change Management Control screen.
Category Name for Entry of Phase Budget Changes
This is the category name that defaults from Category Code For Entry of Phase Budget Changes field. The value is defaulted from the Change Management Control screen.
Allow Job/Phase/Category Null on PCI – Checkbox
This box will allow PCI details with null job/phase/category to be created in the PCI entry program. By default, the field security on the checkbox is "Hidden" and set on the *ALL* role. When the feature is activated, it allows the user to add and save PCI detail lines for which there may not be complete J-lines. The job, phase, category are allowed to be null as long as the PCI header status is in an un-approved class status.
The feature also applies to the Change Management (CM) and Project Management (PM) versions of PCI Entry.
The Project Management (PM) Object refers to the different types of objects that can be created in Project Management, and from which a change item (change order) can be created.
The Change Management (CM) Type and Status refers to the Type of change order and the Status of the change order that should default, if a change order is to be created from any of the various object types listed.
The ‘Proceeding’ checkbox indicates whether the change order will be carried out or not.
The ‘Included in Forecast’ checkbox indicates whether the change order is to be included in the Contract Forecast or not.
Populate OCO When Copying PCI – Checkbox
When checked, the PCI name will be used as the task description for the subcontract's change order. When unchecked, the system will use the PCI long description as the task description for the subcontract's change order (if any).
PCI Amount to Sync with SCO SOV when Linking PCI to SCO – Checkbox
This field is used to indicate which amount from the PCI's details (estimated amount, quoted amount or final amount) will be synchronized with the schedule of value (SOV) line of subcontracts or subcontract change orders.
NOTE: The following field is hidden by default and is only available if the user role has the 'Sync chosen PCI final, quoted or estimated amount with SCO SOV' field privilege for the Project Control program set to unrestricted, and the ‘Synchronize SCO And PCI Amounts’ checkbox is checked for the company on the Change Management Control File screenin the Change Management module. See CMiC Field - Security Roles for more information on how to set field permissions for user roles.
Populate Billing Amt from RFQ Tab – Checkbox
Check this box to auto-populate the Billing Amount field in the PCI Detail tab of the PCI screen from the amount entered in the RFQ tab.
Project Calendar – Tab
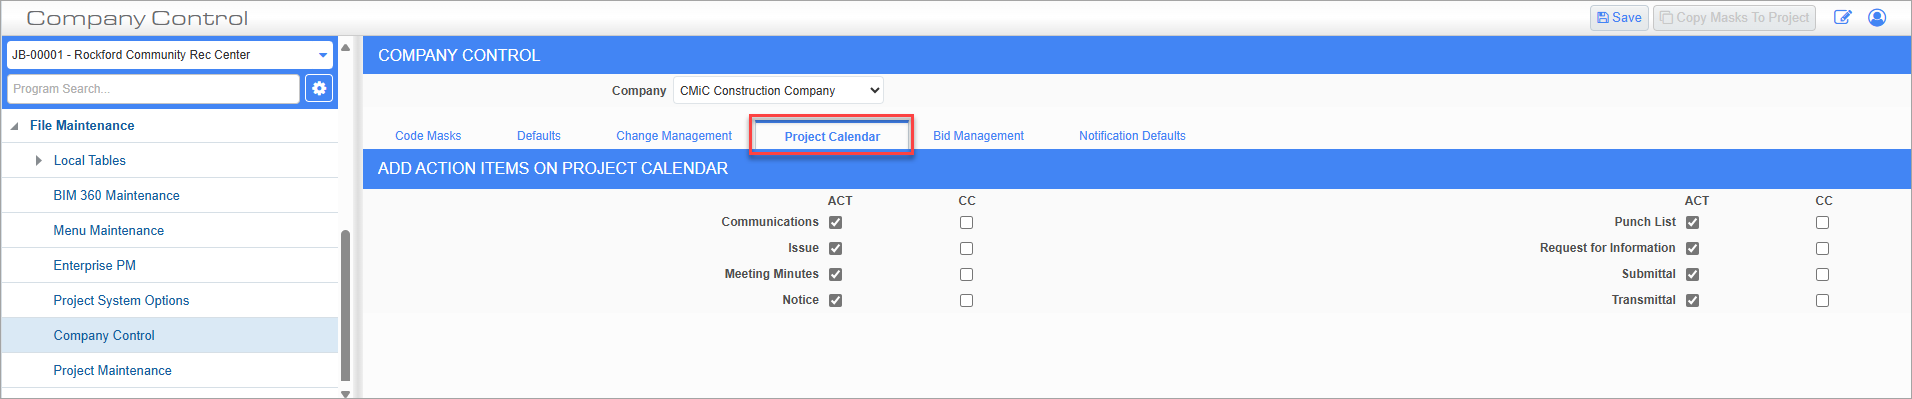
Standard Treeview path: CMiC Field > File Maintenance > Company Control – Project Calendar tab
This tab allows the user to indicate whether action items are to be created automatically for each of the following objects: RFIs, communications, notices, issues, meeting minutes, punch lists, submittals, and transmittals (each controlled independently of the others).
Field security can also be applied to the Project Calendar tab, by setting it at the security role level (standard Treeview path: CMiC Field > Security > Role Maintenance – Programs/Project Control).
The action item will be created in the calendar for the responsible person and will be shown under the appropriate due date.
ACT – Checkbox
Check this box to automatically create an action item for the object.
CC – Checkbox
Check this box to automatically add an action item to the object's CC contact.
Determining Action Item Due Date
The following section explains how the Due Date field of an action item is determined for each of the following objects:
Meeting Minutes – Agenda Items
Agenda Item’s Due Date or Revised Date field is used to set the action item’s due date: if the Due Date field is not null and the Revised Date field is not null, then the Revised Date field is used; if the Revised Date field is null, but the Due Date field is not null, then the Due Date field is used.
Submittal
A Submittal record's Required Start field is used to set the action item’s due date.
Punch List - Items
A Punch List Item record’s Scheduled Completion field is taken as the action item’s due date.
RFI
An RFI record’s Date Required field is used to set the action item’s due date.
Bid Management – Tab
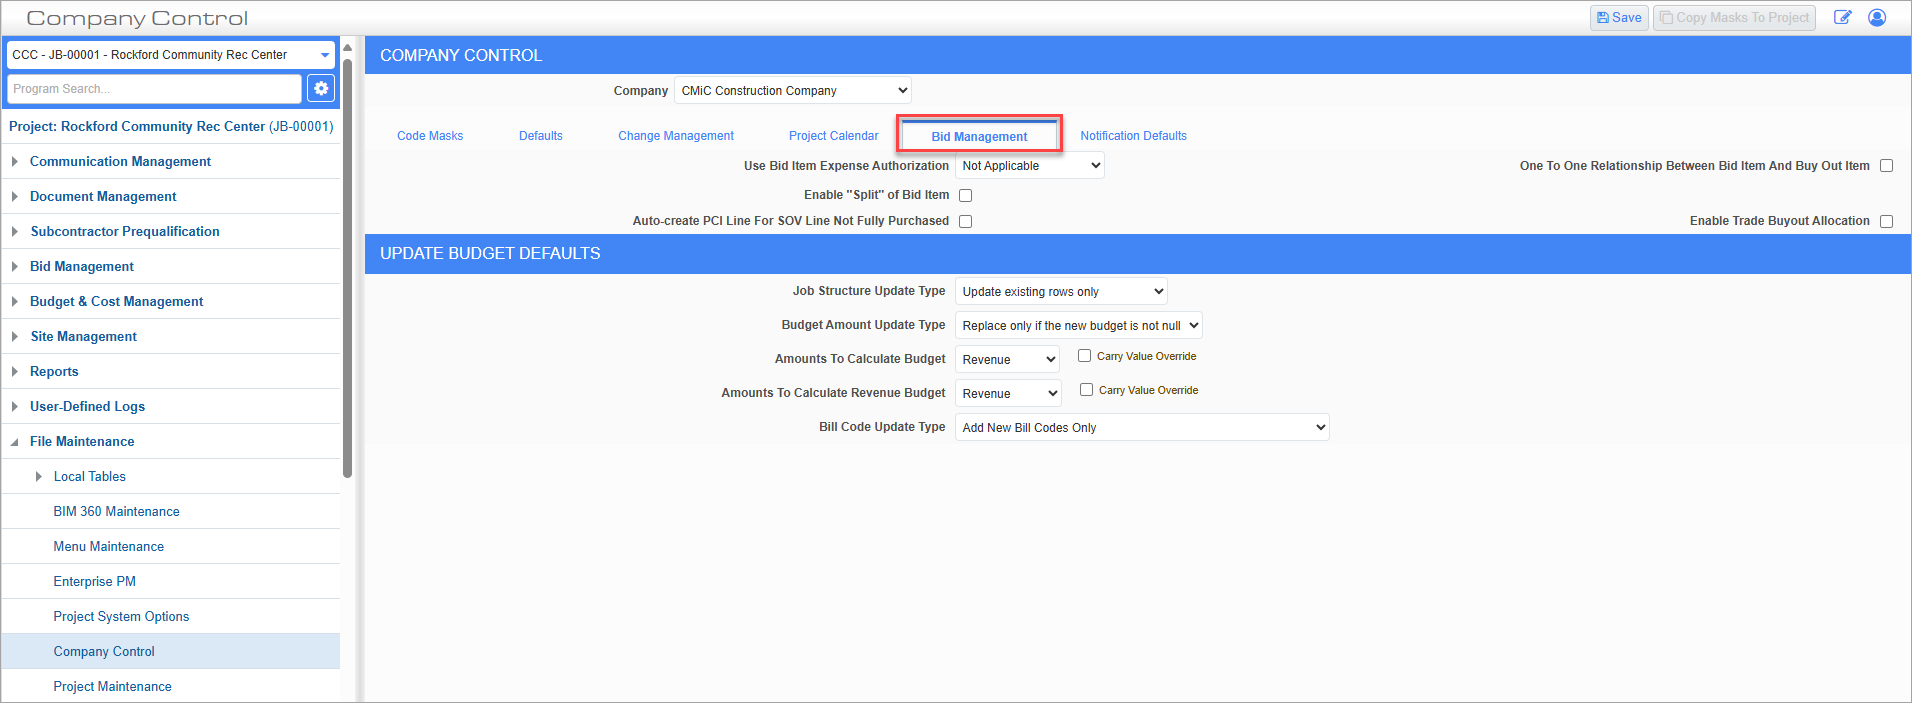
Standard Treeview path: CMiC Field > File Maintenance > Company Control – Bid Management tab
This tab is used to set company-specific bid items’ related parameters that are used to determine the relationship between bid items and buyout items, bid items and PCIs, and how bid items should be treated if the estimated amount exceeds the amount for which a bid item has been bought out.
Use Bid Item Expense Authorization
This box indicates if Bid Item Expense Authorizations are to be used. This is a default value that will be inherited by the projects within the company, but can be overridden. The box is important in the Expense Authorization process (PCIs of OBC class that are linked to bid items). The user can’t select to purchase a bid item that does not have a related posted PCI associated if the ‘Bid Item Expense Authorizations’ box on the project is set to "Y".
One To One Relationship Between Bid Item And Buy Out Item – Checkbox
This indicates whether there is a one-to-one relationship between a bid item and a buy out item. When there is a 1:1 relation, the bid item can’t be mapped to more than one buyout item, and the corresponding LOV has been modified to facilitate this.
Enable “Split” of Bid Item – Checkbox
When this box is checked, it enables the creation of a secondary bid item (usually with the suffix ‘-1’ appended to the original bid item), when posting the subcontract created during the purchase of a buyout item that has been linked to a bid item (1:1) mapping, and if the estimated amount of the bid item is more than the purchase amount. The secondary bid item created is the difference between the estimated and the purchased amount. In addition, during the posting process the estimated amount of the original bid item gets updated with the value of the purchased amount.
Auto-create PCI Line For SOV Line Not Fully Purchased – Checkbox
By default, this checkbox is unchecked. If the box is unchecked, no additional lines will be created in the PCI.
This checkbox is used in relation with the ‘Enable Split of Bid Item’ checkbox, so the latter must be checked when you check the ‘Auto-create PCI Line For SOV Line Not Fully Purchased’ box.
When checked, it controls the creation of additional lines in a posted PCI during subcontract posting, if the subcontract SOV line is not fully purchased when compared with the PCI Estimated Amount for the PCI detail line that it is linked with.
Enable Trade Buyout Allocation – Checkbox
When this box is checked, trade buyout allocation is enabled for the company. The default value is unchecked.
Press [Save] and refresh the screen to enable the Buyout Allocations – Tab on the Company Control screen. This will also enable the Buyout Allocations – Tab on the Project Maintenance screen.
Field security can be applied to the 'Enable Trade Buyout Allocation' box, if necessary (standard Treeview path: CMiC Field > Security > Role Maintenance – Project Control). The possible values are "Unrestricted", "Read-only", and "Hidden".
Update Budget Defaults
The first four fields in this section are the same as those in the Update Budget pop-up window launched from the [Update Budget] button on the Bid Item screen. For more information, please refer to CMiC Field - Bid Item Entry & Import.
Bill Code Update Type
This drop-down menu has the following options:
-
Add New Bill Codes Only
-
Add New Bill Codes and Reset All Groups
-
Add New Bill Codes and Reset All Groups and Bill Code Budgets
-
Reset All Bill Code Budgets
These are the same options that are available in the Job Billing Contract screen of CMiC Enterprise and function in the same way (refer to Job Billing guide).
The default values can be set in Project Control, after which they will be inherited by any new projects.
Notification Defaults – Tab
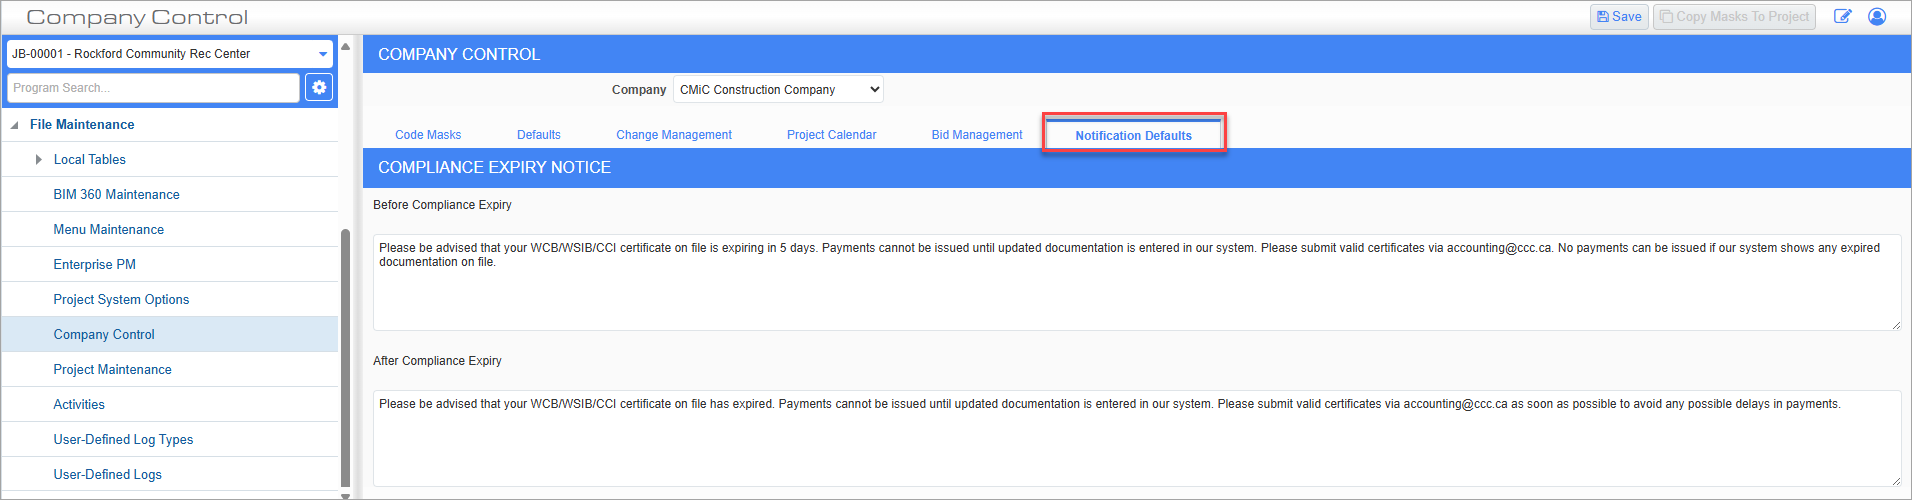
This tab is used to set up the text used in subcontract compliance workflow notifications. These notifications are sent if the compliance/insurance will soon expire or has expired. This gives the user a notification so that they can renew their license/compliance. For more information, please refer to Workflow - Compliance Workflow .
NOTE: Field security may be applied to the Notifications Defaults tab of the Project Control screen in the Role Maintenance screen. For more information, please refer to CMiC Field - Security Roles.
Buyout Allocations – Tab
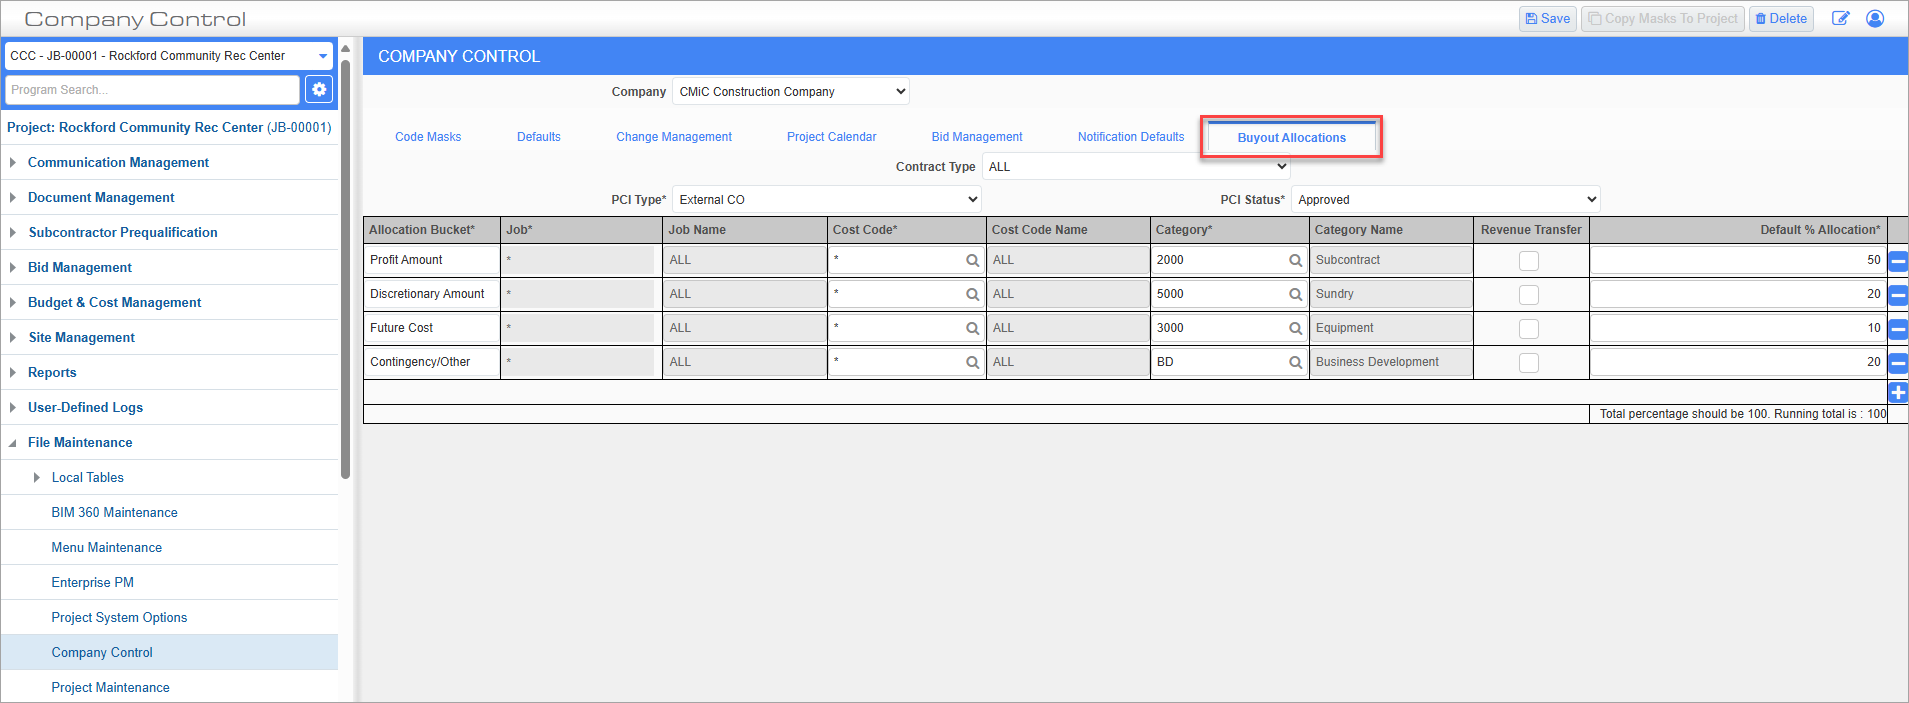
Standard Treeview path: CMiC Field > File Maintenance > Company Control – Buyout Allocations tab
This tab is enabled when the 'Enable Buyout Allocation' box is checked on the Bid Management tab and is used to set up allocation data for the selected company. Users may set up allocations for different combinations of contract types, PCI types, and PCI statuses as required by the company.
NOTE: The details established at the company level will automatically default to the project level, with the option to modify them at the project level as needed. When a new project is created, the Project Maintenance's Buyout Allocations – Tab will inherit the allocation details from the company level. Users are not required to access the Buyout Allocations tab for these details to be inherited, as this process occurs automatically. It is important to note that any changes or overrides made at the project level will not affect the company level details.
Field security can be applied to the fields on this tab, if necessary (standard Treeview path: CMiC Field > Security > Role Maintenance – Project Control).
Contract Type
Select an OM contract type from the drop-down list or select "All" to include all contract types. OM contract types are maintained in the Contract Type screen in the Opportunity Management module in Enterprise. For more information, please refer to Opportunity Management - Contract Types.
PCI Type
Select an active PCI type from the drop-down list. PCI types are maintained in the Maintain PCI Types screen in the Change Management module in Enterprise. For more information, please refer to Change Management - PCI Types.
PCI Status
Select a PCI status from the drop-down list. PCI statuses are maintained in the Change Management module in Enterprise. For more information, please refer to Change Management - PCI Status Codes.
Allocations Table
Press the Plus icon ( ) to add allocations to the table.
NOTE: If no allocations are defined at the project level, the [Buyout Allocation] button will be disabled on a subcontract's SOV line, regardless if allocations are defined at the company level. For more information, please refer to CMiC Field - Subcontract Schedule of Values.
Allocation Bucket
Enter a free-form name for the allocation as per the company's business needs.
Job, Job Name
As this is a company level setup, these fields are non-editable and will always display "*" for all jobs.
Cost Code, Cost Code Name
Enter/select a cost code or select "*" to include all cost codes.
Category, Category Name
Enter/select a category code or select "*" to include all cost codes.
Revenue Transfer – Checkbox
Check this box to set the allocation as a revenue transfer.
Default % Allocation
Enter a default percentage allocation. The total percentage for all lines in the table should be 100. A running total is displayed at the bottom.