Schedule of Values (SOV) are billable work items that can be added to subcontracts or subcontract change orders (SCCOs). This allows the user to keep a detailed log of all individual value lines for each subcontract.
Entering a New SOV for Subcontracts

Schedule of Values section; standard Treeview path: CMiC Field > Budget & Cost Management > Subcontracts – [Add Subcontract] button - Schedule of Values section
Enter a new SOV by pressing the Plus icon in the Action column, as shown above.
Task Code, Task Name
Enter the code and name for the task.
W/M
Select the weight or measure for the amount of the SOV line.
Unit, Rate, Amount
Either enter the amount of the SOV line or the unit and rate, from which the amount can be calculated.
Job, Cost Code, Category, JB Bill Code
Select the job, cost code, category, and job billing code to which the SOV line should be billed.
The 'Available on SC' checkbox on the JC Category Maintenance screen indicates whether the category can be used in subcontracts. When this box is checked, the category is available for use in subcontracts, otherwise, it is not.
For convenience, cost codes/categories (i.e., phases/categories) can be created on-the-fly directly from the Cost Code and Category fields,
Tax Fields
Enter any taxes and their amounts that apply to this SOV line.
Retainage
Enter the retainage percentage here.
Expense Code
If the SOV line is associated with an expense, enter the expense code here. This field is hidden by default. Please see CMiC Field - Security Roles for more information on setting field security and making this field visible and editable.
Long Description
IF the SOV line requires further description, enter it here.
WBS Fields
Enter any WBS codes and values in these fields. These can be created in the WBS Codes and WBS Values screens.
Buyout Allocation pop-up launched from [Buyout Allocation] button
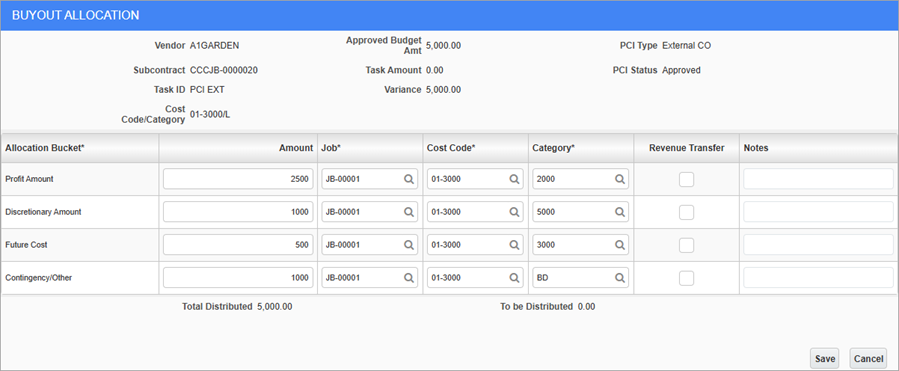
This button is enabled when a bid item or PCI is selected as an SOV line and the 'Fully Purchased' box is checked. Press this button to launch the Buyout Allocation pop-up, as shown in the screenshot above. This pop-up includes buyout allocation details set at the project level on the Buyout Allocations – Tab of the Project Maintenance screen. Users can adjust the values where needed to accept the default values. When changes are made in this pop-up, the system will warn users if the amount in the To be Distributed field does not equal zero.
NOTE: If no allocations are defined at the project level (i.e., in the Buyout Allocations – Tab on the Project Maintenance screen), the [Buyout Allocation] button will be disabled, regardless if the 'Fully Purchased' box is checked.
NOTE: Field security can be applied to the [Buyout Allocation] button, if necessary (standard Treeview path: CMiC Field > Security > Role Maintenance – Subcontract). By default, this field is hidden for the "ALL" role.
Posting the subcontract will automatically create an unposted Buyout PCI record with buyout allocation details, which is available as a link in the Buyout PCI field. For more information, please refer to Buyout PCIs.
NOTE: PCI auto-numbering must be enabled in order to create a new Buyout PCI record.
Link PCI
Use the [Select PCI] button in this column to link a PCI detail line (of a posted or unposted PCI) to a posted subcontract.
When a PCI is linked, the [Unlink PCI] button will appear and the [Select Bid Item] button in the Link Bid Item column will be disabled.
NOTE: This column is available for SC and SCCO SOV lines. Field security can be applied to the Link PCI column, if necessary (standard Treeview path: CMiC Field > Security > Role Maintenance – Subcontract/Subcontract Change Order). By default, this field is hidden for the "ALL" role.
[Select PCIs] – Button
Press this button to launch the Available PCI Detail LOV pop-up. This pop-up displays PCIs with matching vendor, contract, job/sub-job, phase, and category codes, as well as TBD vendors and contracts. A PCI record's detail line can only be linked to one SC. The selected record's PCI code will appear in the subcontract's SOV Task Code field. For a SCCO, the selected record's PCI code will appear in the SOV Item Code field.
When a PCI is linked to a subcontract, the system will reverse the existing transactions and then post transactions with the new information.
A PCI can also be linked to the subcontract via the CMiC Field - Potential Change Items screen (when SC auto-numbering is enabled).
This button is available if there are posted transactions (such as RFPs). Posted transactions will get updated information once the PCI is linked. If an RFP (voucher) transaction is linked to a billing draw, the transaction details will remain and only the link is updated.
[Unlink PCI] – Button
Press this button to unlink the PCI. When a PCI is unlinked, the [Select PCI] and [Select Bid Item] fields will reappear.
If an RFP (voucher) transaction is linked to a billing draw, the transaction details will remain after it is unlinked from the PCI.
Link Bid Item
Use the [Select Bid Item] button in this column to link a bid item detail line to a posted subcontract. When a bid item is linked, the [Unlink Bid Item] button will appear and the [Select PCI] button in the Link PCI column will be disabled.
NOTE: This column is available for SC and SCCO SOV lines. Field security can be applied to the Link Bid Item column, if necessary (standard Treeview path: CMiC Field > Security > Role Maintenance – Subcontract/Subcontract Change Order). By default, this field is hidden for the "ALL" role.
[Select Bid Item] – Button
Press this button to launch the Project Bid Item LOV. The pop-up displays bid items with matching job, cost code, and category codes. A Bid Item record's detail line can only be linked to one SC. The selected record's bid item name will appear in the subcontract's SOV Task Name field. For a SCCO, the selected record's bid item name will appear in the SOV Task Name field.
When a bid item is linked, the 'Closed' box will be checked and the Actual Amount field will display the subcontract's SOV line's amount on the Bid Items screen.
This button is available if there are posted transactions (such as RFPs). Posted transactions will get updated information once the bid item is linked. If an RFP (voucher) transaction is linked to a billing draw, the transaction must remain and only the link is updated.
[Unlink Bid Item] – Button
Press this button to unlink the bid item. When a bid item is unlinked, the [Select Bid Item] and [Select PCI] fields will reappear. The SOV Task Name field will display "Bid Item Unlinked". For a SCCO, the SOV Task Name field will display "Bid Item Unlinked". When a bid item is unlinked, the ‘Closed’ box will be unchecked and the Actual Amount field will be cleared on the Bid Items screen, making the item available for selection again.
If an RFP (voucher) transaction is linked to a billing draw, the transaction details will remain after it is unlinked from the bid item.
[Select PCIs] – Button

The [Select PCIs] button, shown above, can also be used to enter SOV lines. This button allows PCI lines to be selected into base subcontracts (like what is done for SCCOs). This button becomes available once the subcontract header is created.
When pressed, the system presents a multi-select LOV with all available PCI detail lines: regular (non-TBD) and TBD.
The system will only query those PCI detail lines where the job code is equal to either the subcontract header job code or its sub-job.
NOTE: PCIs with status type “Cancelled” are not available for selection with the [Select PCIs] button or SCCOs.
If the subcontract master job is BALMORAL for example, the LOV will show the PCI detail lines for BALMORAL and its sub-jobs (e.g. BALMOR.01, BALMOR.02…)
The PM Control checkbox 'Allow Unposted PCIs To Be Assigned To Subcontract CO' controls whether the unposted PCI records are shown in the LOV or not.
Pressing the [Accept] button will pull the selected PCI detail lines into the base subcontract SOV.
The “TBD” values for Vendor/Contract/Change will be substituted with values from the current subcontract.
Task ID: If the task is specified on a PCI detail line, then that code will be used. Otherwise, if the Task ID = TBD, then the value will be replaced by the PCI No.
Once the SOV Lines are created, the following fields are protected against update:
-
Task Code
-
Job
-
Phase
-
Category
-
WM
Deletion/Unlinking of schedule lines linked to PCI details
Upon deletion of an SOV Line that is associated to a PCI detail, the link will be removed and the PCI line will become available to be selected to the same contract.
NOTE: This is also true for the PCI lines that were originally TBD – they will be locked to the contract that they were initially selected into (after the TBD lines get pulled into a subcontract, they become regular PCI detail lines linked to SOV records and are treated as such).
[Select Bid Items] – Button

The [Select Bid Items] button allows the direct association of a bid item with a schedule of value (SOV) line. This button appears once the header has been saved. Clicking this button displays a LOV of all bid items that have not yet been purchased or linked to another object. Only bid items with valid job/phase/category are listed.
NOTE: This is the same pop-up window launched from the [Select Bid Items] button on the Subcontract Change Orders screen.
When a bid item is pulled into the subcontract SOV, the bid item’s ‘Closed’ box is checked. In addition, the bid item’s actual price set is updated with the values from the Subcontract SOV Line.
During subcontract posting, the bid item’s actual price set is updated with the subcontract SOV Line data to make sure they are the same.
If the subcontract is voided or the SOV Line is deleted, the program will uncheck the bid item’s 'Closed' checkbox and remove the subcontract contract code and actual price set data.
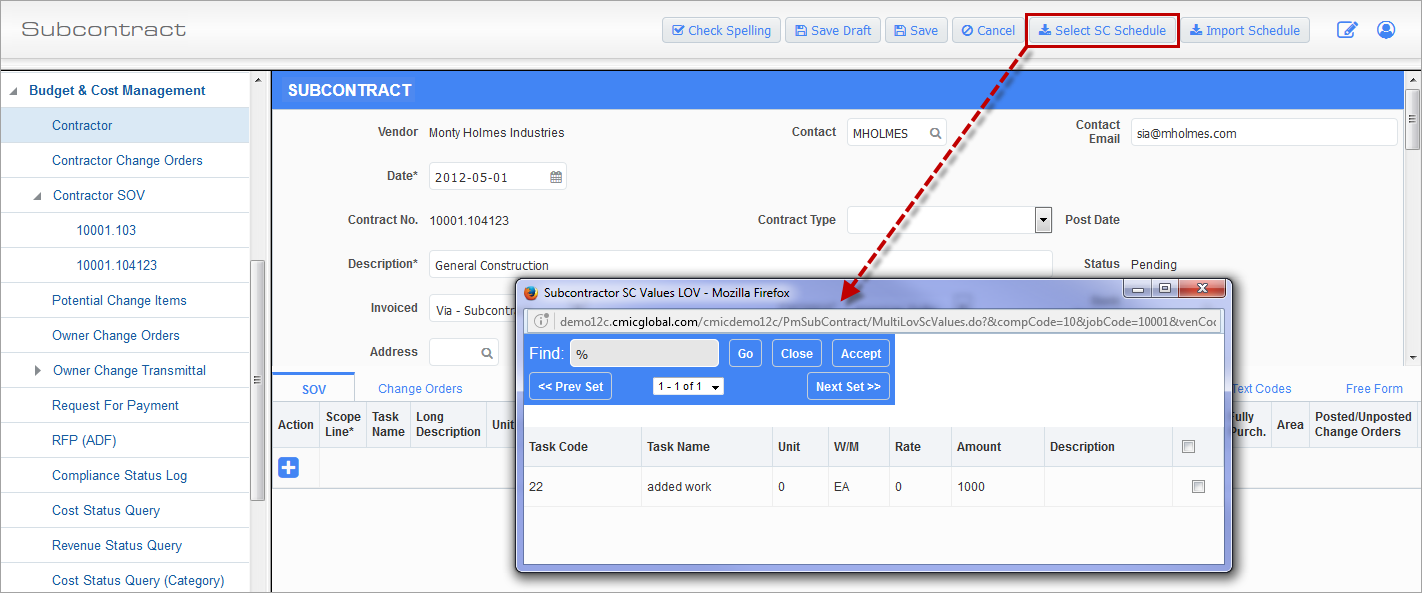
[Select SC Schedule] – Button
Once the Subcontractor Schedule of Values is submitted, use the [Select SC Schedule] button on the Subcontract Entry screen to display a list of the lines entered and submitted by the contractor. Review and select the lines to be brought into the contract.
Importing Subcontract Schedule of Values
Press the [Import Schedule] button to import SOVs to the current subcontract.
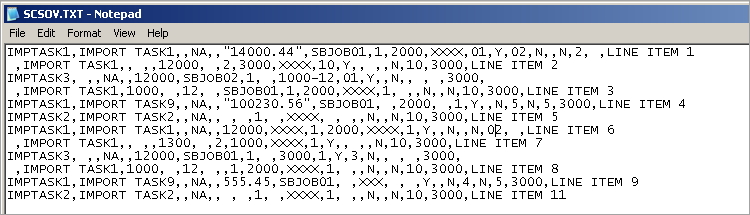
The import file layout is shown below:
Fields terminated by "," optionally enclosed by '"'
| pmsovi_task_code | varchar2(16) | Task Code |
| ,pmsovi_task_name | varchar2(200) | Task Name |
| ,pmsovi_unit | number | Units |
| ,pmsovi_wm_code | varchar2(2) | Weight/Measure |
| ,pmsovi_unit_rate | number | Rate |
| ,pmsovi_amt | number | Amount |
| ,pmsovi_job_code | varchar2(10) | Job Code |
| ,pmsovi_phs_code | varchar2(16) | Phase Code |
| ,pmsovi_cat_code | varchar2(16) | Category Code |
| ,pmsovi_jb_bill_code | varchar2(50) | Bill Code |
| ,pmsovi_tax1_code | varchar2(10) | Tax 1 Code |
| ,pmsovi_tax1_taxable_flag | varchar2(1) | 'Y/N' |
| ,pmsovi_tax2_code | varchar2(10) | Tax 2 Code |
| ,pmsovi_tax2_taxable_flag | varchar2(1) | 'Y/N' |
| ,pmsovi_tax3_code | varchar2(10) | Tax 3 Code |
| ,pmsovi_tax3_taxable_flag | varchar2(1) |
'Y/N' |
| ,pmsovi_hldbk_pct | number | Retainage % |
| ,pmsovi_apexp_code | varchar2(10) | |
|
,pmsovi_long_desc |
varchar2(2000) | Long Description |
| ,pmsovi_wbsv_code1 | varchar2(60) | WBS Code 1 |
| ,pmsovi_wbsv_code2 | varchar2(60) | WBS Code 2 |
| ,pmsovi_wbsv_code3 | varchar2(60) | WBS Code 3 |
NOTE: The file must be .txt or .csv. Also note that if the file is opened using Excel, it may lose some of its original formatting. It is preferable to open and edit using Notepad. For example, if the value of a field is “01”, editing in Excel will possibly change it to ‘1’.
Sample:
Clicking on the button will display the popup box for selecting the import file.
After selecting the file, click [Upload] to bring the data to the initial validation screen.
The validation log shows any errors that arise during the import process. The user can make the corrections and re-import or accept the valid records by clicking the [Accept Valid] button.
When there are no initial validation errors from the import, the [Accept] button is used to pull the records into the subcontract SOV section.
Now that the lines have been imported, they can be modified or deleted as required just as if they had been manually entered.
When the [Save] button is clicked on the subcontract, additional validation for task code, weight/measure, job, phase, category, bill code, tax codes, expense codes etc. are carried out before the record is saved.
An import can be done for an unposted subcontract that already has detail SOV Lines. In this case, the imported records are combined with the existing records on the subcontract.
Adding SOV Lines to Posted Subcontracts & Posted SC Change Orders
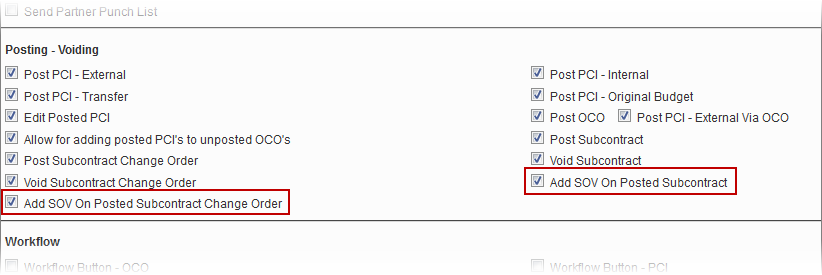
Two Project Role privileges allow the user to add more SOV lines to a posted subcontract and a posted subcontract change order if the need arises: Add SOV On Posted Subcontract and Add SOV On Posted Subcontract Change Order. These could be used, for example, if a client needs to add cost elements to the original contract after the posting because it's not possible to know in advance which cost elements will be used on the contract e.g. gravel for civil work, landscaping.
When they are checked, an [Add SOV] button appears on posted subcontracts and posted Subcontract Change Orders.
The Unit and Amount fields are not editable, but the user can enter the change amount using the W/M and Rate fields.
The [Post] button on the pop-up window is used to commit the additional records to the database without changing the overall amount of the original posted record.