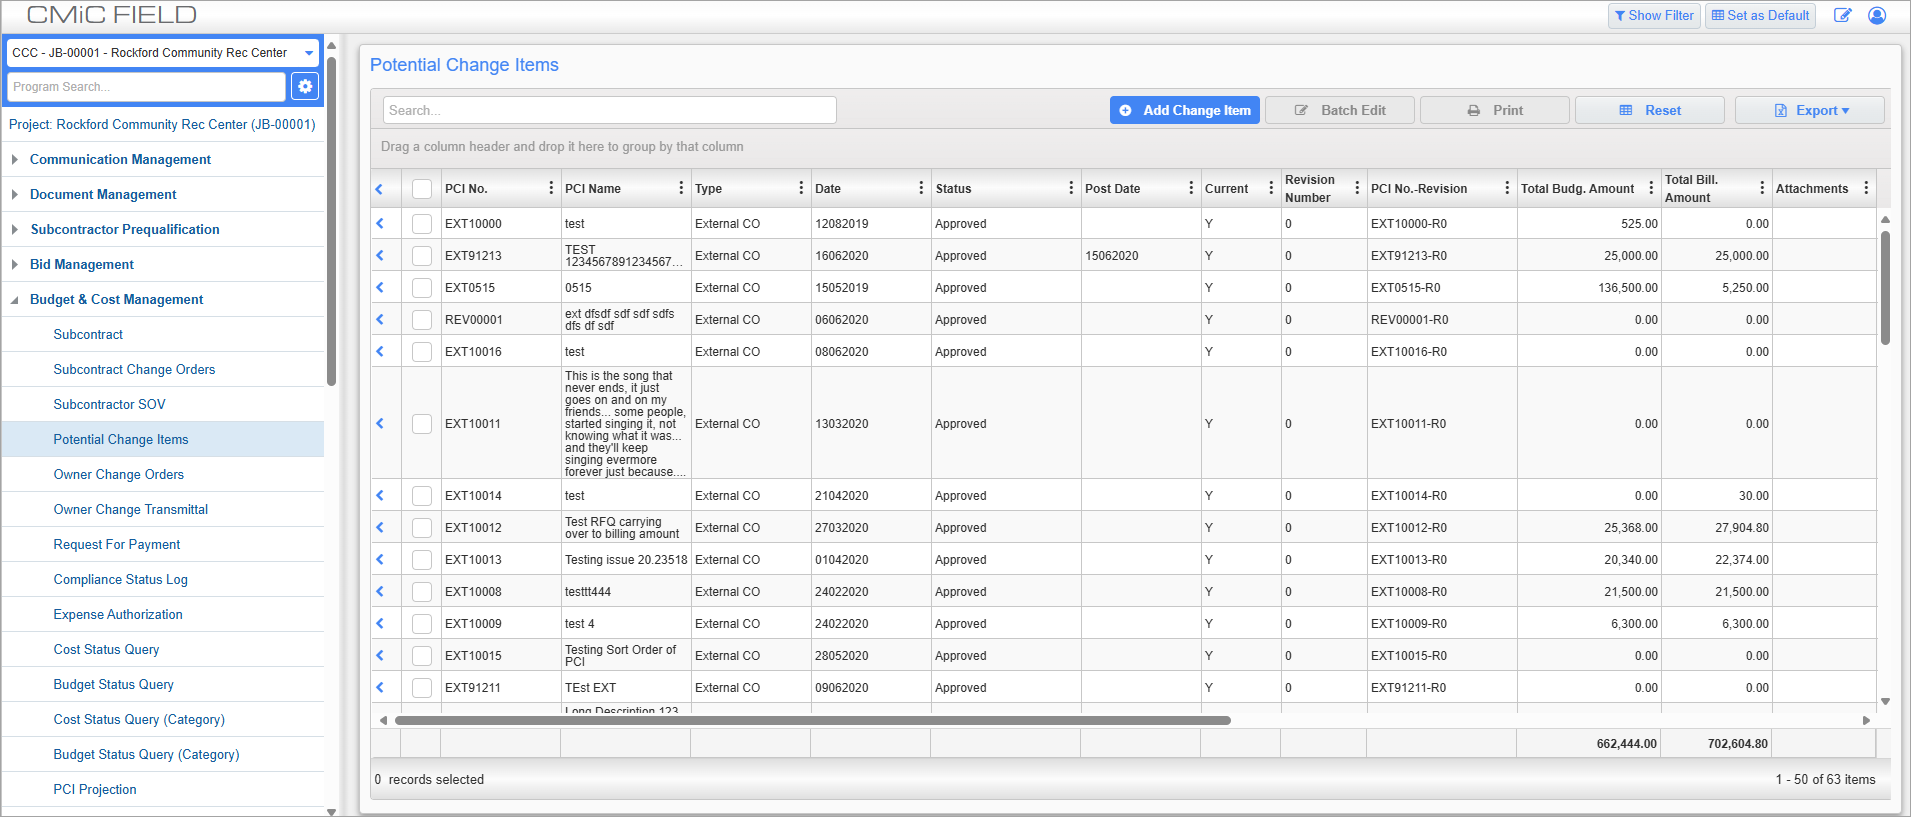
Potential Change Items; standard Treeview path: CMiC Field > Budget & Cost Management > Potential Change Items
The Potential Change Items screen can be used to enter change item requests for ongoing projects. PCIs are items that are expected to result in additional work or cost, beyond what was stated in the original submittal. These items can be made internally or externally and can be linked to requests for quotation (RFQ) and other related objects.
[Add Change Item] – Button
Press the [Add Change Item] button to add a new PCI record to the log.
[Batch Edit] – Button
The [Batch Edit] button is used to launch a pop-up window where a selection of PCIs can be edited all at once.
NOTE: This button is hidden by default and users require the project role privilege 'Allow Batch Edit on PCI' to batch edit PCIs. For more information, please refer to CMiC Field Security - PCIs.
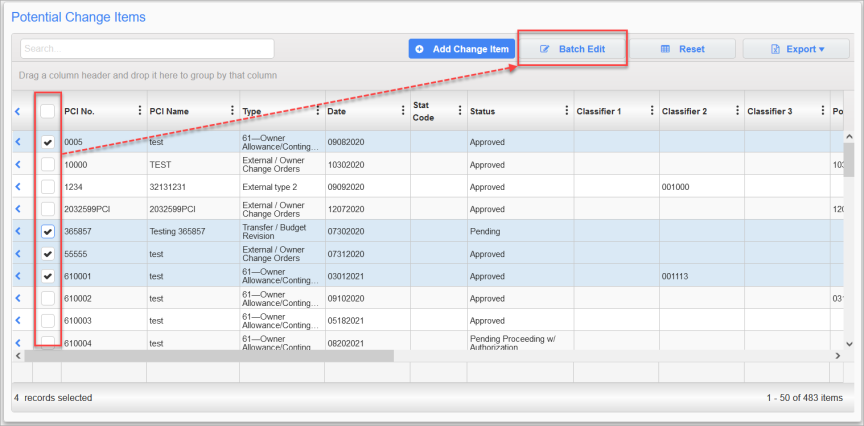
To start, select individual PCIs using the selection column, or use the checkbox located in the selection column’s header to select all of the PCIs at once. When at least one PCI is selected, the [Batch Edit] button will become enabled. Clicking on the [Batch Edit] button will open the Batch Edit PCIs screen.
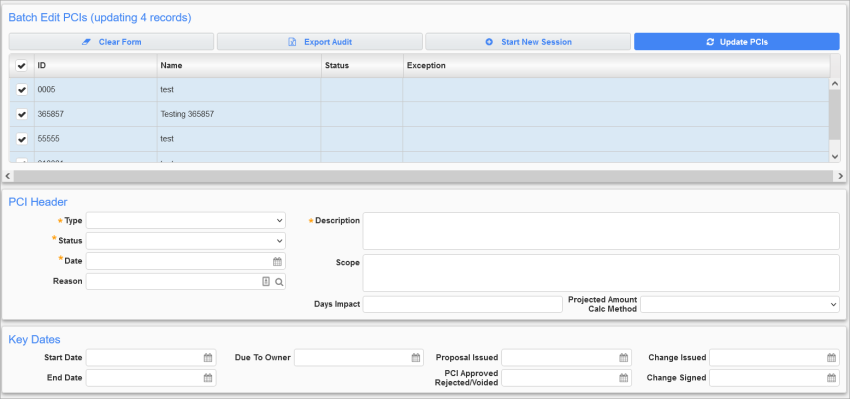
In the Batch Edit PCIs screen, PCI Header and Key Dates information can be edited.
NOTE: If a posted PCI is selected during the batch edit process, the system will allow the user to enter data in a field, unless the field being edited is not allowed to be updated on posted records. In this situation, a message will be displayed to indicate “PCI # XXX could not be modified because it is posted.” Updates to posted records are allowed if the field being modified is normally allowed to be edited on a posted record (e.g., Description).
The following buttons, which are located at the top of the Batch Edit PCIs screen, are available to be used during the editing process:
[Clear Form] – Button: Clears all data from fields.
[Export Audit] – Button: Used to export any changes made to the PCI(s) into an Excel file.
[Start new Session] – Button: Used to start a new session if selected PCIs need to be updated a second time.
[Update PCIs] – Button: Commits the values to the fields.
When finished making edits, press the [Update PCIs] button to save the changes and update the selected PCI records.
[Print] – Button

The [Print] button is used to launch a pop-up window where a selection of PCIs can be printed all at once.
Select one or more PCI records in the log and press the [Print] button to launch the Printing Options pop-up. Select "PCI Summary Report" in the Report Type field and check the 'Include Notes' box to include existing notes in the report. Press [Print] to run the report.
PCI Detail – Tab
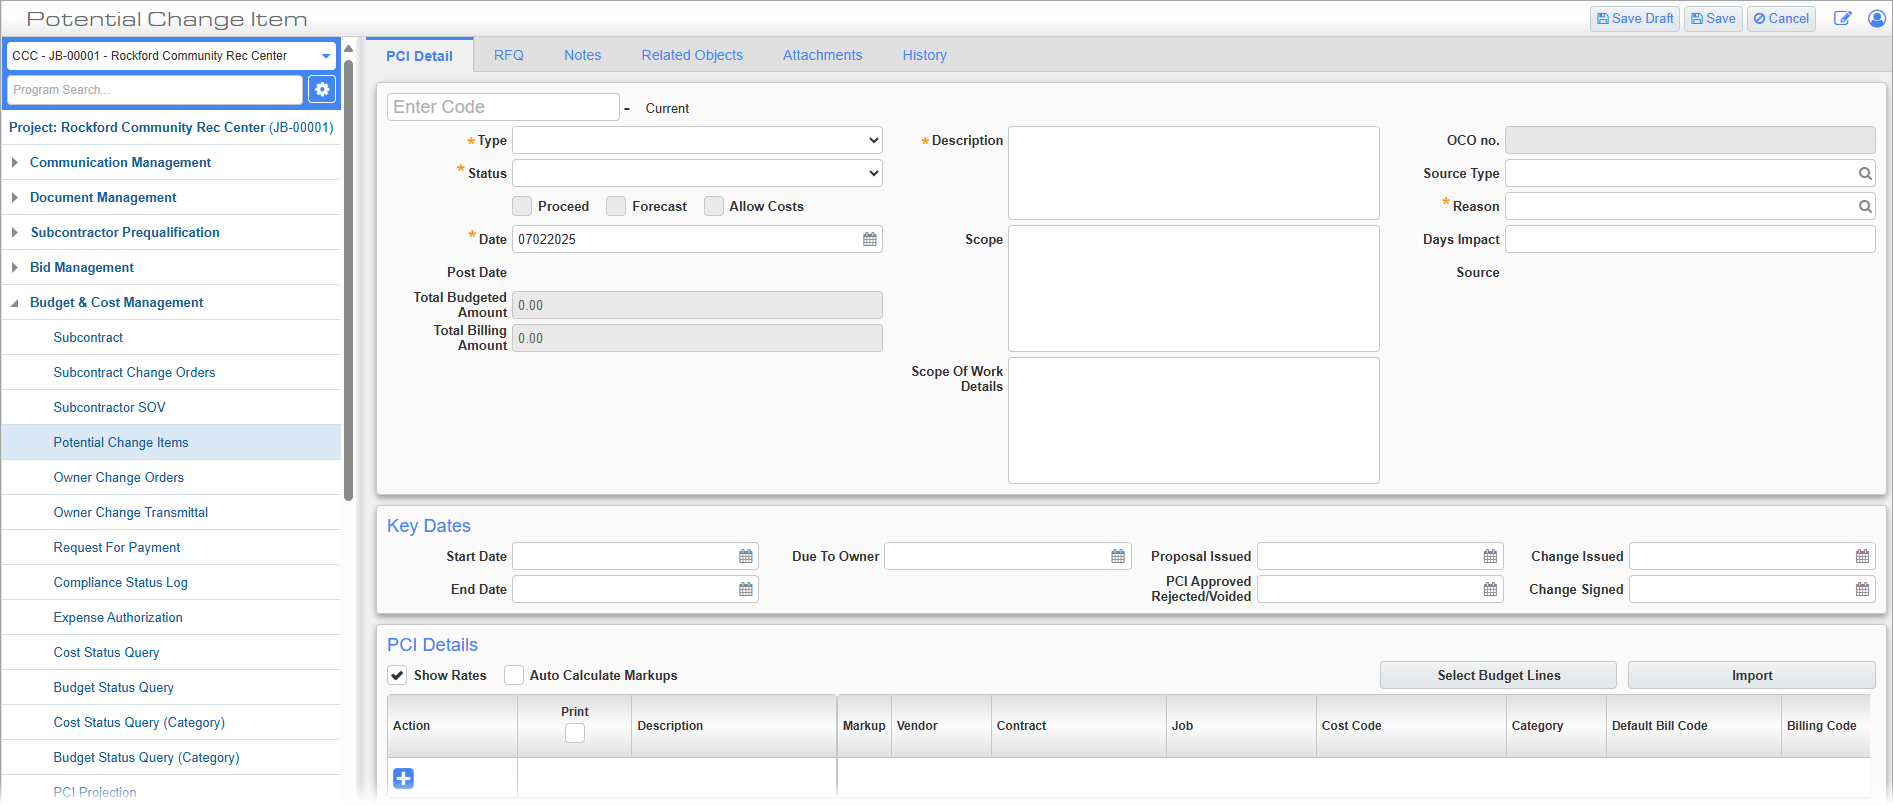
Potential Change Item; standard Treeview path: CMiC Field > Budget & Cost Management > Potential Change Items – [Add Change Item] button
Use this tab to enter all basic information concerning a change order. Press the [Save Draft] button to save any changes to the current record and press the [Save] button to save the record to the system.
NOTE: There is no [Submit] button for this screen as PCIs are added directly to the system when the [Save] button is pressed.
PCI Code
PCI Code
Enter the PCI code. If auto-numbering has been set for PCIs, this field will not be accessible and the system will automatically number the PCI with the next available, sequential number.
Revision Number
This field displays the revision number of the PCI. The original PCI will have the revision number "0" and the system will automatically number the revision with the next available, sequential number.
NOTE: The Revision Number and PCI No. - Revision columns can be added to the PCI log screen using CMiC Field - Log Builder. The PCI No. - Revision column displays the PCI code linked with the revision number. For example, if the PCI number is "EXT-00001" and the revision number is "1", this column will display "EXT-00001-R1".
Current
This field is read-only and displays whether the PCI is "Current" or "Not Current".
NOTE: The Current column can be added to the PCI log screen using CMiC Field - Log Builder and displays "Y" for current PCIs and "N" for noncurrent PCIs.
NOTE: By default, field security on the Revision Number and Current fields are set to “Hidden” for the “ALL” role. Users must set the field PCI Revision Information to “Unrestricted” in order to make these fields visible. For more information, please refer to CMiC Field - Security Roles.
Type
Select the PCI type. This selection will determine the PCI code that appears at the top of this section. For example, if “External CO” is selected and there are already three such PCIs associated with the current project, the PCI code is “EXT 10004”. PCI types are maintained in the Maintain PCI Type screen in the Change Management module. For more information, please refer to Change Management - PCI Types.
NOTE: When using an original budget change item/order, there is no linking to subcontracts and/or vendors, and the related fields are disabled in the PCI Entry screen.
NOTE: Access to selected PCI types may be restricted based on the user's project role settings. For more information, please refer to Restrict PCI Types.
Status
Select whether the PCI is approved, pending, prepending, or rejected. The ‘Proceed’ and ‘Forecast’ boxes are checked automatically, depending on what is selected here. The 'Allow Costs' box makes the value available for selection in the Job Cost Transactions screen; this is done using the WBS Code field in the Detail section of the screen.
NOTE: The 'Proceed' and 'Forecast' boxes are in read-only mode by default. Field security for 'Proceed', 'Forecast' and 'Allow Costs Flag' can be set in Role Maintenance.
Date
Enter/select the creation date of the PCI. This field will default to the current date.
Post Date
This field displays the date the PCI was posted using the [Post] button. The posting of a PCI can be undone by pressing the [UnPost] button.
Total Budgeted Amount, Total Billing Amount
Enter the total amount that appears on the budget for the PCI and the amount that is billed for the PCI.
Description
Enter a brief description of the PCI.
Scope of Work
Enter the full scope of the PCI.
Scope of Work Details
Enter details regarding the full scope of the work for the PCI.
OCO no.
Enter the owner change order number for the PCI. This field is only available after a selection has been made for the Type field.
Users with the project role privilege 'Edit Posted PCI' can also modify this field for posted PCIs.
Posted PCIs can be linked to unposted OCOs so long as the ‘Allow for adding posted PCIs to unposted OCOs’ and ‘Allow Posted PCIs To Be Linked To Unposted OCOs’ boxes are checked on the Project Roles (standard Treeview path: CMiC Field > Security > Project Roles) and System Options (standard Treeview path: CMiC Field > System > Setup > System Options – Projects tab) screens, respectively.
The above privileges also allow posted PCIs to be linked to posted OCOs if the OCO's 'Closed' checkbox is not enabled. For more information, please refer to CMiC Field - Owner Change Orders.
Source Type
If the PCI was created from another object in CMiC Field, enter/select the type of the source. These codes can be created by checking the ‘Maintain Source Type LOV’ box in the Maintenance section of the Project Roles screen (standard Treeview path: CMiC Field > Security > Project Roles).
NOTE: The Source Type field will automatically default to “N/A” only when the PCI_SOURCE_TYPE is made mandatory in the sys_alternate_feature and the field security for Source Type is set to read-only or hidden.
Reason
Enter/select the reason for the PCI.
This field is mandatory if the 'PCI Reason Required' box is checked on the Change Management tab of the CMiC Field - Company Control screen.
The system will prompt the user to add or update a note for the reason if the 'PCI Reason Note Required' box is checked in the General tab of the Project System Options screen. Press the [Reason Note] button to launch the Note pop-up . The note will be saved in the Notes tab.
NOTE: These codes can be created by checking the ‘Maintain Reason Text LOV’ box in the Maintenance section of the Project Roles screen (standard Treeview path: CMiC Field > Security > Project Roles).
Days Impact
Enter how many days work the PCI is estimated to impact the initial submittal.
Source
This field displays the object from which the PCI is created.
Update Projected During Posting – Checkbox
Check this box to edit the Projected Amount Calc Method field. This allows the user to update the projected amount when the PCI is posted.
Projected Amount Calc Method
Select whether the projected amount is calculated by adding the changed budget amount or by recalculating the projected amount.
Key Dates
This section is used to manually enter or edit the key dates pertaining to the PCI, if desired.
Start Date, End Date
Enter/select the dates between which the change order is to take place.
Proposal Issued, Proposal Signed
Enter/select the dates the original proposal was issued and signed.
Change Issued, Change Signed
Enter/select the dates the change order was issued and signed.
Due To Owner
Enter/select the date the PCI is due to be returned to the original owner.
PCI Details
To add a detail item line to the PCI, press the Plus icon ( ) in the Action column.
To allow detail lines to be entered with no job, phase, or category codes, check the ‘Allow Job/Phase/Category null on PCI’ box on the Change Management tab of the Company Control screen (standard Treeview path: CMiC Field > File Maintenance > Company Control).
![]() ) in the Action Column. All the data from the selected line is copied to a new detail line except for the Change Order and Task ID (these fields are dependent on settings on the Change Management – Tab of the Company Control screen).
) in the Action Column. All the data from the selected line is copied to a new detail line except for the Change Order and Task ID (these fields are dependent on settings on the Change Management – Tab of the Company Control screen).
To enable the Endless Scroll feature and convert this section to a standard system log, the 'Endless Scroll for PCI Details' security privilege must be assigned. For more information, please refer to CMiC Field Security - PCIs. Once the security privilege is assigned, this log can be customized using the Column Configuration screen. Refer to CMiC Field - Column Configuration for more information, as additional security privileges are required to use this functionality.
In the Endless Scroll PCI Details log, a search bar is available to filter the PCI detail lines. As well, grand total fields are available at the bottom of the log for the following fields: Estimated Amount, Quoted Amount, Final Amount, and Billing Amount.
For more information, please refer to Endless Scrolling in PCI Details.
Show Rates – Checkbox
Check this box to reveal the Quantity, Estimated Rate, Quoted Rate, Final Rate, Billing Quantity, and Billing Rate fields.
Auto Calculate Markups – Checkbox
Check this box to automatically generate markup lines once the PCI record has been saved. Otherwise, the [Calc. Markups] button can be pressed to manually achieve the same result.
The rules for markup calculation can be set on the PCI Markup Rules screen.
[Reset Layout] – Button
Press this button to reset the layout of the grid. Column order, filters, and groupings will automatically save and be displayed in the current state unless modified by the user. This button is hidden by default and requires the security role privilege 'Endless Scroll for PCI Details'. For more information, please refer to CMiC Field Security - PCIs.
[Detach] – Button
Press this button to expand the PCI Detail section to full screen. In Detached mode, press [Collapse] to bring the Detail section back to the main screen. This button is hidden by default and requires the security role privilege 'Endless Scroll for PCI Details'. For more information, please refer to CMiC Field Security - PCIs.
[Select Budget Lines] – Button
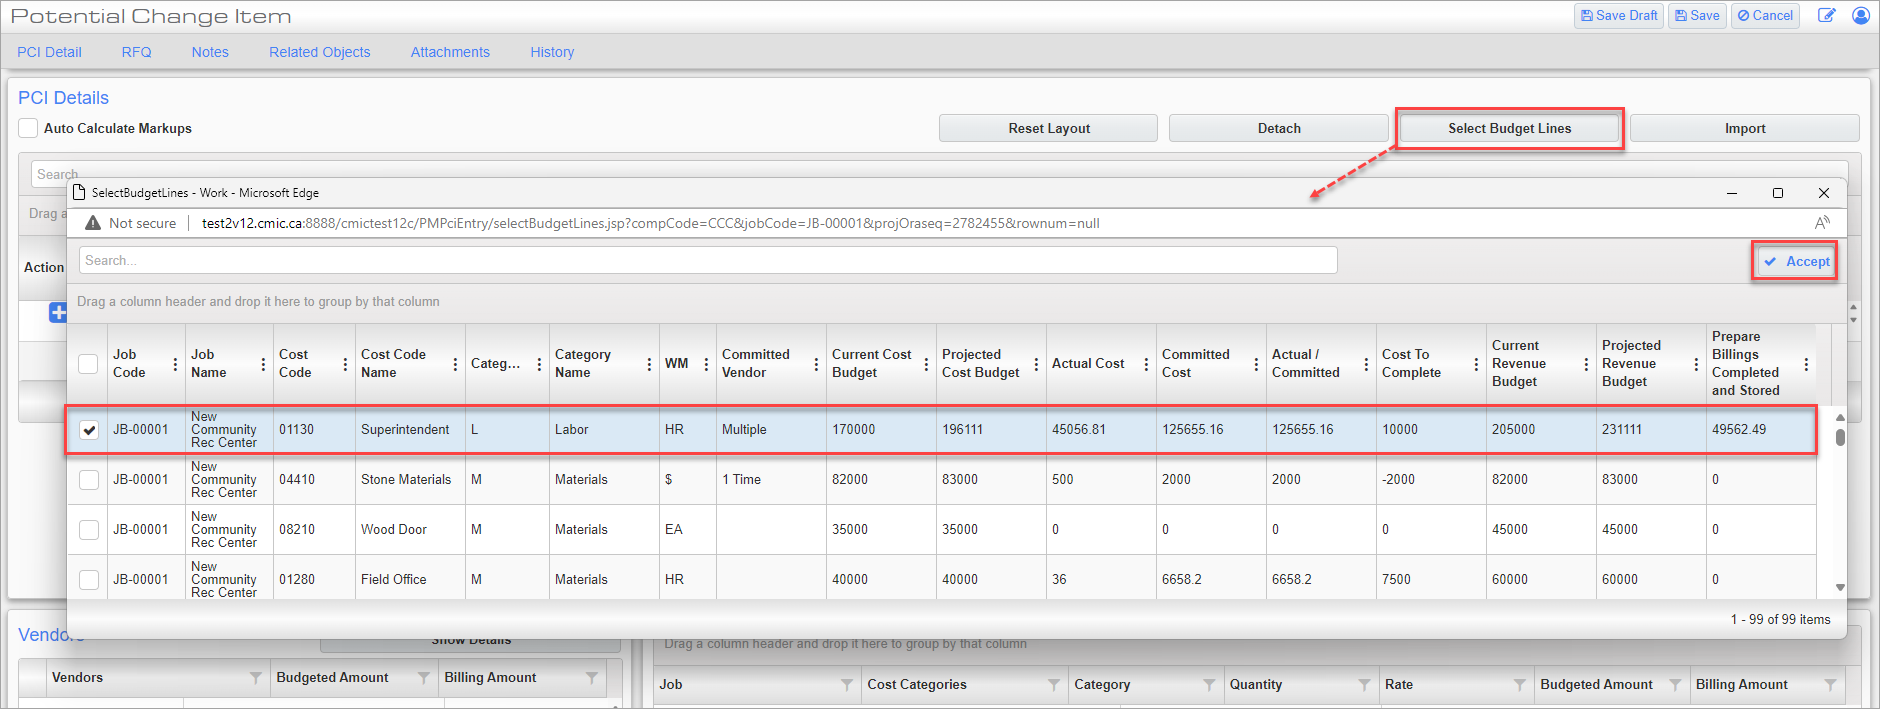
Press this button to launch the Select Budget Lines pop-up screen. This screen is used to review budget amounts for cost codes and categories. After reviewing the amounts, budget line items can be selected which will populate the PCI Details with the selected line’s job code, cost code, category code,
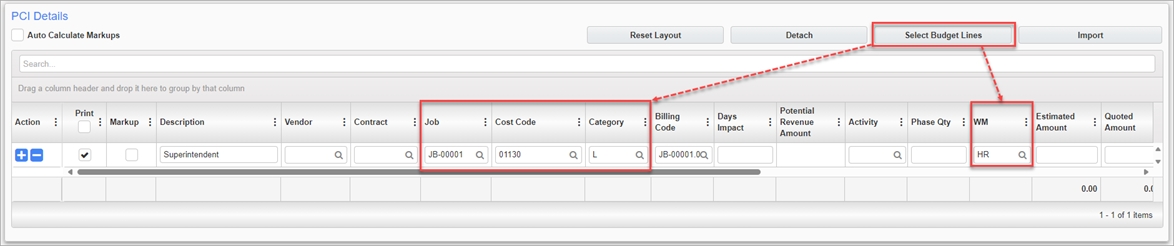
The details from the selected budget lines will populate the Job, Cost Code, Category, and Weight/Measure (WM) columns in the PCI Details.
NOTE: If the user wants to add multiple lines of the same cost code and category, they will have to re-open the pop-up and select those budget lines again.
[Import] – Button
Press this button to bring up the CMDetail Import pop-up screen.
Please see Importing PCI Details for more information about the import process.
Print – Checkbox
Check this box to print this detail line upon posting.
Markup – Checkbox
Check this box to designate this detail line as a markup line.
Vendor, Contract, Job, Cost Code, Category, Billing Code
Enter/select a vendor, contract, job, cost code, and category for the detail line. The job field will default from the current user job. The Billing Code field will default after entering a cost code and a category. For information on adding cost codes/categories on the fly, refer to Create Cost Codes/Categories On-the-Fly.
Default Bill Code – Checkbox
The 'Default Bill Code' checkbox is enabled when the 'Do Not Generate New Bill Codes with WBS Mapping' checkbox in System Options is checked (standard Treeview path: System > Setup > System Options > Projects tab > General section).
In the Import Layout file, a column for the 'Default Bill Code' checkbox is available to update when importing PCI details. For further details, see CMiC Field - Importing PCI Details.
Days Impact
Enter the number of days due to be impacted by the change. These will print on the change order and a new finish date will be calculated.
Spent/Committed
This field shows the amount spent (i.e. the committed cost) for the detail line.
Phase Qty
Enter the phase quantity for the detail line.
Quantity, WM
Enter the quantity and its units.
Estimated Rate, Estimated Amount, Quoted Rate, Quoted Amount, Final Rate, Final Amount
If a value has been entered in the Quantity field, then entering a value in any of the rate fields will automatically fill the corresponding amount field (and vice versa).
Billing Quantity, Billing Rate, Billing Amount
The billing quantity, rate, and amount associated with the detail line are shown here. These fields are display-only and cannot be edited here.
Subcontract Change
Select the associated subcontract change code.
Task ID
Select the task ID for the subcontract change order.
If the 'Modify Item Code on Unposted SCO Linked to Posted PCI' privilege is assigned to the user role in the Role Maintenance screen, this ID will populate the Item Code field if this PCI is linked to a SCCO. Please note that the PCI must be posted and the SCCO to which it is linked must be unposted.
Status
Select the approval status of the PCI.
NOTE: This field is enabled if the 'Use PCI Detail Status' box is checked on the Change Management – Tab of the Company Control screen. Additionally, if the 'Use PCI Type' box is checked on the Company Control screen, this field is dependent on whether the PCI type has the 'Use PCI Detail Status' box checked on the Maintain PCI Types screen in the Change Management module. For more information, please refer to Change Management - PCI Types.
This field is read-only for markup lines, which inherit the status from the corresponding base detail line. Please note that it is the user’s responsibility to recalculate the markups if there are any changes in the amounts, statuses, or OCO numbers of the base lines to ensure the generated markup lines are accurate.
NOTE: An error message will be generated upon saving if the PCI detail lines are linked to the same OCO but have different statuses. To resolve this error, update the detail lines so that all the statuses are the same (to match the header status) and re-calculate markups.
OCO No.
Enter the owner change order number associated with the change order. The OCO number is a reference field that will appear on the Job Billing AIA reports. The OCO LOV allows users to select existing OCOs to associate with the PCI detail line or to create a new OCO on the fly.
This field is informational only and does not update the OCO that it references (i.e., it does not link the detail line to any OCO).
NOTE: This field is enabled if the 'Use PCI Detail Status' box is checked on the Change Management – Tab of the Company Control screen. Additionally, if the 'Use PCI Type' box is checked on the Company Control screen, this field is dependent on whether the PCI type has the 'Use PCI Detail Status' box checked on the Maintain PCI Types screen in the Change Management module. For more information, please refer to Change Management - PCI Types.
For more information, please refer to Linking PCI Details to OCO.
This field is read-only for markup lines, which inherit the OCO number from the corresponding base detail line. Please note that it is the user’s responsibility to recalculate the markups if there are any changes in the amounts, statuses, or OCO numbers of the base lines to ensure the generated markup lines are accurate.
Vendors
This section displays every vendor associated with the PCI, as well as their associated budgeted and billing amounts. This section is display-only, so any changes to vendor amounts should be made in the PCI Detail section.
A search can be made on vendor compliances. If the vendor is not compliant, it will be displayed with a yellow background. Hovering the mouse over a yellow vendor then displays a list of non-compliances.
[Show Details] – Button
Press this button to open a pop-up with more detailed vendor information.
NOTE: This section is converted to a standard system log when the 'Endless Scroll for PCI Details' security privilege is assigned. For more information, please refer to CMiC Field Security - PCIs.
Allocation
This section displays every job associated with the PCI, as well as their associated budgeted and billing amounts.
[Show SubJob Total] – Button
Press this button to show sub-job totals along with the full job totals already displayed.
NOTE: This section is converted to a standard system log when the 'Endless Scroll for PCI Details' security privilege is assigned. For more information, please refer to CMiC Field Security - PCIs.
Main Toolbar Buttons

Potential Change Item; standard Treeview path: CMiC Field > Budget & Cost Management > Potential Change Items
These buttons, highlighted above, appear in the main toolbar of the PCI Detail tab once the record has been saved.
[Add PCI] – Button
Press this button to open a new, blank PCI record.
[Copy] – Button
Press this button to open a copied, unposted, version of the current PCI record.
[Edit] – Button
Press this button to edit the current record.
[Delete] – Button
Press this button to delete the current record.
[Print PCI] – Button
![Pop-up window launched from the [Print PCI] button on the PCI screen](../../../../../Resources/Images/CMiC_Field/PCI_PrintPCI_741x272.png)
Pop-up window launched from the [Print PCI] button on the PCI screen
Press this button to open a pop-up from which the current PCI record can be printed. In the Select Report pop-up window, use the Report Name field's drop-down menu to select the report to be printed. In addition to the PCI report, other useful reports can be printed (e.g., PCI Approval Sheet). The list of available reports is managed in the Report Assignment screen. Refer to CMiC Field - Reports & Form Letter Assignment for more information.
[Select Bid Items] – Button
Press this button to attach any bid items to the PCI record.
[Calc. Markups] – Button
Press this button to generate markups for the PCI. If the ‘Auto Calculate Markups’ box is checked in the PCI Details section this button need not be used.
[Post] – Button
Press this button to post the most recently saved version of the PCI record. This button is enabled if users have the appropriate PCI posting privileges assigned in the Posting-Voiding section on the CMiC Field - Project Roles screen.
NOTE: This button may be disabled if the user also has the 'Workflow Button - PCI' privilege assigned on the CMiC Field - Project Roles screen. If there is no active workflow for the PCI, users can either add/activate a workflow to enable the [Workflow] button or unassign the 'Workflow Button - PCI' privilege to enable the [Post] button.
If unapproved lines for the PCI exist, a pop-up window similar to the one shown in the screenshot below will appear, prompting the user to indicate whether they would like a new PCI created and posted, which contains only those lines which have been approved.
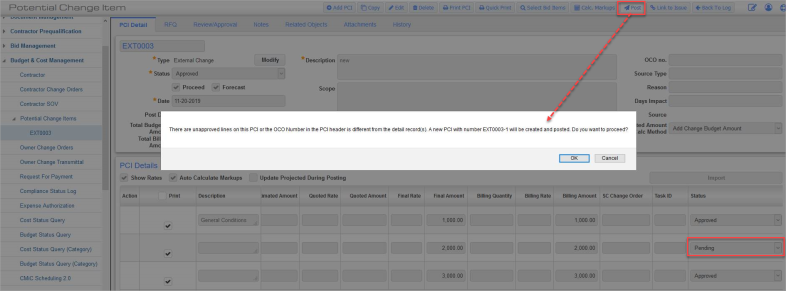
Pop-up window launched when a user attempts to post a PCI and unapproved lines exist
[Link To Issue] – Button
Press this button to link the PCI with any issue records. Issues can be set in the Issues screen (standard Treeview path: Communication Management > Issues).
[Back To Log] – Button
Press this button to return to the PCI log screen.
[Create Revision] – Button
Press this button to create a revision of an existing, unposted PCI. The system will create an exact copy of the PCI including all the detail lines, dates, notes, attachments etc. of the original PCI.
For more details, please refer to Creating PCI Revisions.
NOTE: This button is disabled for posted PCIs. As well, by default, field security on the 'Create Revision' checkbox is set to “Hidden” for the “ALL” role. Users must set the Revise PCI field to “Unrestricted” in order to make this checkbox visible. For more information, please refer to CMiC Field - Security Roles.
[Bluebeam Review] – Button
Press this button to open a pop-up with the Bluebeam Gateway log-in screen.
RFQ – Tab
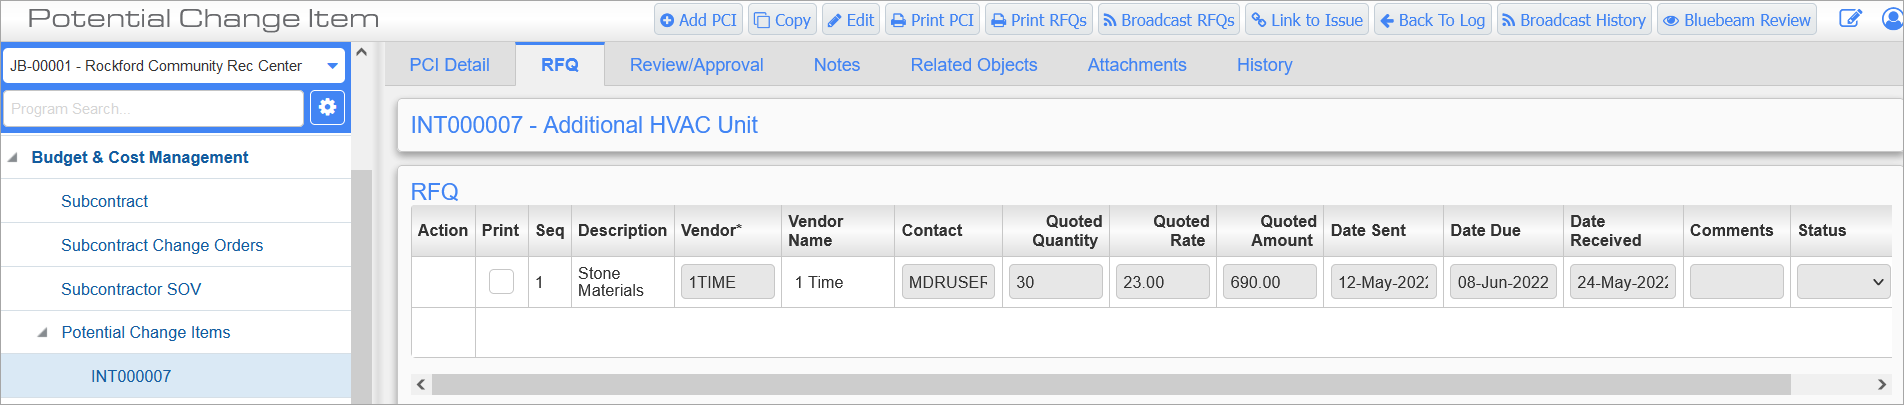
Potential Change Item; standard Treeview path: CMiC Field > Budget & Cost Management > Potential Change Items – RFQ tab
The RFQ tab can be used to send requests for quotations to the vendors who are to work, in whole or in part, on the PCI. Individual detail lines can be added by pressing the [Edit] button and then the Plus icon (![]() ) in the Action column.
) in the Action column.
Enter the vendor and contact. The contact is the person to whom the RFQ for the selected vendor is sent. Leave the Quoted Quantity, Quoted Rate and Quoted Amount fields blank, as they will be filled in when the contact responds to the RFQ Broadcast and submits their quote. A message will pop up if the record already has these fields filled.
RFQs can be sent to multiple contacts from the same vendor but only the record with the sequence number (i.e., Seq column) will be used to update the Quoted fields for the associated PCI detail line, when the quote is submitted into Project Management.
The Date Sent field is automatically updated when the [Broadcast RFQs] button is pressed. The value in the Date Due field is then updated based on the Default RFQ Review period field of the Project screen (standard Treeview path: CMiC Field > File Maintenance > Project Maintenance – Defaults tab). The Date Received field is updated after the contact receives and submits the email they are sent.
Status
The Status field can be used to track the status of the RFQ. Status codes and their color schemes can be customized and maintained in the RFQ Status Maintenance screen. For more information, please refer to CMiC Field - RFQ Status.
Validations exist for the following statuses, if they are defined:
-
Received: The RFQ has been received.
-
In Review: The RFQ is in review.
-
Accepted: The RFQ has been accepted.
-
Returned: The RFQ has been returned.
If the Date Received field is updated, the status will automatically change to "Received".
If the status is "Received", "In Review", or "Accepted", the Date Received field becomes mandatory.
If the status is changed to "Returned", the Date Received and Quoted Amount fields are blanked (and this change is logged in the History tab).
[Broadcast RFQs] – Button
Press this button to send the selected RFQs to the persons entered in the fields in the Contact column. Contact email addresses can be entered in the Project Contact Directory screen.
The email address from which the RFQ is sent can be entered in the Broadcast Sender Email field of the Project screen (standard Treeview path: CMiC Field > File Maintenance > Project Maintenance – General tab).
The contact then receives an email from which they can enter their quoted values. Pressing the [Submit] button then updates both the RFQ tab and the relevant PCI Detail lines.
NOTE: Contacts may add documents with their response, which are linked to the Attachment document type. Please ensure auto numbering is enabled for the Attachment document type to allow contacts to include files without errors. Auto numbering can be enabled in the Document Options node of the Maintain Data Process screen in the System Data module. For more information, please refer to System Data - Maintain Data Process.
Broadcast templates may be added through the Broadcast Message Templates screen (standard Treeview path: CMiC Field > File Maintenance > Local Tables > Broadcast Message Templates). To view the available placeholders for broadcast templates, press the [Add] button and then the [Available Placeholders].
Users can include attachments from the PCI Attachments tab by pressing the [Select All] button or by checking the 'Select' box to select specific attachments.
It may be desirable to set up notifications when recipients respond to an RFQ they have been sent. Please see the RFQ Response Notification Setup quick guide at the end of this document for more information.
Review/Approval – Tab
The Review/Approval tab appears if CMiC Workflow is being used with the Subcontract screen. It works with the [Workflow] button which is used to establish integration between CMiC Field and Workflow, if the appropriate workflows are configured for subcontract approval.
For more information, please refer to Subcontract Integration with Workflow.
Notes – Tab
Please refer to Notes, Attachments, and Documents for further details.
Related Objects – Tab

Potential Change Items; standard Treeview path: CMiC Field > Budget& Cost Management > Potential Change Items – Related Objects tab
For objects added in the Related Objects tab of a PCI, the PCI will be available in the Related Objects tab of that object and vice versa.
To add an object, click on the Assign Objects link to open the Related Objects pop-up window. From the pop-up, filter the objects by object type using the drop-down menu, then select objects related to the PCI and press the [Accept] button.
Attachments – Tab

Potential Change Items; standard Treeview path: CMiC Field > Budget& Cost Management > Potential Change Items – Attachments tab
This is one of many Attachments tabs throughout CMiC Field. Please refer to Notes, Attachments, and Documents for further details.
History – Tab

Potential Change Items; standard Treeview path: CMiC Field > Budget& Cost Management > Potential Change Items – History tab
This tab can be used to view all changes and edits made to a PCI record. This tab is view-only and so changes must be made with the [Edit] button in the PCI Detail tab.
Create Cost Codes/Categories On-the-Fly
Security
To use this feature, the ‘Assign Phase/Cat On The Fly’ program must be assigned to the user’s security role in the Role Maintenance screen. By default, this program is unchecked. In addition, the system privilege “JCPHSINS - JC: Allows the user to create a new Phase/Category on the fly” must also be assigned to the user on the System Privileges tab of the User Maintenance screen in the System Data module. If required, field security can be assigned to the ‘Assign Phase/Cat On The Fly’ program in the Role Maintenance screen, which allows security levels to be adjusted on the fields in the Quick Phase/Category Insert pop-up window.
Creating New Cost Code
For convenience, cost codes/categories (i.e., phases/categories) can be created on-the-fly directly from the Cost Code and Category fields.
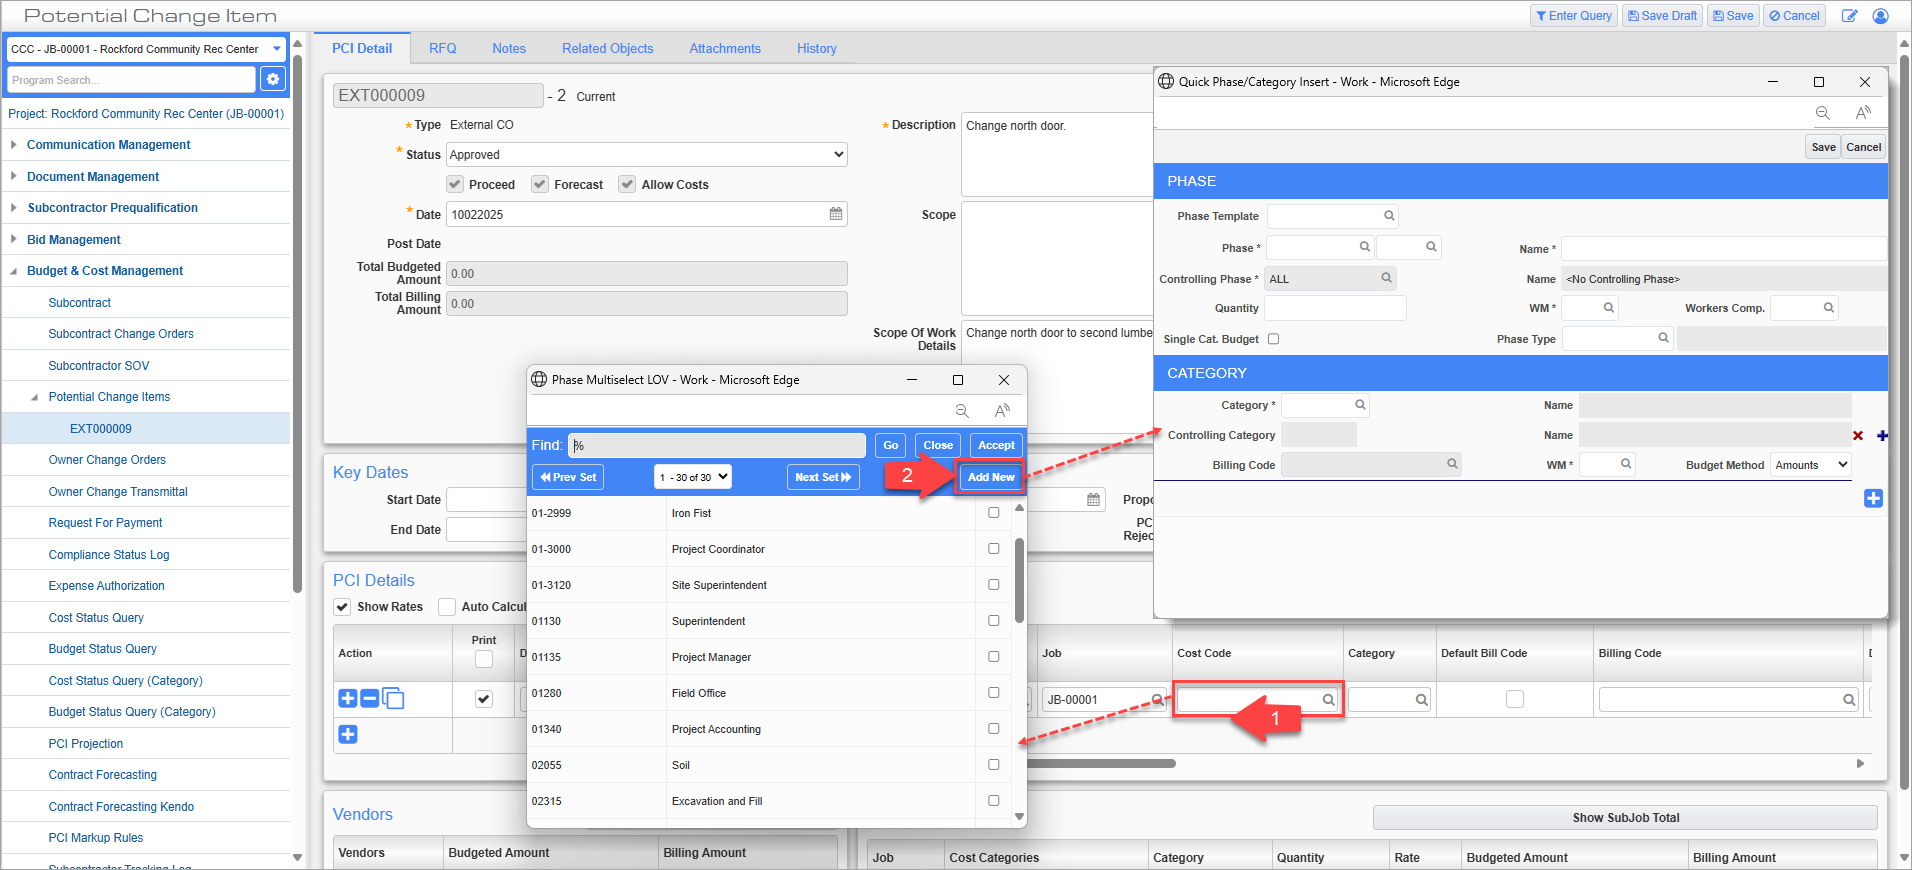
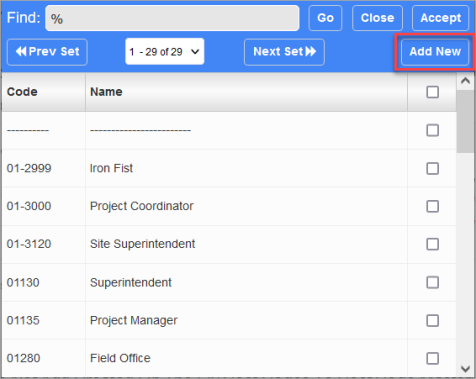
If a user has the proper security assigned, when selecting a cost code or category, they will be able to use the [Add New] button in the Cost Code or Category field’s LOV to access the Quick Phase/Category Insert pop-up window where cost codes and categories can be created on-the-fly.

Click on the Cost Cost field under PCI Details to access the Phase Multiselect LOV pop-up window.
Pop-up window launched from the Cost Code field
Click on the [Add New] button in the Phase Multiselect LOV to open up the Quick Phase/Category Insert pop-up window.

Quick Phase/Category Insert pop-up window
Use the Quick Phase/Category Insert pop-up window to create any new cost codes or categories. When finished, press the [Save] button to close the pop-up window and return to the PCI.
If the 'Enforce Phase Segmentation' box is checked in the Phase Segmentation section on the Defaults tab of the Company Control screen, users can enter cost code (i.e., phase) segments in the Phase field. When checked, only cost codes that already exist in the master list (i.e., the Enter Cost Code screen in the Job Costing module) can be added. These cost codes are listed under "Master Phases" in the Phase Segment LOV. As well, the cost code plus the segment code will be concatenated and displayed as a single cost code when added.
If the ‘Do Not Add Created On The Fly Cost Codes To Cost Code Master’ box is checked on the Projects tab of the System Options screen in the System Data module, then any cost codes (i.e., phases) that are created on-the-fly will not be added to the Cost Code Master (i.e., the Enter Cost Codes screen in the Job Costing module).
NOTE: When the Cost Code field's LOV initially appears in the PCI Detail, the list is limited to the list of cost codes currently available on the job. If the user selects the [Add New] button, then the full phase master list appears.
Creating PCI Revisions
![Screenshot of PCI toolbar with [Create Revision] button highlighted.](../../../../../Resources/Images/CMiC_Field/CMICFIELD_PCI_CreateRevision1.png)
[Create Revision] button on main toolbar
The [Create Revision] button allows users to create PCI revisions of unposted PCIs while preserving the original PCI's details. The goal is to enable tracking of the PCI through the approval process with an owner without modifying the original PCI and losing the details initially sent for approval. Once revised, the original PCI will have no impact on the rest of the system and will be treated as if it was deleted. For more details, please refer to Main Toolbar Buttons.

PCI revision information on original PCI and revision
The Revision Number and Current fields on the PCI Detail tab display the PCI revision information. The original PCI will have the revision number "0" and the system will automatically number the revision with the next available, sequential number. As well, the Revision Number, PCI No. - Revision, and Current columns can be added to the PCI log screen. For more details, please refer to PCI Detail – Tab.
Creating a PCI Revision
When creating a revision, the system will create an exact copy of the PCI including all the detail lines, dates, notes, attachments etc. of the original PCI. The latest PCI revision will be displayed in communication records (such as RFI and Issue records), the Contract Forecasting with PCI Projections screen, the PCI Projection screen, the Cost Status Query screen, and reports.
Copying a PCI Revision
After copying a PCI from any revision via the [Copy] button the main toolbar, the copied PCI will become the original PCI (i.e., revision number "0") for the new PCI code.
Editing a Current PCI Revision
Only the latest revision can be edited, and the PCI amounts of noncurrent revisions will not impact the rest of the system (e.g., there is no impact on the budget, contract forecasting, etc.). As dates are maintained from the previous PCI, it is the responsibility of the user to override or update the dates.
Deleting the Current PCI Revision
When a current revision (i.e., with a revision number that is greater than "0") is deleted, the previous revision will become the current one and become editable. For example, deleting EXT-0003-R1 will make EXT-0003-R0 the current PCI.
PCI Linked to Subcontract (SC)
When the original PCI (revision "0") is linked to a SC and the PCI details are modified, the system will prompt the user to either delete or unlink the detail lines from the SC, similar to standard behavior.
When a PCI is linked to a SC and a revision is created, the SC is linked to the current revision and the link remains intact until the user chooses to unlink or delete the PCI line. Noncurrent revisions will display the SC information but will no longer be actively linked to the SC.
If a detail line is deleted in the current PCI revision, the system will prompt the user to either delete or unlink the detail lines from the SC. If a detail line is not deleted and only modified, the SC will reflect the latest change.
PCI Linked to Subcontract Change Order (SCO)
When the original PCI (revision "0") is linked to a SCO and the PCI details are modified, the system will prompt the user to either delete or unlink the detail lines from the SCO, similar to standard behavior.
When a PCI is linked to a SCO and a revision is created, the SCO is linked to the current revision and the link remains intact until the user chooses to unlink or delete the PCI line. Noncurrent revisions will display the SCO information but will no longer be actively linked to the SCO.
If a detail line is deleted in the current PCI revision, the system will prompt the user to either delete or unlink the detail lines from the SCO. If a detail line is not deleted and only modified, the SCO will reflect the latest change.
PCI Linked to Owner Change Order (OCO)
If a PCI is linked to an OCO and a revision is made that results in updates to amounts or detail lines, the linked OCO will automatically be updated as well.
Buyout PCIs
Posting a subcontract will automatically create an unposted Buyout PCI record for the subcontract's SOV lines where buyout allocation was enabled. For more information, please refer to the [Buyout Allocation] – Button on the Subcontracts screen.
The PCI detail lines, as created for the subcontract SOV lines, will also have allocation lines created in the Allocation section of the PCI Detail tab as per the job/cost code/category setup, with amounts to offset the PCI cost amount.
NOTE: The billing amounts for the allocation lines will be set to 0.00 unless the 'Revenue Transfer' box is checked in the Buyout Allocation pop-up of the Subcontracts screen.
The total for the Billing Amount column will be used to offset the PCI detail lines created for the subcontract SOV lines.
Allocation Billing Amount Calculations
The following rules are used to calculate the billing amount:
-
If the PCI type is "Internal", then
Billing Amount = 0.00
-
If the PCI type is non-internal (e.g., "External", "Original Budget", "Transfer"), then
Billing Amount =Buyout Allocation Amount
-
If the PCI type is non-internal (e.g., "External", "Original Budget", "Transfer"), and the 'Revenue Transfer' box is unchecked in the Buyout Allocation pop-up of the Subcontracts screen, then
Billing Amount = 0.00
When the CM control checkbox 'Transfer CI Budgeted Amount must be balanced" is checked, use the job/cost code/category code from the SOV lines to balance out and set the following PCI Detail amounts:
Final Amount = Sum of Buyout Allocation Amounts
Billing Amount = Sum of Revenue Transfer Amounts
Linking PCI Details to OCO
PCI detail lines can be linked to OCOs via the OCO Number field, which is enabled if the 'Use PCI Detail Status' box is checked on the Change Management – Tab of the Company Control screen.
The same PCI can be linked to different OCOs, as only the amount from the PCI detail line is linked to the OCO and the OCO is only updated by the detail amount.
If the [Approve All] button is used on the OCO, then only the linked PCI detail lines will be approved.
NOTE: PCI detail lines cannot be linked to a posted OCO.
Posting PCI/OCO
When an unposted PCI detail line is linked to an unposted OCO and the OCO is posted, only the approved PCI detail lines will be posted. Those that are approved at the time of posting are moved to a new PCI (with the extension ’-nnn’), and the unapproved lines remain in the original PCI.
When unposting an OCO, only the new PCI detail lines (i.e., the new PCIs) will be unposted. The project system option to only unpost the latest OCO linked to a JB contract (via the 'Only Latest OCO can be Unposted' on the Project System Options screen) will still be in effect, if set.
WSB1 Updates When New PCI is Created or Posted
When a new PCI is created or posted, the WBS1 value is updated with the new PCI code.
Posting with Use PCI Types Feature Enabled
When posting a PCI with the 'Use PCI Types' box checked on the Change Management – Tab of the Company Control screen, the following rules apply:
-
The PCI header does not need to have an approved status class as a condition to post. As long as one detail line is approved, posting is allowed. Users will be prompted with the following warning: "The PCI Header is not approved, are you sure you want to post?".
-
If the PCI header is in an approved status class but none of the detail lines have been approved, posting is not allowed.
-
If the PCI header is not in an approved status class and all the PCI detail lines are in approved status classes, then on posting, the PCI will be split. A new posted PCI will be created with all the detail lines, and the original PCI header with no detail lines will remain unposted. The new PCI will inherit the approved status from the detail lines.
-
If the PCI header is in an approved status class and all the PCI detail lines are in approved status classes, then on posting, the entire PCI will be posted and will not be split. The PCI is effectively "closed out".
NOTE: These posting rules are applicable when posting PCIs in the Potential Change Items and Owner Change Orders screens, and via workflow posting for PCI and OCOs.
Owner Change Order Summary
The following fields on the Owner Change Order Summary section will only display updated values in relation to the linked PCI Detail line:
-
Net Change by Previously Authorized Requests and Changes
-
The Contract Sum Prior to This Change Order was
-
The Contract Sum will be Increased by
-
The New Contract Sum Including This Change Order
When a PCI detail line is linked to an OCO, the date/time information comes from the header of the PCI, and once a new split PCI is created and posted, the OCO is updated with the new date/time information. The following fields on the Owner Change Order Summary section are appropriately updated:
-
The Original Completion Date was
-
Time Changes Prior To This Change Order were
-
The Completion Date Prior To This Change Order was
-
The Contract Time Will Not Be Changed
-
The Date of Substantial Completion as of This Change Order therefore is