Report Assignment
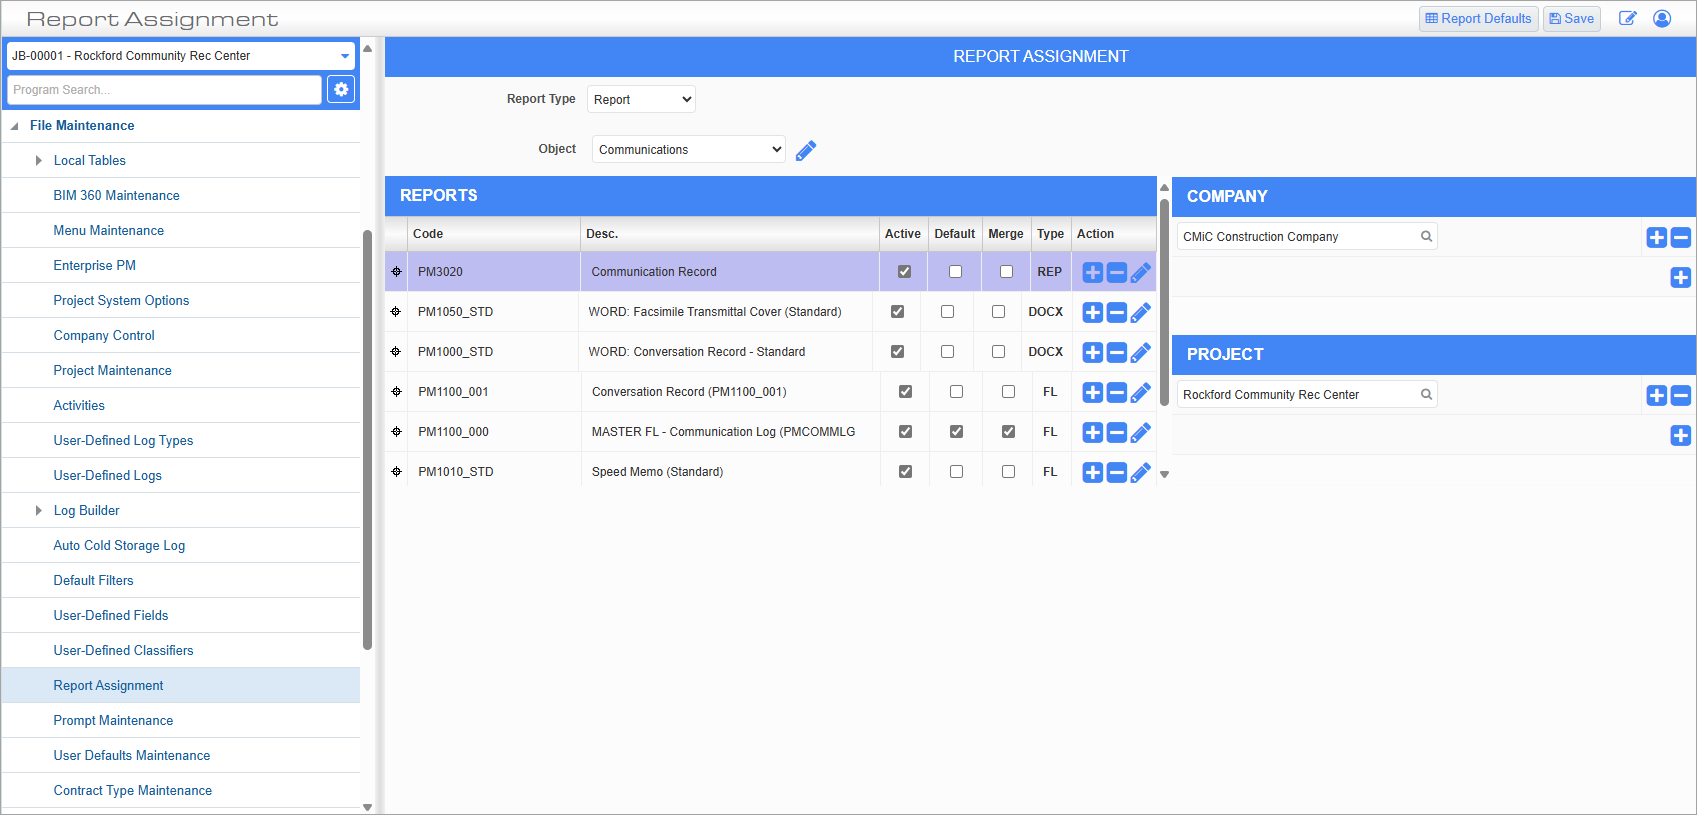
Report Assignment; standard Treeview path: CMiC Field > File Maintenance > Report Assignment
Certain Form Letters and Reports can be restricted to certain companies and projects through the Reports and Form Letters Assignment feature of CMiC Field.
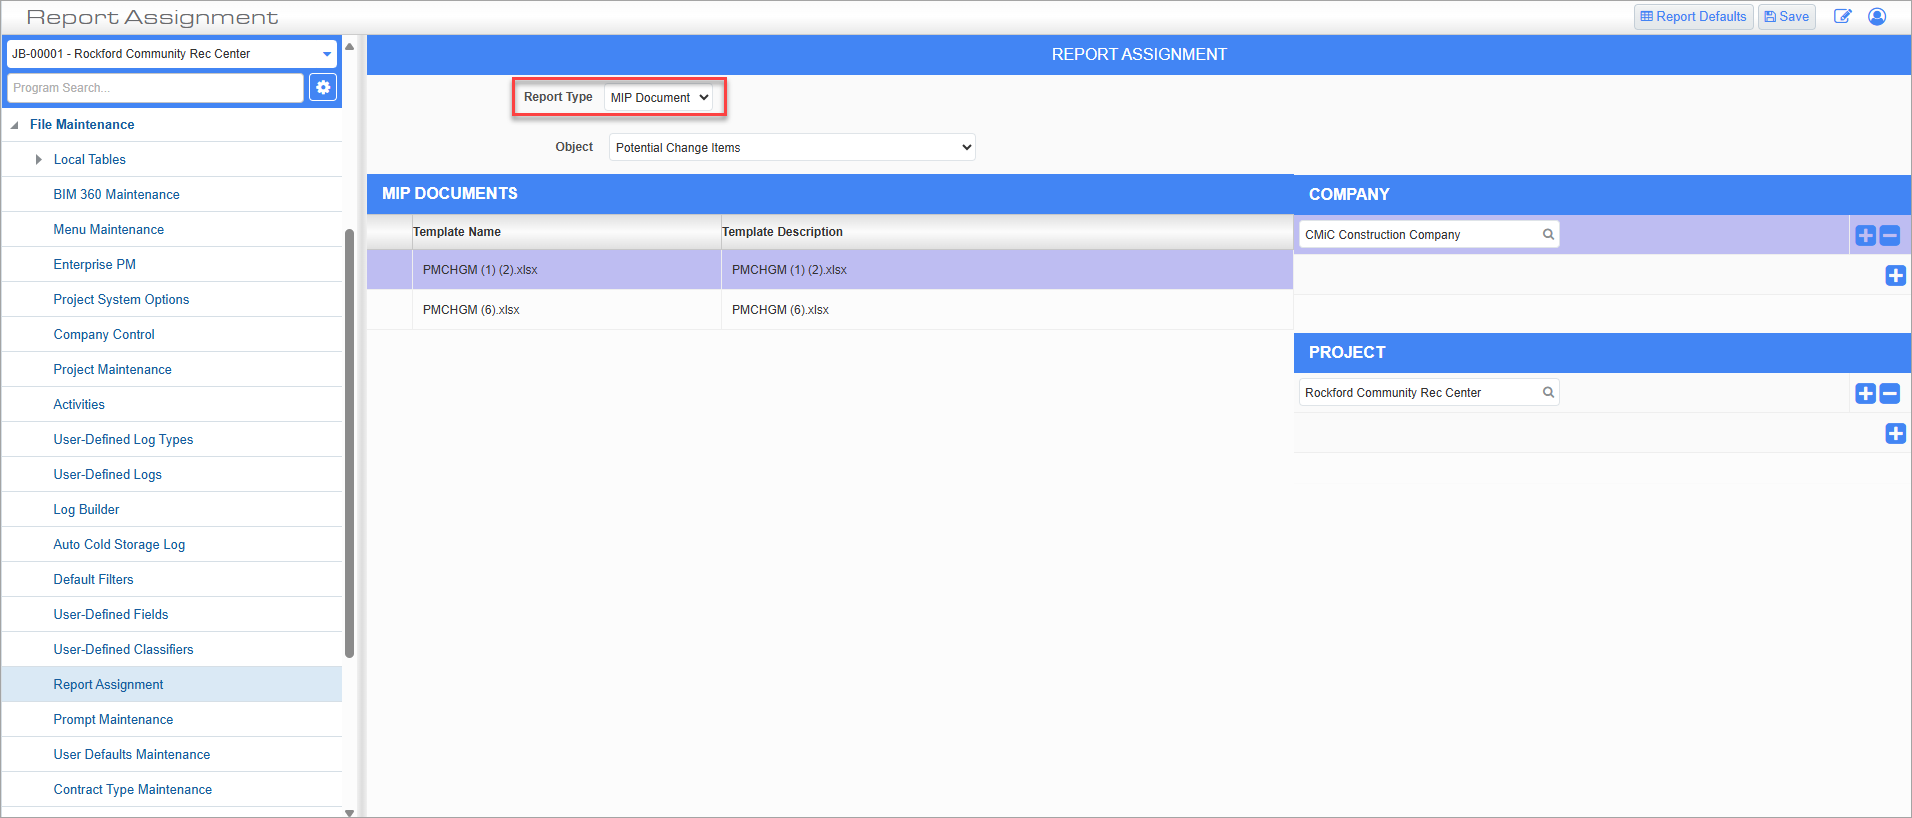
Report Type
Select whether the assignment is for a report or a MIP Document. Select the latter to set default templates for Excel documents.
Object
Select the screen on which the report is available.
Selecting these two fields will then populate the Reports section with all relevant reports. To set a default on a specific report, which would be used instead of the universal default, click on the Edit icon ( ) which will launch the Report Default pop-up for that report.
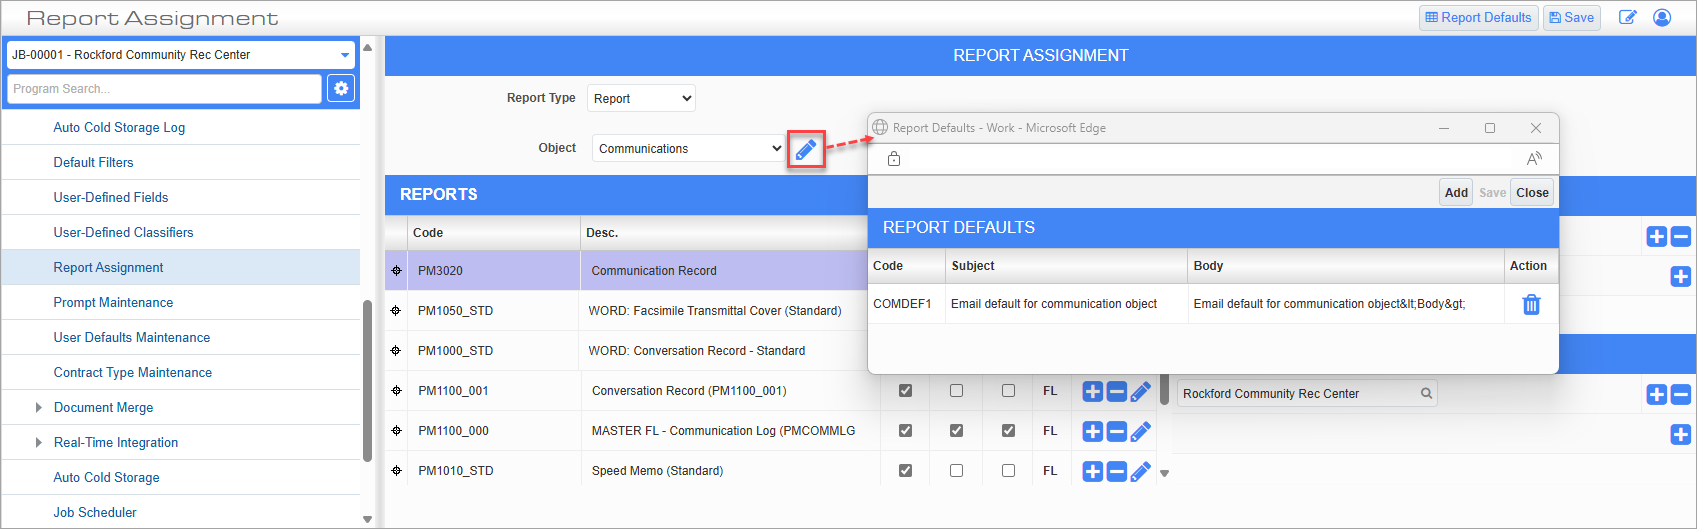
Example of Report Defaults pop-up launched from Edit icon
Reports

All related form letters and reports for that object will then be loaded in the Reports section.
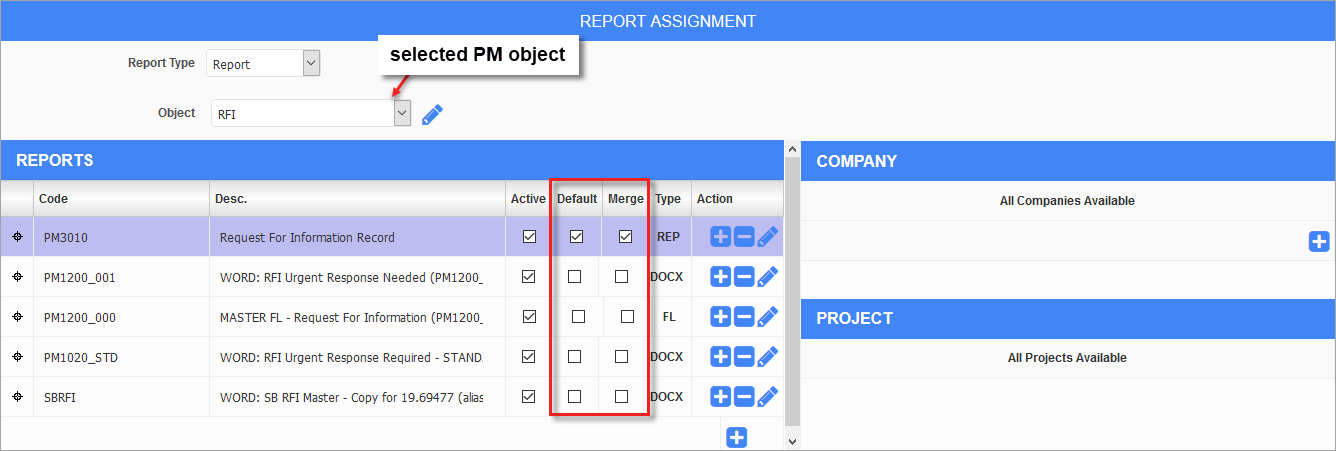
Code, Description
The report Code and Description fields allow users to specify the report filename and description for their custom reports separately.
Active – Checkbox
The ‘Active’ checkbox indicates whether the report is active or inactive.
Default, Merge – Checkboxes
The ‘Default’ and ‘Merge’ boxes are relevant to the Quick Print functionality on certain objects. The 'Default' checkbox designates the report as the default to be printed by the [Quick Print] button for the PM object. The ‘Merge’ checkbox is used to indicate whether any attachments associated with a particular record are to be merged with the default report.
NOTE: The [Quick Print] button is available for the following PM objects: Communications, Meeting Minutes, RFIs, Issues, and Submittals.
Type
The Type field will show documents that are form letters (FL), standard reports (REP), or documents created using the Document Merge feature (DOCX).
Action
This field is used to add custom reports.
Select the form letter or report that is to be assigned by clicking the mouse-pointer on it. Once selected, the record will have a purple background.
Company
A company is assigned access to this report by adding it in the LOV in the Company section.
Project
Finally, select the projects from the LOV which the report will be accessible and click [Save].
Refresh the session to see the effects of the changes made to the object that was chosen. Reports that are restricted to a particular company/project will only be available for printing to users that are in that company/project security group. Users without this report/form letter assignment will not see it listed in their set of available reports/form letters for that object, while in CMiC Field.
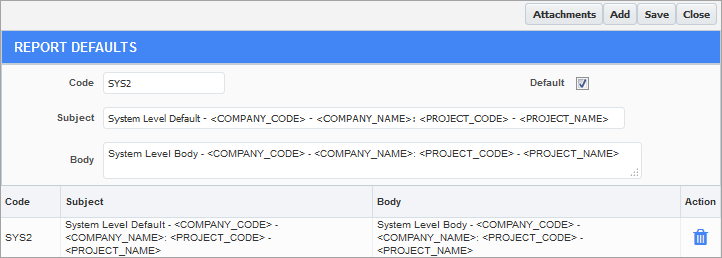
[Report Defaults] – Button
![Screenshot of Report Defaults pop-up launched from [Report Defaults] button.](../../../../Resources/Images/CMiC_Field/CMICFIELD_ReportAssignment4.png)
Example of pop-up window launched from [Report Defaults] button on Report Assignment screen
Clicking on the [Report Defaults] button opens a pop-up window where you can define default parameters for reports. Click on the [Add] button to add a new report default. Press the [Attachments] to add an attachment to the report default. This attachment will then appear on any report with this default assigned.
Email Replacement Parameters
The user can attach parameters to the Subject or Body of Report Defaults for Email, in Report Assignment.
The following replacement variables are allowed: <PROJECT_CODE>, <PROJECT_NAME>, <COMPANY_CODE>, <COMPANY_NAME>...not necessarily in that order, but they must be in uppercase.
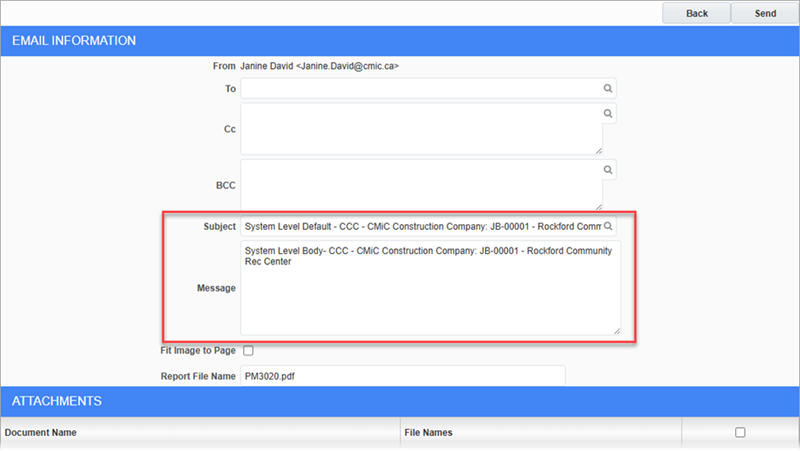
Example:
In Report Assignment for Communications, you can define a default email subject/body:
Example of default email subject/body for Communications report
When printing the Communication record to email, the following will be shown:
Excel MIP Documents for Report Assignment
Report Assignment; standard Treeview path: CMiC Field > File Maintenance > Report Assignment – MIP Report
An additional report type "MIP Document" gives the ability to select Excel MIP documents for Report Assignment for the objects listed under that selection.
Any defined Excel templates for a particular object can be assigned to particular companies or company/projects.
Quick Print
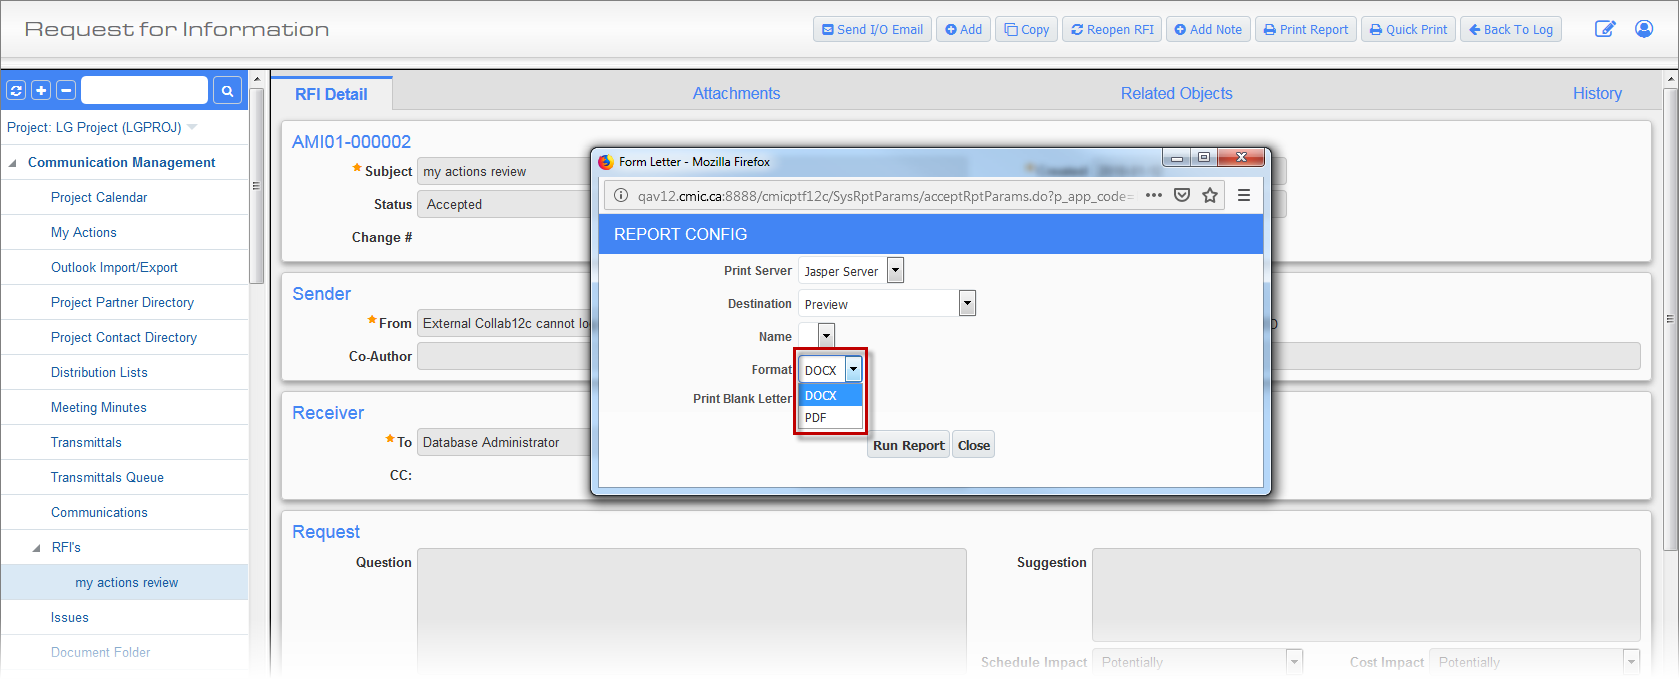
![Screenshot of [Quick Print] button on RFI screen.](../../../../Resources/Images/11_File_Maintenance/Reports_Form_Letter_Assignment_8.png)
Request For Information; standard Treeview path: CMiC Field > Communication Management > RFIs
The underlying concept of quick print is to allow users to assign a report or form letter relevant to a specific PM object, such as an RFI, to the [Quick Print] button on the screen that displays individual records of the PM object. Also, quick print gives users the option of merging any attachments associated with the currently displayed PM object record to the report/form letter assigned to the [Quick Print] button.
As an example, the above screenshot shows the [Quick Print] button on the Request For Information screen when it is displaying the details of an RFI. If clicked, the report/form letter assigned to this screen’s [Quick Print] button will be initiated, and if opted, any attachments for the displayed RFI will be merged to the assigned report/form letter.
Assign Report to [Quick Print] Button
Report Assignment screen; standard Treeview path: CMiC Field > File Maintenance > Report Assignment
In the Report Assignment screen, the ‘Default’ checkbox is used to indicate that the report is the default to print when the [Quick Print] button is clicked on the screen displaying records of the CMiC Field object selected via the Object field.
The ‘Merge’ checkbox is used to indicate whether any attachments associated with a specific record are to be merged with the default report set to print by the [Quick Print] button for the CMiC Field object selected via the Object field (shown above).
As an example, in the above Report Assignment screen, the selected CMiC Field object is an RFI, and the report checked as its default is Request For Information Record. So, the [Quick Print] button on the RFI screen displaying individual RFI records (shown in previous screenshot) will generate the Request For Information Record report, and if opted, any attachments for the displayed RFI record will be merged to the report.
Only one report/form letter at a time can have these checkboxes checked. When a ‘Merge’ box is checked, it makes sense to ensure that the corresponding ‘Default’ box is also checked.
The [Quick Print] button is available for the following CMiC Field objects: Communications, Meeting Minutes, RFIs, Issues, and Submittals.
Print Report/Form Letters with Embedded Attachments
![Screenshot of Select Report pop-up launched from [Print Report] button.](../../../../Resources/Images/CMiC_Field/CMICFIELD_ReportAssignment8.png)
Example of Select Report pop-up launched from [Print Report] button
The printing of single or multiple reports/form letters via the standard [Print Report] button, on screens displaying individual CMiC Field object records, allows the user to choose whether or not the attachments associated to the records get appended to the printed report/form letters. This option is available on the pop-up window launched via the [Print Report] button, as shown above.
For more information, please refer to CMiC Field - Printing a Report, CMiC Field - Printing Multiple Reports, and CMiC Field - Emailing Reports.
Converting DOCX to PDF When Printing Documents
Setup
1. LibreOffice Installation - Apache LibreOffice is used to convert DOCX files to PDFs. It is a manual installation, to the following location:
{cmHome}\{version}\{environment}\sql\LibreOffice
(ex. D:\cm\v10\prod\sql\LibreOffice)
NOTE: Changes are not available for Unix.
2. LibreOffice license link:
https://www.libreoffice.org/about-us/licenses/
Rules
To convert an MS Word DOCX file to PDF, the following rules apply:
-
DOCX template must not be in compatibility mode on MS Word 2016.
-
For the layout, use tables, otherwise there will be a misalignment issue and CMiC will not support this.
-
Use of MS Word objects can result in a conversion failure. Please avoid using MS Word objects as CMiC will not support conversion issues related to them.
Feature Description
This feature allows the user to print a DOCX file as a PDF rather than only as a DOCX, the only option which was available in CMiC up to this point.
When printing a form letter based on a DOCX template, use the "Preview" and "Email" destination options.
When “E-mail” is selected, the E-mail pop-up window offers additional format options: PDF or DOCX.
Below are sample screenshots for a possible path to printing a PDF report from a DOCX report.
First, select the DOCX report from the reports list when the [Print Report] button is clicked:
![Screenshot of Select Report pop-up launched from [Print Report] button.](../../../../Resources/Images/CMiC_Field/CMICFIELD_ReportAssignment18.png)
Next, select options for the Destination and Format fields on the Report Config pop-up window:
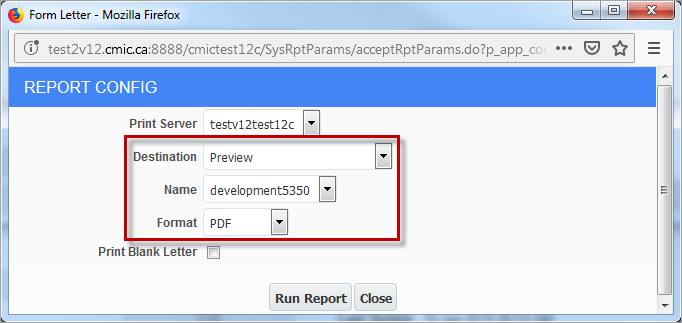
When the Destination field is set to “Preview”, the Format field can be chosen as either “DOCX” or “PDF”.
"PDF" will display the DOCX as a PDF document. "DOCX" will display the DOCX in its unconverted format (as per original functionality).
When the Destination field is set to “E-mail” the Email Information pop-up window is displayed with the ability to select the format. In this screen, the user can select the PDF format for the DOCX report. You can also select any attachments to accompany the main report.
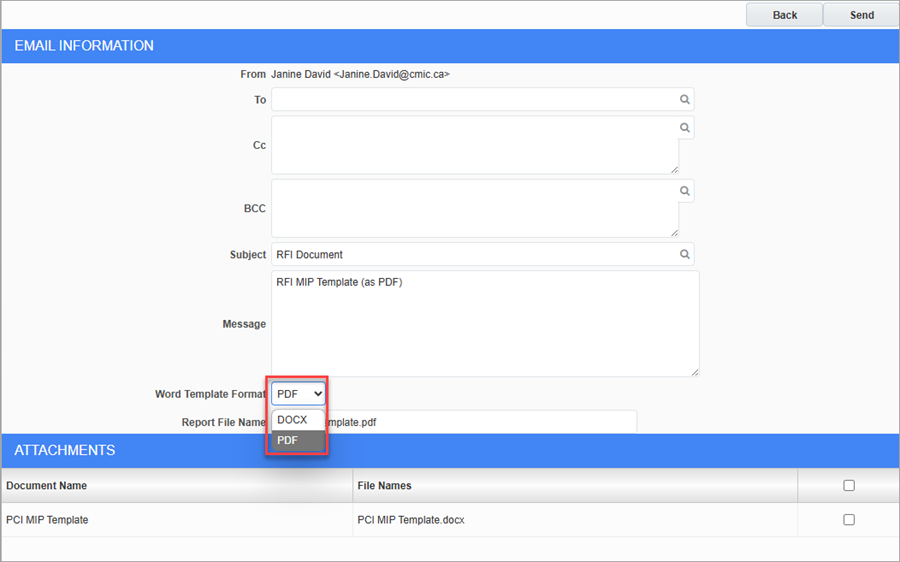
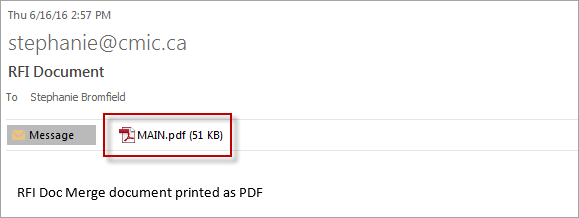
Select “PDF” then click [Send], and the resulting e-mail that is sent will have the DOCX report converted to a PDF report.
Form Letters & Key Players
Some form letters use key player role codes as replacement fields. For details, please refer to the Key Players (Assignment) – Tab subsection under CMiC Field - Project Maintenance for details.