NOTE: As of Nexus 01 (January 2026), Daily Journal will be deprecated, meaning it will no longer be supported as soon as a customer installs Nexus 01. CMiC encourages users to use the web deployment of Construct PM - Journals. To add this custom menu item to the Treeview, please refer to Construct Feature.
Overview
Daily Journal; standard Treeview path: CMiC Field > Site Management > Daily Journal
The Daily Journal can be used to record the day's activities on the job site. This information can be used to explain costs or justify project delays.
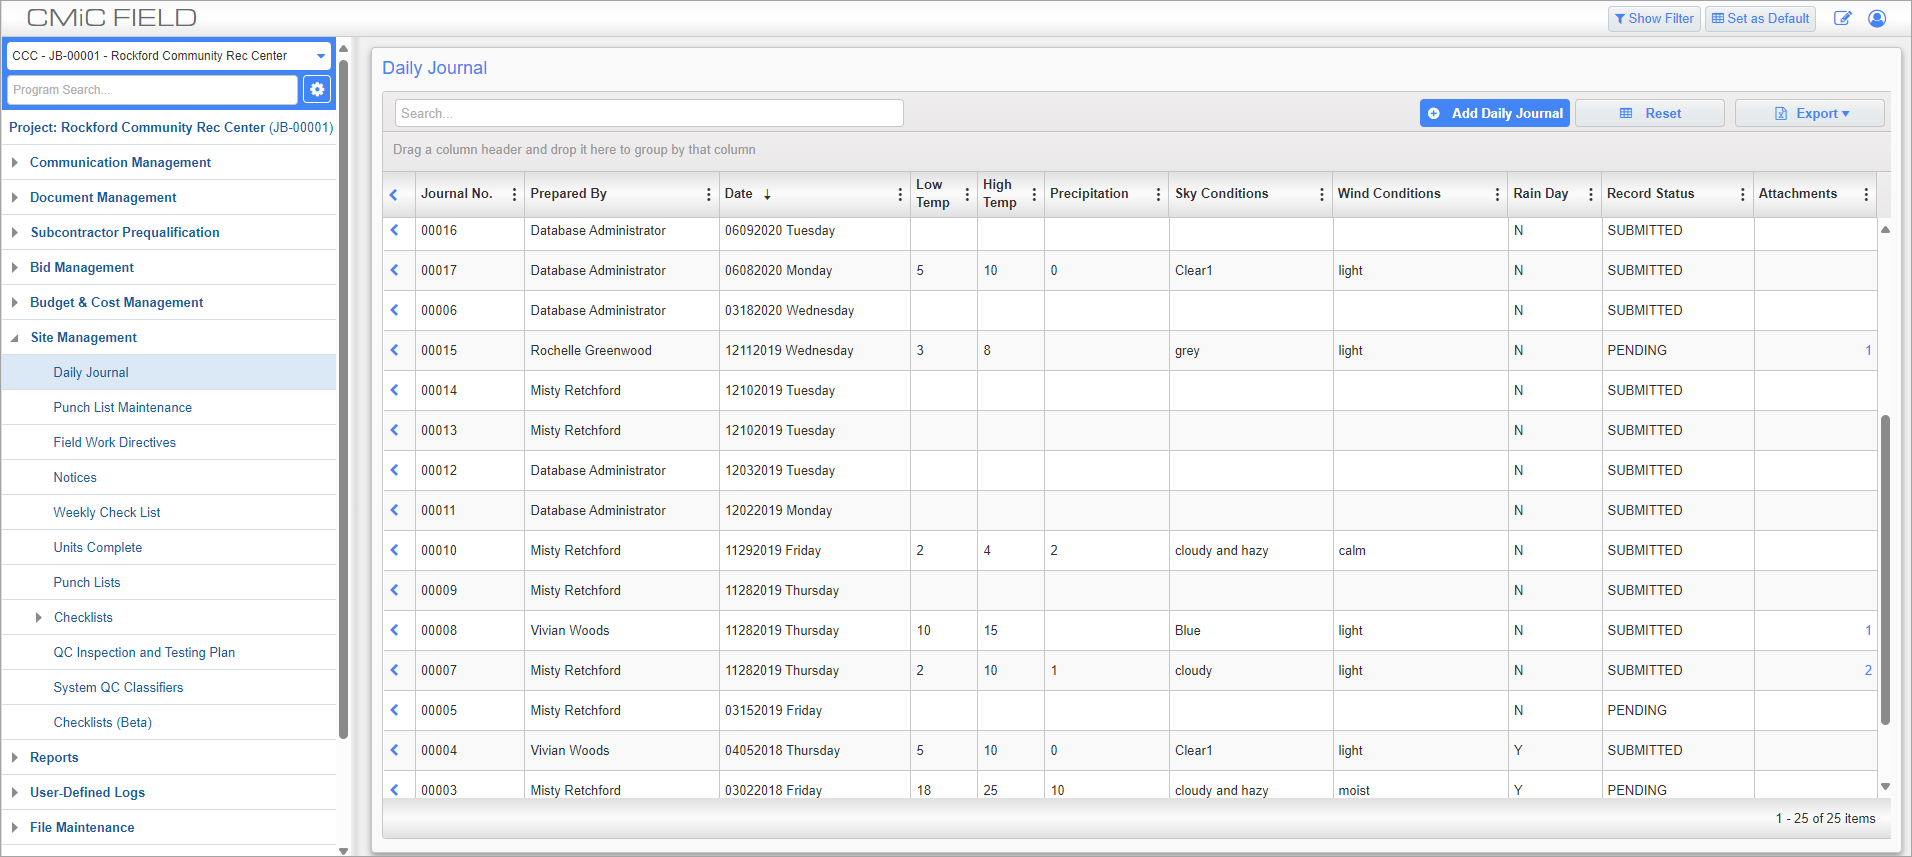
When Daily Journal is first selected in the Treeview, a log of all existing daily journals is displayed.
Creating a New Journal
![Screenshot of Daily Journal launched from [Add Daily Journal] button](../../../../Resources/Images/9_Site_Management/Site_Management_1.png)
Daily Journal; standard Treeview path: CMiC Field > Site Management > Daily Journal – [Add Daily Journal] button
To create a new journal, press the [Add Daily Journal] button at the top of the log to start the new journal process.
To create a new journal from scratch, enter information into the Daily Journal Detail tab and press the [Save] button. After the journal is saved, the screen switches to View mode. In this mode, the [Previous] and [Next] buttons can be used to scroll through existing journals.
Daily Journal Detail – Tab
Daily Journal; standard Treeview path: CMiC Field > Site Management > Daily Journal – Daily Journal Detail tab
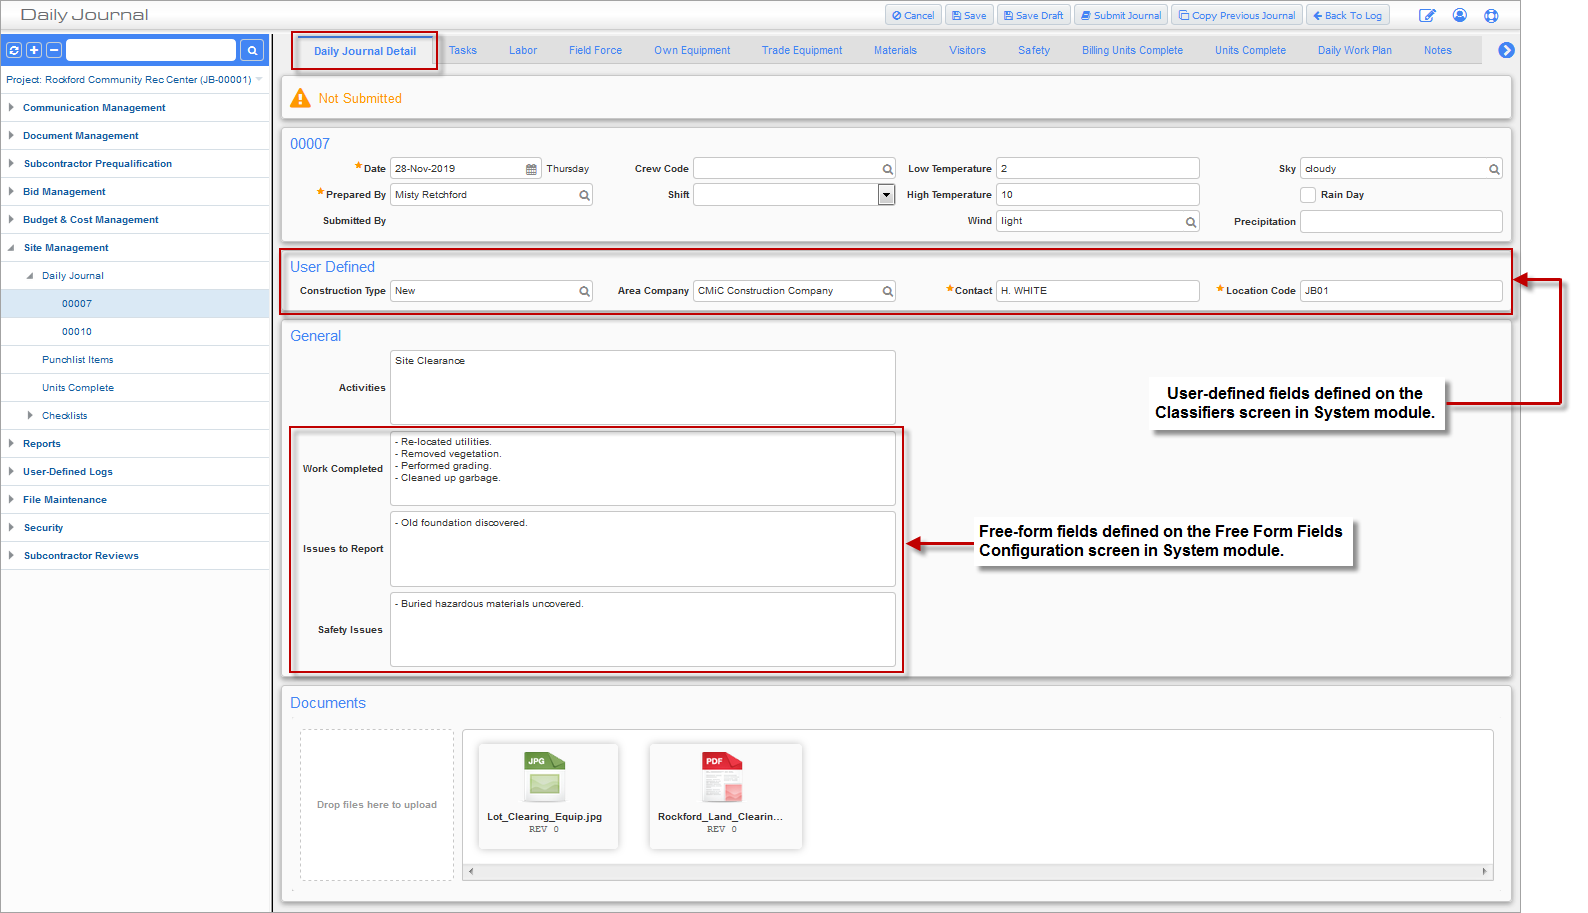
The Daily Journal Detail tab is used to record the day’s events.
Daily Journal Header

This section of the tab contains key administrative information such as the date, name of the user preparing the journal, as well as details on the crew and the weather.
In View mode, the Units Complete Status field is displayed. It also displays on the log. This field is read-only. When there are no units complete on a daily journal, the status is “EMPTY”, if there are unposted units the status is “UNPOSTED”, and if all units have been posted then the status is “POSTED”.
Date
Enter the date for the journal. This will default to the current system date. A validation error may appear if a date is entered outside of the permitted date range. This range is maintained in the Field Options tab on the Project System Options screen.
Prepared By, Submitted By
Once the journal is submitted using the [Submit Journal] button, the submitter’s name will appear in the Submitted By field.
Crew Code
The Crew Code field is used when real crews have been defined in the Payroll module. Enter the crew having their timesheets entered for this daily journal. The crew code selected here will default to the Crew Code field on the Units Complete tab. It is also used in conjunction with the Daily Work Plan tab.
Shift
The Shift field can be used to identify whether the selected crew worked a day shift or a night shift.
Low Temperature, High Temperature, Wind, Sky, Rain Day, Precipitation
If work was conducted outside, or if it is otherwise relevant, enter the day's weather in these fields.
User Defined

In the User Defined section, users can add up to six user-defined fields using the System Data - Classifiers screen in the System Data module, as shown in the screenshot below (standard Treeview path: System > User Extensions > Classifiers).
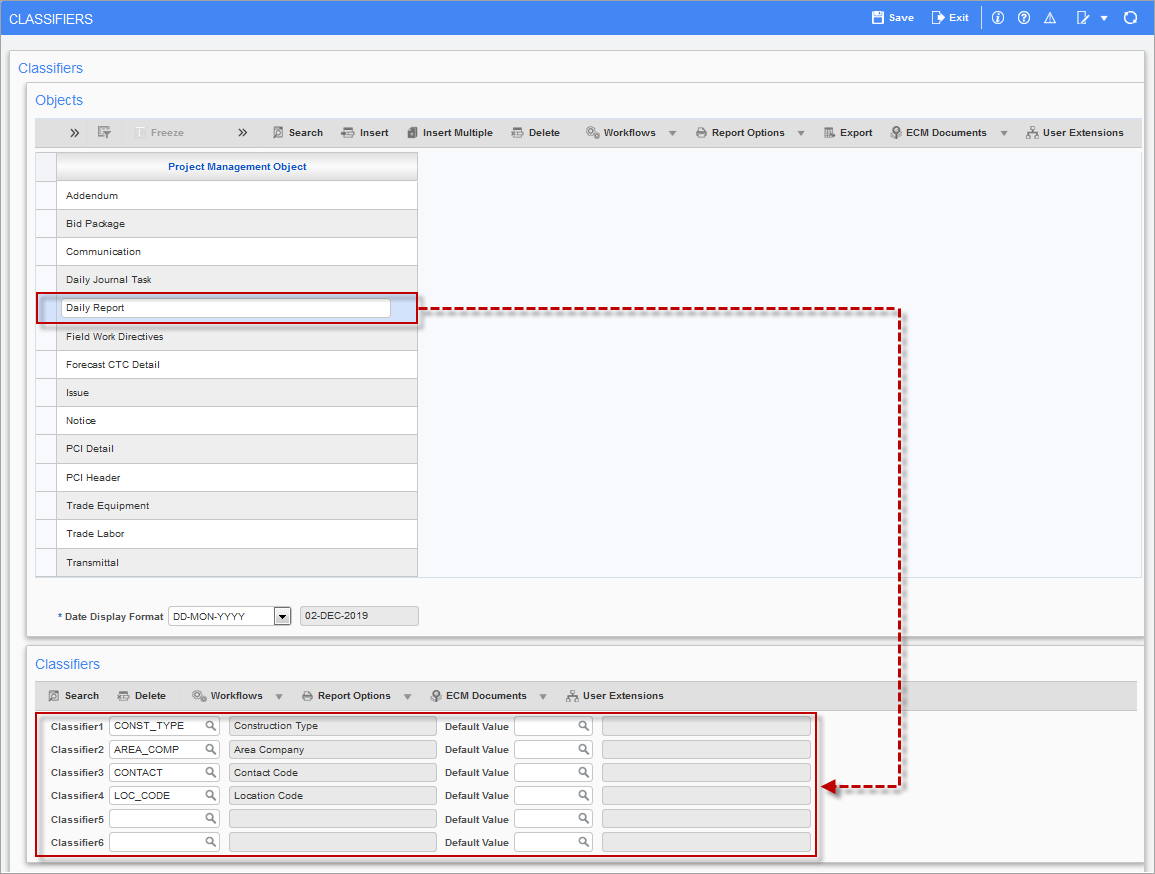
Pgm: PMCLSFM – Classifiers; standard Treeview path: System > User Extensions > Classifiers
General
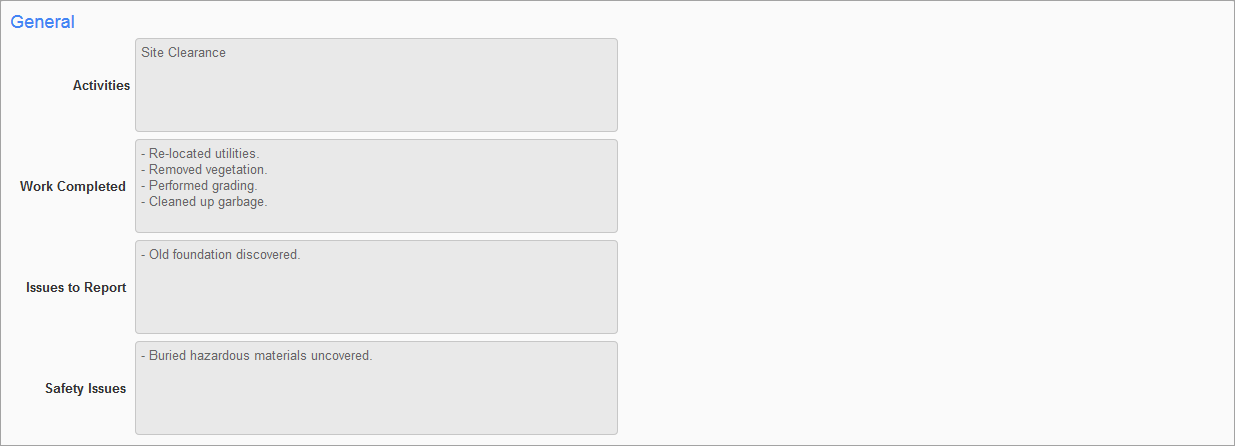
In the General section up to six additional free-form (user-defined) fields can be added, in addition to the system-defined Activities field, using the System Data - Free Form Fields Configuration screen in the System module, as shown in the screenshot below (standard Treeview path: System > User Extensions > Free Form Fields).
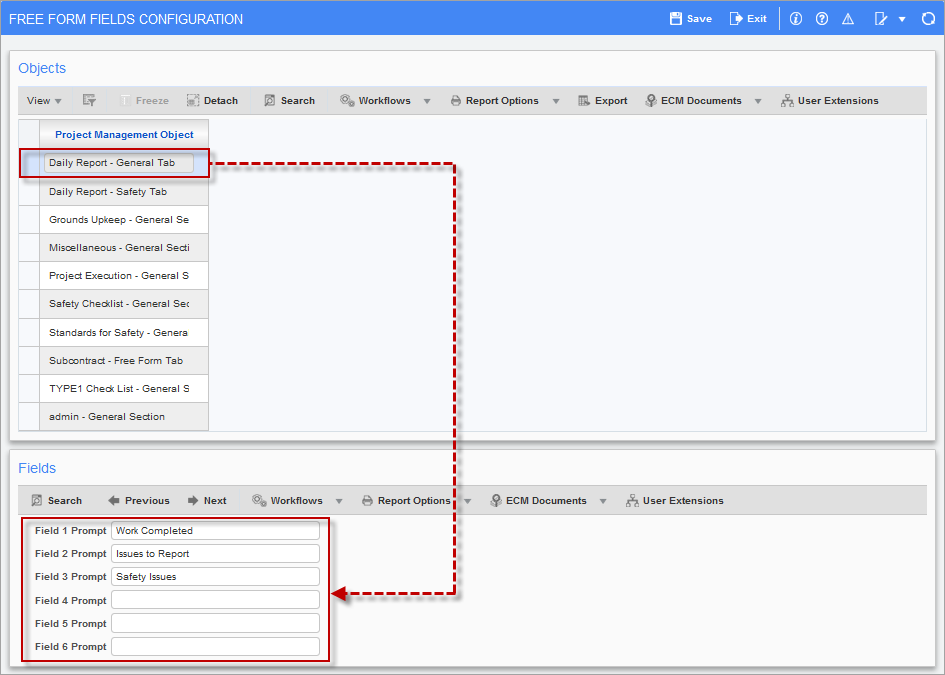
Pgm: PMFFSET – Free Form Fields Configuration; standard Treeview path: System > User Extensions > Free Form Fields
Documents
The Documents strip can be used for attaching any related documentation to a journal. Files can be dragged and dropped, or uploaded in the File Upload pop-up window launched by clicking inside the dotted textbox.
Any documents added the Document section of the screen will also be added to the screen’s Attachment tab, and vice versa.
For more information, please refer to Notes, Attachments, and Documents.
Tasks – Tab
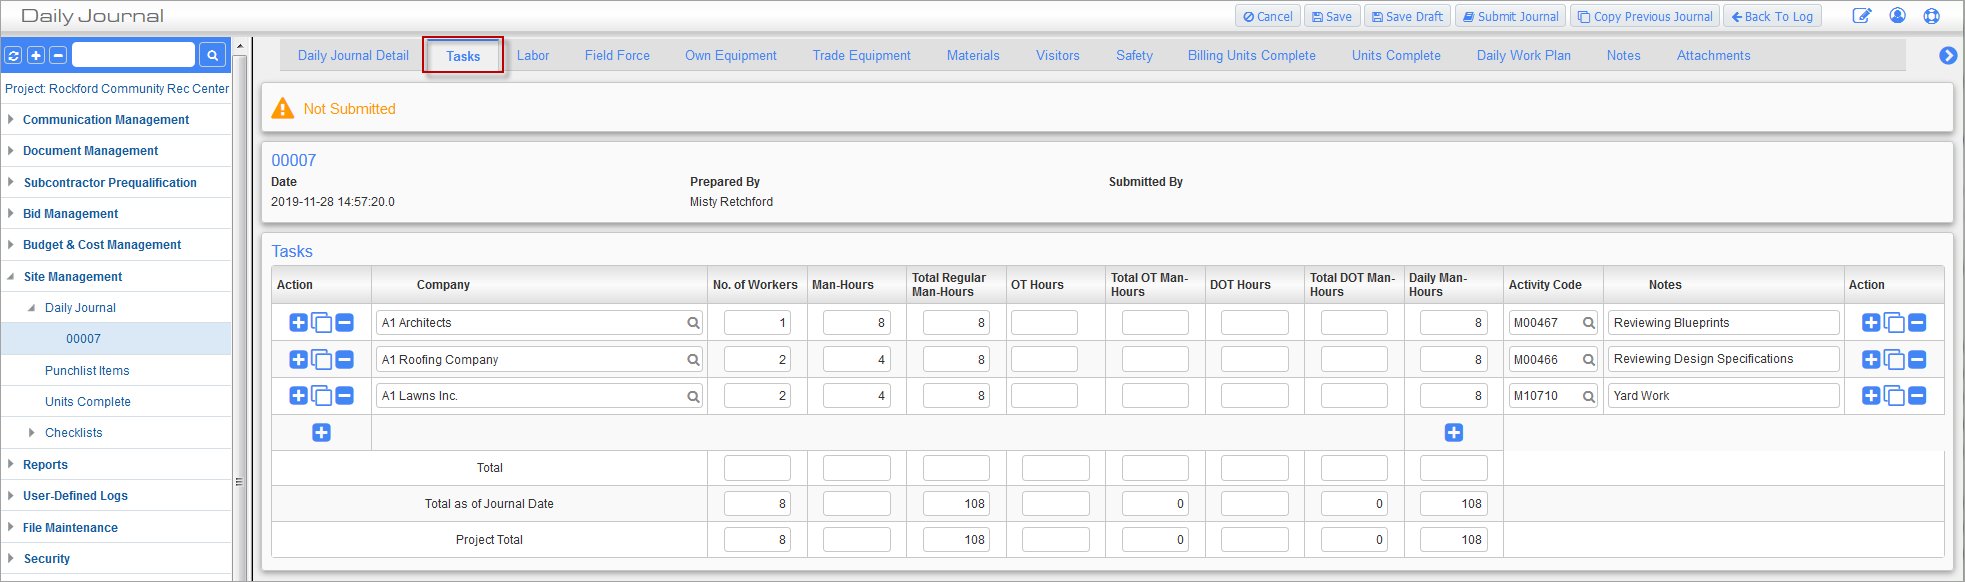
Daily Journal; standard Treeview path: CMiC Field > Site Management > Daily Journal – Tasks tab
This tab is used to record and calculate values relating to the number of workers and the man hours worked. Totals are kept both at the daily report level and the project level.
Press the [Edit] button at the top of the screen to enter Edit mode to add or remove tasks. Use the Plus and Minus icons in the Action column to add or remove a task line, respectively. Use the Copy icon to copy the task line and all its data.
Daily Man Hours
This is calculated as:
Daily Man Hours = (No. of Workers * Man Hours) + (No. of Workers * OT Hours) + (No. of Workers * DOT Hours)
Total Regular Man Hours
This is calculated as
Total Regular Man Hours = No. of workers * Regular hours
Total OT hours
This is calculated as
Total OT Hours = No. of workers * OT hours
Total DOT hours
This is calculated as
Total DOT hours = No. of workers * DOT hours
These three total columns (Total Overtime Man Hours, Total Double Overtime Man Hours and Total Regular Man Hours) have field security with a default setting of “Hidden” on the *ALL* role (standard Treeview path: CMiC Field > Security > Role Maintenance – Programs/Daily Journal).
Activity Code
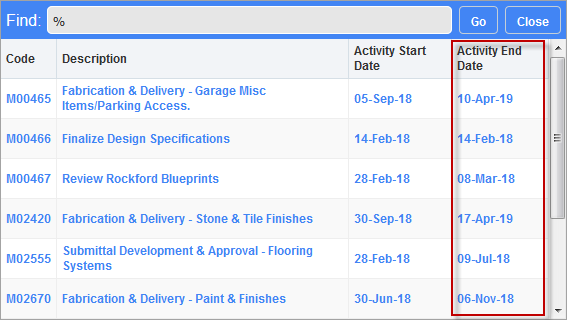
Pop-up window launched from Activity Code field on Daily Journal – Tasks tab
Press the LOV in the Activity Code column to launch the pop-up window shown above. The activities listed in this window are defined in the Activity Code Maintenance screen.
NOTE: The Activity End Date column displayed in the pop-up window above is a calculated end date related to submittals. It is not the same field as the End Date column used in the Activity Code Maintenance screen, which is an end date stored on the activity record.
[Import] – Button
![Screenshot of Daily Journal with [Import] button highlighted](../../../../Resources/Images/9_Site_Management/Site_Management_16.png)
Pop-up window launched from [Import] button on Tasks tab of the Daily Journal screen
Clicking the [Import] button launches a pop-up window used to import man-hours data from an Excel file (.csv) or a text file (.txt) into an existing daily journal. Select the import file by pressing the [Browse] button and then, once the file has been selected, the [Upload] button.
Validation Method
When ‘Allow NULLs’ is selected, the system assigns null as an acceptable value for the Company field during validation. If ‘Use Current Company when NULL’ is selected, the system will assign the current company code if the Company field is null in the import file.
The import file control file should have the following layout:
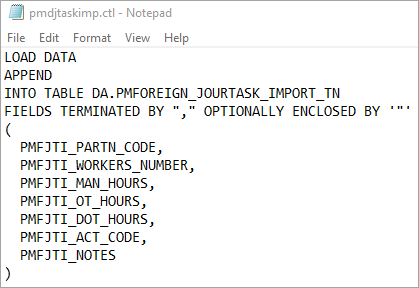
Manpower import control file
The following table provides a description of each field:
|
Column Name |
Description |
Required |
Type |
Length |
|---|---|---|---|---|
|
PMFJTI_PARTN_CODE |
A valid CMiC partner code |
Yes |
Varchar2 |
8 |
|
PMFJTI_WORKERS_NUMBER |
Total number of workers |
Yes |
Num |
10 |
|
PMFJTI_MAN_HOURS |
This field depicts the number of hours a worker worked for. |
Yes |
Num |
12,2 |
|
PMFJTI_OT_HOURS |
Over-Time Hours |
Yes |
Num |
12,2 |
|
PMFJTI_DOT_HOURS |
Double Over Time Hours |
Yes |
Num |
12,2 |
|
PMFJTI_ACT_CODE |
Schedule Activity Code |
Yes |
Varchar2 |
30 |
|
PMFJTI_NOTES |
Notes |
Yes |
Varchar2 |
4000 |
The import functionality functions the same way as other CMiC Field imports. For numeric codes, leading zeroes are usually removed in a .csv file, therefore, ensure these are adjusted appropriately.
The following screenshots show examples of the Manpower import file in text format (.txt) and in Excel format (.csv).

Example of Manpower import text file (.txt)
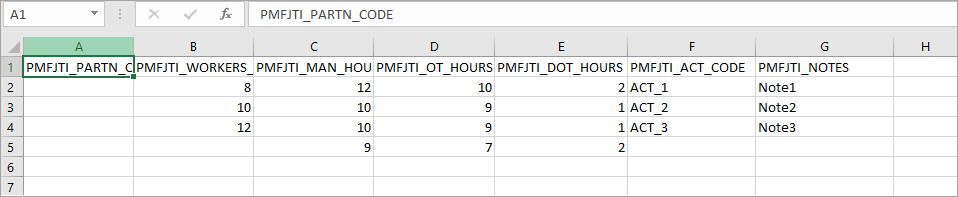
Example of Manpower import Excel file (.csv)
Labor – Tab
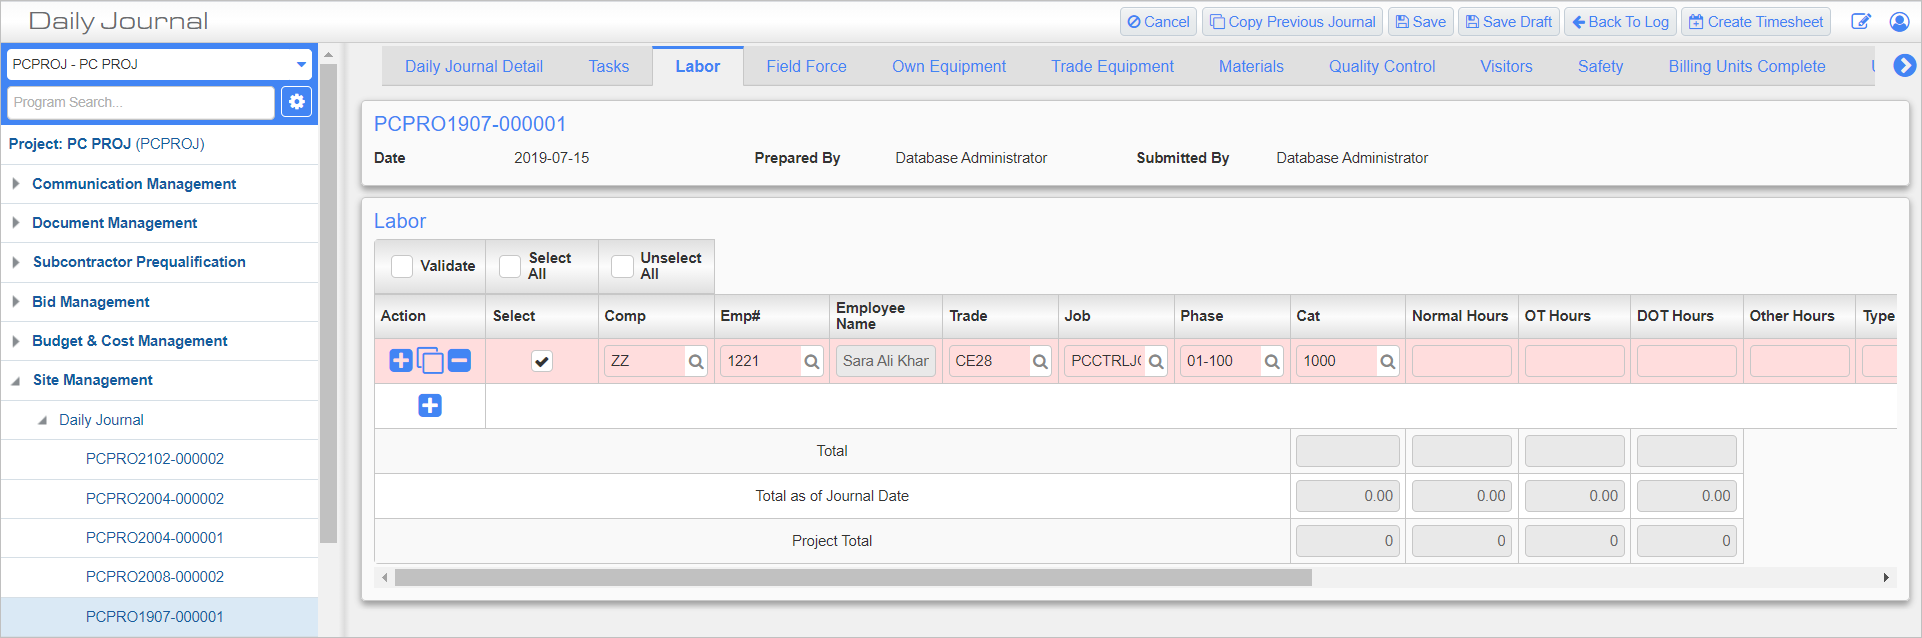
Daily Journal; standard Treeview path: CMiC Field > Site Management > Daily Journal – Labor tab
This tab is used to record the hours worked by individual employees. Timesheets can be created using the [Create Timesheet] button. If using the CMiC Payroll system, the user can save double entry of timesheets by submitting these timesheets directly to the payroll system.
The default value for the [Create Timesheet] button is set to “Hidden” for the *ALL* role.
For more information on the fields in this screen, please refer to US Payroll - Timesheet Entry.
Validate – Checkbox
As the Daily Journal screen does not require that timesheets be created, entries can be made on this screen that do not correspond to records in CMiC Field. Check this box to make sure that entries only correspond to saved records.
Select a labor record and check this box to validate that record. This action will validate the values of the Emp#, Job, Phase, and Cat fields, as well as checking that the employee has an assigned pay rate. If any of these values are invalid an error message appears and any invalid fields are highlighted.
Field Force – Tab
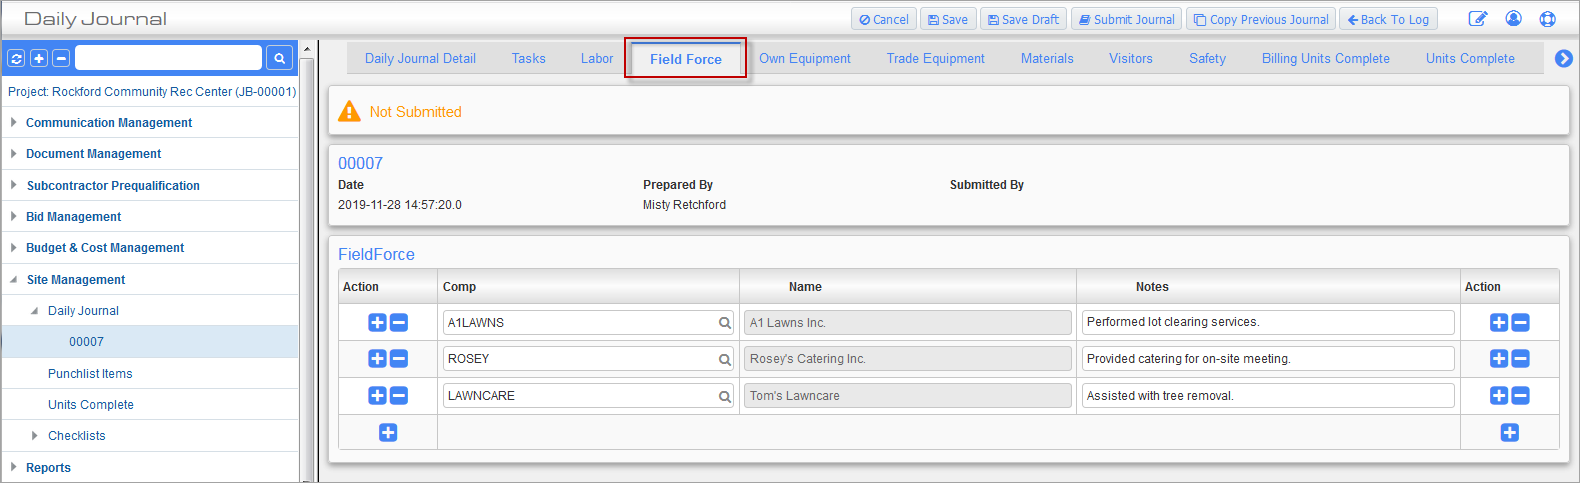
Daily Journal; standard Treeview path: CMiC Field > Site Management > Daily Journal – Field Force tab
This tab allows for the recording of the crews or subcontractor crews that worked on the job during the day. Add constituents of the force by selecting the relevant company from the Comp LOV and enter any details in the Notes field.
Own Equipment – Tab
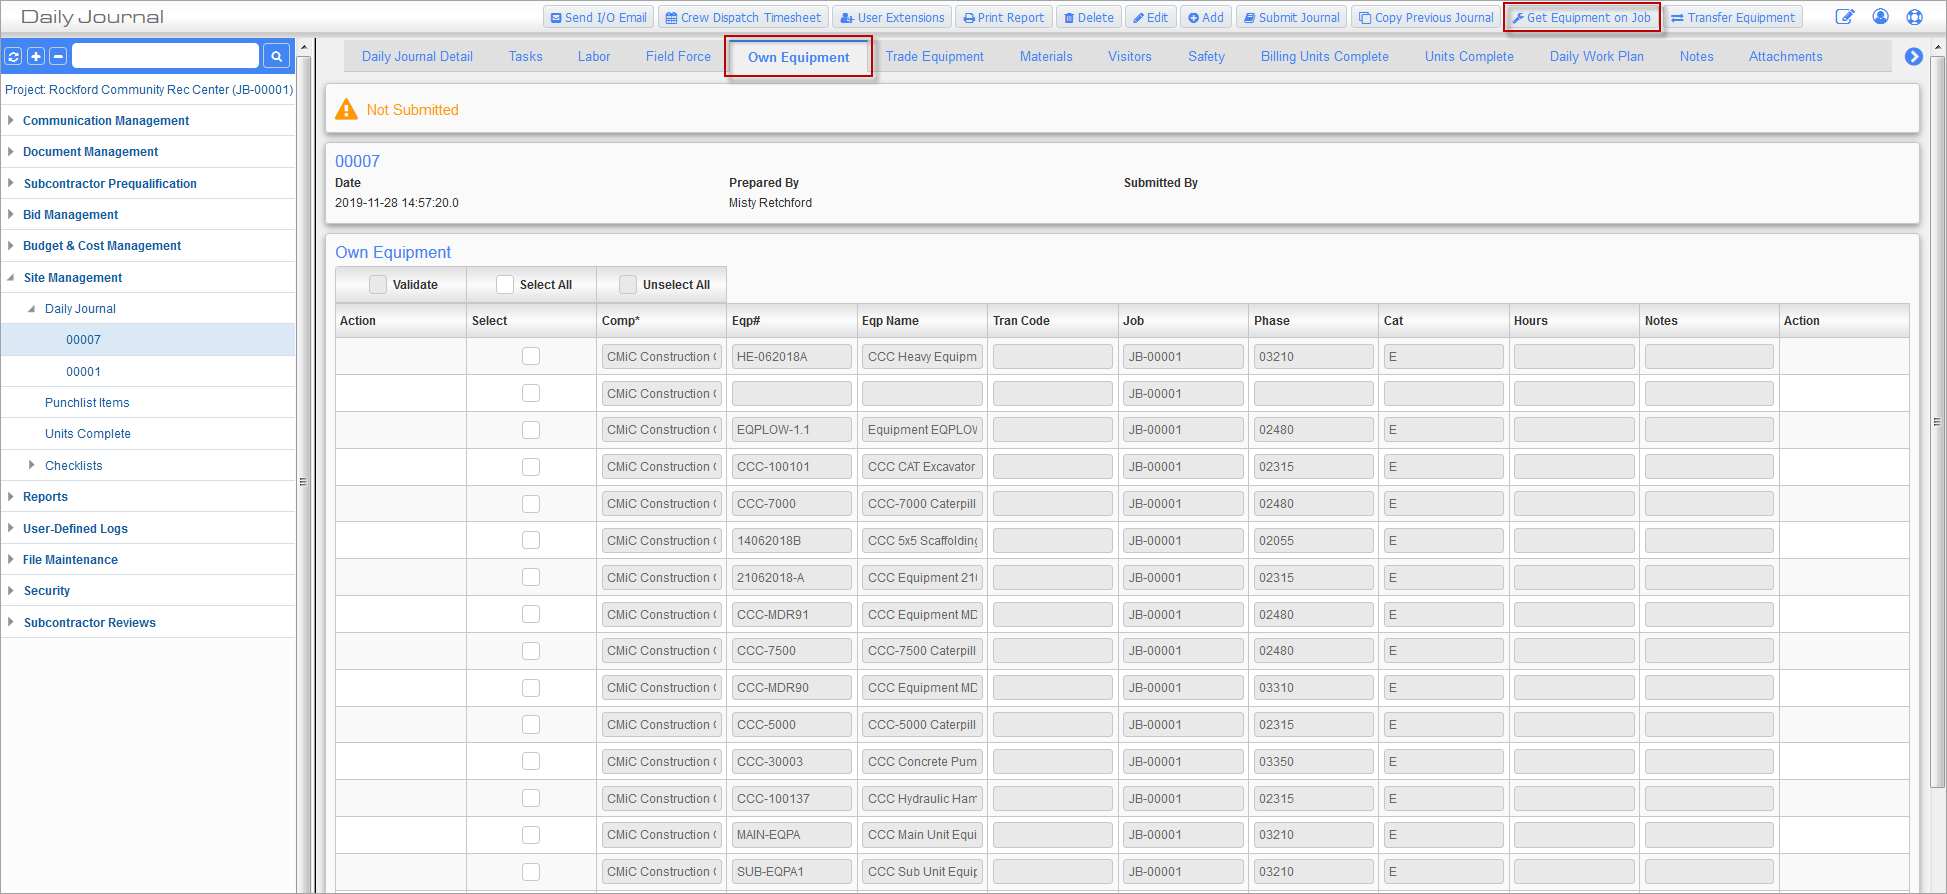
Daily Journal; standard Treeview path: CMiC Field > Site Management > Daily Journal – Own Equipment tab
This tab is used for entering corporate equipment. This information can be used as a proof of equipment charges posted to the project.
[Get Equipment on Job] – Button
Press this button to display the equipment currently on the job. As more equipment is added to the job, users can use this button to refresh the equipment list. Once the equipment is displayed, the user can transfer out any equipment if necessary with the [Transfer Equipment] button.
[Transfer Equipment] – Button
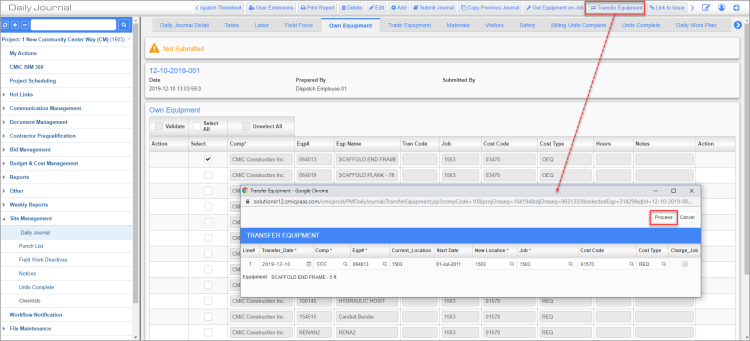
This button helps keep track of equipment location. It can be used to move equipment from one job site to another, or from one location on a job site to another location on the same job site.
This transaction is integrated with the Equipment Costing module in Enterprise, as the Equipment Costing - Automatic Charge-Outscreen is completely reliant on the actual location transfers for the appropriate job cost allocations for billing purposes. An actual transfer must occur for an automatic charge out to be created.
First select the equipment to be transferred using the ‘Select’ checkbox. Then press the [Transfer Equipment] button to display the Transfer Equipment pop-up window shown above. Enter the details for the transfer. The 'Charge Job' checkbox must be checked if this transfer is to be included for automatic charge out. Press [Proceed] and if the transfer is successful a message is displayed.
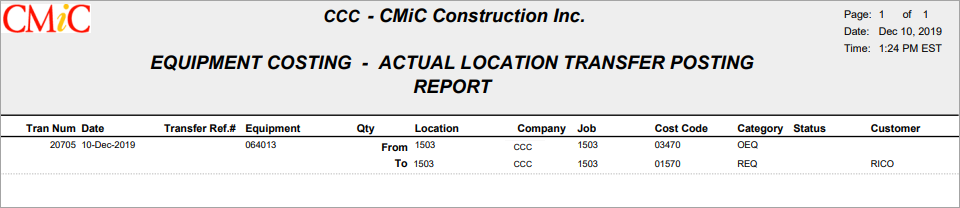
In addition, the Equipment Costing module’s Actual Location Transfer Posting Report (EM102) is available for printing in CMiC Enterprise:
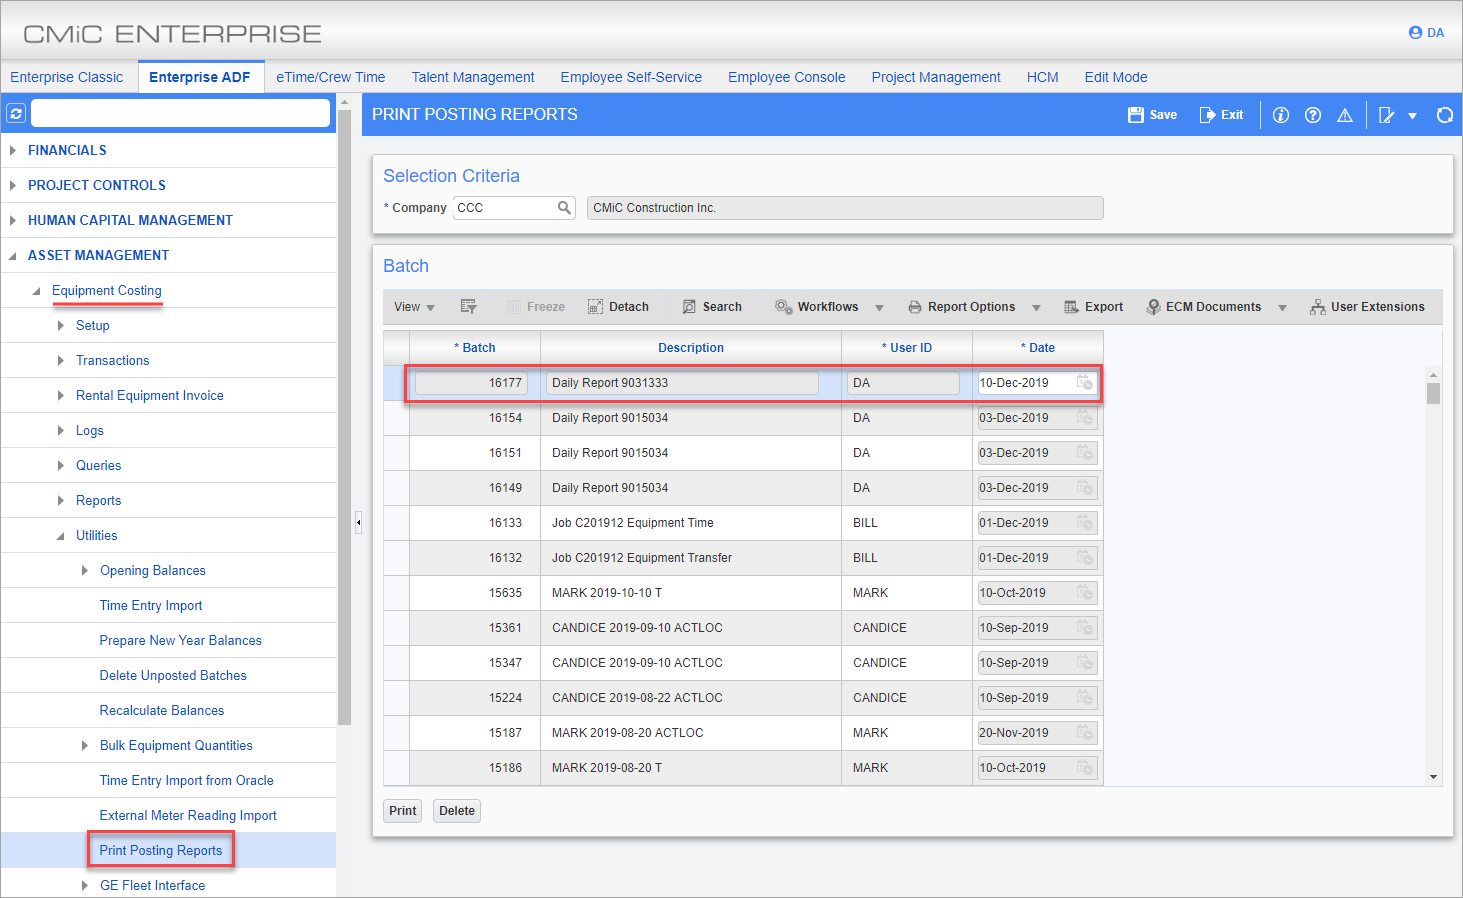
Pgm: SYSRUN – Print Posting Reports; standard Treeview path: Equipment Costing > Utilities > Print Posting Reports
The transaction is also available in the relevant reports/queries in the Equipment Costing module. For example:
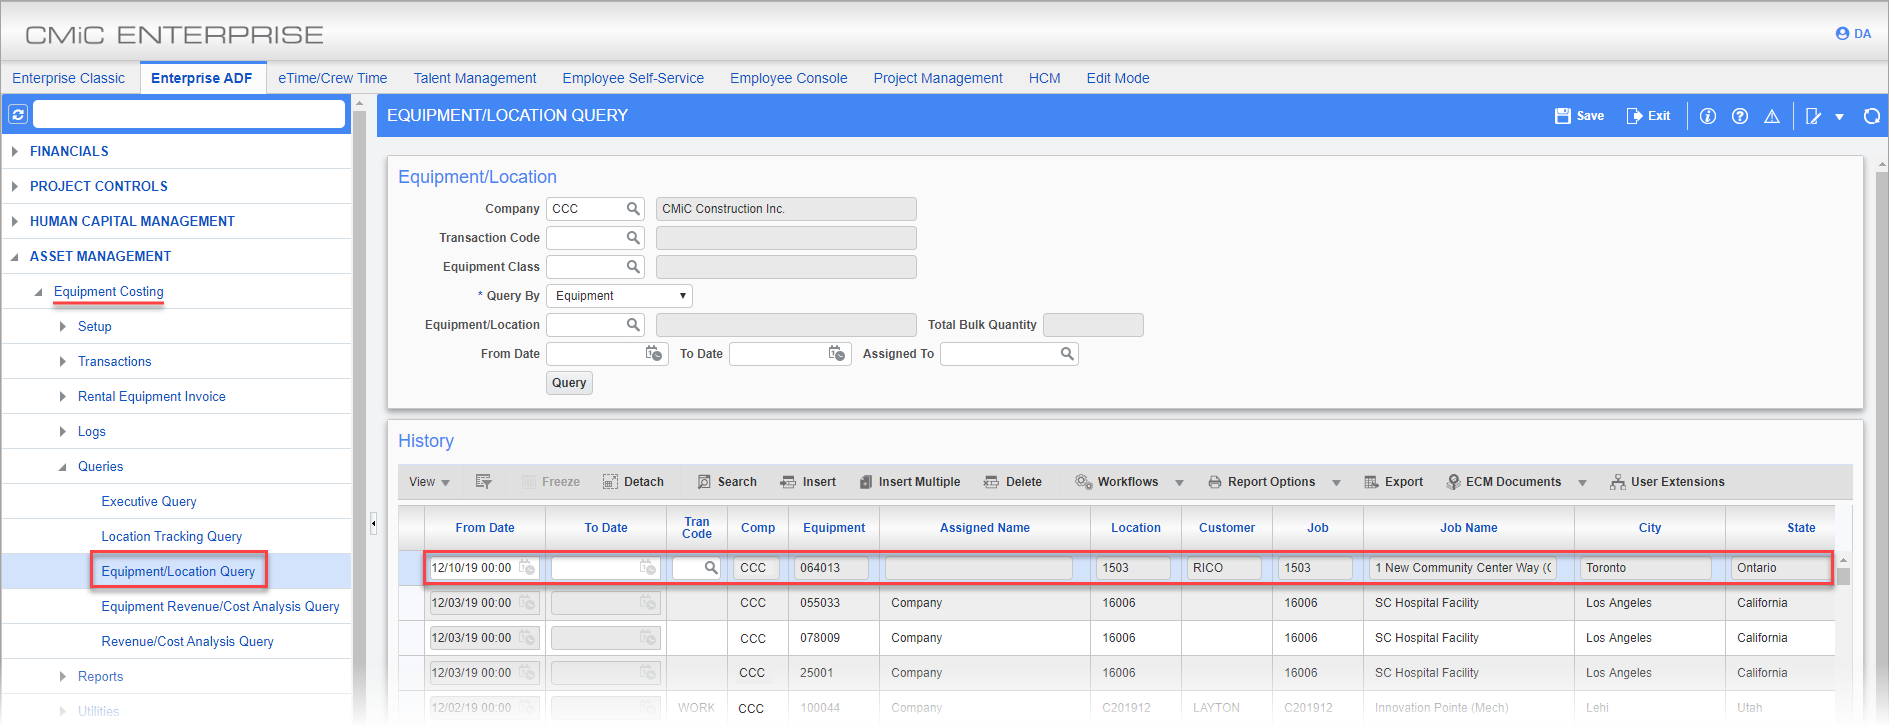
Pgm: EMEQPLOCQRY – Equipment/Location Query; standard Treeview path: Equipment Costing > Queries > Equipment/Location Query
Trade Equipment – Tab
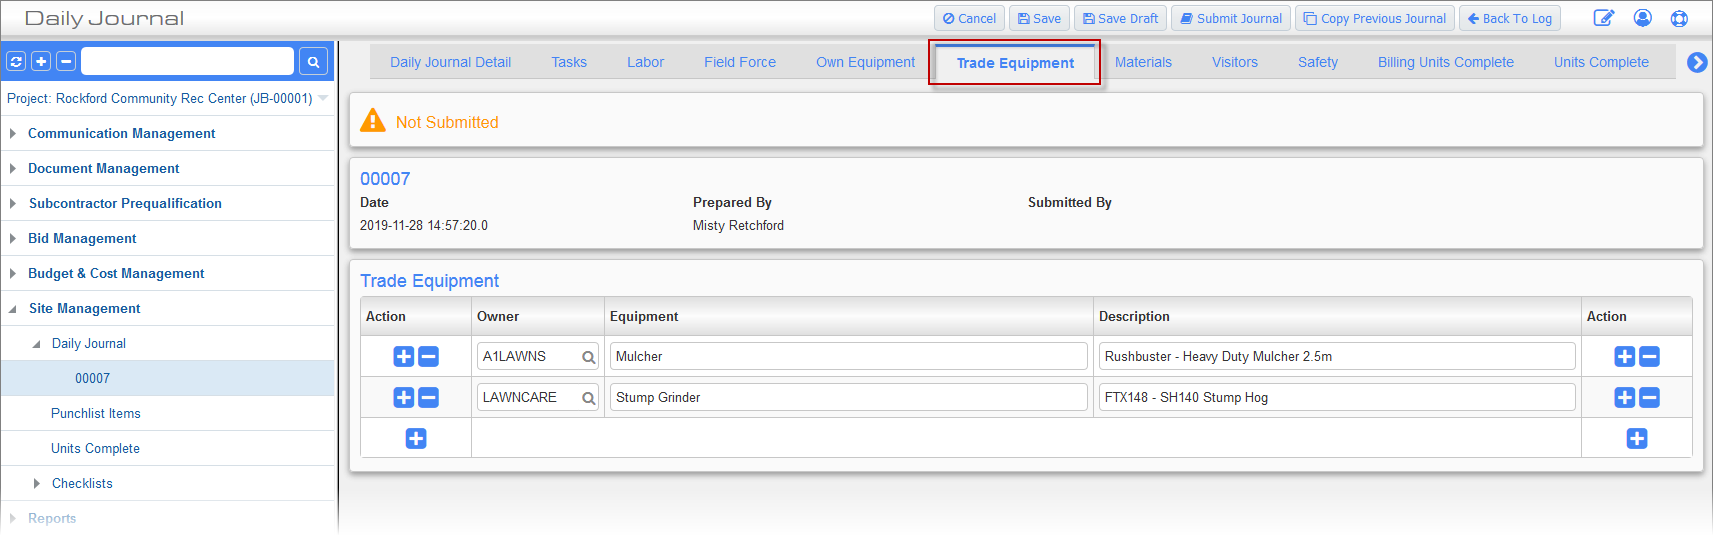
Daily Journal; standard Treeview path: CMiC Field > Site Management > Daily Journal – Trade Equipment tab
This tab is used to enter the types and quantity of equipment used or rented by subcontractors.
Materials – Tab
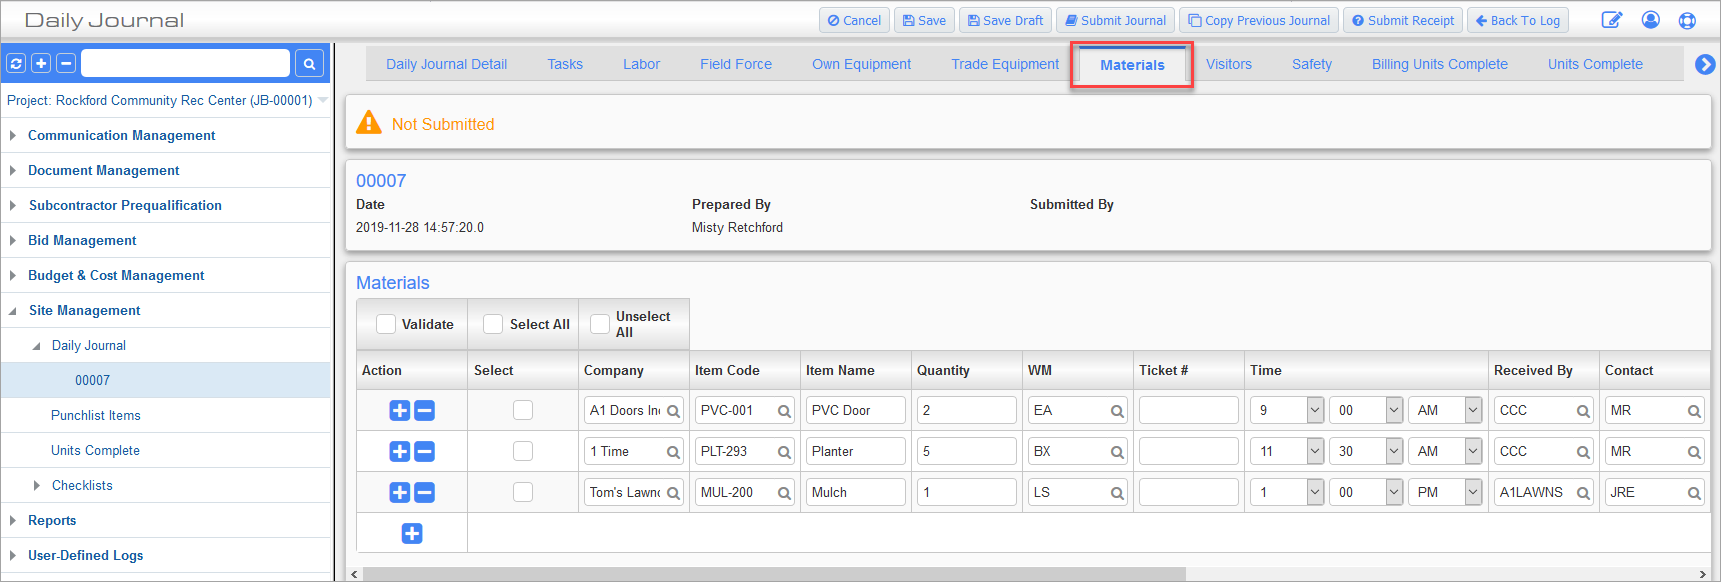
Daily Journal; standard Treeview path: CMiC Field > Site Management > Daily Journal – Materials tab
The Materials tab is for recording deliveries to the jobsite.
Quality Control – Tab
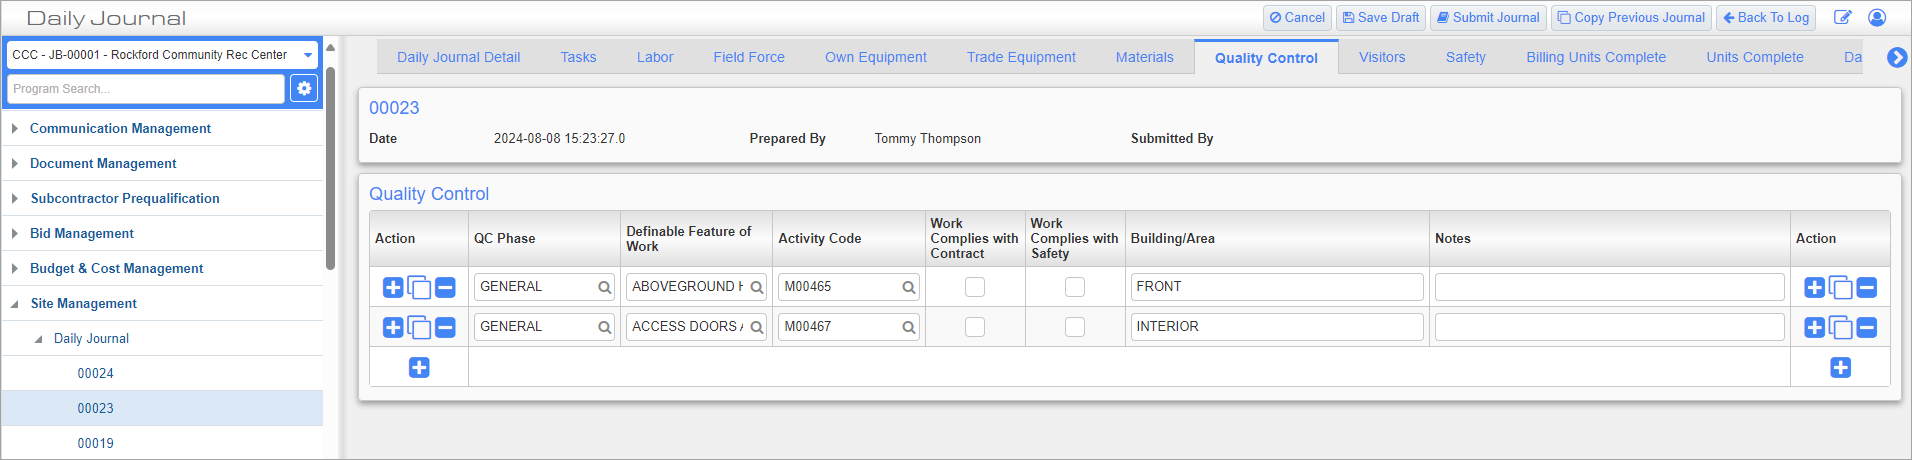
Daily Journal; standard Treeview path: CMiC Field > Site Management > Daily Journal – Quality Control tab
The Quality Control tab is for recording the day's quality control actions and to indicate whether they complied with the contract and with safety requirements. Quality Control (QC) phase codes are maintained in the QC Phase LOV Maintenance screen. Work variable codes are maintained in the Definable Feature of Work LOV Maintenance screen. For more information, please refer to CMiC Field - QC Phase Values and CMiC Field - Definable Feature Of Work Values.
NOTE: The Quality Control (QC) feature and its associated screens have been deprecated (e.g., CMiC Field - QC Inspection and Testing Plan, CMiC Field - System QC Classifiers, Quality Control – Tab in Daily Journals, CMiC Field - QC Phase Values, and CMiC Field - Definable Feature Of Work Values).
Visitors – Tab

Daily Journal; standard Treeview path: CMiC Field > Site Management > Daily Journal – Visitors tab
This tab is for recording who visited the site as well as when and why they visited.
Safety – Tab
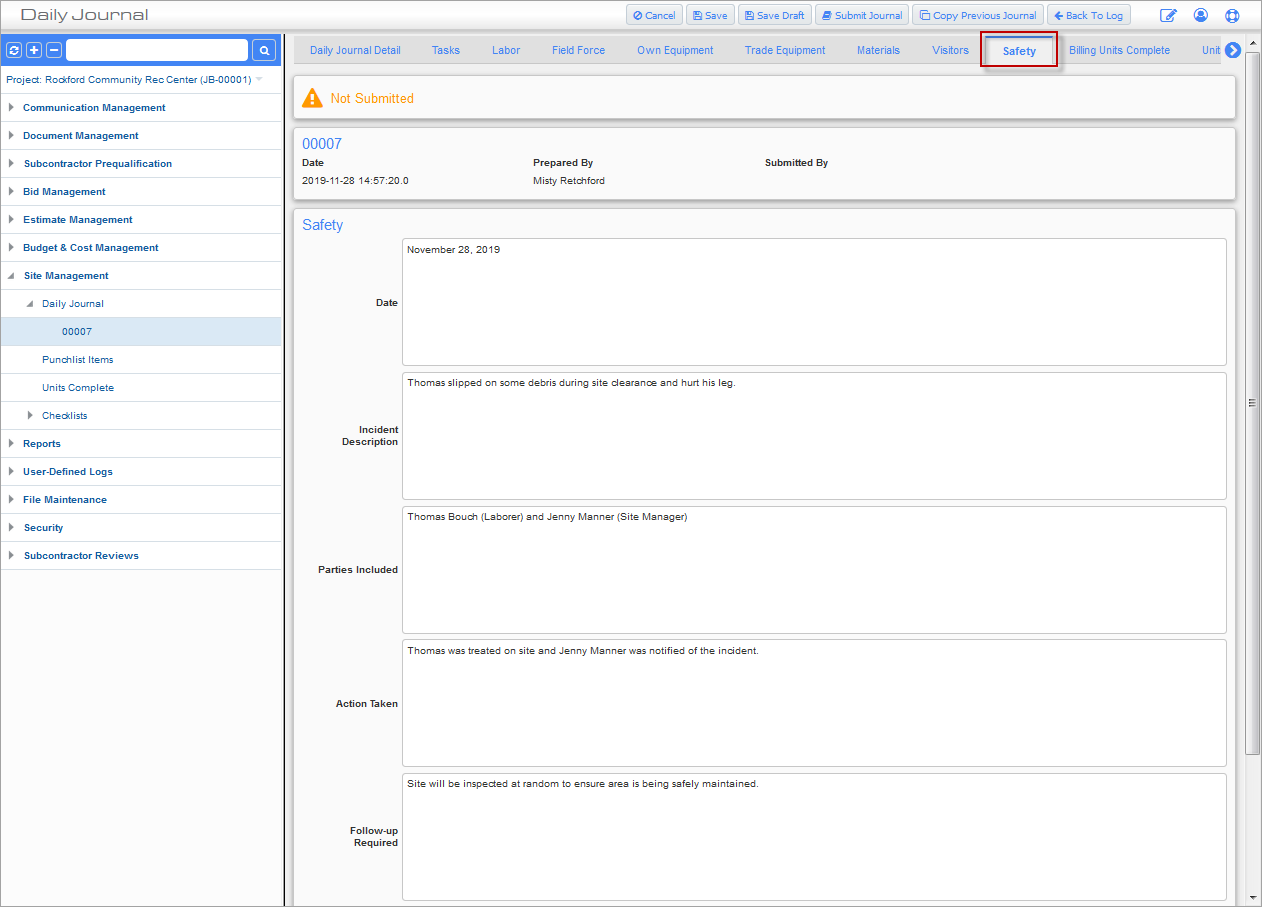
Daily Journal; standard Treeview path: CMiC Field > Site Management > Daily Journal – Safety tab
This tab is used to enter safety related incidents on site for the specified date.
This tab contains up to six user-defined fields which are set up using the System Data - Free Form Fields screen in the System module (standard Treeview path: System > User Extensions > Free Form Fields).
Billing Units Complete – Tab
This tab automatically displays all lines of a contract that are defined with the billing type of UPHS – “Phase Unit Billing”.
Each billing line will show the bill code, the bill code name, the billing weight measure, the contracted units, and previously invoiced (billed) units. The Today’s Units column is the only editable field.
A Previously Submitted Units column has also been added to this tab. It is the total of the Today's Units column accumulated for daily journals prior to the current journal date, for SUBMITTED journals. The Daily Journal Reports (PM4010.REP, PM4010_2.REP, PM4010_3 (Jasper)) show this column as well.
The Prepare Billing Detail screen in the Job Billing module reads the values entered on this tab as the units to bill when the billing is created (standard Treeview path: Job Billing > Billing > Prepare Billing). This is the Override Qty column. This procedure will find the last daily journal where the date of the journal is not after the ‘Include up to date’ and bring the units from the journal into the bill.
Units Complete – Tab
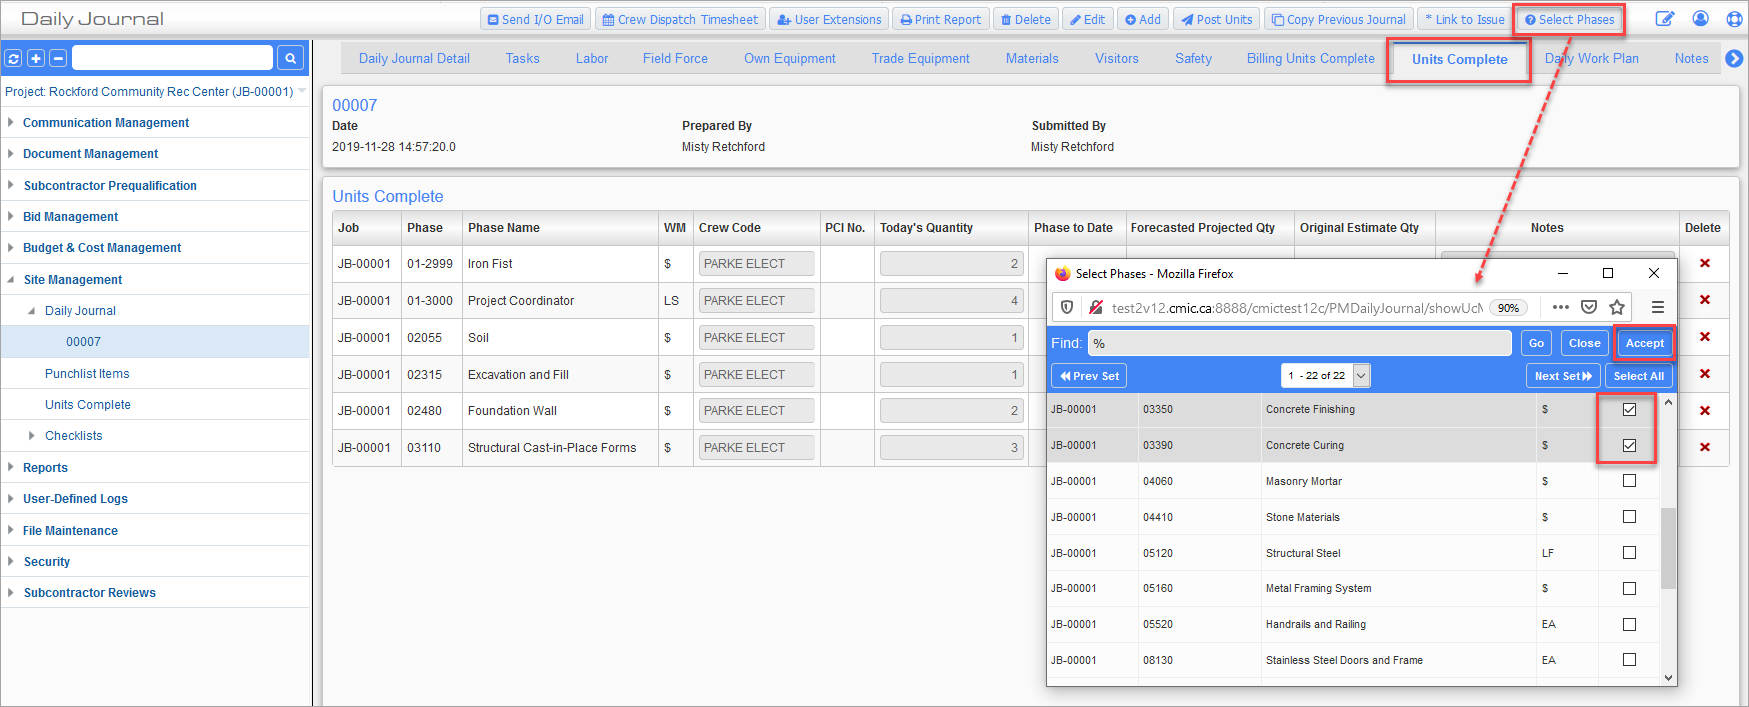
Daily Journal; standard Treeview path: CMiC Field > Site Management > Daily Journal – Units Complete tab
This tab is used to track a job’s completed units. Phases are selected and then units completed against those phases can be tracked for the day.
Phases are selected using the [Select Phases] button on this tab, as shown in the screenshot above. The [Select Phases] button is available in View mode and is enabled for “EMPTY” and “UNPOSTED” Daily Journal records. Clicking on this button launches a pop-up window where multiple phases can be selected and added to the screen.
Phases are commonly unit or productivity based, but if the associated Project Control (Defaults) box is checked to include amounts, then phases for amount type are included.
NOTE: If there are more than 50 phases and the user presses the [Select All] button, a warning message will be issued to indicate that performance could be compromised.
Once the phases have been added to the screen, click the [Edit] button to put the screen in Edit mode so additional details can be entered.
A Delete Phase icon ( ) will be displayed against each of the phases if the user has the required field security.
The tab displays the job code (as there could be sub-jobs associated to the job on the project), the phase code, phase name, crew code, phase WM, today’s quantity, and the phase units to date.
The Crew Code field has an LOV and validation against real crews defined in the Payroll module, and will only be mandatory if real crews have been defined. This field will default the crew code entered in the header of the Daily Journal Detail tab. If real crews are not being used, this field will not be visible to the user.
The [Post Units] button is enabled when the journal is submitted using the [Submit Journal] button.
The posting of the units will automatically create a JC batch number, and post all of the units entered.
There is drill-down capability on the Phase to Date column which will open a window with the following information: the first section will show the job code, phase code and phase name from the record being drilled down on; the detail section will show journal number, journal date, prepared by name, submitted (Yes or No), transaction quantity, posted quantity, phase to date quantity, WM, and notes. Units not posted from the Daily Journal will show “NA”.
Calculations
Forecasted Projected Qty = Budgeted Units (phase level)
Original Estimate Qty = Budgeted Units (at the time the job is started)
and remains unchanged throughout the life of the job.
When the [Post Units] button is pressed, if the value of Today’s Qty + Phase to Date exceeds the Forecasted Projected Qty, then a warning appears:
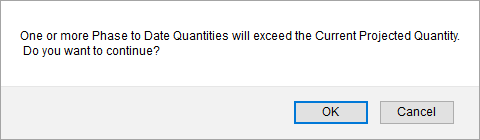
If the [OK] button is selected, the posting process is carried through. If the [Cancel] button is selected, the posting process is cancelled, and the record remains in the Units Complete tab (View mode).
Daily Work Plan – Tab
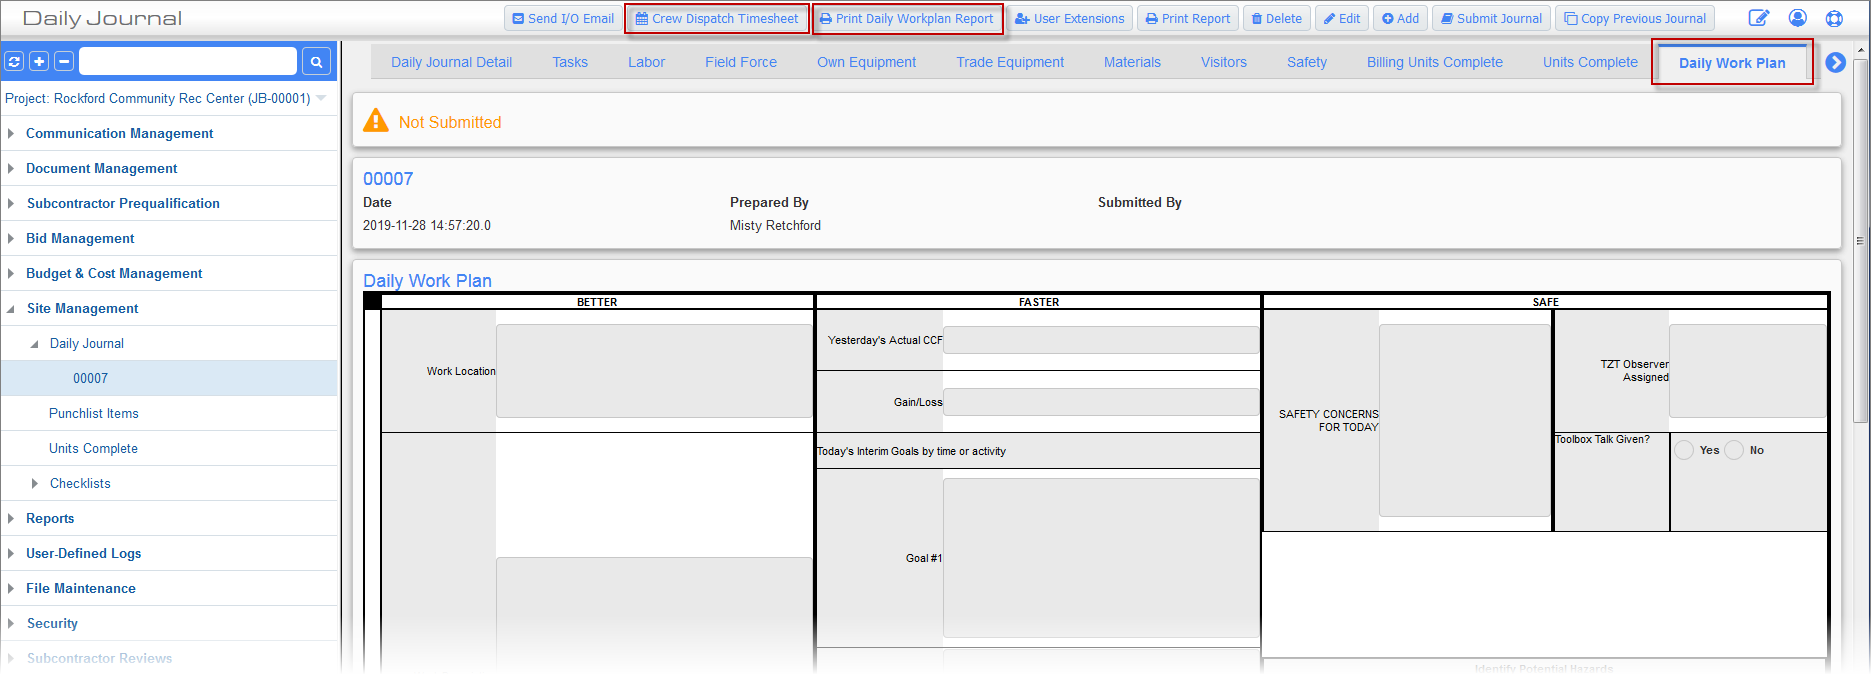
Daily Journal; standard Treeview path: CMiC Field > Site Management > Daily Journal – Daily Work Plan tab
This tab is used to enter a daily work plan and time card for a specified work crew. The work crew is defined by the crew code entered in the Crew Code field of the header of the Daily Journal Detail tab. Crew codes are maintained in the Payroll module (standard Treeview path: US Payroll > Setup > Local Maintenance > Real Crew Maintenance). Entering a crew code allows the specified crew to have their timesheets entered for this daily journal. Once all data has been entered, a Daily Work Plan Report can be printed which contains the day’s work plan and time card.
[Crew Dispatch Timesheet] – Button
This button opens the crew timesheet, pre-populated with the crew and date.
[Print Daily Workplan Report] – Button
This button prints a two-page report consisting of the work plan and the daily time card.
NOTE: The Daily Workplan Report is only used with the Daily Journal screen and is not used anywhere else in the system.
Acronyms
The Daily Work Plan uses the following acronyms:
-
CCF: Crew Cost Factor
-
TZT: Targeting Zero Together
-
TCT: Traffic Control Technician
-
TCS: Traffic Control Supervisor
Notes – Tab
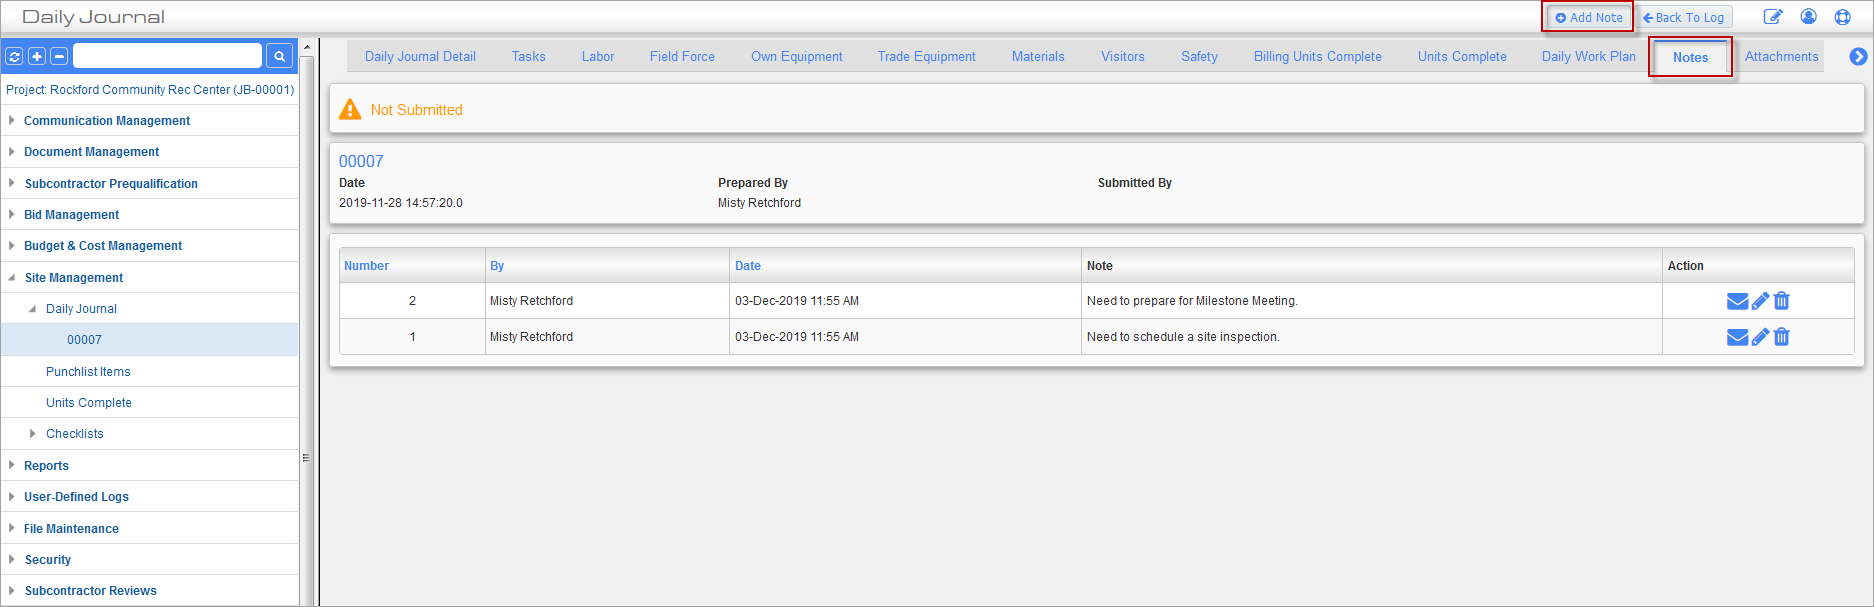
Daily Journal; standard Treeview path: CMiC F–ield > Site Management > Daily Journal – Notes tab
This tab is used to add any additional notes to the daily journal. To add a note, click on the [Add Note] button and press the [Submit] button once the note has been entered.
Attachments – Tab
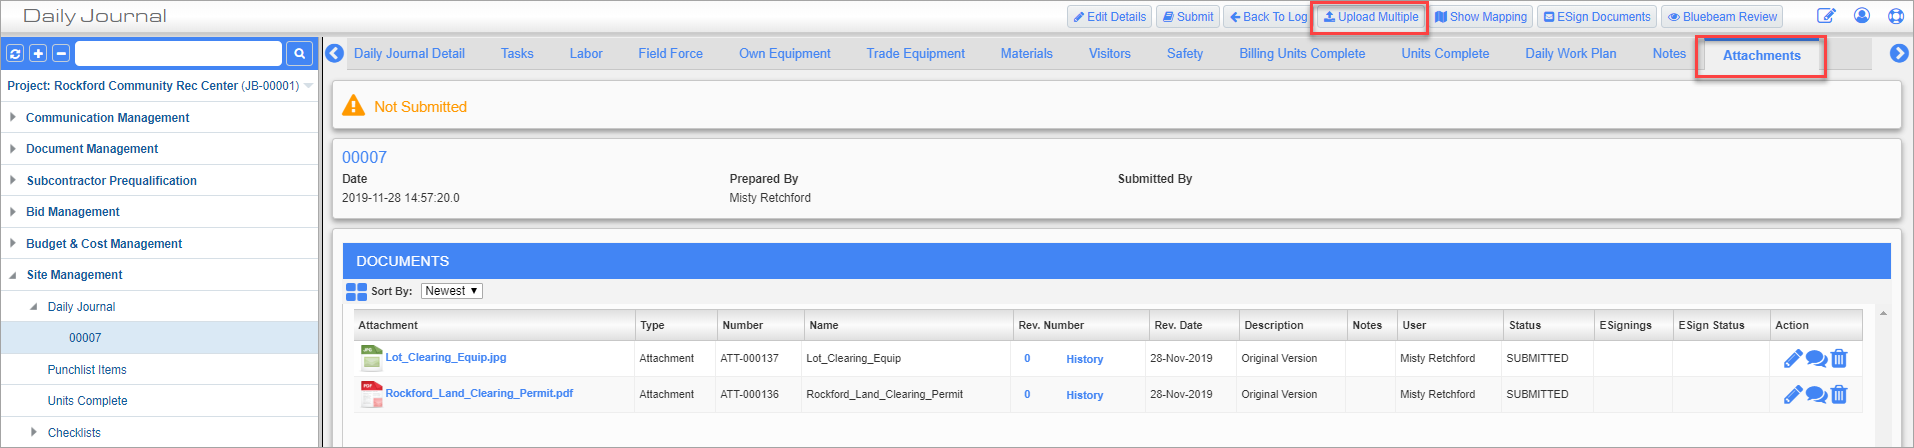
Daily Journal; standard Treeview path: CMiC F–ield > Site Management > Daily Journal – Attachments tab
This tab is used to add any additional attachments to the daily journal. To upload a document, press the [Upload Multiple] button.
Attachments uploaded here will also appear in the Document section of the Daily Journal Detail tab and vice versa.
Review/Approval – Tab
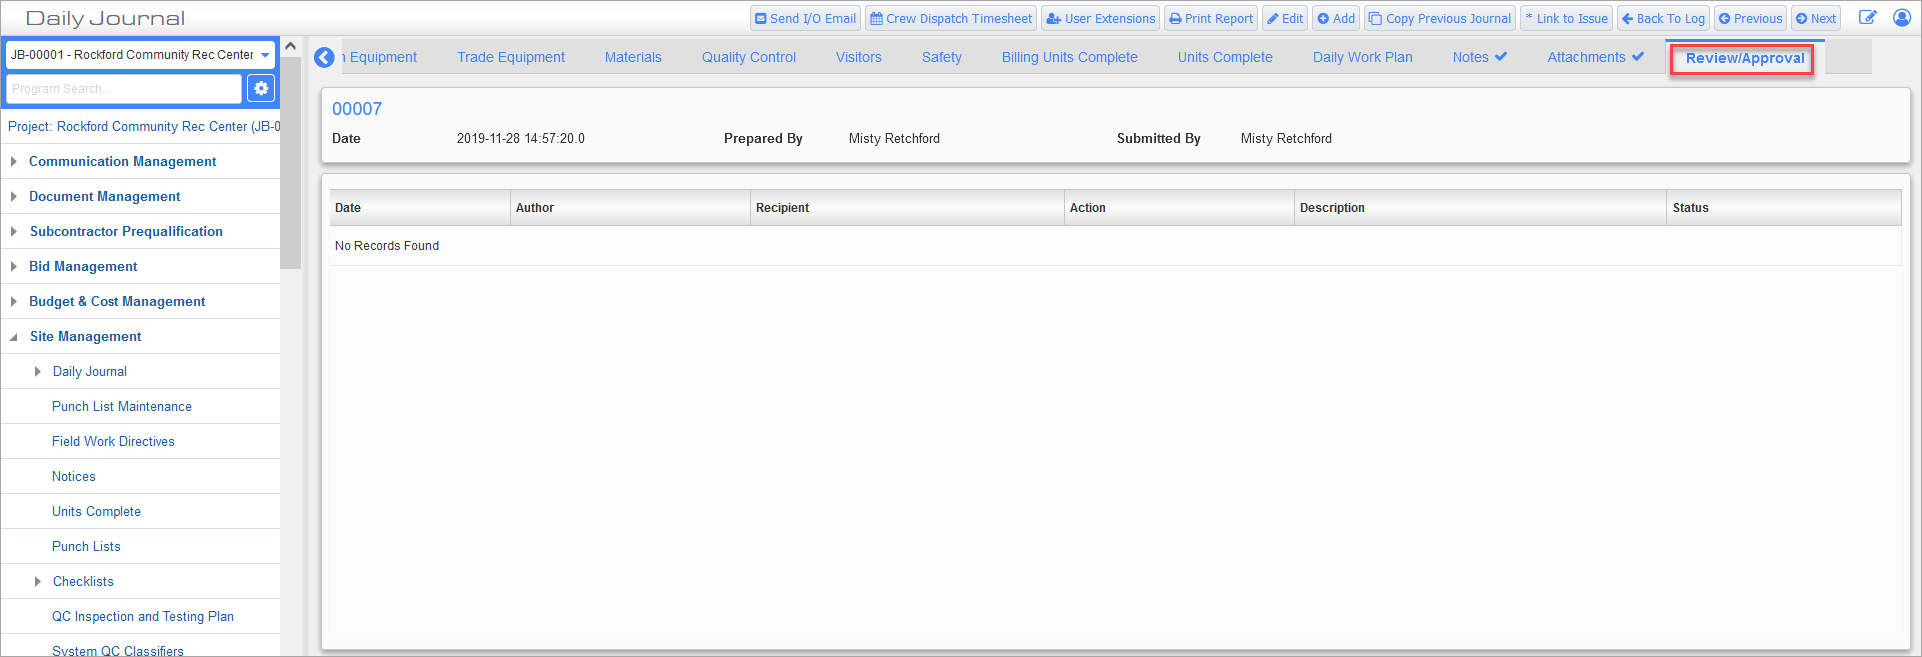
Daily Journal; standard Treeview path: CMiC F–ield > Site Management > Daily Journal – Review/Approval tab
This tab was designed for use with a custom workflow. Contact Support for more information on how your business may benefit from a custom workflow.
NOTE: The Review/Approval tab is hidden by default and users require the proper field security to see it. See CMiC Field - Security Roles for more information on how to set field permissions for your user roles.
Daily Journal Security
For information concerning on security for the Daily Journal screen, please refer to Journals.
Daily Journal Buttons
[Copy Previous Journal] – Button
![Pop-up window launched from the [Copy Previous Journal] button on the Daily Journal screen](../../../../Resources/Images/9_Site_Management/Site_Management_2_752x351.png)
Pop-up window launched from the [Copy Previous Journal] button on the Daily Journal screen
Press the [Copy Previous Journal] button at the top of the screen to copy details from a previous journal and use them in the creation of a new journal. Clicking this button launches a pop-up window, shown in the screenshot above. Use this pop-up window to select a journal from the Daily Journal field and then use the checkboxes to select the types of data to be duplicated.
NOTE: This feature is only available for copying journal entries to/from the same project.
The ‘Phase Units’ box must be checked if the phase units from the Billing Units Complete tab are to be copied. The default value is taken from the project level but can be overridden. If this checkbox is checked in the pop-up, only the phase codes and related data are copied, and not the previous/entered quantities.
When complete, press the [Proceed] button to create the new journal.
[Edit] – Button
Once a journal has been created, information can be added, modified, or deleted using the detail tabs.
To update one of the tabs, click on the [Edit] button to open the fields in Edit mode. On some of the tabs, the Plus icon ( ) can be used to add a new row, or the Minus icon (
 ) to remove a record. When the Plus icon is clicked, a new row is opened above it and includes an additional Copy Previous Row icon (
 ), which copies the contents of the previous row into this row. Field security can be applied to the Copy Previous Row icon. The possible settings are “Unrestricted” or “Hidden”, and the default setting is “Unrestricted”.
Only one tab can be edited at a time. If another tab is opened without saving the previous one, the system will automatically save the information entered in the previous tab.
The [Save Draft] button, when pressed, will save the current data and then the screen is returned to Edit mode so the user can continue entering data, compared with [Save] in which the record is saved but then the screen changes to View mode.
Once a journal is complete, it should be submitted to ensure that it can’t be changed or updated without the proper privilege. To do this, use the [Submit Journal] button at the top of the screen. The project role privilege ‘Submit Daily Journal’ determines if a user can submit Daily Journal records (standard Treeview path: CMiC Field > Security > Project Roles). A submitted journal can’t be edited or deleted unless the ‘Daily Journal – Edit Own Records’ security privilege is assigned (standard Treeview path: CMiC Field > Security > Role Maintenance) or the user has the project role privilege 'Update All' assigned for Daily Journals.
NOTE: Only admin users can edit or delete a locked Daily Journal record. Please see Locking a Daily Journal for more information.
[Delete] – Button
To delete a journal, use the [Delete] button at the top of the view page.
Locking a Daily Journal
Submitted Daily Journal records can be automatically locked after a user-defined period of time (days) from the daily journal date. The lock overrides any privileges (Update all, etc.) except for users that have been assigned an Admin role in CMiC Field - Security Roles.
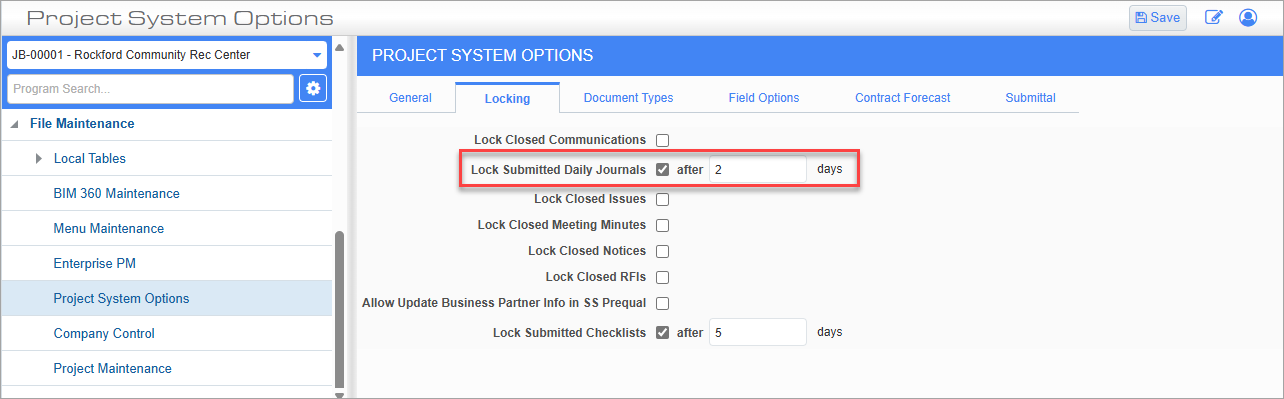
Project System Options; standard Treeview path: CMiC Field > File Maintenance > Project System Options – Locking tab
This feature is controlled by the 'Lock Submitted Daily Journals' checkbox on the CMiC Field - Project System Options - Locking - Tab. To immediately lock the daily journal upon submission, enter "0" days.
Daily Journal Audit and Email Notification for Changes
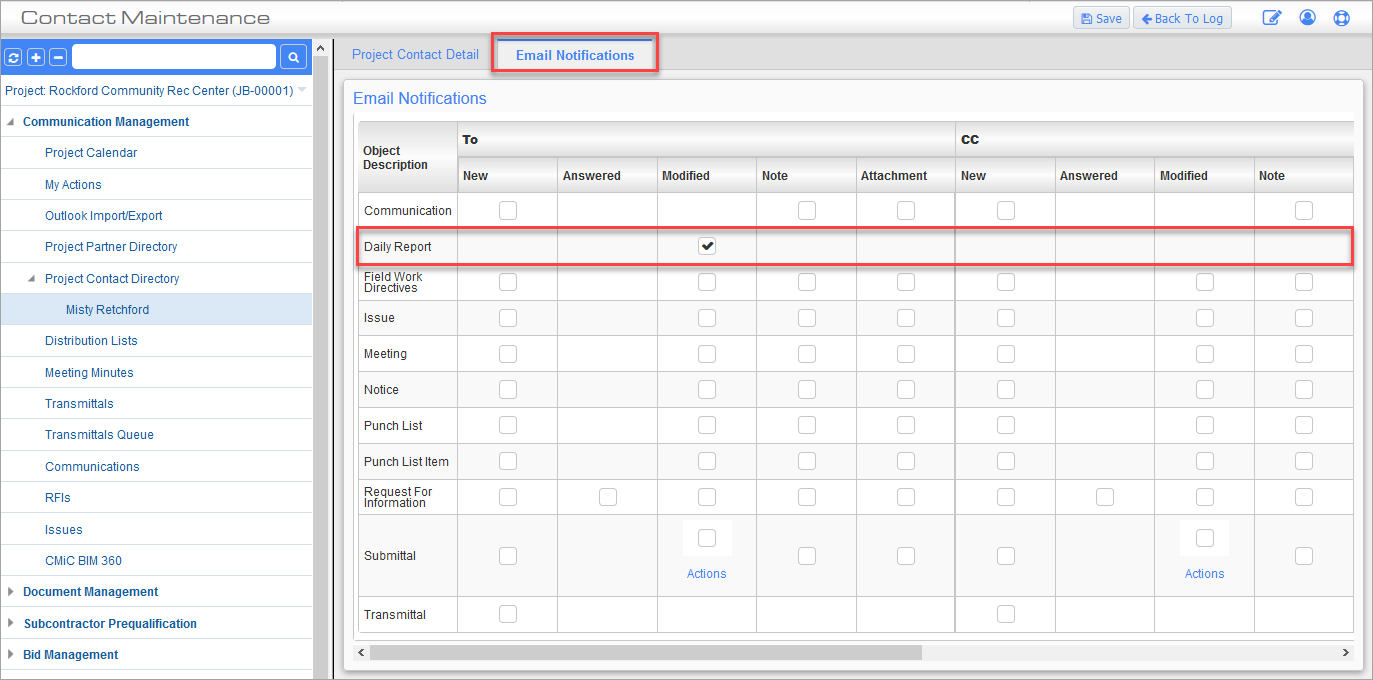
Standard Treeview path: CMiC Field > Communication Management > Project Contact Directory
If a user other than the author of a Daily Journal record makes any change to it, an email notification will be sent to the author, once the Email Notifications tab is configured accordingly. The Daily Report object must be set to ‘Modified’ on the user’s Project Contact record, as shown in the screenshot above.
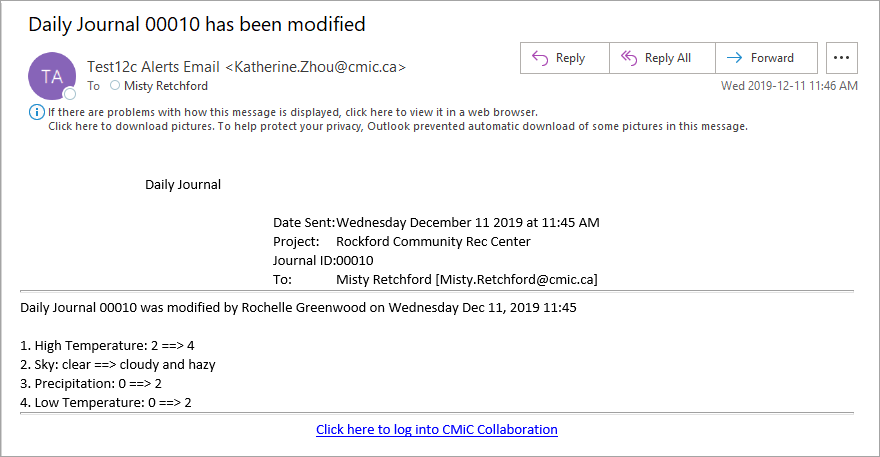
The notification e-mail contains detailed information when the header gets updated (who made the change and when, field, old value, new value):
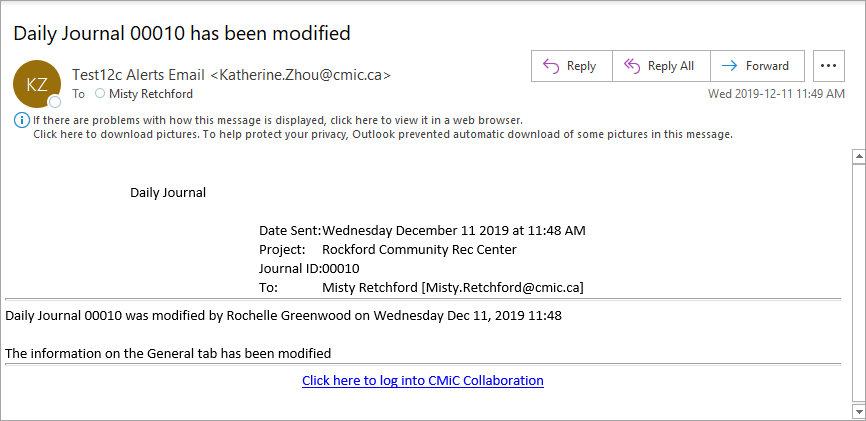
If anything changes in the detail tabs, the information will be limited to the author, date and the tab where the change has occurred:
Daily Journal Log View for Equipment and Labor Costs
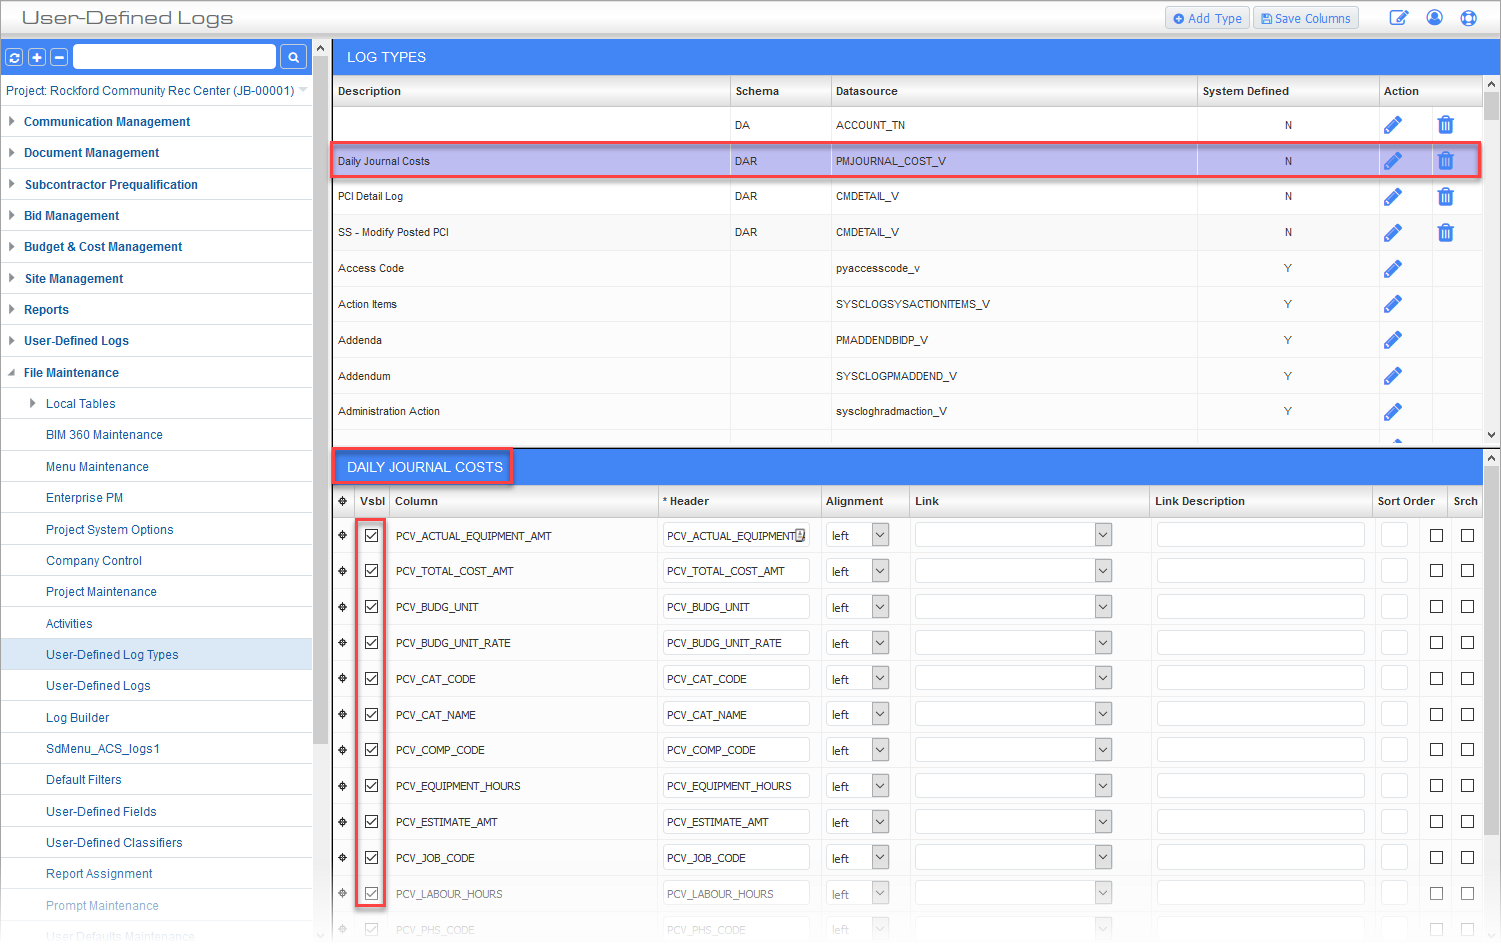
A Daily Journal view associated with equipment and labor costs is available. The view has been defined for use in the User-Defined Logs screen. The source name is PMJOURNAL_COST_V under schema DAR.
For example, in the screenshot below, a user-defined log type is defined based on this view:"
![Screenshot of User-Defined Log Types – [Add Type] button](../../../../Resources/Images/9_Site_Management/Site_Management_53.png)
Standard Treeview path: CMiC Field > File Maintenance > User-Defined Log Types – [Add Type] button
Once the definition is saved, the user can see the underlying columns of the view and select the desired columns and apply other attributes (alignment, link, sort order, etc.), and re-positioning:
Example of User-Defined Log Type
This log type is available to be used to create user-defined logs.
It is also not restricted to a specific project so the WHERE clause will also need to be set up like PCV_PROJ_ORASEQ = %%PROJECT_ORASEQ%%:
![Screenshot of User-Defined Log – [Add Log] button](../../../../Resources/Images/9_Site_Management/Site_Management_55.png)
Standard Treeview path: CMiC Field > File Maintenance > User-Defined Log – [Add Log] button
The view groups the records based on Job/Phase/Category so all data is summed up across all the Daily Journal records for a given project (when WHERE clause is applied).
Printing a Daily Journal
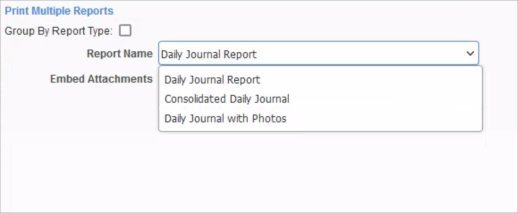
![Pop-up window launched from the [Print Report] button on the Daily Journal screen](../../../../Resources/Images/CMiC_Field/Daily_Journal_Report_772x320.png)
Pop-up window launched from the [Print Report] button on the Daily Journal screen
Once a Daily Journal record has been filled out, it can be printed in various formats. These formats are described in more detail in Types of Reports. Click on the [Print Report] button to launch the Select Report pop-up window, where the desired report type can be selected using the drop-down menu in the Report Name field.
Once the desired report has been selected, press the [Print] button to open up the standard Report Config screen.
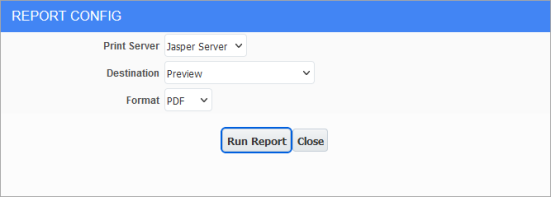
Press [Run Report] to produce the selected report.
Types of Reports
The report types available to be printed from the Daily Journal screen are described below.
NOTE: The report's logo is maintained in the Company Logo field on the Company Setup screen in the General Ledger module.
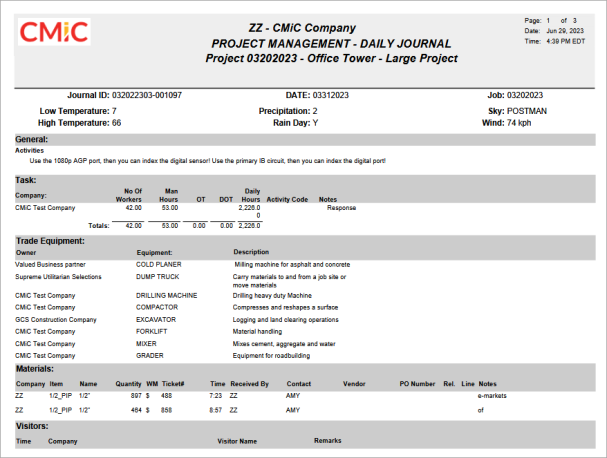
Daily Journal Report
This option prints a report of the daily journal, with notes.
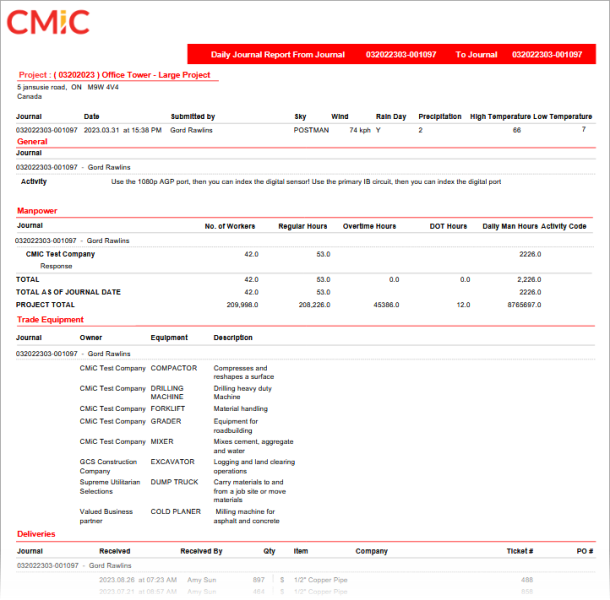
Consolidated Daily Journal
This option prints a summary of the daily journal.
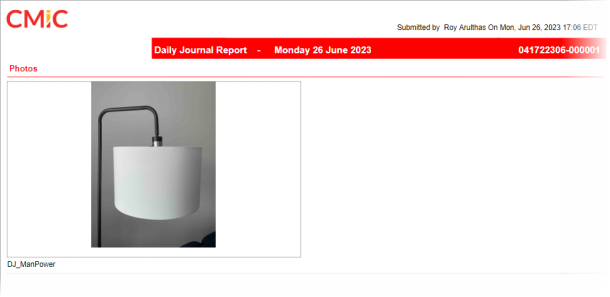
Daily Journal with Photos
Like the Consolidated Daily Journal option, this option prints a summary of the daily journal and also includes photo attachments.