Charge-Out Rules
-
Automatic charge does not use hourly rates.
-
The rate is determined by the rate as defined in the rate table for the days selected. The rate used may be a blended rate that encompasses more than one rate over the course of the billing period. A detailed description will be found in the description field showing how many days and at what rate they were charged.
-
There must be a location transfer with an accurate start date for an automatic charge-out creation. The auto charge-out generation will be using the cost code/category for the job from the equipment location history table by default. When the ‘Override Auto Charge Phase And Cat From Last Posted Auto Charge Transaction’ checkbox is checked in System Options (standard Treeview path: System > Setup > System Options – Assets tab), then the system will use the cost code/category from the last posted auto charge-out transactions for the same equipment/job combination, if available. Otherwise, the default cost code/category combination from the equipment location history will be used.
-
The automatic charge-out creates internal cost transactions against the job based on the daily, weekly and monthly rate and location transfer. The charge is based on the Working Days and the rates table start and end dates.
-
Automatic charge-out will look for the best rate when sliding scale is used.
As an example using monthly rate of $900.00, Weekly Rate 1/3 of monthly $300.00 and Daily Rate 1/9 of monthly $100.00
Enter a start date and end date equally 2 weeks and 3 days with working schedule including weekends (17 days). The system will multiply 17 days × 100.00 = $1700.00 and will multiply weeks + 2 days = $600.00 + $300.00 = $900.00. System will charge a fee of one month at $900.00.
As the calculations continue for the piece of equipment at the one location, the system will continually go to the first day the equipment arrived at the location and re-work the charges always making sure that the best rate is charged. A detailed description will appear in the Long Description line showing the calculation.
-
If the 'Use Equipment Revenue Rate Types' is checked on the Equipment Costing Control File, sliding scale will be disabled and daily rates will be the only rate taken into consideration (standard Treeview path: Equipment Costing > Setup > Local Tables > Control – Charge/Reconciliation tab).
-
For bulk equipment, a user can have multiple automatic charge out unposted batches created for the same equipment in different locations. For non-bulk equipment, if there is an unposted batch which already contains an equipment and a user tries to create a new batch, it will throw an error.
Setting Up Standard Automatic Charge-Out
Example of setting up equipment to be automatically charged out to a job
This section outlines the steps to take before generating an automatic chargout. This example is using a standard autocharge method (non-revenue rate type), which means that 'Use Equipment Revenue Rate Types' is unchecked on the Charge/Reconciliation tab. This example is using the Working Days calendar, which sets up the calendar for each year.
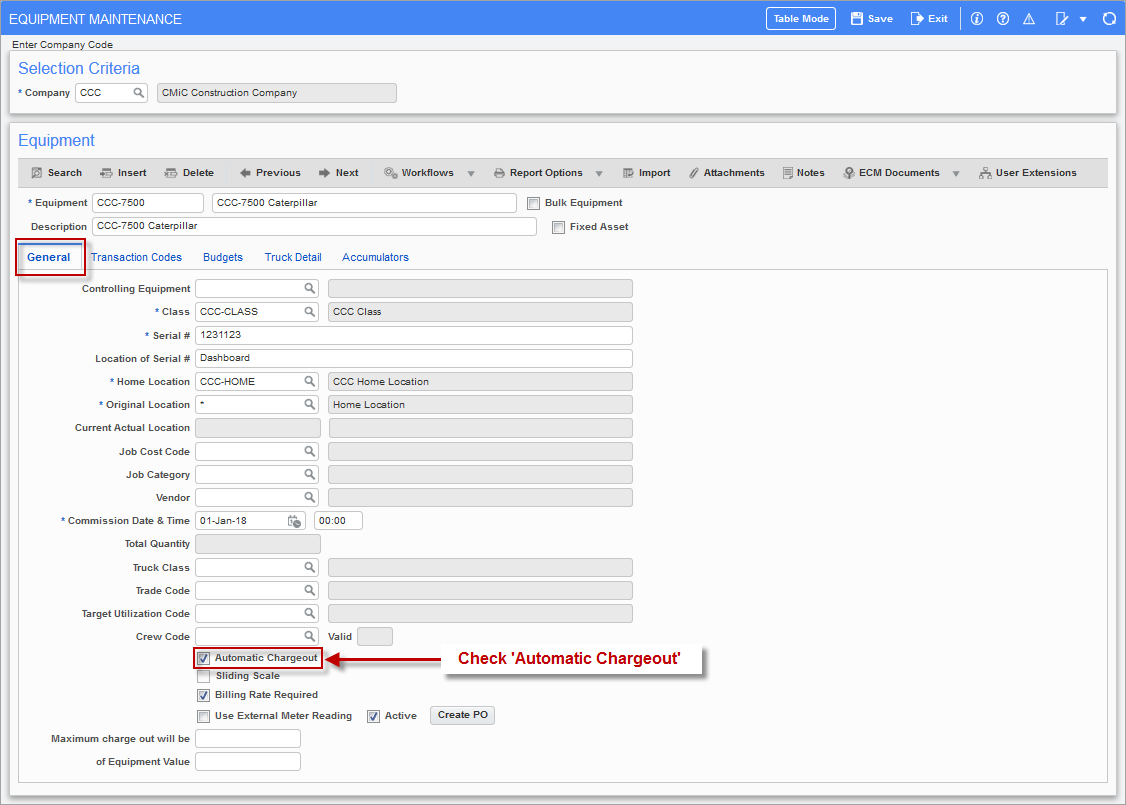
Set up the equipment to automatically charge out to a job. Ensure the 'Automatic Chargeout' checkbox is checked.
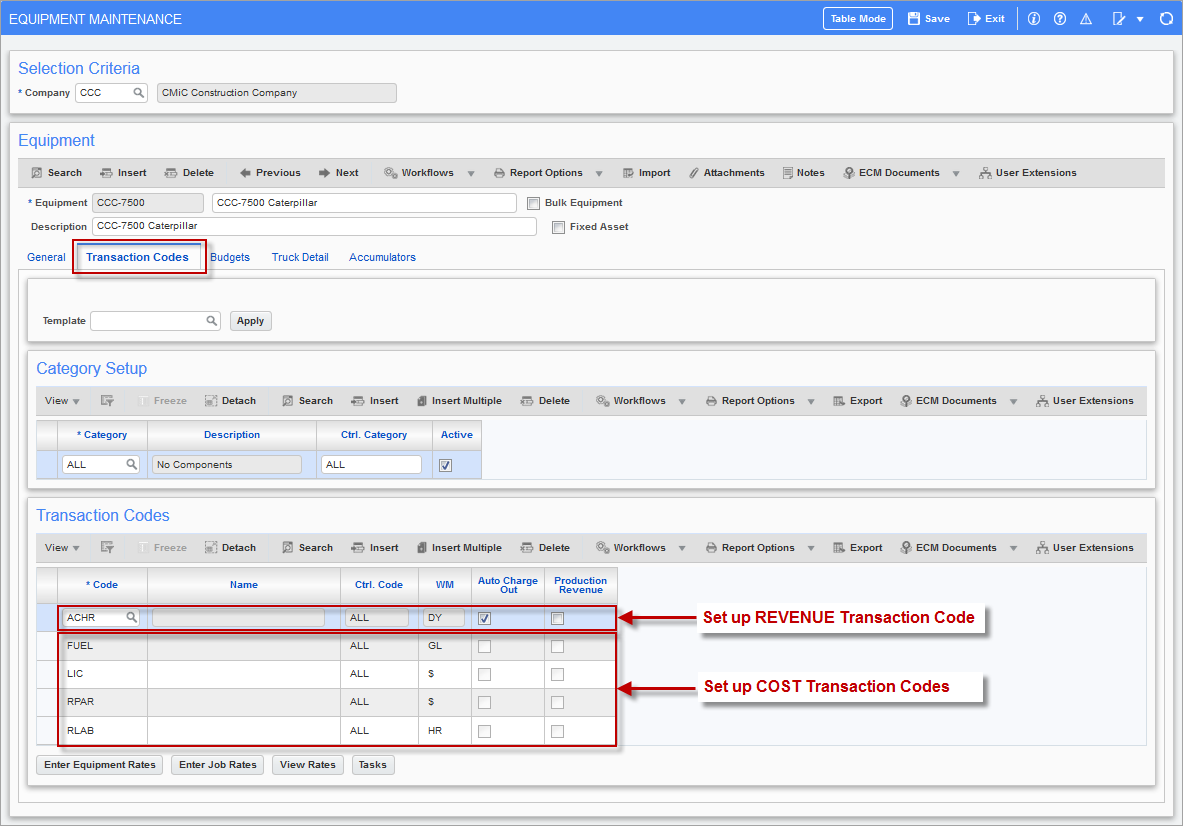
Example of setting up cost and revenue transaction codes
Select cost and revenue transaction codes. Cost transaction codes are used to post costs to A/P, JC, CI, PY, EM, or WO. The revenue transaction code is used in equipment costing and there is only one code dedicated to auto-charge.
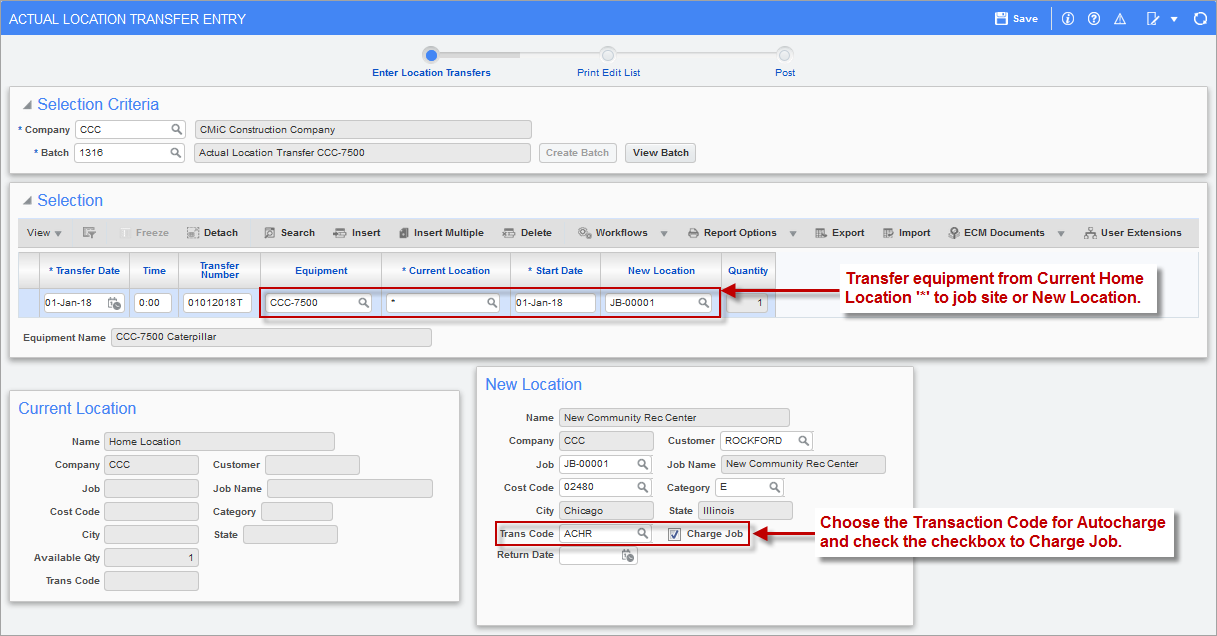
Example of moving (transferring) equipment to actual job site
Move (transfer) the equipment to the actual job site. The job can now be charged for this equipment.

Example of setting up rates for equipment
Set up the billing and charge rates for the equipment. Since this example is using standard rate type, only Rates menu options are being used (standard Treeview path: Equipment Costing > Setup > Local Tables > Rates). The charge rate is the amount charged to the job, and the billing rate is the amount billed to the customer.
Now the user is ready to generate an automatic charge-out for this equipment.
Create Transactions for Automatic Charge-Out
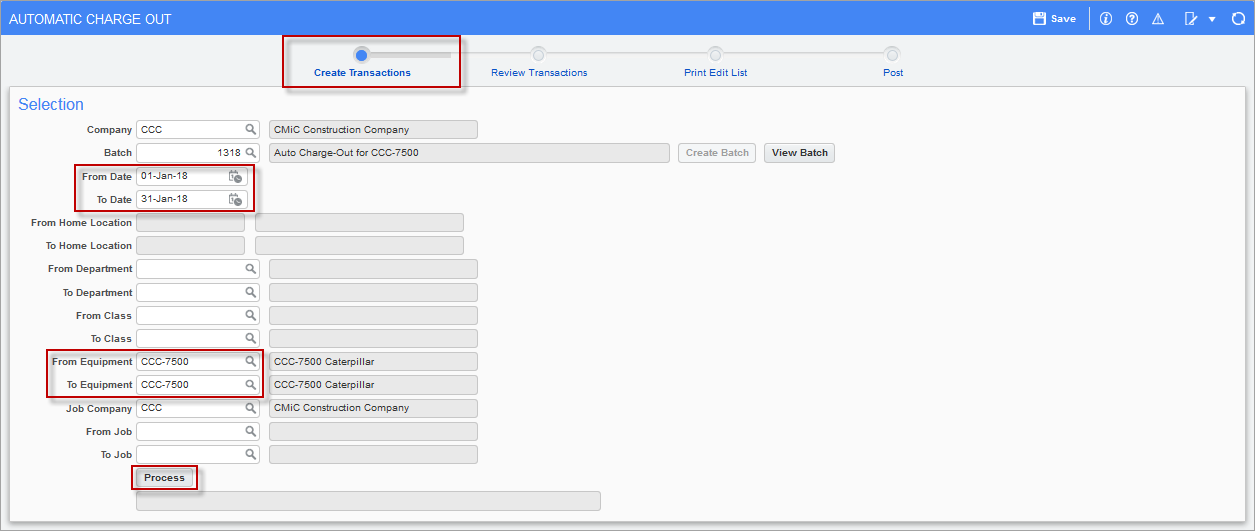
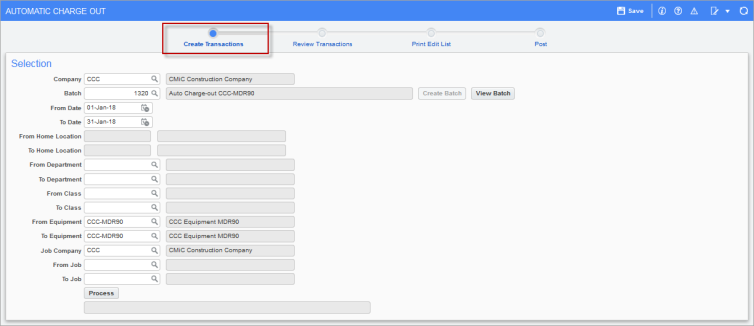
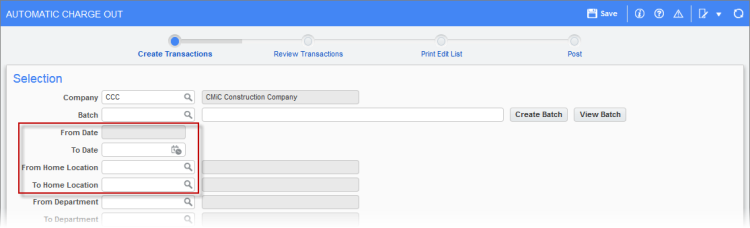
Pgm: EMCHARGE – Create Transactions for Automatic Charge out; standard Treeview path: Equipment Costing > Transactions > Automatic Charge-Outs
The Automatic Charge-Out screen is an internal billing system which charges jobs with the costs associated with the use of an equipment item on a specific job.
Company
Enter/select company code; defaults to user’s default company.
Batch
Create an Automatic Charge-Out batch. The user can use the [Create Batch] button to create a new batch or use the [View Batch] button to launch the Equipment Costing Batch Entry pop-up window to create a new batch.
From/To Date
Enter the To and From dates for the billing period.
From/To Home Location
The From and To home location is disabled. These fields become enabled when using Auto-Charge Cycle.
From/To Department, Class, Equipment, Job
The user can limit the billing by specifying specific department, class, equipment and job.
Job Company
Enter Job Company code; defaults to user’s default Company.
To bill for everything that requires an automatic charge, enter the dates and click [Process]. When finished, the number of transactions created will appear at the bottom of the screen. The automatic charge function will create a non-charge for a job that does not allow transactions; however, a warning message will appear.
Review Transactions for Automatic Charge Out
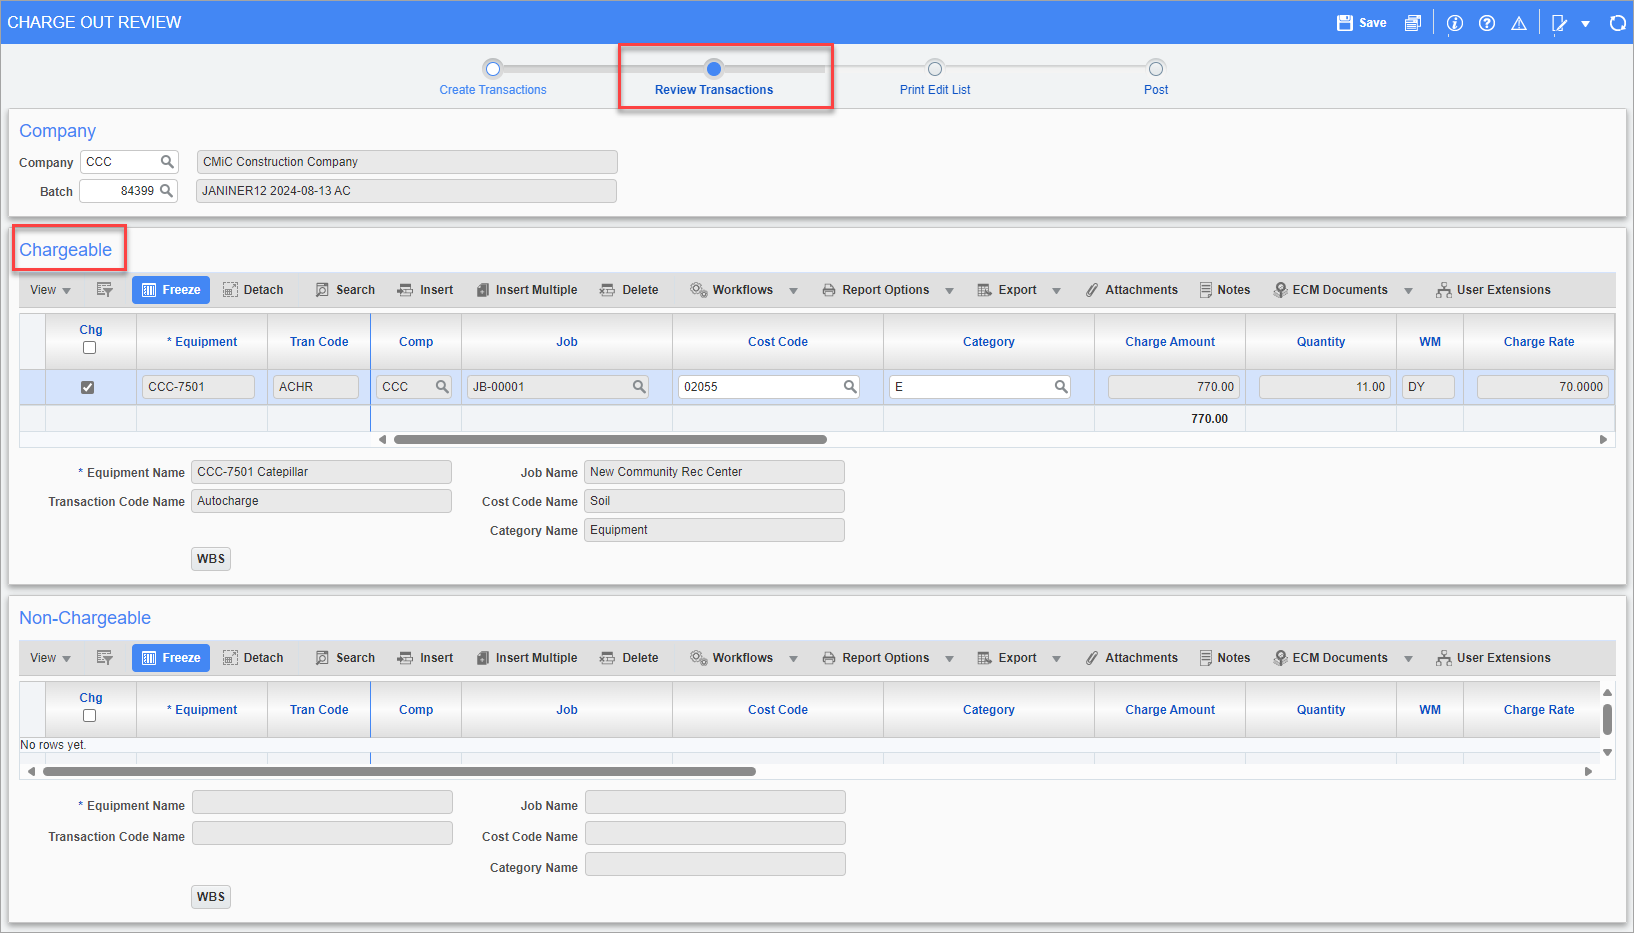
Pgm: EMCHGQRY – Charge Out Review Transactions – View A
Once the system creates the charge out transactions based on the selection criteria in the Create Transactions option, they may be reviewed and/or modified prior to posting. The system will display both the chargeable as well as the non-chargeable transactions within the batch. Only the chargeable transactions will be posted. A breakdown showing how the rate was derived will appear in the Description field.
While the transactions are being reviewed within this batch, the user can change the billing status of the equipment item within a job. Chargeable items may be changed to non-chargeable (and vice versa) by clicking the [Chg.] box. The exception will be a non-chargeable amount set up for a job that does not allow transactions.
Users can upload attachments using the [Attachments] button available on both the Chargeable and Non-Chargeable section toolbars. Attachments will be displayed in the pop-up window launched from the [Revenue Trans] button on the Equipment Costing - Executive Query screen.
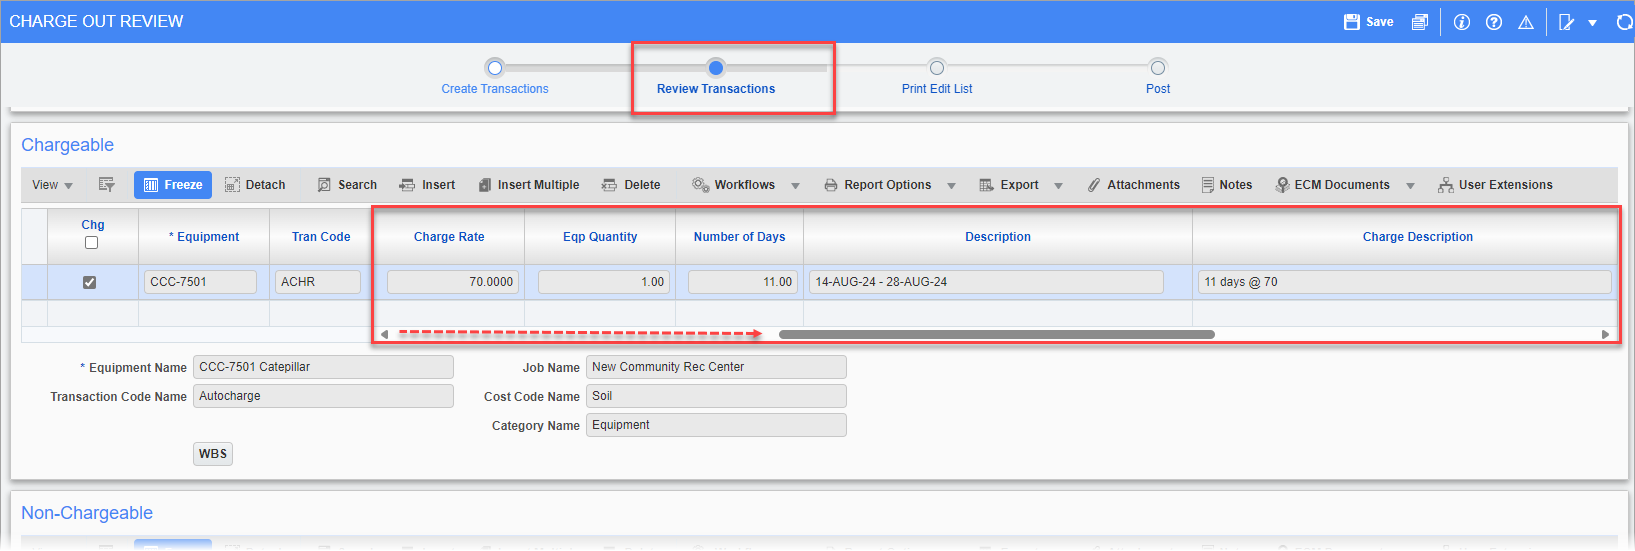
Pgm: EMCHGQRY – Charge Out Review Transactions – View B
Company
Enter/select company code; defaults to user’s default company.
Batch Number
Enter/select the automatic charge-out batch number to be reviewed.
Chargeable
All transactions, which were created within the specified batch, will be displayed. Chargeable transactions will be displayed in the upper section of the screen. Non-chargeable transactions will be displayed in the lower portion of the screen.
Chg (Charge Field) – Checkbox
The Charge field will be checked if the transaction is deemed chargeable. The transaction created by the system will post to the Job Costing and General Ledger modules.
* Charge Cap Exceeded
When the amount of the transaction exceeds the charge cap as set up on the equipment item entry or entered on the rates by job screen, the system will place a * beside the Chg. Field. This flag indicates that the system has reduced the charge-out amount on this transaction to equal the cap amount minus the total previously charged on the job.
Equipment and Transaction Code
For the specified charge-out period, the system will create a transaction for each equipment item/transaction code combination where a location transfer has occurred.
Comp, Job
The system will display the company and job. These fields are display-only.
Cost Code and Category
The system will default cost code and category to which a cost will be assigned. The job/cost code/category comes from the actual location for the specified charge-out period. The cost code and category can be updated if necessary.
Amount
The system will calculate and default the charge-out amount based on the quantity and the rate calculated in the next fields. This amount will represent the total cost to be charged to the job/cost code/category for this billing line.
Quantity and WM
The system will enter the quantity in terms of the Weight Measure for which the equipment item will be charged. The system will compare the WM codes between the transaction code assigned to the equipment item and the WM code in the Equipment Cost Control File. If they are the same (i.e. DY for Day), the default will be the number of working days. However, if the WM code is different (i.e. HRS on transaction code), the system will go to the Weight Measure table on the global tables and look for the conversion between hours to days. The default will be the quantity of hours to make up the working days as found on the Working Days Schedule. The system will take the number of working days from the Working Days schedule that falls within the specified charge-out period.
Rate
The automatic charge-out processing package will calculate the best rate during automatic charge-out processing when using sliding scale.
-
As an example, if the user had daily rates set up at $200.00, weekly rates set up at $920.00 and entered a range of 15 days, 10 of which are working days, the system will take the daily rate of $200.00 X 10 days for a total of $2000.00 and compare the rate to 7 days (1 week) at 920.00 and 3 days X 200.00 for a total of $1520.00 and give the charge out rate at $1520.00 thereby giving the “best rate”, Rate by Class, Rate by Equipment or Rate by Job. If the rate is not exactly as stated, it may be a blended rate.
-
A blended rate may include the blending of monthly, weekly and daily rates, but also will look at start and end dates on the rates tables.
If the ‘Use Equipment Revenue Rate Types’ is checked on the Equipment Costing Control File, sliding scale will be ignored and only daily rate will be used (standard Treeview path: Equipment Costing > Setup > Local Tables > Control – Charge/Reconciliation tab). The same is true if the Sliding Scale checkbox is unchecked on the Equipment Entry screen (standard Treeview path: Equipment Costing > Setup > Enter Equipment – General tab).
Equipment Quantity
The equipment Quantity field displays the actual quantity at that location charged with the auto-charge. For regular equipment the display will be ‘1’.
Description/Charge Description
The description field will default with the start and end date for the period charged on this billing line and the rates used. For equipment items where the Charge Cap has been exceeded, the system will also default a warning that the “Amount Reduced by the Chg. Cap”.
Non-Chargeable
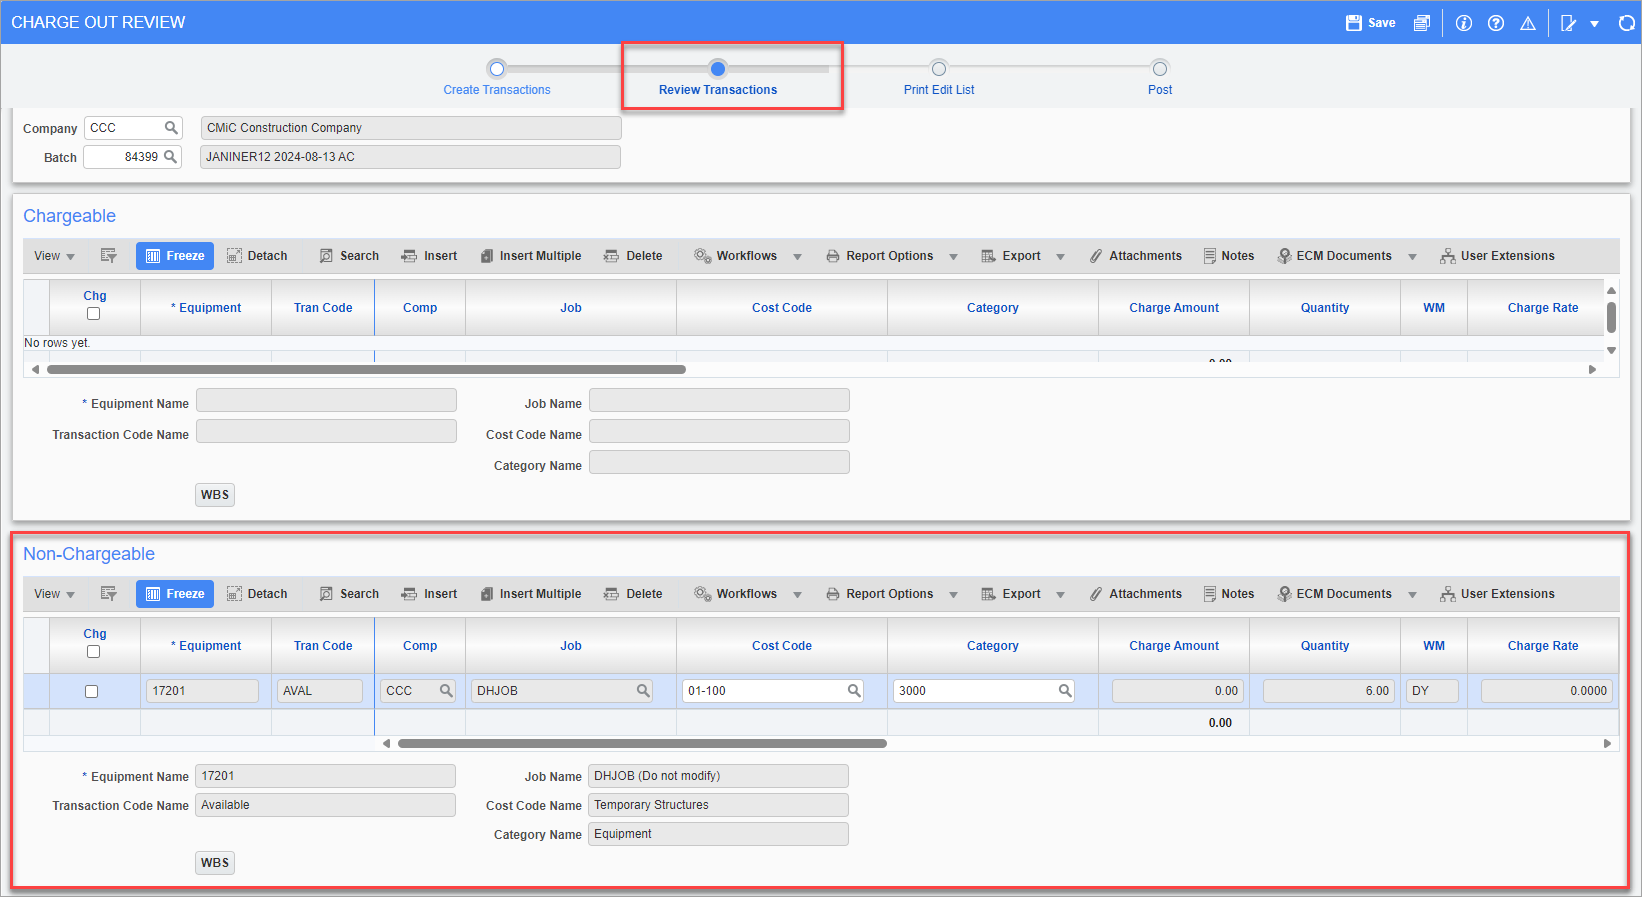
Example of Non-Chargeable section of the Charge Out Review screen
This section of the screen is used for non-chargeable transactions. Transactions will appear in the Non-Chargeable section of the Charge Out Review screen if equipment is flagged as non-chargeable on the Actual Location Transfer screen, or if the charge cap on the equipment is exceeded.
Examples of these non-chargeable transactions are explained in the next two sections.
Example of Non-Chargeable - Actual Location Transfer
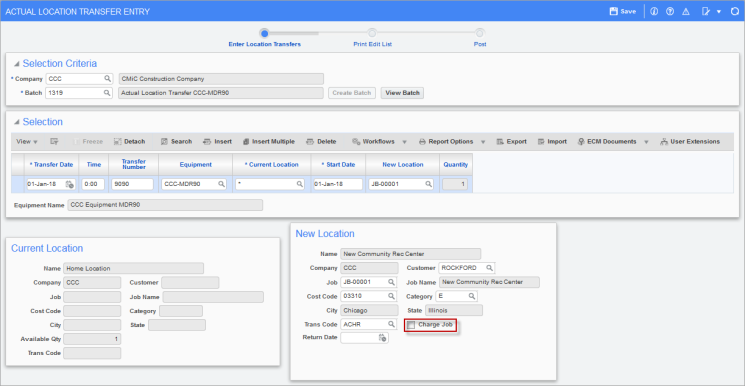
Example of Actual Location Transfer Entry screen with ‘Charge Job’ checkbox unchecked
If the user would like to transfer equipment to a location without creating a chargeable transaction, do not check the ‘Charge Job’ checkbox on the Actual Location Transfer Entry screen.
Next, create the Automatic Charge-out transaction.
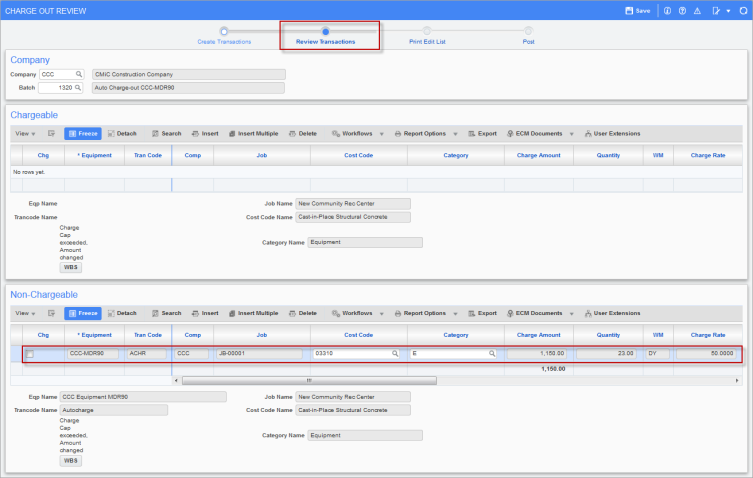
Example of Non-Chargeable transaction on the Charge Out Review screen
The transaction will appear in the Non-Chargeable section of the Charge Out Review screen. If the user decides to change this transaction to chargeable, click on the ‘Chg’ checkbox and click on [Save]. The user will also need to re-generate the autocharge.
Example of Non-Chargeable - Charge Cap Exceeded
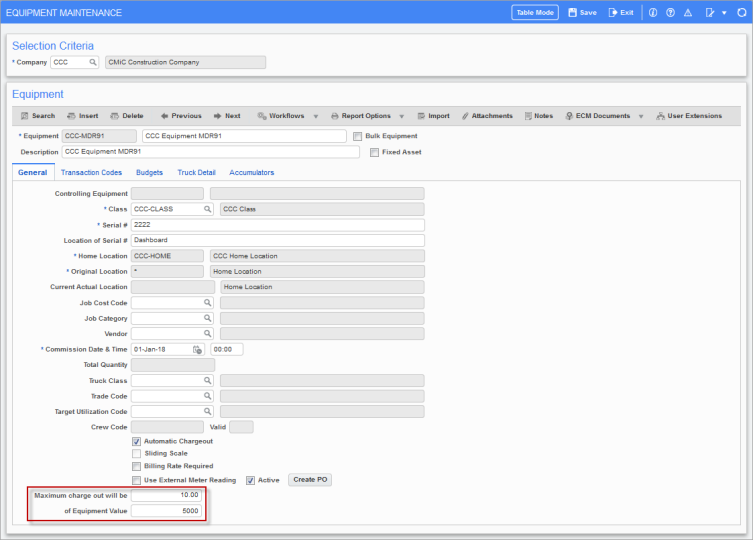
Example of Charge Cap entered on Equipment Maintenance screen
If a Charge Cap is entered for a piece of equipment on the Equipment Maintenance screen (standard Treeview path: Equipment Costing > Setup > Enter Equipment), transactions will be charged until the charge cap limit is reached and then any transactions will flow into the Non-Chargeable section of the Charge Out Review screen.

Example of Non-Chargeable transaction due to charge cap exceeded
In the Non-Chargeable section, the Amount will appear as $0 and the user will be unable to post the transaction. To start charging the equipment again, the user will need to increase the charge cap for the equipment on the Equipment Maintenance screen and re-generate the autocharge.
Print Edit List for Automatic Charge-Out
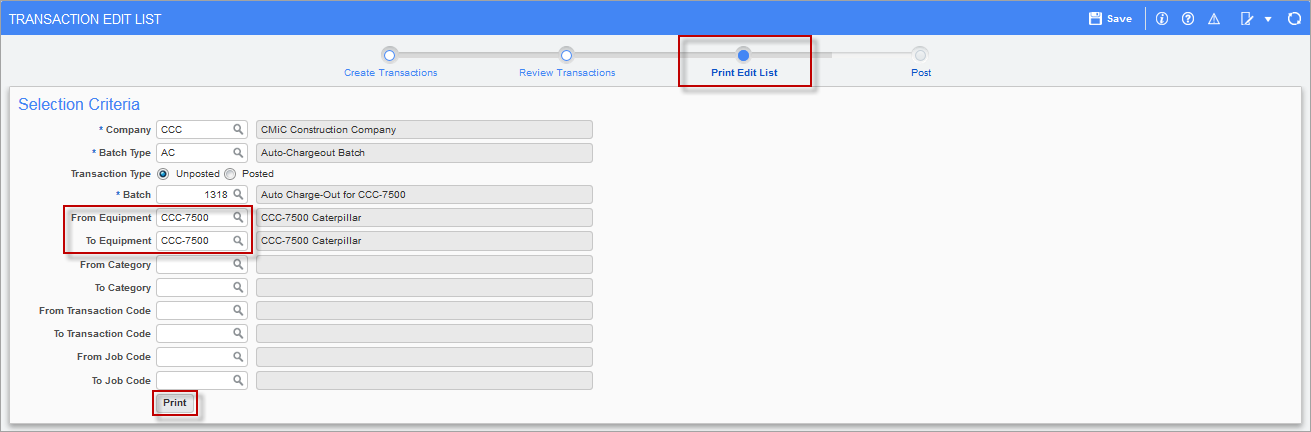
Pgm: EMTRNLST – Print Edit List
Enter equipment details in Print Edit List screen and click on the [Print] button to review the Automatic Charge-Out Edit List.
![]()
Pgm: EMTRNLST – Edit Listing -Automatic Charge-out
The Edit List shows the rate as Equipment Daily Rate multiplied by the equipment quantity. Therefore, in the case of bulk equipment, the rate column displays the total rate of the bulk equipment quantity currently charged at that location.
Post Automatic Charge-Out

Pgm: EMPST – Post - Automatic Charge-out
Use this screen to post automatic charge-outs. Check the “Preview Posting” checkbox to preview the posting reports before posting.

Example of pop-up window launched after clicking on [Post] button
Use the pop-up window to select which Reports to preview. Options are “EM” (Equipment Costing Report), “Job Cost Posting Report”, and “General Ledger Posting Report”.
After previewing the reports, click on [Post] button again to post the batch.
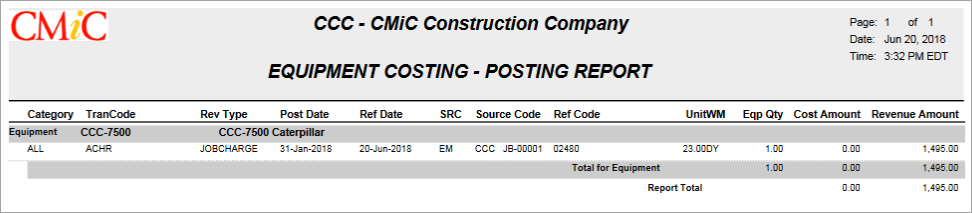
Example of Equipment Costing – Posting Report

Example of JC Posting Report
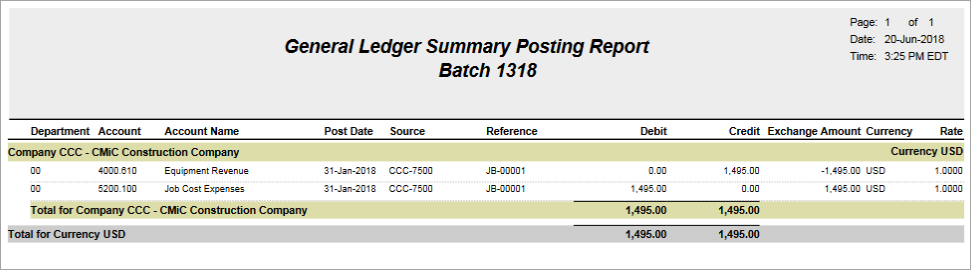
Example of General Ledger Posting Report
28 Day Auto Charge Cycle
The Auto-Charge Cycle option can be set in the Charge/Reconciliation tab of the Equipment Cost Control File screen as shown below. This functionality gives CMiC the ability to generate equipment rental transactions using a similar method as equipment rental companies do.
NOTE: By default, this option is set in the Assets tab of the System Options screen but users can override these settings at the company level. If the 'Use Billing Revenue Cap' box checked in System Options, then default settings for this option can't be changed in Equipment Costing module.
Once this option is in use and transactions are created, it cannot be switched back.

Pgm: EMCTRL – Equipment Costing Control File; standard Treeview path: Equipment Costing > Setup > Local Tables > Control – Charge/Reconciliation tab
The auto-charge is calculated based on the values set in each of the following fields:
How Many Days = 1 Week = a number 2 thru 7. The number entered represents the minimum number of days that will be considered as a week for the purposes of auto-charging. It is the number of days before the charge rate is switched to weekly rate.
How Many Weeks = 1 Month = a number 2 thru 3. The number entered represents the minimum number of weeks that will be considered as a month for the purposes of auto-charging. It is the number of weeks before the charge rate is switched to the monthly rate.
How Many Days in a Billing Cycle = a number 18 thru 31. The number entered represents the minimum number of days that will be considered as a month for the purposes of auto-charging. It is the number of days that define the billing cycle.
Indicate if $0 transactions are to be created for amounts over the Charge Cap, by checking the ‘Create $0 Over Charge Cap Transaction’ checkbox (by default, this is un-checked). Zero dollar transactions will also be created if there are transactions with dates outside of the valid date range for the equipment charge rates.
Rules:
This cycle follows the rules below:
-
Auto-charge starts on the Transfer In Date
-
Auto-charge does not charge for the Transfer Out Date
-
Auto-charges will always start charging from the equipment start date for equipment with no previous charges and will start charging from the last charge date +1 for those equipment which have previous charges for the current transfer.
-
Auto-charge does not use ‘Working Days’, it is purely calendar days, so there will be no checkup on vacation days and so on.
-
Auto-charge uses the latest rate as of the 28th day or the Transfer Out Date; number of days depends on the System Options value in How Many Days in a Billing Cycle field.
-
Auto-charge always switches rates by following the rules specified in the System Options (How Many Days = 1 Week and How Many Weeks = 1 Month), unless the amount is not the optimal amount (e.g. it may charge for a whole month if it found it was a better rate than charging for 2 weeks and 2 days). Therefore, for a given number of days, it will try to find the best combinations (months, weeks and days) in terms of charge amount.
-
The auto-charge routine will create billable transactions if the Charge Cap is reached and depending on the System Options checkbox ‘Create $0 Over Charge Cap Transactions’.
-
Auto-charge may or may not start re-calculating charges when equipment is moved within a job according to the Job Setup checkbox ‘Equipment Auto Charges Do Not Restart’.
-
The Charge Description is for the cumulative equipment charges and period on that job.
-
The auto-charge would be consistent by collecting 1 month rent on the 28th rental day (System Option value: How Many Days in a Billing Cycle) and every 28th day thereafter. Upon transfer off the job, the final rental amount is collected based on the number of days since the last charge.
NOTE: When the 'Use Auto Charge Cycle' checkbox is checked, the system will apply the relevant charge-out procedure directly for all equipment regardless of the existing charge status of those equipment. That means if there are some previously uncharged or missed gaps, the auto-charge will not be charged for them if there is an existing charge-out after those gaps.
When generating auto-charge transactions under this option, the From Date is disabled and the From and To Home Location are enabled:
Pgm: EMCHARGE – Automatic Charge Out; standard Treeview path: Equipment Costing > Transactions > Automatic Charge-Outs