Overview
Owner Change Orders; standard Treeview path: CMiC Field > Budget & Cost Management > Owner Change Orders
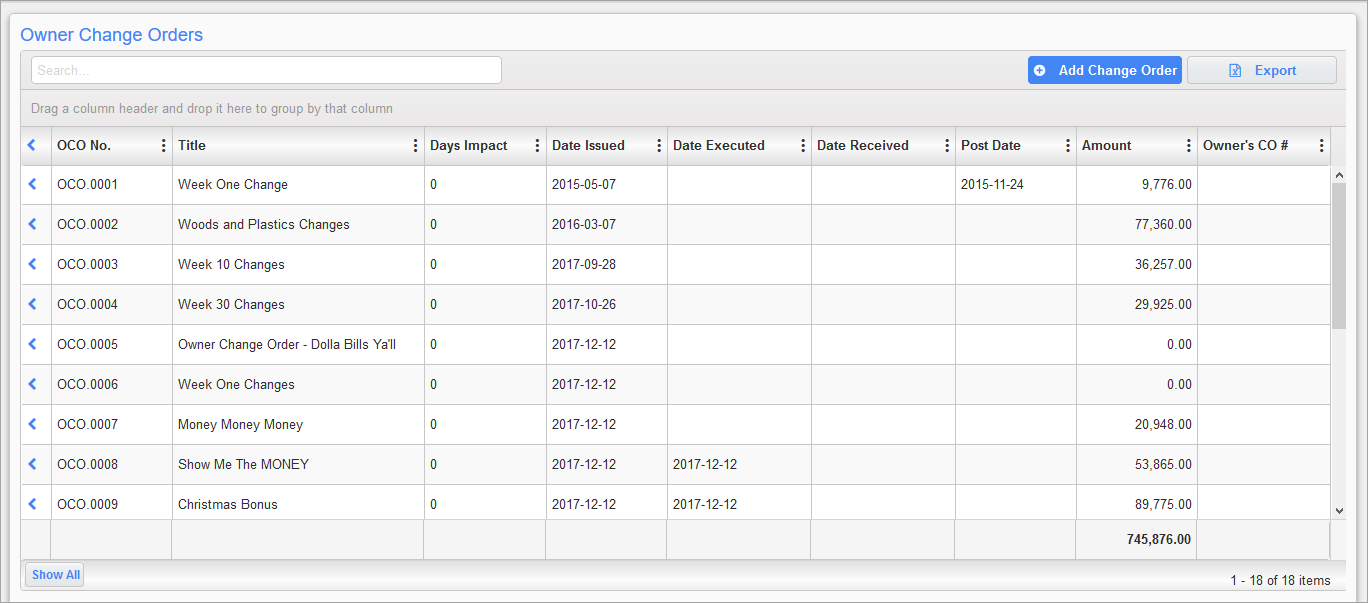
This screen can be used by internal CMiC Field users. It is used to assemble multiple PCIs into one Owner Change Order (OCO).
Change Numbers – Tab
Owner Change Orders; standard Treeview path: CMiC Field > Budget & Cost Management > Owner Change Orders
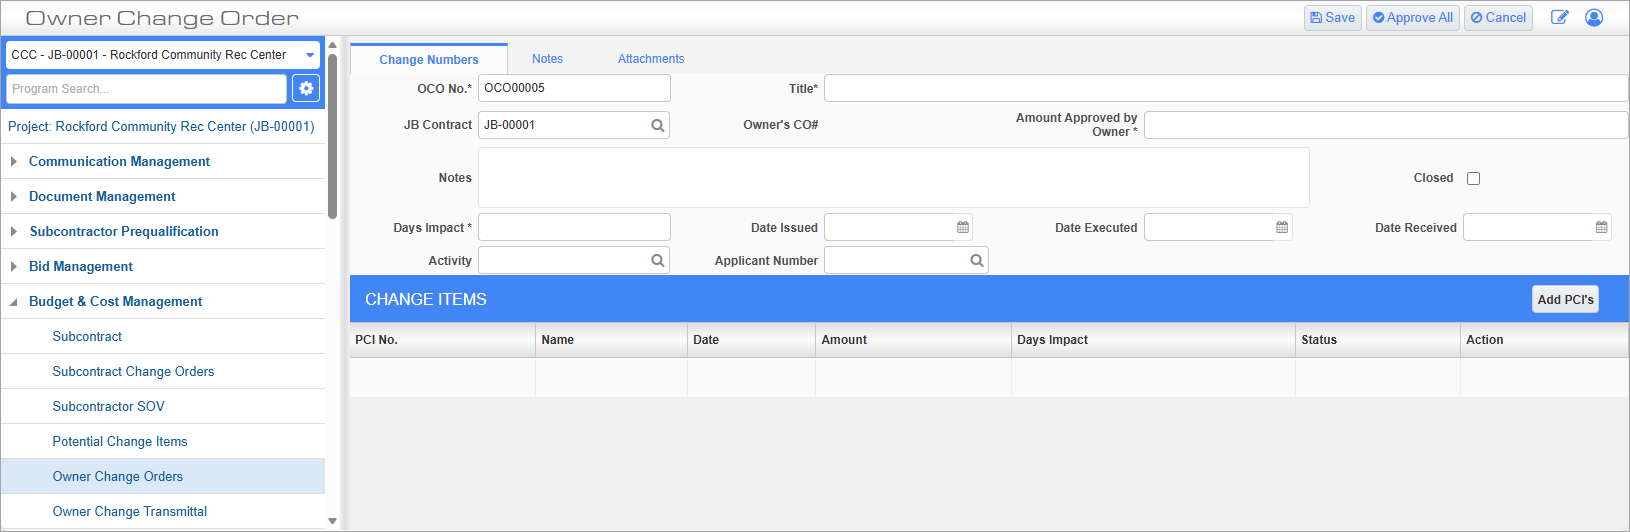
To add a new OCO record, press the [Add Change Order] button in the OCO log. The OCO No. and Title fields are the only required fields.
OCO No.
If auto-numbering has been defined in the Change Management module’s Control screen in Enterprise (standard Treeview path: CM > Local Tables > Control), then the change order number will automatically default into the OCO No. field. The ‘Allow Override’ checkbox is also set on the CM Control screen in Enterprise for OCOs and it is only applicable to CMiC Field. The checkbox is only available if OCO auto-numbering is being used.
Title
Enter a title for the OCO.
JB Contract, Owner's CO#
The JB Contract and Owner's CO # fields were introduced to facilitate the correct reporting of the summary info when there are sub-jobs with their own JB contract. When creating an OCO, the JB contract will default in if the project job has sub-jobs.
If a JB contract for the main job (as opposed to a sub-job) is selected in the JB Contract field, or if this field is left empty, all calculations will work as they were originally programmed. However, if a JB contract is selected for sub-job that has its own JB contract, the calculations will be based only on that JB contract.
If a value is entered in the Owner’s CO# field, it must be unique within the JB Contract code (if any). Calculations of amounts (orig. amt., prior changes, etc.) have been adjusted to be in respect of the JB contract code entered in the JB Contract field in the OCO header. The dates of impact are in respect to both the JB contract code and the 'OCO Completion Date by JB Contract' checkbox found in the Defaults tab of the Project Maintenance screen.
Another setting that should be considered when using the JB Contract field is the 'Allow Only PCIs Associated with JB Contract in OCO' checkbox, located on the Change Management tab of the Company Control screen. This function allows users to filter out available PCIs in an Owner Change Order (OCO) based on the contract selected in the JB Contract field in the OCO header. If the flag is checked, when a user is in the OCO entry screen, only the PCIs that have details that are associated with the contract selected in the JB Contract field in the OCO header are available for selection in the PCI LOV of the OCO. If the control flag is not checked, then the availability of the PCIs in the LOV does not include consideration of the JB Contract field in the OCO header, regardless of whether a contract is selected in the JB Contract field or not (this is original functionality).
Field security can be applied to both the JB Contract field and the Owner’s CO# field. The default value on the JB Contract field is “Hidden” for the *ALL* role.
Amount Approved by Owner
The Amount Approved by Owner field is mandatory and numeric - with the format 16.2 (16 digits before the decimal point, 2 decimal places). It can be secured using field security. By default, the field security is set at “Hidden” on the *ALL* role, so it can’t be seen by any user.
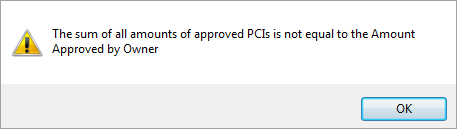
When PCI details are added to the OCO, the sum of the approved lines is validated against the amount in the Amount Approved by Owner field.
This validation takes place when the user presses the [Post] button. If the amounts do not match, the following message is displayed:
Notes
Add a note for the OCO being created. Once the OCO is saved, the Notes tab can also be used for any additional notes.
Closed – Checkbox
When checked, closed OCOs are restricted from being linked to posted PCIs and are excluded from the OCO Number field's LOV on the posted PCI header.
NOTE: The 'Closed' checkbox's visibility and behavior is controlled by the 'Allow Posted PCIs To Be Linked To Unposted OCOs' system option located on the Projects tab of the System Options screen in the System Data module. When this option is enabled, the 'Closed' box is visible and editable on both posted and unposted OCOs. When this option is disabled (default state), the 'Closed' box is not enforced and OCOs remain open and editable (both posted and unposted records).
Days Impact
Enter the number of days due to be impacted by the OCO.
This field is designed for manual entry and is not automatically calculated from the days impact values of the associated PCIs. This is to account for potential situations where PCIs may overlap, ensuring the total impact is accurately represented. For example, if two PCIs, each with a 5-day delay, occur concurrently, the actual total days impact will be 5 days rather than 10.
Once the OCO is posted, this field will be locked to prevent any further edits.
NOTE: If the 'Days Impact on Owner Change Order is Required' box is checked on the Change Management Control File screen (standard Treeview path: Change Management > Local Tables > Control), the OCO record cannot be saved until a value is entered in the Days Impact field. For more information, please refer to Change Management - Control (CM Control File).
Date Issued
Select the date the OCO was issued. By default, the system date is displayed.
Date Executed
Select the date the OCO was executed.
Date Executed
Select the date the OCO was received.
Change Items
This section of the screen contains the PCIs.
[Add PCIs] – Button
![Screenshot of OCO with [Add PCI] button highlighted](../../../../Resources/Images/CMiC_Field/CMICFIELD_OwnerChangeOrder3_756x385.png)
PCIs are added to the OCO by clicking the [Add PCIs] button. A pop-up window will be displayed with a multi-select LOV for selecting the required PCIs. When finished, press the [Accept] button in the pop-up window to add the PCIs to the Change Items section of the OCO. When finished, click on [Save]. The screen will redisplay with a Summary section.
NOTE: Users will receive a validation message if the PCI's detail lines are linked to the same OCO but have different statuses. For more information, please refer to the Status field in PCI Details.
Summary
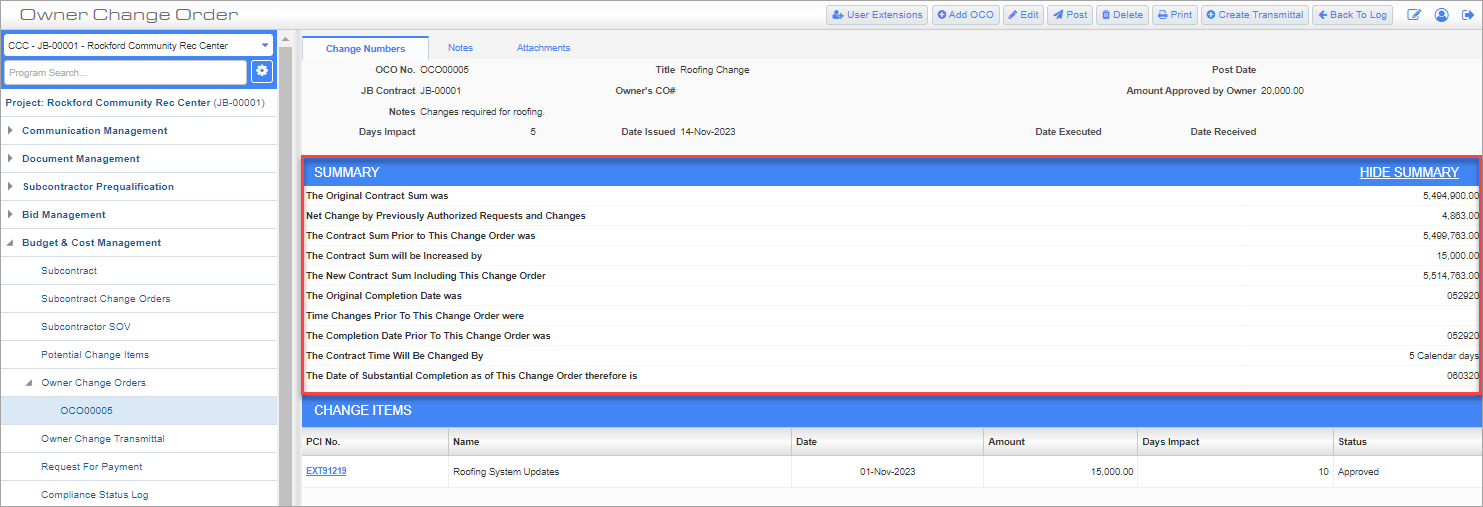
The Summary section is displayed after PCIs are added to the Change Items section. The information displayed in this section is used to display how this OCO affects the total contract.
The Original Contract Sum was
The Original Contract Sum was field is read-only and is calculated based on how the job (and sub-jobs) and project are set up. For more information, please refer to CMiC Field - Calculating Original Contract Amounts in Owner Change Orders.
The Original Completion Date was
The Original Completion Date was field defaults from the End Date field on the General tab of the CMiC Field - Project Maintenance screen. This default can be overridden if the 'OCO Completion Date by JB Contract' box is checked on the Defaults tab of the Project Maintenance screen. The JB contract must be entered in the JB Contract field in the Owner Change Order screen for the end date value to be defaulted from the JB contract.
NOTE: The Date of Substantial Completion as of This Change Order Therefore is field is calculated by using the date set in The Completion Date Prior To This Change Order Was field and adding the number of working days set in The Contract Time Will Be Changed By field. This is assuming the 'Use Working Days for OCO Date' box has been checked in the Project Defaults tab.
For example, if The Completion Date Prior To This Change Order Was field is set to December 28, 2020 and The Contract Time Will Be Changed By field is set to "11 Working Days", then The Date of Substantial Completion as of This Change Order Therefore is field will be January 13, 2021, since weekends and holidays are not counted as working days.
Notes & Attachments – Tabs

Notes and Attachments tabs are also available on the Owner Change Order screen.
OCO Buttons
The buttons displayed on the screen will vary depending on whether the screen is in log view or record view, as well as security privileges assigned.
[User Extensions] – Button
This button is used to apply user extensions. Refer to System Data - User Extensionsfor details on defining user extensions.
[Add OCO] – Button
This button is used to add a new OCO record. In log view, the [Add Change Order] button will be displayed.
[Edit] – Button
This button is used to edit the PCI. For example, to change the status of each PCI.
[Post] – Button
This button is used to post the OCO. The PM Role privilege ‘Post OCO’ is used to restrict the posting of OCOs by disabling the [Post] button. By default, the flag is not set, and will need to be set for the relevant PM role prior to carrying out any OCO posting.
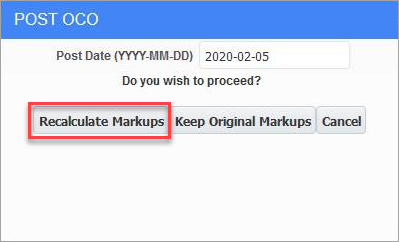
If there are multiple PCIs in the details and they are not all approved at the time of posting, the unapproved items will not be posted, only those that are marked as approved. The system conveniently splits the items that are approved and posted to a new PCI. However, the markups that are included in the OCO are the markups that are calculated on all the line items, not just those that are approved. At this point, users have the option of using the [Recalculate Markups] button in the Post OCO pop-up window to calculate the markups on only those items marked as approved, as shown in the screenshot below. Field security can be assigned to the [Recalculate Markups] button, if required.
[Delete] – Button
This button is use to delete an OCO record.
[Create Transmittal] – Button
![Screenshot of OCO with [Create Transmittal] button highlighted](../../../../Resources/Images/CMiC_Field/CMICFIELD_OwnerChangeOrder4_837x529.png)
This button is used to create an owner transmittal.
[Workflow] – Button
The ‘Workflow Button – OCO’ privilege allows submission of an OCO to Workflow, provided the necessary configuration is in place. The [Workflow] button only shows if a workflow exists, and the privilege is turned on. In addition, if both privileges are set, the [Workflow] button will supersede the OCO [Post] button.
Editing User-Defined Fields on Posted OCOs
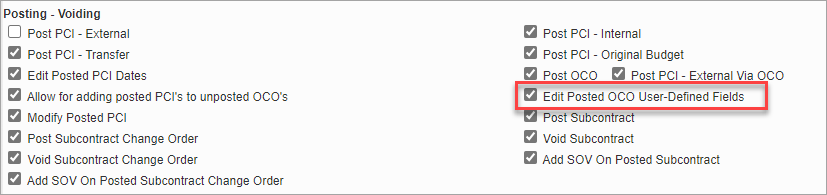
Posting – Voiding section on Project Roles screen
The 'Edit Posted OCO User-Defined Fields' privilege is available in the Posting – Voiding section of the Project Roles screen (standard Treeview path: CMiC Field > Security > Project Roles).

Example of posted OCO with 'Edit Posted OCO User-Defined Fields' privilege enabled
When this privilege is enabled, users can edit the user-defined fields on a posted OCO.

Example of posted OCO with 'Edit Posted OCO User-Defined Fields' privilege disabled
When this privilege is disabled, users cannot edit the user-defined fields on a posted OCO.