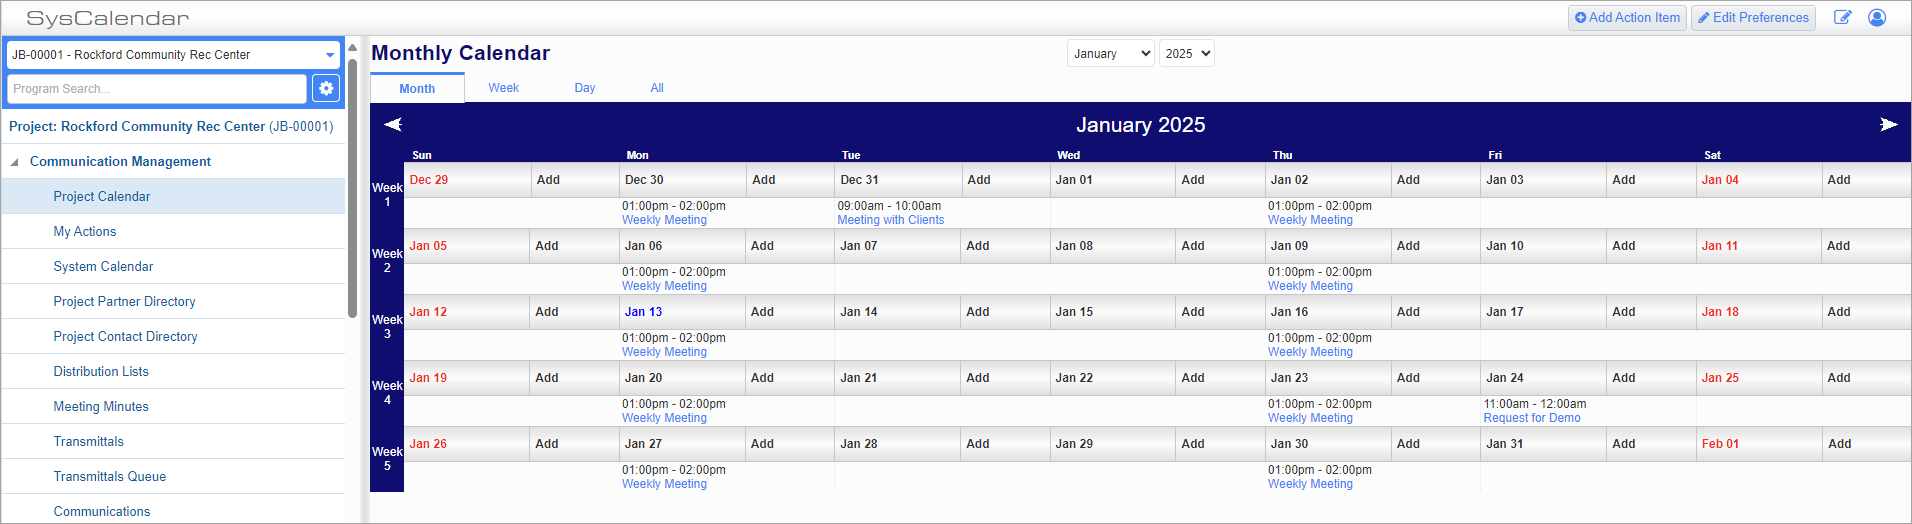
Standard Treeview path: CMiC Field > Communication Management > Project Calendar
The Project Calendar screen can be used to view meetings and other scheduled items relating to the current project. Items can also be added and shared with other project contacts.
Items can be added to the calendar, either with the [Add Action Item] button or the individual Add links on the calendar dates themselves.
Press the Month, Week, Day, or All tabs to change the calendar timescale. The date range for the selected tab can be selected with the Date LOV above the calendar.
Non-working days and the current day appear highlighted in red and blue, respectively. Non-working days can be defined on the Holidays screen in the US Payroll module (standard Treeview path: US Payroll > Setup > Local Tables > Holidays). Weekends are considered non-working by default. To designate a day as non-working or working on this screen, right-click the day and select the setting.
NOTE: Only users with the ‘Maintain non-working days’ privilege will be able to make these changes and it is only available in Project Management (standard Treeview path: CMiC Field > Security > Project Roles).
[Add Action Item] – Button
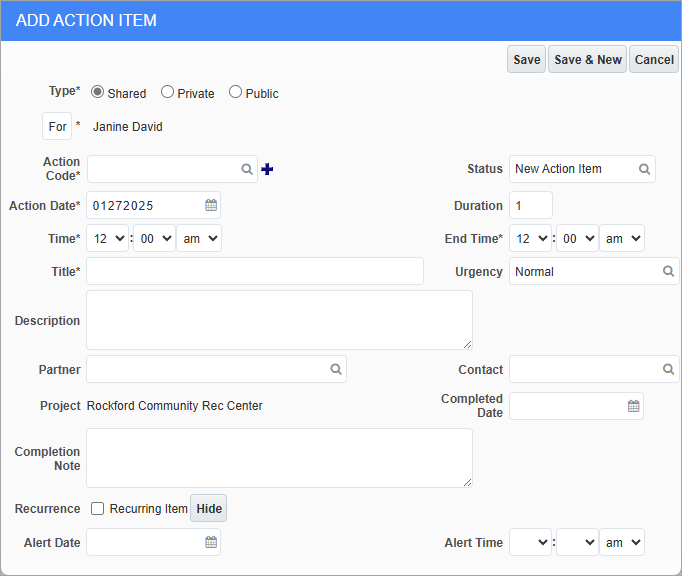
Add Action Item; standard Treeview path: CMiC Field > Communication Management > Project Calendar – [Add Action] button
Type
Select whether the action item is:
-
Private: Items that only the user can see.
-
Public: Items that anyone collaborating on the project can see.
-
Shared: Items that are only restricted to certain people.
[For] – Button
Press this button to select who the action concerns. Multiple people may be notified for the same action. This button is only available if the “Shared” option is selected in the Type field.
Action Code
Enter/select the action code being added. These codes can be set in the Action Item Codes screen in Enterprise (standard Treeview path: Opportunity Management > Setup > Action Item Codes).
Status
Enter/select the status for the action code. These codes can be set in the Action Item Status Codes screen in Enterprise (standard Treeview path: Opportunity Management > Setup > Action Item Status Codes).
Enter/select the date the action begins.
Duration
Enter the number of days the action lasts.
Time, End Time
Enter the start and end times for the action.
Title, Description
Enter the title and full description for the action.
Urgency
Enter/select the urgency code for the action. These codes can be set in the Urgency Codes screen in Enterprise (standard Treeview path: Opportunity Management > Setup > Urgency Codes).
Partner, Contact
Enter/select the partner and contact codes for the action.
Completed Date, Completion Note
Enter/select the date the action was, or is expected to be, completed.
Recurring Item– Checkbox
Check this box if the action is to repeat in the future. Checking this box reveals other options for specifying how often and how many times the action is to repeat. Users will only receive an email notification for the earliest instance of a recurring item to avoid large numbers of redundant emails.
Alert Date, Alert Time
Enter/select when to send an alert regarding the action to all attending persons.
When done press the [Save] button to exit or press the [Save & New] button to commit the current action and begin a new entry. Creating an action item will send an action item notification to the user.
[Edit Preferences] – Button
![Screenshot of Calendar Preferences pop-up launched from [Edit Preferences] button.](../../../../Resources/Images/CMiC_Field/CMICFIELD_ProjectCalendar2.png)
Calendar Preferences; standard Treeview path: CMiC Field > Communication Management > Project Calendar – [Edit Preferences] button
Holidays – Checkbox
Check this box to show holidays on the Project Calendar screen.
Show My Closed Action Items – Checkbox
Check this box to display those actions which have already been closed.
Project Calendar – Checkbox
Check this box to hide personal and shared action items that do not relate the selected project.
Restrict to Company or Business Partner
To restrict the actions displayed on the calendar to a single company or business partner, select a code for this field.
Restrict to Contact
To restrict the actions displayed on the calendar to a contact, select a code for this field.