Overview
In the Checklist Template Maintenance screen, users can create checklist templates at the system level (Checklist Templates tab), they can assign system level templates to projects, or they can create or modify project-specific checklists (in the Project Checklists tab). This article includes details on the basic security setup required to use Checklist Template Maintenance as well as the functionality around building and managing templates.
This screen will run alongside the existing Checklist Maintenance screen until it is fully deprecated, and works with the new CMiC Field - Project Checklists screen.
Setup
Adding or Creating the Menu Item

Checklist Template Maintenance can be found in the standard Treeview menu under: CMiC Field > File Maintenance > Local Tables > Checklist Template Maintenance.
If it's not already in your Treeview menu, it can be added through CMiC Field - Menu Maintenance by dragging the node over from the standard menu to the desired location.
You can also add Checklist Template Maintenance to your menu by creating a custom menu node with the following property values:
-
Type: URL
-
Value: ../PmCheckListMaint/Index.jsp?allChklstTypes=Y&classicModeFlag=N
-
Icon Type: Document
-
Target: Content Frame
Please note that custom menu nodes do not apply the standard menu access security settings. Instead, they are unrestricted by default, but once Assigned to Security Role(s) - they will only be accessible by the assigned roles.
Assign the Checklist Templates Maintenance Menu Item
To view the new Checklist Maintenance screen in the Treeview, assign access to the Checklist Template Maintenance menu item in the Role Maintenance screen. This is distinct from the Checklist Maintenance menu item, used to gain access to the previous Checklist Maintenance screen.
Users will also need program access to "Checklist Maintenance" via their Security Role(s).
Assign the Checklist Maintenance Program Access
To use Checklist Template Maintenance, users will also need program access to "Checklist Maintenance" via their CMiC Field - Security Roles. This setting is shared with the classic version of CMiC Field - Checklist Maintenance (Classic).
Assign the Checklist Admin and Project Checklist Admin Privileges
In order to do more than simply view Checklist Template Maintenance and the checklist templates there, users will also need either the "Checklist Admin" or "Project Checklist Admin" privileges.
The Checklist Admin privilege serves as a system level admin privilege and allows users to create, edit and assign checklist templates, as well as modify any related settings, at both the system level (Checklist Templates) as well as the project level (Project Checklist). Additionally, the Checklist Admin privilege controls the template locking at the system level and project level, as well as the 'Link to Parent Template' checkbox at the project level.
The Project Checklist Admin privilege serves as a project level admin privilege and allows users to assign system level templates to projects where the user is a project contact. It also allows users to create project-specific checklists, edit project level templates and modify the security settings for project level templates (e.g., create, edit, delete).
NOTE: Field level security also exists on the Role Maintenance screen, if required.
Checklist Templates Library – Tab

Checklist Templates; standard Treeview path: CMiC Field > File Maintenance > Local Tables > Checklist Template Maintenance - Checklist Templates Library tab
Creating or Editing Checklist Templates
Checklist Templates; standard Treeview path: CMiC Field > File Maintenance > Local Tables > Checklist Template Maintenance - Checklist Templates tab
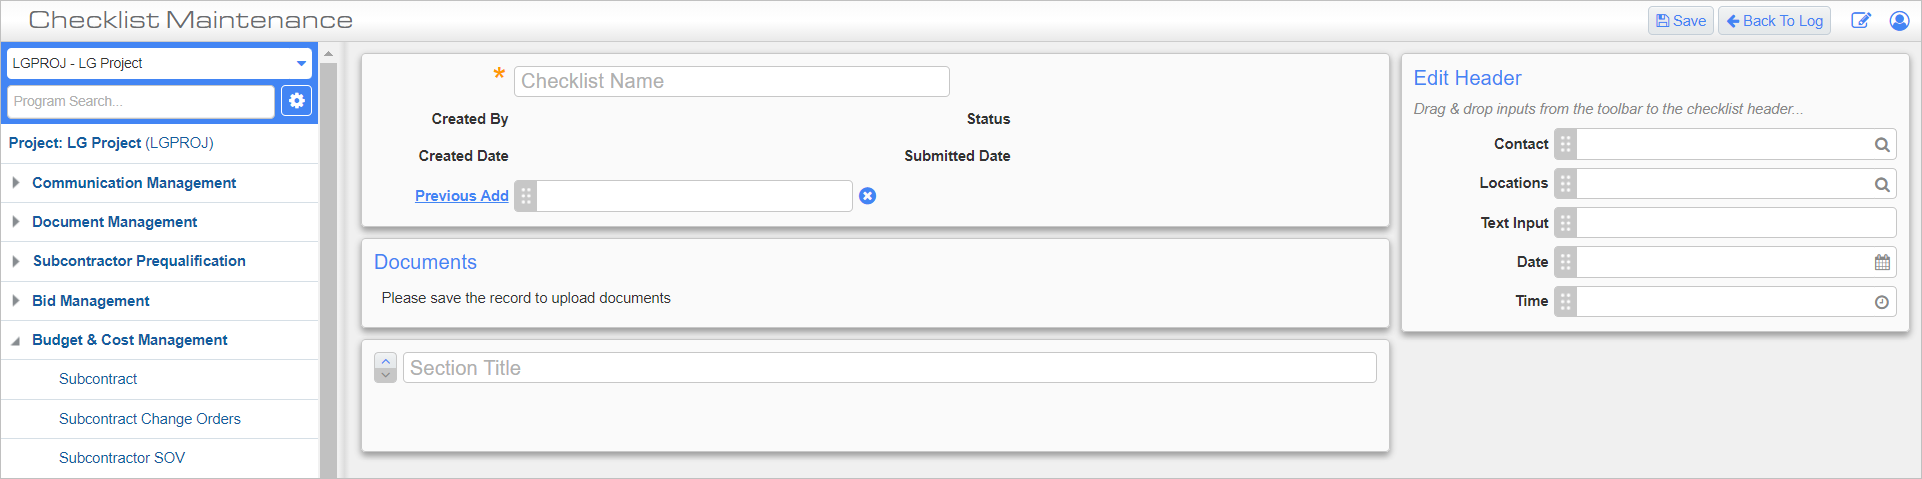
Within the template editing screen, there are three areas in the central part of the screen: the header of the checklist which contains fields for information such as the name of the checklist, and record-specific information such as the status of the record and the submitted date; the documents ribbon which allows for instructional documents to be attached; and everything below the documents ribbon is the body of the checklist where sections and questions can be added to the template.
There is also an area in the right portion of the screen where an adaptive toolbar is displayed. The options available in this menu will depend upon what part of the template edit screen the user is interacting with.
Documents Ribbon
Once the checklist template has been saved, Instructional Documents can be added to the Documents ribbon, for reference during checklist execution.
The default document type for instructional documents being added to the Documents ribbon is read from the document type set under the "Media" PM object type in the Document Types tab on the Project System Options screen. For more information, please refer to CMiC Field - Project System Options - Document Types - Tab.
Edit Header
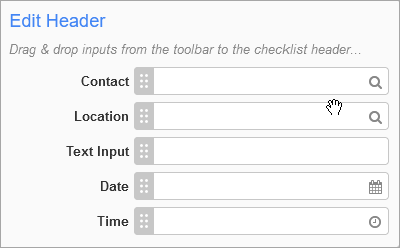
After clicking inside the header area - the toolbox will display "Edit Header". The header contains the name of the checklist template as well as four default fields that populate automatically when a new record is created. Additional header fields can also be added. These additional fields come in a handful of different types: contacts, locations, text, date, and time. To add additional header fields simply click on the desired type and drag it into the header section, then click on the label to rename the field. Each of these field types can be added multiple times and renamed to better reflect the intended data that the field is meant to capture.
Edit Section
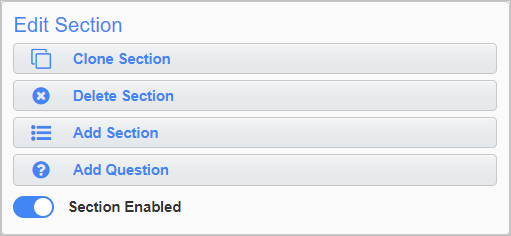
This window appears after clicking within a section (but not within a question, which will bring up the Edit Question toolbox). To edit the section title, simply click inside the title field and start editing. The order of sections can also be changed by pressing the up and down arrows to the left of the Section Title field. Every checklist must contain at least one section.
Clone Section
Creates an identical section below the selected section. This will also clone any questions associated with the section.
Delete Section
Deletes the currently selected section. A dialogue box is presented to confirm this operation. This can also be achieved by clicking on the X-button to the right of the section title.
Add Section
Creates a new blank section.
Add Question
Adds a new blank question to the current section.
Section Enabled
This switch allows users to enable or disable sections without deleting them.
Edit Question
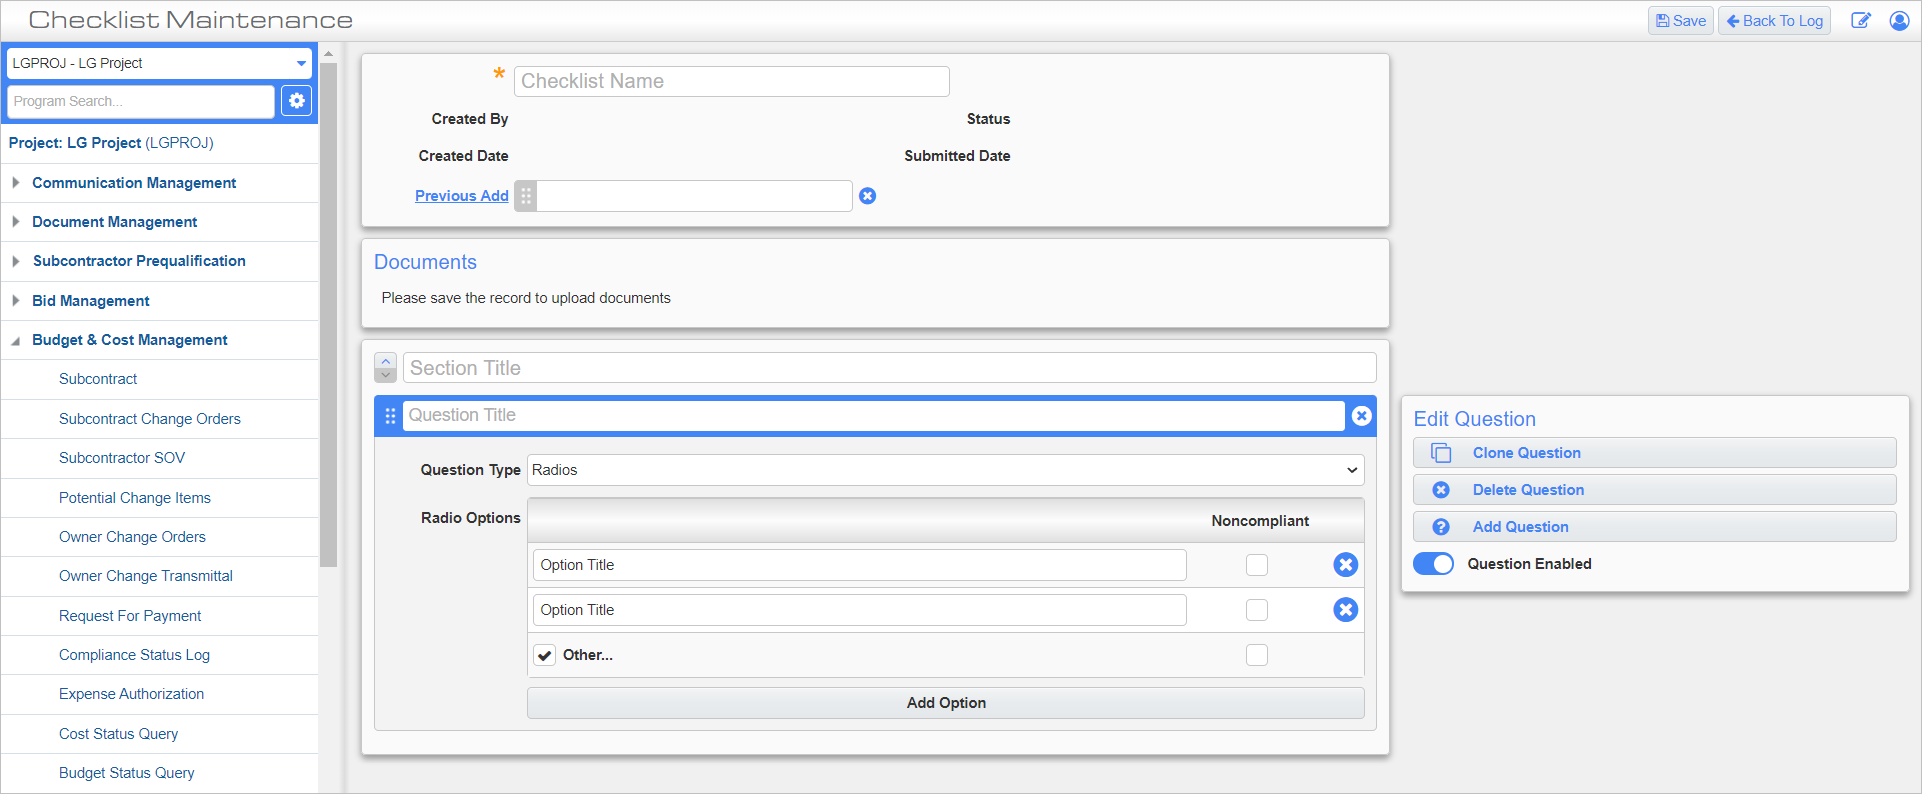
Clone Question
Creates a duplicate of the selected question within the same section.
Delete Question
Deletes the selected question. A confirmation dialogue is presented before completing this operation. This can also be achieved by clicking the X-button to the right of a question title.
Add Question
Adds a new blank question to the current section.
Question Enabled
This switch allows users to enable or disable questions without deleting them.
Question Title
Select the title field to enter or modify the question.
Question Type
Select from the drop-down menu the desired question/response type.
Checkbox
Allows users to select as many or as few of the available options as they would like. If the "Other" option is enabled, an additional option will be displayed with a blank text field, allowing the user to enter an option that is not pre-defined.
Radio
Allow users to select one, and only one of the available options. Radio question can also include the "Other" option.
Dropdown
Like the radio option, drop-down type questions allow for only one answer to be selected. However, drop-down's have a more compact display and cannot include an "Other" option.
Short Answer
Allow the user to freely enter text.
NOTE: There is a 4000 character limit for both the short answer response fields, and the free entry values for the "Other" options .
Date & Time
Can be set to allow a date and/or time value to be entered.
Numeric
Allows users to enter a numeric response.
Additional settings are provided for data validation and display formatting. Select "Integer" (to exclude decimals) or "Float" (for arbitrary precision) from the Number Type field's drop-down menu. Users may also enter optional minimum and maximum parameters in the Min and Max fields, or leave these fields blank. The lowest possible valid minimum is -2,147,483,648 and the greatest possible maximum is 2,147,483,648.
The numeric question will show what type of number is expected/required with a placeholder value reflecting the data validation requirements. For example, for a question requiring an integer number type with both minimum and maximum values specified, the placeholder value will be "Requirements: Integer, from 10 to 15,001".
NOTE: For the Checkbox, Radio, and Drop-down question types, as many response options as desired can be added by pressing the [Add Option] button displayed at the bottom of the selected question.
Noncompliant – Checkbox
This checkbox only appears for radio and drop-down question types. Check this box to mark an answer as non-compliant. When a non-compliant answer is selected during checklist execution, the user will be prompted to create an issue. Non-compliant answers cannot be selected without creating an Issue record.
Template Specific Icons
Template Specific Icons
In the far right columns of the Checklist Templates log, there are two icons that apply to the specific templates in the corresponding row.
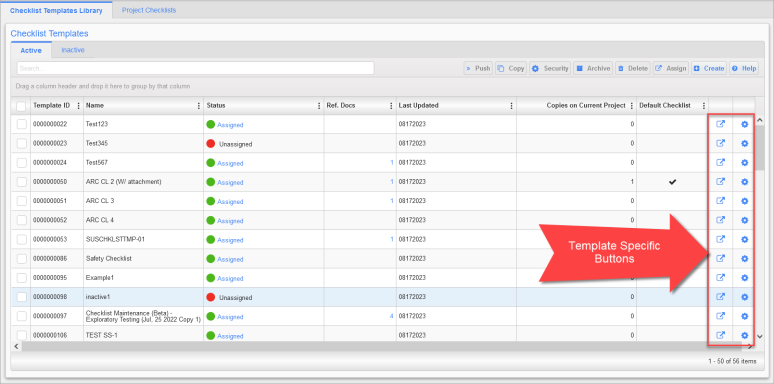
Quick Assign Icon
The Assign icon (![]() ) is used to assign the corresponding template to the current project.
) is used to assign the corresponding template to the current project.
Security Icon
The Security icon (![]() ) is used to assign security privileges to a checklist template. Refer to Security Settings for more information.
) is used to assign security privileges to a checklist template. Refer to Security Settings for more information.
Security Settings
Security privileges related to a checklist template can be viewed or modified by pressing the Security icon (![]() ) next to a particular checklist template.
) next to a particular checklist template.
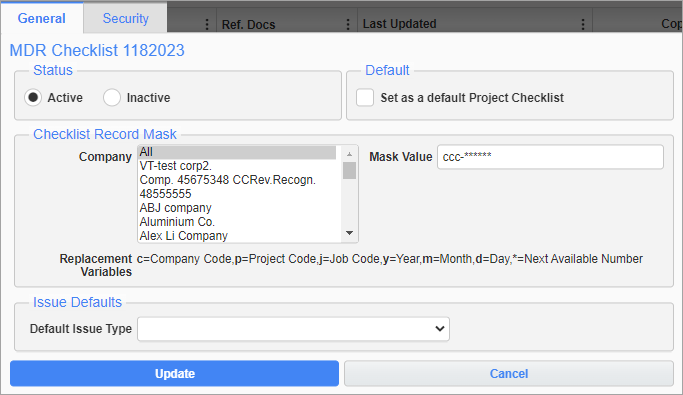
This pop-up consists of two tabs. The General tab is used for setting up default values relating to checklist execution and the Security tab is used for assigning basic Security Role privileges.
General – Tab
Checklist Security; standard Treeview path: CMiC Field > File Maintenance > Local Tables > Checklist Template Maintenance - Security Icon - General tab
Status
Active, Inactive – Radio Buttons
Select whether the checklist is active or inactive.
Default
Set as default Project Checklist – Checkbox
Select whether the checklist should be the default checklist for the project. When checked, the checklist template will automatically default to any new projects that are created under any company.
NOTE: This checkbox is not visible from the Security pop-up of a project checklist.
Checklist Record Mask
At the system level, mask values can be set for individual companies, all companies, or a subset of companies by selecting them from a list of values. The appropriate mask value will be then carried over to a project when the template is assigned. At the project level, the mask value for the template on the current project can be viewed or set in the same location.
Company
Select an individual company, multiple companies, or all companies being assigned a mask. To select multiple companies, press and hold the Ctrl key on your keyboard and click on each company using your mouse. To update all companies at once, select “ALL”
Mask Value
Enter or update a mask for the selected company or companies.
Replacement Variables
Pre-defined replacement variables can be used to define a mask. Available codes are conveniently displayed in this field.
For example: c=Company Code, p=Project Code, j=Job Code, y=Year, m=Month, d=Day, *=Next Available Number
Issue Defaults
Default Issue Type
Select the default issue type from the drop-down menu. When assigning the checklist to a project, the corresponding default issue type is copied.
When viewing this tab for a Checklist Template at the Project level, there will also be an option to choose a default issue contact. This user will automatically populate the "To" field in all new issues created while executing that checklist.
Security – Tab
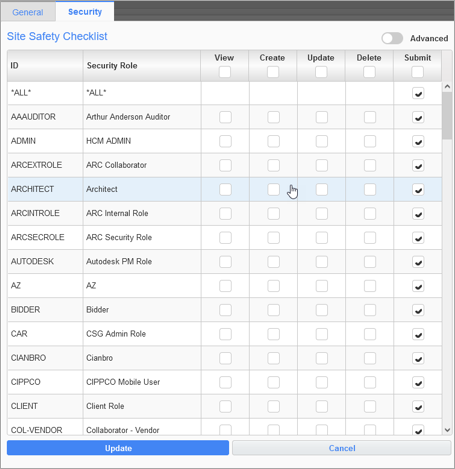
Checklist Security; standard Treeview path: CMiC Field > File Maintenance > Local Tables > Checklist Template Maintenance - Security Icon - Security tab
This tab can be used to assign security privileges relating to checklists. For more information on security roles in CMiC Field, please refer to Security Roles.
Template Locking
Once a template is created, users are able to lock the entire template or sections of it to prevent further changes to the template. System and project templates can be locked at the header level or item level. Locking a template at the header level locks the entire checklist template.
NOTE: If a system-level template has any locks enabled and is assigned to a project, the project-level template will automatically inherit those locks.
Locking Checklist Header
The entire template (including header and items) can be locked using the header lock. This prevents any editing to the template at both the system and project levels.

Template header unlocked

Template header locked
Locking Checklist Item
If a template is unlocked at the header level, individual checklist items can be locked. Locking at the item level prevents changes to the question type, question value, response options, and the question’s active status (i.e., Question Enabled toggle).

Template question unlocked
NOTE: If a child item (e.g., Question) is locked (regardless of whether it is enabled/disabled), then the parent section cannot be deleted. If a child item is locked and enabled, then the parent section can't be disabled.
Checklist Templates Toolbar
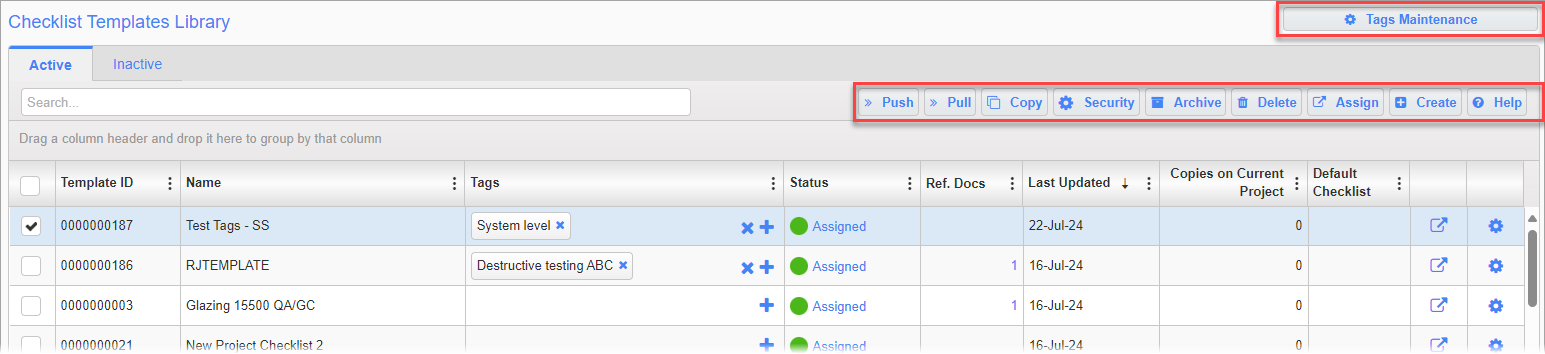
Checklist Templates; standard Treeview path: CMiC Field > File Maintenance > Local Tables > Checklist Template Maintenance - Checklist Templates
Aside from the [Create] button, all of the toolbar features operate on the selected checklist templates (i.e., the templates which have the box in the left-most column checked).
[Tags Maintenance] – Button
Press the [Tags Maintenance] button to launch the Checklist Tags Maintenance pop-up, to create new tags or edit existing tags at either the system or project level. For more information, please refer to CMiC Field - Using Checklist Maintenance Tags.
[Assign] – Button
Once a checklist template has been created, it can be assigned from the template library to the current project. This can be done by hitting the Assign To Project icon ( ) for an individual checklist template or by selecting multiple templates and pressing the [Assign] button in the toolbar.
Templates must be assigned to a project before they can be used to create checklist records. Templates can be assigned to a project (and customized) as many times as desired. The number of copies of a template on the current project is displayed alongside a drill-down menu with a list of all projects the template has been assigned to; the list of projects can be accessed by clicking on the "Assigned" link in the status column.
[Push] – Button
The Push function allows any selected checklist templates to be assigned to multiple projects in a single operation. Once the user clicks the [Push] button they will be presented with a pop-up.
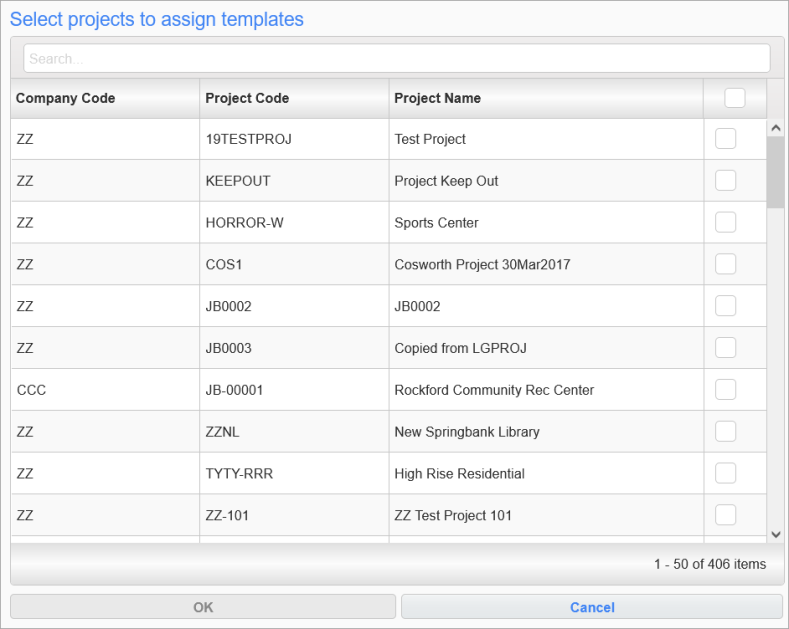
Checklist Security; standard Treeview path: CMiC Field > File Maintenance > Local Tables > Checklist Template Maintenance - Push Button
Select the projects to assign the template(s) to and then press [OK]. Press [OK] again when prompted to confirm the assignment.
[Copy] – Button
Using this button creates duplicates of selected templates. The copied versions will have the current date appended to the template name.
[Delete] – Button
One or more selected templates can be deleted using this button.
NOTE: When using the [Delete] button, checklist templates that do not have any child records are simply deleted. However, checklist templates which have child records will be rendered inactive. These templates can be viewed (and reactivated) from the Inactive tab for that project checklist. To fully delete a project checklist template, it's necessary to first delete all of that template's child records on the project.
[Archive] – Button
One or more selected templates can be archived. They will be flagged as inactive and can be seen under the Inactive tab.
[Security] – Button
This button opens a pop-up that allows for the template security settings to be batch edited. This functions the same as the Security tab described earlier except it can apply the privileges to multiple checklist templates at one time and will never show the current settings of any selected templates.
Project Checklists – Tab
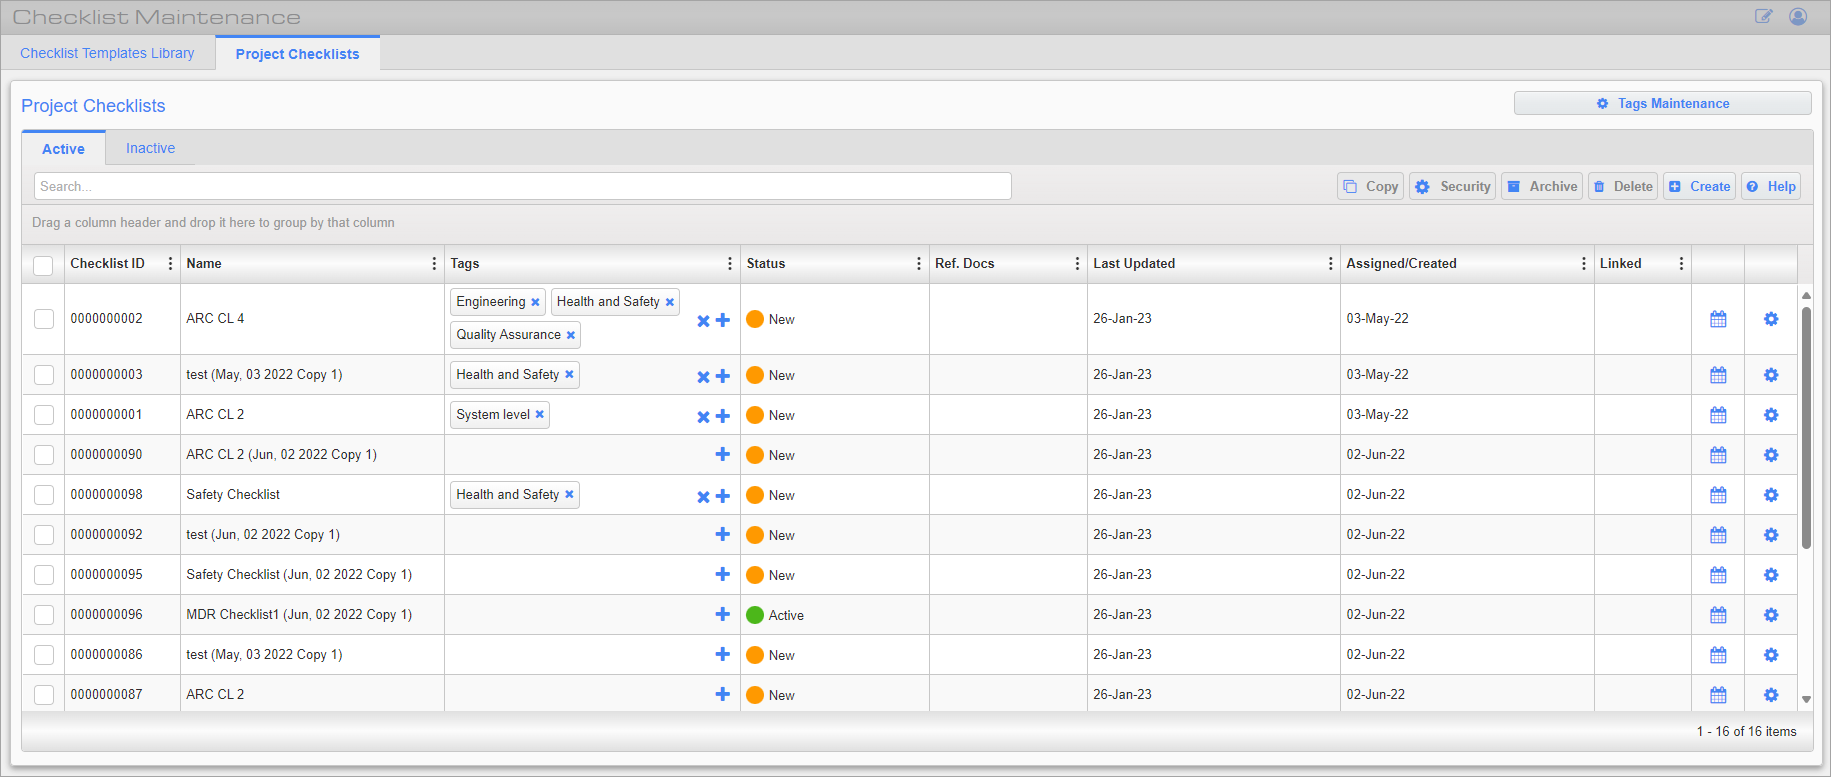
Project Checklists; standard Treeview path: CMiC Field > File Maintenance > Local Tables > Checklist Template Maintenance - Project Checklists tab
Once a template has been assigned to the current project, it appears in the Project Checklist tab. Project checklists can be configured and edited in the same way as checklist templates.
Editing Project Templates
Users with either the Checklist Admin or Project Checklist Admin privileges can edit checklist templates assigned to the current project. Such users can add questions and flag existing ones as "Disabled". Doing so will prevent the question from appearing during checklist execution. Users can also add new header fields.
Creating Project Specific Checklists
Users with either Checklist Admin privilege can also create checklists at the project-level that are not tied to a system-level template. This allows project teams to create checklists to capture project-specific information that would not be relevant to other projects.
Creating a project-specific checklist is done in the same way as a checklist template. The only difference being that project checklists cannot be transferred to other projects.
Assigning Checklists for Completion
Press the Calendar icon (  ) to bring up the Assignment screen, shown below, which allows Checklist templates to be assigned for completion either once or on a recurring basis. Any existing assignments for that Checklist template will also be displayed here. Assignments added here will create Action items for the assigned users that will appear in the Project Calendar and CMiC Field - My Actions.
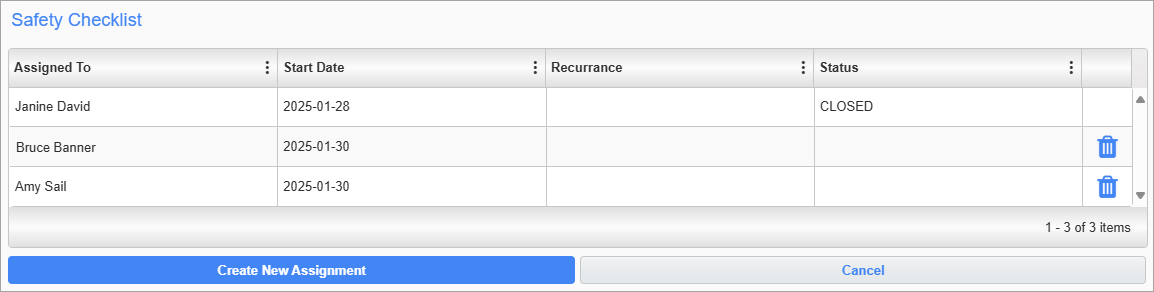
When a user submits a checklist record of the corresponding type, the system will close the action item. Once closed, the action item can no longer be deleted.
If there are multiple action items related to the template, the system will close the action item with the earliest due date (i.e., the first open action item or the most overdue action item if the due date has already passed) regardless if the user has submitted an action item with a later date.
[Create New Assignment] – Button
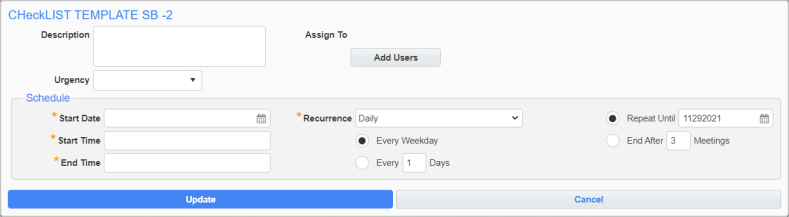
Press this button to assign a checklist for completion. Users will be presented with the screen shown above. One or more users can be included in the assignment with the [Add Users] button. Each of the selected users will receive identical action items based on the other selected settings. By selecting from the options in the Recurrence field's drop-down menu, assignment to these Action items can be set to repeat at a specified regularity for an assigned period of time. Press [Update] to complete the process.
Linking to Parent Template
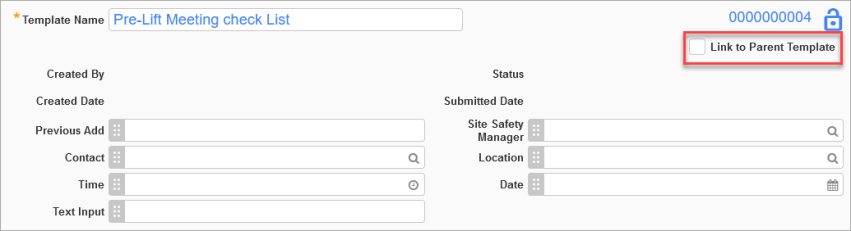
The 'Link to Parent Template' checkbox controls whether changes made to a system-level parent template are pushed to project-level versions of the template. When a system-level checklist template is assigned to a project, the 'Link to Parent Template' checkbox will appear on the project-level checklist and is enabled by default. When checked, any changes made to the system-level template will be inherited by any linked project-level templates.
NOTE: Sections inherited from the parent template will not be editable in the project template.
Editing a Linked Project-Level Template
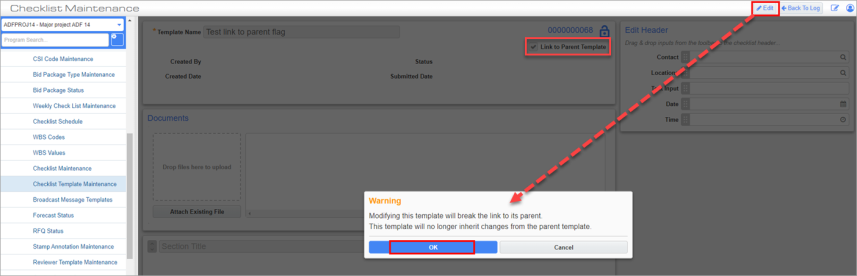
If an attempt is made to edit a project-level template that is linked to a parent-level template, a Warning message will be issued to indicate that modifying this template will break the link to its parent template and will prevent it from inheriting any future changes. To proceed with the edits, clicking [OK] in the Warning message will put the project-level template in Edit mode. Once in Edit mode, the ‘Link to Parent Template’ checkbox will be unchecked and the project-level template will be unlinked. Edits can now be made to the unlinked project-level template.
While in Edit mode, if the ‘Link to Parent Template’ checkbox is re-checked, the Warning message that appears next will depend on whether child checklist items exist on the project-level template.
If no child checklist items exist, then the following pop-up message will appear
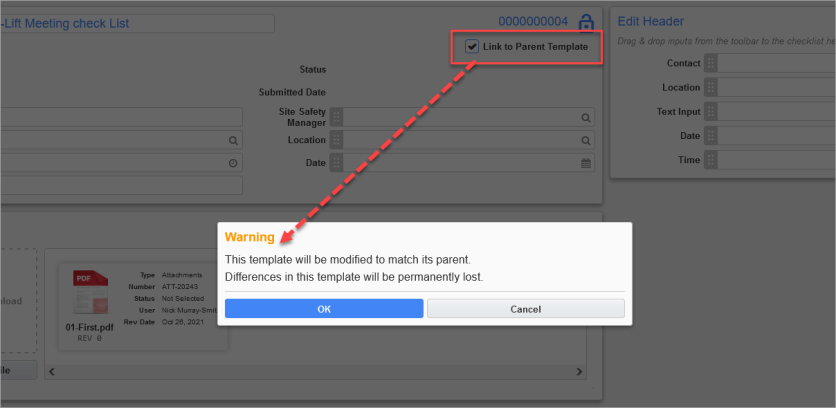
Clicking [OK] will modify the project template to match the parent template. Prior changes made to the project template will be lost.
If child checklist items exist, then the following pop-up message will appear.

Clicking [OK] will modify the project template to match its parent template. However, to preserve child checklist items, a branched copy of the project template with all its differences from the parent template will be made (to which all of the template's children will be linked).