Overview

Standard Treeview path: CMiC Field > File Maintenance > Menu Maintenance
Menu Maintenance can be used to customize the CMiC Field Treeview and reflect the actions taken by a user on a daily basis. It can also incorporate web pages (internal and external) and logs.
The Menu Maintenance screen can be reached at any point by pressing the Settings icon ( ) below the search bar at the top of the Treeview.
The Menu Maintenance screen has the following features:
-
Allows for editing menus by project in PM and by user in all the other modules (OM, HR, DM)
-
Allows for adding standard and custom logs, internal and external URLs to the menu
-
Drag & Drop between the standard menu and the custom one
-
Drag & Drop within the custom menu
-
Drop on an item adds the dragged item as a child
-
Holding Shift while dragging the items will place them before the drop target
-
Multi-Select functionality
-
Right-Click menu functionality
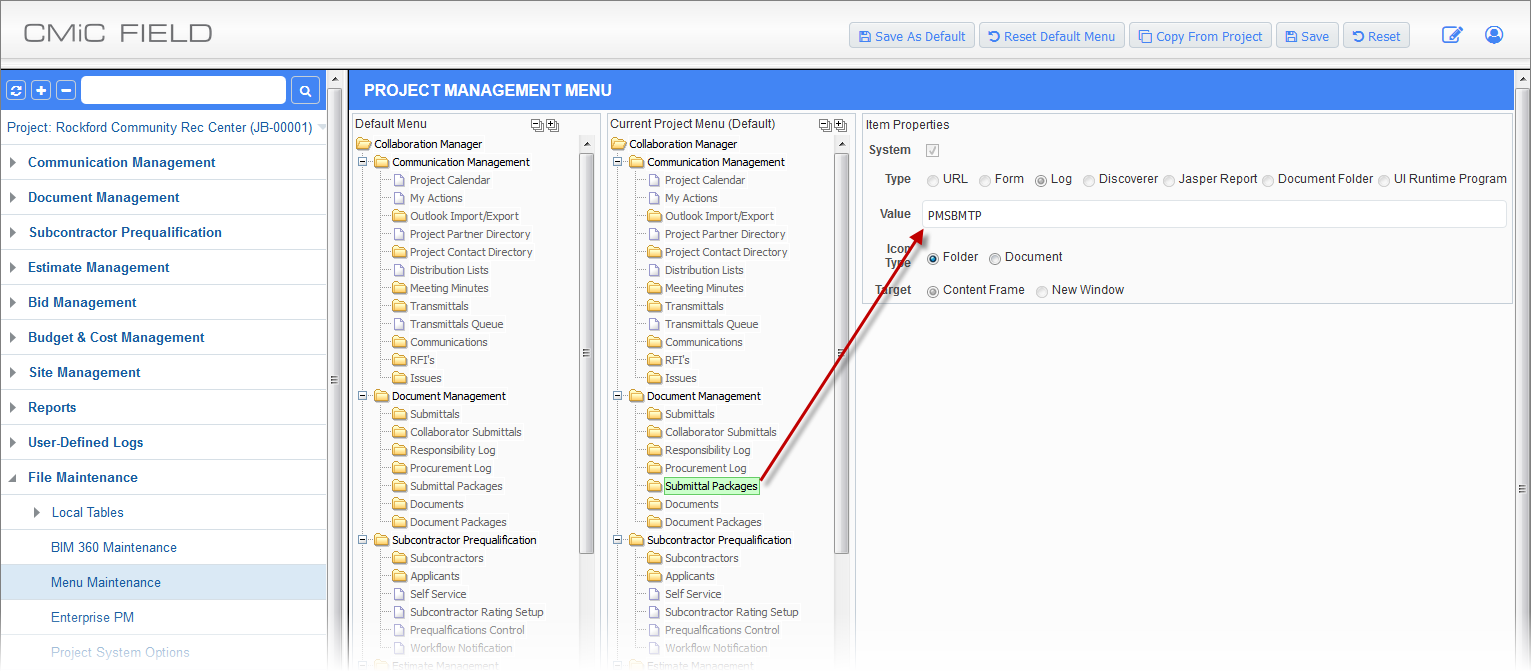
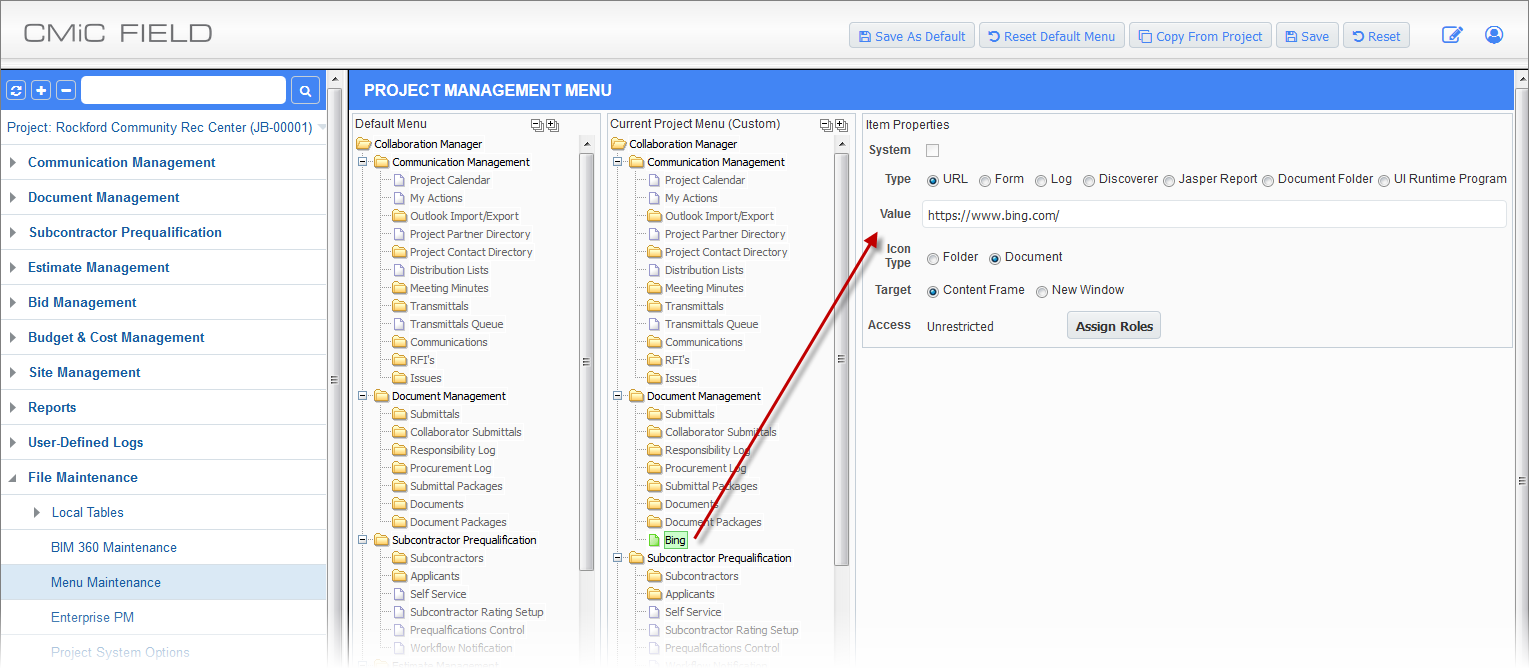
In the screenshot shown above, for example, the Default Menu is the standard CMiC Field Treeview showing all the functions available and the various lower levels.
The Current Project Menu is your work-area for dragging items from the standard menu and dropping them wherever you wish in the current project area. If you click on an item in the Current Project Menu, it becomes highlighted in green, and the Item Properties (rightmost frame) will show the various property values for that item. As is shown by the red arrow, the item selected is a system file of ‘Log’ type. The icon pictured for this menu item is a ‘Folder’, and if it should be selected from the Project Treeview on saving, the log will come up in the ‘Content Frame’.
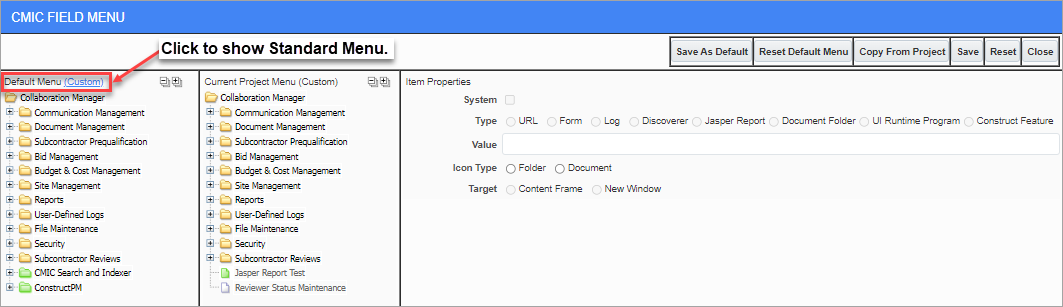
Customized Default Menu
If the Default Menu is customized, a Custom link will be displayed. Click the Custom link to display the Standard Menu.
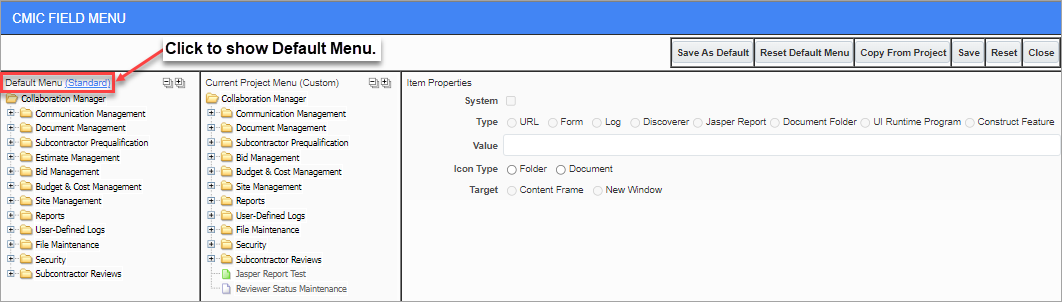
Customized Standard Menu
The Standard/Custom link is used to toggle between the Default Menu and the Standard Menu.
NOTE: Having multiple copies of standard logs in the Treeview menu is not supported. Please ensure that only a single copy of system logs are present in your Treeview menu.
Right-Click Functionality
Click the right mouse button on a node while in the ‘Current Project Menu’ area. A similar screen to the one pictured below is shown.
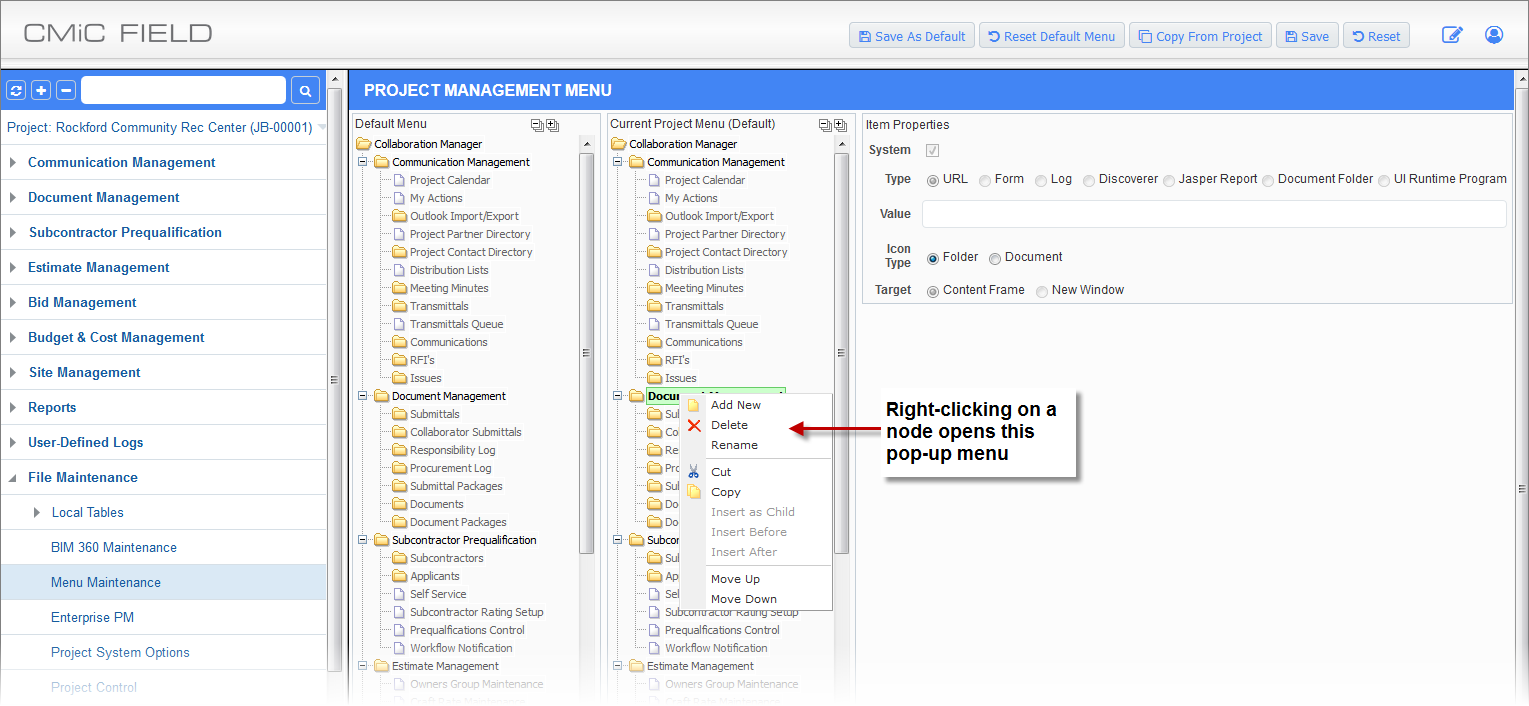
From this pop-up menu, you can add a new node, delete an existing one, rename, cut, copy, etc. Actions become enabled or disabled depending on the node level you are on.
EXAMPLE:
If you click on ‘Add New’, the New Node text comes up and you can give the node an appropriate name, e.g. Bing. Then select type = URL; value = https://www.bing.com/. Set the icon type = Document, and the Target = Content Frame.
Once you have completed re-configuring your CMiC Field Treeview, press the [Save] button.
You can also copy the Treeview configuration from an existing project by pressing the [Copy From Project] button.
Refresh your session so that the change can take effect.
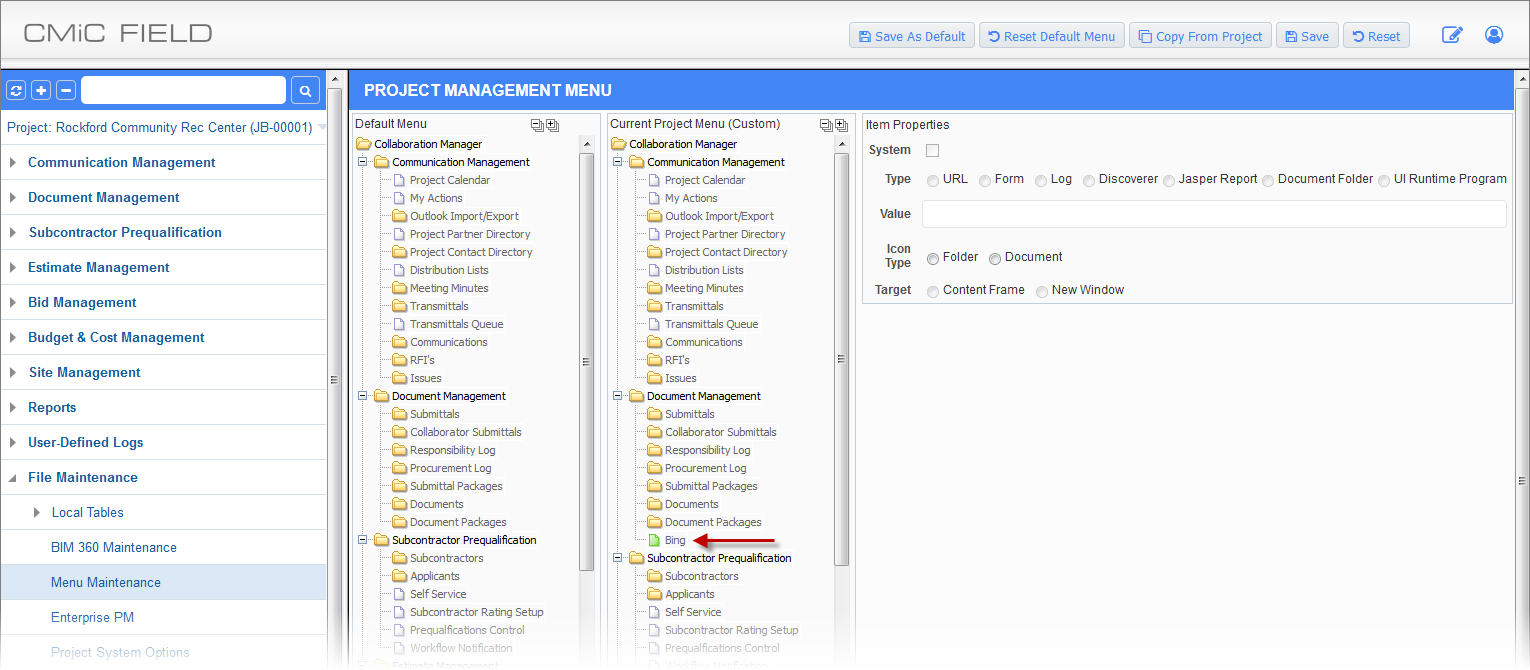
The custom Treeview created above, when saved and the session refreshed, is shown in the following screenshot.

Resetting Custom Treeview to the Standard (Default)
![Screenshot of [Reset] button on Menu Maintenance.](../../../../Resources/Images/11_File_Maintenance/Menu_Maintenance_7.png)
To reset the CMiC Field Treeview back to the standard (default) look, go to the Menu Maintenance of your custom menu and click the [Reset] button.
Security Settings for Menu Maintenance
Security Roles; standard Treeview path: CMiC Field > Security > Role Maintenance – Assign Privileges
Resetting Custom Treeview to the CMiC Standard
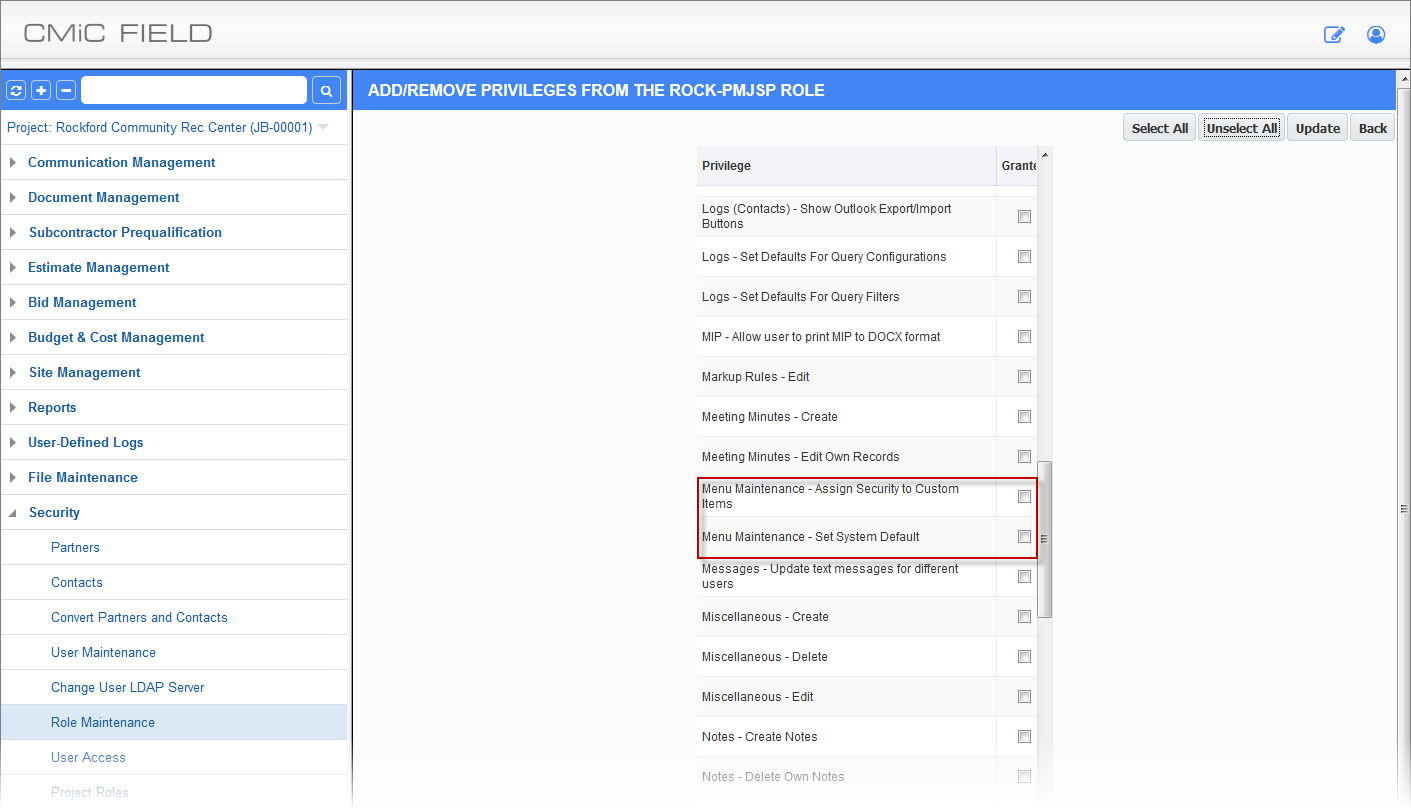
The privilege ‘Menu Maintenance - Set System Default’ allows the user with this privilege to save a system-wide default menu configuration. Two buttons on the Menu Maintenance screen become enabled for the user with this privilege - they are [Save as Default] and [Reset Default Menu].
![Example of [Save As Default] and [Reset Default Menu] buttons on Menu Maintenance screen](../../../../Resources/Images/11_File_Maintenance/Menu_Maintenance_9.png)
Example of [Save As Default] and [Reset Default Menu] buttons on Menu Maintenance screen
The [Save as Default] button saves the current menu as the new system-wide default menu. The [Reset Default Menu] resets the system default menu back to the CMiC Default.
Assigning Security to Custom Items
The CMiC Field security privilege ‘Menu Maintenance – Assign Security to Custom Items’ can be set at either the role or the user level. When checked, the user with this privilege will be able to assign security roles to custom items defined in Menu Maintenance.
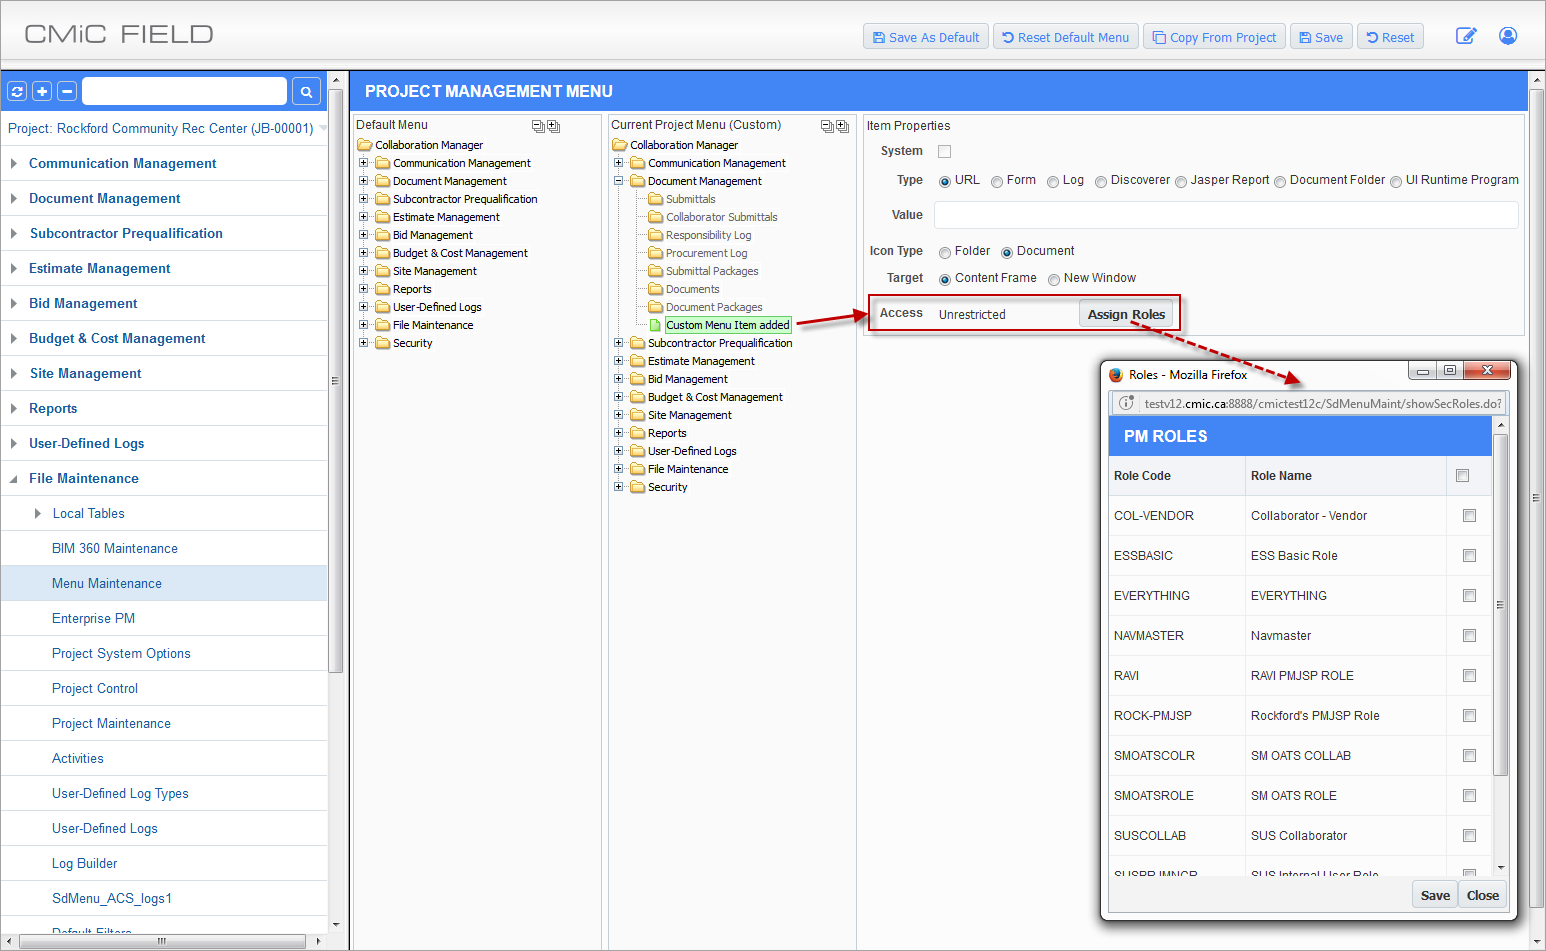
Example of assigning security to Custom Menu Item
Users with the privilege will have access to the [Assign Roles] button which is displayed when a custom menu item is selected in Menu Maintenance.
If no roles are assigned to a custom menu item, it is available to anyone. Otherwise, it is only available to users with the selected roles.
Defining Custom Menu Items for Documents and Document Packages
An added feature to the Menu Maintenance is the ability to launch specific document and document package types from the CMiC Field Menu, using the Menu Maintenance custom item definition, and passing the document type (defined in Document Options), as a parameter in the Value property of the item:
PMDOCMNT&otherparams=p_doc_type_code=DRAW+term=cmicweb.res
NOTE: The forms SHOULD NOT be set up to load in the CONTENT frame, use NEW WINDOW.
Additional Note: The parameter term=cmicweb.res only needs to be used in conjunction with "otherparams". If "otherparams" is not used, it is not necessary to specify the term=cmicweb.res part.
Example:
For Documents: PMDOCMNT&otherparams=p_doc_type_code=DRAW+term=cmicweb_res

Example of Defining Custom Menu Items for Documents
For Document Packages: PMDOCFM&otherparams=p_doc_type_code=DRAW+term=cmicweb.res
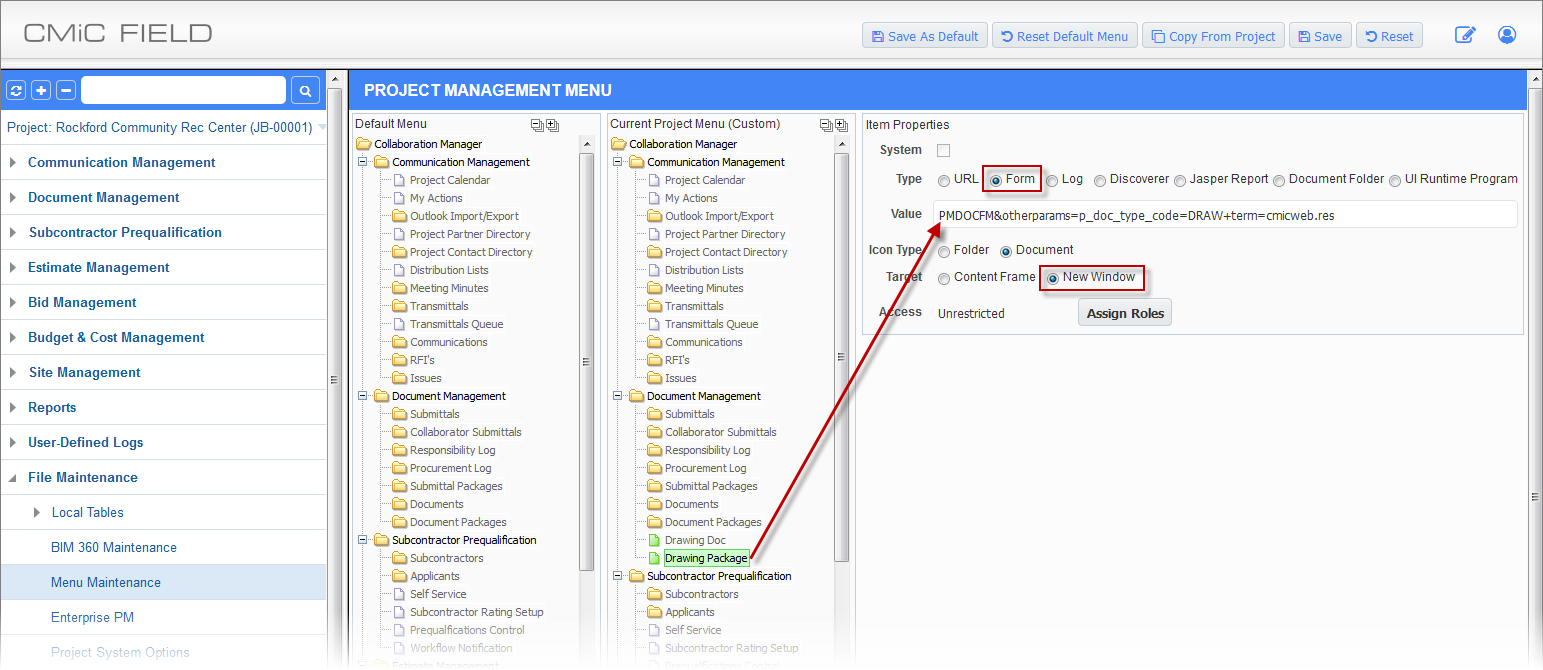
Example of Defining Custom Menu Items for Document Packages
Attaching Business Partner Form to Treeview
Adjustments have been made so that the Business Partner form can be called from the Treeview by specifying the application code as well. This is needed because the form may behave differently based on where it is called from (PM, AP...). By default, when the form is attached, it will show buttons applicable to PM. To get the additional buttons applicable to the AP module for instance, additional parameters are required.
For example, calling the Business Partner form from the AP application, the user would enter:
BPBPFM & otherparams = P_APP_CODE = AP
See the screenshot below.
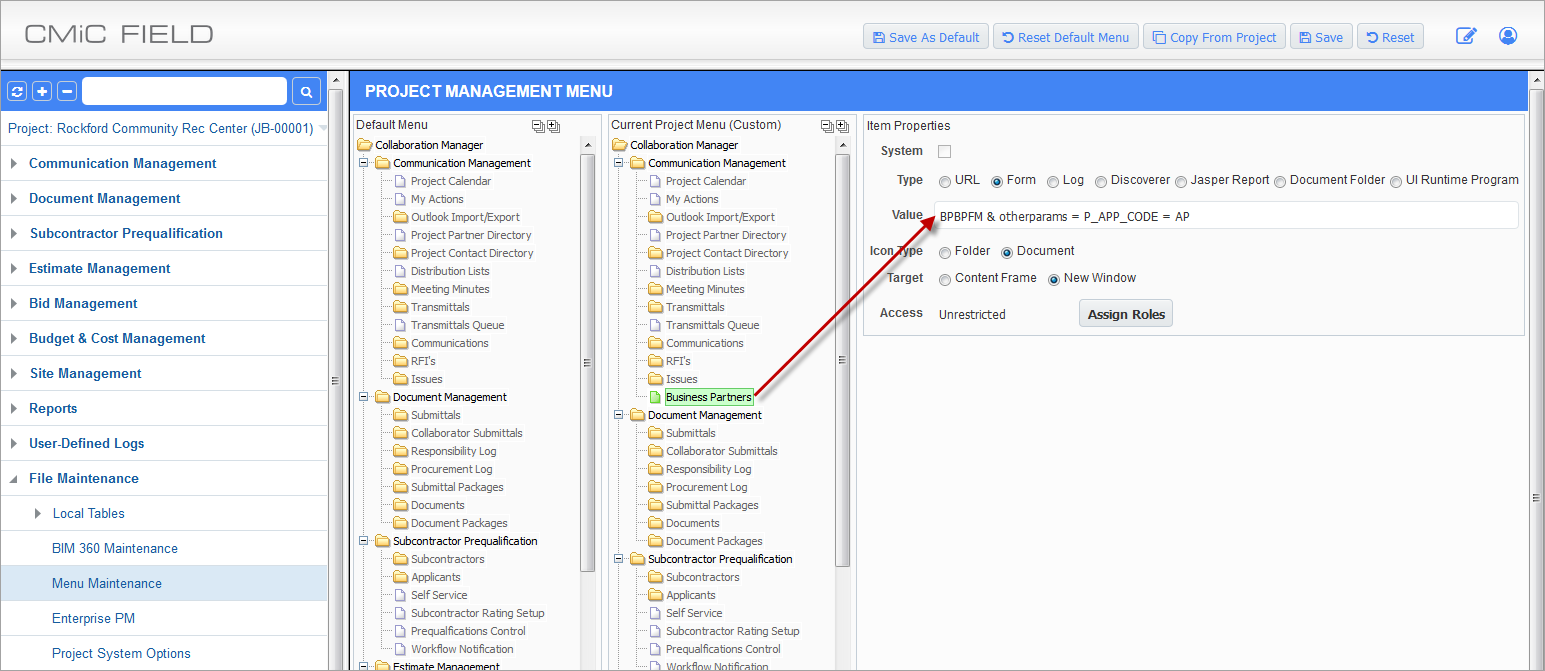
Example of attaching a Business Partner Form to Treeview
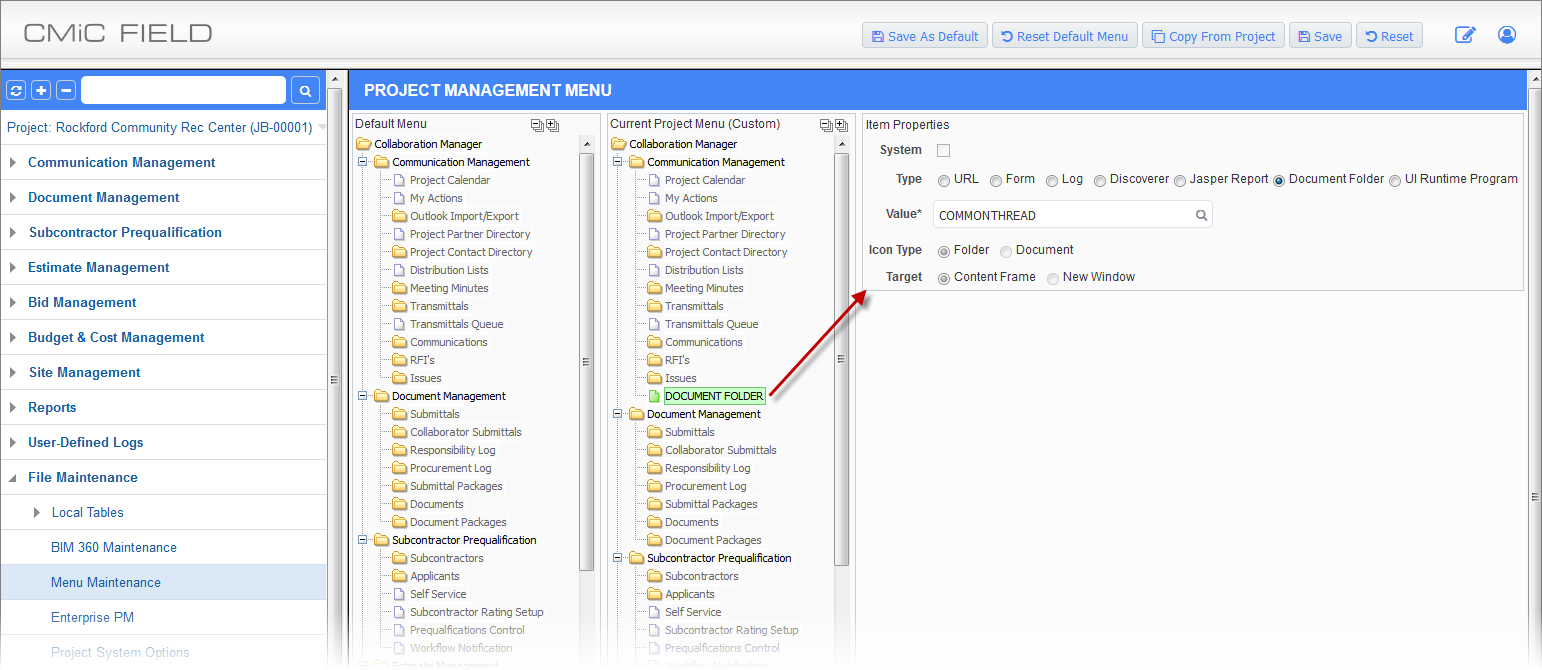
Document Folders
![Screenshot of Menu Maintenance with [Document Folder] button highlighted.](../../../../Resources/Images/11_File_Maintenance/Menu_Maintenance_14.png)
The Document Folder Menu Maintenance Type allows creation of a menu item for Document Folder under which different related PM objects can be listed, similar to a log.
Once the document folder is created and saved, the user can assign CMiC Field security to it using the [Assign Roles] button in Menu Maintenance.
To assign various related PM objects to the newly created document folder, simply access the folder on the Treeview as you would for any other program or log.
![Screenshot of Related Objects pop-up launched from [Add Reference] button on Document Folder.](../../../../Resources/Images/11_File_Maintenance/Menu_Maintenance_16.png)
Press the [Add Reference] button which will display a pop-up window of various types of related object type. Check the boxes for your selection and press the [Accept] button. The objects selected will be saved to the document folder and can be accessed directly by their Object ID link:
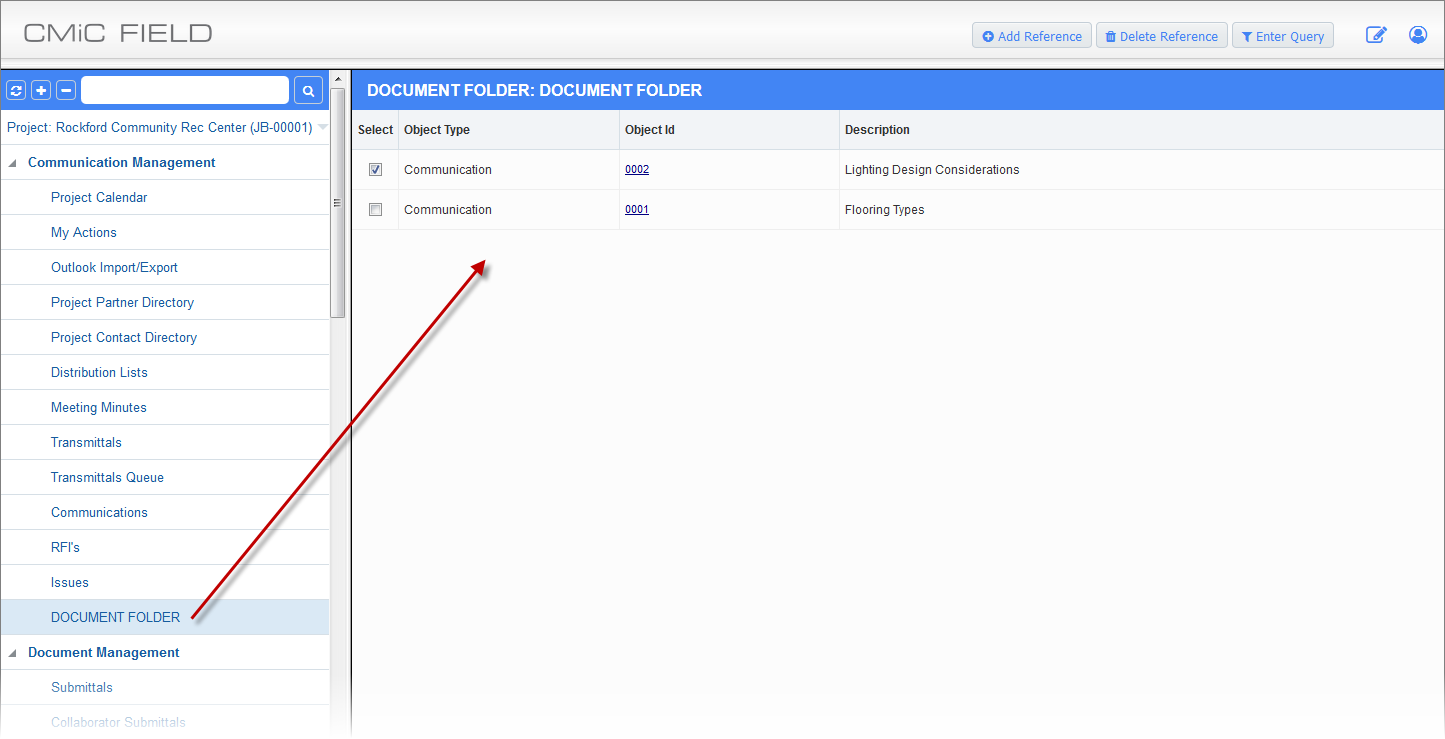
To remove one or more referenced objects from the log, first select them using the checkbox to the far left and then press the [Delete Reference] button.
A shortcut way of assigning a document record to a Document Folder is via the Document Folder field in the header of document records (see screenshot below).
![Screenshot of Document Folder Selection pop-up window launched from [Select] button.](../../../../Resources/Images/11_File_Maintenance/Menu_Maintenance_18.png)
To select a Document Folder, click the [Select] button first to get the Document Folder Selection pop-up window, then right-click on the desired item to get a pop-up to 'Select' or 'Unselect'.
The Document Folder field is only available when uploading documents, that is, during Upload Multiple mode of document records either directly in Document Management or via the Attachments tab of PM objects. The field can be hidden via field security, if required.
Construct PM Menu Item URLs
You can run specific Construct PM web deployment features in your existing Treeview menu. To do this, you just need to add a custom menu item to your projects menu that points to one of the direct links.
To see a list of direct links and to learn more about accessing our web deployment of CMiC Field, refer to Construct PM - Web Deployment.
NOTE: Custom menu items may be removed from the Treeview if the user resets the Default Menu (Custom) to the CMiC system default menu with the [Reset Default Menu] button. To avoid this issue, users can set their custom menu as the system default menu with the [Save As Default] button. Field security can be applied to these buttons in the Security Roles screen to ensure only authorized users can make changes to the menu.
Construct Feature
This feature is used to ensure that when a user is logged in on the web deployment and another device (web or app) simultaneously and they switch projects on their other device, that any direct links to Construct PM continue to display data from the current project in the JSP menu, and not the project being displayed on the other device.
NOTE: This feature will not update any existing custom Construct PM nodes, so nodes with direct links to modules in the old format will still be susceptible to this issue. This will also not update existing custom menus, either at the project or default levels.
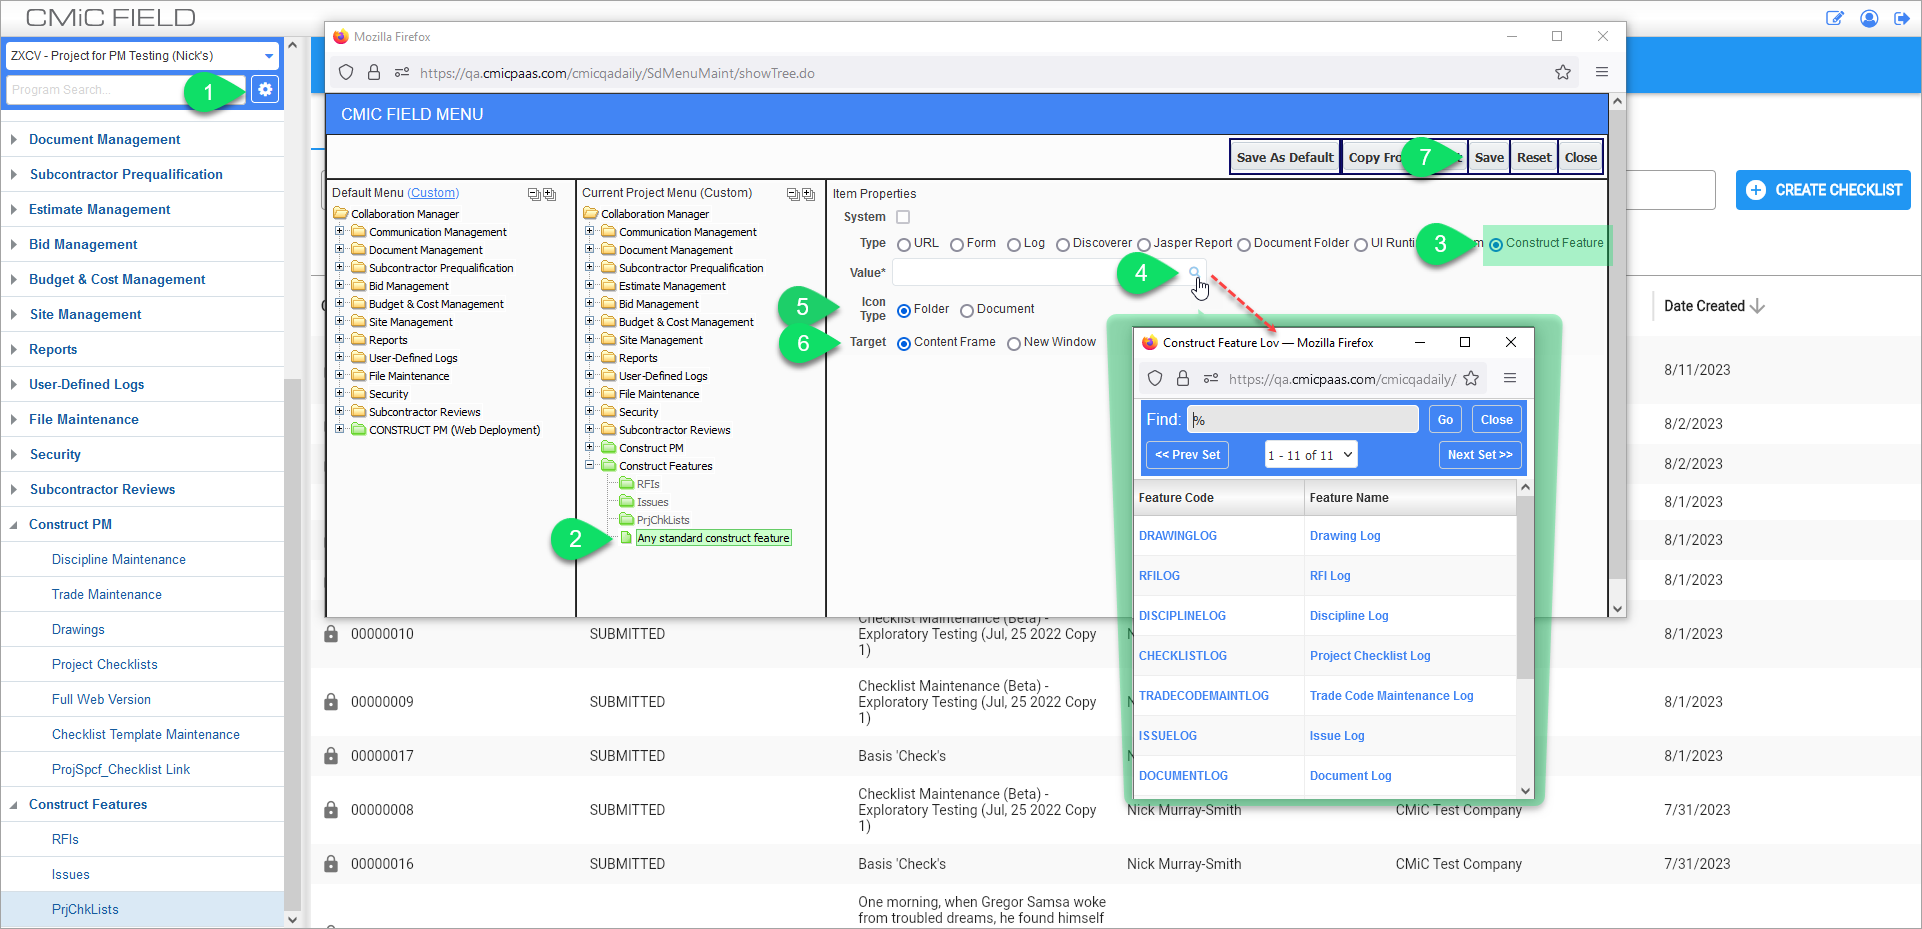
The screenshot above shows the Menu Maintenance screen being launched from the Menu Maintenance icon ( ). It guides you through the process of linking a node to any standard Construct PM feature.