NOTE: As of Nexus 02 (July 2026), Submittals will be deprecated, meaning it will no longer be supported as soon as a customer installs Nexus 02. CMiC encourages users to use CMiC Field - Submittals V2.
Overview

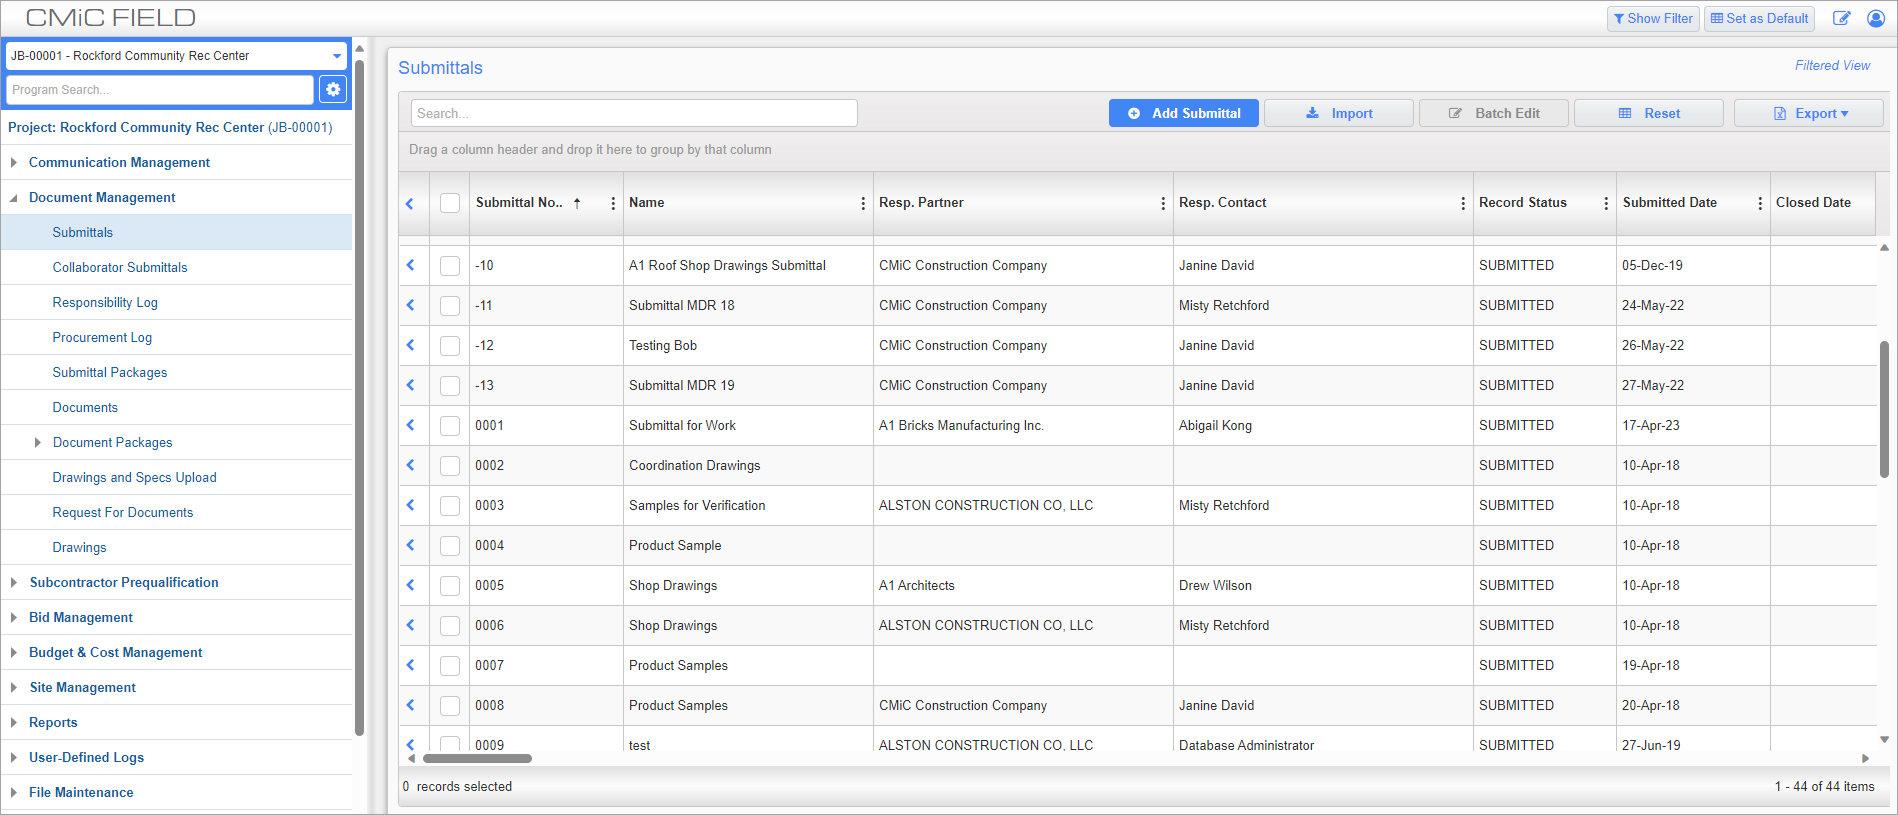
Submittals; standard Treeview path: CMiC Field > Document Management > Submittals
For vendors and subcontractors, the Submittal screen displays all submittals that are applicable to their company. For general contractors, this log displays all submittals.
The Submittal Log screen, shown above can be used to add, import, and edit submittal records. To add a new record, press the [Add Submittal] button. Records can also be edited in batch by selecting their record rows and pressing the [Batch Edit] button. This button only becomes available after selecting a submittal record. For more information about batch edits, please refer to Submittal Batch Edits.
NOTE: Submittal records cannot be deleted from the log or batch deleted. However, individual records can be deleted using the [Delete] button available on the main toolbar of each Submittal record.
For more information on the activity banners that appear in the top-left corner of object records, please refer to Activity Banners.
NOTE: The Days Out field is only available in log view (i.e., not visible on Submittal Detail tab of Submittal record). It can be added to the Submittal log using the Log Builder screen. The days out value is equal to the system date minus the sent date. The sent date is the same as the action date value for the “Sent” line in the submittal history. For example, if the sent date is March 1, 2018 and the system date is March 31, 2018 then the days out value would be 30 days. When the submittal is returned, the system date is changed to the return date in the calculation.
Submittal Detail – Tab

Submittal; standard Treeview path: CMiC Field > Document Management > Submittals – [Add Submittal] button
Submittal Number
Enter a submittal number. Once the record is saved, the submittal number cannot be changed.
If autonumbering is enabled, the system will generate the number based on the mask code defined at either the company or project level. If the ‘Allow Override’ box is checked for the code mask on the Defaults tab on the Project Maintenance screen (i.e., on the Default Masks pop-up launched from the [Masks] button), you can modify the auto-generated number before saving the Submittal record.
Name
Enter the name of the submittal.
Description
Enter a full description for the submittal.
Public Record– Checkbox
Check this box to make the record visible and accessible to all users who have access to the Submittals module. This grants all team members the ability to refer to specific, approved submittals as necessary. By default, this box is unchecked on all new records.
If a submittal has the 'Public Record' flag checked, the record will be visible and accessible to all users who have both the menu and program security role privileges for the Submittals module. For more information on these privileges, please refer to CMiC Field Security - Submittals.
NOTE: The ability to modify this checkbox is tied to the security role privilege "Submittal – Make Record Public". As well, by default, field security on the 'Public Record' checkbox is set to “Hidden” for the “ALL” role. Users must set this value as “Unrestricted” or "Read-Only" in order to make this checkbox visible. For more information, please refer to CMiC Field - Security Roles.
The Public Record column can also be added to the Submittals log screen by making the following column visible in the CMiC Field - Log Builder screen: "Submittals: PMSM_PUBLIC_RECORD_FLAG".
If a submittal has the 'Public Record' flag checked, and the user has the privilege to update it, the public status can be batch edited from the Submittals log screen.
Type
Select the type of the submittal. These type codes can be set in the Submittal Type screen (standard Treeview path: CMiC Field > File Maintenance > Local Tables > Submittal Type).
Procurement Item – Checkbox
Check this box to mark the submittal as a procurement item. Items with this box checked appear in the Procurement Log screen.
Spec Section, Spec Sub. Section
Enter/select the specification section and the specification sub-section for the submittal. These codes are used for ordering purposes and can be set in the CMiC Field - CSI Code Maintenance screen.
Package No.
Enter/select the package number if the entered submittal is part of a submittal package. Submittal packages and their numbers can be created in the Submittal Packages screen.
Submitted
This field gets populated with the date set in the Submitted Date field found on the Submittal Log for the selected record. It will be set to null until the Closed field is populated.
Closed
The Closed field gets populated with the system date when the Submittal status is changed to "Closed" (Status Class = 'C'). The Closed Date field will be set to null when the Submittal status is changed from "Closed" to any other status.
[Create Change] – Button
Press this button to open the Potential Change Item pop-up screen. From here, create a new PCI and link it to the submittal.
[Link Change] – Button
Press this button to link the submittal to an already existing PCI.
Sender
Prepared By
Enter/select the employee responsible for preparing the submission request.
Contact
If the person to contact with regards to the sending of the submittal differs from the employee entered in the Prepared By field, enter/select that employee here.
Transmitted For
Select whether the submittal is being submitted for approval, clarification, information only, or selection.
Required Finish
Enter the required finish date for the submittal date.
Receiver
Approval By
Enter/select the employee responsible for approving the submittal request.
Contact
If the person to contact with regards to the receiving of the submittal differs from the employee entered in the Approval By field, enter/select that employee here.
[CC], [BCC] – Buttons
Press these buttons to add employees to CC or BCC when the submittal is submitted.
NOTE: Only employees with a valid email address in their project contact details will appear in the CC/BCC list in the Send I/O Email screen. If no email is assigned, the contact will be removed from the list. For more information, please refer to CMiC Field - Project Contact Directory.
[Edit] – Button
Press this button to add employees to copy when the submittal is sent to the employee selected in the Approval By field. Any employees added with this button are available upon pressing the [Send I/O Email] button.
Response
Response
Allows receiver to select whether or not to approve the submittal using a drop-down menu.

NOTE: This section is only available for roles that have been assigned access to it. Access is granted by changing the security for Response Fieldset to "Unrestricted", as it is set to "Hidden" by default. See CMiC Field - Security Roles > Assigning Field Security for more information on how to change field security for roles within the company.
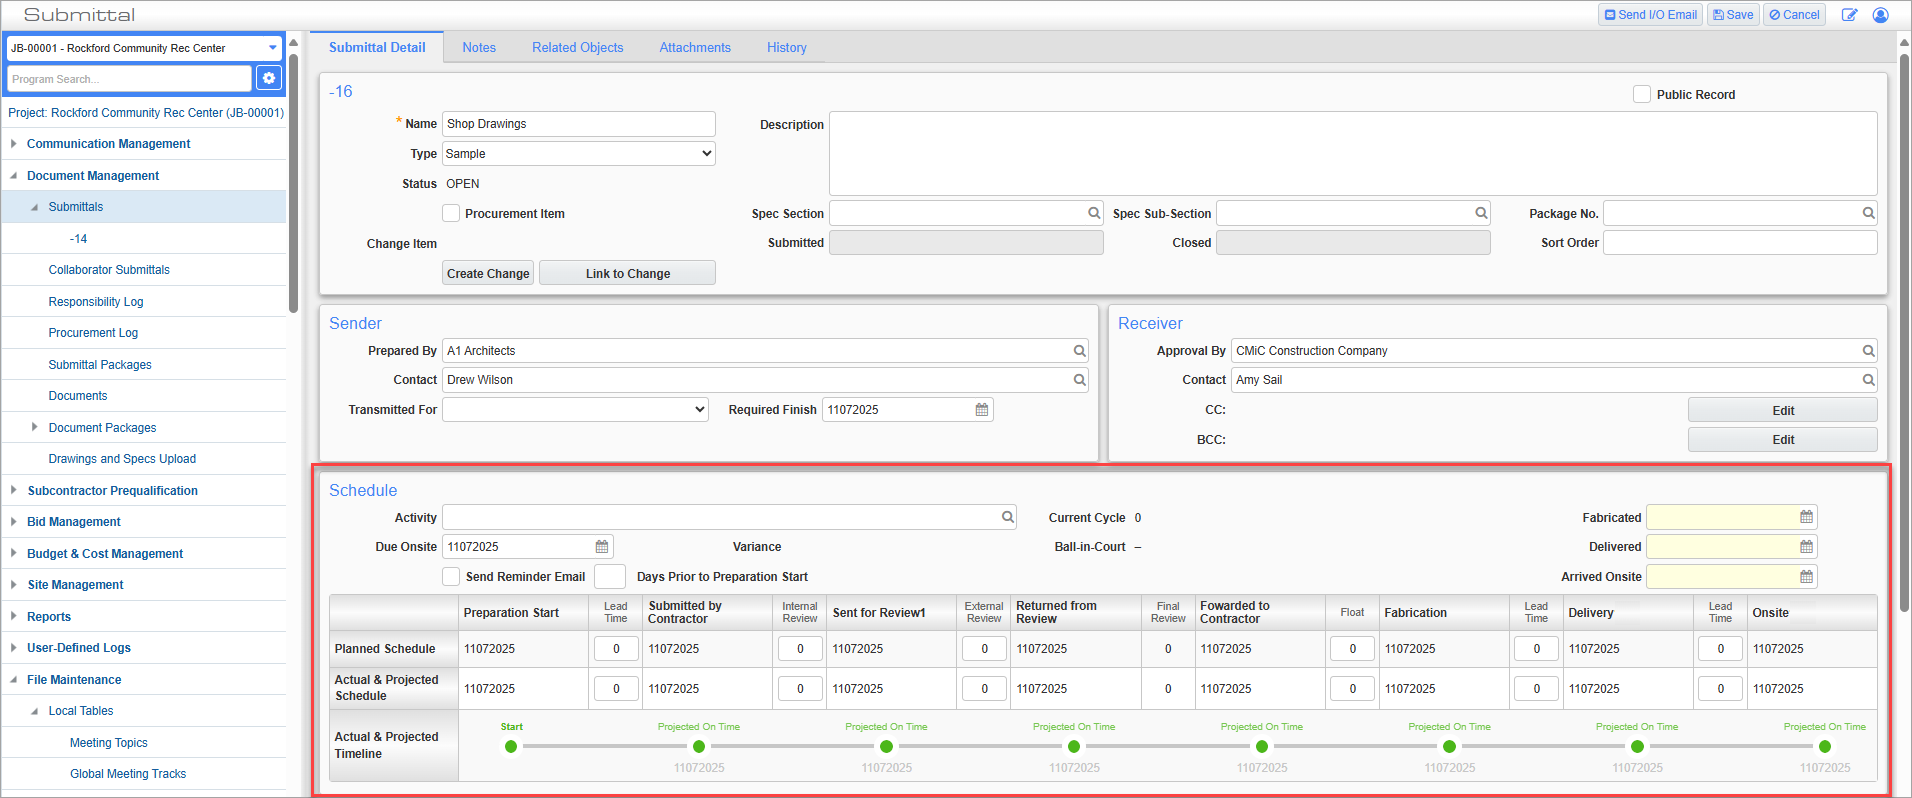
Schedule

Activity
Enter/select the activity being performed as part of the schedule. These activity codes can be set in the Activities screen (standard Treeview path: CMiC Field > File Maintenance > Activities). Selecting an activity from this list may also edit the entry in the Due Onsite field.
Due Onsite
Enter/select the date the submittal is due to be carried out on the work site.
Variance
This field provides the difference in days between the actual or projected date in the Forwarded to Contractor field (located in the Actual & Projected Schedule row) and the planned date in the Fabrication field (located in the Planned Schedule row). If the Forwarded to Contractor field’s date falls before the date in the Fabrication field, then the Variance field will show that the submittal is that many days in float. If the date in the Forwarded to Contractor field falls after the date in the Fabrication field, then the Variance field will show that the submittal is that many days late.
Send Reminder Email – Checkbox
Check this box if an email is to be sent prior to the date entered in the Due Onsite field. This box also appears on the Default tab of the Company Control screen (standard Treeview path: CMiC Field > File Maintenance > Company Control – Default tab).
Days Prior
Enter how many days before the submittal is scheduled to be submitted by the contractor.
Ball-in-Court
This field displays the employee with the current responsibility on the schedule. This field is display-only and can’t be edited here.
Fabricated
Enter the actual date fabrication started for the materials or products that the submittal relates to. This will also update the Fabrication field in the Actual & Projected Schedule row.
NOTE: This field can only be edited by pressing the [Edit] button after all required reviewers have approved the submission.
Delivered
Enter the actual date when the physical goods related to the submittal were sent for delivery. This will also update the Delivery field in the Actual & Projected Schedule row.
NOTE: This field can only be edited by pressing the [Edit] button after fabrication has started for the materials or products related to the submittal (i.e., a date is selected in the Fabricated field).
Arrived Onsite
Enter the actual date that the goods related to the submittal arrived on the job site. This will also update the Onsite field in the Actual & Projected Schedule row.
NOTE: This field can only be edited by pressing the [Edit] button after the physical goods related to the submittal were delivered (i.e., a date is selected in the Delivered field).
Current Cycle
This field displays the current schedule cycle. A new review cycle is reached if a reviewer returns a submittal for revision rather than approving it. A list of all past cycles can be seen by pressing the [Edit History] button.
Timelines and Schedules

The table allows users to enter expected and actual dates for completion of the following parts of the submittal process:
- Preparation Start
- Submitted by Contractor
- Sent for Review
- Returned from Review
- Forwarded to Contractor
- Fabrication
- Delivery
- Onsite
Planned Schedule
This section displays the desired timeline for the submittal process.
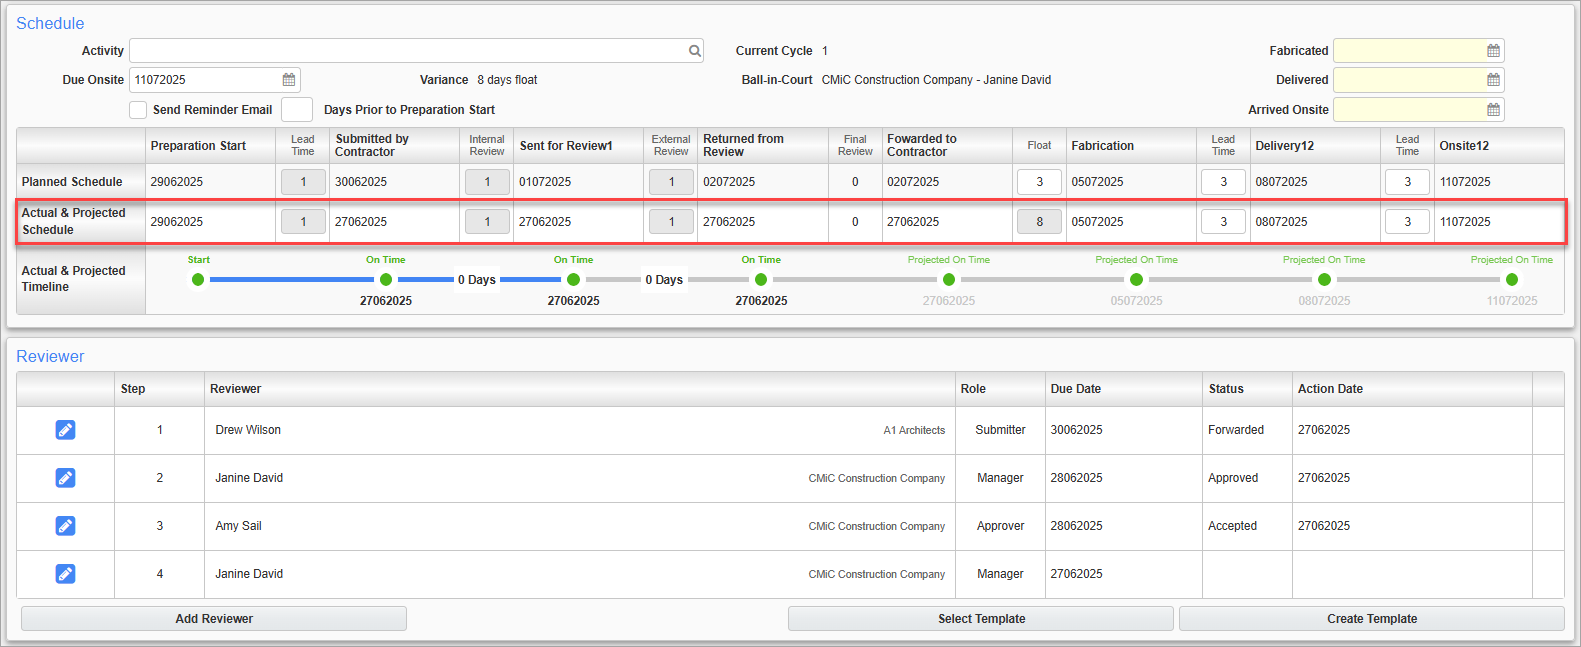
Actual and Projected Schedule
This section displays the actual or projected timeline for the submittal process.
Actual and Projected Timeline
This section displays the current review cycle for the submittal. Nodes on the progress bar display red if the lead times are late, green if they are projected or actually on time, and amber if they are projected late.
For more information, please refer to Submittal Schedule
Reviewer

Request For Information; standard Treeview path: CMIC Field > Communication Management > Submittals – Submittal Detail tab – Reviewer section
For more information please refer to Reviewer Section.
Main Toolbar Buttons

Submittal Detail; standard Treeview path: CMiC Field > Document Management > Submittals – Submittal Detail tab
These buttons, highlighted above, appear in the main toolbar of the Submittal Detail tab once the record has been submitted.
[Edit History] – Button
Press this button to show the complete edit history of the submittal. This screen can then be used to edit said history, add reviewers, create transmittals, and create review cycles.
[Edit] – Button
Press this button to edit the current submittal. This button is only available to those users with the ‘UpdateAll’ PM role privilege assigned. Upon submittal of an edit, an email is sent to those users selected in the Project Contact Directory screen.
Notes – Tab

Submittal; standard Treeview path: Communication Management > Submittals – Notes tab
This is one of many Note tabs throughout CMiC Field. Refer to Notes Tab for more information.
Related Objects – Tab

Submittal; standard Treeview path: Communication Management > Submittals – Related Objects tab
For objects added in the Related Objects tab of a submittal, the submittal will be available in the Related Objects tab of that object and vice versa.
To add an object, click on the Assign Objects link to open the Related Objects pop-up window. From the popup, filter the objects by object type using the drop-down menu, then select the objects related to the submittal and press the [Accept] button.
Attachments – Tab

Submittal; standard Treeview path: Communication Management > Submittals – Attachments tab
This is one of many Attachments tabs throughout CMiC Field. Refer to Using Attachments for more information.
History – Tab

Submittal; standard Treeview path: Communication Management > Submittals – History tab
This tab can be used to view all changes and edits made to a submittal record. This tab is view-only and so changes must be made with the [Edit] button in the Submittal Detail tab.
Submittal Schedule

Schedule section on Submittal Detail tab
The Schedule section is used to ensure the submittal process meets the project schedule. The planned and actual dates in the table are initially populated by the date entered in the Due Onsite field.

Lead times can be entered between the different review stages, and the system will back-calculate each required date, starting at the Due Onsite date and moving backwards through each lead time.

The Actual and Projected Schedule due dates are defaulted with the planned schedule dates but will be adjusted as the submittal moves through the review process.
Initially, the projected dates are kept as the due dates of the review/fabrication/delivery cycle actions respectively. When a date is entered by the user (i.e., in the Action Date fields in the Reviewer section and/or the Fabricated, Delivered, and Arrived Onsite dates in the Schedule section), the projected dates are updated as per the lead times in between. As the dates are being calculated, the float period is adjusted. This means, if the actual dates are adjusted, the float varies from a positive number to zero. If it is greater than 0, the Fabrication/Delivery/Onsite dates are adjusted.

Nodes on the progress bar display red if the lead times are late, green if they are projected or actually on time, and amber if they are projected late.
Locking Schedule Dates

Schedule dates are updated if the lead times are changed, provided that the submittal does not yet have an action date for that part of the cycle. Changes made to the Planned Schedule row will impact the Actual and Planned Schedule row. However, once some action has been taken for that part of the cycle, the dates and lead times can no longer be updated. In the example above, the locked fields are displayed in gray.
Automatically Creating Review Cycles on Submittal Return
The submittal status at either the Sent or Returned stage is associated with a status class of either "Reviewed" or "Resubmit". If the status class is set to "Resubmit", the next review cycle will be created automatically and the submittal will be placed back in the subcontractor's responsibility. The Current Cycle field will update to the next count. Submittal classes are maintained in the CMiC Field - Submittal Status screen.
Recommended Workflow for Submittals
-
The subcontractor (SC) gathers the relevant documents and submits them to the general contractor (GC).
-
If the documents are approved, the GC passes them along to the architect/engineer.
-
At this point, the architect may forward the submittal and its materials to outside consultants. It is recommended that the [Add Reviewer] button be used for this purpose.
-
If rejected by the architect, the GC will inform the SC of the necessary amendments.
-
If approved by the architect, the GC will inform the SC that they are clear to proceed with carrying out the submittal.