NOTE: As of Nexus 01 (January 2026), RFIs will be deprecated, meaning it will no longer be supported as soon as a customer installs Nexus 01. CMiC encourages users to use the web deployment of Construct PM - RFIs. To add this custom menu item to the Treeview, please refer to Construct Feature.
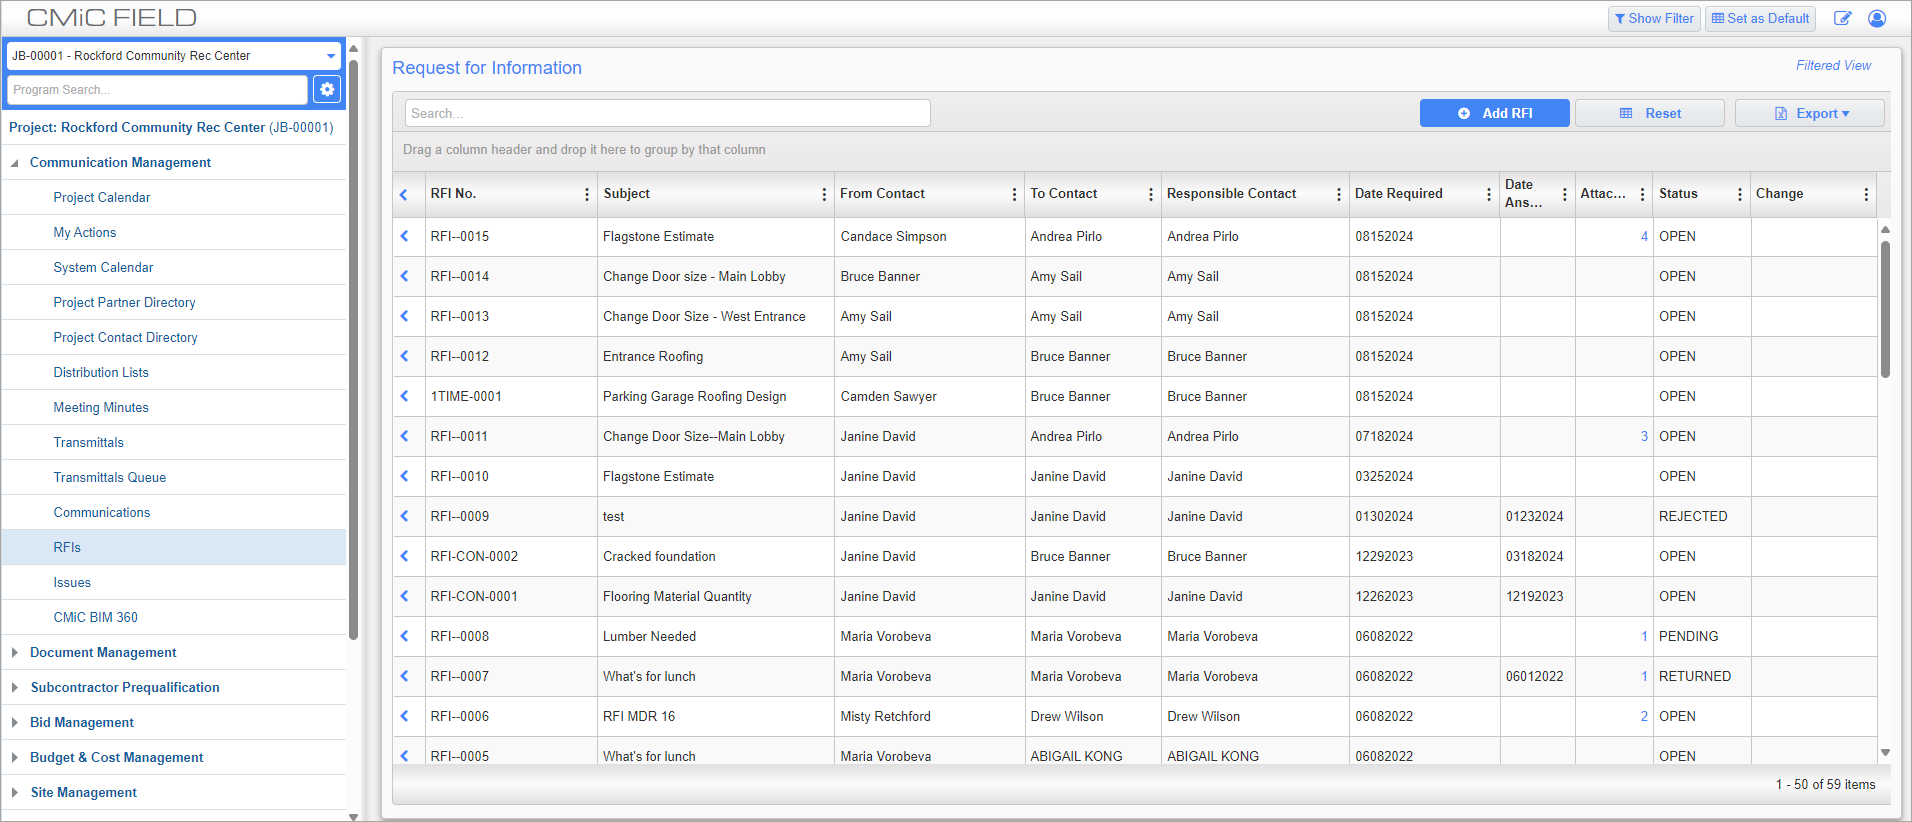
Request For Information; standard Treeview path: CMiC Field > Communication Management > RFIs
The RFIs screen can be used to enter requests for information. These requests can then be linked to issue and PCI records.
For more information on the activity banners that appear in the top-left corner of object records, please refer to Activity Banners.
RFI Detail – Tab
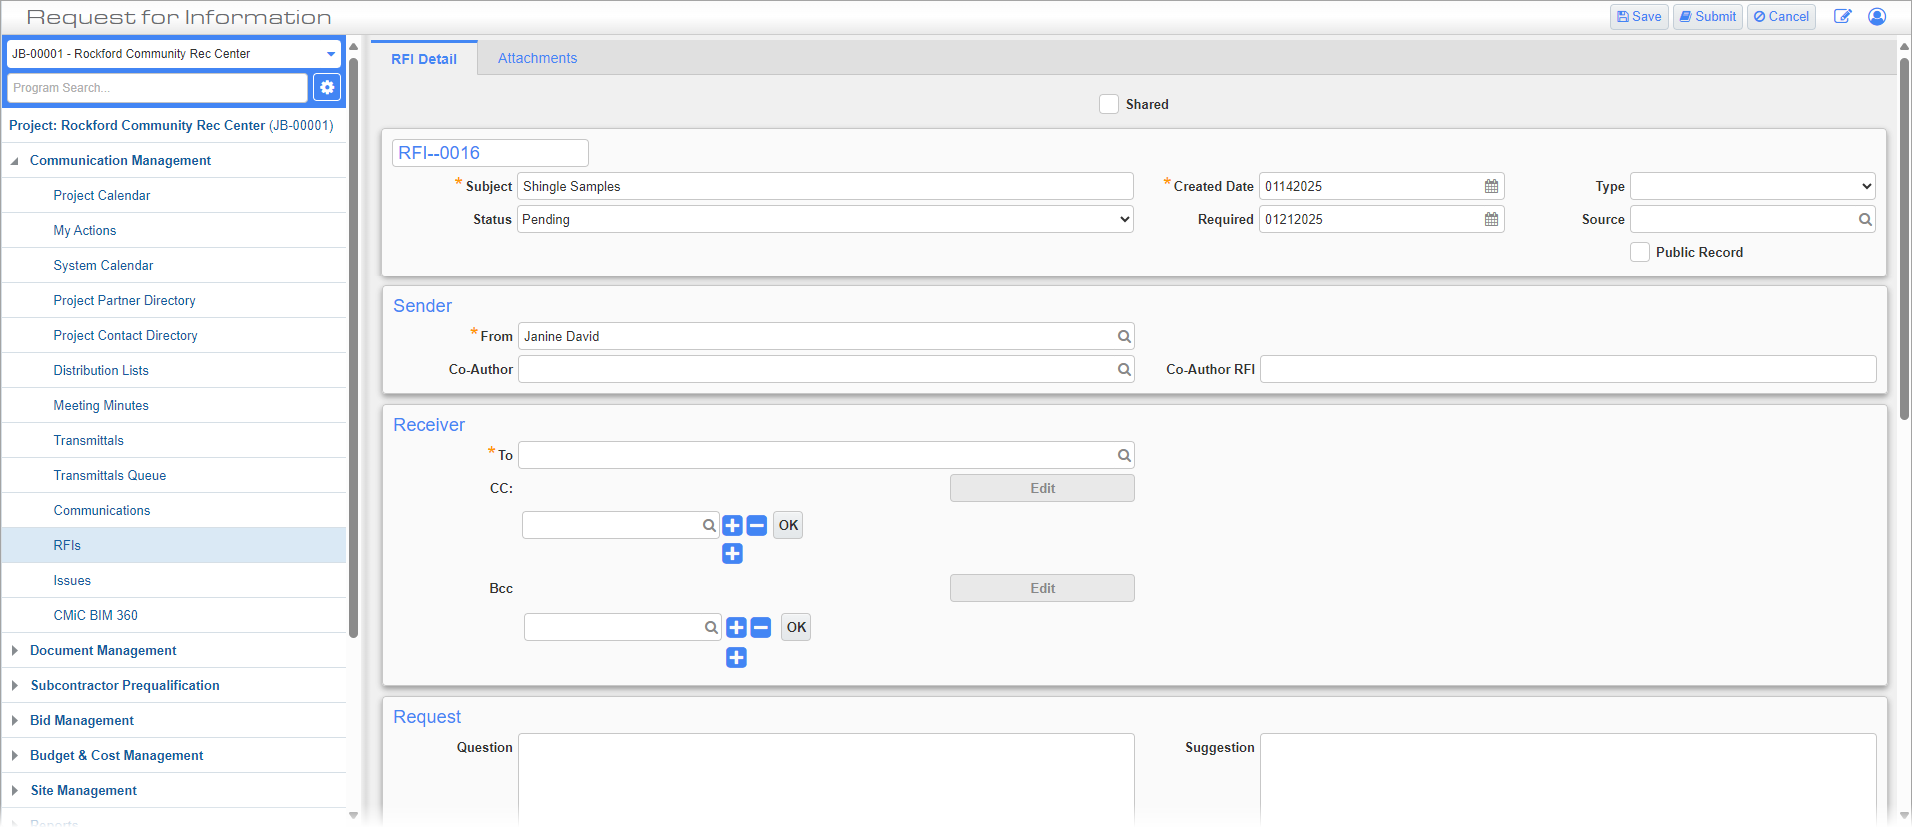
Request For Information; standard Treeview path: CMIC Field > Communication Management > RFIs – RFI Detail tab
This tab can be used to enter all the relevant information for the RFI.
Shared – Checkbox
Check this box if the RFI is to be shared beyond the parties identified in this screen.
Subject
Enter a summary of the request.
Created
Enter/select the date the RFI was created.
Status
Select whether the RFI is accepted, approved, closed, new, pending, rejected, or returned.
RFI statuses are managed in the Maintain Data Process screen in the System Data module. To learn more about how these codes are set up and maintained, refer to
Required
Enter/select the date by which the RFI is expected to be fulfilled.
The default RFI review period can be set on the Project Maintenance screen (standard Treeview path: File Maintenance > Project Maintenance – Defaults tab). The date in the Required field therefore defaults to the date in the Created field added to the default review period amount.
Type
Select the RFI type. These codes can be created in the RFI Types Maintenance screen.
Source
Select the RFI source from the LOV or enter a new source code. These codes can be used to group RFI records together.
Public Record– Checkbox
Check this box to make the record visible and accessible to all users who have access to the RFI module. For completed RFIs with a "Closed" status, press the [Save] button at the top of the screen to update the status of the checkbox. This grants all team members the ability to refer to specific, completed RFIs as necessary. By default, this box is unchecked on all new records.
If an RFI has the 'Public Record' flag checked, the record will be visible and accessible to all users who have both the menu and program security role privileges for the RFI module. For more information on these privileges, please refer to CMiC Field Security - RFIs.
NOTE: The ability to modify this checkbox is tied to the security role privilege "RFI – Make Record Public". As well, by default, field security on the 'Public Record' checkbox is set to “Hidden” for the “ALL” role. Users must set this value as “Unrestricted” or "Read-Only" in order to make this checkbox visible. For more information, please refer to CMiC Field - Security Roles.
The Public Record column can also be added to the RFI log screen by making the following column visible in the CMiC Field - Log Builder screen: "Request for Information: PMSCRFI_PUBLIC_RECORD_FLAG".
Change #
To link the RFI to a PCI, either create a new change item by pressing the Create Change link, or link to an existing change item by pressing the Link Change link. These links only appear once a RFI has been submitted.
NOTE: Once a PCI is linked to an RFI, a link to the PCI can be found in the RFI log under the Change column. Refer to CMiC Field - Change Column in Logs for more information.
Current Responsibility
Select the contact currently responsible for the RFI.
Sender
From
Enter/select the employee sending the RFI. This is the logged-in user by default.
Co-Author, Co-Author RFI
If there is a related RFI, enter/select its co-author and RFI number.
Receiver
To
Enter/select the target of the request.
NOTE: If the user responds to an I/O email regarding an RFI but they have not yet been assigned a security role, then any response they send will only be received if they are the "To" contact and not if they are the "CC" contact.
[CC], [BCC] – Buttons
Press these buttons to add employees to CC or BCC when the RFI is submitted.
NOTE: Only employees with a valid email address in their project contact details will appear in the CC/BCC list in the Send I/O Email screen. If no email is assigned, the contact will be removed from the list. For more information, please refer to CMiC Field - Project Contact Directory.
Closed Date
NOTE: The PMRFI_CLOSED_DATE column can be made visible in the RFI Log by checking the Vis checkbox in the RFI Log Builder.
The Closed Date field gets populated with the system date when the RFI status is changed to "Closed" (Status Class = 'C'). The Closed Date field will be set to null when the RFI status is changed from "Closed" to any other status.
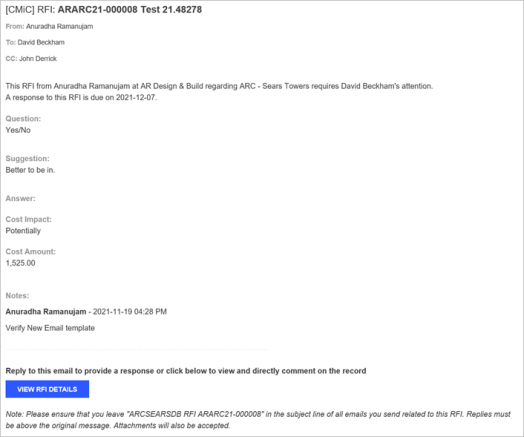
Once the RFI is submitted, contacts entered in this section will receive an I/O email like the one shown below. From here they can either reply to the email directly or follow the [View RFI Details] button to comment on the record in Field.
Once the RFI is submitted, contacts entered in this section will receive a notification like the one shown below. From here, they can click on the link to view the RFI details, if they have collaboration access.

Request
Question
Enter the question to be sent to the employee in the To field.
Suggestion
Enter a suggested answer to the question posed in the Question field.
Schedule Impact, Days
Select whether there will, will not, or may be an impact to the project schedule as a result of the RFI. If there is expected to be an impact, enter the number of days affected in the Days field.
Cost Impact, Cost Amount
Select whether there will, will not, or may be an impact to the cost of the project. If there is, enter the total amount in the Cost Amount field.
Response
Answer
Enter the answer to the question posed in the Question field. The ‘Allow to answer an RFI’ PM role privilege should be assigned for this field to be available.
Answered
Enter/select the date the answer was given.
Answered By
Enter/select the employee who provided the answer. The field defaults to the logged-in user.
[Select Standard Answer] – Button
Press this button to select an answer from an existing RFI.
[Copy Answer From Suggestion] – Button
Press this button to copy the text from the Suggestion field to the Answer field.
Reviewer

Request For Information; standard Treeview path: CMIC Field > Communication Management > RFIs – RFI Detail tab – Reviewer section
For more information please refer to Reviewer Section.

RFI Detail; standard Treeview path: CMiC Field > Communication Management > RFIs – RFI Detail tab
These buttons, highlighted above, appear in the main toolbar of the RFI Detail tab once the record has been submitted.
[Redirect] – Button
If an RFI has already been submitted, press this button to change to who it is sent. This button is commonly used by external collaborators who want to send an RFI without changing its content.
This button can only be used by users without create and edit privileges.
[Answer] – Button
This button is available for the RFI receiver to answer the RFI. The ‘Allow to answer an RFI’ PM role privilege should be assigned for this button to be available.
[Reject Answer] – Button
Press this button to reject the RFI's answer. If rejected, the Answer, Answered, and Answered By fields in the Response section will be cleared and a note will be added to the Notes section to indicate the date, time, and author of the rejection. Once an answer is rejected, the RFI will go back to the receiver to be answered again and the [Answer] button will become available in the main toolbar.
[Close RFI] – Button
Press this button to mark the current RFI as closed. This removes the ability to respond to and edit the RFI. This action can be undone by pressing the [Reopen] button.
[Reopen RFI] – Button
Press this button to reopen the RFI. This button is available for admin users (i.e., users with the 'Admin' box checked for their security role on the Security Roles screen).
[Forward] – Button
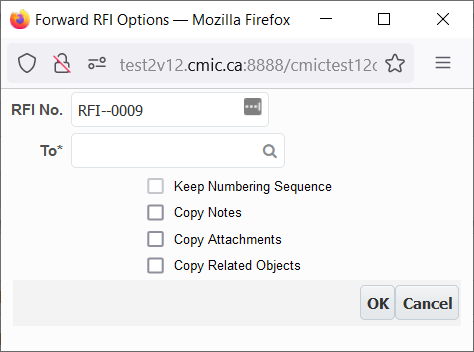
Press this button to forward the RFI to some other party. Only those users with the ‘Forward RFIs’ project role privilege assigned.
Check the ‘Keep Numbering Sequence’ box to keep the RFI issue number when forwarding the record. This checkbox is only available to collaborators. Check the ‘Copy Notes’, ‘Copy Attachments’ and 'Copy Related Objects' boxes to forward any notes, attachments or related objects, respectively, to the employee entered in the To field.
[Update Ref. RFI] – Button
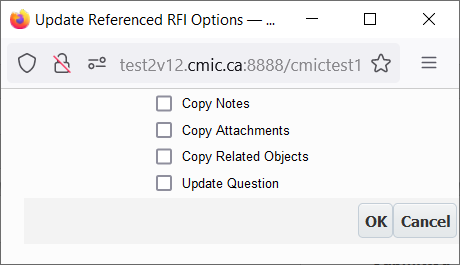 N
N
This button only appears for forwarded RFIs. The checkboxes determine whether to copy notes, attachments, related objects and question updates from the forwarding RFI to the forwarded RFI.
[Link To Issue] – Button
Press this button to link the RFI with any issue records. Issues can be set in the Issues screen (standard Treeview path: Communication Management > Issues).
Attachments – Tab
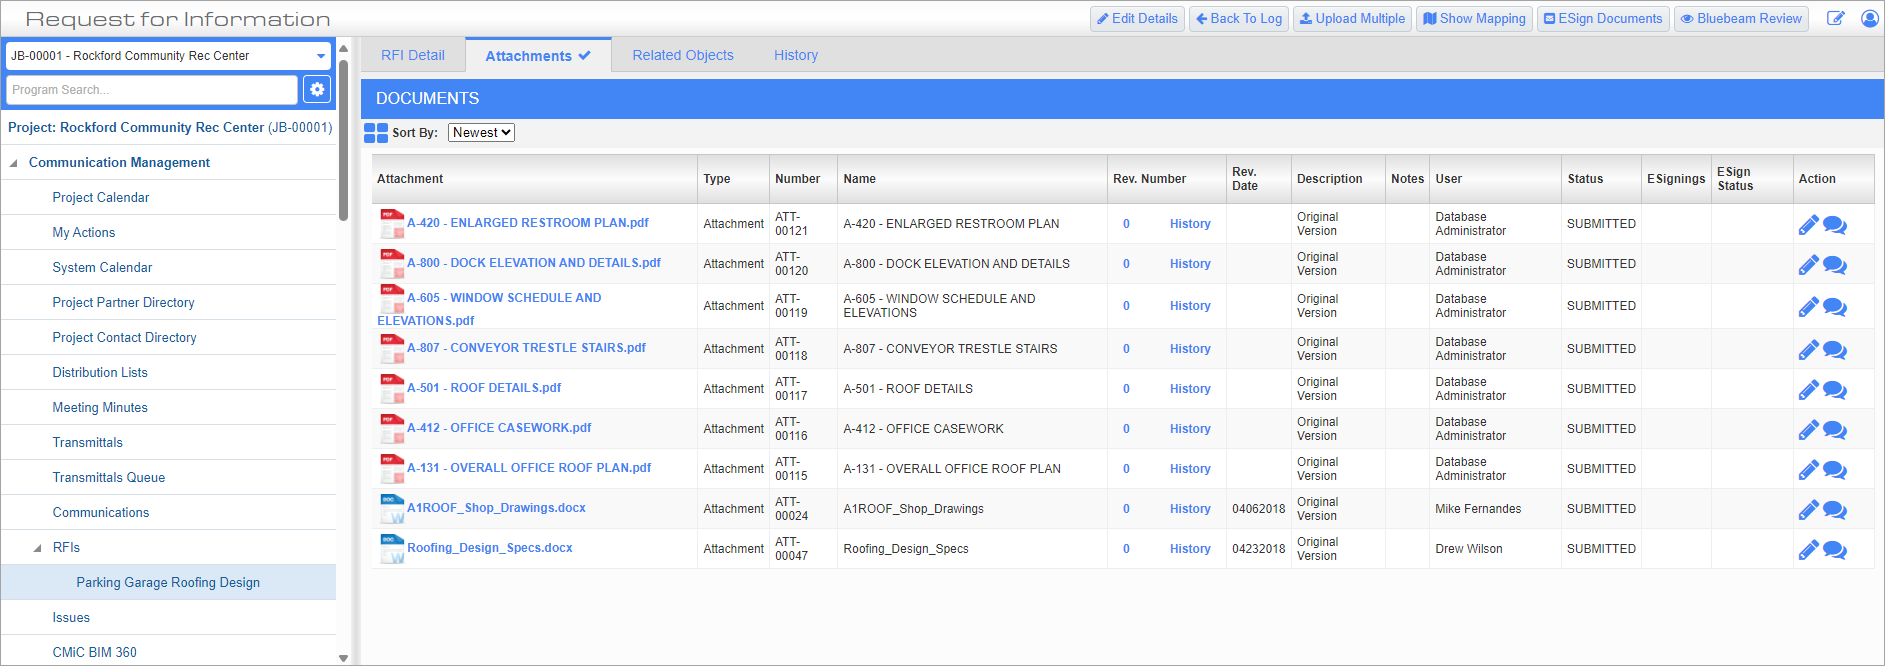
Request For Information; standard Treeview path: CMiC Field > Communication Management > RFIs – Attachments tab
This is one of many Attachments tabs throughout CMiC Field. Please refer to the Notes and Attachments section for further details.
Related Objects – Tab
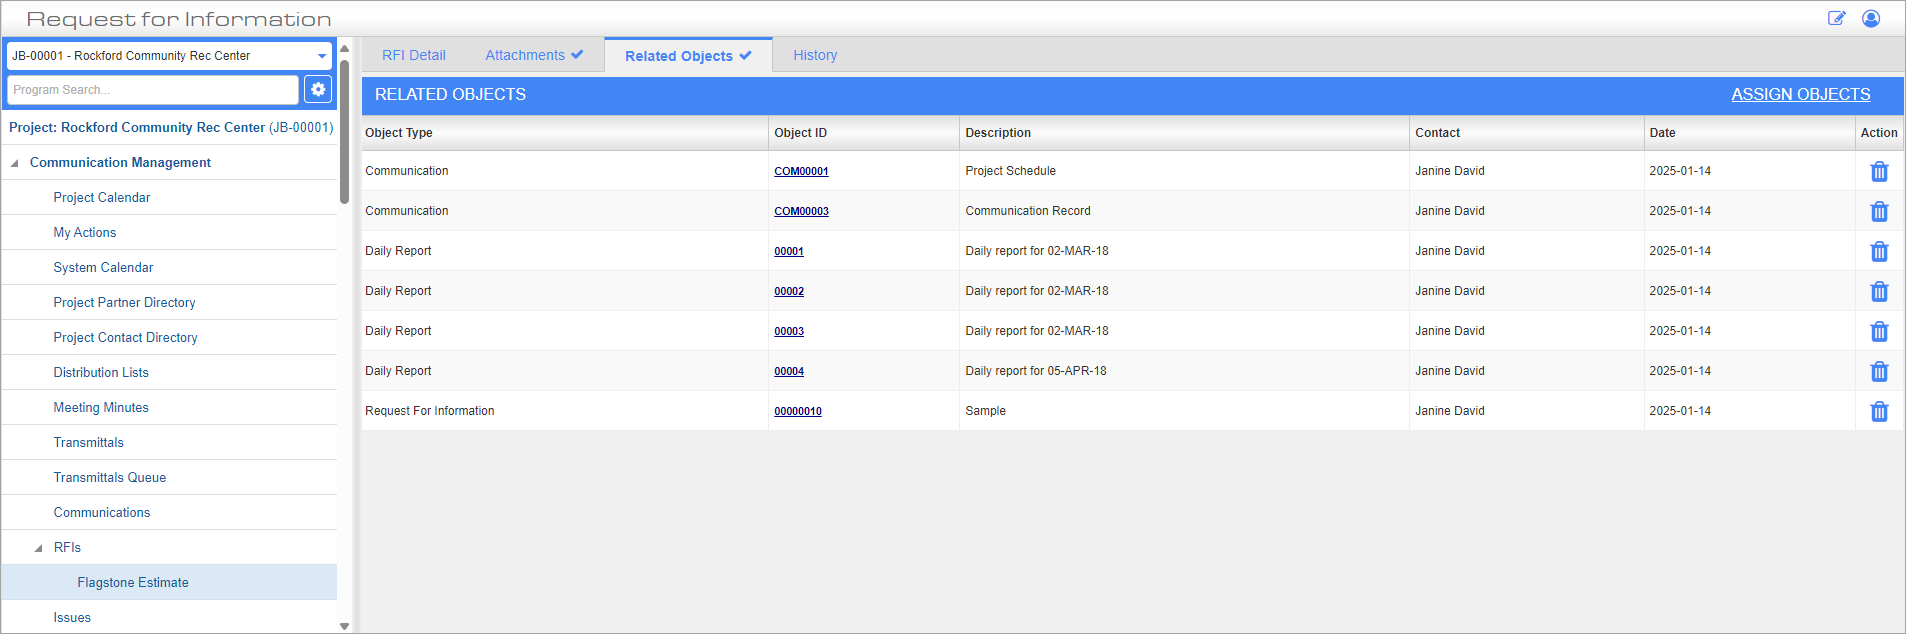
Request For Information; standard Treeview path: CMiC Field > Communication Management > RFIs – Related Objects tab
For objects added in the Related Objects tab of an RFI, the RFI will be available in the Related Objects tab of that object and vice versa.
To add an object, click on the Assign Objects link to open the Related Objects pop-up window. From the pop-up, filter the objects by object type using the drop-down menu, then select objects related to the RFI and press the [Accept] button.
If the RFI is linked to a drawing set’s annotation(s), the Store Drawing Sheet link will be displayed. Refer to Storing a Drawing Sheet for details on using this feature.
History – Tab

Request For Information; standard Treeview path: CMiC Field > Communication Management > RFIs – History tab
This tab can be used to view all changes and edits made to an RFI record. This tab is view-only and so changes must be made with the [Edit] button in the RFI Detail tab.