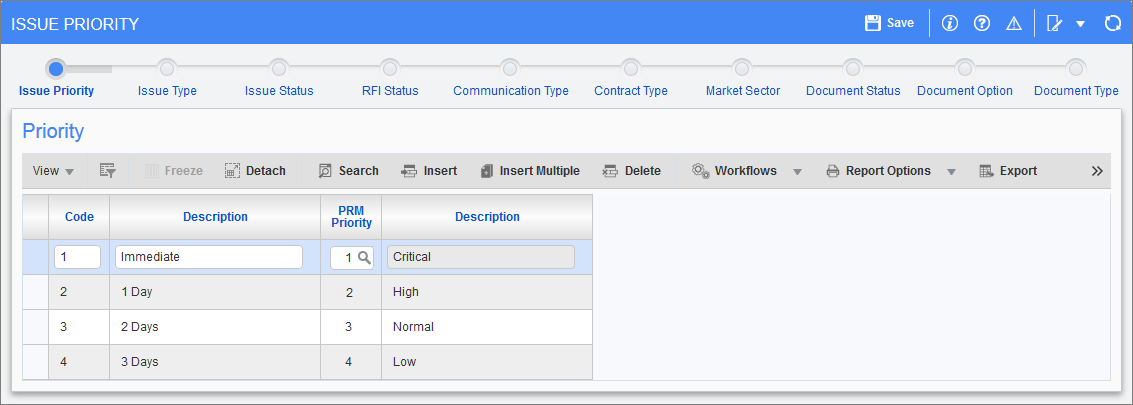
Pgm: DMIPRIOR – Issue Priority; standard Treeview path: System > Global Tables > Maintain Data Process
Clicking on the ‘Maintain Data Process’ link in the Treeview menu launches a screen that contains a CMiC process train along the top to launch various table maintenance screens for tables of values used in CMiC Field. When the screen first opens, the first node on the process train is displayed, which is the Issue Priority node.
The process train contains the following nodes:
Issue Priority
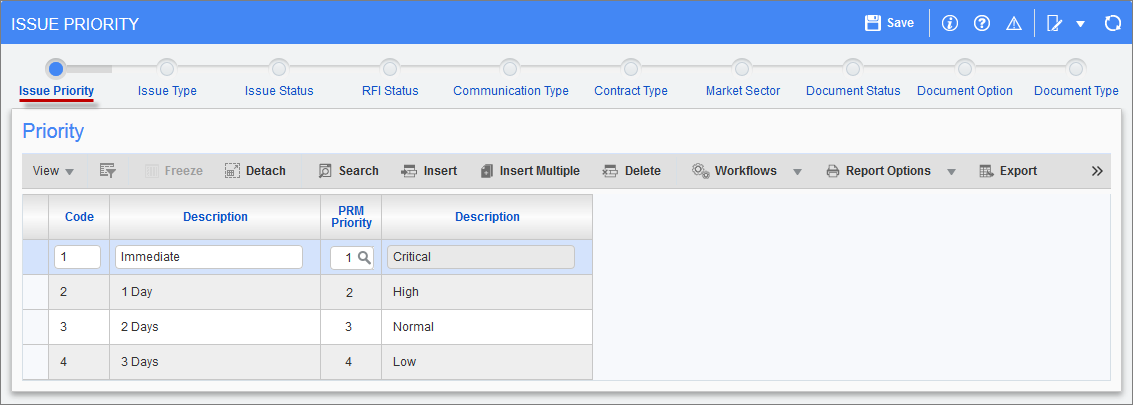
Pgm: DMIPRIOR – Issue Priority; standard Treeview path: System > Global Tables > Maintain Data Process – Issue Priority node
This screen is used to maintain the issue priorities available for selection when creating new issues.
Issue priorities are used to prioritize issues within CMiC Field. The system comes with four pre-defined issue priorities.
Code, Description
Identifying code for issue priority, and its description.
PRM Priority, Description
Priority level that a Work Item created out of Issue Entry will have when created with this Delivery Management Priority.
Issue Type

Pgm: DMITYPE – Issue Type; standard Treeview path: System > Global Tables > Maintain Data Process – Issue Type node
This screen is used to maintain the issue types available for selection when creating new issues.
Issue types are used to manage issues by grouping and categorizing them. The system comes with a pre-defined set of issue types, but the set can be customized via this maintenance screen.
Code, Description
Identifying code for issue type, and its description.
Issue Status

Pgm: DMISTAT – Issue Status Entry; standard Treeview path: System > Global Tables > Maintain Data Process – Issue Status node
This screen is used to maintain the issue statuses available for selection when creating new issues.
Issue statuses are used to manage the issue process. The system comes with a set of pre-defined issue statuses, but the set can be customized via this maintenance screen.
Code, Description
Identifying code for issue status, and its description.
Active – Checkbox
If checked, the issue status will be available in LOVs.
RFI Status
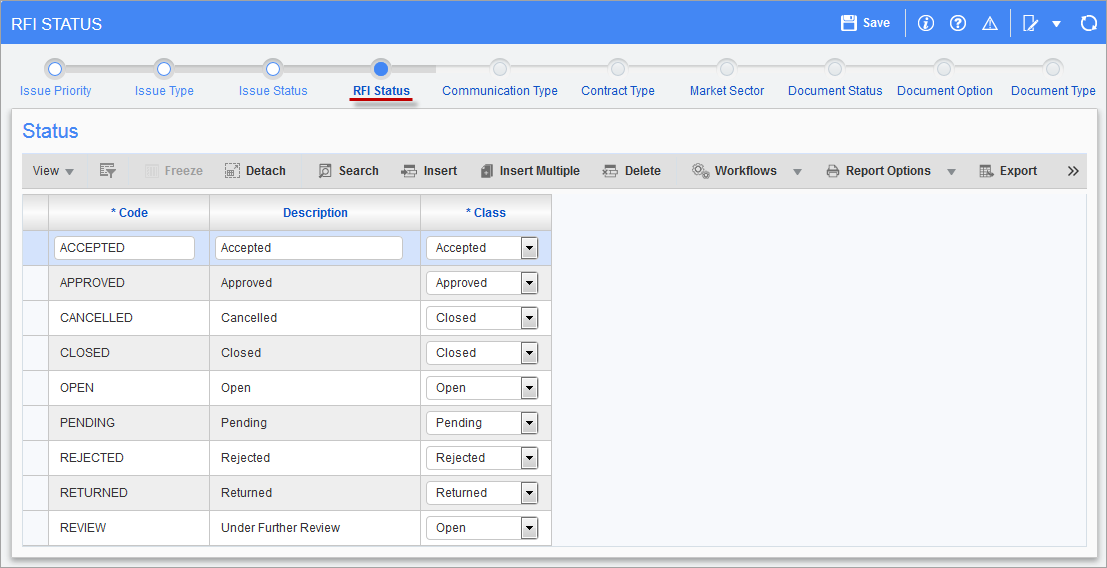
Pgm: PMRFIST – RFI Status; standard Treeview path: System > Global Tables > Maintain Data Process – RFI Status node
This screen is used to maintain the RFI statuses available for selection when creating new RFIs.
RFI statuses are used to manage the RFI process. The system comes with a set of basic RFI statuses defined, however, this screen can be used to create a custom set based on your business processes.
Code, Description
Identifying code for RFI status, and its description.
Class
Class of RFI status.
RFI Status Class
RFI status classes are used to determine how RFI statuses affect records when applied, as well as to determine when the statuses are available/applicable, and include:
-
Accepted
-
Approved
-
Closed: Statuses of this class will close any RFI they are applied to.
-
Pending: Only statuses of this class can be applied to RFIs before they are submitted.
-
Open
-
Rejected
-
Returned: Statuses of this class are applied when an RFI is answered using the [Answer] button in Field/PM.
When a new RFI is created and before it has been submitted, its status may only be set to a status of the "Pending" class. The RFI may be saved without being submitted, allowing users to later add to, review, or edit the record before submitting it.
When an RFI is submitted, its status will be updated to a status of the "Open" class. If there is a status with the code "OPEN" and the class "Open", it will be the default status applied. Otherwise, the first status in the list alphabetically with the class "Open" will be applied.
When an RFI is closed (either by the [Close RFI] button or by applying a status of the "Closed" class), its status may either be preserved or updated to "CLOSED" depending on the current status of the record, as shown below:
| RFI Status Class | Behavior when RFI is closed |
|---|---|
| Accepted | Status preserved |
| Approved | Status preserved |
| Pending | Status preserved |
| Open | Status set to CLOSED |
| Rejected | Status preserved |
| Returned | Status set to CLOSED |
If the status is preserved when the RFI is closed, the record remains in the same status (even though the record itself is closed). For example, for an RFI record where a question has been answered and the answer has been approved, a status with the "Approved" class might be used to indicate that the response and conclusions have been validated. Closing the RFI would preserve this status and also close the record, preventing further changes.
Communication Type

Pgm: BPCOMMFM – Communication Type Maintenance; standard Treeview path: System > Global Tables > Maintain Data Process – Communication Type node
This screen is used to maintain the communication types available for selection when creating new communication records.
Communication types are used for reference purposes only. The system comes with a set of pre-defined Communication types, but the set can be customized via this maintenance screen.
Type, Description
Identifying code for communication type, and its description.
Sort Order
The order in which the type appears in LOVs.
Contract Type
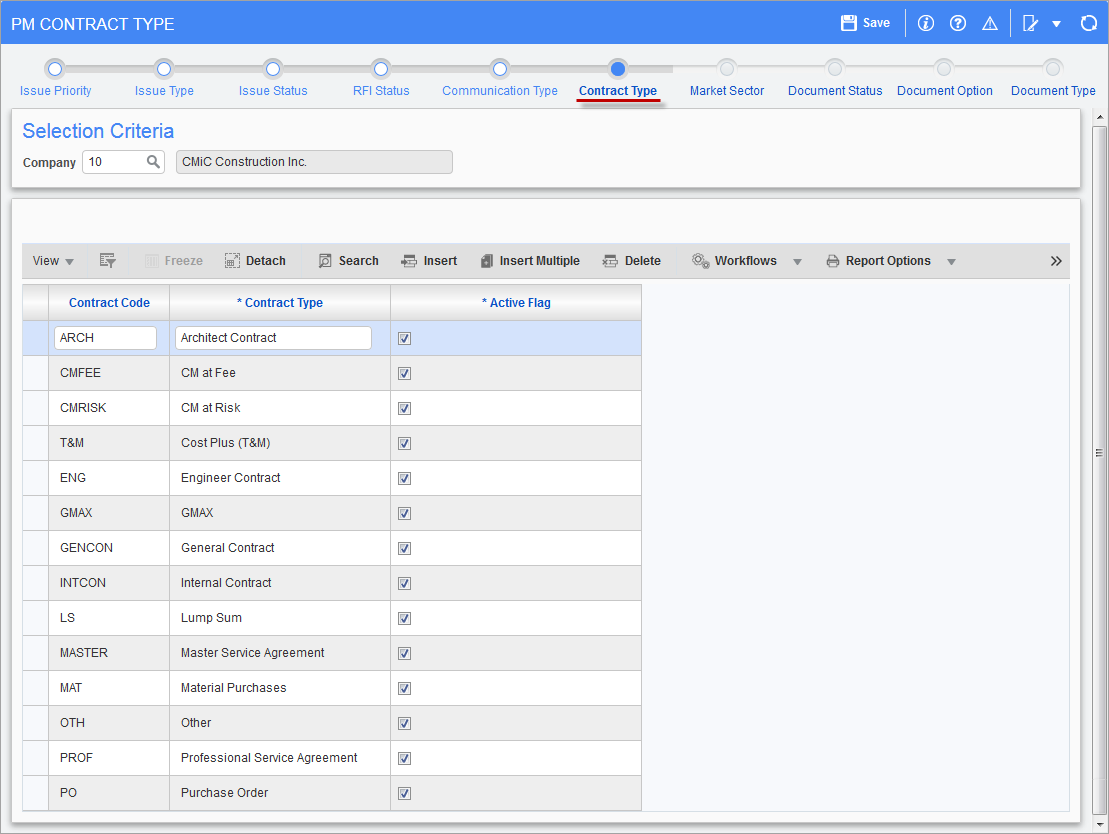
Pgm: PMCTYPE – PM Contract Type; standard Treeview path: System > Global Tables > Maintain Data Process – Contract Type node
This screen is used to maintain the contract types available for selection when creating new contracts.
Contract types can be used to differentiate contracts, for reference purposes. The system comes with a pre-defined set of contract types, but you can customize the set via this maintenance screen.
Market Sector

Pgm: PMSECTOR – PM Market Sector; standard Treeview path: System > Global Tables > Maintain Data Process – Market Sector node
The codes created on this screen are used on the Market Sector tab of the Business Partner Maintenance screen. These codes are used to classify and group business partners (customers) according to market sectors. These classifications are used to maintain the market sectors available for selection and filtering purposes in CMiC Field.
For example, when selecting bidders for an invitation to bid, the list of potential bidders can be filtered according to market sectors, as shown in the screenshot below.

Adding Bidders to and Invitation to Bid in CMiC Field Using Additional Bidder Selection Options
Code, Description
Identifying code for market sector, and its description.
NOTE: The market sector codes being defined here should not be confused with the building type market sector codes that are used in the Opportunity Management module. Building type market sector codes are defined in the Market Sector Maintenance screen in the Opportunity Management module (standard Treeview path: Opportunity Management > Setup > Opportunity Market Sector). Refer to Opportunity Management - Opportunity Market Sector for more information.
Document Status

Pgm: PMDOCST – PM Document Status; standard Treeview path: System > Global Tables > Maintain Data Process – Document Status node
This screen is used to maintain the document statuses available for selection when creating new documents.
Document statuses are used to manage the life cycle of all document types and document packages.
Code, Description
Identifying code for document status, and its description.
Class
Class of document status; values available are pre-defined in the system.
Document Option
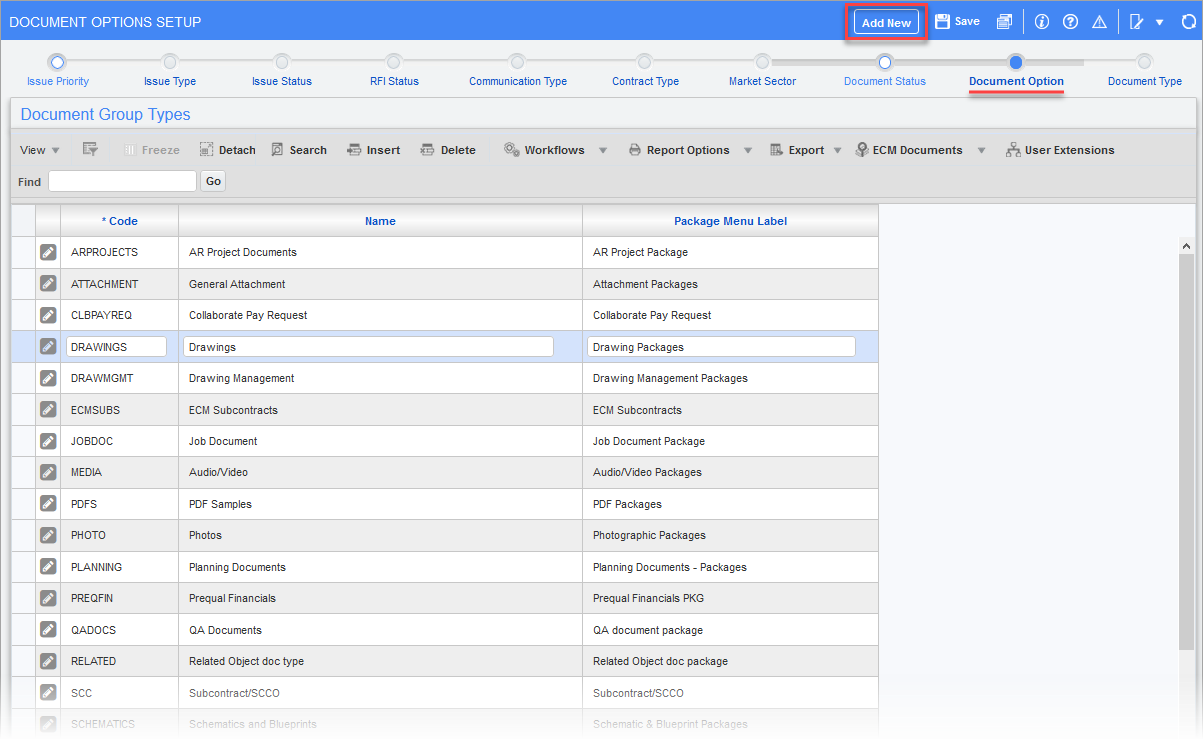
Pgm: PMOPTFM – Document Options Setup; standard Treeview path: System > Global Tables > Maintain Data Process – Document Option node
This screen is used to create and configure document group types (i.e. document package types) which then appear as document folders in the Documents screen in CMiC Field (standard Treeview path: CMiC Field > Document Management > Documents).
Document packages contain specific documents, and can be transmitted directly to your bidders, suppliers, architects or any other party associated with a contract.
NOTE: The Document Options Setup screen can also be accessed in the Job Costing module (standard Treeview path: Job Costing > Utilities > Document Options).
To add a new document group type, press the [Add New] button, and to edit an existing record, click its corresponding Edit icon.
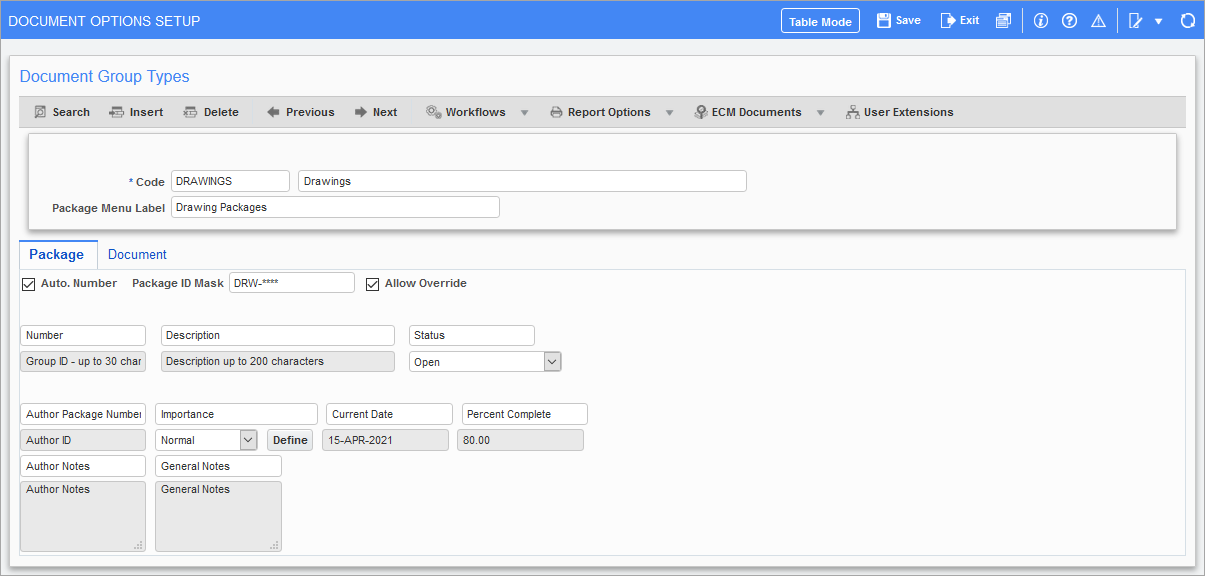
Document Options Setup screen in Form Mode
Code, Name
Enter identifying code for document package type, and its description.
Package Menu Label
Enter the name to identify document package in system.

Document Options Setup – Package tab
The Package tab is used configure the defaults for document packages of this type.
NOTE: The Documents tab is used to configure the defaults for documents contained in this package type.
Auto. Number - Checkbox
Indicates whether auto-numbering is to be used for new document packages of this type.
Package ID Mask
If the 'Auto. Number' checkbox is checked, the Package ID Mask field becomes enabled to enter the auto-numbering mask used for new document packages of this type. This field is a user-defined mask that specifies how the numbering system generates a new document package code.
The asterisk (*) is used to indicate the placeholder for numbers within the string. There are pre-defined codes that may be used as detailed below, or you may hard code a prefix or suffix. The pre-defined codes must be entered in lowercase, otherwise they will be assumed to be hard coded values. Do not include a space between characters when defining masks.
NOTE: At least one asterisk (*) must be used as a placeholder for the package auto-numbering.
The available pre-defined codes are as follows:
| Code | Description |
|---|---|
| t | Document Type |
| c | Company |
| j | Project |
| y | Year |
| m | Month |
| d | Day |
| l | Location |
| e | Sheet Number |
| * | Next Available Number |
NOTE: When creating document types, masks can be defined for both the Package ID and the Document ID. The Package ID Mask field on the Package tab and the Document ID Mask field on the Document tab are defined using the same process as described above.
Allow Override - Checkbox
This box enables the Number field (Document Package ID) for new document packages to allow editing, even if auto-numbering is being used. The auto-generated number can be overridden when creating a new package.
NOTE: If not assigning a mask, ensure the ‘Allow Override’ box is checked, otherwise that document type cannot be used.
Status
Select the default status for new document packages of this type.
[Define] - Button
Press this button to manage the values available for its corresponding drop-down list. For instance, the corresponding drop-down list can be configured to be a field to select the level of importance of the package, or it can be configured to be a field to select the topic of the package (General, Electrical, Mechanical, Structural, Labor, etc.).
The remaining editable fields on this tab are used to edit the labels for their corresponding fields.
Document - Tab
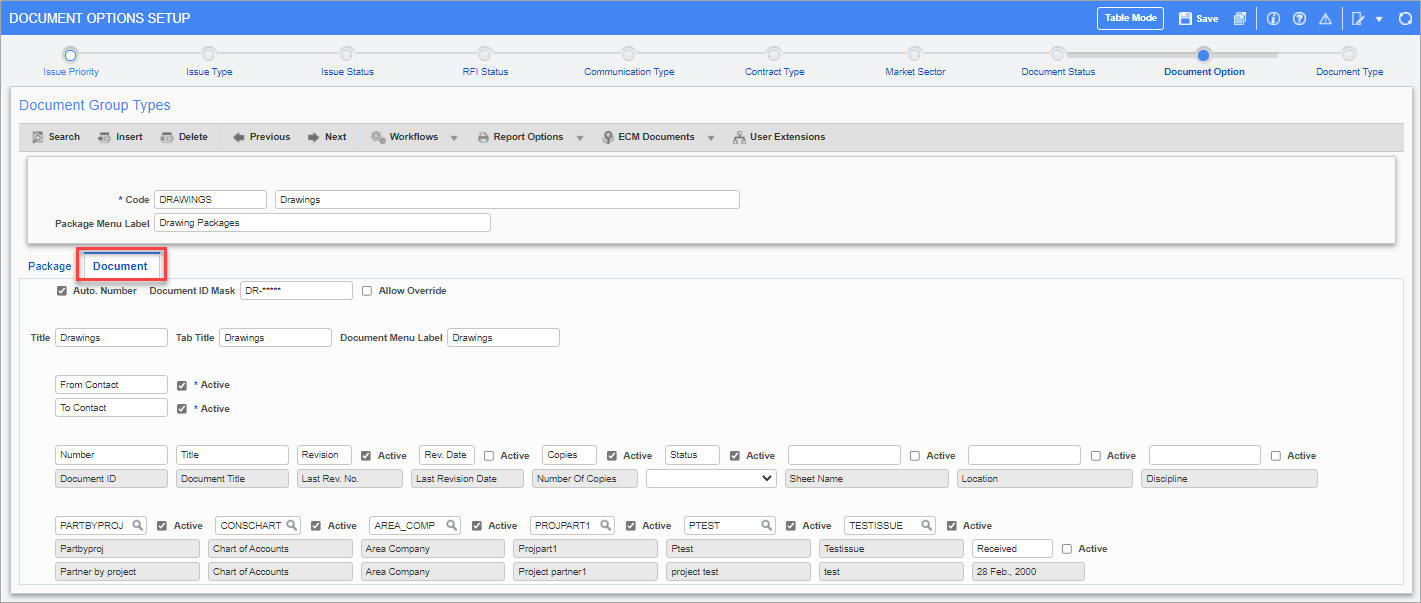
Document Options Setup – Document tab
The Document tab is used to set up the defaults for documents contained in this type of document package.
Auto. Number - Checkbox
Indicates whether auto-numbering is to be used for new documents that will be included in document packages of this type.
Document ID Mask
If 'Auto. Number' checkbox is checked, the Document ID Mask field becomes enabled to enter the auto-numbering mask used for new documents contained in this type of document package. This field follows the same mask format as the Package ID Mask field on the Package tab of this screen. Refer to Package - Tab section for more details on how to define a mask.
NOTE: This field can accommodate up to 100 characters.
Allow Override – Checkbox
This checkbox enables the Number field (Document ID) for new documents, to allow editing, even if auto-numbering is being used. The auto-generated number can be overridden when creating a new document.
NOTE: If not assigning a mask, ensure the ‘Allow Override’ box is checked, otherwise users will not be able to find the document.
The remaining editable fields on this tab are used to edit the labels for their corresponding fields, and the default states of the flags.
Document Type

Pgm: SYSDOCTP – Document Types; standard Treeview path: System > Global Tables > Maintain Data Process – Document Type node
This screen is used to set up the document types available for selection in the module selected via the Application field drop-down menu.
Document types (also known as Form Letter Types) are associated to a data source, and they are used to create and group MIP Word Documents and PM Form Letters. This step is only necessary if an appropriate document type for a new MIP Word Document has not yet been defined in the system. As shown in the above screenshot, system defined document types have a check in the System column.
For details about creating MIP Documents, please refer to the MIP reference guide.
To create a new document type, click the Block Toolbar’s [Insert] button to insert a new row. Then, enter a code and description for the new document type, and select a data source using the Data Source field’s LOV.
System
Display-only field indicating if document type was pre-defined for the system.
Code, Name
Identifying code for document type, and its description.
Data Source
Data source for document type. To view the columns of a data source, click the [Show Columns] button.
[Show Columns] – Button
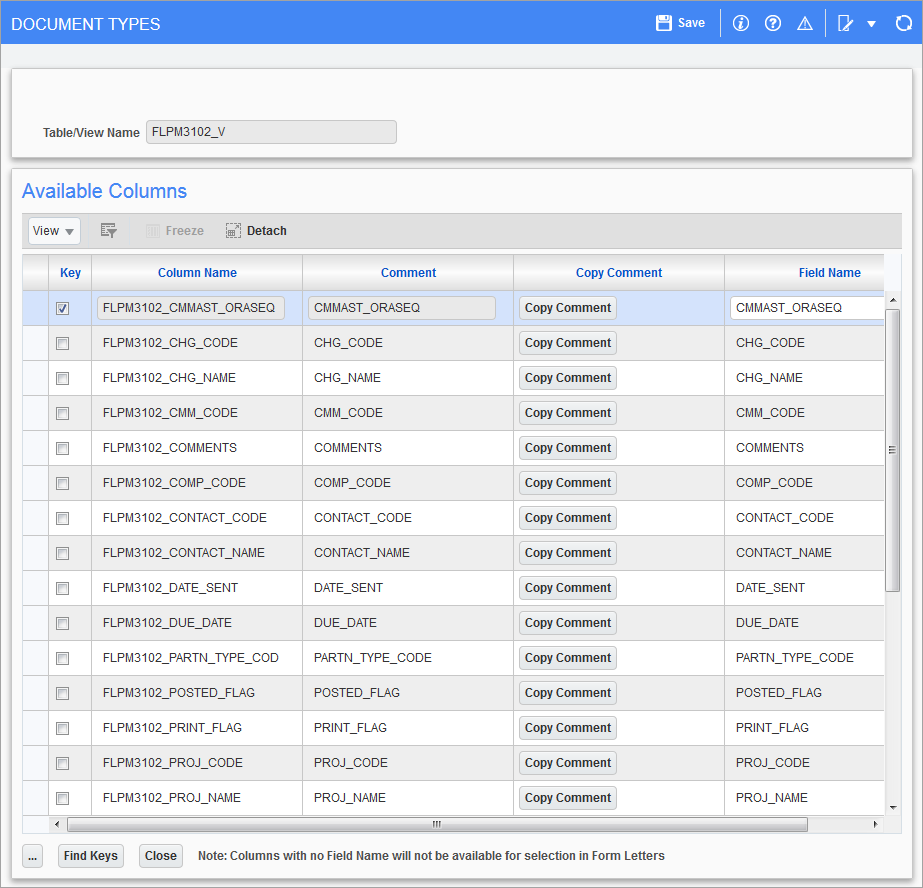
Pop-up window launched from the [Show Columns] button on the Document Types screen (standard Treeview path: System > Global Tables > Maintain Data Process – Document Type node)
This button’s pop-up window displays the columns of the data source specified for the document type selected on the previous screen.
The ‘Key’ checkbox is used to indicate which columns can be used to link rows from one data source to another (e.g. link a project record to its corresponding opportunity record in order to display information from both).
The following provides details about the buttons located on this pop-up window.
[Copy Comment] – Button
Replaces the value in the Field Name field with the value from the Comment field.
[…] – Button
Used to replace all the values of the Field Name fields with the values from the Comment fields.
[Find Keys] – Button
Provides a list of all primary and unique keys for the data source’s table/view. However, it should be noted, primary or unique keys cannot be identified for all views. Keys are used to link rows (records) from one table/view to another.