CMiC Analytics: Catalog Builder - Data Sources
The backbone of CMiC Analytics (BI Dashboard Builder and BI Query Builder) is a semantic layer called a data catalog. It is a layer that describes information in the database in natural language terms. It also defines relationships between different parts of the database, such as Job Costing and Project Management. CMiC ships a default catalog to every customer, called the “CMiC Default Data Source”. This contains nearly every table and view in the system, with nearly all the joins that could be required between them optimally predefined. For example, it contains common tables and joins that most users would use in a BI report. Users who have access to Catalog Builder can make copies and customized versions of the data catalog, or even create one from scratch.
NOTE: The CMiC Default Data Source should not be modified, as patch installations and hotfixes update this default data source, overwriting any changes made to it and making any dependent dashboards unusable.
As shown below, CMiC Default Data Source is comprised of subsets of tables and views that are grouped by Enterprise modules.

If CMiC Default Data Source is not sufficient to create a desired dashboard, because a different join type is required (e.g., left outer join required instead of inner) or a table\view needs to be added to it, it is recommended that a copy of CMiC Default Data Source is created for modification and use. Refer to Copy (Data Sources, Business Areas, Folders) for more information.
If a new data source is required, and it does not make sense for it to be a copy of the CMiC Default Data Source, only then would the Create Data Source screen be used to create it.
NOTE: If required, security roles can be assigned to the CMiC Default Data Source at any level, including data source, business area, and folder level. Please refer to CMiC BI Security – BI Catalog Builder for more information.
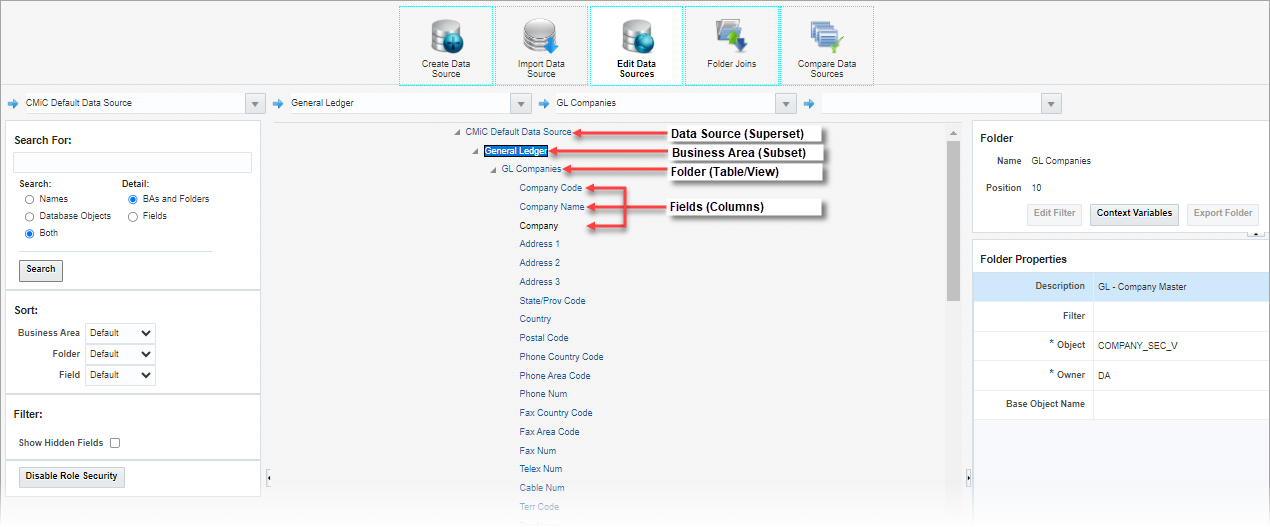
The CMiC Default Data Source is made up of business areas, folders, and fields.
Data Source (Superset of Database Objects)
In BI Catalog Builder, a data source is a master set of database objects (i.e., tables, views) that have been logically organized into subsets referred to as business areas.
Pop-up window launched when creating a new dashboard in BI Dashboard Builder tool
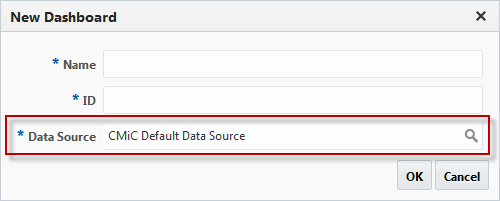
In BI Dashboard Builder, a data source is selected when creating a new dashboard (as shown above), and its folders (i.e., tables/views), and the results (rows) returned by their joins are used to create the dashboard’s visualizations (i.e., charts, gauges, tables).
Business Area (Subset of Data Source)
A business area is a subset of the data source that contains a logical grouping of tables/views (i.e., folders) pertinent to a dashboard to be created in BI Dashboard Builder.
To learn more, refer to BI Catalog Builder - Business Areas and Folders.
Folder (Table/View)
A folder is a single table or view, which contains rows of records comprised of fields (i.e., columns).
To learn more, refer to BI Catalog Builder - Business Areas and Folders.
Field (Column in Row of Table/View)
For a table or view’s row, its data is stored in fields (i.e., columns).
Overview
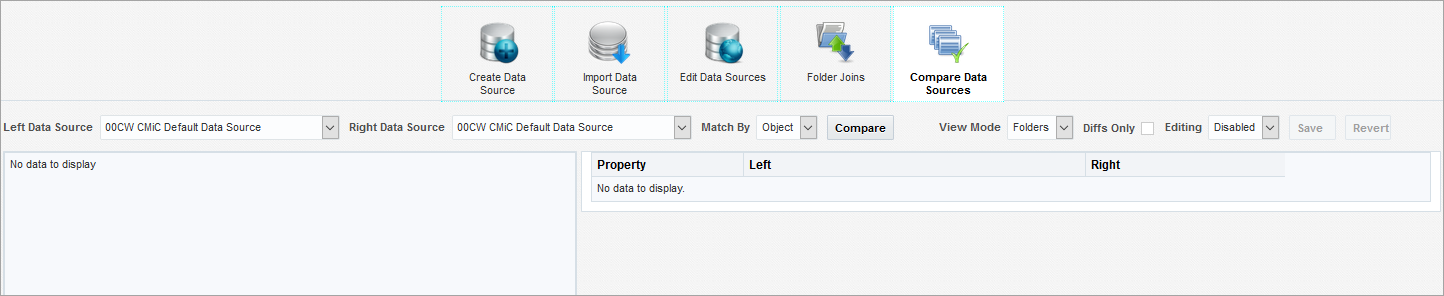
Compare Data Sources Screen
The Compare Data Sources is used to see differences between two specified data sources and all their objects like Business Areas, Folders, Fields, Joins and Joins conditions and all their properties.
It also allows users to copy/merge differences from one data source to another and/or delete unnecessary objects to match the other data source.
The screenshots below show a comparison of two data sources: “CMiC Default Data Source v1” and “CMiC Default Data Source v2”. The differences are highlighted in red font.
Controls
Compare Data Sources Screen’s Controls
Left Data Source, Right Data Source
Select data sources to compare.
Match By
Specify how to match objects for comparison. Available options are “Object” and “Name”.
-
Object: Data Source items will be matched using corresponding database objects.
-
Name: Data Source items will be matched using their names only. This mode allows users to check if there are folders or fields with the same name that point to different database objects.
[Compare] – Button
Press this button to compare data sources. A message displaying comparison results will be displayed next to the button.
View Mode
Controls what information to display in the right screen section. Options available are “Folders” or “Joins”.
Diffs Only – Checkbox
When checked, only items that contain differences will be shown.
Editing
Available options are “Enabled” and “Disabled”. When editing is enabled, users will be able to apply changes from one data source to another.
[Save], [Revert] – Buttons
When data sources are modified, press either [Save] to apply the changes or [Revert] to remove all unsaved changes.
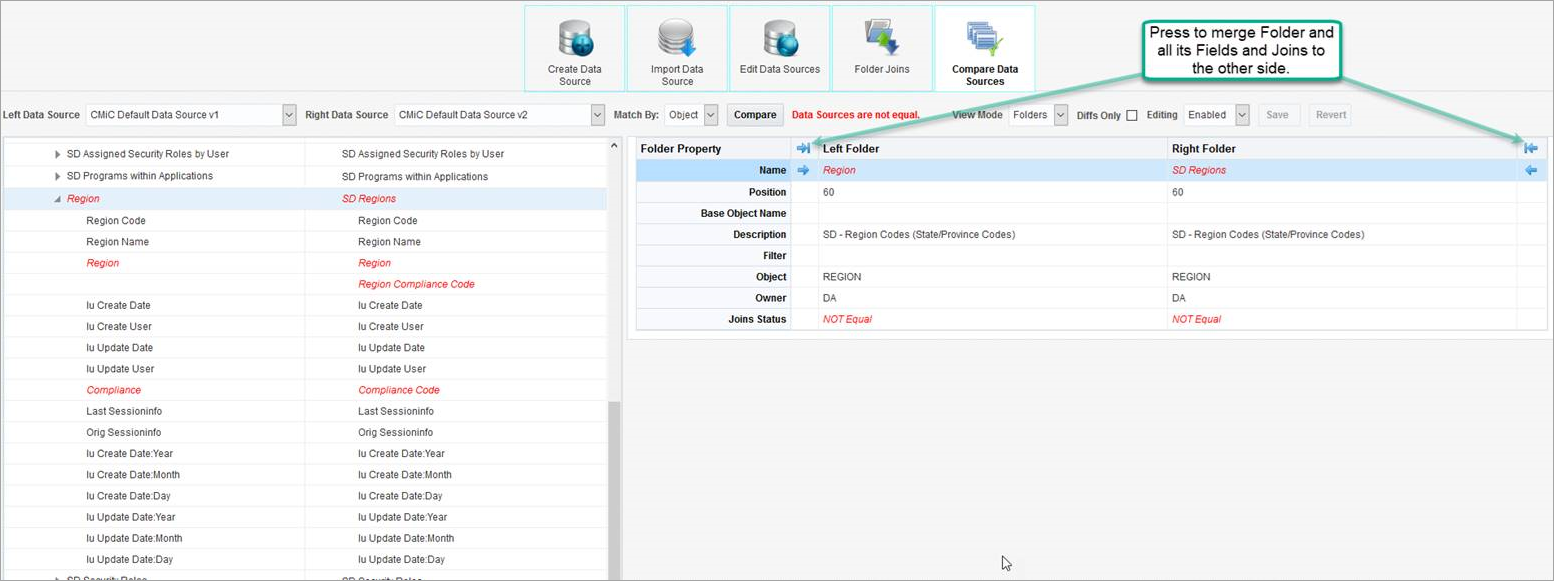
Compare Folder Joins
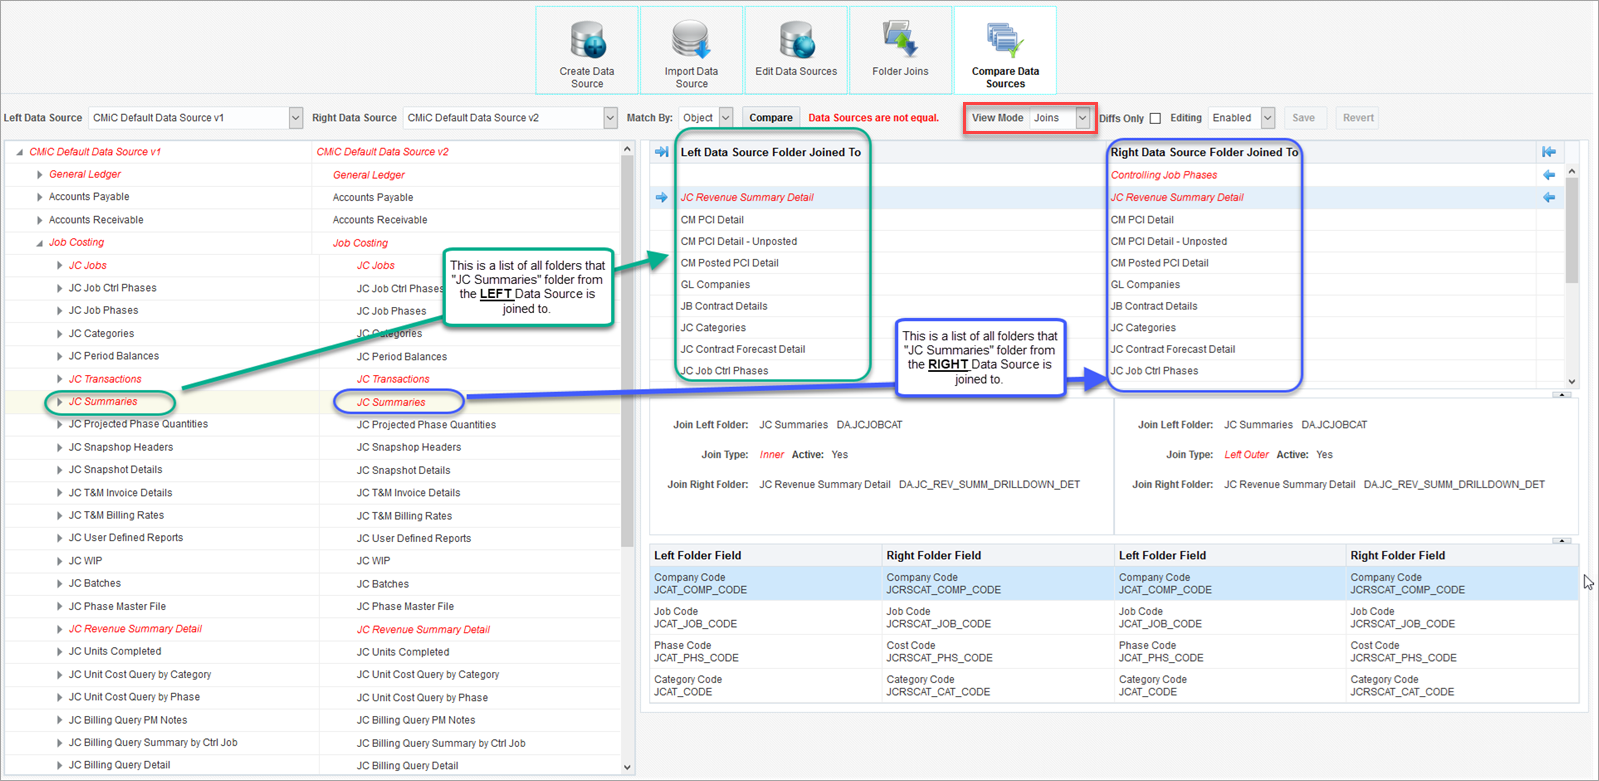
Comparing Folder Joins in the Compare Data Sources Screen
To compare joins, select “Joins” in the View Mode field’s drop-down menu.
Joins are sorted alphabetically by default. However, in order to make it easier to see joins that are “not equal”, they will always appear first in the list. Users can change how the joins are sorted by clicking on the sorting arrows in the column headers.
Editing
Users can merge differences from one data source to another.
By default, Editing mode is disabled to prevent unexpected modifications. To allow data sources modifications, switch the Editing field from “Disabled” to “Enabled” in the drop-down menu.
Editing is only allowed when the Match By field is set to “Object” using the drop-down menu.
When Editing mode is enabled, the Right panel will have Arrow buttons ( and
and ) that are used to copy or merge Properties, Fields, Folders, Business Areas, or Joins from one data source to another.
Copy Properties
This section contains examples of copying properties for fields.
Copy Field Properties
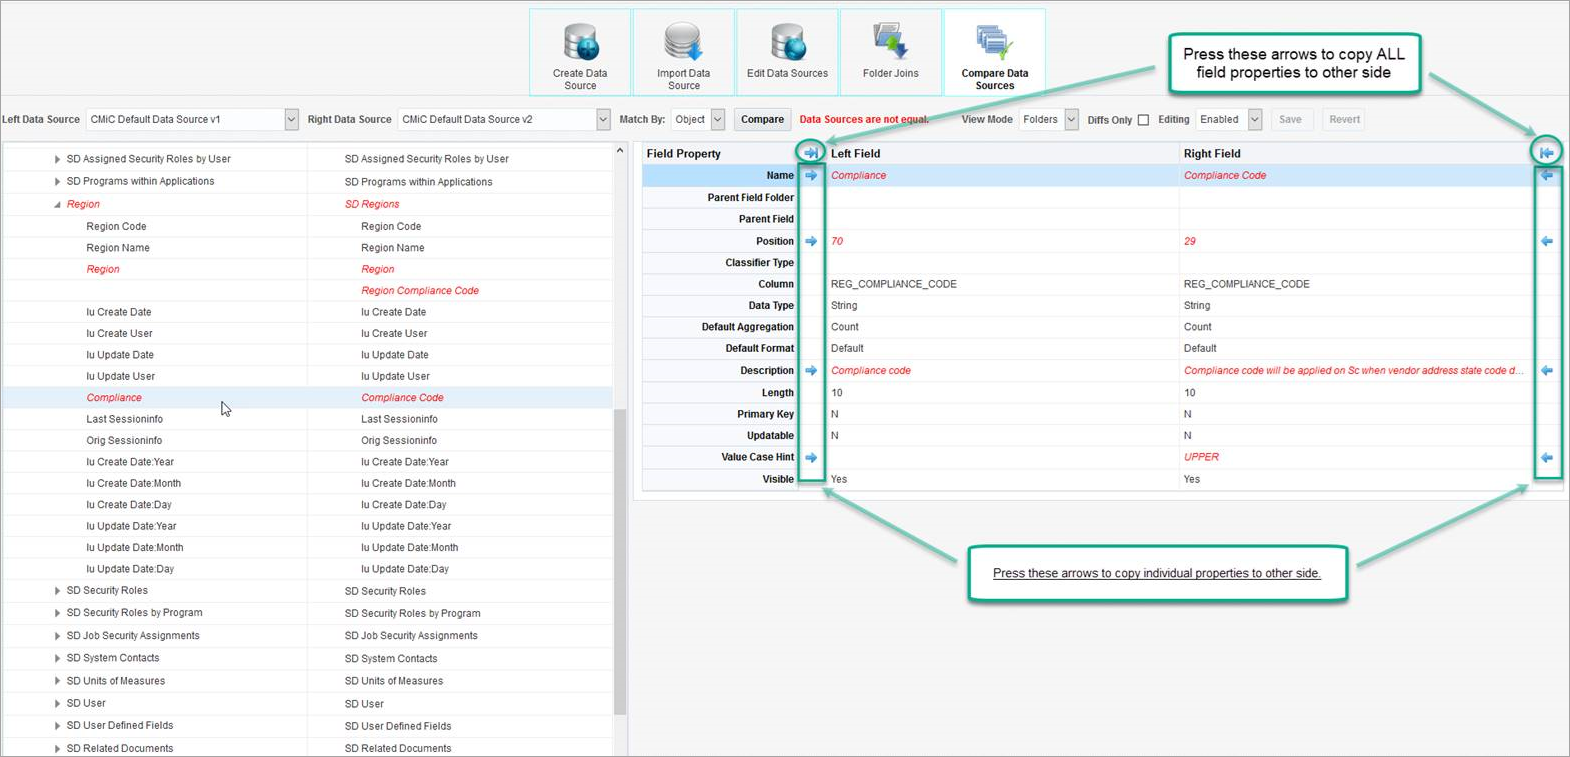
Copying Fields in Compare Data Sources Screen
The screenshot above shows an example of copying field properties.
Copy Calculated Field Properties
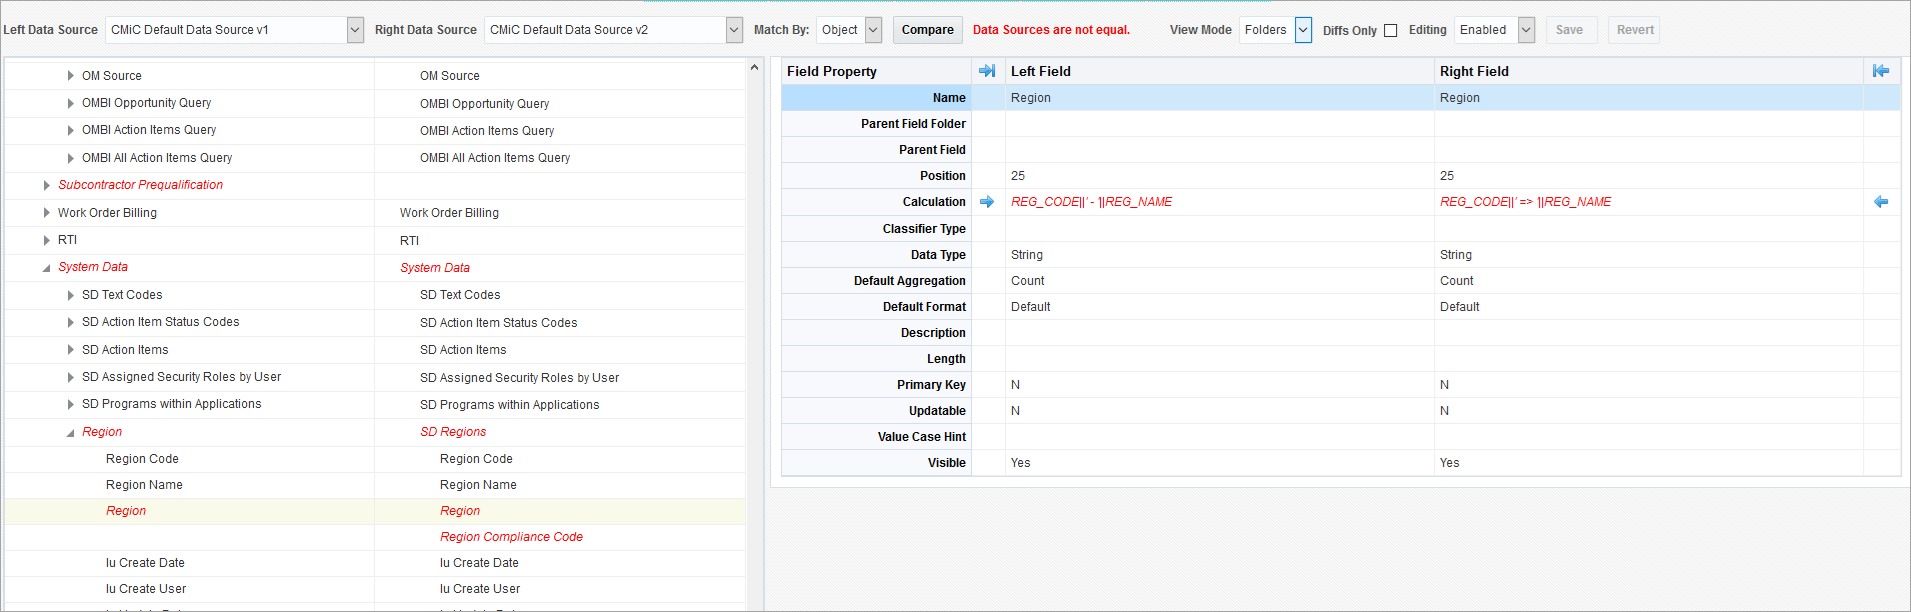
Copying Calculated Fields in Compare Data Sources Screen
The screenshot above shows an example of copying calculated field properties. Calculated fields are always matched by name to allow calculation updates.
Copy Missing Objects or Delete Obsolete Objects
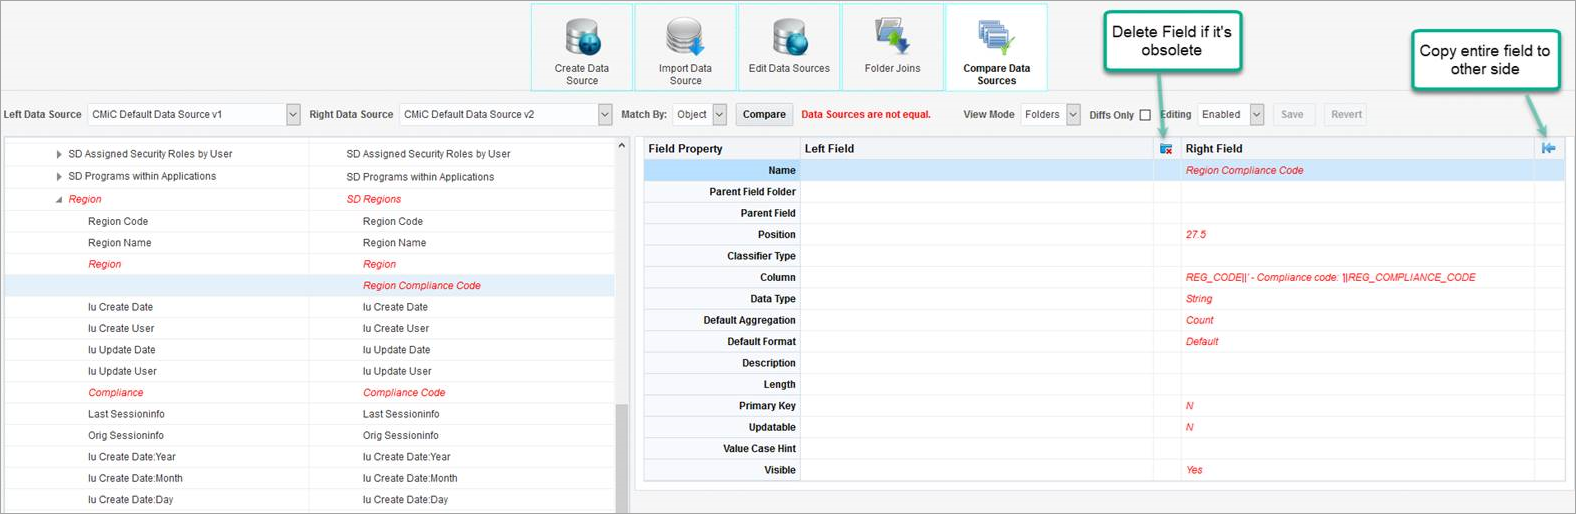
Copying Missing Objects or Deleting Obsolete Objects in the Compare Data Sources Screen
The screenshot above shows an example of copying missing objects or deleting obsolete objects for fields.
Merge Folders/Business Areas or Entire Data Source
Users can merge differences from one object to another including all its children.
NOTE: The merging process will never delete obsolete objects. Obsolete objects can only be deleted one by one.
For example:
-
Merging a Folder: All folder’s fields and joins will also be merged.
-
Merging a Business Area: All business area’s folders will also be merged.
-
Merging an Entire Data Source: All business areas and their folders will be merged.
To merge objects, use the buttons shown in the screenshot below, which shows an example of merging folders.
Merging Folders in Compare Data Sources Screen
Copy Joins
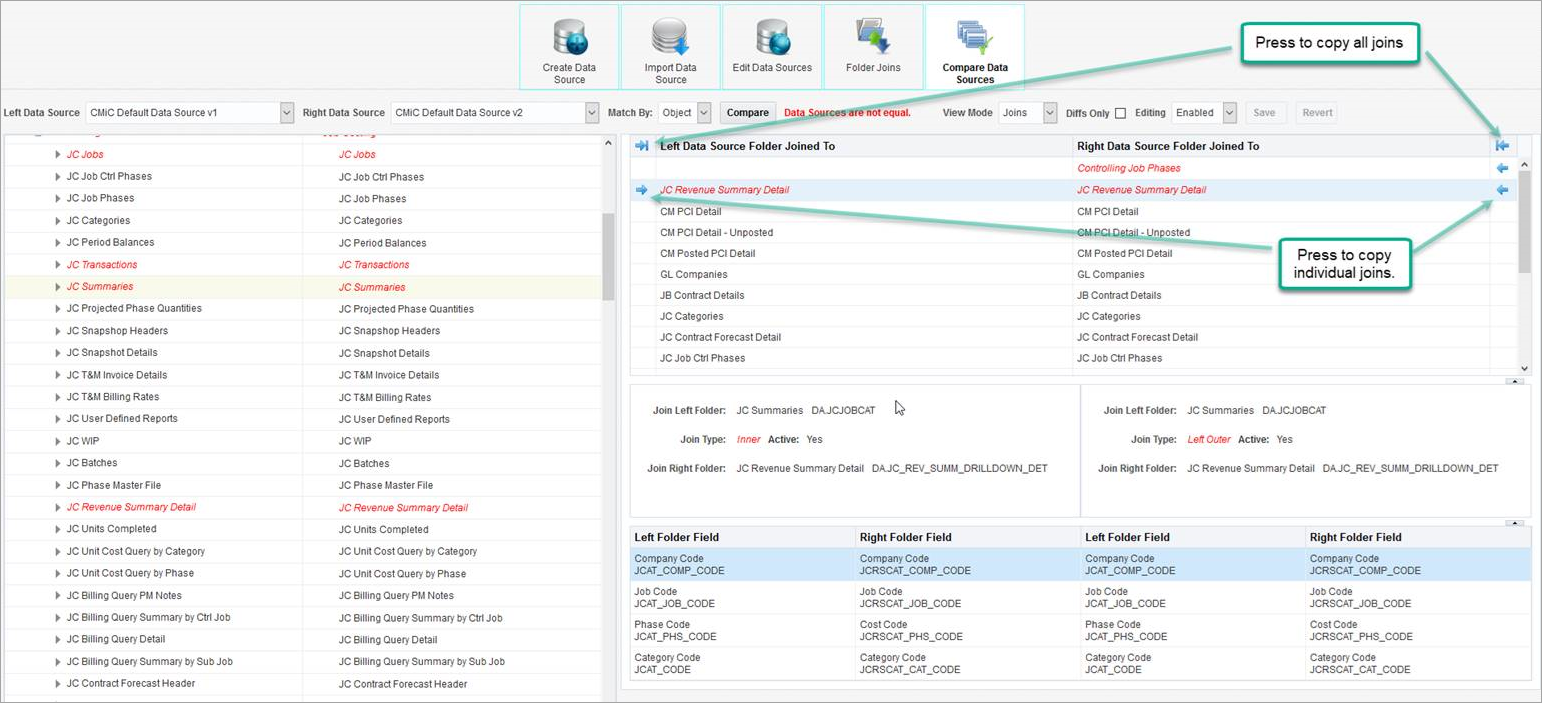
Copying Joins in Compare Data Sources Screen
The screenshot above shows an example of copying joins in the Compare Data Sources screen.
Delete Obsolete Joins
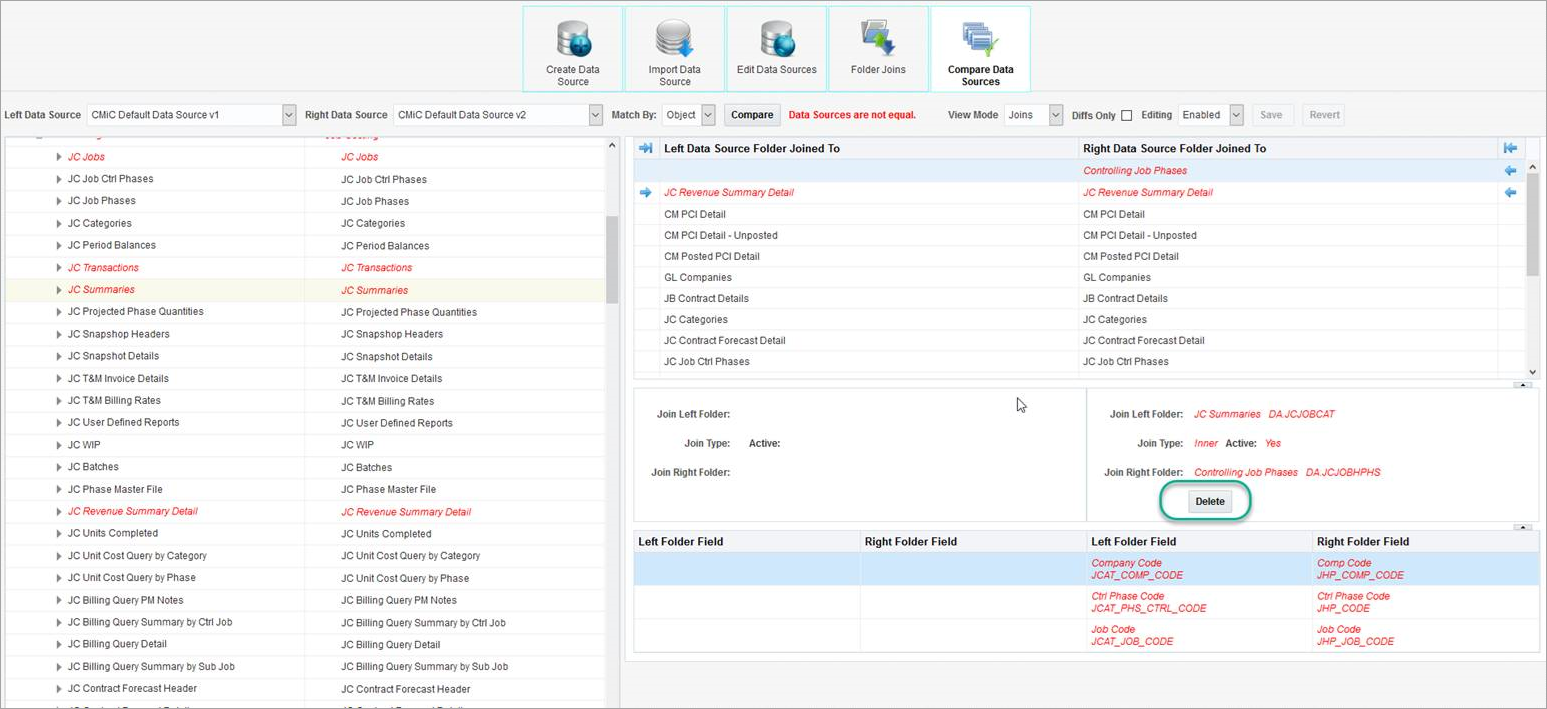
Deleting Obsolete Joins in Compare Data Sources Screen
The screenshot above shows an example of deleting obsolete joins in the Compare Data Sources screen.
System Privileges
Depending on their system privileges, some users won’t be able to modify joins, calculated fields, etc. In this case, the Merge functionality will still merge all possible objects but will skip objects that current user is not allowed to update.
Compare Context Variables
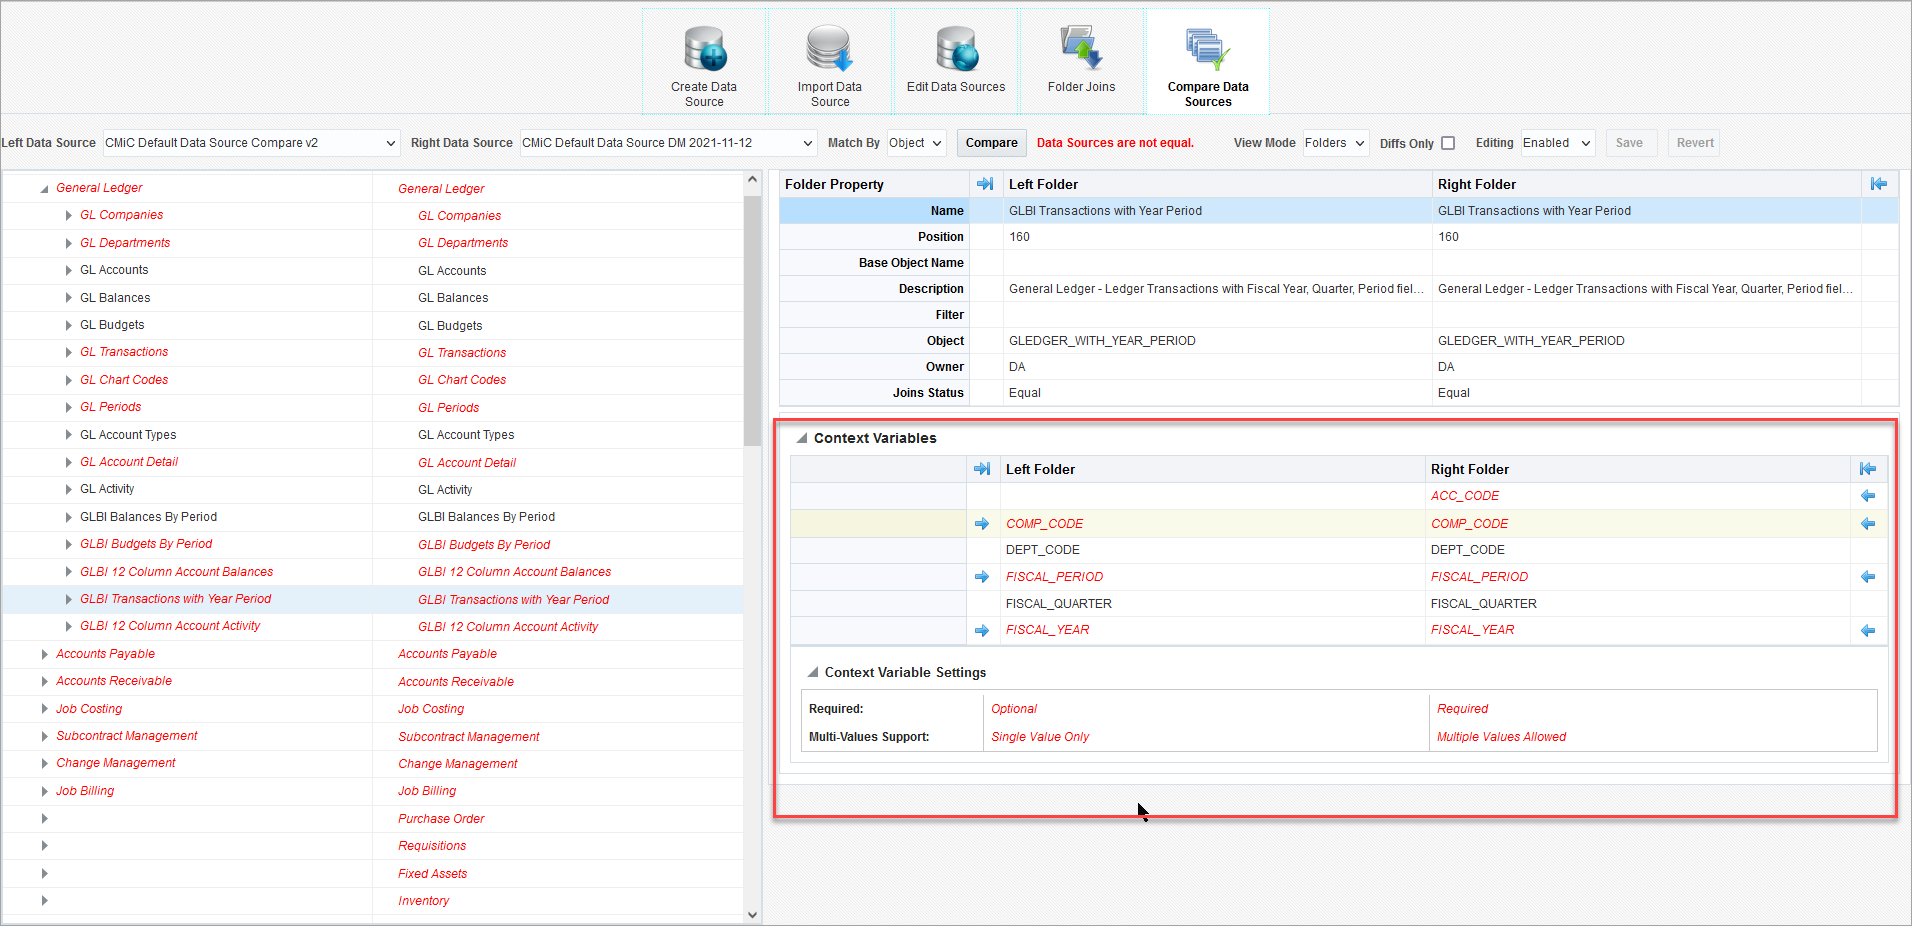
Comparing Context Variables in the Compare Data Sources Screen
The Compare Data Sources screen also allows you to compare context variables, as shown in the screenshot above.
Overview

Import Data Source Screen
This screen is used to import data sources, including business areas and folders.
When importing a specific folder or business area, the program will also import joins.
Export file extensions are as follows:
*.ds – export file for an entire data source
*.dsb – export file for a specific business area
*.dsf – export file for a specific folder
NOTE: Unlike dashboards and queries, data sources offer greater portability, as they can be imported across different patch levels and hotfix versions without compatibility issues. However, data sources created in a Cloud environment cannot be transferred to an Enterprise environment. In contrast, data sources created in an Enterprise environment can be imported into a Cloud environment.
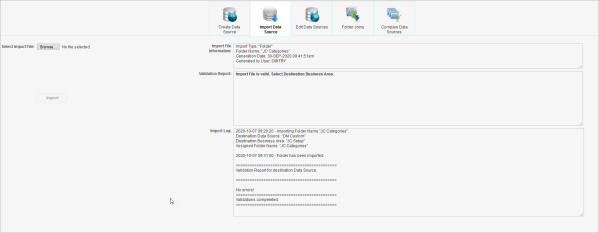
Importing Data Sources
To import a data source, business area, or folder, complete the following steps:
-
On the Import Data Source screen, click the [Browse] button and select a valid file (e.g. .ds for data source, .dsb for business area, or .dsf for folder).
The following screenshots show an example of selecting a data source file.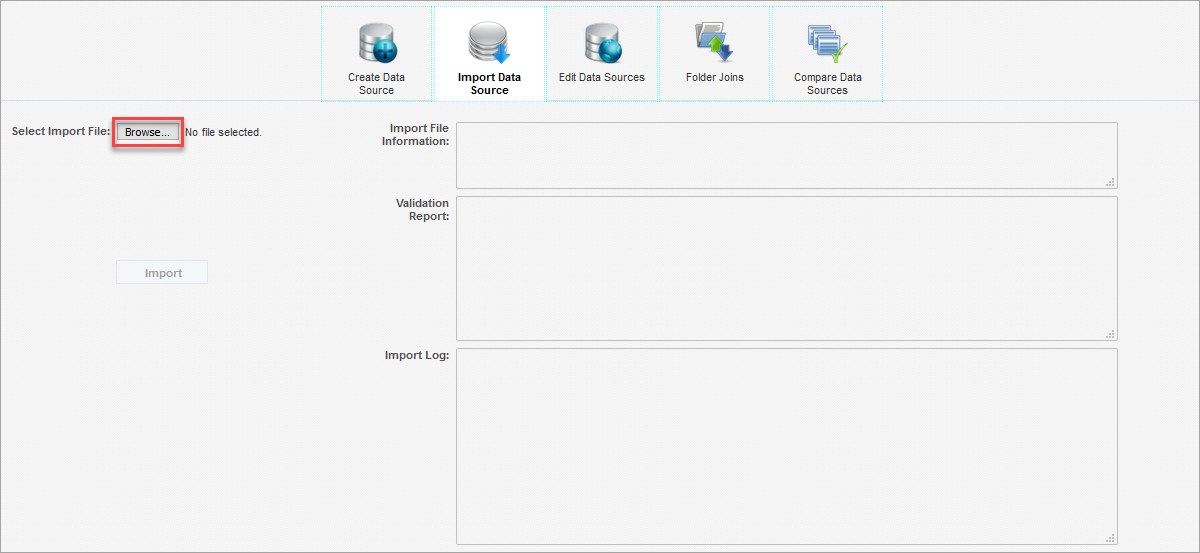
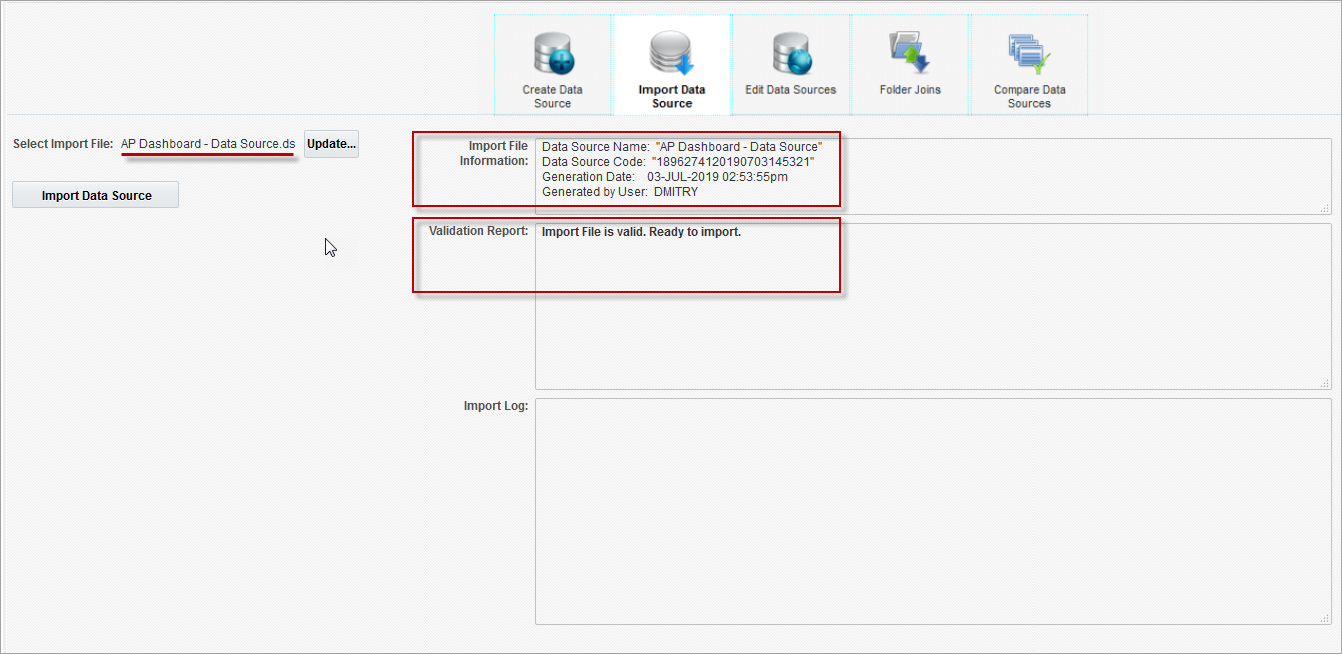
-
Once a file is selected, it will be validated before it is imported, and import file information and a validation report will be presented.
-
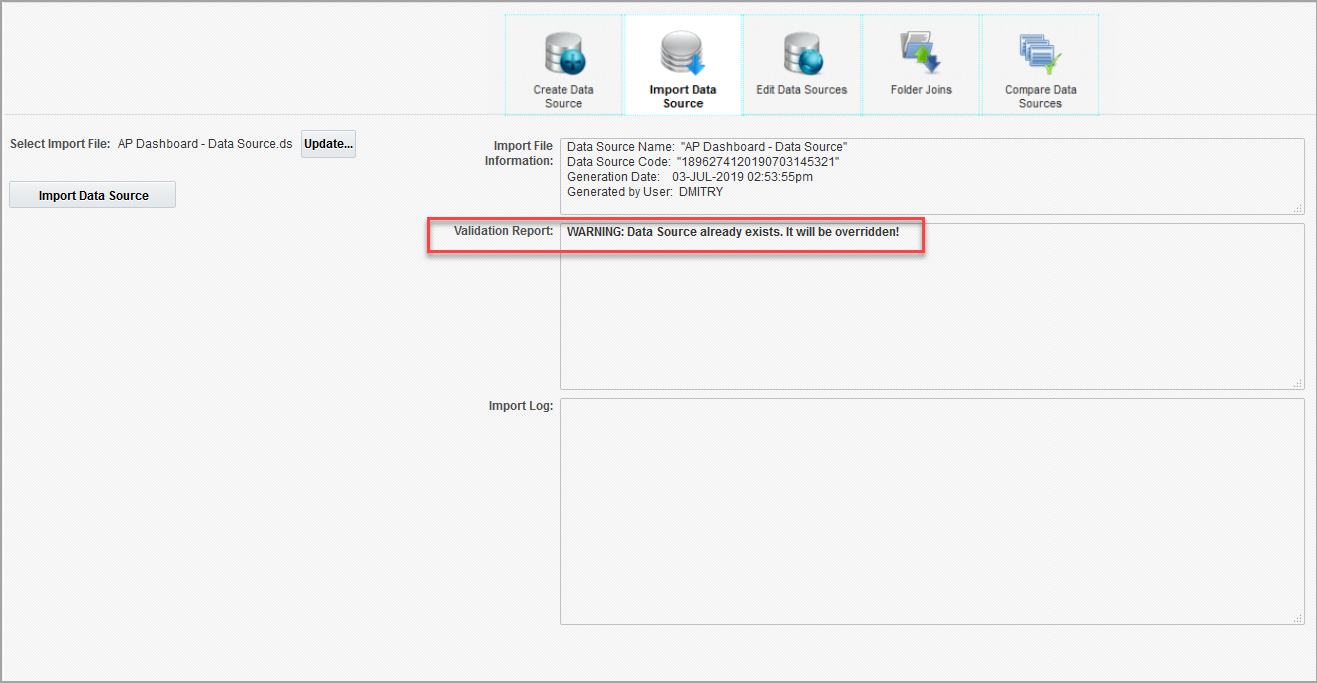
If a data source to be imported already exists, the validation report will issue a warning. It is recommended to always review the Validation Report panel before importing, as it may contain important warnings depending on a specific use case. If the destination data source already has a folder or business area with the same name as the one to be imported, then it will be imported with a new name (adding a number suffix). The new name will be displayed in the import log.
-
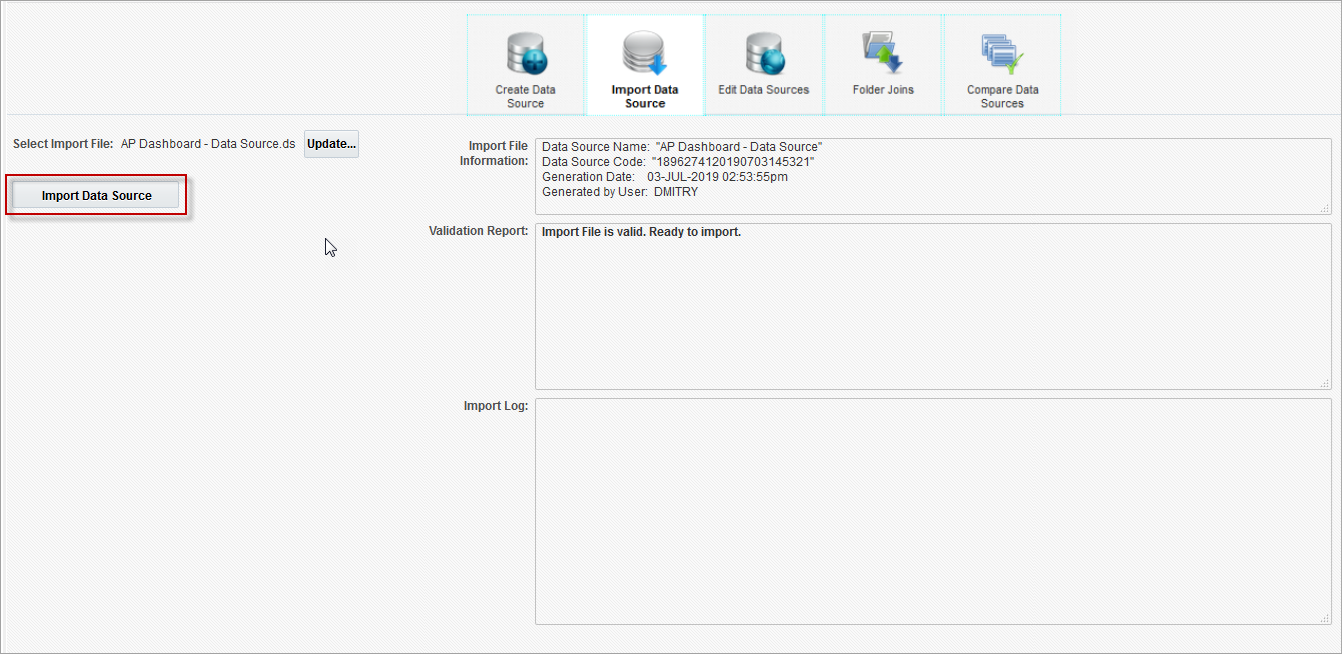
If validation passes and no critical errors are found for a data source import file, the [Import Data Source] button will become enabled. Click this button to start the import process.
If validation passes and no critical errors are found for a business area import file or a folder import file, select the Destination Data Source if importing a business area or select both a Destination Data Source and Destination Business Area if importing a folder. Next press the [Import] button to start the import process. The following screenshot shows an example for a folder import.
-
When the import is complete, review the import log.

Users can export any data source into a file and then import it into another or the same environment.
For details on exporting data sources, refer to the [Export Data Source] button in the BI Catalog Builder - Editing Data Sources
Overview
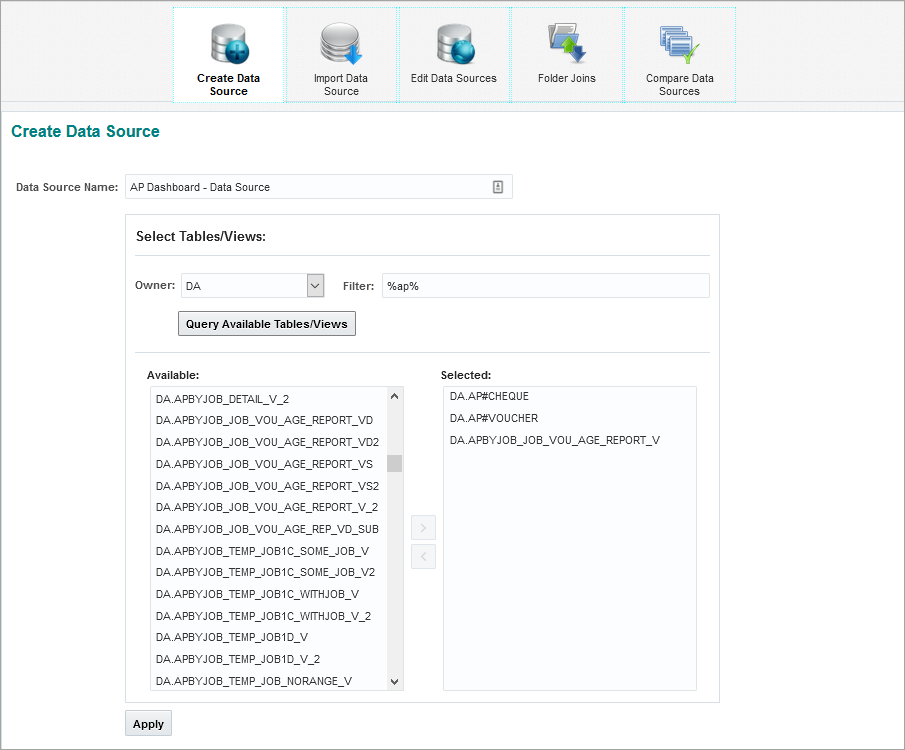
Create Data Source Screen
The Create Data Source screen of BI Catalog Builder is used to create a new data source to add to the catalog of data sources available for the BI Dashboard Builder tool. The list of created data sources is available on the Edit Data Source screen.
Using this Screen
This screen would typically not be required, as the default data source provided with this application, CMiC Default Data Source, has been created to contain nearly all the tables and views in the system, with nearly all the joins that could be required between them optimally predefined. If CMiC Default Data Source is insufficient, because a different join type is required or a table\view needs to be added to it, it is recommended that a copy of CMiC Default Data Source is created for modification and use.
NOTE: It is recommended that CMiC Default Data Source is not modified, as patch installations and hotfixes update this default data source, overwriting any changes made to it and making any dependent dashboards unusable.
For details about creating a copy of CMiC Default Data Source, please refer to Copy (Data Sources, Business Areas, Folders) for more information.
If a new data source is required, and it does not make sense for it to be a copy of CMiC Default Data Source, then this screen would be used to create it, as outlined by the following steps.
NOTE: For CLOB type table/view columns, BI Catalog Builder will generate calculated fields that will truncate CLOB values if they are longer than 4000 characters, adding “[TEXT TRUNCATED]” to the truncated value if truncation occurred. Users can modify this calculation if necessary. This applies when fields are being generated, such as when a new data source is created on the Create Data Source screen or when a data source is edited on the Edit Data Source screen using the context menu options “Edit Business Area” or “Refresh”.
Creating Data Source – Steps
The following three steps are taken to create a new data source when it does not make sense for it to be a copy of CMiC Default Data Source.
Step 1: Create Data Source

First, the following actions are performed via the Create Data Source screen:
Part 1: Data source is created and defined.
Part 2: Data source’s business areas are created and defined.
Step 2: Edit Data Source

Second, the following actions are performed via the Edit Data Source screen:
-
Provide more meaningful names for folders and files of new data source’s business areas.
-
Set the default aggregate function for the fields.
-
Set which fields are visible in the BI Dashboard Builder tool, for simplification’s sake.
Step 3: Modify Folder Joins

Third, the Modify Folder Joins screen is used to define the joins between the tables/views that will return the desired data to be charted in the BI Dashboard Builder tool.
The Create Data Source screen is used to create a new data source.
In BI Catalog Builder, a data source is a master set of database objects, from which pertinent subsets, known as business areas, are defined.
A data source is created by providing it a name and specifying which tables/views it contains.
Screen’s Fields & Buttons
Data Source Name
Name for data source being created.
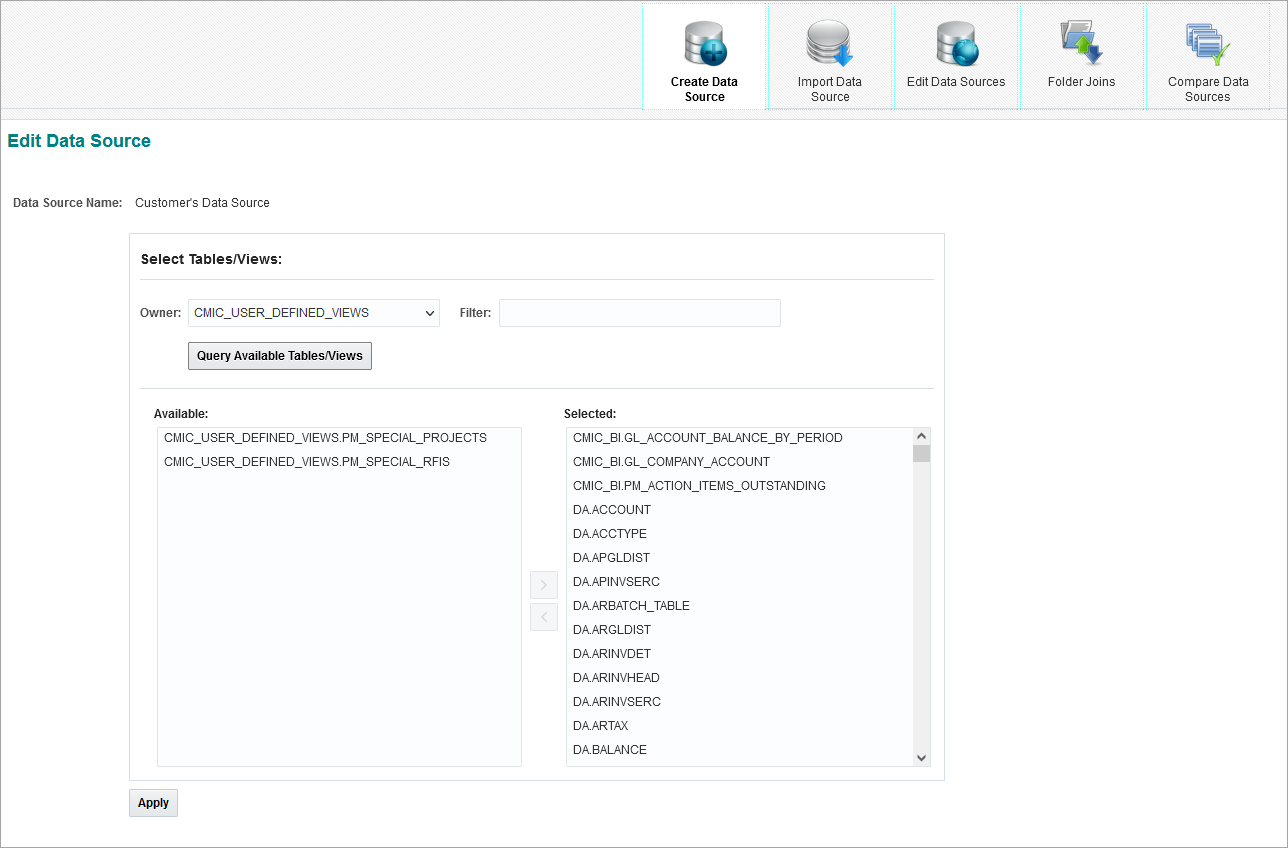
Owner
Owner of database object; after selecting relevant owner via this field, click [Query Available Tables/Views] to display all objects belonging to owner in the Available field’s list.
Filter
Used to filter results returned for selected owner. The following wildcard characters can be used:
-
% (any string of characters)
-
_ (any single character)
Click [Query Available Tables/Views] to view all objects belonging to selected owner and satisfy entered filter expression in the Available field’s list.
[Query Available Tables/Views] – Button
If values for Owner or Filter field are changed, click this button to refresh the results for the Available field’s list.
Available – List
Lists all database objects that belong to selected owner and satisfy the entered filter.
Selected – List
Lists database objects selected for data source being created; use arrow buttons to add or remove objects from this list - single arrows move one selected object, and double arrows move all objects.
[Apply] – Button
Once the new data source is defined, click [Apply] to save it, and to move to the next step, which is to create business areas for the new data source.
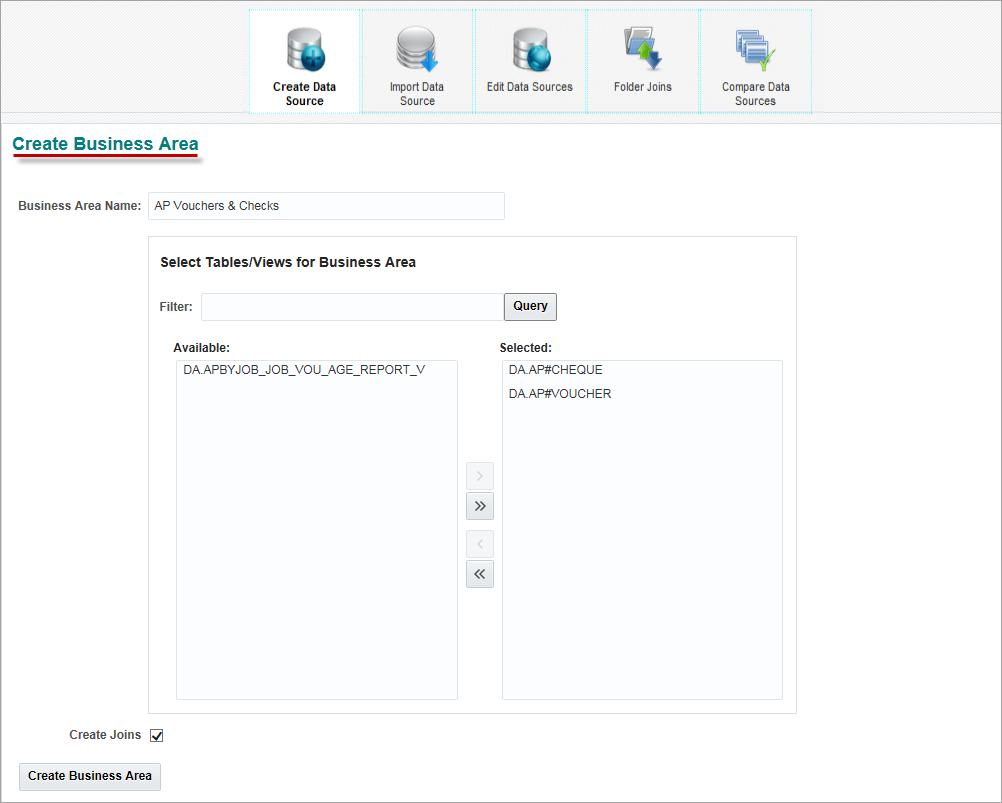
The Create Business Area screen is used to define the subsets of a data source, known as business areas, which are pertinent to dashboards to be created in the BI Dashboard Builder tool.
Screen’s Fields & Buttons
Business Area Name
Name for business area being created.
Filter
Used to filter database objects listed in the Available field’s list. The following wildcard characters can be used:
-
% (any string of characters)
-
_ (any single character)
Click [Query] to filter objects in the Available field’s list according to entered filter expression.
[Query] – Button
If filter expression is changed, click this button to refresh the filtered results for the Available field’s list.
Available
Lists all database objects contained in data source, and that satisfy the entered filter expression.
Selected
Lists database objects selected for business area being created; use arrow buttons to add or remove objects from this list - single arrows move one selected object, and double arrows move all objects.
Create Joins – Checkbox
If checked, all existing joins between the tables/views of this business area (listed in Selected field’s list) will automatically be created, based on constraints defined in the database. Please note that this will create some, but not all, of the required joins. Use the Modify Folder Joins screen to review the current joins, and to create additional joins.
NOTE: This process creates joins for tables using their foreign keys definitions and creates joins for views using existing joins in the Default Data Source.
[Create Business Area] – Button
Once a new business area is defined, click this button to save it, which brings up the following pop-up:
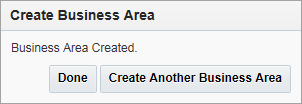
Click [Done] if another business area does not need to be created, or [Create Another Business Area] to create another one.
Overview
Edit Data Sources Screen
This screen is used to edit existing data sources and to create new data sources via the following actions:
-
Provide more meaningful names for folders and files of new data source’s business areas.
-
Set the default aggregate function for the fields.
-
Set which fields are visible in the BI Dashboard Builder tool, for simplification’s sake.
-
Restrict access to data source by associating security role(s) to it.
A Navigation panel is provided on this screen to allow users to navigate the data source tree and selected tree nodes using drop-down lists. Refer to BI Catalog Builder - Navigation Panel (Edit Data Sources) for more details.
Search, Sort, and Filter panels are also provided on this screen. These panels allow users to:
-
Search a data source's tree for specified text or for specific objects/columns.
-
Sort business areas, folders and fields.
-
Filter to show/hide hidden fields.
Refer to BI Catalog Builder - Search, Sort and Filter Tree Nodes for more details.
A Legend is also available on this screen to explain what the colors represent for the folders and fields in the data source tree.
Operations to a data source and its components are made via this screen’s context menu, which is launched via a right-click.

To edit a data source, click it, and use the Property pane on the right to edit it.
Data Source – Property Pane Section
Name
Name of data source.
[Export Data Source] – Button

This button is used to export data sources. Users can export any data source into a file and then import it into another or the same environment. Refer to BI Catalog Builder - Import Data Source for more information on importing data sources.
To export a data source, select the data source and click on the [Export Data Source] button. In the Download Data Source Export File pop-up window, specify a file name for the data source and press [Download]. Once file generation is complete, depending on the browser’s download settings, the browser will either prompt the user for a location to store the downloaded file, or the file will automatically be stored in the browser’s download location. The downloaded file will have the extension .ds (e.g. my_datasource.ds).
[Download ERD script] – Button
This button allows users to download a DDL script for a selected data source so that it can be imported into a data modeling tool, such as Oracle’s SQL Developer Data Modeler, to create Entity-Relationship Diagrams (ERDs) for that data source.
Refer to BI Catalog Builder - Generating ERDs for Data Sources for more information.
Data Source Properties – Property Pane Section
Disabled
If set to “Yes”, data source will not be available in the BI Dashboard Builder tool; otherwise it will.
Property Description – Property Pane Section
This section provides a description for the selected data source property in the Data Source Properties section.

To edit a business area, click it, and use the Property pane on the right to edit it.
Business Area – Property Pane Section
Name
Name of business area; editable to provide a more meaningful name.
Position
Position of business area node inside branch; editable to change the position of a node to control in what order business areas are displayed in a data source.
[Export Business Area] – Button
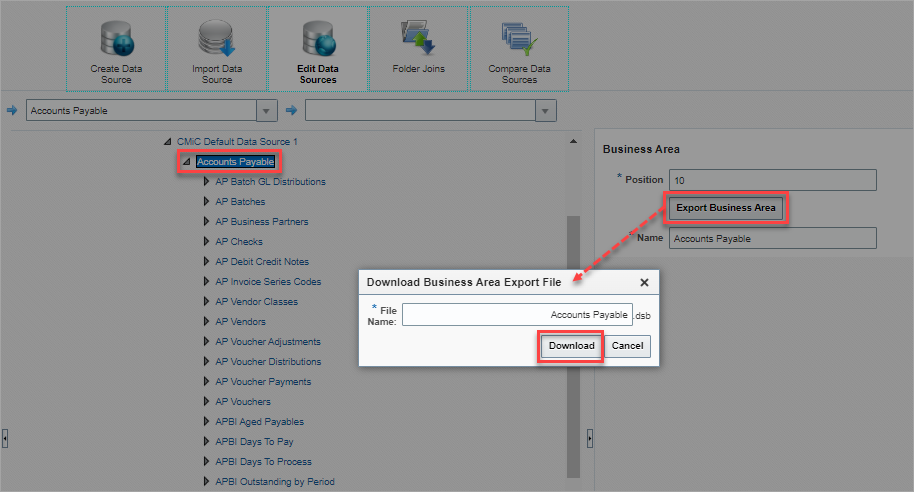
This button is used to export business areas. Users can export any business area into a file and then import it into another or the same environment. Refer to the BI Catalog Builder - Import Data Source
To export a business area, select the business area and click on the [Export Business Area] button. In the Download Business Area Export file pop-up window, specify a file name for the business area and press [Download]. Once the file generation is complete, depending on the browser’s download settings, the browser will either prompt the user for a location to store or download the file, or the file will automatically be stored in the browser’s download location. The downloaded file will have the extension .dsb (e.g., my_businessarea.dsb).

To edit a field, click it, and use the Property pane on the right to edit it. It is also possible to select multiple fields and update properties for all selected fields at once (for more information, please refer to Editing Multiple Fields).
Field – Property Pane Section
Name
Name of field; initially set to default name of field (column) but can be edited to provide a more meaningful name.
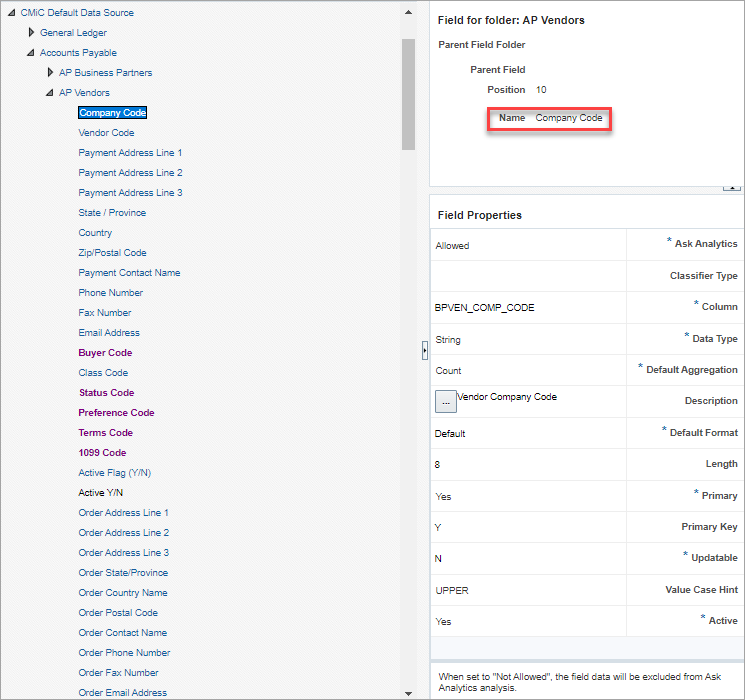
Parent Field Folder, Parent Field

Pop-up window launched from Parent Field Folder LOV in Field Pane Section
The Parent Field Folder property provides an LOV where the user can select a parent field folder for a parent field to enable field hierarchy in BI Dashboard Builder.
A parent field folder must be selected using the LOV before a parent field can be selected from the Parent Field drop-down menu.
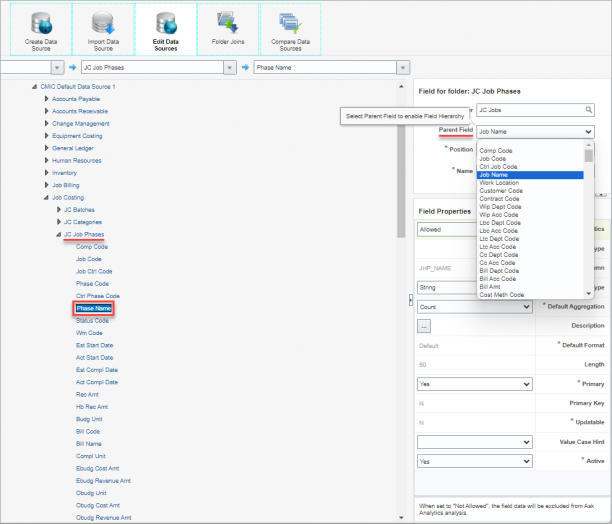
For example, to enable a Company Name/Job Name/Phase Name/Category Name hierarchy, the field structure would appear as follows:
| Folder | Field | Parent Field Folder | Parent Field |
|---|---|---|---|
|
JC Categories |
Category Name |
JC Job Phases |
Phase Name |
|
JC Job Phases |
Phase Name |
JC Jobs |
Job Name |
|
JC Jobs |
Job Name |
GL Companies |
Company Name |
Once the above setup is complete in BI Catalog Builder, to enable the hierarchy functionality in a BI Dashboard table, the following steps must be taken:
-
Add at least one of the above fields to the table.
-
Ensure parent field folders are added into list of selected folders for the table.
Once the above steps are taken, if the user’s BI Dashboard table visualization contains any of the fields below, their parent field will be available to be added into the table via column hierarchy context menu, if it doesn’t exist already.
-
JC Categories.Category Name
-
JC Job Phases.Phase Name
-
JC Jobs.Job Name
-
GL Companies.Company Name
For example, if the user’s table visualization is based on “JC Transactions” and “GL Companies.Company Name” field is added, then the hierarchy functionality will be enabled for the Company Name field, allowing users to add any of the related fields (e.g., Phase Name, Job Name, or Category Name).
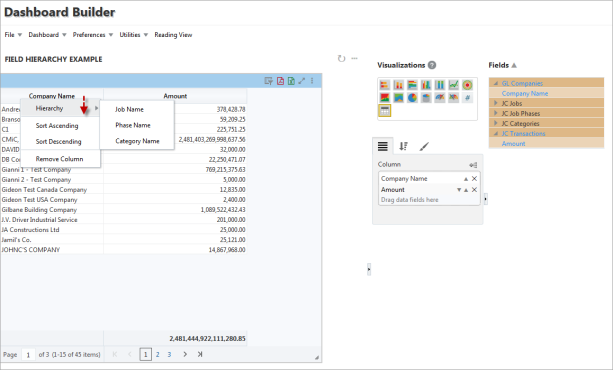
Field Hierarchy enabled in BI Dashboard Builder table visualization
Position
Position of field node inside branch; editable to change the position of a node to control in what order fields are displayed in a folder.
Field Properties – Property Pane Section
Ask Analytics
When set to "Not Allowed", the field data will be excluded from Ask Analytics analysis.
Classifier Type
Field's classifier type.
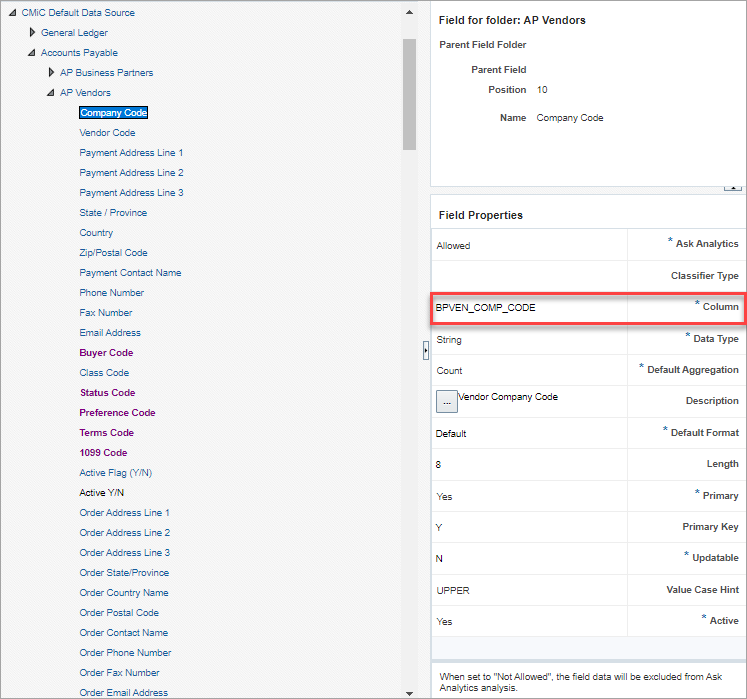
Column
Name of field (column); display-only.
Data Type
Field’s data type: String, Number, Date.
If the data type is “String”, users can select “URL” from this LOV instead; if set to “URL”, the field’s value is expected to be a URL and it is displayed as a hyperlink in dashboards.
Default Aggregation
Default aggregate function to use in BI Dashboard Builder for the field. This default can be changed in BI Dashboard Builder.
The aggregate functions available in this property’s LOV depend on the field’s data type.
An aggregate function is one in which a single value is outputted for multiple inputted values, e.g., SUM(), COUNT().
Description
Description of field; initially set to default description but can be edited to be more meaningful.  ) launches the Edit Text pop-up window where a muli-line description can be entered.
Default Format
If the field is of the date or number data type, this property has an LOV from which users can select its format for dashboards.
Length
Maximum length for field string value.
Primary
Used to designate this field as a primary field. Fields that are classified as primary are displayed by default in Query/Dashboard Builder. Available settings are "Yes" or "No".
Primary Key
Indicates if this field is a primary key field.
Updatable
Indicates if this field is updatable in Card View.
NOTE: In BI Catalog Builder, any User-Defined Fields can be made updatable. However, not all non-User-Defined Fields can be made updatable. Updatability for these fields is determined by CMiC. If "Updatable" field property is not available, it means the field can't be updatable in card view.
Value Case Hint
Use this field property to set whether values in a field are always uppercase or lowercase, which allows a faster case-sensitive search in dashboard filters. Available options are “UPPER” or “lower”.
For example, since company codes are always uppercase, setting the Value Case Hint property to “UPPER” allows for faster filter searches by only returning values that are in uppercase.
The BI Catalog Builder tool automatically sets this property to “UPPER” for fields that have a common name which ends with “_CODE” or “_FLAG” (e.g., COMP_CODE, JOB_ACTIVE_FLAG, etc.).
If this property is set incorrectly, then the filters search will not return results with values that are not in the case specified in this property. For example, if the property is set to “UPPER”, but the actual column contains values in mixed case, values that contain lowercase won’t be returned.
NOTE: In order to have performance improvements, the corresponding database column must be indexed.
If set to “No”, the field will not be visible in the BI Dashboard Builder tool; otherwise, it will be visible.
Property Description – Property Pane Section
This section displays a description for a selected property in the Field Properties section.
Editing Multiple Fields
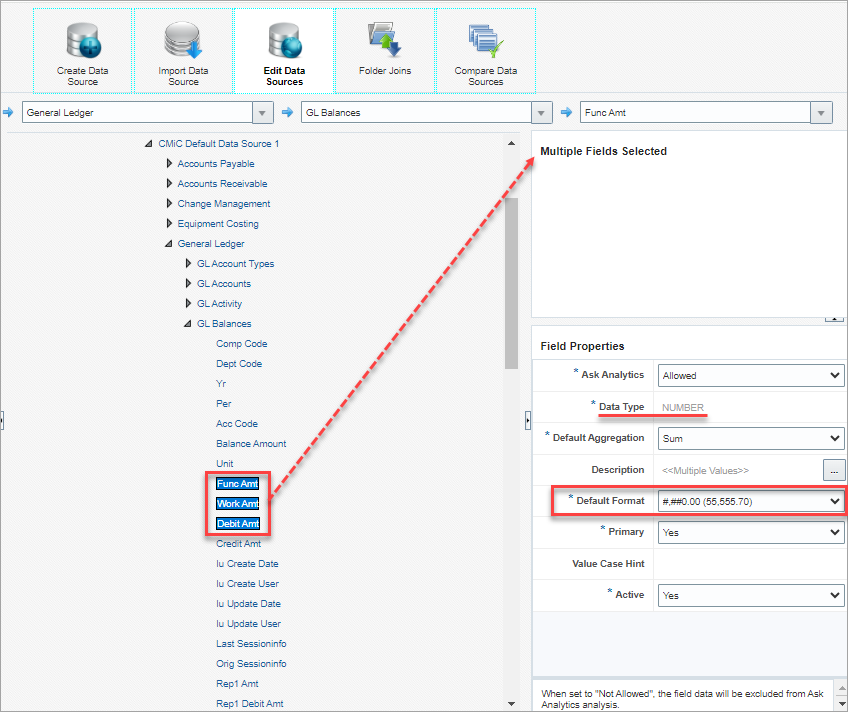
Example of selecting multiple fields and updating properties for all selected fields at once
Users can select multiple fields and update properties for all selected fields at once. To select multiple fields, use Ctrl + mouse click to select individual fields or use Shift + mouse click to select a range of fields. Users can also select multiple fields using the Search panel (for more information on search functionality, refer to BI Catalog Builder - Search, Sort and Filter Tree Nodes).
The Field Properties section in the property panel will only display those properties and LOVs that are applicable for the data type of the selected fields.
For example, users can select multiple fields in a folder with the same data type (e.g., amount fields in a folder which all use the NUMBER data type), as shown in the screenshot above, and update the Default Format property for these fields all at once.
If the selected fields have different data types (e.g., some of them are STRING and others are NUMBER), then the Default Format property, as well as other type-specific properties, won’t appear in the property panel.
If the selected fields have different values for a property, then such a property value will be displayed as “<<Multiple Values>>”. Users can modify this value as required.
For example, if the following two fields were selected:
-
Salary
-
Description property value: “Employee Salary”
-
-
Rate
-
Description property value: “Hourly Rate”
-
Since each field has a different description, the Description property value on the Field Properties panel would display “<<Multiple Values>>”. Users could update this property with the same value for both fields at once by replacing “<<Multiple Values>>” with a new description such as “This field is used for salary calculations.”
The descriptions for each of the fields would be updated as follows:
-
Salary
-
Description property value: “This field is used for salary calculations.”
-
-
Rate
-
Description property value: “This field is used for salary calculations.”
-
The same logic applies to properties with LOVs. “<<Multiple Values>>” will be one of the values in a drop-down list and if it’s changed, the new value will be applied to all selected fields.
Date Fields
As shown below, every field that is of the date data type has three corresponding calculated fields: one for the year component, one for the month component, and one for the day component. As shown below, these corresponding calculated fields are added to the end of a folder’s list of fields:
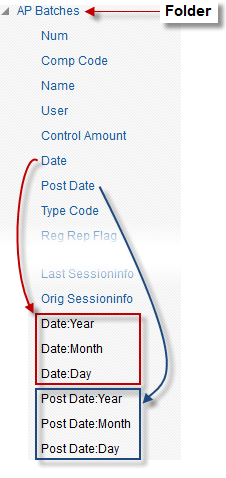
In BI Dashboard Builder, these date calculated fields can be added to visualizations in order to sort or group their data by year, month or day.
NOTE: Date calculated fields cannot be deleted from a data source.
To edit a folder, click it, and use the Property pane on the right to edit it.
NOTE: If new columns are added to a standard table/view in the CMiC Default Data Source, the data source/view must be refreshed to make the new columns available. To do this, right-click the relevant folder (table/view) in the data source tree and select "Refresh" from the drop-down menu. After refreshing, manually add the new columns to any pre-existing dashboards.
Folder – Property Pane Section
Name
Name of folder (table/view); name initially set to default name of table/view, but can be edited to provide a more meaningful name.
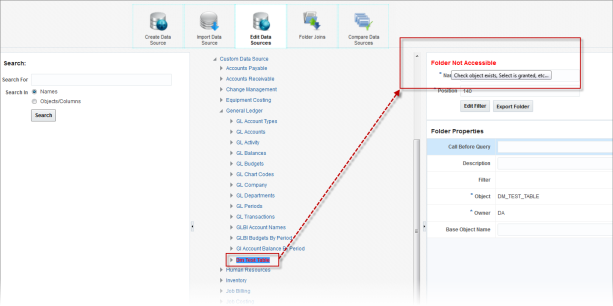
If a folder is not accessible in BI Dashboard Builder, it will appear in red, as shown in the screenshot below. This feature is useful for Enterprise customers that use their own tables/views. To resolve the folder’s accessibility issue, please refer to BI Catalog Builder - Adding Custom Tables/Views to Data Sources.
Position
Position of folder node inside branch; editable to change the position of a node to control in what order folders are displayed in a business area.
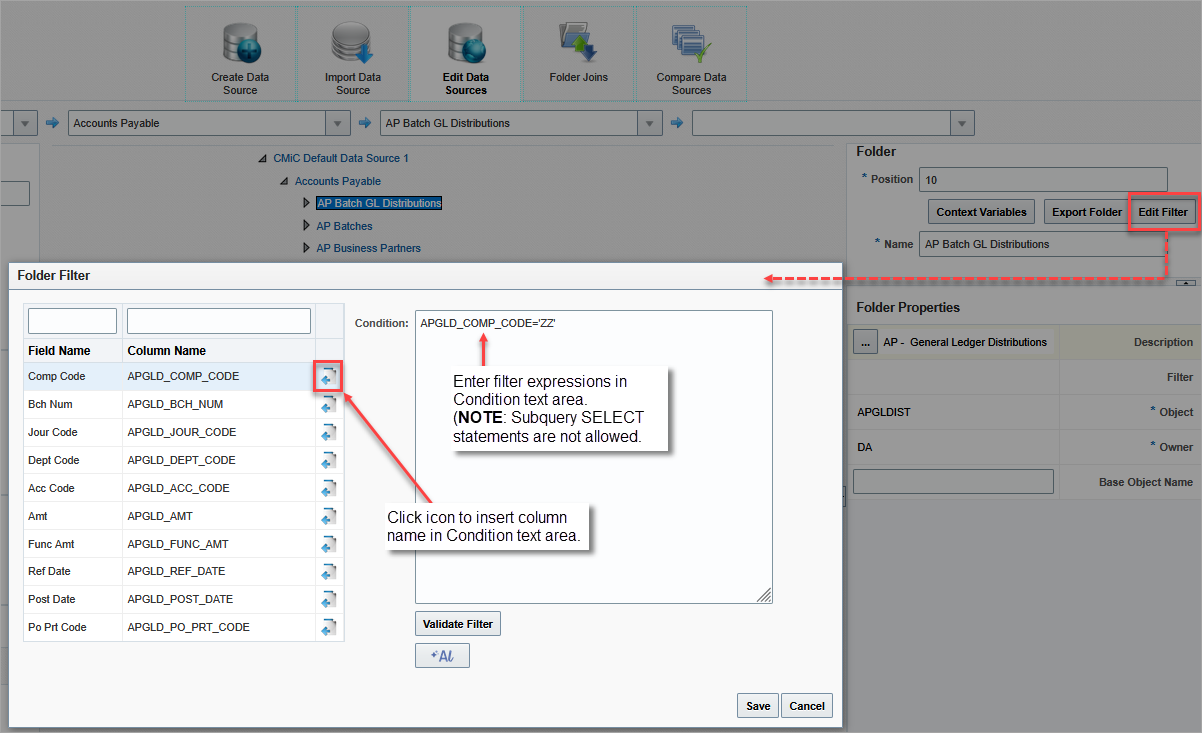
The [Edit Filter] button’s pop-up is used to create a filter for the selected folder.
This feature is available to Enterprise and Cloud Catalog Builder clients only, and users must have the system privilege ‘BICFDRFLTR’ to use it; otherwise, the button will be hidden.
Filter expressions are created in the Condition text area using valid SQL syntax for WHERE clause of SELECT statements. (Note that subquery SELECT statements are not allowed.) A Column Name can be added to the Condition text area by clicking the Column Name’s corresponding Insert icon, as shown above.
Filter expressions can range from simple to complex. For example, to create a simple filter expression, use single quotes around values to compare against, and the following wildcard characters:
-
% (any string of characters)
-
_ (any single character)
For the creation of a more complex filter expression, the [Validate Filter] button can be used to validate an expression as it is being entered without it being saved. An error message will only appear if the expression is not valid. If the expression is valid, no message will appear.
The [Validate Filter] button is available for convenience only, as the same validation process occurs when the user clicks on the [Save] button.
![Screenshot of Folder Filter pop-up window with [AI] button highlighted.](../../../Resources/Images/12cTOOLS_-_BI_Catalog_Builder_-_NoTracking/BIC_FolderFilterAI_1.png)
The [AI] button is also available to assist in creating a filter.
![Screenshot of pop-up window launched from [Al] button.](../../../Resources/Images/12cTOOLS_-_BI_Catalog_Builder_-_NoTracking/BIC_FolderFilterAI_2.png)
Click the [AI] button to launch the AI pop-up window, then enter a natural language description of the filter you want to create. When finished describing the filter, press [Generate].
The AI Assistant will generate the appropriate filter expression for you.
[Context Variables] - Button
![Screenshot of Edit Data Sources screen with [Context Variables] button highlighted in Folder panel.](../../../Resources/Images/12cTOOLS_-_BI_Catalog_Builder_-_NoTracking/BIC_EditingFolders2_611x366.png)
This button is used to list available context variables for folders. As context variables are used in BI Dashboard/Query Builder, users have the ability to see the list of context variables for a corresponding folder in BI Catalog Builder. Users can also specify for each context variable, if the variable value is required and if the variable can handle multiple values.
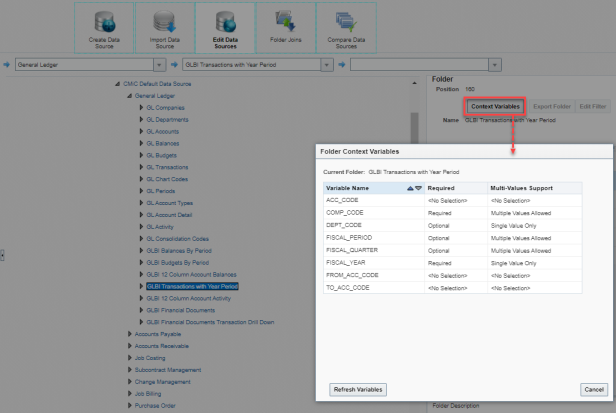
Refresh Process:
The refresh process will also refresh the list of context variables.
Custom (Customer's Own) Views:
If context variables in a customer’s own views are modified, to bring the updated list of variables into BI Catalog Builder, users can either use the [Refresh Variables] button in the Folder Context Variables pop-up window (as shown in the screenshot above), or execute a refresh on the folder.
NOTE: In order to be used in CMIC BI, the context variables must use namespace “CMIC_BI”.
Please refer to Advanced Drillthrough Features for BI Dashboard Developers and Designers for details on how to use context variables in your dashboards and queries.
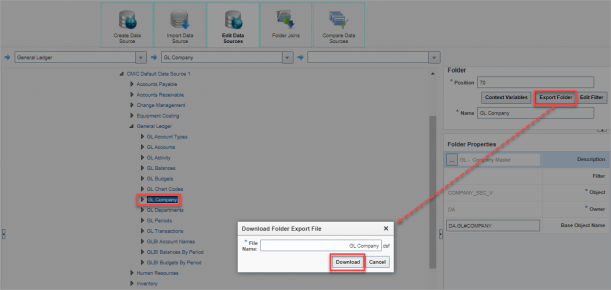
[Export Folder] – Button
This button is used to export folders. Users can export any folder into a file and then import it into another or the same environment. Refer to BI Catalog Builder - Import Data Source for more information.
To export a folder, select the folder and click on the [Export Folder] button. In the Download Folder Export file pop-up window, specify a file name for the folder and press [Download]. Once the file generation is complete, depending on the browser’s download settings, the browser will either prompt the user for a location to store or download the file, or the file will automatically be stored in the browser’s download location. The downloaded file will have the extension .dsf (e.g., my_folder.dsf).
Folder Properties – Property Pane Section
Description
Description for folder (table/view); description initially set to default description of table/view but can be edited to provide a more meaningful description. ) launches the Edit Text pop-up window where a muli-line description can be entered.
Filter
If a filter was created for the folder via the [Edit Filter] button in the previous section, this field displays the filter expression.
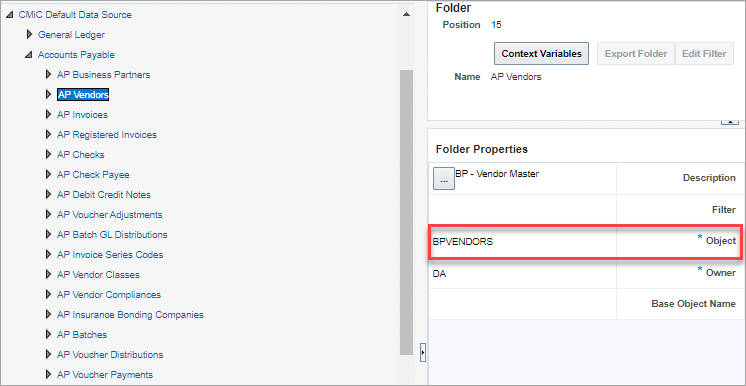
Object
Database name of table/view; display-only.
Owner
Owner of table/view; display-only.
Base Object Name
Used to specify corresponding CMiC table/view when defining UDFs in folders.
NOTE: For a user to be able to update the Base Object Name property, the user must have the following system privilege: ‘BIUDFSETUP - Allow users to modify setup for User Defined Fields definitions’.
Refer to Add/Remove User-Defined Fields (Folders) for more details on using this folder property.
Property Description – Property Pane Section
This section provides a description for the selected folder property in the Folder Properties section.
User-Defined Folders
Example of User-Defined Folder
User-defined folders appear in black font, as shown in the screenshot above. They can be created in BI Dashboard Builder using the Create User-Defined Folder feature.
When a new user-defined folder is created, a corresponding user-defined database view will be generated.
User-Defined Views
Adding User-Defined View to a Data Source
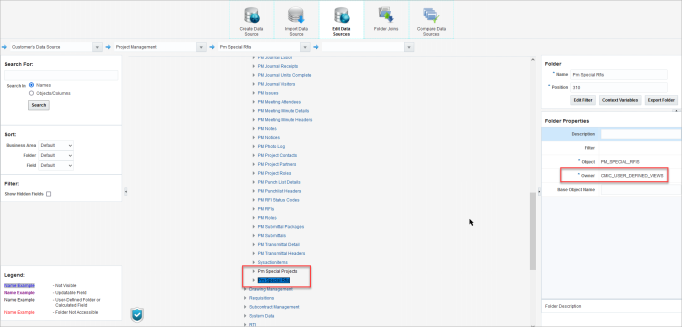
Currently, user-defined views can only be created using the Create User-Defined Folder functionality in BI Dashboard Builder. User-defined views are created in CMIC_USER_DEFINED_VIEWS database schema.
Once a user-defined view is created, it can be added as a folder to any user’s data source the same way as any other database view (using Edit Available Tables/Views and Edit Business Area context menu options). Folders created for user-defined views will appear in BI Catalog Builder using black font.
NOTE: For performance reasons, it is advised to avoid creating joins for folders based on user-defined views, as these views may already combine data from many different database tables and views.
User-Defined Views Maintenance
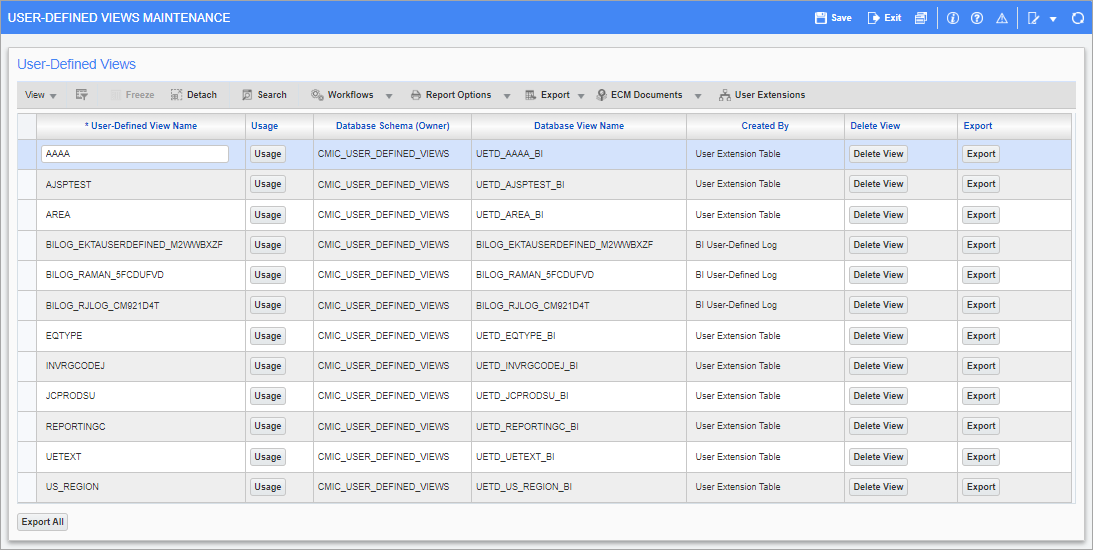
Pgm: SYSUDVIEWMNT – User-Defined Views Maintenance; standard Treeview path: System > User Extensions> User-Defined Views Maintenance
User-defined views can be maintained using the User-Defined Views Maintenance screen located in the System Data module.
This screen allows users to:
-
Re-name views.
-
Check views usage.
-
Delete views (if no usage found).
-
Generate views export script (Enterprise clients only).
Refer to System Data - User-Defined Views Maintenance for more information about this screen.
To learn more about how these views are used in BI Catalog Builder, refer to BI Catalog Builder - Creating BI-Friendly User-Defined Views from User Extension Tables.
Export/Import User-Defined Views
NOTE: For Enterprise clients only.
Export/import of user-defined views is implemented via generated SQL scripts.
Views can be exported using the [Export] and [Export All] buttons in the System Data - User-Defined Views Maintenance screen in the System Data module.
To import user-defined views, the generated SQL script will need to be installed by Database Administrators.
Overview
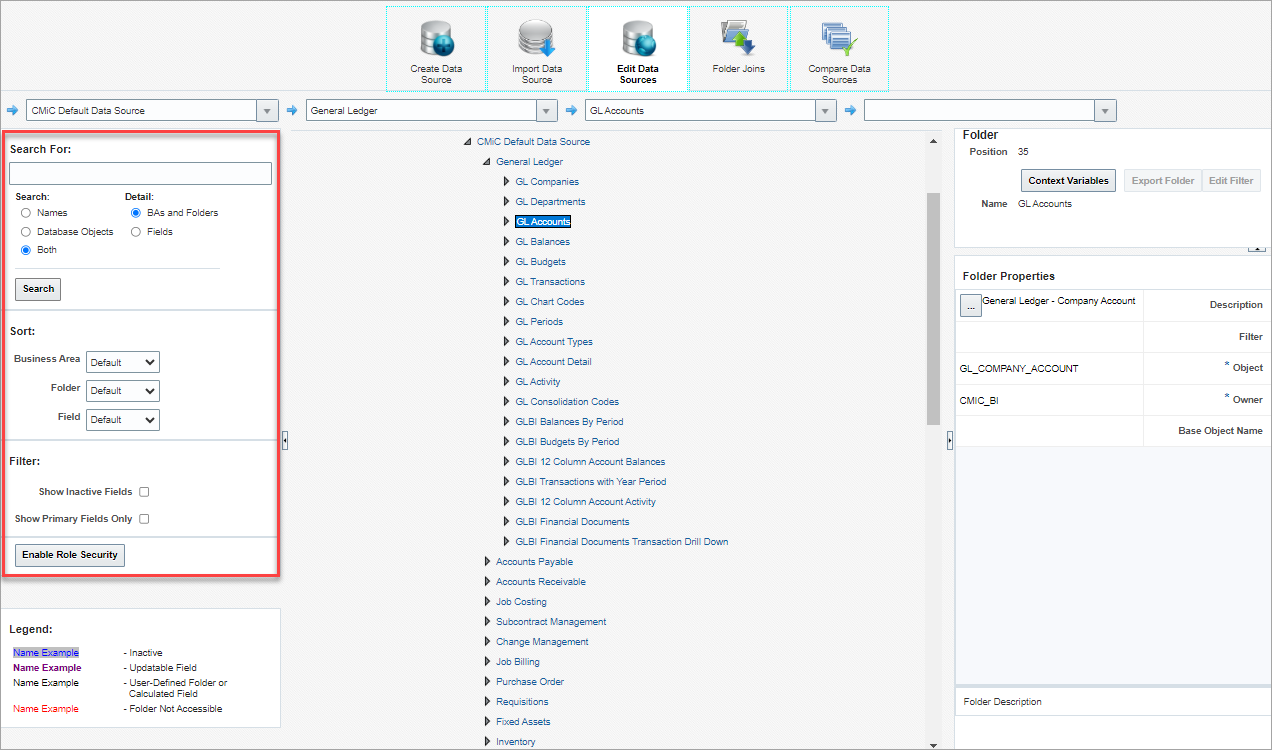
A Search panel is available on the Edit Data Sources screen which allows users to search, sort, and filter tree nodes.
Search For
As shown above, on the Edit Data Source screen, users can search a data source’s tree for specified text or for specific database objects using the Search panel.
NOTE: If no search results are found, the Search panel will display a message “NOT FOUND”.
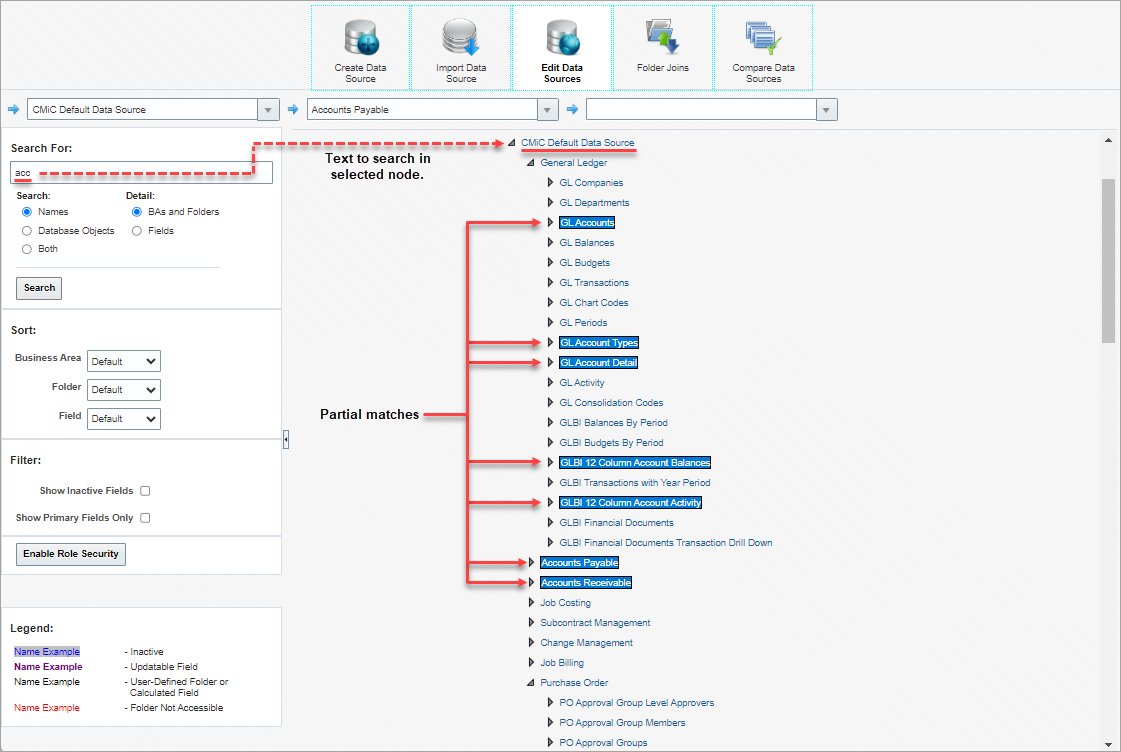
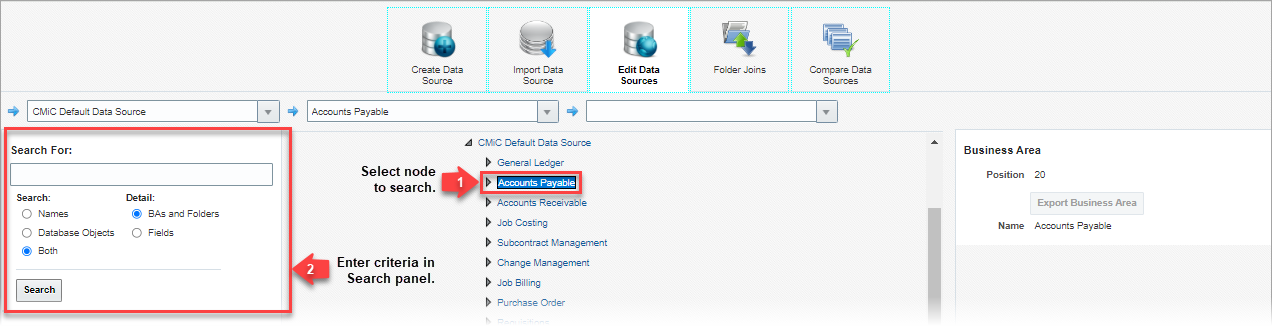
To search a data source’s tree for specified text, select a data source tree or any of its sub-nodes (business area or folder). Searching will take place for the selected tree-node and all of its sub-nodes, however, fields will not be searched unless a specific business area or folder is selected.
Next, enter the text to search for in the Search For field. In the Search section, indicate what will be searched: Names (Object Names), Database Objects (Database Object Names) or Both. In the Detail section, indicate the scope of the search: BA and Folders or Fields. When finished, click on [Search]. All matches, including partial ones, will be highlighted in the selected tree/sub-node, as shown above.
Search
Determines what will be searched.
Names
Search only in Object Name (Business Area Name, Folder Name, Field Name).
Examples:
Business Area:

Folder:
Field:
Database Objects
Search only in Database Object Name (Folder Property “Object”, Field Property “Column”, Field Property “Calculation”).
Use this option if you need to find folder(s) that corresponds to a certain database view or table, or if you need to find field(s) that corresponds to a certain column of a database table or view.
Examples:
Folder:
Field:
Both
Search in both Names and Database Object Names.
Detail
Determines the scope of the search.
BA and Folders
Use this option if you need to find business area(s) or folder(s) inside a data source.
The search will be performed across all business areas and folders in a currently selected data source only.
NOTE: Fields won’t be searched.
Fields
Use this option if you need to find field(s) inside a specific folder or business area.
The search will be performed across all fields in a currently selected business area or folder only.
Sort

The Sort panel allows users to sort business areas, folders and fields by:
-
Default (using property position)
-
Name Ascending
-
Name Descending
Filter

The Filter panel contains the following options:
Show
When unchecked, fields that have the
NOTE: The filter is unchecked by default, which means that the
Show Primary Fields Only - Checkbox
When checked, only fields that have the Primary field property set to "Yes" will be displayed. Fields are designated as primary in the Field Properties panel in the Edit Data Sources screen. Refer to BI Catalog Builder - Editing Fields for more information on field properties.
[Enable Role Security] / [Disable Role Security] - Button
This button is used to enable/disable the Role Security feature. It switches between "Enable Role Security" and "Disable Role Security", depending on the enabled and disabled date of the button.
NOTE: This button is only available for users with the following security privilege assigned: BISECMNG: Allows the user to modify security.
During initial setup, once security role assignment has been completed for users in BI Catalog Builder, press [Enable Role Security] to activate the Role Security feature. When this feature is enabled, the Security Shield icon ( ) will appear in the bottom left corner of the BI Catalog Builder screen. To deactivate the Role Security feature, click the [Disable Role Security] button.
Example of context menu for a data source (options vary between objects)
The following section provides details about the options available via the context menu of the Edit Data Source screen, which is launched by right-clicking a data source, business area or folder.
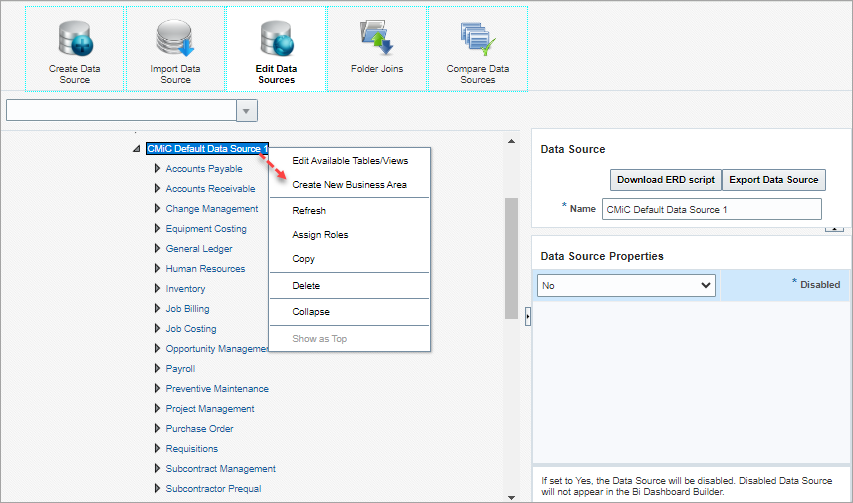
Create New Business Area (Data Sources, Business Areas)
This option is enabled for data sources and business areas. It launches the Create Business Area screen to create a new business area for the data source. For details about this screen, please refer to Part 2: Create Business Areas.
Edit Business Area (Business Areas, Folders)
This option is enabled for business areas and folders. It launches the Edit Business Area screen to edit the selected business area. For details about this screen, please refer to Part 2: Create Business Areas.
Edit Available Tables/Views (Data Sources)
This option is enabled for data sources. It launches the Edit Data Source screen to edit the available tables/views of the selected data source. For details about this screen, please refer to Part 1: Create Data Source.
Add/Remove User-Defined Fields (Folders)
This option is enabled for folders, if the corresponding table/view in the database has user-defined fields.
Add UDFs to System for Use in BI Catalog Builder
There are two ways in which user-defined fields (UDFs) can be added to the system for use in BI Catalog Builder.
-
UDFs can be added in CMiC Field, as shown below:
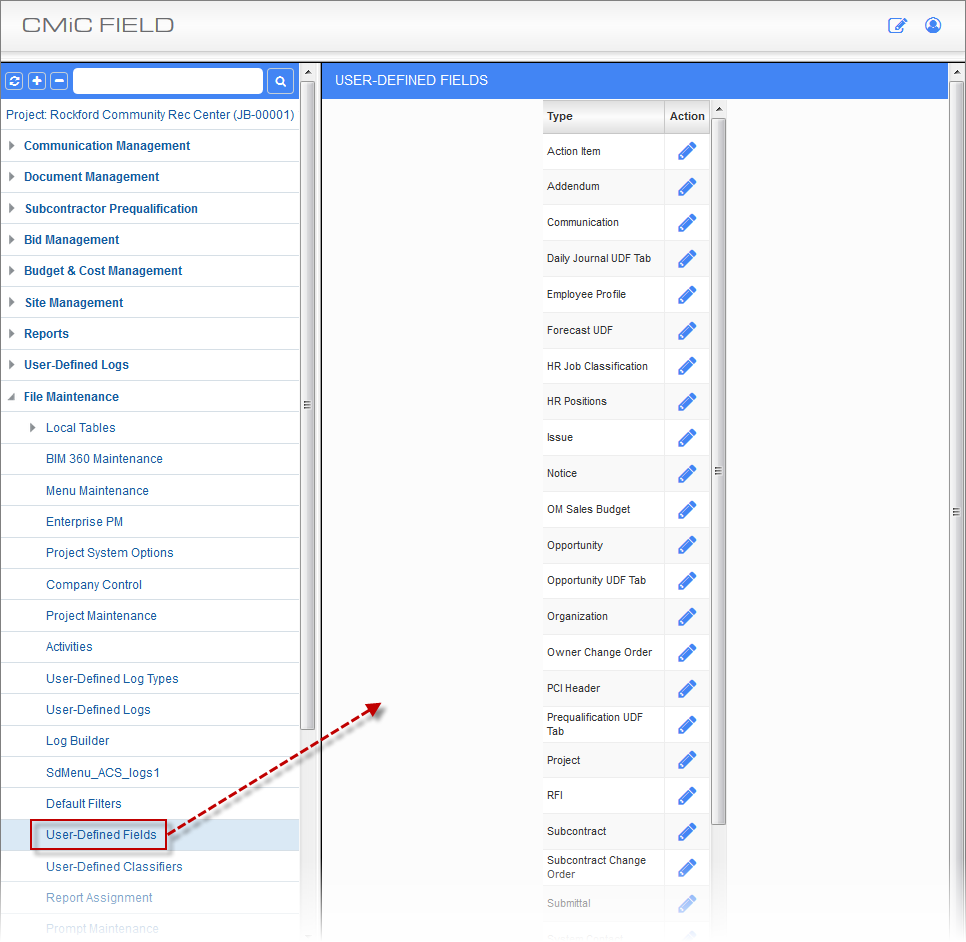
User-Defined Fields; standard Treeview path: CMiC Field > File Maintenance > User-Defined Fields
For details, please refer to the CMiC Field reference guide.
-
UDFs can be added using the Lite Editor tool, as shown below:
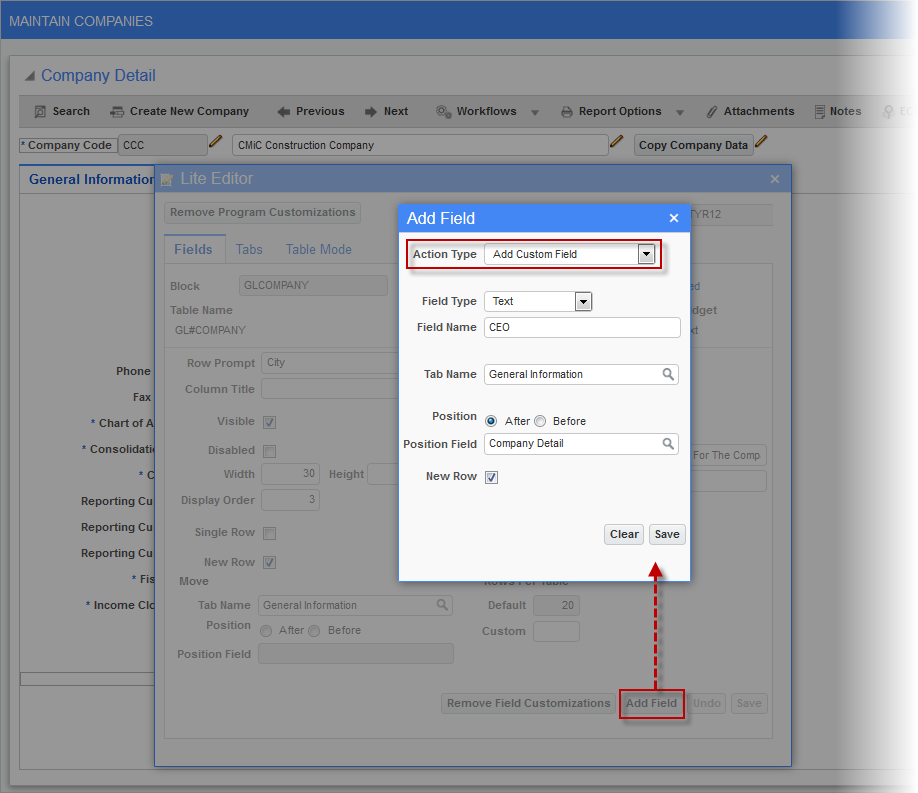
For details, please refer to the Lite Editor reference guide.
Add UDF to Folder in BI Catalog Builder
Once a UDF has been added to the system through either CMiC Field or through the Lite Editor, it can be added to the appropriate folder, as shown below:

In the Add or Remove User-Defined Fields pop-up window, shown below, for the Type field:
-
If the UDF was added via CMiC Field, select its CMiC Field UDF type.
-
If it was added via the Lite Editor tool, select “User-Defined Fields”.

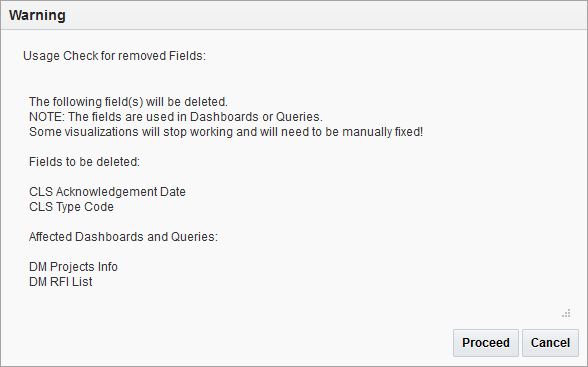
If a UDF is going to be removed while it’s used in a dashboard/query, a warning will appear showing a list of affected dashboards/queries.
Add User-Defined Fields to Custom Folders
As UDFs are linked to specific tables/views, the option to add/remove UDFs is disabled for folders that correspond to user created tables/views.
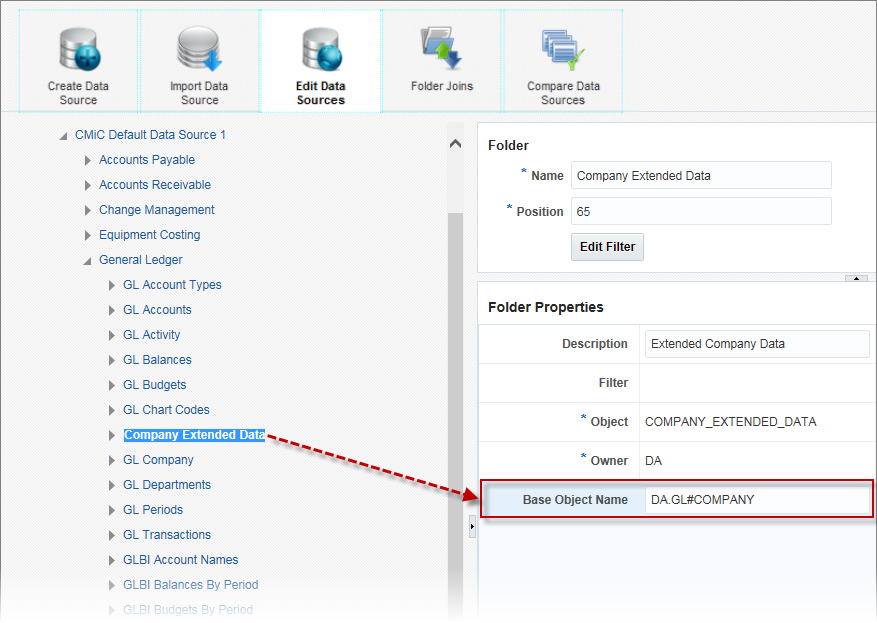
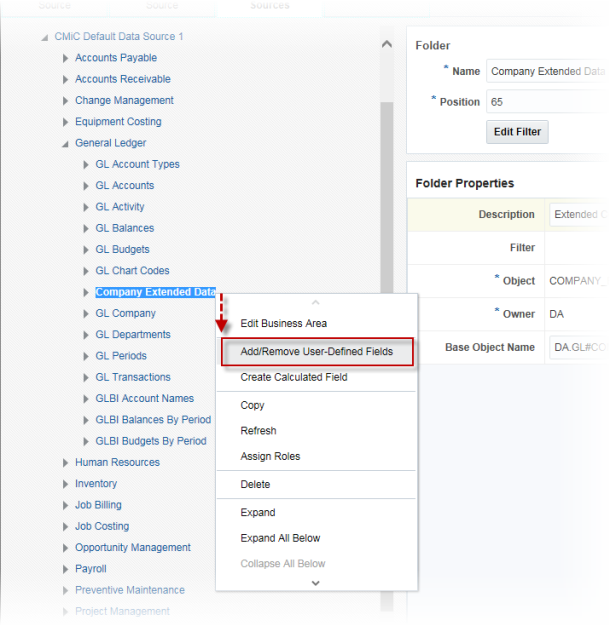
However, if users know that their custom view corresponds to a specific CMiC table/view, it is possible to enable UDFs (added via Lite Editor) for folders that correspond to user-created views/tables by specifying the corresponding CMiC table/view via the Base Object Name folder property, as shown below:
Example:
A customer:
-
Added a UDF, PO Box Number Custom Field, via the Lite Editor:
-
Created their own view “DA.COMPANY_EXTENDED_DATA”, which queries data found in the Company Setup screen.
-
Added their view into their data source as a folder titled “Company Extended Data”.
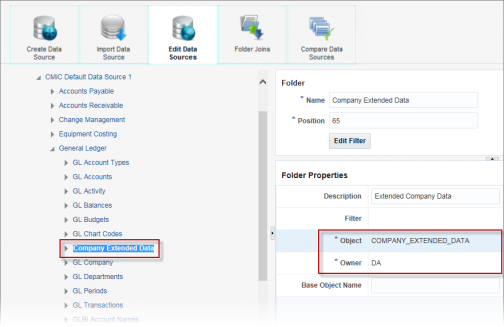
Now, the customer would like to add this UDF into their custom Company Extended Data folder.
To do so, we need to provide the correct value into the Base Object Name folder property, as follows:
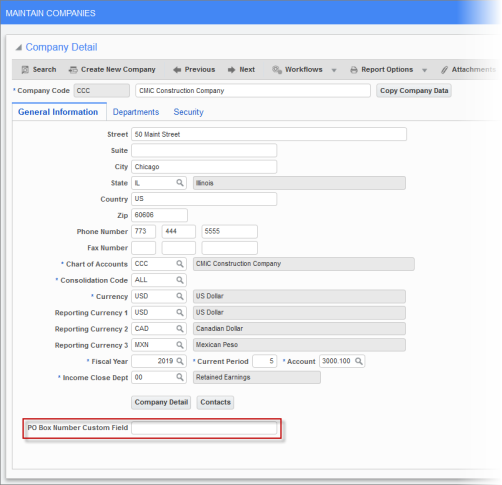
-
Open the Maintain Companies screen, put the cursor on the UDF field, and click the About toolbar icon (
 ):
):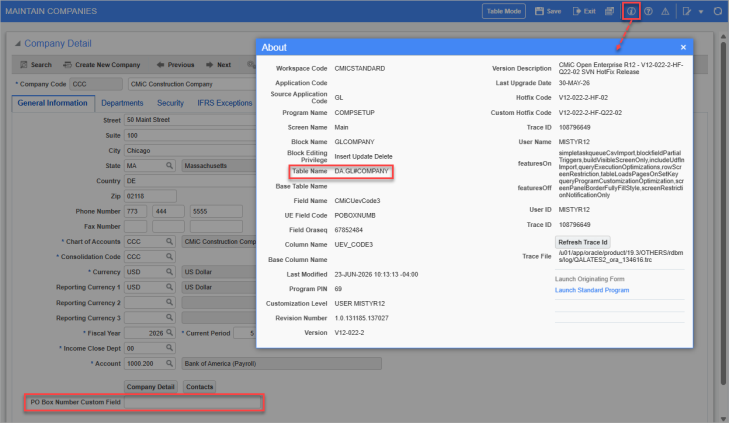
Pgm: COMPSETUP – Maintain Companies; standard Treeview path: General Ledger > Setup > Company Setup
-
Copy the value from the Table Name field into the Base Object Name folder property:
NOTE: For a user to be able to update the Base Object Name property, the user must have the following system privilege: ‘BIUDFSETUP - Allow users to modify setup for User Defined Fields definitions’.
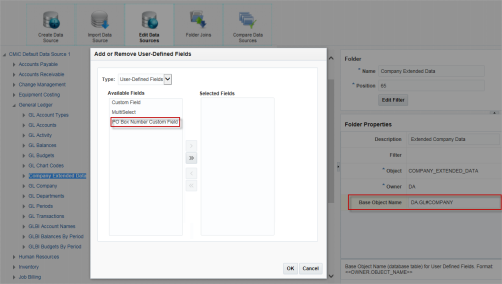
After the Base Object Name folder property is provided, the Add/Remove User-Defined Fields context (right-click) menu option for the custom folder (Company Extended Data) will be enabled for users to add the UDF field to the folder:
Different Environment Considerations
When users copy their own data sources to a different environment (for example, when they copy a data source from DEV environment to TEST environment), they must make sure that the added UDFs exist in the destination environment.
For example, while in the DEV environment, if a new custom field is added via the Lite Editor, and then this field is added to a folder in the user’s data source, before installing this data source into the user’s other environments, the user should make sure that the added custom field already exists in the destination environment.
Best Practice
The best practice would be to never add a new custom field via the Lite Editor in a TEST or DEV environment. Instead, always add these fields in PROD, and have them copied into other environments by database cloning.
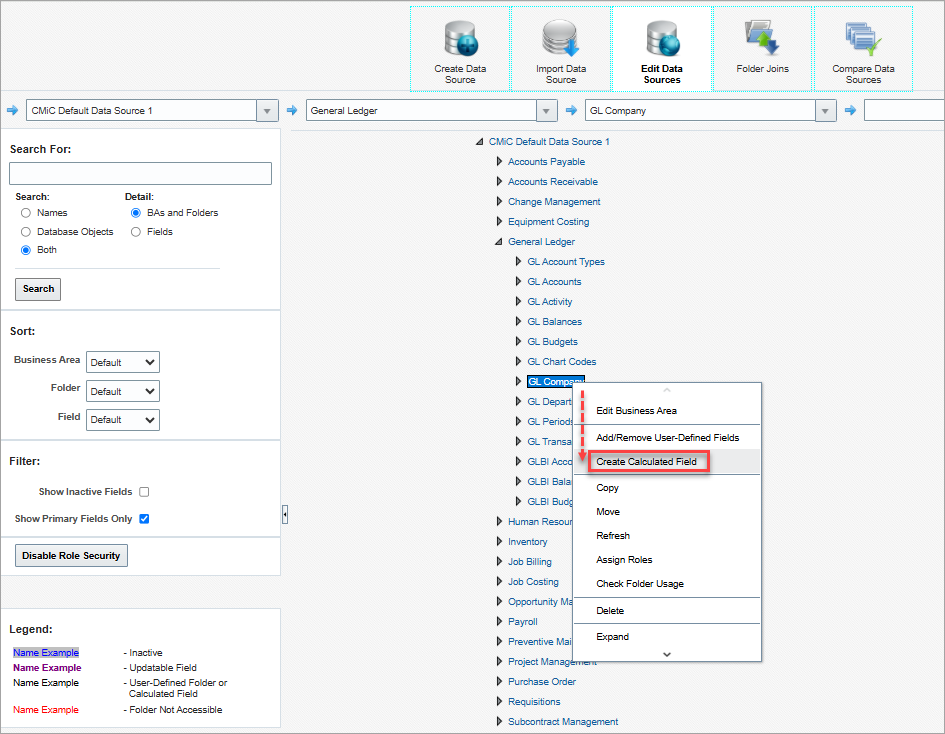
Create Calculated Field (Folders, Fields)
This option is enabled for folders and fields, and it is available to users with the BICALCFLD system privilege, which is granted to a user via the System Privileges tab of the User Maintenance screen, as shown below:
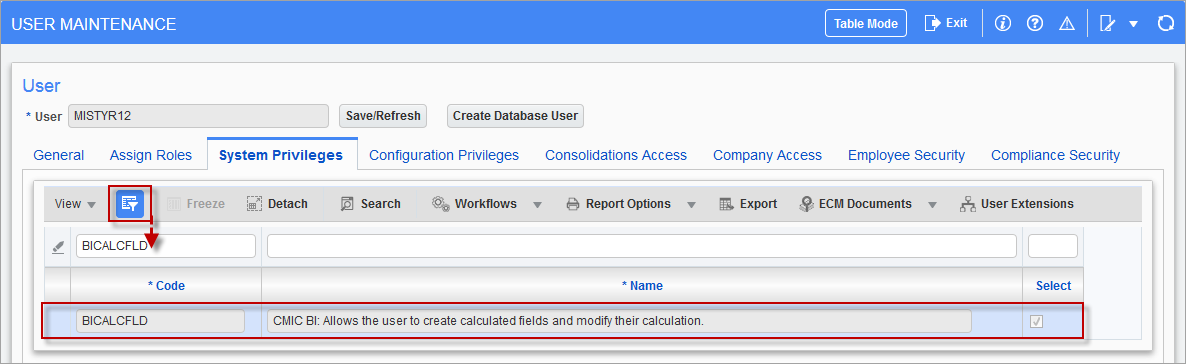
Pgm: SDUSRMNT – User Maintenance; standard Treeview path: System > Security > Users > User Maintenance – System Privileges tab
The BICALCFLD system privilege can also be granted to a user by adding the privilege to their security role via the [System Privileges] button at the bottom of the Define Roles screen (standard Treeview path: System > Security > Roles > Define Roles).
In launching the context menu to create a calculated field, if a folder was right-clicked, the new calculated field will be added to the bottom of its list of fields. If a field was right-clicked, the new calculated field will be added after the clicked field.
In BI Dashboard Builder, visualizations can use these created calculated fields.
When a calculated field is added to a folder (table/view), a column for the new field is added to it, and each of its rows has the new calculated field. For each row, the calculated field’s value is the result of an SQL expression, which can contain references to any fields in the folder to specify values. A field referenced in an SQL expression represents the value of that field in the row of the calculated field being evaluated.
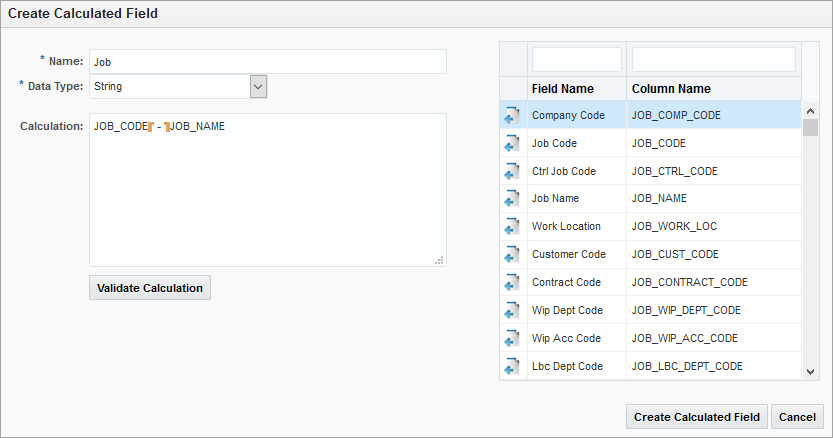
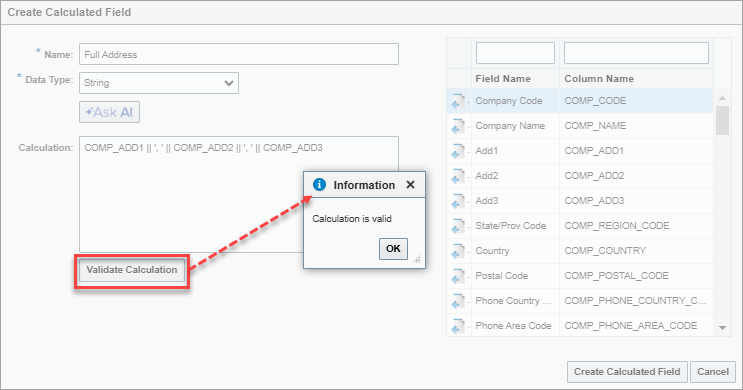
To create a calculated field, in this option’s pop-up (shown above), enter the field’s name and specify its data type. Next, enter a valid SQL expression in the Value textbox to set its value.
Any Oracle SQL functions and operators can be used, and any other fields in the folder can be referenced. For convenience, the folder’s fields are listed in a pane on the right side of the pop-up, and they are filterable (using search boxes over the columns) and sortable (using sort-arrows in column headers). To add a field to the SQL expression from this pane, at the cursor’s location in the Value textbox, select it and click its corresponding left-arrow, or double-click it.
NOTE When converting a field from CHAR to NUMERIC in SQL to create a calculated field, use the TO_NUMBER function. Conversely, to convert a NUMERIC field back to a CHAR (or string), use the TO_CHAR function.
Users can validate the calculation syntax using the [Validate Calculation] button. A message will be issued to indicate whether the calculation is valid or invalid.
Once finished, click [Create Calculated Field], which also validates the SQL expression.
NOTE: While Oracle analytic functions are allowed in calculated fields and may work well in many (simple) cases, they can significantly affect performance if used in complex dashboards and tables. To improve performance, users can try to simplify the table visualization by removing unnecessary folders (if any). Applying stricter filters to limit the queried data set can also help. In most cases, it will be more efficient to create a custom view for a particular use case or find the required data in other views instead of using analytic functions in calculated fields.
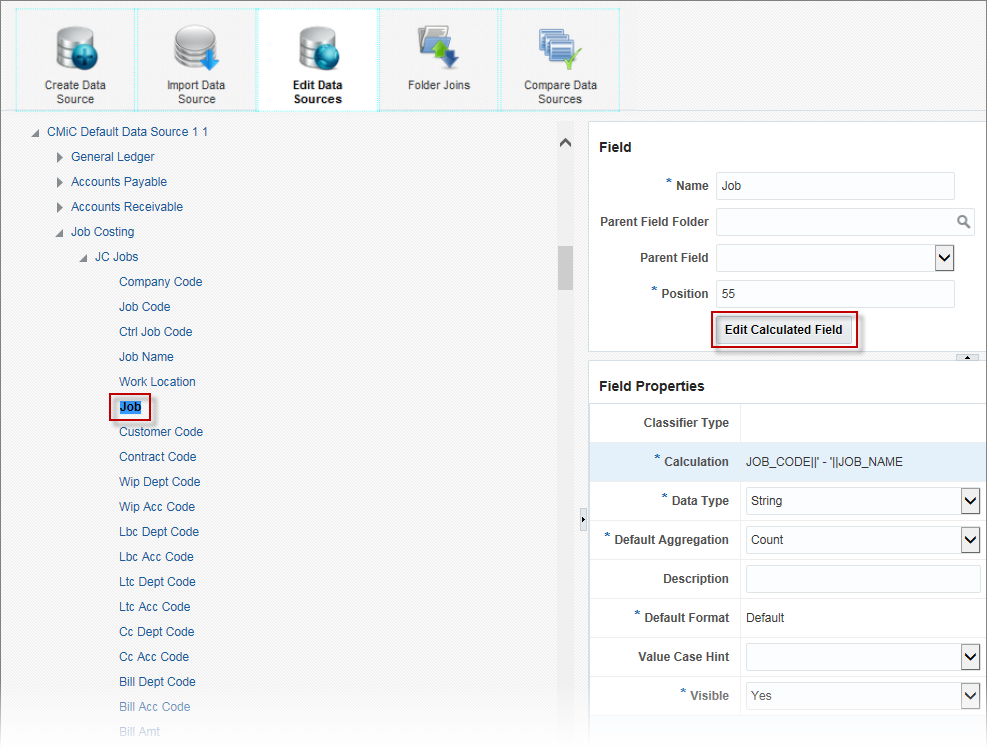
As shown above, calculated fields are identified by their black text, and when they are selected, the [Edit Calculated Field] button is made available for them to edit their calculated value, if they have the BICALCFLD system privilege. To edit a calculated field, click the [Edit Calculated Field] button and use the Update Calculated Field pop-up to edit its name, data type or what is displayed by it, then click [Update].
Create Calculated Field Using AI-Enabled Expression Assistant
NOTE Before using this functionality, the Ask Al feature must be enabled. For more information, refer to BI Analytics - Enabling "Ask Al" Within CMiC Analytics.
To create a calculated field using the AI-enabled Catalog Builder expression assistant, right-click on a folder where you want to create the calculated field.
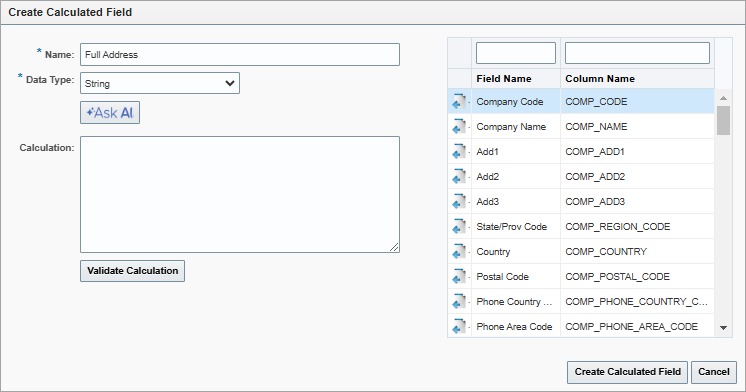
Provide a name and choose the data type for your calculated field. Then, click the Ask Al button to launch the Ask Al pop-up window.
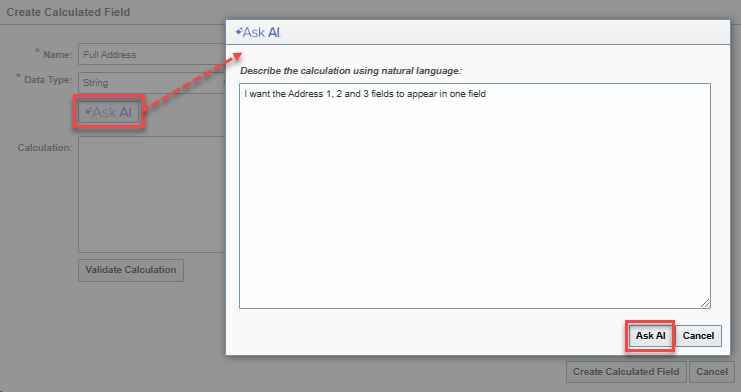
In the Ask Al pop-up window, describe the calculation you need in plain English and press Ask Al.
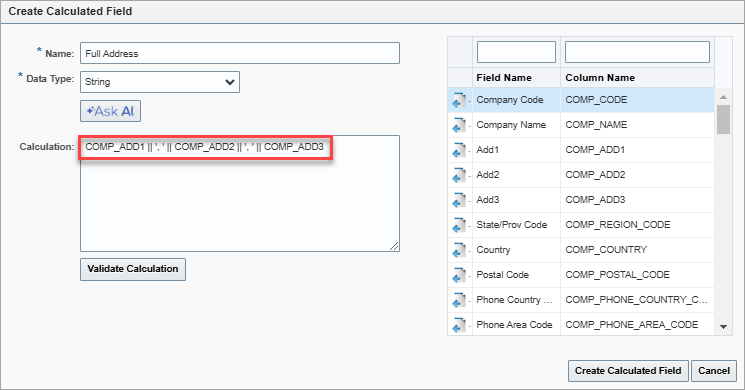
The assistant will automatically generate the corresponding SQL expression for you.
Finally, validate the calculation to ensure it meets your needs. This intuitive workflow makes creating calculated fields effortless, even without SQL expertise.
Create Calculated Field to Launch Programs Using Targets
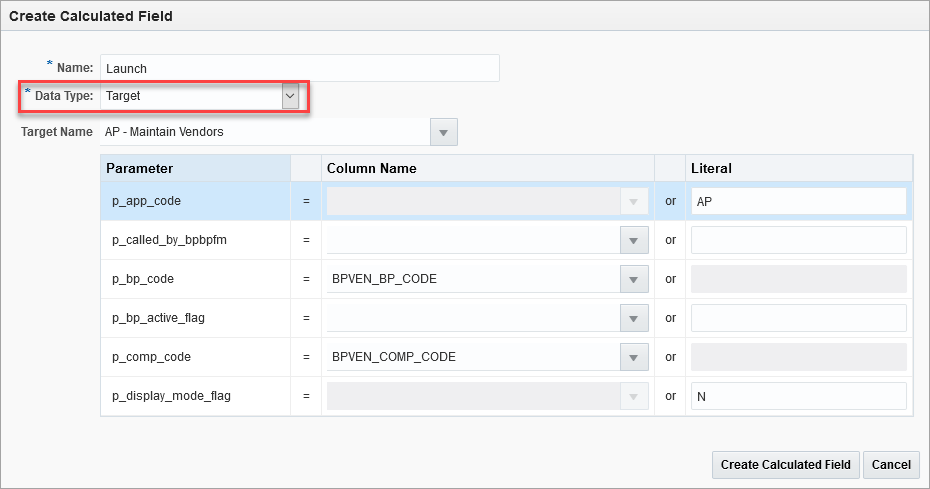
Creating a Calculated Field with a Target Data Type
A calculated field can be created to launch a program from a field using targets. For example, this feature allows users to create launch fields to open up other programs in their table visualizations.
To launch a program using a target:
-
Right-click on a folder or on any existing folder field and select “Create Calculated Field” in the drop-down menu. This launches the Create Calculated Field pop-up window. (Refer to Create Calculated Field (Folders, Fields) for more details.)
-
In the Create Calculated Field pop-up window, enter a field name.
-
Select “Target” in the Data Type drop-down menu.
-
Select a target in the Target Name drop-down menu (Search is available).
-
If there are parameters for the selected target, either select a Column Name or type a Literal value to be passed to the target parameter.
Available target types:
-
UIRuntime Program
-
UI Log
-
JSP Program
-
JSP Direct Call
-
Static ADF
Copy (Data Sources, Business Areas, Folders)
This option is enabled for data sources, business areas and folders.
NOTE: When one of these database objects are copied, their assigned security roles are also copied.
Data Source Copying

For a data source, this option is used to create a copy of the selected data source, and optionally, copies of its dashboards can also be created.
In the New Data Source Name field, enter a name for the copy of data source being created.

When copying the CMiC Default Data Source, the default analytics canvas will also be copied along with all dashboards.
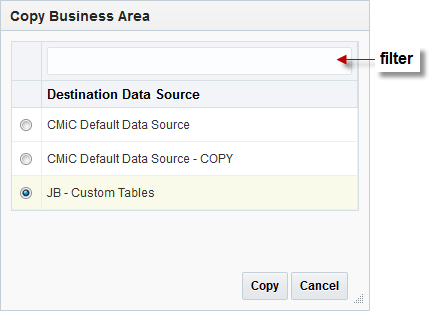
Business Area Copying
For a business area, the pop-up asks to which data source it is to be copied:
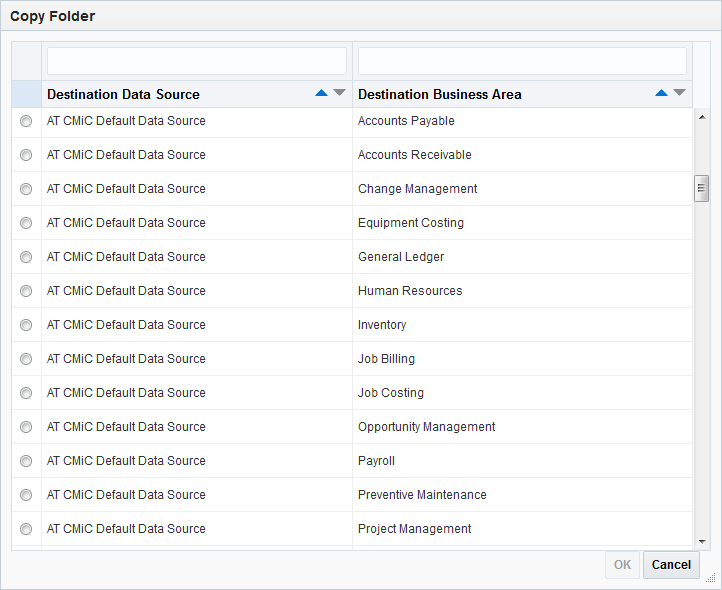
Folder Copying
Folders can be copied into the same business area, or into a different business area inside the same or different data source.
When a folder is copied, the folder’s joins will also be copied.
NOTE: This functionality is particularly useful for Cloud customers who don’t have the ability to modify joins. When a new folder is added to the default data source by CMiC, Cloud customers can just copy this new folder into their own custom data source, and it will automatically be joined to all the same folders (database objects) as in the default data source.
Move (Folders)
This option is used to move a folder from one business area to another inside the same data source without affecting existing dashboards/queries.
Refresh (Data Sources, Business Areas, Folders)
This option is enabled for data sources, but for the provided default data source, CMiC Default Data Source, this option is only available to Enterprise clients.
NOTE: It is recommended that CMiC Default Data Source is not modified, as patch installations and hotfixes update this default data source, overwriting any changes made to it and making any dependent dashboards unusable.
This option is also enabled for business areas, and folders.
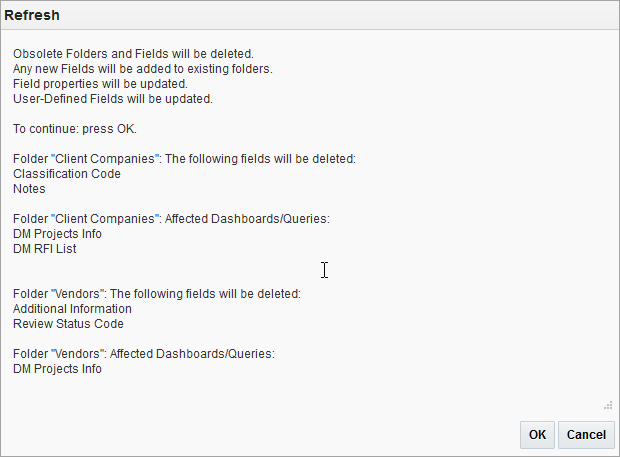
Refreshing is required for data sources, business areas, or folders if it is suspected that they have been altered (e.g., fields were added).
If this option is clicked and refreshing is required, the pop-up informs the user of what will happen and asks for confirmation. Refresh will check if any folders or fields are going to be deleted and will show a list of such folders and fields, along with a list of dashboards/queries where they are used.
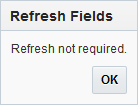
If refreshing is not required, the pop-up informs the user:
To learn more about the importance of refreshing data sources, BI Catalog Builder - Frequently Asked Questions.
Assign Roles (Data Sources, Business Areas, Folders)
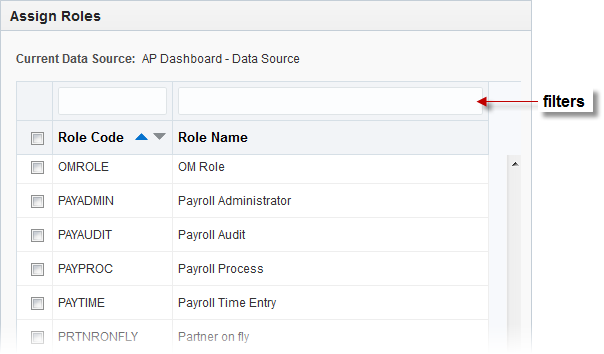
Pop-up window launched from Assign Roles context menu
This option is enabled for data sources, business areas and folders. It is only available to users with the BISECMNG system privilege, which is granted via the System Privileges tab of the User Maintenance screen, as shown below:
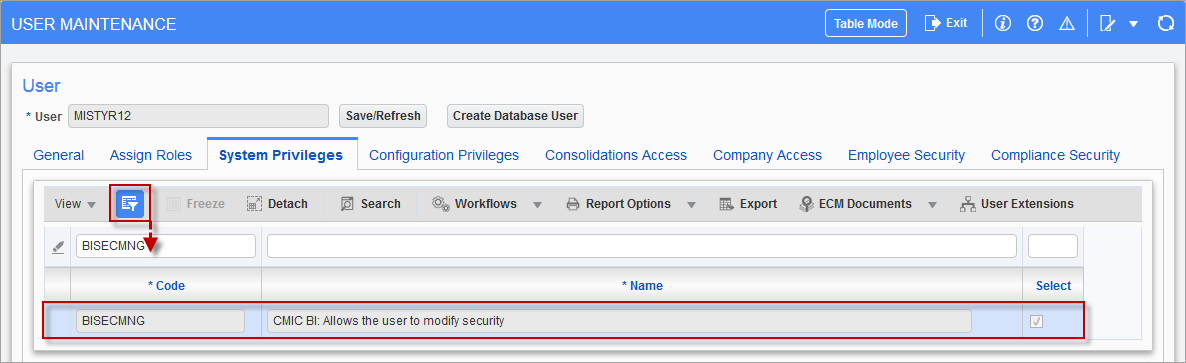
Pgm: SDUSRMNT – User Maintenance; standard Treeview path: System > Security > Users > User Maintenance – System Privileges tab
The BISECMNG system privilege can also be granted to a user by adding the privilege to their security role via the [System Privileges] button at the bottom of the Define Roles screen (standard Treeview path: System > Security > Roles > Define Roles).
This option’s pop-up (first screenshot) is used to specify which security roles have access to a data source, business area or folder.
If Catalog Security is not enabled, everyone with access to BI Catalog Builder can access the data sources; otherwise, only members with the assigned security roles can access them. For details about BI Catalog Builder’s security options and rules, please refer to CMiC BI Security – BI Catalog Builder.
The Roles screen in the System Data module is used to maintain these security roles (standard Treeview path: System > Security > Roles > Define Roles).
Check Folder Usage (Folders)
This option will show a list of dashboards/queries where the folder is used.
Delete Data (Sources, Business Areas, Folders)
This option is used to delete data sources, business areas, and folders.
It is particularly useful to customize copies of data sources, by deleting business areas and folders from the copy that are not required for the customized version.
When users try to delete a business area or a folder, the program will check if the folders are actually used in any dashboards and if they are, it will display a list of those dashboards in a pop-up window with a warning that visualizations in these dashboards will stop working if the folders are deleted. If the folders are subsequently deleted, an error message will appear on affected visualizations indicating that some folders cannot be accessed because they have been removed.
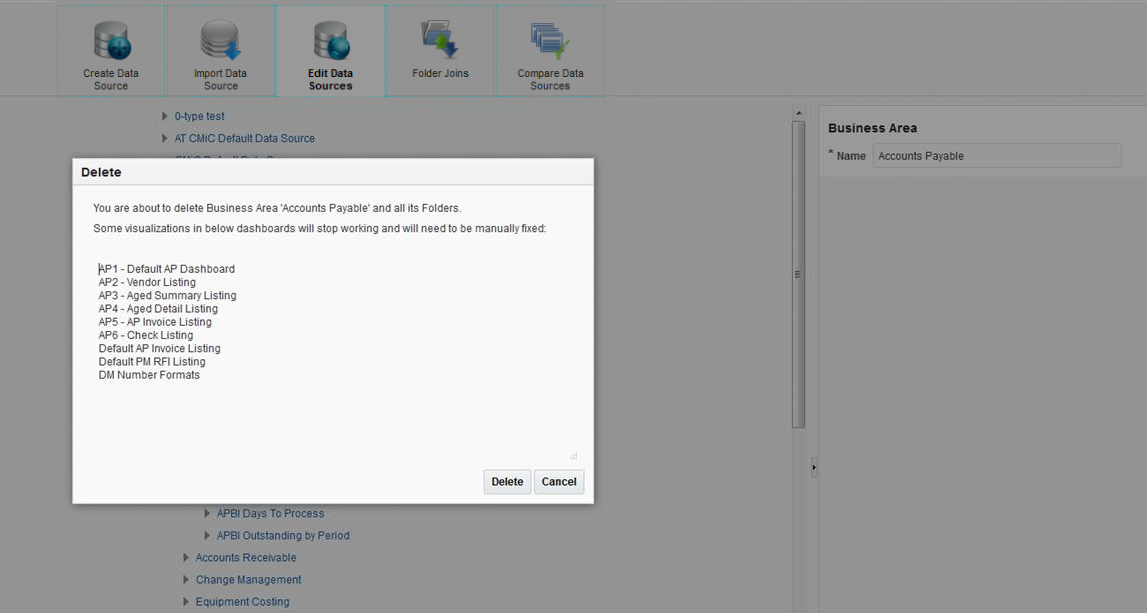
Example of pop-up window launched when users attempt to delete a business area or a folder, and folders are being used in dashboards
Expand
Expands the selected node to reveal its contents. Note, the  icon next to the node can also be used to expand the node’s contents.
Expand All Below
Expands the selected node and its sub-nodes to reveal their contents.
Collapse
Collapses selected node to hide its contents. Note, the  icon beside the node can also be used to collapse the node.
Collapse All Below
Collapses the selected node and its sub-nodes to hide their contents.
To add a custom table or view to a data source in order for it to be used in dashboards, the CMIC_BI_RUNTIME and CMIC_USER_DEFINED_VIEWS schemas must be granted a SELECT or READ privilege for that custom table or view, otherwise, dashboards that use the corresponding folder will not function or some BI functionality may be not available.
For example, to grant the CMIC_BI_RUNTIME and CMIC_USER_DEFINED_VIEWS schemas the SELECT privilege for a custom table/view, such as CUSTOM_SCHEMA.CUSTOM_TABLE, the following GRANT statement must be issued in the database:
grant SELECT on CUSTOM_SCHEMA.CUSTOM_TABLE to CMIC_BI_RUNTIME, CMIC_USER_DEFINED_VIEWS
NOTE: CMiC automatically grants SELECT privilege on all views and tables located in DA and CMIC_BI schemas during patch installations. In order to access tables/views from other schemas, users need to grant SELECT privilege or READ privilege on those tables/views to CMIC_BI_ RUNTIME and CMIC_USER_DEFINED_VIEWS schemas manually.
Steps for Adding a Custom Table/View to a Data Source
To add a custom table/view to a data source:
-
Grant the SELECT or READ privilege to CMIC_BI_RUNTIME and CMIC_USER_DEFINED_VIEWS schemas for the custom table/view, as described above.
-
Add the custom table/view to the data source by right-clicking on the data source and selecting “Edit Available Tables/Views” from the drop-down menu. For more details, please refer to Edit Available Tables/Views (Data Sources).
-
Add the custom view/table into the business area by right-clicking on the business area and selecting “Edit Business Area” from the drop-down menu. For more details, please refer to Edit Business Area (Business Areas, Folders).
NOTE: Custom tables/views and their columns must have basic Oracle names not enclosed in quotation marks.