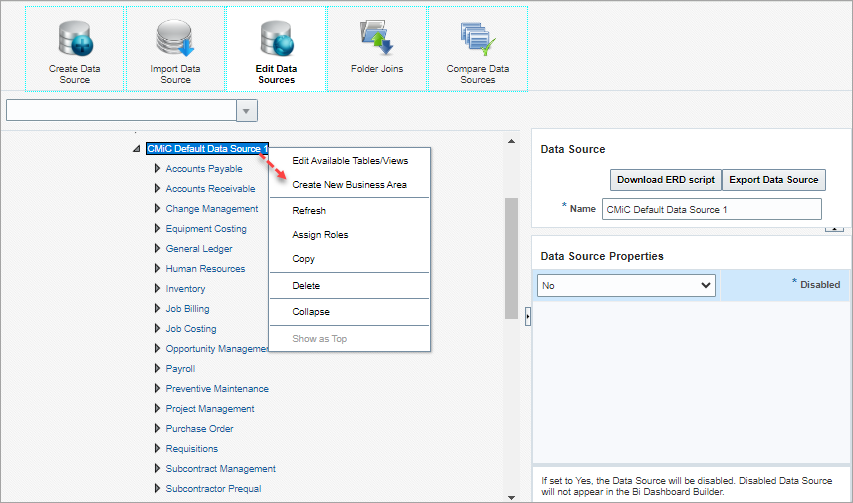
Example of context menu for a data source (options vary between objects)
The following section provides details about the options available via the context menu of the Edit Data Source screen, which is launched by right-clicking a data source, business area or folder.
Create New Business Area (Data Sources, Business Areas)
This option is enabled for data sources and business areas. It launches the Create Business Area screen to create a new business area for the data source. For details about this screen, please refer to Part 2: Create Business Areas.
Edit Business Area (Business Areas, Folders)
This option is enabled for business areas and folders. It launches the Edit Business Area screen to edit the selected business area. For details about this screen, please refer to Part 2: Create Business Areas.
Edit Available Tables/Views (Data Sources)
This option is enabled for data sources. It launches the Edit Data Source screen to edit the available tables/views of the selected data source. For details about this screen, please refer to Part 1: Create Data Source.
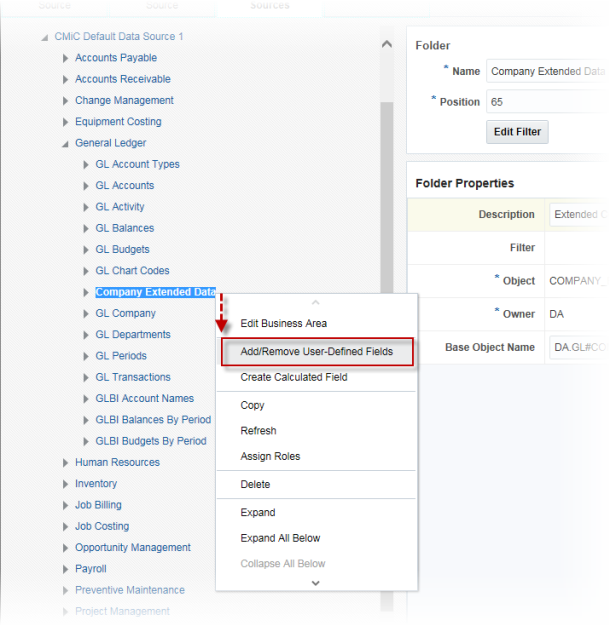
Add/Remove User-Defined Fields (Folders)
This option is enabled for folders, if the corresponding table/view in the database has user-defined fields.
Add UDFs to System for Use in BI Catalog Builder
There are two ways in which user-defined fields (UDFs) can be added to the system for use in BI Catalog Builder.
-
UDFs can be added in CMiC Field, as shown below:
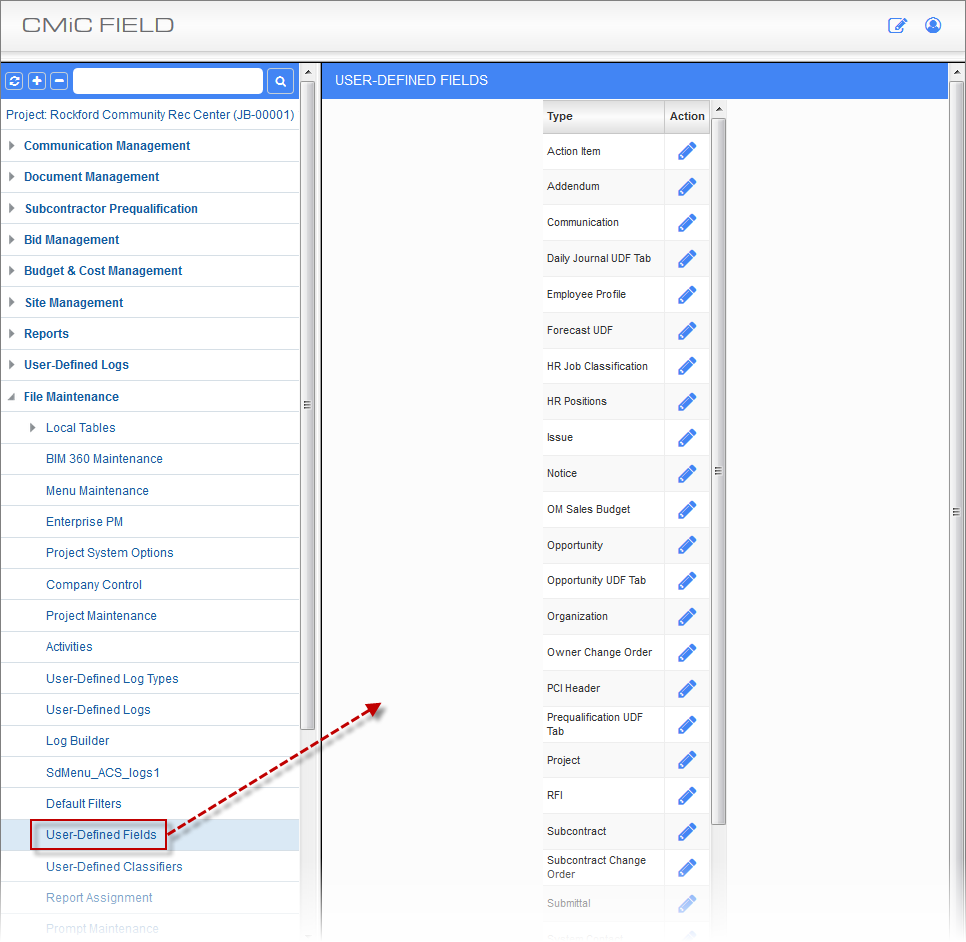
User-Defined Fields; standard Treeview path: CMiC Field > File Maintenance > User-Defined Fields
For details, please refer to the CMiC Field reference guide.
-
UDFs can be added using the Lite Editor tool, as shown below:
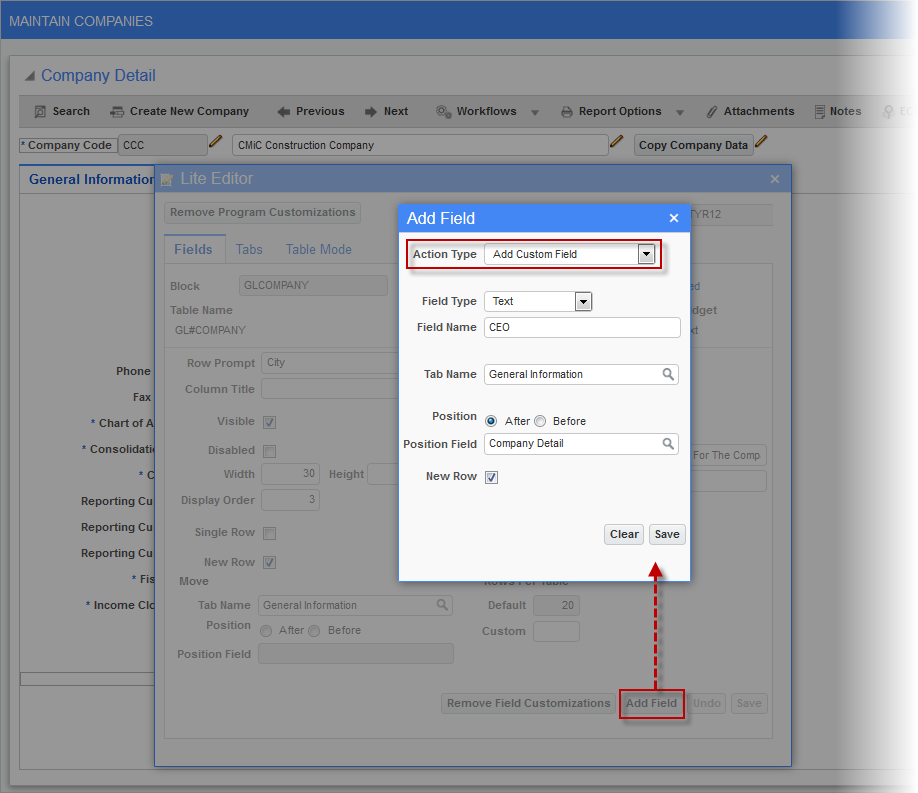
For details, please refer to the Lite Editor reference guide.
Add UDF to Folder in BI Catalog Builder
Once a UDF has been added to the system through either CMiC Field or through the Lite Editor, it can be added to the appropriate folder, as shown below:

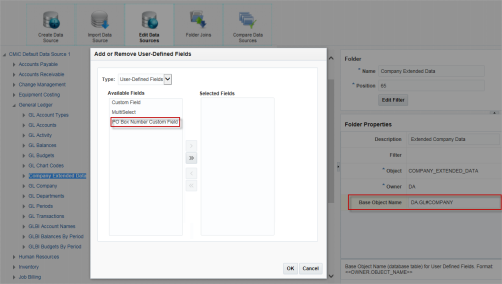
In the Add or Remove User-Defined Fields pop-up window, shown below, for the Type field:
-
If the UDF was added via CMiC Field, select its CMiC Field UDF type.
-
If it was added via the Lite Editor tool, select “User-Defined Fields”.

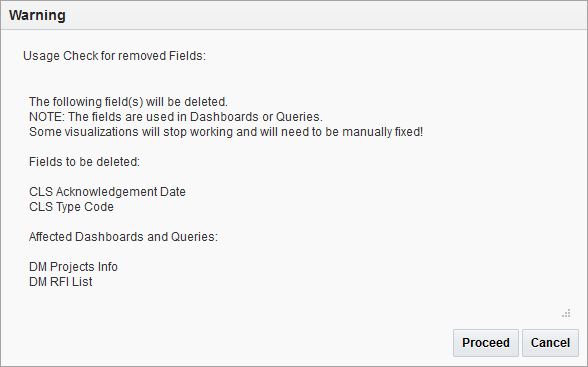
If a UDF is going to be removed while it’s used in a dashboard/query, a warning will appear showing a list of affected dashboards/queries.
Add User-Defined Fields to Custom Folders
As UDFs are linked to specific tables/views, the option to add/remove UDFs is disabled for folders that correspond to user created tables/views.
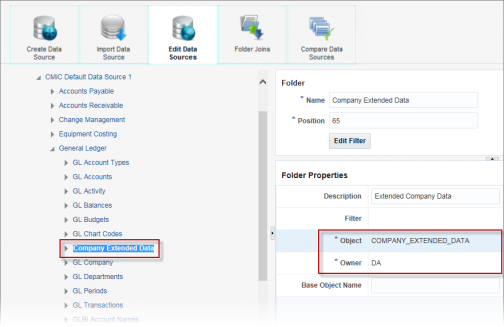
However, if users know that their custom view corresponds to a specific CMiC table/view, it is possible to enable UDFs (added via Lite Editor) for folders that correspond to user-created views/tables by specifying the corresponding CMiC table/view via the Base Object Name folder property, as shown below:
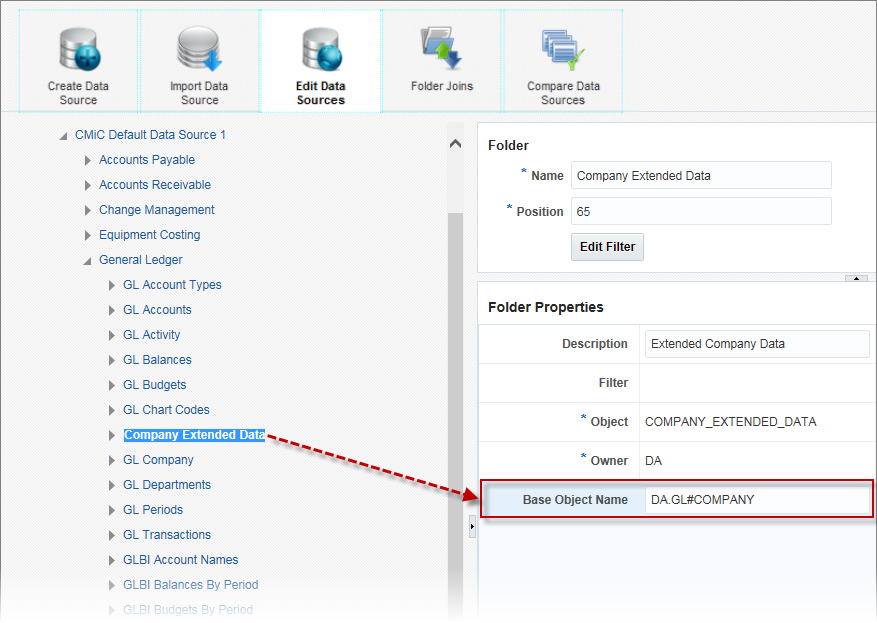
Example:
A customer:
-
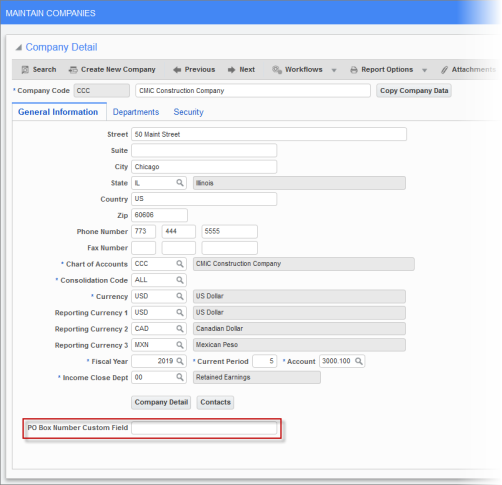
Added a UDF, PO Box Number Custom Field, via the Lite Editor:
-
Created their own view “DA.COMPANY_EXTENDED_DATA”, which queries data found in the Company Setup screen.
-
Added their view into their data source as a folder titled “Company Extended Data”.
Now, the customer would like to add this UDF into their custom Company Extended Data folder.
To do so, we need to provide the correct value into the Base Object Name folder property, as follows:
-
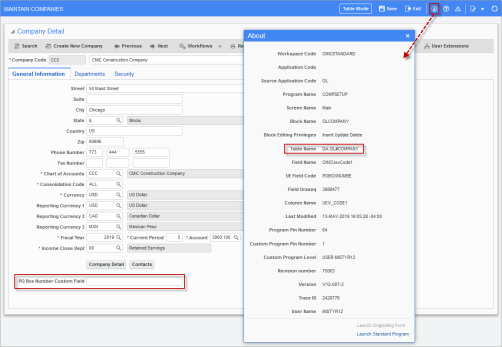
Open the Maintain Companies screen, put the cursor on the UDF field, and click the About toolbar icon (
 ):
):
Pgm: COMPSETUP – Maintain Companies; standard Treeview path: General Ledger > Setup > Company Setup
-
Copy the value from the Table Name field into the Base Object Name folder property:
NOTE: For a user to be able to update the Base Object Name property, the user must have the following system privilege: ‘BIUDFSETUP - Allow users to modify setup for User Defined Fields definitions’.
After the Base Object Name folder property is provided, the Add/Remove User-Defined Fields context (right-click) menu option for the custom folder (Company Extended Data) will be enabled for users to add the UDF field to the folder:
Different Environment Considerations
When users copy their own data sources to a different environment (for example, when they copy a data source from DEV environment to TEST environment), they must make sure that the added UDFs exist in the destination environment.
For example, while in the DEV environment, if a new custom field is added via the Lite Editor, and then this field is added to a folder in the user’s data source, before installing this data source into the user’s other environments, the user should make sure that the added custom field already exists in the destination environment.
Best Practice
The best practice would be to never add a new custom field via the Lite Editor in a TEST or DEV environment. Instead, always add these fields in PROD, and have them copied into other environments by database cloning.
Create Calculated Field (Folders, Fields)
This option is enabled for folders and fields, and it is available to users with the BICALCFLD system privilege, which is granted to a user via the System Privileges tab of the User Maintenance screen, as shown below:
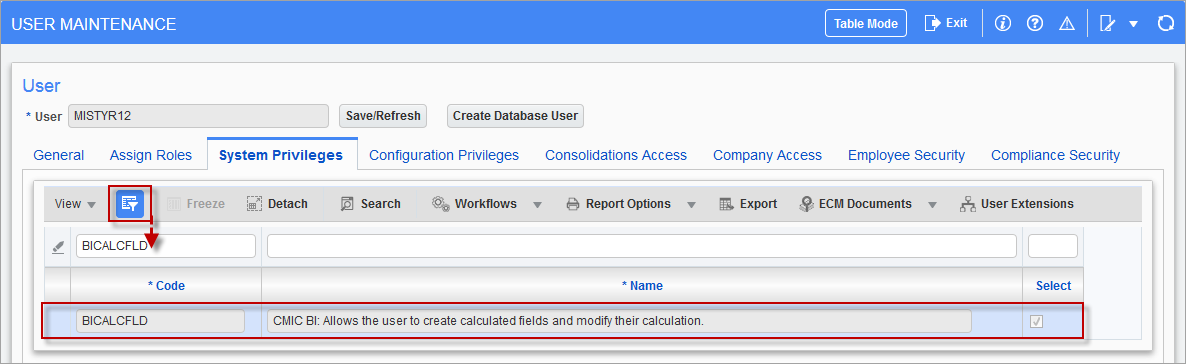
Pgm: SDUSRMNT – User Maintenance; standard Treeview path: System > Security > Users > User Maintenance – System Privileges tab
The BICALCFLD system privilege can also be granted to a user by adding the privilege to their security role via the [System Privileges] button at the bottom of the Define Roles screen (standard Treeview path: System > Security > Roles > Define Roles).
In launching the context menu to create a calculated field, if a folder was right-clicked, the new calculated field will be added to the bottom of its list of fields. If a field was right-clicked, the new calculated field will be added after the clicked field.
In BI Dashboard Builder, visualizations can use these created calculated fields.
When a calculated field is added to a folder (table/view), a column for the new field is added to it, and each of its rows has the new calculated field. For each row, the calculated field’s value is the result of an SQL expression, which can contain references to any fields in the folder to specify values. A field referenced in an SQL expression represents the value of that field in the row of the calculated field being evaluated.
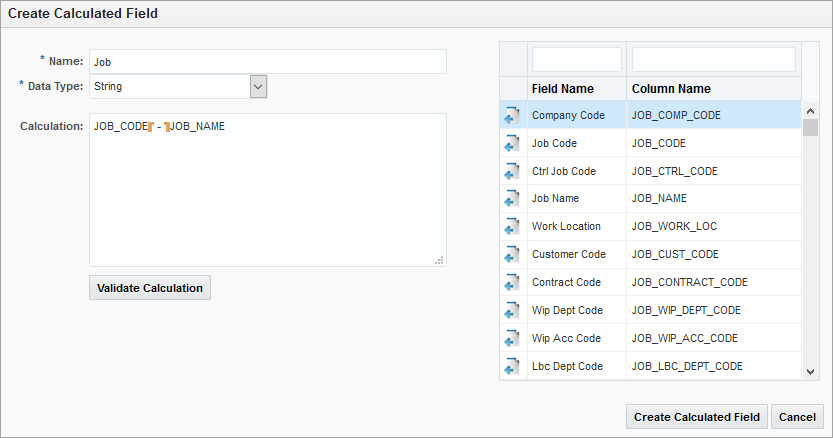
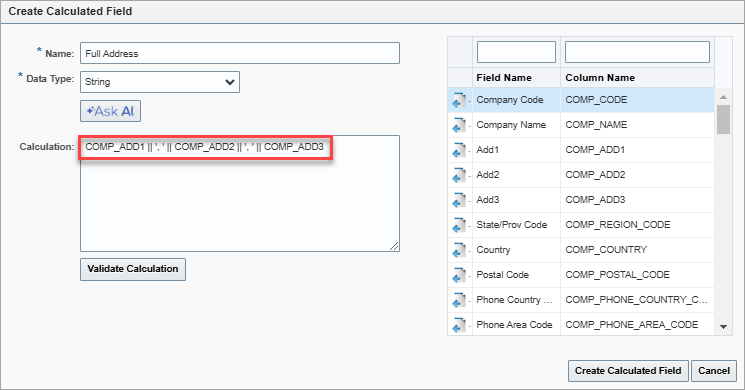
To create a calculated field, in this option’s pop-up (shown above), enter the field’s name and specify its data type. Next, enter a valid SQL expression in the Value textbox to set its value.
Any Oracle SQL functions and operators can be used, and any other fields in the folder can be referenced. For convenience, the folder’s fields are listed in a pane on the right side of the pop-up, and they are filterable (using search boxes over the columns) and sortable (using sort-arrows in column headers). To add a field to the SQL expression from this pane, at the cursor’s location in the Value textbox, select it and click its corresponding left-arrow, or double-click it.
NOTE When converting a field from CHAR to NUMERIC in SQL to create a calculated field, use the TO_NUMBER function. Conversely, to convert a NUMERIC field back to a CHAR (or string), use the TO_CHAR function.
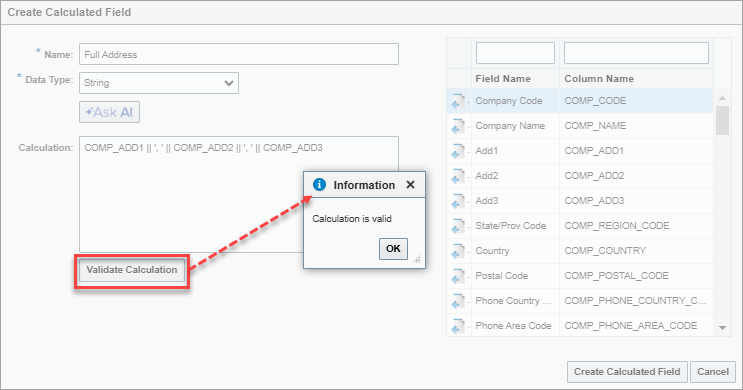
Users can validate the calculation syntax using the [Validate Calculation] button. A message will be issued to indicate whether the calculation is valid or invalid.
Once finished, click [Create Calculated Field], which also validates the SQL expression.
NOTE: While Oracle analytic functions are allowed in calculated fields and may work well in many (simple) cases, they can significantly affect performance if used in complex dashboards and tables. To improve performance, users can try to simplify the table visualization by removing unnecessary folders (if any). Applying stricter filters to limit the queried data set can also help. In most cases, it will be more efficient to create a custom view for a particular use case or find the required data in other views instead of using analytic functions in calculated fields.
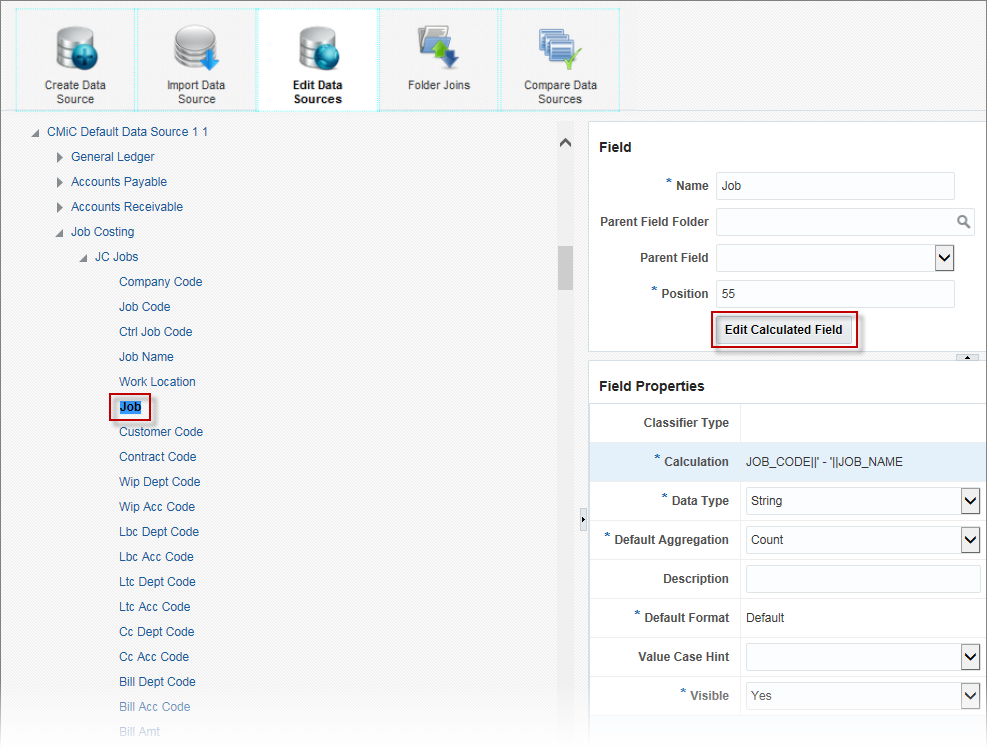
As shown above, calculated fields are identified by their black text, and when they are selected, the [Edit Calculated Field] button is made available for them to edit their calculated value, if they have the BICALCFLD system privilege. To edit a calculated field, click the [Edit Calculated Field] button and use the Update Calculated Field pop-up to edit its name, data type or what is displayed by it, then click [Update].
Create Calculated Field Using AI-Enabled Expression Assistant
NOTE Before using this functionality, the Ask Al feature must be enabled. For more information, refer to BI Analytics - Enabling "Ask Al" Within CMiC Analytics.
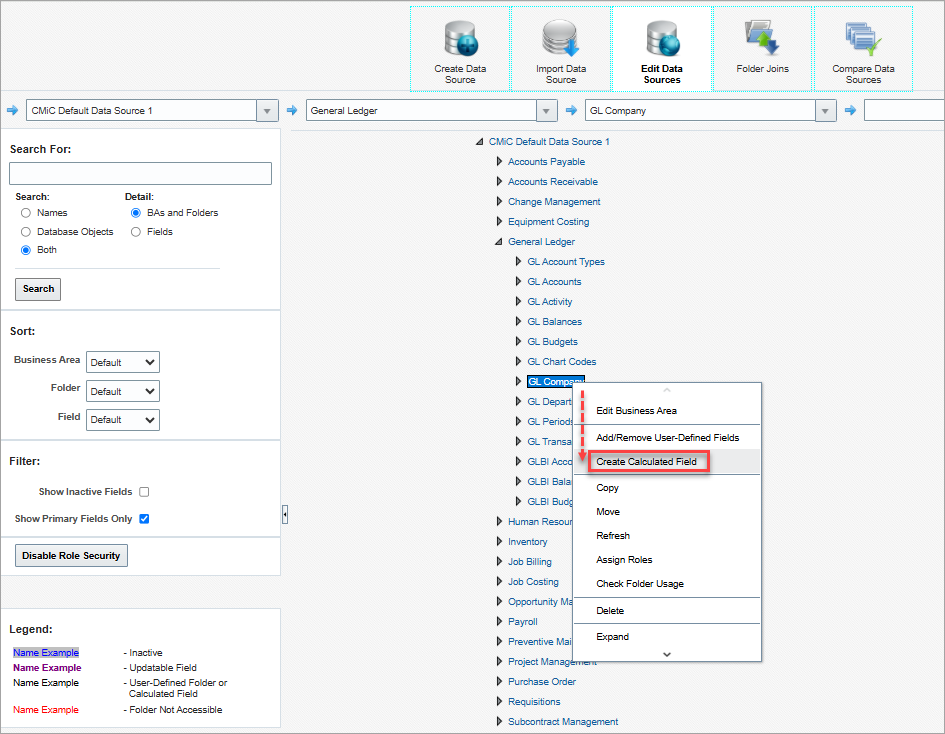
To create a calculated field using the AI-enabled Catalog Builder expression assistant, right-click on a folder where you want to create the calculated field.
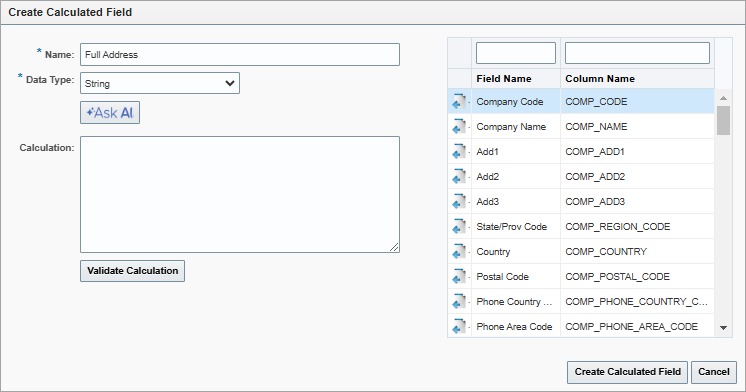
Provide a name and choose the data type for your calculated field. Then, click the Ask Al button to launch the Ask Al pop-up window.
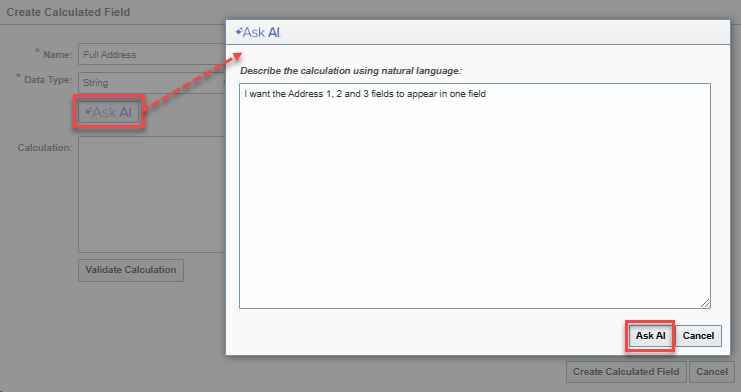
In the Ask Al pop-up window, describe the calculation you need in plain English and press Ask Al.
The assistant will automatically generate the corresponding SQL expression for you.
Finally, validate the calculation to ensure it meets your needs. This intuitive workflow makes creating calculated fields effortless, even without SQL expertise.
Create Calculated Field to Launch Programs Using Targets
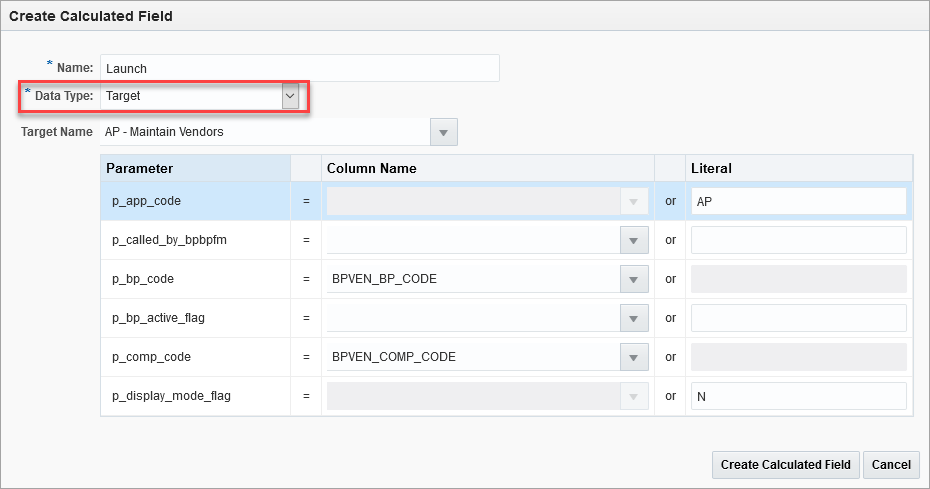
Creating a Calculated Field with a Target Data Type
A calculated field can be created to launch a program from a field using targets. For example, this feature allows users to create launch fields to open up other programs in their table visualizations.
To launch a program using a target:
-
Right-click on a folder or on any existing folder field and select “Create Calculated Field” in the drop-down menu. This launches the Create Calculated Field pop-up window. (Refer to Create Calculated Field (Folders, Fields) for more details.)
-
In the Create Calculated Field pop-up window, enter a field name.
-
Select “Target” in the Data Type drop-down menu.
-
Select a target in the Target Name drop-down menu (Search is available).
-
If there are parameters for the selected target, either select a Column Name or type a Literal value to be passed to the target parameter.
Available target types:
-
UIRuntime Program
-
UI Log
-
JSP Program
-
JSP Direct Call
-
Static ADF
Copy (Data Sources, Business Areas, Folders)
This option is enabled for data sources, business areas and folders.
NOTE: When one of these database objects are copied, their assigned security roles are also copied.
Data Source Copying

For a data source, this option is used to create a copy of the selected data source, and optionally, copies of its dashboards can also be created.
In the New Data Source Name field, enter a name for the copy of data source being created.

When copying the CMiC Default Data Source, the default analytics canvas will also be copied along with all dashboards.
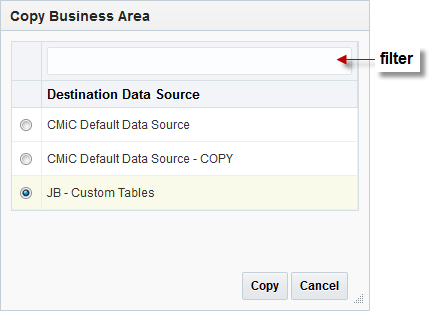
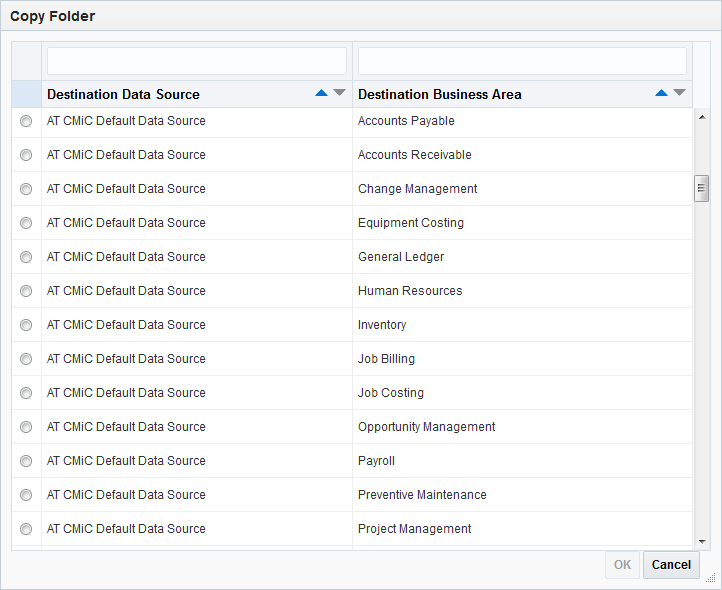
Business Area Copying
For a business area, the pop-up asks to which data source it is to be copied:
Folder Copying
Folders can be copied into the same business area, or into a different business area inside the same or different data source.
When a folder is copied, the folder’s joins will also be copied.
NOTE: This functionality is particularly useful for Cloud customers who don’t have the ability to modify joins. When a new folder is added to the default data source by CMiC, Cloud customers can just copy this new folder into their own custom data source, and it will automatically be joined to all the same folders (database objects) as in the default data source.
Move (Folders)
This option is used to move a folder from one business area to another inside the same data source without affecting existing dashboards/queries.
Refresh (Data Sources, Business Areas, Folders)
This option is enabled for data sources, but for the provided default data source, CMiC Default Data Source, this option is only available to Enterprise clients.
NOTE: It is recommended that CMiC Default Data Source is not modified, as patch installations and hotfixes update this default data source, overwriting any changes made to it and making any dependent dashboards unusable.
This option is also enabled for business areas, and folders.
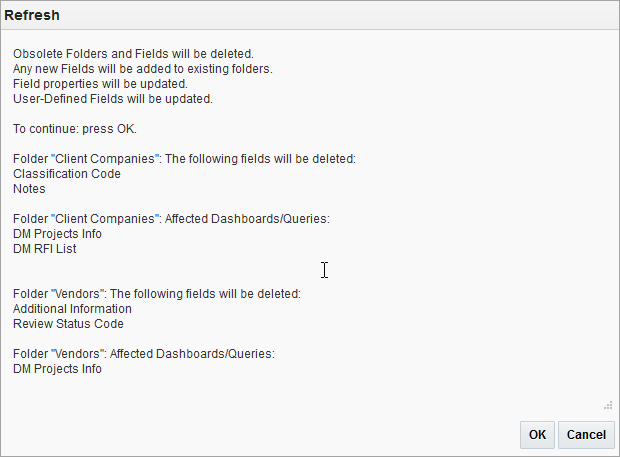
Refreshing is required for data sources, business areas, or folders if it is suspected that they have been altered (e.g., fields were added).
If this option is clicked and refreshing is required, the pop-up informs the user of what will happen and asks for confirmation. Refresh will check if any folders or fields are going to be deleted and will show a list of such folders and fields, along with a list of dashboards/queries where they are used.
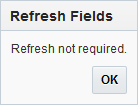
If refreshing is not required, the pop-up informs the user:
To learn more about the importance of refreshing data sources, BI Catalog Builder - Frequently Asked Questions.
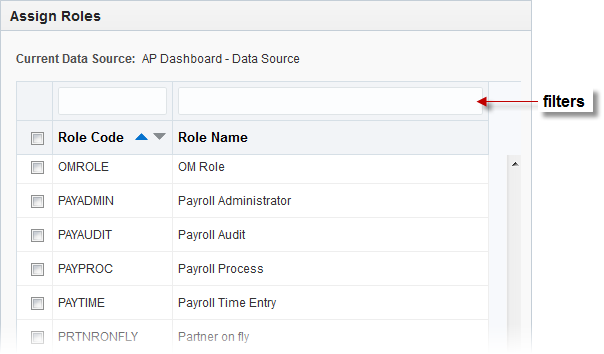
Assign Roles (Data Sources, Business Areas, Folders)
Pop-up window launched from Assign Roles context menu
This option is enabled for data sources, business areas and folders. It is only available to users with the BISECMNG system privilege, which is granted via the System Privileges tab of the User Maintenance screen, as shown below:
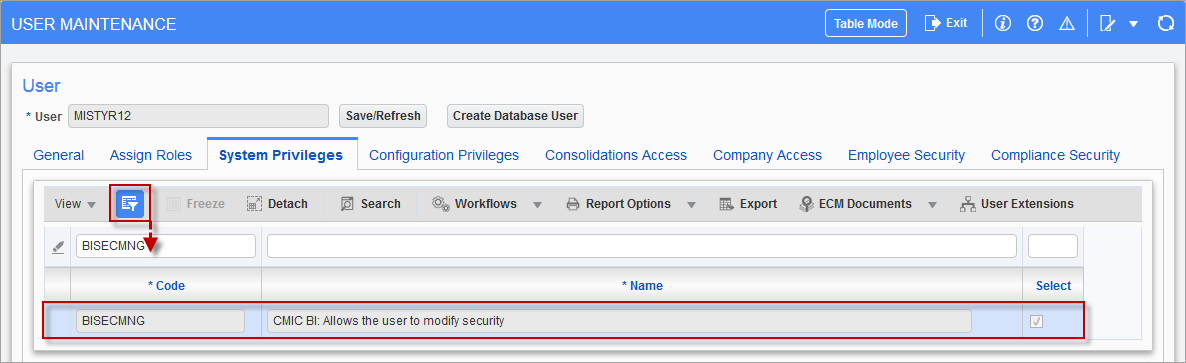
Pgm: SDUSRMNT – User Maintenance; standard Treeview path: System > Security > Users > User Maintenance – System Privileges tab
The BISECMNG system privilege can also be granted to a user by adding the privilege to their security role via the [System Privileges] button at the bottom of the Define Roles screen (standard Treeview path: System > Security > Roles > Define Roles).
This option’s pop-up (first screenshot) is used to specify which security roles have access to a data source, business area or folder.
If Catalog Security is not enabled, everyone with access to BI Catalog Builder can access the data sources; otherwise, only members with the assigned security roles can access them. For details about BI Catalog Builder’s security options and rules, please refer to CMiC BI Security – BI Catalog Builder.
The Roles screen in the System Data module is used to maintain these security roles (standard Treeview path: System > Security > Roles > Define Roles).
Check Folder Usage (Folders)
This option will show a list of dashboards/queries where the folder is used.
Delete Data (Sources, Business Areas, Folders)
This option is used to delete data sources, business areas, and folders.
It is particularly useful to customize copies of data sources, by deleting business areas and folders from the copy that are not required for the customized version.
When users try to delete a business area or a folder, the program will check if the folders are actually used in any dashboards and if they are, it will display a list of those dashboards in a pop-up window with a warning that visualizations in these dashboards will stop working if the folders are deleted. If the folders are subsequently deleted, an error message will appear on affected visualizations indicating that some folders cannot be accessed because they have been removed.
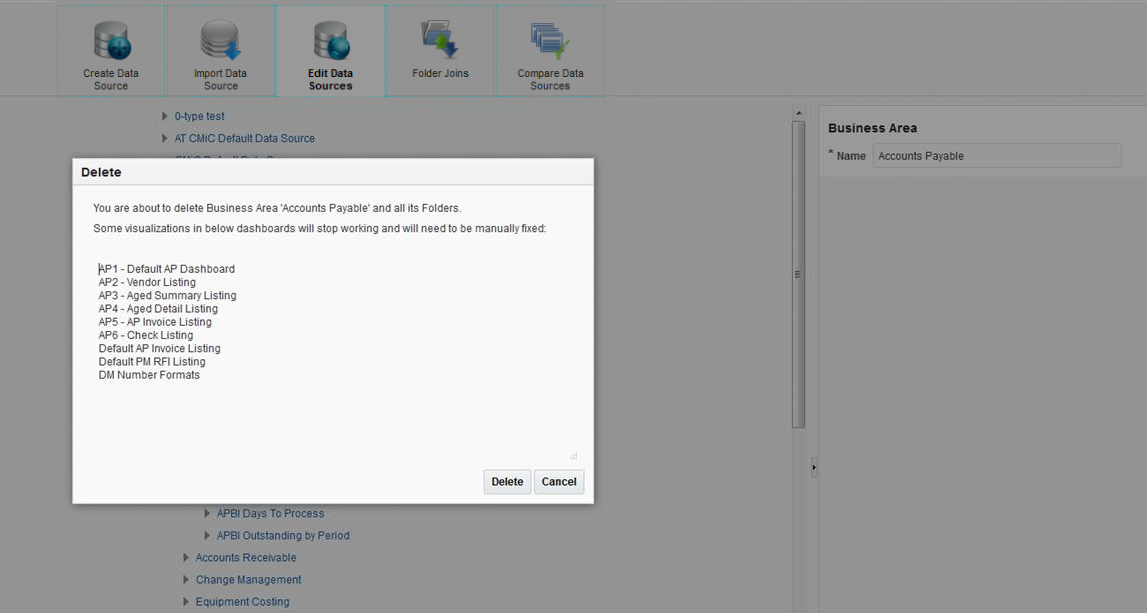
Example of pop-up window launched when users attempt to delete a business area or a folder, and folders are being used in dashboards
Expand
Expands the selected node to reveal its contents. Note, the  icon next to the node can also be used to expand the node’s contents.
Expand All Below
Expands the selected node and its sub-nodes to reveal their contents.
Collapse
Collapses selected node to hide its contents. Note, the  icon beside the node can also be used to collapse the node.
Collapse All Below
Collapses the selected node and its sub-nodes to hide their contents.