Overview
The Drawings screen allows mobile users to view and manipulate construction drawings for the project. Mobile users can annotate drawings directly from the app as well as publish their annotations for other users to see. Drawings are uploaded through the web application.
NOTE: If a user has the basic version of the PSPDF license, images will not load in Construct PM (web deployment) and an error will be shown. As well, Drawing Measurement tools are not supported with the basic version. For more information, please refer to Construct PM - Basic vs Enhanced PSPDF Licenses.
Drawings Log
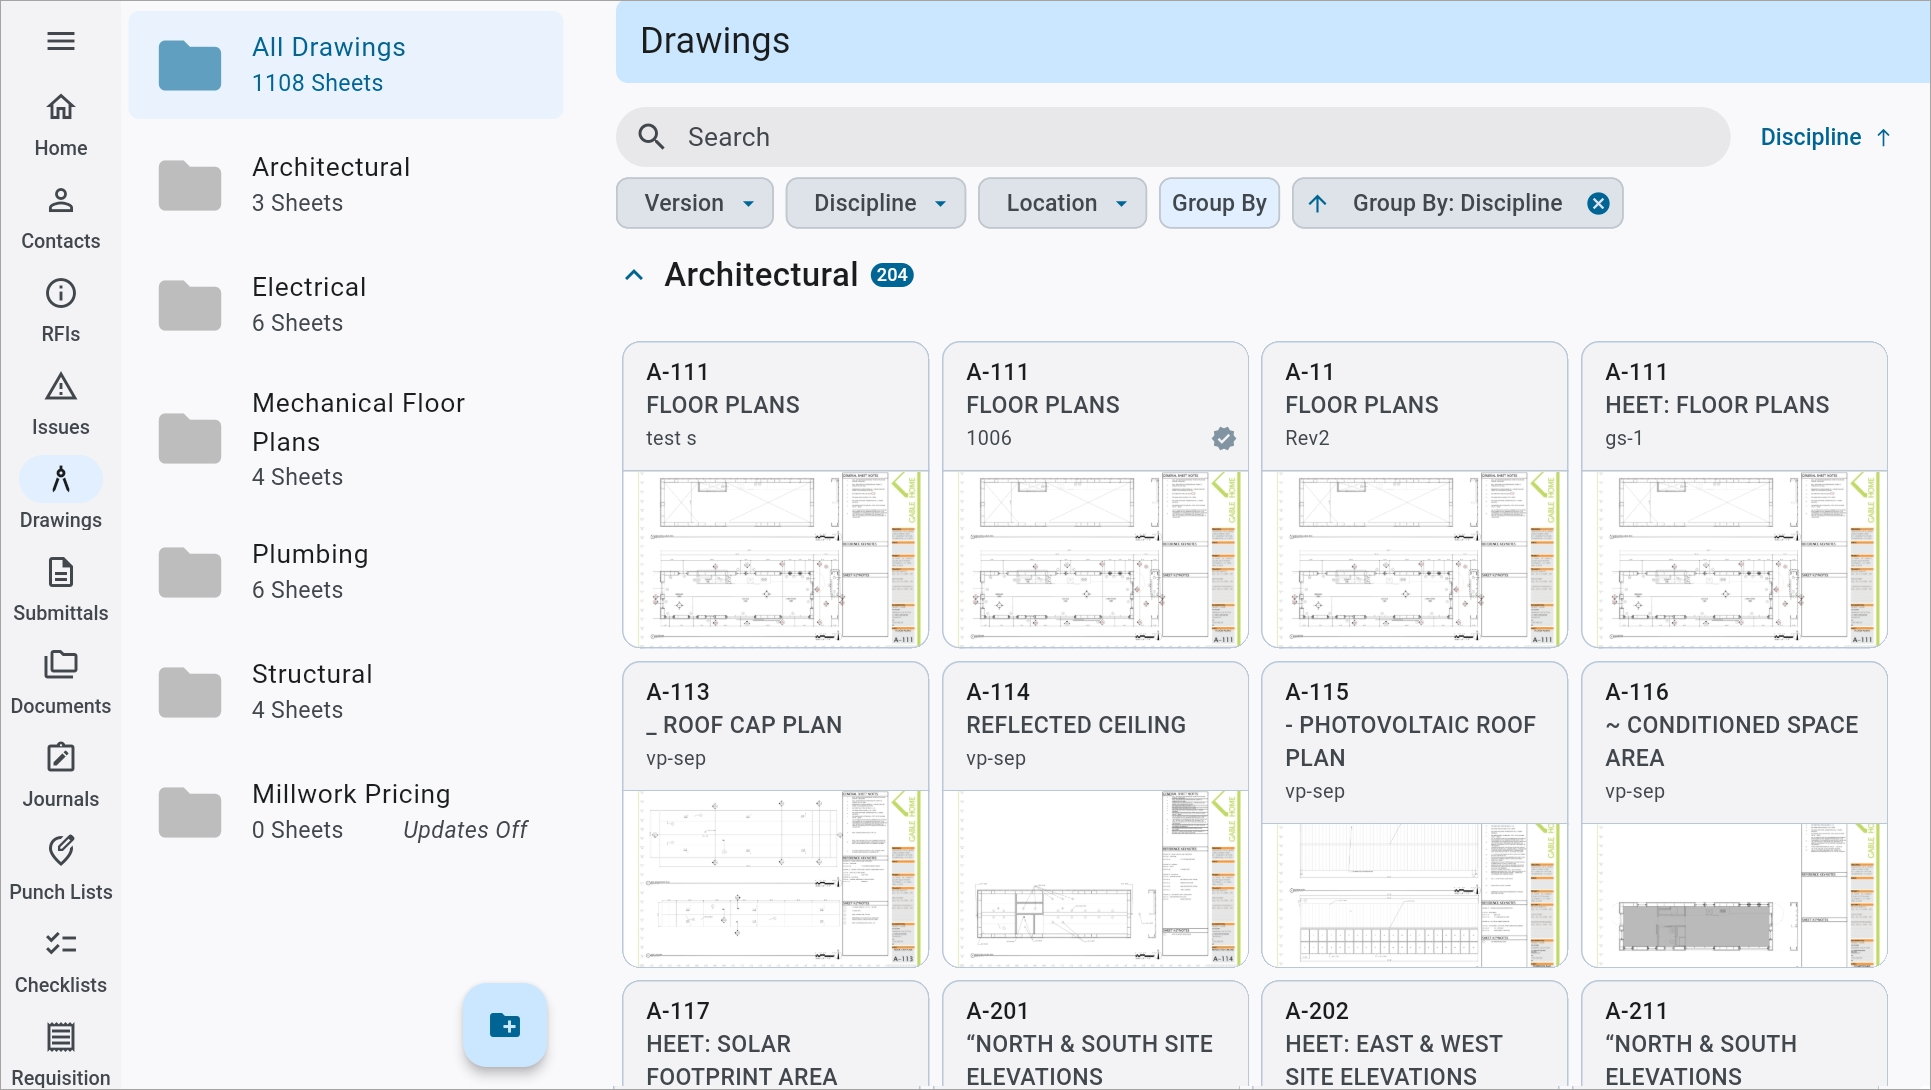
Pressing the Drawings icon in the main menu brings up the main Drawings screen. This shows all the drawings uploaded for the project. Touch any drawing to view the sheet.
Above the thumbnail of each drawing is its sheet name, sheet number, and revision number. The Annotation icon (![]() ) indicates that there are published annotations on that drawing sheet.
) indicates that there are published annotations on that drawing sheet.
Search
The search bar and filter buttons are available to filter the search results. Drawings can be filtered by version, discipline, and location code.
NOTE: The Search feature is currently only available for the Sheet Number field. Please use the available filters and Group By option as alternatives where applicable.
NOTE: The user-defined Trade field will not appear as a filterable column in the Drawings log. This functionality has been replaced by the Discipline field instead.
Sort
Press the icon that reads "Discipline" to sort drawings by sheet name, date received, or trade, etc. Press the arrow next to the sort option to sort in ascending or descending order.
Group By
Press this button to group the log by revision date, discipline, location, or version. The log is grouped by discipline by default. Press the arrow to sort the results in ascending or descending order.
NOTE: This option is available via the Search bar for mobile devices.
List/Grid
NOTE: List view is only available on Construct PM web.
Drawing Viewer
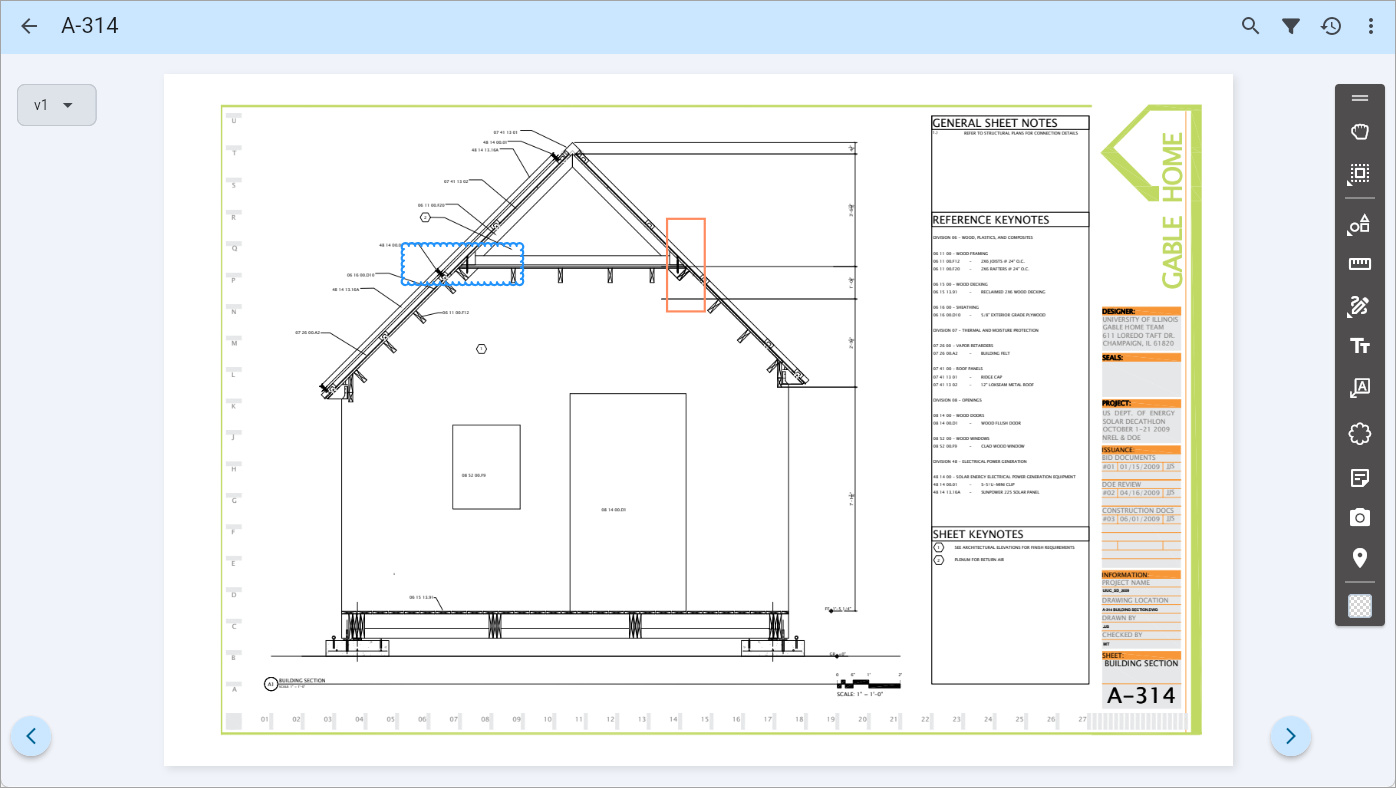
Drawing Viewer
The viewer presents users with a full-screen view of the selected project drawing. This screen also allows users to annotate and mark drawings and then publish and link those annotations.
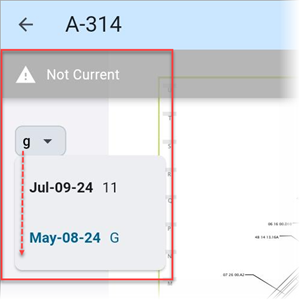
The Revision Selector drop-down menu appears in the top-left. Press the revision name link (which here says, "11") to select different revisions of the drawing. If a non-current revision is currently selected a message appears at the top of the drawing which reads, "Not Current".
Header Icons
Search
Press the search icon (![]() ) to search all project documents. The search term is highlighted in yellow.
) to search all project documents. The search term is highlighted in yellow.
Annotation Filters
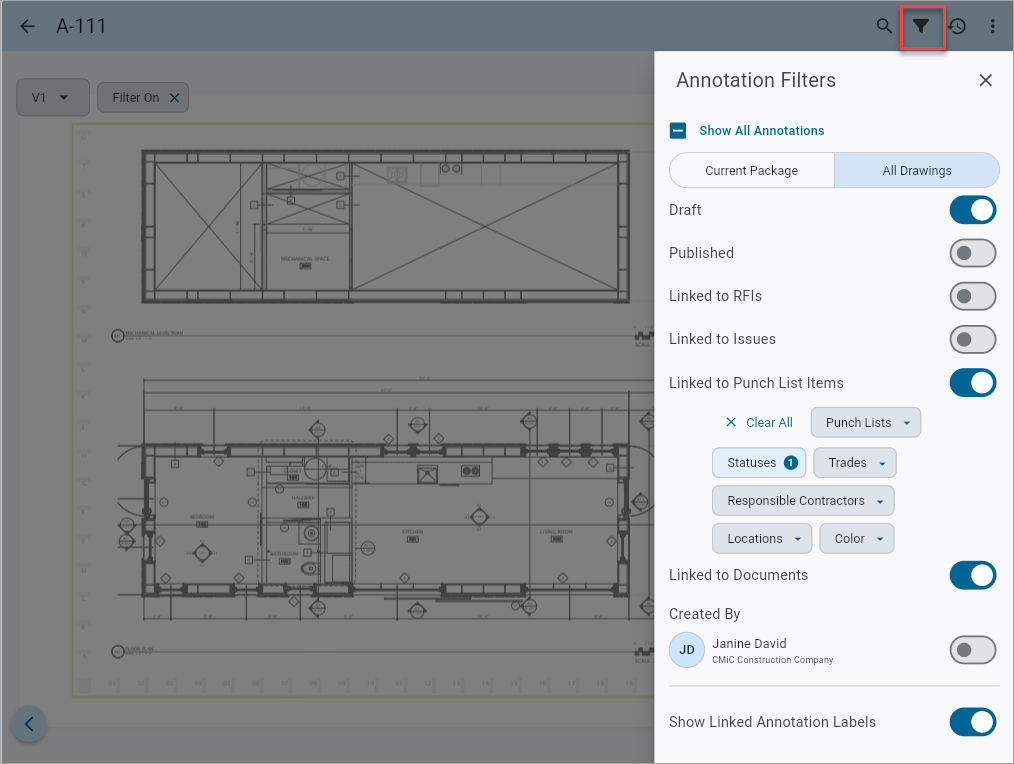
Annotation Filters menu within PSPDF view
Use the Annotation Filters menu to select which drawings are shown on the main Drawings screen. From here the user can hide all annotations, or select the type or creator of the annotation that they want to view. If any filters are being used, the Filter On icon (next to the Revision Selector) will be displayed. All filters can be cleared if this icon is closed.
NOTE: The Annotation Source filter is available as of Patch 22 for JSON projects only and allows users to choose whether to display all annotations published from the main Drawing log or only annotations relevant to the current package.
Recent Sheets
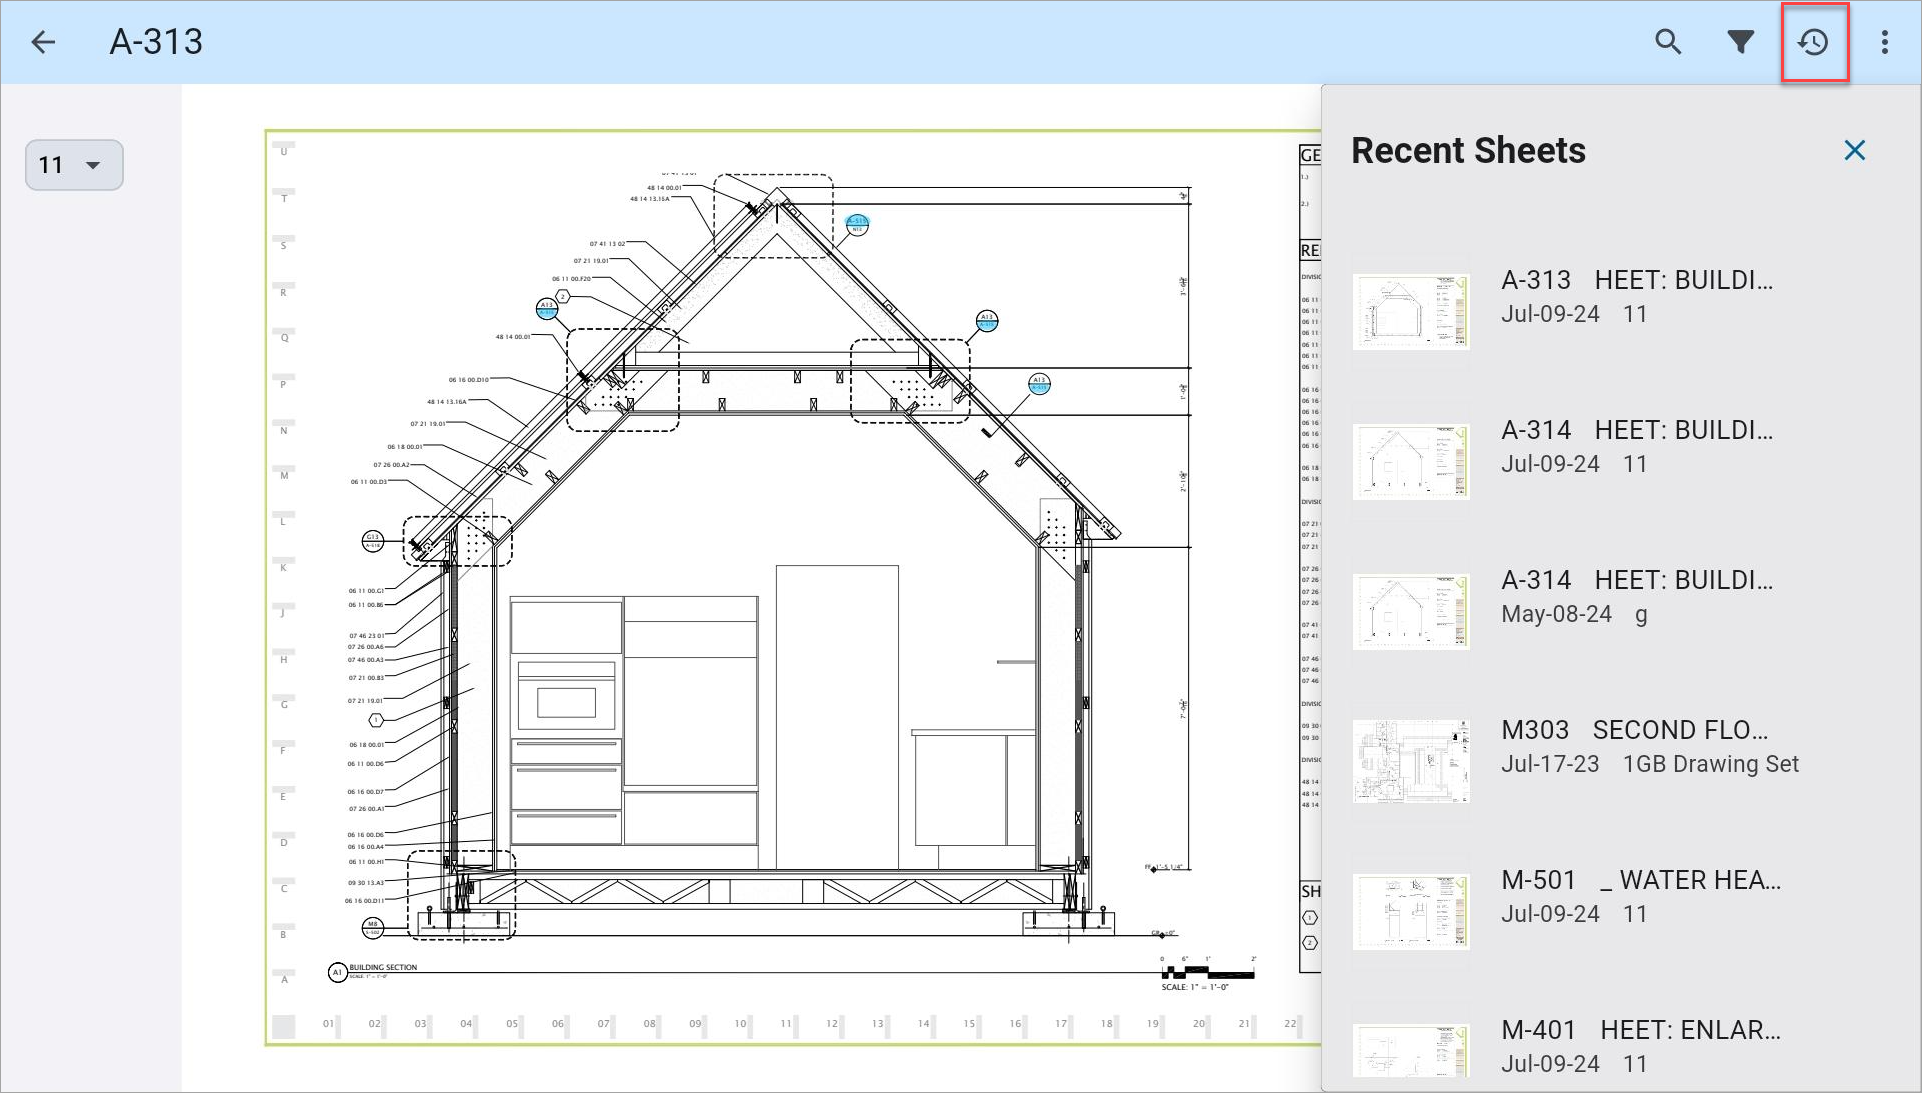
Recent Sheets menu within PSPDF view
Press this icon to show the sheets most recently viewed by the user.
Menu
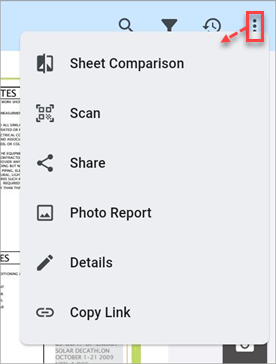
Pressing the Menu icon provides a drop-down menu with additional features, such as Sheet Comparison,
Sheet Comparison
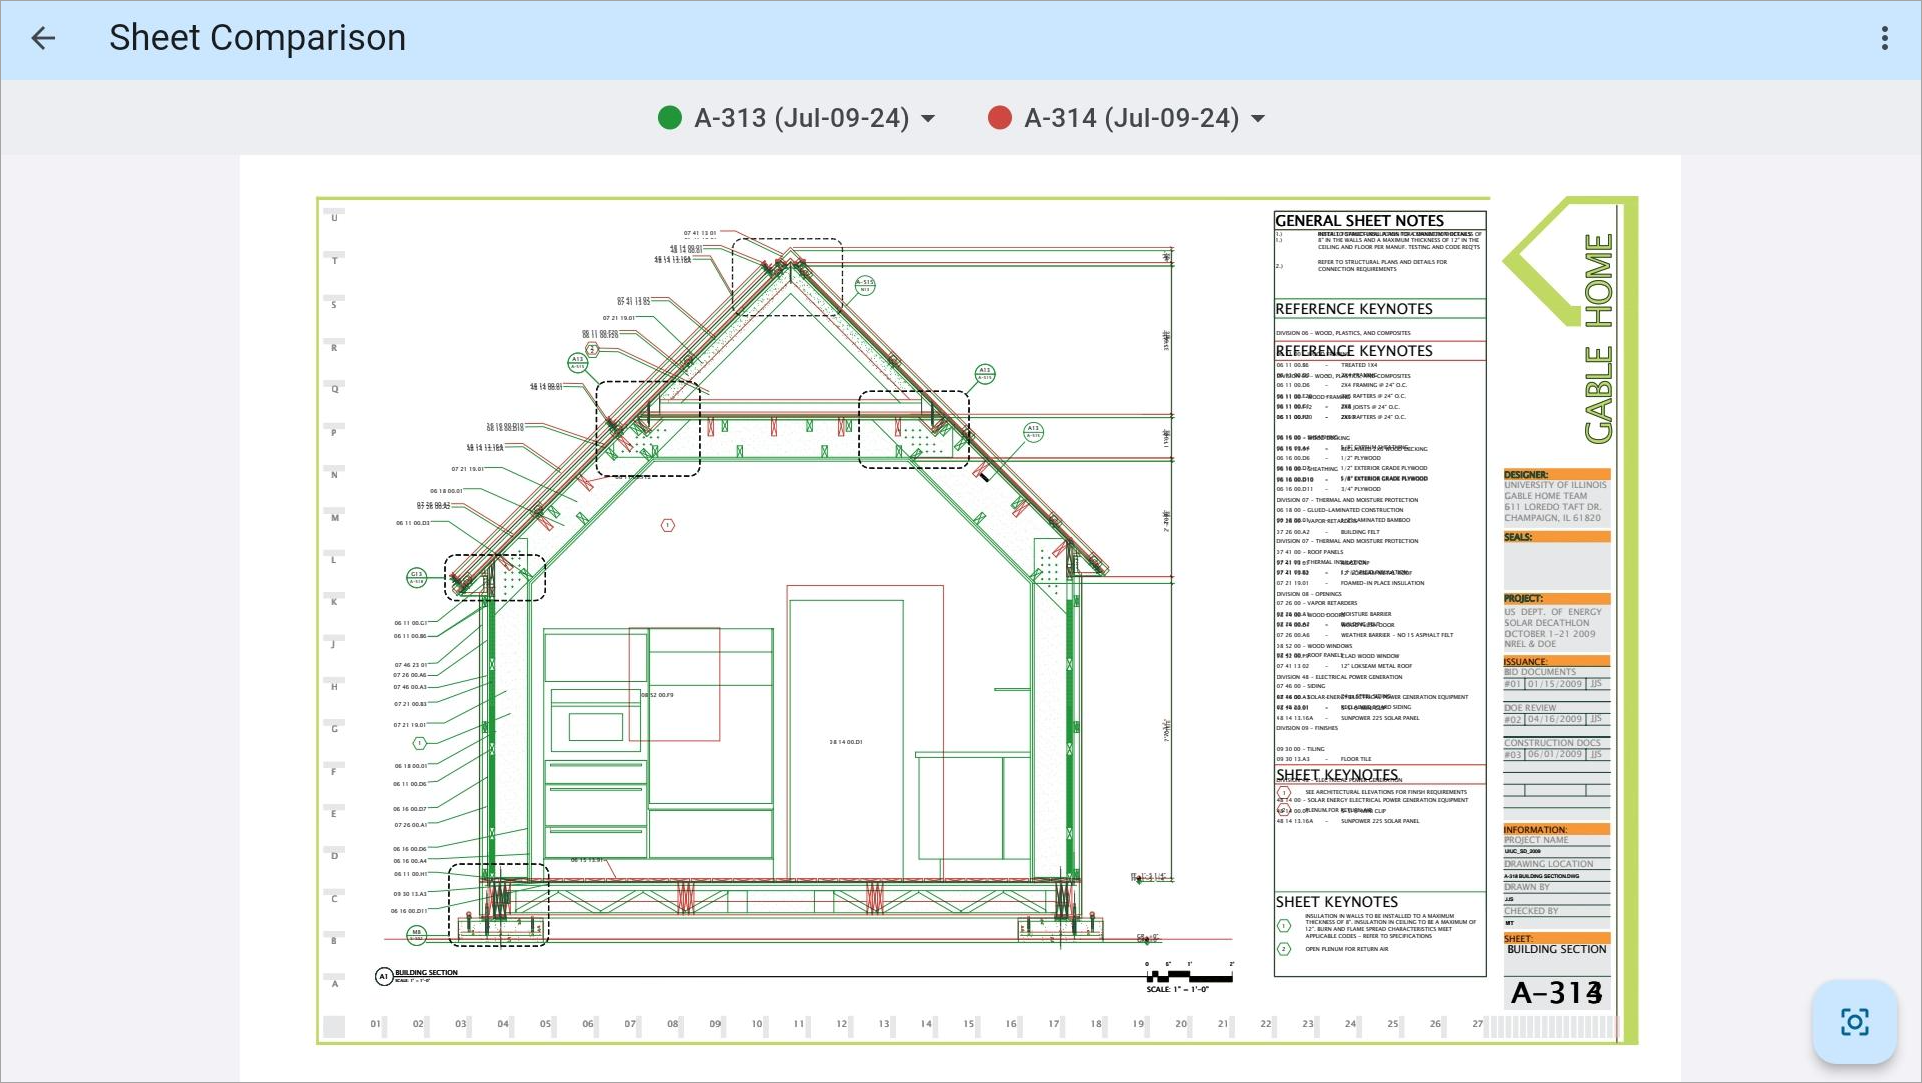
Sheet Comparison within PSPDF view
Construct PM allows for comparison between different construction drawings by laying the two drawings on top of one another. Press the Sheet Comparison icon to bring up the Compare Sheets menu. Select a drawing from this menu to bring up the above screen. The original drawing appears in green and the comparison drawing appears in red.
When comparing two drawing sheets that were created on two different sheet sizes, the automatic sheet comparison feature may not align the two drawings accurately. To resolve this, users can now perform a manual sheet comparison by selecting points on the drawing sheets. The blue button in the bottom-right corner can be clicked to initiate this manual sheet comparison process.
Scan QR Code
Press this option to set up the location of drawings by scanning a QR code.
If a QR code is scanned that is related to another project, the following message will be issued:
This location code is from [PROJECT NAME], please switch to this project.
Otherwise, a verification pop-up will be displayed as shown below.
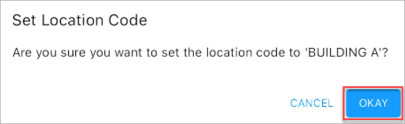
Click on the [Okay] button to set the default location.
Share
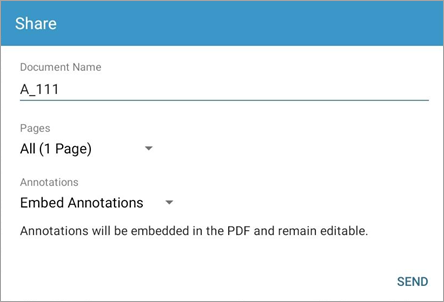
Press this option to share a drawing as a PDF.
If sharing as a PDF, use the Annotations field's drop-down to select how annotations within the drawing should be handled. The following options are available:
-
Embed Annotations: Annotations will be embedded in the PDF and remain editable.
-
Flatten Annotations: Annotations will be rendered in the PDF and will not be editable.
-
Ignore Annotations: The PDF won't contain any annotations.
When finished, press [Send] and select the desired recipients.
NOTE: Drawings can also be shared using the Share Drawing Sheets option. Refer to Share Drawing Sheets for more information.
Photo Report
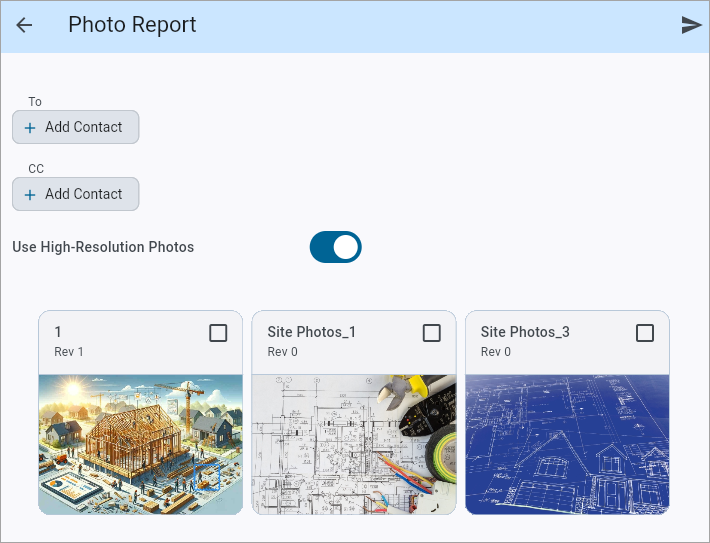
Press this option to create a photo report that can be shared with project contacts.
Details
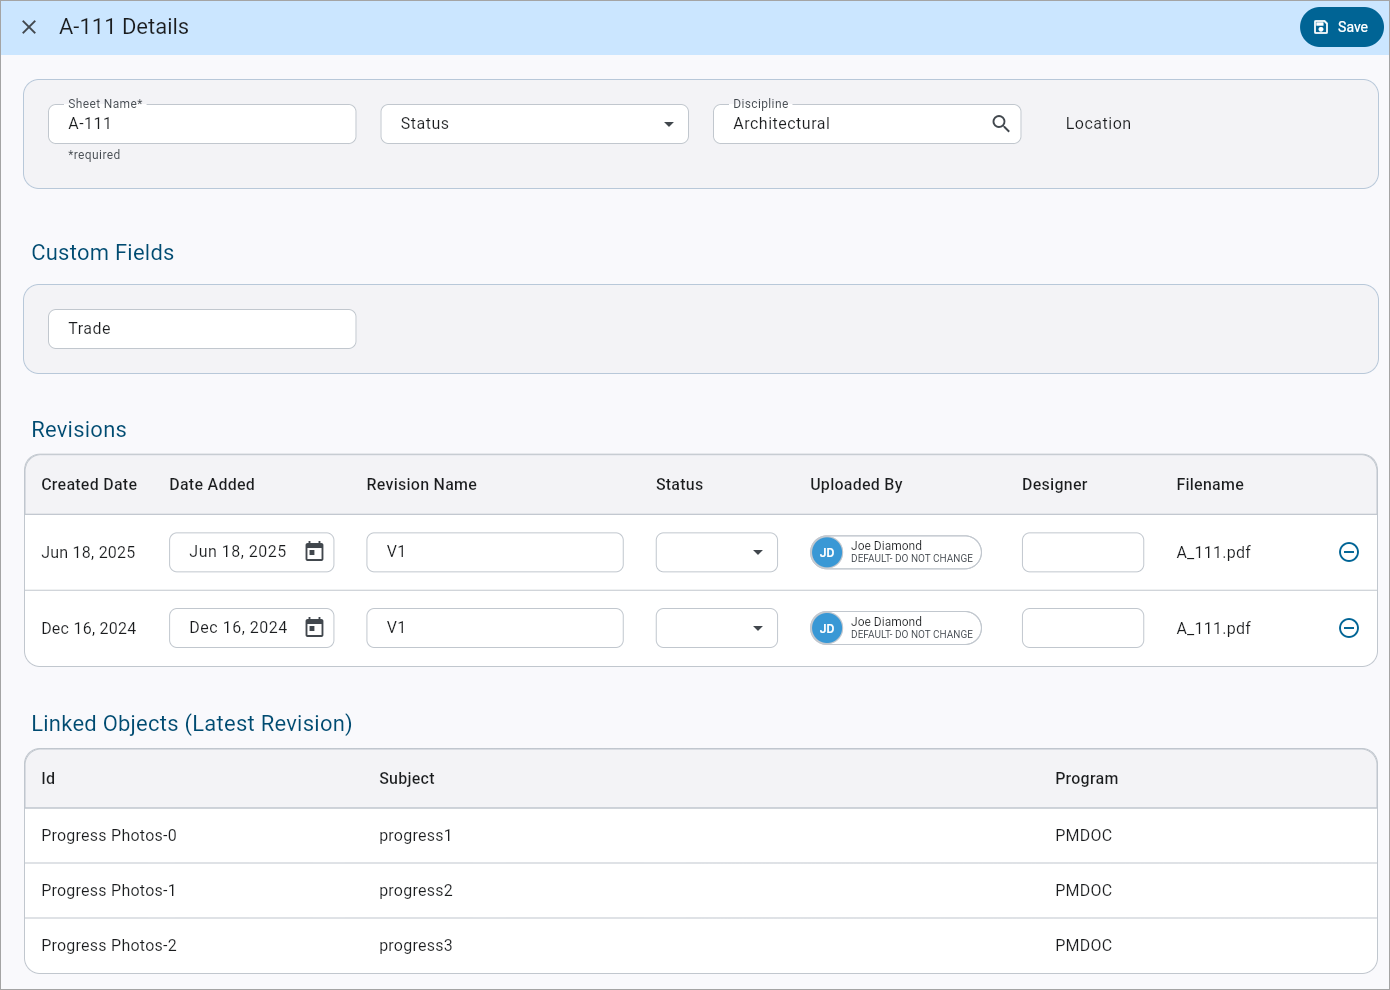
Press this option to view metadata details, revision details, and to view linked items objects (in the latest revision).
NOTE: The Location field for a drawing sheet is read-only and cannot be edited. Location codes can be specified during the upload process via the Drawings and Specs Upload screen in CMiC Field. Location codes can be entered for the entire drawing set in the Locations field in the Enter Details section or for individual sheets in the Drawing Extraction pop-up when reviewing the OCR extracted data. For more information, please refer to CMiC Field - Drawing and Specs Upload and Extraction Tool.
Use the Delete (![]() ) icon to delete a revision. Users require the project role privilege 'Allow to Delete Document Revision' and the Delete privilege for the particular document folder type within the user’s project role under Show In Menu/View/Create/Update/Delete/Unlink All Document Types in the Project Roles screen.
) icon to delete a revision. Users require the project role privilege 'Allow to Delete Document Revision' and the Delete privilege for the particular document folder type within the user’s project role under Show In Menu/View/Create/Update/Delete/Unlink All Document Types in the Project Roles screen.
Copy Link
Press this option to copy a drawing's URL so the link can be quickly pasted and shared. For more information, please refer to Construct PM - Using Copy Link (Web).
Annotation Icons
The Annotation toolbar contains two types of icons: tool and category. A tool icon represents an individual tool, while a category icon represents a set of related tools. To help distinguish between the two types, a category icon has a small triangle in the bottom left corner to signal a toolset menu exists. This way, pressing on a category icon will initially open a toolset menu for the selected category. Once the toolset menu is open, the toolset can be reviewed and an individual tool can be selected.
Move
Press this icon to access the Move tool to relocate the Annotation toolbar on the screen.
NOTE: This tool is currently only available in Construct PM web.
Pan
Press this icon to select the Pan tool to move the view vertically or horizontally (when zoomed into the drawing sheet).
NOTE: This tool is currently only available in Construct PM web.
Select
Press this icon to access the Text Highlight and the Multi-Select tools.
The Text Highlight tool is used to select text on the drawing sheet. For more information on the Text Highlight tool, please refer to
The Multiselect tool is used to select multiple annotations on a drawing sheet at once to link/publish/remove.
The types of annotations selected will determine what options can be performed on the selected set. For example, shape type annotations have the option to link, publish, and remove. If multiple annotations that are using the shape type are selected, then the option to link, publish, and remove will be available to be completed on the selected set. However, if a measurement annotation type is added to the selected set with the shape annotation types, then only the option to remove will be available to be completed on the mixed set of annotations, since this is the only option available on a measurement type annotation and the options that appear in the blue toolbar will only take the lowest common denominator(s) into account. Refer to CMiC Field - Using Drawing Multiselect for more information.
NOTE: The Text Highlight tool and the Multiselect tool are only available in Construct PM web and iOS app.
Shapes
Press this icon to access the Stamp, Arrow, Line,
Drawing Measurements
Press this icon to select the Drawing Measurements tool and access a complete set of measuring tools. For more information on this tool, refer to Construct PM - Using Drawing Measurements.
Drawing
Press this icon to access the Pen and Highlighter tools.
Text Box
Press this icon to add a text box to the drawing.
Text Callout
Press this icon to add a text callout to the drawing. Similar to a text box but includes built-in leader arrow which can be dragged to point to a location on the drawing.
Cloud
Press this icon to add a cloud shape to the drawing. This tool is similar to the Shape tool used for arrows, lines, and circles.
Note
Press this icon to add a note to the drawing.
Drawing Link
Press this icon to create a link to a drawing sheet in the Drawing log. Only one drawing sheet can be linked. By default, the link will not be published but the option to publish is available. For more information, refer to Creating Hyperlinks on Drawing Sheets.
Photo
Press this icon to add a photo to the drawing. When adding a new photo, it must be saved to a document type folder. These folders, and what types of documents can be saved in them, are determined by the Document Type tab in Project System Options. In this case, photo-annotations in Construct PM fall under the "Media" PM object type.
Punchlist Stamp
Press this icon to add a stamp annotation and an associated punch list item.
Default Color
Press this icon to launch a color palette pop-up used to specify a default color for the annotations. If a color is selected, annotations which normally have their own unique default color will use the selected color. If the "Default Color" icon ( ) is selected in the color palette, then the annotations will use their default color settings. For example, by default, clouds are green, manual hyperlinks are blue, punch list stamps are pink, etc.
NOTE: The color of photo annotations can't be changed and by default will remain blue even if a default color is selected in the color palette.
Annotation Options
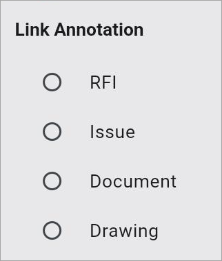
Link, Publish, and Remove options within PSPDF view
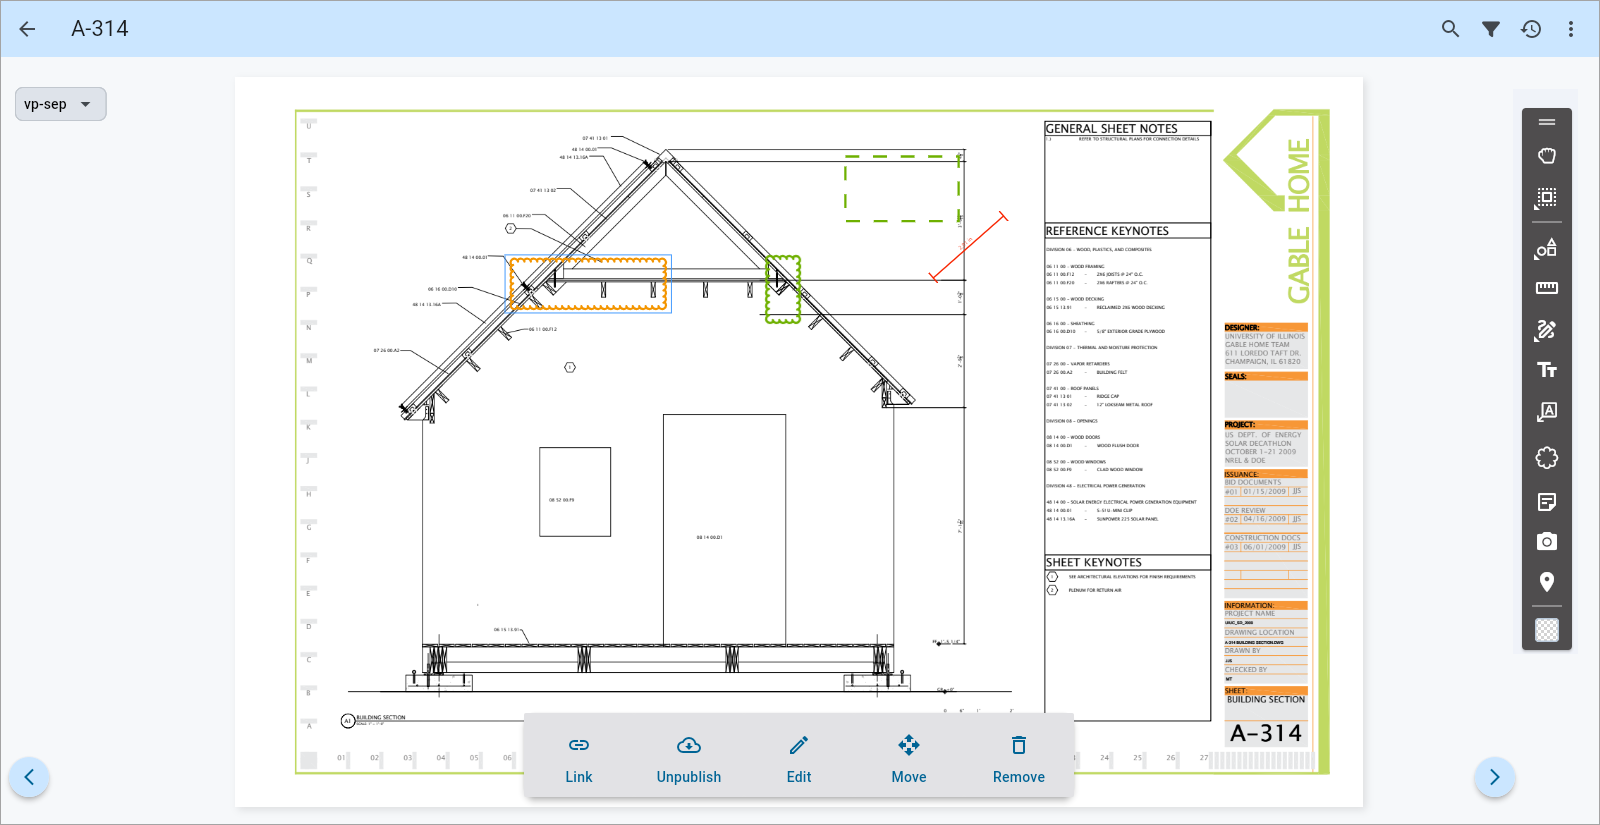
Press any annotation on a drawing in PSPDF view to bring up the linking options. Annotations can link to RFIs, issues, documents, and drawings.
NOTE: Linking an annotation to a drawing and creating a drawing link are two separate functionalities. Any annotation can be linked to a mix of RFIs, issues, documents or drawings. However, creating drawing hyperlinks is strictly for hyperlinking, as explained in Creating Hyperlinks on Drawing Sheets.
Link
Press this button to link the annotation to an object within Construct PM. The user-linked object can be an RFI, issue, document, or another drawing.
Create a new object by selecting the object type and pressing the New link. This will then bring up either the RFI or Issue creation screen. Enter the object's information and press the Submit link to link the object to the annotation. To select a pre-existing object, press the Existing link. This will open the appropriate log from which the existing object can be chosen.
Users can link as many drawings as they wish using the Link functionality. When using this feature, the drawing log screen will open so users can select from any of the drawing packages to which they have been given access.
Unlink
Select the "Unlink" option in the record's Options menu's drop-down to unlink the selected record.
Publish/Unpublish
This option allows users to select whether or not to publish the annotation for other project contacts to view.
Draft annotations remain in the Draft state until published and are only available to the author and users who have the 'View Draft Annotations' project role privilege. For more information, please refer to Construct PM - Security.
Edit
This option launches a pop-up window where formatting changes can be made to the annotation.
Move
This option allows users to move and resize the annotation. This option is only available for published annotations.
NOTE: Users require the Edit privilege to access this option. For more information, please refer to Drawings.
Remove
Press this button to remove the annotation from the drawing.
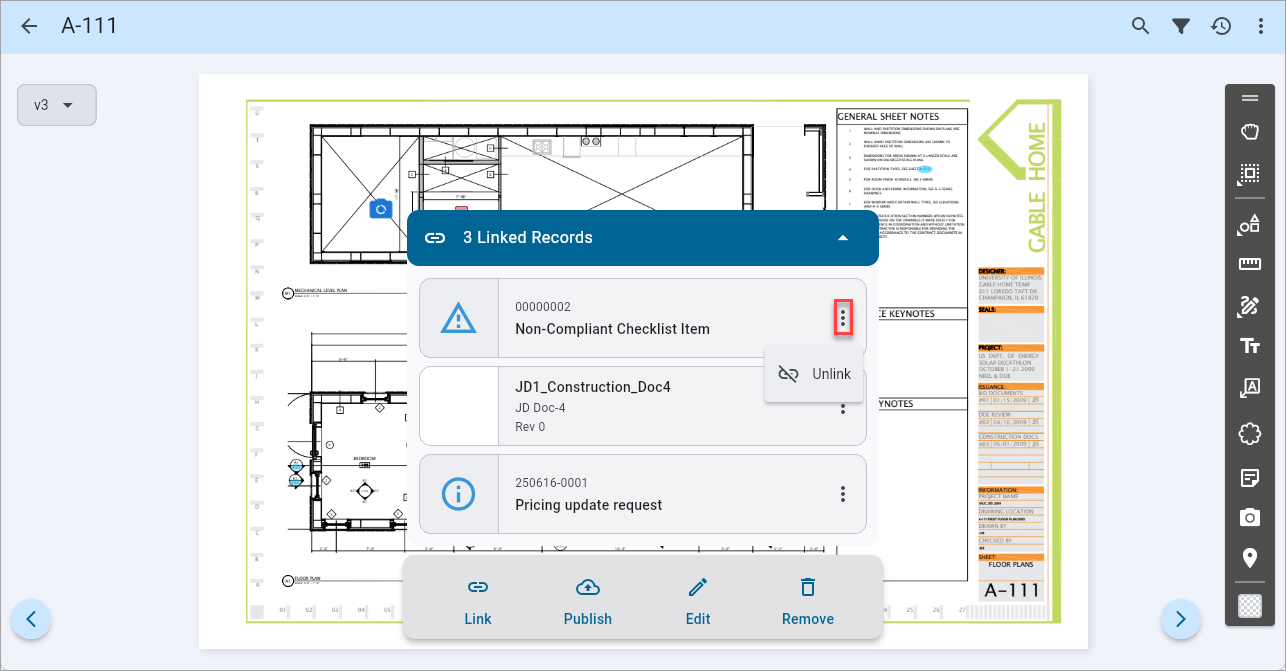
Highlighting Text
NOTE: This is currently only available on Construct PM web.
This feature is used to highlight important text in a drawing sheet and includes a variety of basic formatting options (e.g., highlight, underline, and strikethrough). Highlighting text on a drawing opens a menu with the following options:
Text Highlight
Highlights the highlighted text.
Strikethrough
Adds a line through the highlighted text.
Underline
Underlines the highlighted text.
Squiggle
Adds a squiggle under the highlighted text.
Batch Edit Drawings
NOTE: This is currently only available on the web.
The Batch Edit option is a time-saving feature used to complete edits across multiple selected drawings at once. Users can update multiple fields of selected drawings all in the same batch.
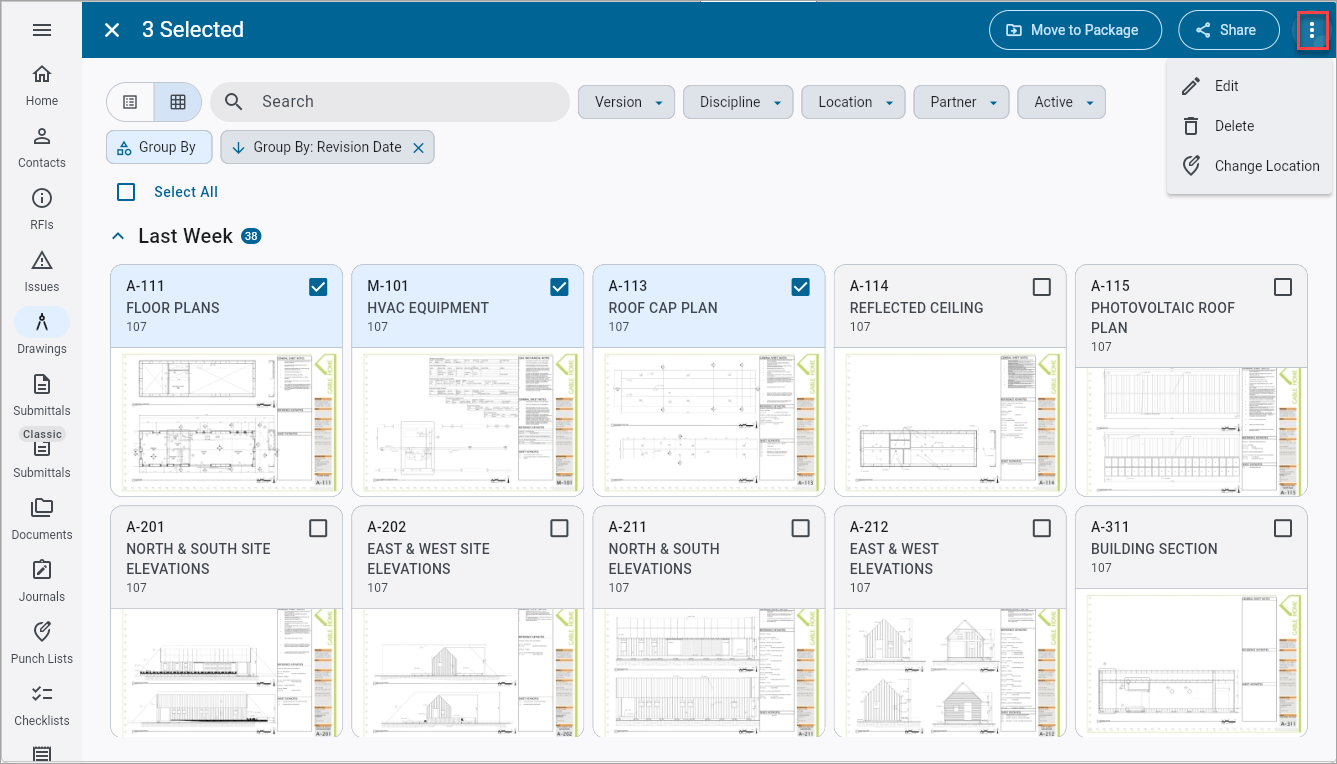
Selecting multiple drawings for batch edit
Press and hold a drawing record to put the screen in selection mode. Once in selection mode, select individual drawings or use the ‘Select All’ checkbox to select all the drawings at once. Once the drawings are selected, use the Menu icon ( ) to access the Edit
NOTE: The Change Location option is only available for JSON projects.
Edit Details
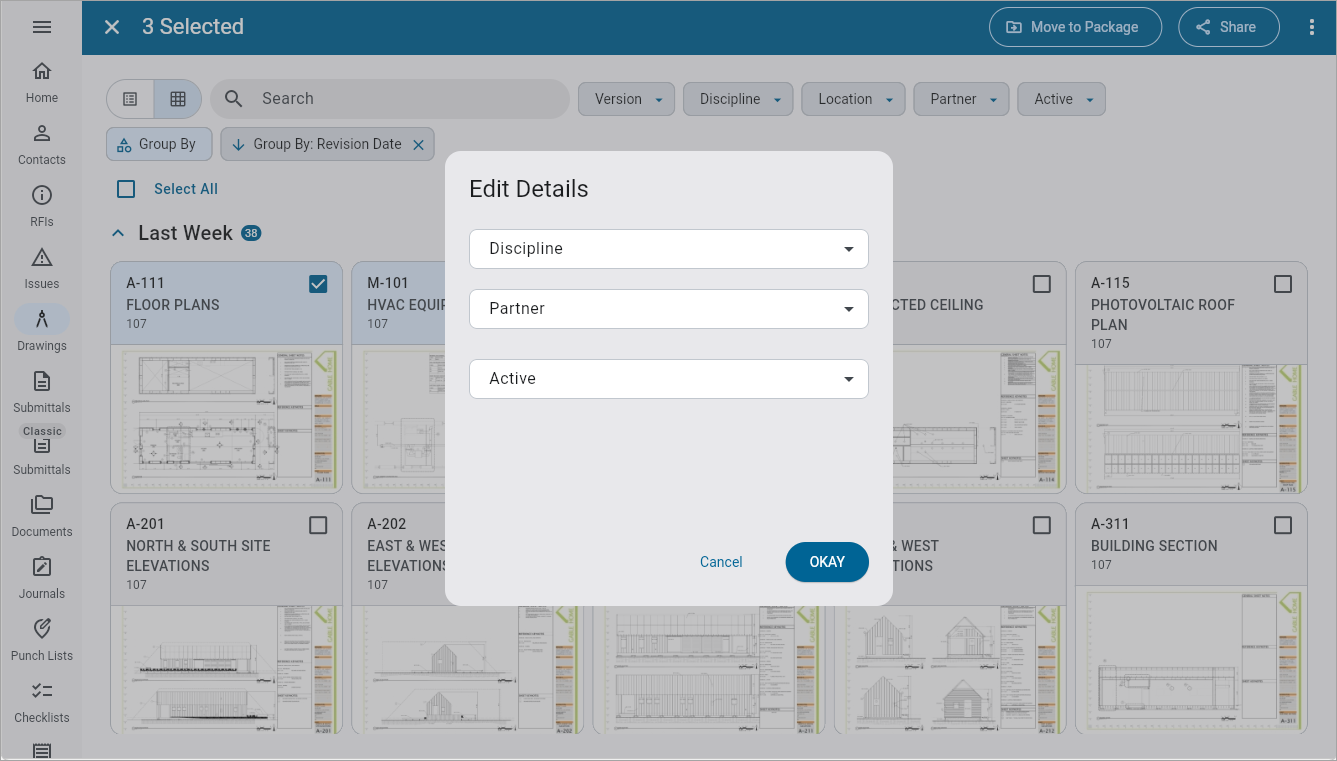
Choosing the Edit option launches the Edit Details pop-up window, which allows for the bulk edit/mass update of the Discipline, and custom fields (if applicable).
Change Location
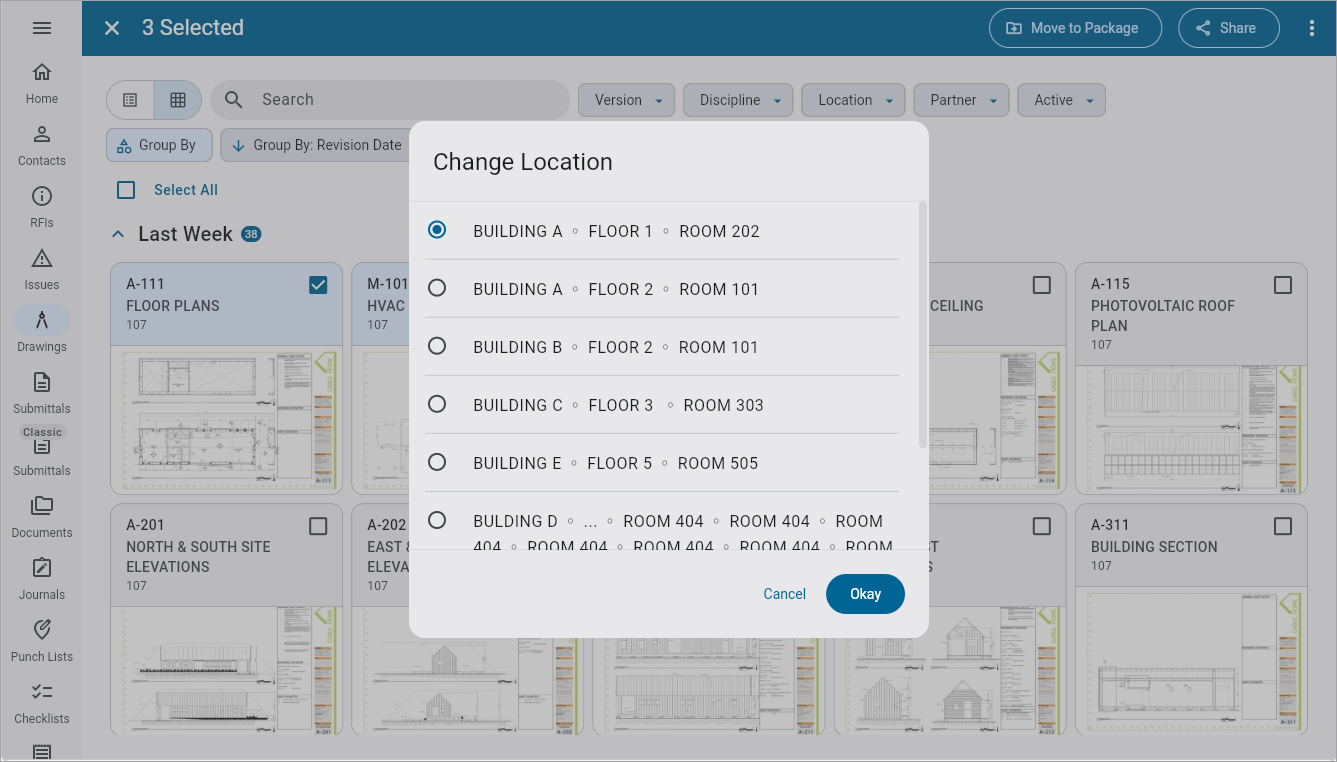
Choosing the Change Location option launches the Change Location pop-up window, which allows for the bulk edit/mass update of the location code.
Share Drawing Sheets
The Share Drawing Sheets option is used to share multiple selected drawings at once.
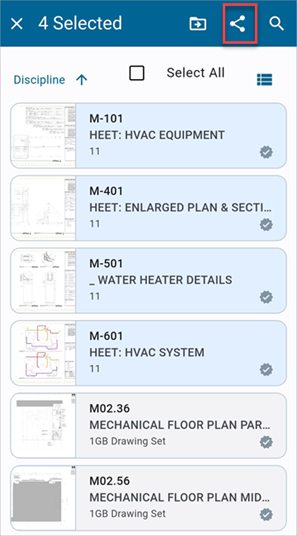
Press and hold a drawing record to put the screen in selection mode. Once in selection mode, select individual drawings or use the ‘Select All’ checkbox to select all the drawings at once. Once the drawings are selected, press the Share icon (![]() ).
).
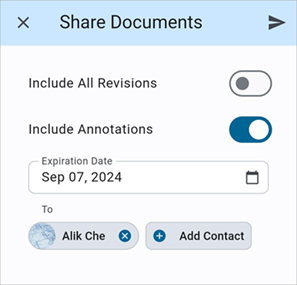
Pressing the Share icon launches the Share Drawing Sheets pop-up window, where sharing options can be completed.
Include All Revisions – Toggle
Use this toggle to include/exclude all revisions of the selected drawings.
Include Annotations – Toggle
Use this toggle to include/exclude annotations in the selected drawings. If enabled, only published annotations will be included.
Expiration Date
Select an expiration date to indicate when the download link will expire.
To (Contacts)
Select project contacts and CCs using the [Add Contact] button. There is also an option to add a distribution list.
When finished completing the sharing options, press ![]() )
)
Export Logs
NOTE: The Export Log feature is only available on the web.
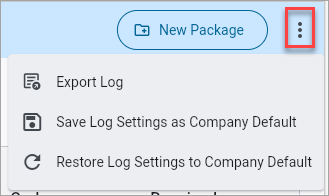
To export the Drawings log, click on the Options Menu icon () and select the "Export Log" option in the drop-down menu. A CSV file is generated which contains all items that meet the current filters applied on the Drawings log screen.
NOTE: UDFs and custom fields are currently not included in the export file but will be addressed in future updates. For more information, please refer to Construct PM - Export Log Feature (Web).
Preserve Log Settings

Users have the ability to preserve their last log settings, including filters, sorting, and grouping. Once applied, these settings will be maintained, allowing users to switch between modules without needing to reapply them. This feature works across all device types, ensuring consistency on both Web and Mobile platforms.
Admin users with the 'Logs - Set Default Log Configuration' security role privilege can set a company-level default log by selecting the “Save Log Settings as Company Default” option in Menu options (see Security) . This default will be applied to all users. However, users can still adjust their logs as needed, and any changes made will be preserved when they return. Additionally, users can reset their log settings at any time to the company default by selecting the “Restore Log Settings to Company Default” option. If no company default is set, this will reset the log to the application's default view.
Drawing Packages
Refer to Document Packages for information on drawing packages.