Security Roles and User Access
When user profiles are created in CMiC Field, they are assigned a variety of security and project roles, depending on their involvement in the project. Which roles are assigned affects what that user will be able to see and do within Construct PM. As such, it is advised to read through this section to ensure that the relevant roles are assigned so the user has access to all of their mobile data.
For each part of Construct PM, this section will cover what security roles (including programs, menu items, and privileges) and project roles that users should have assigned to their user profile.
NOTE: The system does not support separate security between Enterprise/CMiC Field and Construct PM. For example, you cannot enable a permission in Enterprise/CMiC Field and then disable that same permission in Construct PM. This type of split security is not possible. It is not possible to manage permissions in Construct PM and any changes to access or permissions must be managed at the Enterprise/CMiC Field level.
For more information on the
Quick Links
Attachments
Construct PM allows for the linking of documents with objects such as RFIs or issues. In order to be able to link attachments, please ensure that the relevant security is assigned. Note that attachment security is assigned for each document type so the below boxes should be checked for each document type that the user may wish to use as an attachment.
Project Roles
The following privileges are located in the pop-up window launched from the 'Show in Menu/View/Create/Update/Delete/Unlink All Document Types' link on the CMiC Field - Project Roles screen for each document type.
View - Check this box to view attachments on documents.
Create - Check this box to save and create new documents that can then be linked to objects.
Edit - Check this box to save changes to attachment documents. In PSPDF view such saved changes are saved as a new revision of that document.
Delete - Check this box to delete document records.
Link - Check this box to link existing documents to an object within Construct PM.
Unlink - Check this box to remove links between documents and objects within Construct PM.
Contacts
Security Roles
The following security settings are located on the CMiC Field - Security Roles screen.
Programs
Project Contact Maintenance - Assign this program to open the Project Contacts screen.
Menu Items
Project Contact Directory - Assign this menu item to open the Project Contact Log.
Privileges
Create - Assign this privilege to create a new project contact.
Delete - Assign this privilege to delete a project contact
Edit - Assign this privilege to edit a project contact.
NOTE: The Project Contact Maintenance program must be enabled for users to view Contact Record information throughout the Construct PM application. This includes TO / CC fields on programs like RFIs and Issues. Users will also require this program to be enabled for them to select contacts from an LOV.
RFIs
Security Roles
The following security settings are located on the CMiC Field - Security Roles screen.
Program
RFI - Assign this program to open the RFIs screen.
Menu Items
RFI - Assign this menu item to open the RFIs log.
Privileges
RFI Create - Assign this privilege to use the [Create RFI] button.
RFI Make Record Public - Assign this privilege to use the 'Public Record' checkbox on the RFIs screen.
Logs - Set Default Log Configuration - Assign this privilege to set a company-level default log by selecting the “Save Log Settings as Company Default” option in the Menu options.
Notes - Create Notes - Assign this privilege to add notes to an RFI.
Access to Unsubmitted Records Of The Same Partner - Assign this privilege to view pending RFI records created by other users in the same partner/company. Admin users with this privilege can also view pending records submitted by other partners/companies.
Field Security Settings
Add Note Button - Set to "Unrestricted" to enable the Add Note button.
Project Roles
The following privileges are located in the Request For Information section of the pop-up window launched from the 'View/Create/Update/Delete All Objects' link on the CMiC Field - Project Roles screen.
View - Check this role to view all RFIs, regardless of who made them. If unchecked, then the user can only view RFIs which involve the user.
Create - Check this box to allow the user to change who the RFI is from. If unchecked, the user will only be able to send RFIs from their own user account.
Update - Check this box to edit RFIs.
Delete - Check this box to delete RFIs.
The following privilege is located below the 'View/Create/Update/Delete All Objects' link on the CMiC Field - Project Roles screen.
Restricted View for all RFIs - Check this box to view all RFIs from C-Type (internal) users and contacts also assigned to the project company.
The following privileges are located in the Send/Receive section on the CMiC Field - Project Roles screen.
Send Partner RFI - Check this box to allow the user to send RFIs to all project contacts. If unchecked, the user can only send RFIs to C-Type users.
Send I/O Email - Check this box to use the [I/O Email] button.
The following privileges are located in the Other section on the CMiC Field - Project Roles screen.
No RFI Answer Entry - Check this box to edit the Answered Date and Answered By fields.
Allow to Answer an RFI - Check this box to edit the Answer field.
Issues
Security Roles
The following security settings are located on the CMiC Field - Security Roles screen.
Programs
Issues - Assign this program to open the Issue screen.
Menu Items
Issues - Assign this menu item to view the Issue log.
Privileges
Issue Create - Assign this privilege to create new issue records.
Project Roles
The following privileges are located in the Issue section of the pop-up window launched from the 'View/Create/Update/Delete All Objects' link on the CMiC Field - Project Roles screen.
View - Check this box to view all issues, regardless of who made them. If unchecked, then the user can only view issues which involve the user.
Create - Check this box to allow the user to change who the issue is from. If unchecked, the user will only be able to sent issues from their own user account.
Update - Check this box to edit issues.
Delete - Check this box to delete issues.
The following privilege is located in the Send/Receive section on the CMiC Field - Project Roles screen.
Send Partner Issue - Check this box to allow the user to send issues to external partners (i.e., P-type users).
The following privilege is located in the Other section on the CMiC Field - Project Roles screen.
Allow for Adding Notes and Attachment to Closed Issues - Check this box to add notes and attachments to closed issues.
Documents
In CMiC Field, security is assigned for each document type individually. As such, the below boxes should be checked for each document type that the user may wish to use within Construct PM.
Project
The following privileges are located in the pop-up window launched from the 'Show in Menu/View/Create/Update/Delete/Unlink All Document Types' link on the CMiC Field - Project Roles screen for each document type.
Show in Menu - Check this box to see and open the document folder for a particular document type.
View - Check this role to view all documents of that type.
Create - Check this box to create new document records.
Edit - Check this box to edit documents. For PSPDF documents, any changes will be saved as a new revision.
Delete - Check this box to delete documents.
The 'View All Records Associated with Business Partner' checkbox allows the user to view all submitted records for their business partner. If a specific user has access to a document package, this privilege allows other users at the same company the ability to view the package as well.
The following privilege is located in the Other section on the CMiC Field - Project Roles screen.
Allow to Delete Document Revision - Check this box to allow the user to delete particular revisions made to documents.
Journals
Security Roles
The following security settings are located on the CMiC Field - Security Roles screen.
Programs
Daily Journal - Assign this program to open the Daily Journal screen.
Menu Items
Daily Journal - Assign this menu item to open the Daily Journal screen.
Privileges
Create - Assign this privilege to create a new daily journal record.
Edit Own Records - Assign this privilege to allow the user to edit their own daily journal records.
Logs - Set Default Log Configuration - Assign this privilege to set a company-level default log by selecting the “Save Log Settings as Company Default” option in the Menu options.
Project Roles
The following privileges are located in the Daily Report section of the pop-up window launched from the 'View/Create/Update/Delete All Objects' link on the CMiC Field - Project Roles screen.
View - Check this box to view all journals on the project, regardless of who made them. If unchecked, then the user can only view journals submitted by their company.
Create - Check this box to allow the user to change who the journal is from. If unchecked, the user will only be able to send journals from their own user account. This box also allows users to save journal records.
Update - Check this box to edit journals.
Delete - Check this box to delete journals.
The following privilege is located in the Other section on the CMiC Field - Project Roles screen.
Submit Daily Journal - Check this box to submit daily journals.
Punch Lists
Security Roles
The following security settings are located on the CMiC Field - Security Roles screen.
Programs
Punch List - Assign this program to open the Punch List screen and view punch list items.
Menu Items
Punch List - Assign this menu item to open the Punch List screen.
Privileges
Punchlists – Create - Assign this privilege to create new punch lists from the Punch List Maintenance screen. This privilege is tied to the 'Create' project role privilege located in the Punch List section of the pop-up window launched from the 'View/Create/Update/Delete All Objects' link on the CMiC Field - Project Roles screen, with the following conditions:
-
If the 'Punchlists – Create' privilege is enabled and the 'Create' privilege is disabled:
-
Punchlists can be created from the Punch List Maintenance screen and from within punch list items.
-
-
If the 'Punchlists – Create' privilege is disabled and the 'Create' privilege is enabled:
-
Punchlists can not be created from the Punch List Maintenance screen but can be created from within punch list items.
-
-
If the 'Punchlists – Create' privilege is disabled and the 'Create' privilege is disabled
-
Punchlists can not be created from the Punch List Maintenance screen nor from within punch list items.
-
Logs - Set Default Log Configuration - Assign this privilege to set a company-level default log by selecting the “Save Log Settings as Company Default” option in the Menu options.
Project Roles
The following privileges are located in the Punch List section of the pop-up window launched from the 'View/Create/Update/Delete All Objects' link on the CMiC Field - Project Roles screen.
View - Check this box to view all punch lists on the project, regardless of who made them. If unchecked, then the user can only view punch lists submitted by their company.
Create - Check this box to create new punch list records. This privilege is tied to the security role privilege 'Punchlists – Create'.
Update - Check this box to edit all punch list records.
Delete - Check this box to delete punch list records.
The following privileges are located in the Punch List Items section of the pop-up window launched from the 'View/Create/Update/Delete All Objects' link on the CMiC Field - Project Roles screen.
View - Check this box to view all punch lists items on the project, regardless of who made them. If unchecked, then the user can only view punch lists items submitted by their company.
Create - Check this box to create new punch list items.
Update - Check this box to edit all punch list items.
Delete - Check this box to delete punch list items.
The following privileges is located at the top of the CMiC Field - Project Roles screen.
View All Records Associated with Business Partner - Assign this privilege to allow users to view a punch list stamp and its details on a drawing sheet and in the Punch List log.
Drawings
Security Roles
Privileges
Logs - Set Default Log Configuration - Assign this privilege to set a company-level default log by selecting the “Save Log Settings as Company Default” option in the Menu options.
Project Roles
The following privileges are located in the pop-up window launched from the 'Show in Menu/View/Create/Update/Delete/Unlink All Document Types' link on the CMiC Field - Project Roles screen for the Drawings document type, as well as the Drawing Management document type. Privileges for both of these document types need to be completed.
Show in Menu - Check this box to see the Drawing screen in the Main Menu and view the Drawings log.
View - Check this box to open drawings in PSPDF.
Link - Check this box to attach objects like RFIs or issues to drawings.
Unlink - Check this box remove objects from drawings.
The following privileges are located in the Drawing Management section on the CMiC Field - Project Roles screen.
Publish Annotation - Check this box to publish annotations.
Hide Annotation - Check this box to hide annotations.
Edit Annotation - Check this box to edit the location or appearance of an annotation. When this box is checked, users can edit and remove any annotations (including someone else's annotations). When unchecked, users cannot edit or remove any annotations except their own.
Administrate Detail/Elevation Hyperlinks - Check this box to create user-generated hyperlinks on drawing sheets.
View All Packages - View all drawing packages in the project, even if the user is not included under the Manage Access settings (project role or project contact).
The following privilege is located in the Other section on the CMiC Field - Project Roles screen.
Allow to Delete Document Revision - Check this box to allow the user to delete a drawing revision.
Notes
Security Roles
The following security settings are located on the CMiC Field - Security Roles screen.
Privileges
Create Notes - Assign this privilege to create new notes on objects.
Delete Own Notes - Assign this privilege to delete user-created notes.
Edit Own Notes - Assign this privilege to edit user-created notes.
Project Roles
The following privileges are located in the Other section on the CMiC Field - Project Roles screen.
Allow For Adding Notes And Attachments To Closed RFIs - Check this box to add notes and attachments to RFIs that have been closed.
Allow For Adding Notes And Attachments To Closed Issues - Check this box to add notes and attachments to issues that have been closed.
Allow P-Type Collaborators To View All Notes - Check this box to allow external users access to both internal and external notes.
Submittals (Classic)
Security Roles
The following security settings are located on the CMiC Field - Security Roles screen.
Programs
Submittal - Assign this program to gain access to the Submittals
Menu Items
Submittals - Assign this menu item to have the Submittals
Project Roles
The following privileges are located in the Submittal section of the pop-up window launched from the 'View/Create/Update/Delete All Objects' link on the CMiC Field - Project Roles screen.
View - View all submittal records. Without this privilege users can only see submittals where they are assigned as a reviewer or CC.
Create - Create new submittal records.
Update - Edit submittal records.
Delete - Delete submittal records.
The following privilege is located in the Maintenance section on the CMiC Field - Project Roles screen.
Maintain Submittals Spec Section LOV - Add new values to the Spec Section field on the Submittals
The following privileges are located in the Other section on the CMiC Field - Project Roles screen.
Update Submittal from Bid Item screen - Use the [Update Submittals] button in the main toolbar of the Bid Items screen.
Delete/Remove multiple Submittals in Submittal Package - Allow only one instance of a submittal record in a submittal package.
Link Collaboration Users to Full Submittal Program - Include a link to the standard Submittal screen in I/O Emails sent to collaboration (external) users.
Allow Collaborators to edit Submittal History - Allow Collaborate users to use the [Edit History] button on the Submittals
Submittals
NOTE: The Submittals screen was released in Patch V12-21.
Security Roles
The following security settings are located on the CMiC Field - Security Roles screen.
Programs
Submittals
Privileges
Submittals 2.0 Beta Tester - Assign this privilege to view the Submittals screen. This version does not have other settings or access control and is meant solely as a preview.
Submittal – Make Record Public - Assign this privilege to use the 'Public Record' checkbox on the Detail tab of the Submittals screen.
Submittals![]() ) in the Submittals screen. This privilege also allows admin users to review responses on behalf of anyone (regardless of company/partner affiliation), even if the user is not linked to the submittal.
) in the Submittals screen. This privilege also allows admin users to review responses on behalf of anyone (regardless of company/partner affiliation), even if the user is not linked to the submittal.
NOTE: Submittal managers only require the 'Update All' project role privilege to provide a submittal response and can enter review responses on behalf of other users at any review step regardless of company/partner affiliation. They are permitted to respond prior to the scheduled start date or the projected (calculated) end date.
Logs - Set Default Log Configuration - Assign this privilege to set a company-level default log by selecting the “Save Log Settings as Company Default” option in the Menu options.
Project Roles
The following privileges are located in the Submittal
View - View all submittal records. Without this privilege users can only see submittals where they are assigned as a reviewer or CC.
Create - Create new submittal records.
Update - Edit submittal records. This privilege allows users to make changes to submitted Submittal records, including:
-
Modifying the record details.
-
Changing the review workflow.
-
Changing the planned schedule.
-
Entering review responses on behalf of other users.
-
The ability to enter schedule dates on all records (i.e., not just those where they are a listed contact).
Delete - Delete submittal records.
The following privileges are located at the top of the CMiC Field - Project Roles screen.
View All Records Associated with Business Partner - Add additional (but still limited) view-access to Submittal records. It will allow users to view any Submittal records meeting one of the following conditions:
-
The record was created by a contact under the same business partner as the current user (i.e., same Company or Partner).
-
The record is addressed to a contact under the same business partner as the current user, where the contact is listed as one of the following: Submitter (i.e., Sender), Submittal Manager, Receiver (i.e., Approver), CC, or an additional Reviewer included in the workflow.
-
The record is addressed to the business partner that the current user belongs to, where the user’s parent business partner is listed as one of the following: Submitter, Receiver, or Additional Reviewer.
Respond on behalf of Business Partner - Provide responses on behalf of their organization or for other contacts registered under it. Users with this privilege will be able to provide “review responses” on submittal records for a BIC reviewer if the reviewer is:
-
The user’s parent company/partner.
-
Another project contact, who is also registered under the same company/partner.
The following privileges are located in the Reviewers Table section on the CMiC Field - Project Roles screen.
Maintain Review Workflows – Submittals
Maintain Tags – Submittals
Checklist Template Maintenance
Security Roles
The following security settings are located on the CMiC Field - Security Roles screen.
Programs
Checklist Maintenance - Assign this program to gain access to the Checklist Template Maintenance screen.
Checklist Template Maintenance - Assign this program to gain access to the Checklist Template Maintenance screen.
Menu Items
Checklist Template Maintenance - Assign this menu item to have the Checklist Template Maintenance screen appear in the Treeview menu.
Privileges
Checklist Admin - Assign this privilege for system level checklist administration.
Project Checklist Admin - Assign this privilege for project level checklist administration.
NOTE: Without one of the above privileges, users will have read-only access even if they have program and menu access.
Field Security Settings
Checklist Maintenance:
-
Assign Checklist to Project Checkbox - Set to "Unrestricted" to display the [Assign] and [Push] buttons; otherwise, they will be hidden.
Checklist Template Maintenance:
-
Assign Checklist Template
-
Create Checklist Template
-
Checklist Template Settings
-
Delete Checklist Template
-
Schedule Checklist Template for Completion
-
Edit A Checklist Template
Project Checklists
Security Roles
The following security settings are located on the CMiC Field - Security Roles screen.
Programs
No required programs need to be assigned.
Menu Items
Project Checklist - Assign this menu item to have the Project Checklist screen appear in the Treeview menu.
Privileges
Security is managed at the template level.
Logs - Set Default Log Configuration - Assign this privilege to set a company-level default log by selecting the “Save Log Settings as Company Default” option in the Menu options.
Template Settings
The following security settings are located on the Checklist Template Maintenance screen.
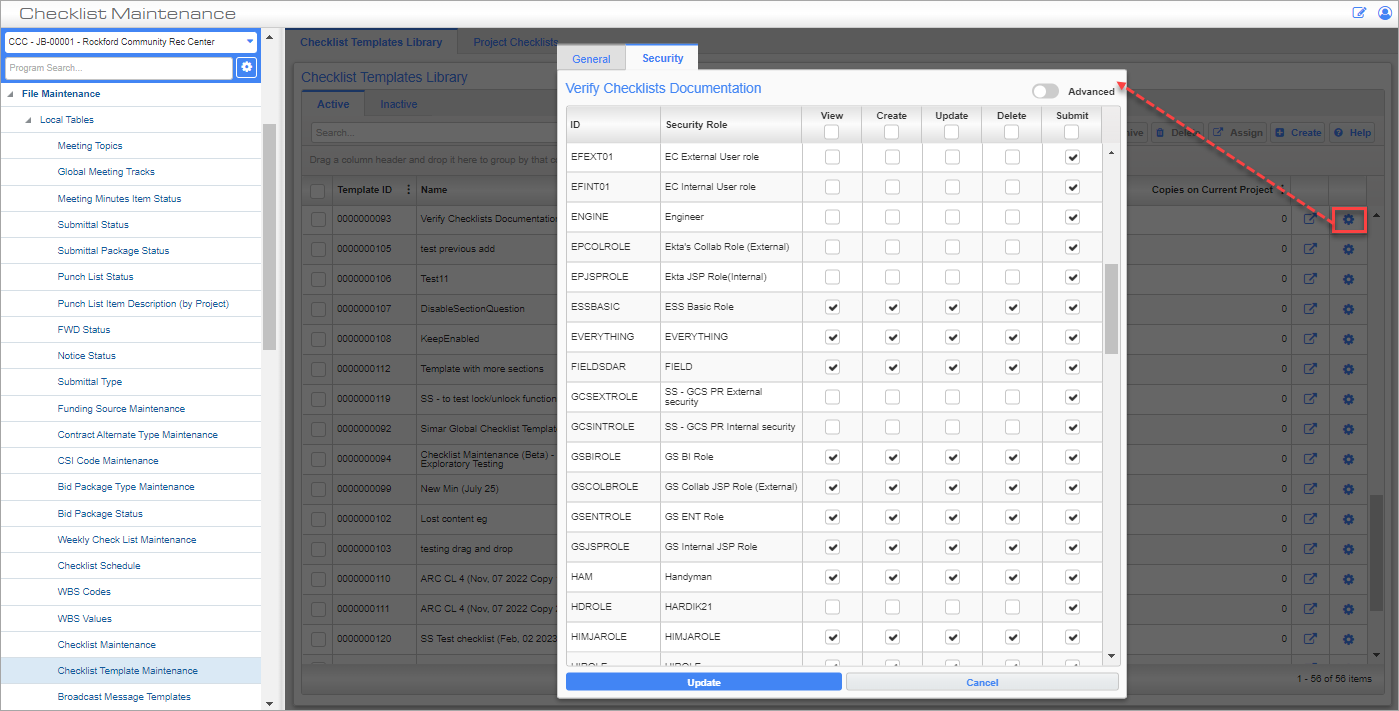
Checklist Maintenance; standard Treeview path: CMiC Field > File Maintenance > Local Tables > Checklist Template Maintenance
To manage these settings, select an individual template's row and click on the Security icon ( ) or select multiple templates to perform a mass update and click on the [Security] button. A pop-up window will be launched which contains a Security tab used for assigning security role privileges.
View - View all template records.
Create - Create new template records.
Update - Edit template records.
Delete - Delete template records.
Submit - Submit template records.