Overview
Construct CT Legacy can be used to monitor safety, provide accurate invoicing, and record labor hours, project costs, expenses, and equipment use. Timesheets in Construct CT Legacy make it easier to control labor costs and maximize productivity by providing insights into the work, time, and costs of projects and jobs.
Crew Menu
Before using Timesheet Entry, users should select a project and crew in the Construct CT Legacy menu. Crews contain details of crew members, task details, shift, crew start and end times, in/out time, and equipment used. Setting the default crew in the Construct CT Legacy menu can make timesheet entry quicker by defaulting much of this information when entering a new timesheet.
Timesheet Entry
Select the Timesheet option from the menu or Home screen to launch the screen below.
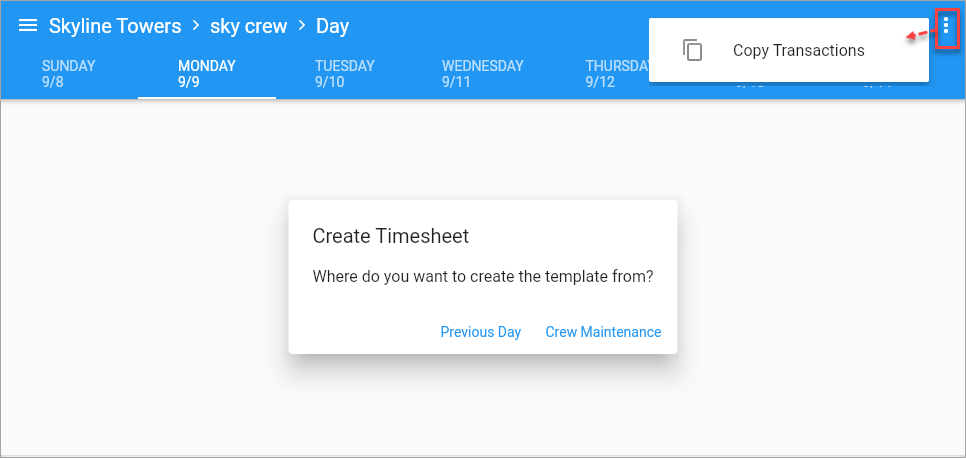
The [Copy Transactions] button in the menu allows users to copy timesheets (including employee hours), equipment hours, and employee expenses (with the appropriate configuration). Please see Copying Expenses with Timesheets for more information.
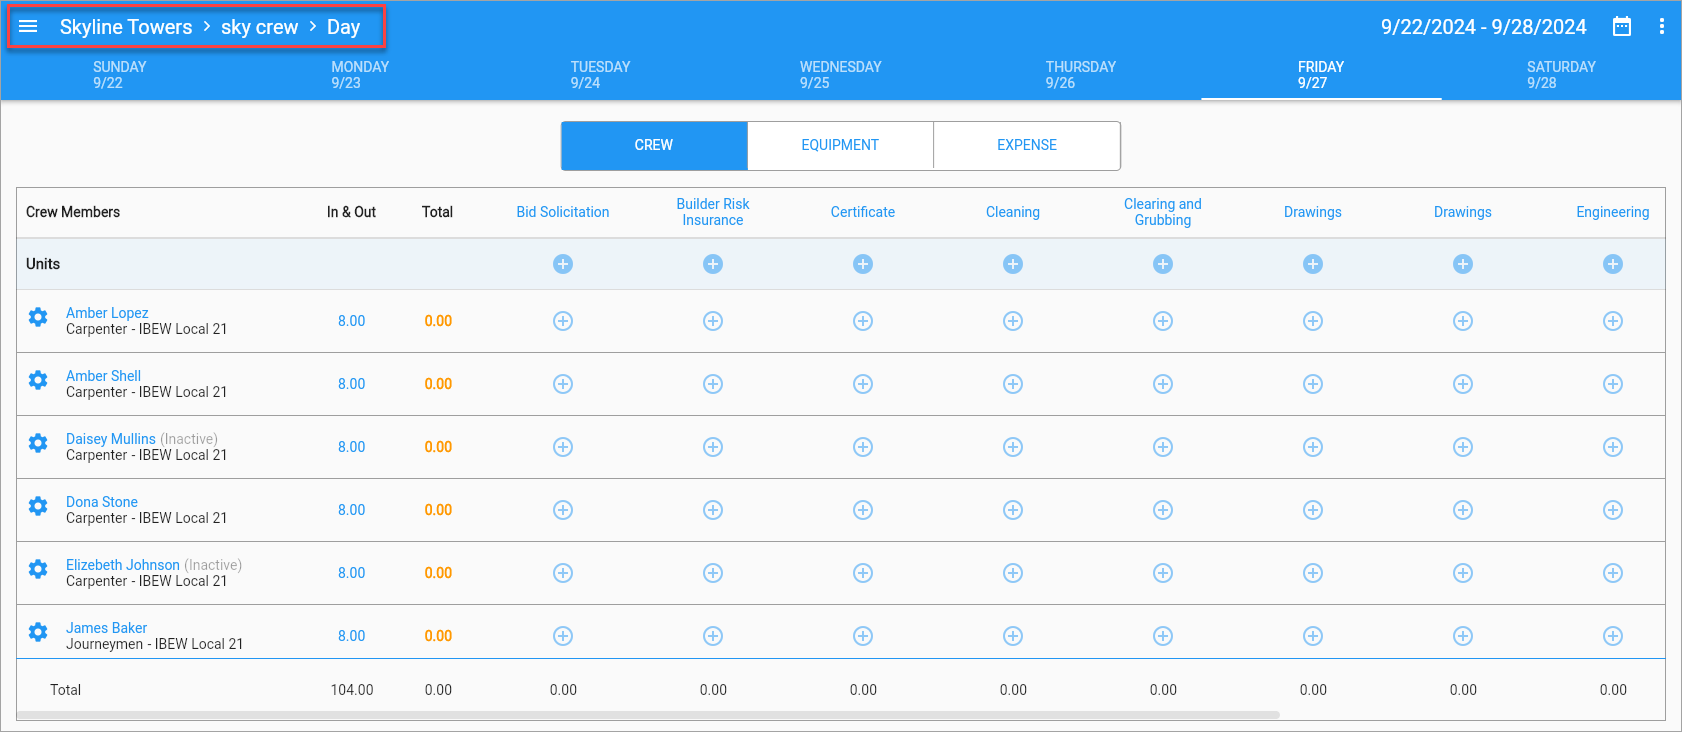
The date range and particular day can be selected in the top section of the screen. Individual or batch time can be entered in the middle section. A total of all hours entered in the timesheet appears in the bottom section. In/Out time is defaulted based on the crew schedule but can be changed.
In & Out pop-up
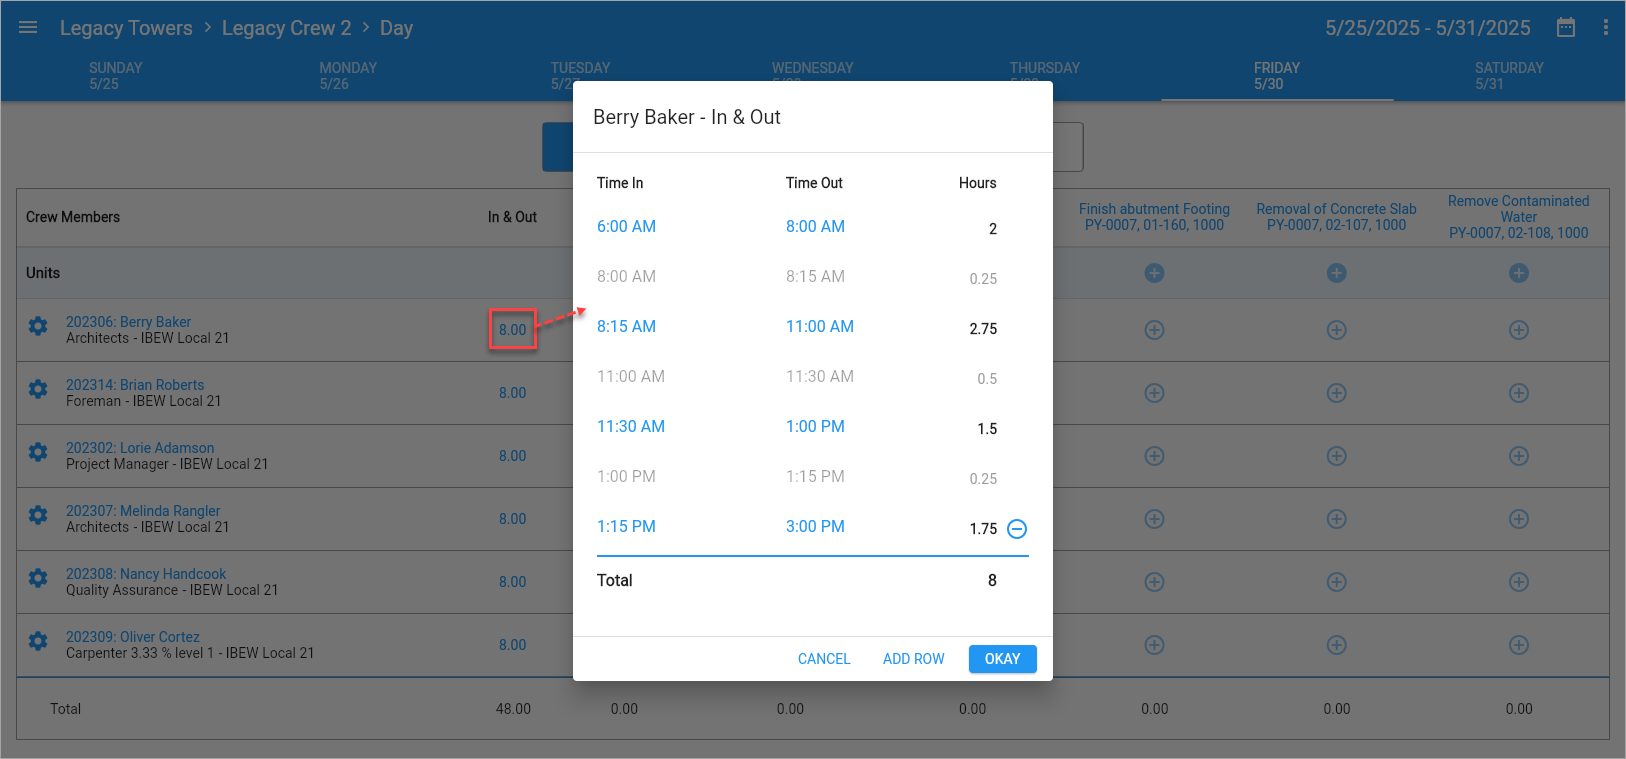
If there is a crew schedule, the In & Out pop-up will show the time along with any defined breaks displayed in gray. If there is no schedule, the pop-up will display the actual break time.
Menu Options
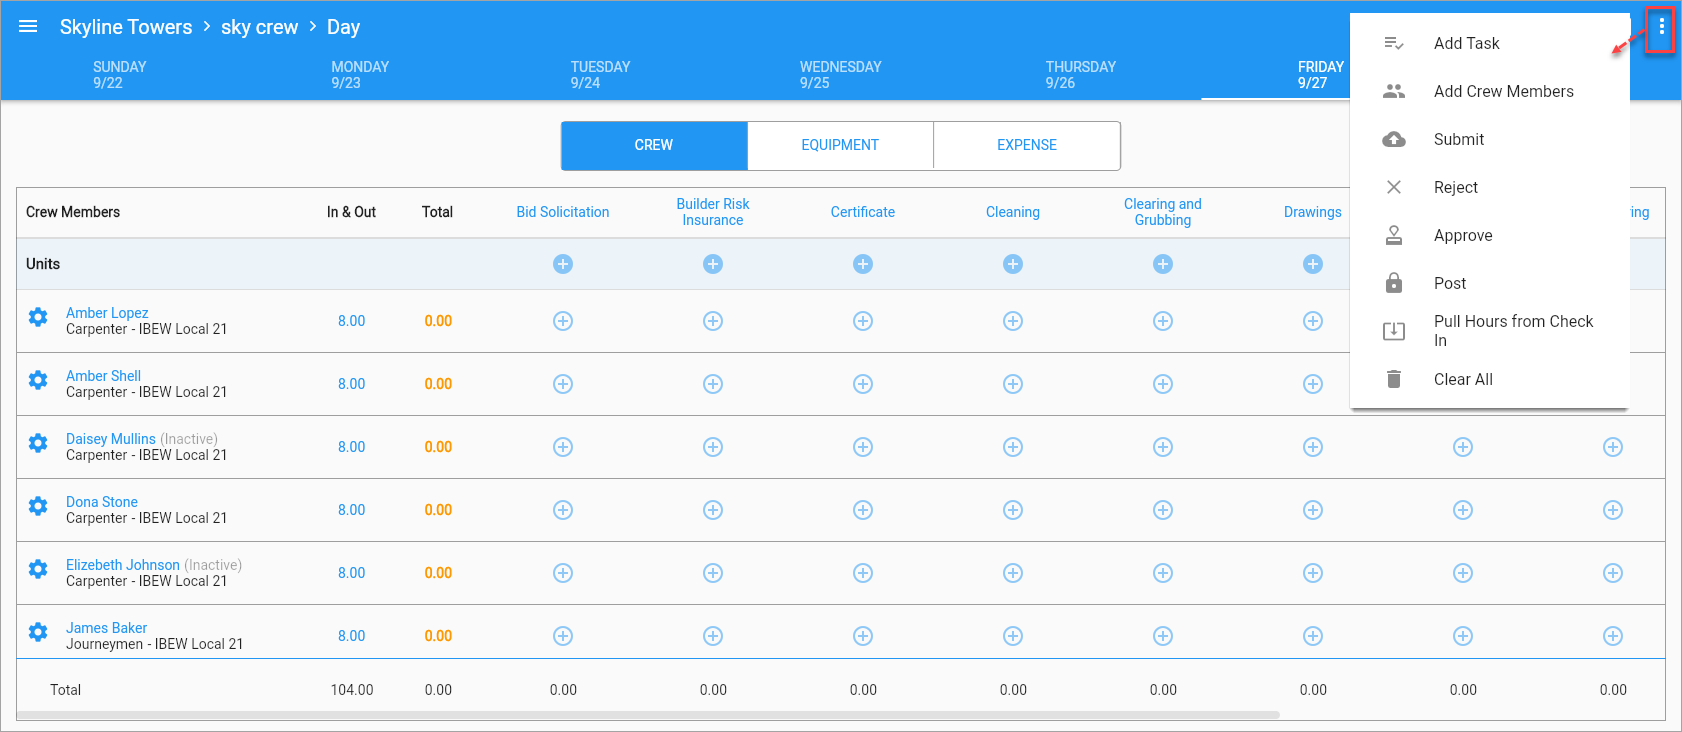
Press the Menu icon (![]() ) to open the timesheet menu, shown above. This menu can be used to add tasks and crew members to the timesheet on the fly. The user's abilities to submit, reject, approve, and post timesheets are determined by their security privileges.
) to open the timesheet menu, shown above. This menu can be used to add tasks and crew members to the timesheet on the fly. The user's abilities to submit, reject, approve, and post timesheets are determined by their security privileges.
Individual Time Entry
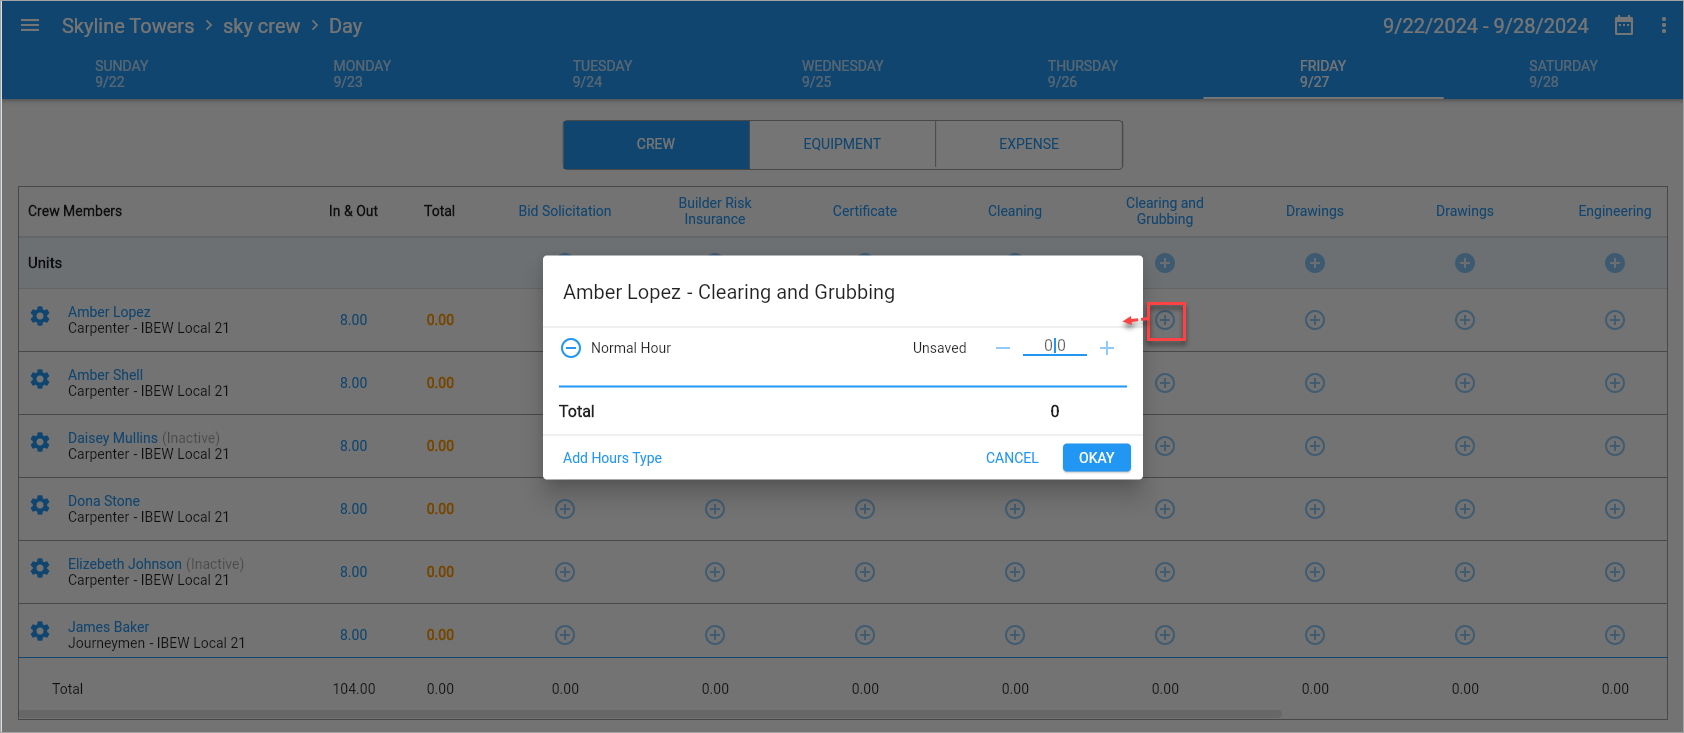
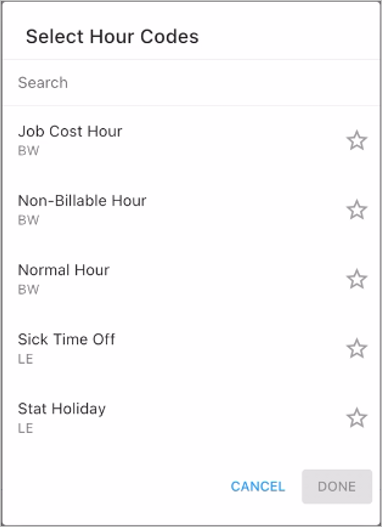
Press any of the Plus icons ( ) to enter time for that employee and category. Hour types can be added by pressing the [Add Hour Types] button, which launches the Select Hour Codes pop-up, shown below.
NOTE: Overtime and Double Overtime hour types can only be saved for employees who have the 'OT' and 'DOT' boxes checked on their US Payroll - Employee Profile.
Batch Time Entry
The following video provides an overview of entering timesheet hours in batch entry mode.
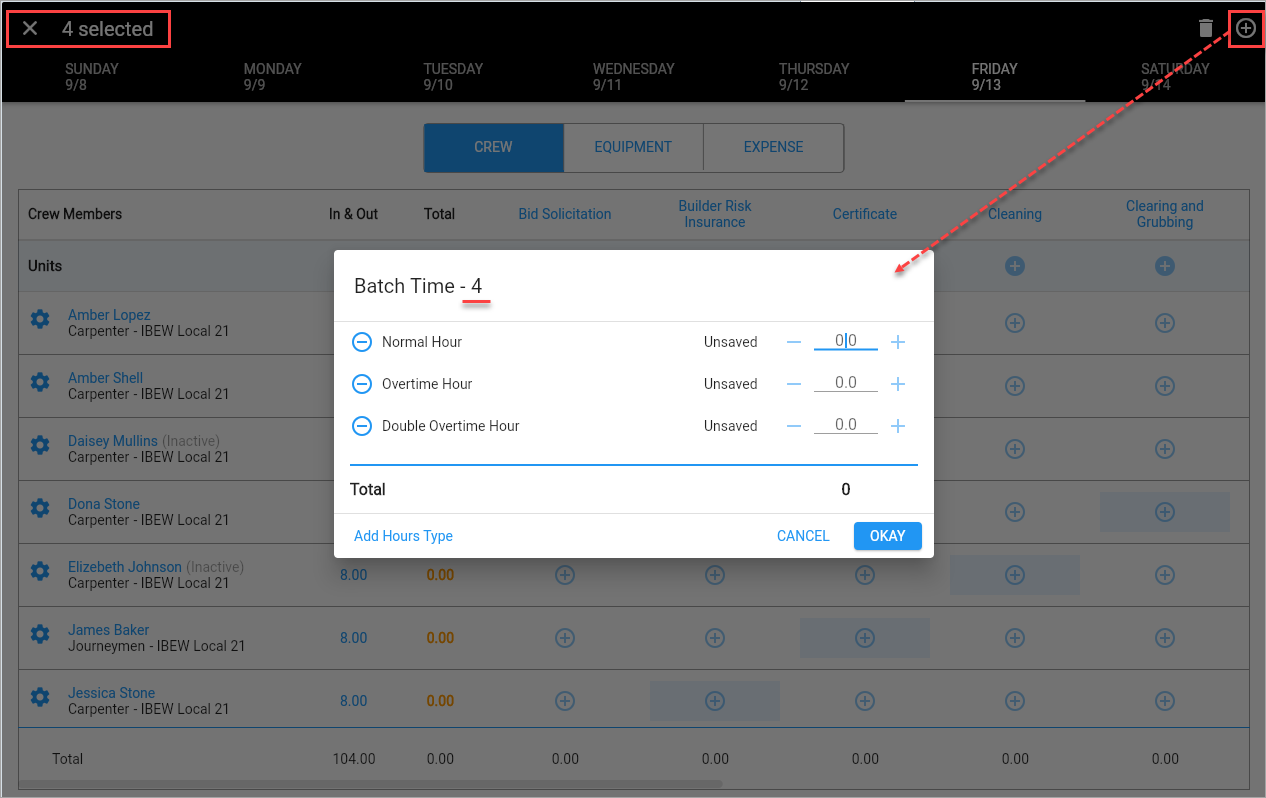
Time can be entered in batch by pressing and holding any of the Add icons (![]() ). Multiple crew members and activities can be selected at once. Press the Add icon (
). Multiple crew members and activities can be selected at once. Press the Add icon (![]() ) in the top right corner to launch the Batch Time pop-up. Enter normal and/or overtime hours and press the [Done] button. The system will automatically populate the hours for each selected activity and crew member.
) in the top right corner to launch the Batch Time pop-up. Enter normal and/or overtime hours and press the [Done] button. The system will automatically populate the hours for each selected activity and crew member.
Pulling Timesheet Hours from Construct CHK App
The "Pull Hours from Check-In" option located in the Timesheet menu is used to pull hours for selected employees into the timesheet from the Construct CHK app. For more information on using this feature, refer to Pulling Hours from Construct CHK App.
Editing and Deleting Hours
The following video provides an overview of editing and deleting timesheet hours.
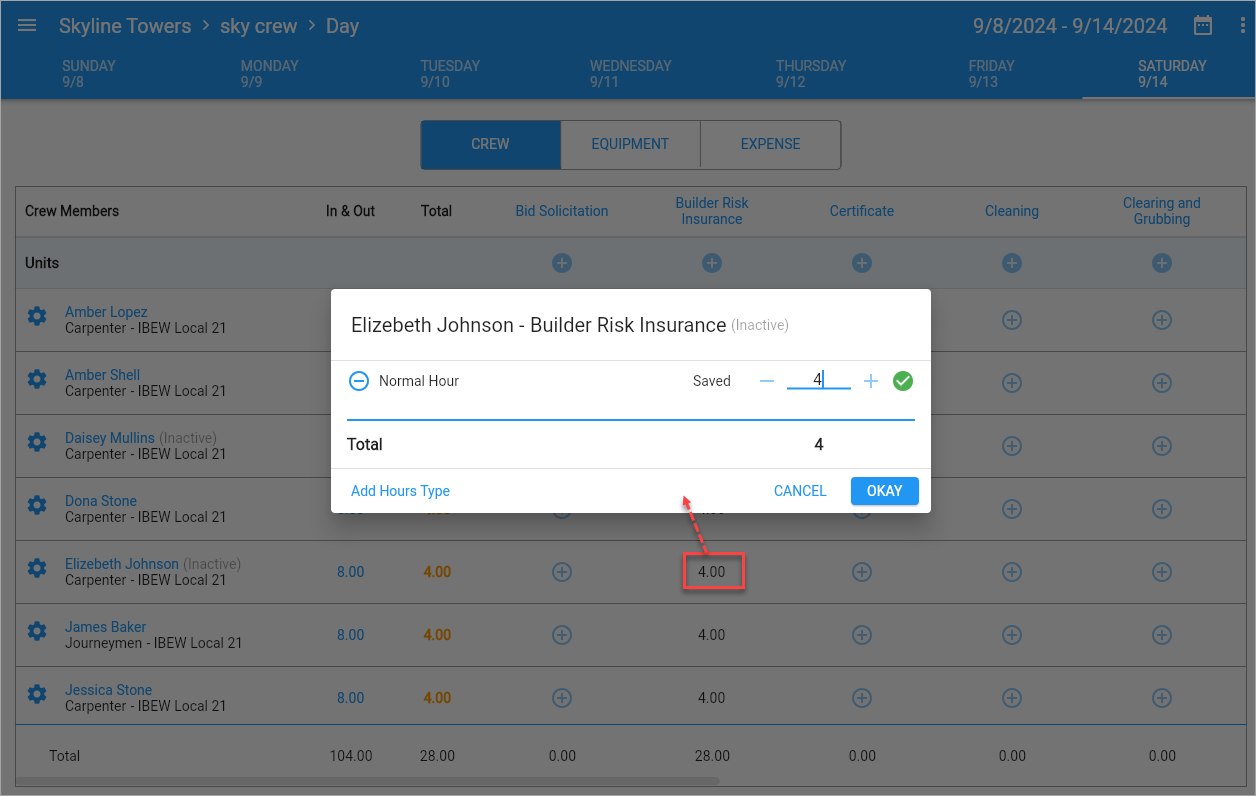
Timesheet hours can be edited by pressing an activity cell and adding or subtracting hours. To delete the entire entry, press the Minus (![]() ) icon. Timesheet hours can also be edited and deleted in batch.
) icon. Timesheet hours can also be edited and deleted in batch.
The Clear All menu option allows users to delete all transactions on the timesheet.
Adding and Deleting Crew Members
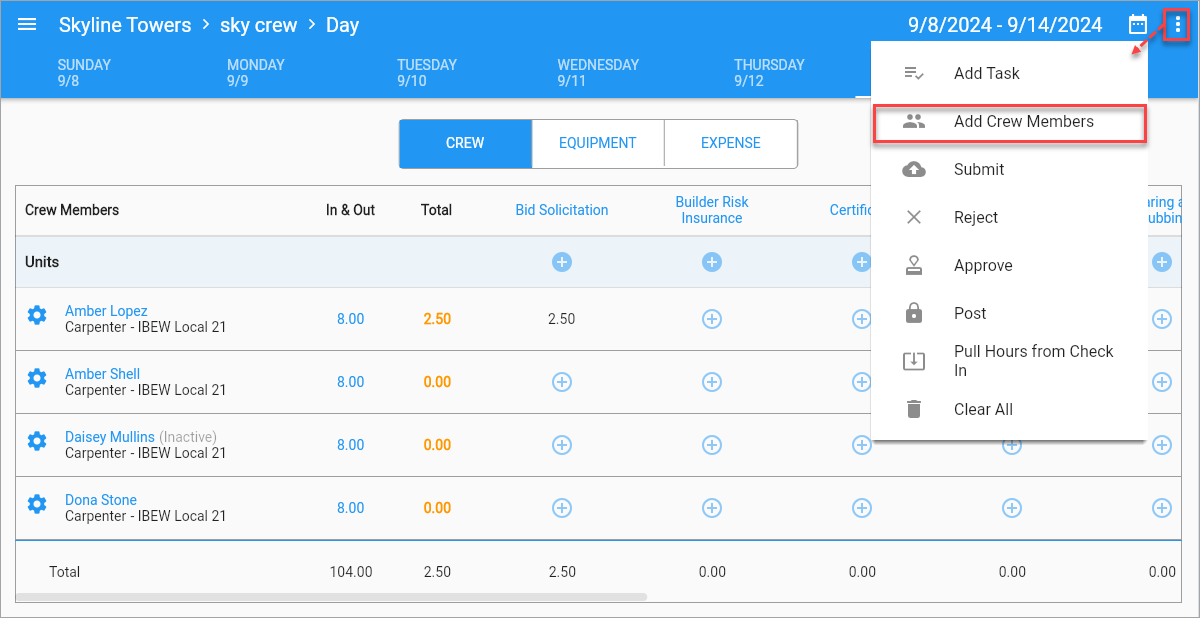
Use the Add Crew Members option in the timesheet menu to add crew members on the fly. For more information, please refer to Adding Crew Members.
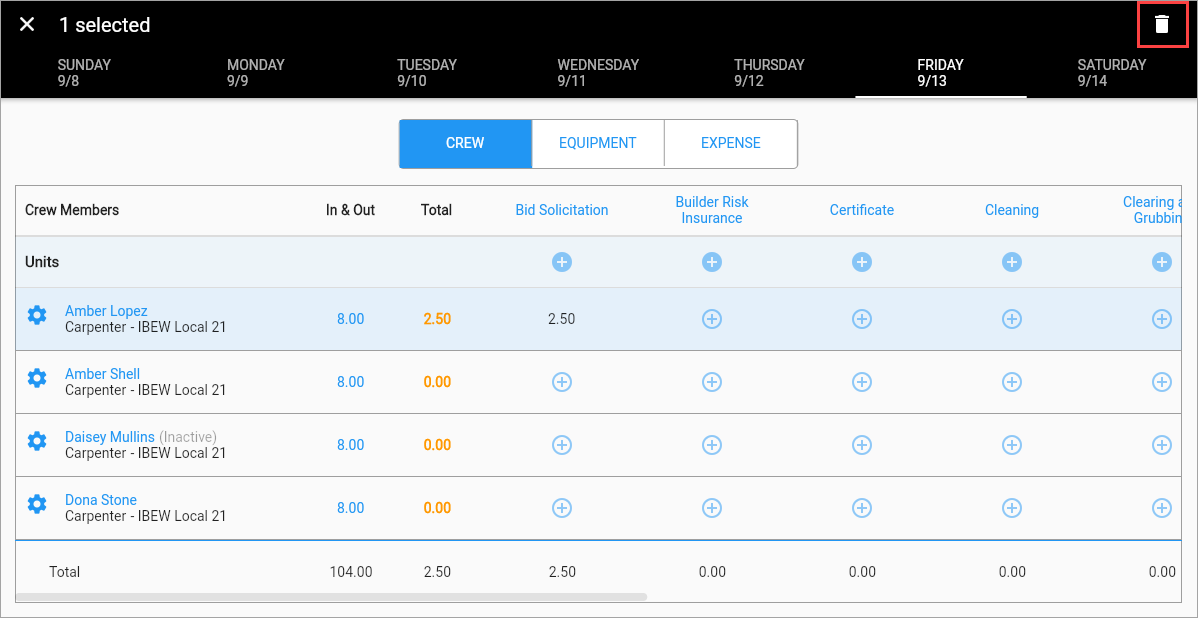
Crew members can be deleted by pressing and holding their name on the timesheet.
Editing the Task
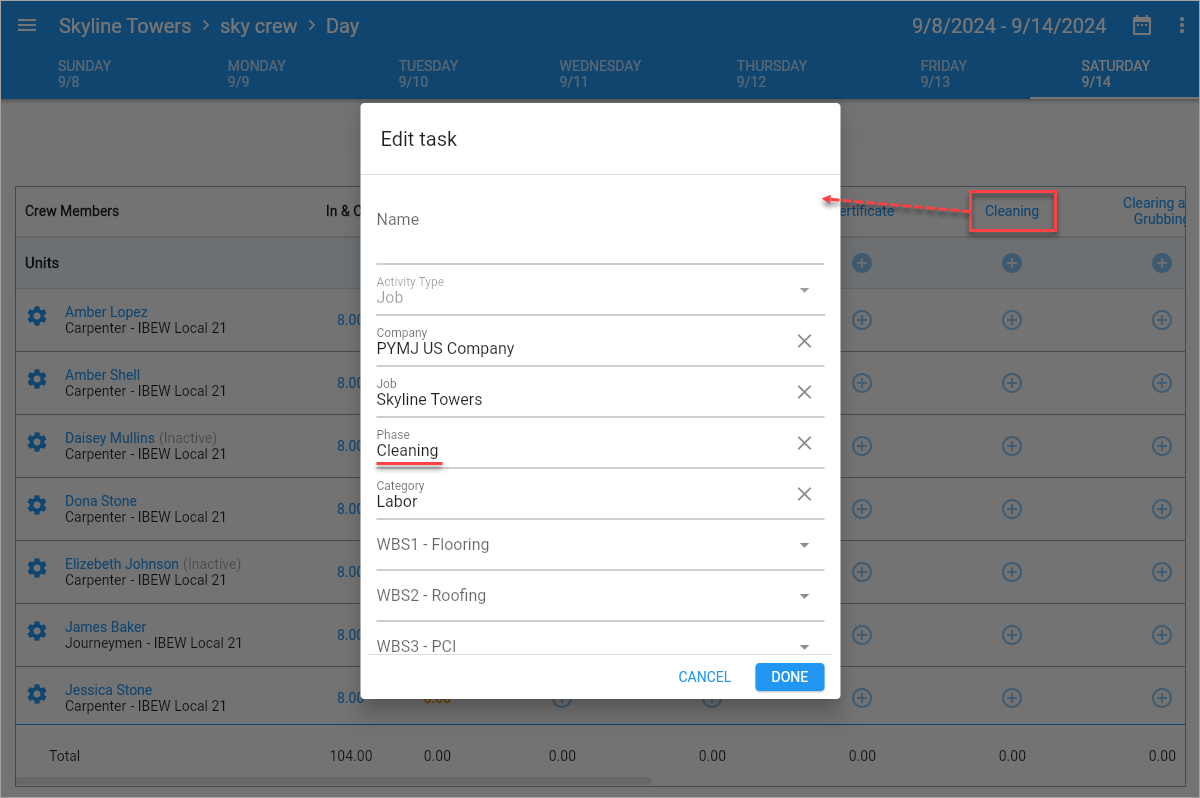
Tasks can be edited by pressing the task in the timesheet, which brings up the Edit Task screen, shown below. Here, users can associate tasks with WBS values, sector codes, and schedule codes.
By default, the task name appears as the cost/phase name in the crew sheet. Refer to Construct CT Legacy - Task Names for more information.
Adding Employee Level Trade and Equipment
Watch this video to see how employee level trades and equipment can be added using this feature.
Trades and equipment can be added on an as-needed basis to the schedule of any employee from the Crew Timesheet Entry screen. Equipment and trade added this way will only apply to a given employee on the date specified and will not alter the equipment and trades assigned to them through the Crew Maintenance screen.
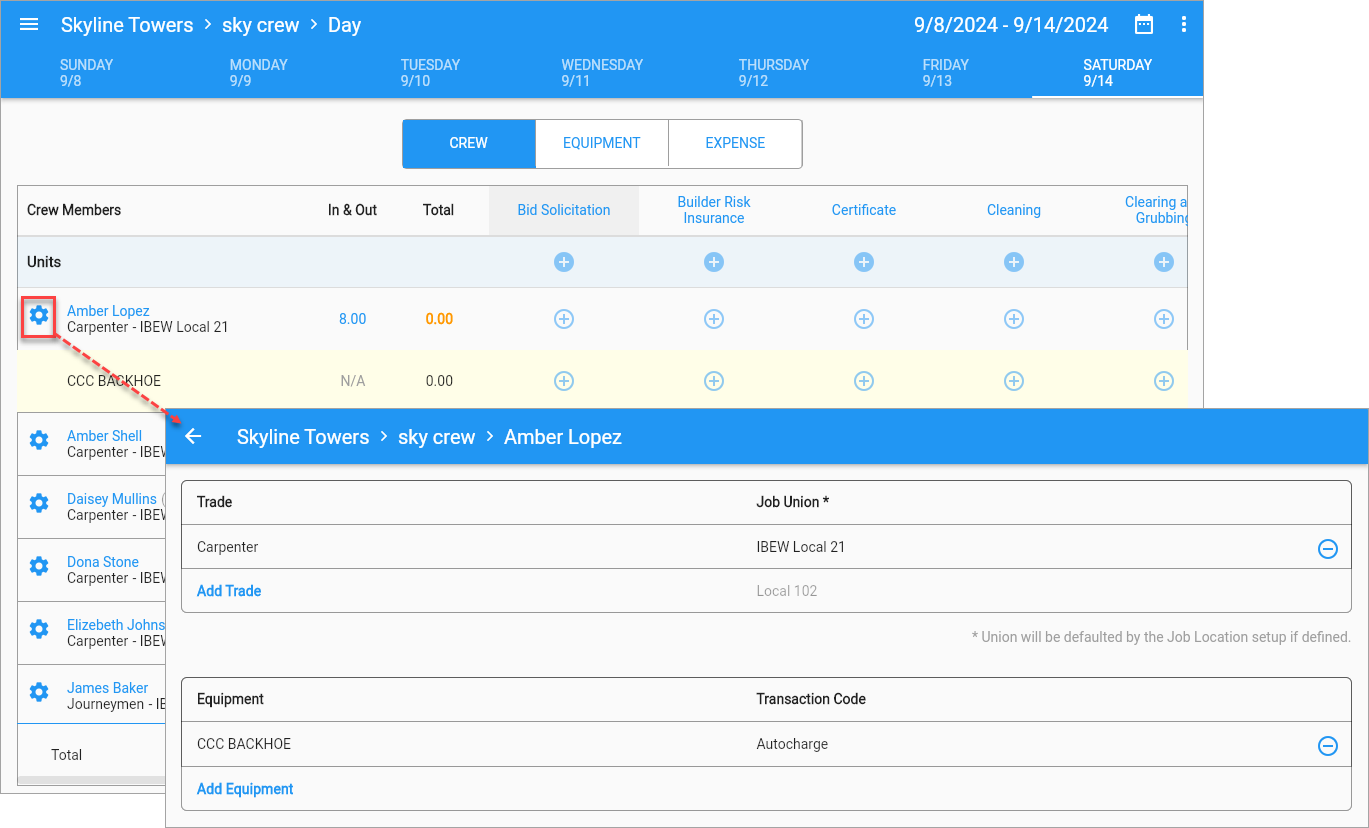
Clicking on the Settings icon (![]() ) next to an employee opens up the Trades and Equipment screen for that employee. This screen may already contain some trade and equipment items, which default from the Crew Maintenance screen.
) next to an employee opens up the Trades and Equipment screen for that employee. This screen may already contain some trade and equipment items, which default from the Crew Maintenance screen.
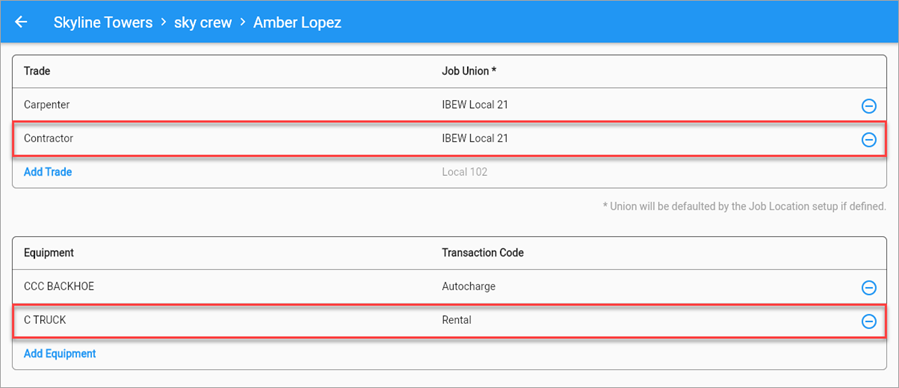
Use the [Add Trade] and [Add Equipment] button to add any additional trade and equipment items which apply to the employee for that particular day.
NOTE: The ability to assign multiple trades/unions is determined by the 'Allow to Change Trade and Union' checkbox located in the Crew/Mechanic Time Configuration screen in E-Time. When the 'Allow to Change Trade and Union' box is checked, the 'Show Union' box is checked by default. The 'Show Union' checkbox is used to control whether the union is displayed in an employee's timesheet.
The Delete icon (![]() ) is available after at least one trade/union combination has been added. Existing trade/union values defaulted from the employee's profile cannot be edited but can be deleted once additional trade/union combinations are added.
) is available after at least one trade/union combination has been added. Existing trade/union values defaulted from the employee's profile cannot be edited but can be deleted once additional trade/union combinations are added.
NOTE: If the 'Allow to Change Trade and Union' privilege is not enabled, the Delete icon will not be visible and users will be restricted to the defaulted trade/union.
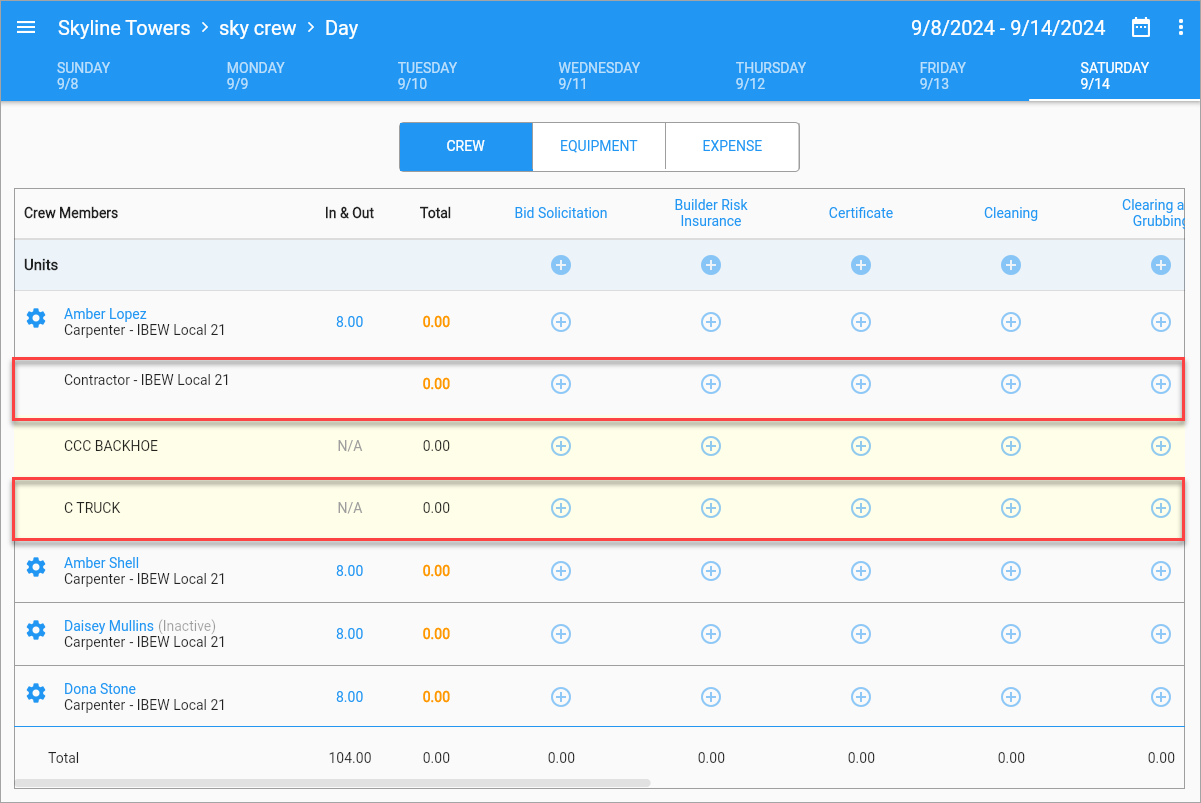
Once the additional items are added and the user returns to the Crew Timesheet Entry screen, these newly added items will be displayed for the selected employee on the specified day. Time can now be entered against these items as required. These ad hoc items will only appear on the Crew Timesheet Entry screen and will not be permanently added to the Crew Maintenance screen.
NOTE: Equipment records are highlighted in the Crew Timesheet screen to distinguish them from the Trade records.
Entering Notes for Employees
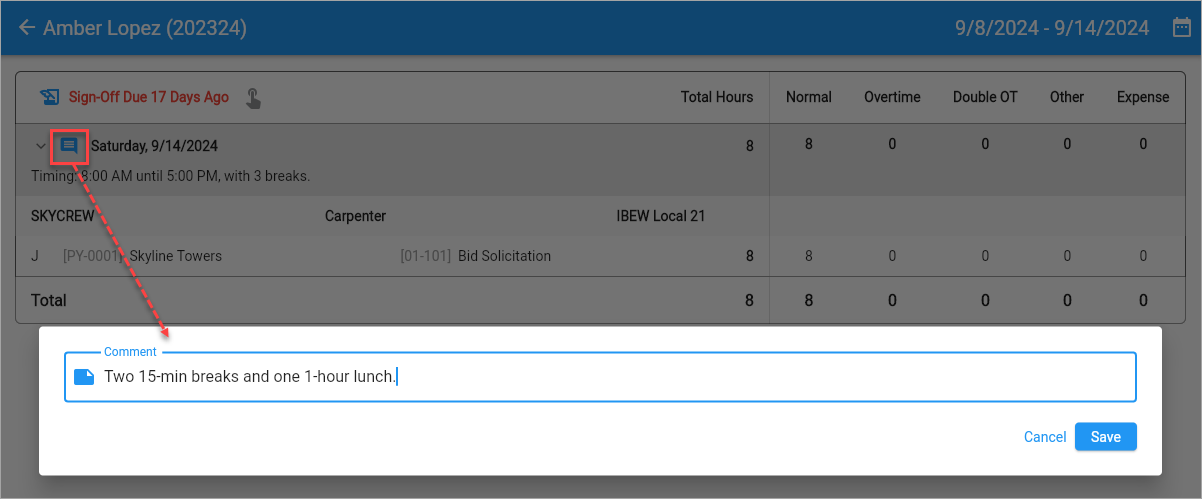
Notes for employees can be entered for individual days by selecting a crew member from the timesheet and pressing the Notes icon ( ).
).
Timesheet Sign-Off
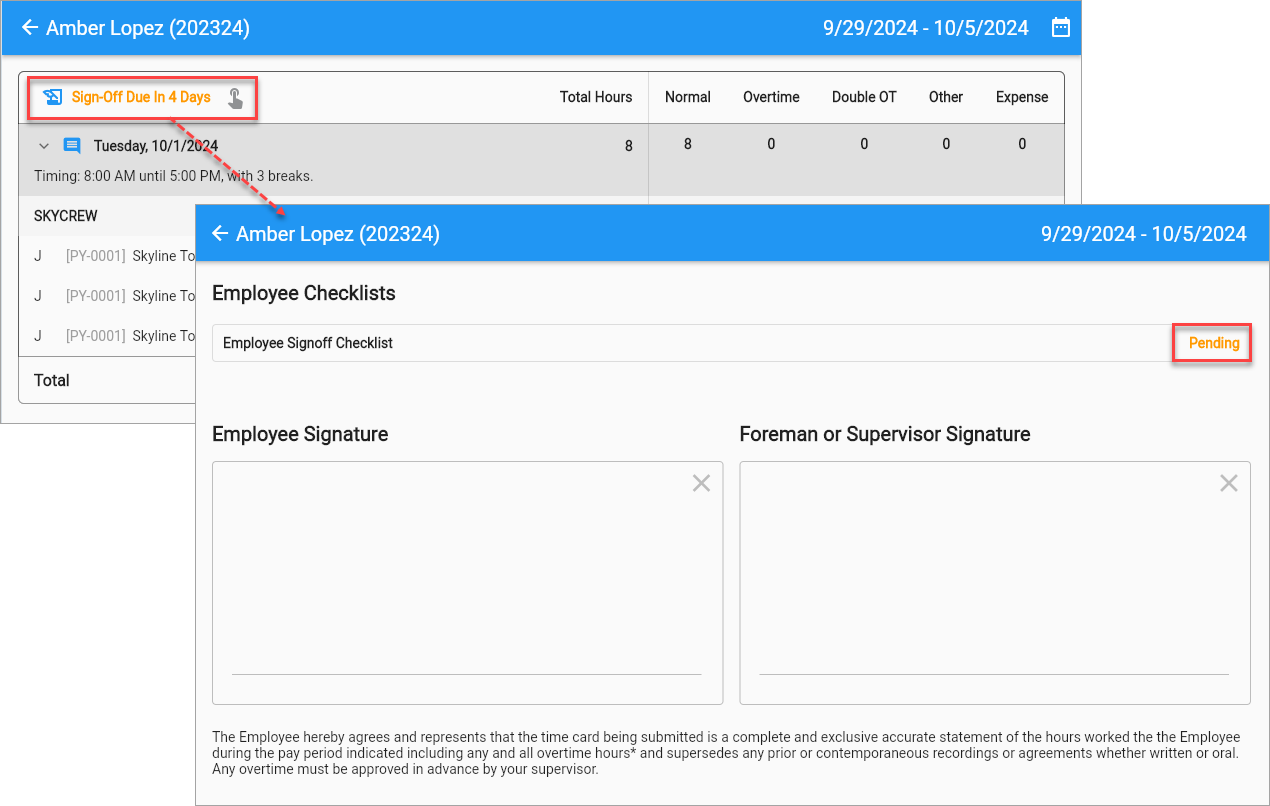
Select an employee from the timesheet and press the Sign Off link to complete the sign-off process.
Press the Sign-Off icon to bring up the Employee Checklists screen, shown below.
Checklists
Before timesheets can be signed off by the employee and foreman, there my be checklists that need to be completed. Checklists provide a way to ask foremen and crew members a series of questions prior to timesheet sign-off. This feature can be used to ensure that proper safety procedures have been followed on the job site.

If the assigned checklist is an “Employee Sign-Off Checklist”, as indicated in the Checklist Category Name field on the E-Time - Crewtime Checklist Setup screen, the sign-off checklist link will be visible to employees when adding timesheets. This visibility is based on the settings in the Sign-Off field on the Crew Maintenance screen. If the Sign-Off field is set to "Daily" or "Weekly", employees will be able to view and complete the sign-off checklist. If it is set to "None", they will not see the sign-off checklist link.
Detailed information on setting up checklists can be found in Construct CT Legacy - Checklists .
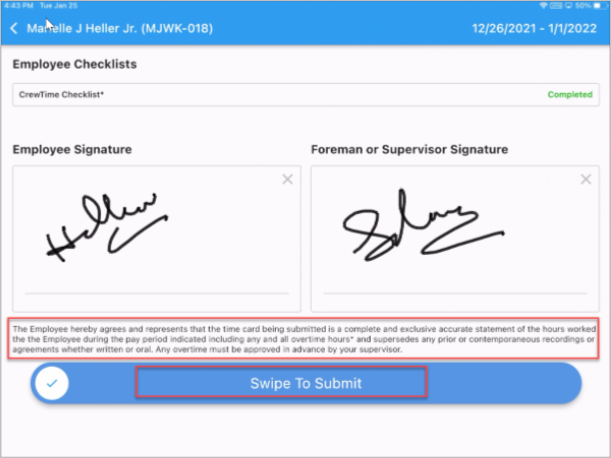
Once the selected checklist has been completed by the employee, and both the employee and foreman have added their signature, the Swipe To Submit button appears, as shown above. Employees can then swipe this button to submit their timesheet.
The status of the timesheet is given by its color on the crew sheet:
-
Saved timesheets appear in black.
-
Submitted timesheets appear in blue.
-
Approved timesheets appear in green.
-
Posted timesheets appear in gray.