NOTE: As of Nexus 02 (July 2026), Contacts will be deprecated, meaning it will no longer be supported as soon as a customer installs Nexus 02. CMiC encourages users to use the web deployment of Construct PM - Contacts. To add this custom menu item to the Treeview, please refer to Construct Feature.
Contacts; standard Treeview path: CMiC Field > Security > Contacts
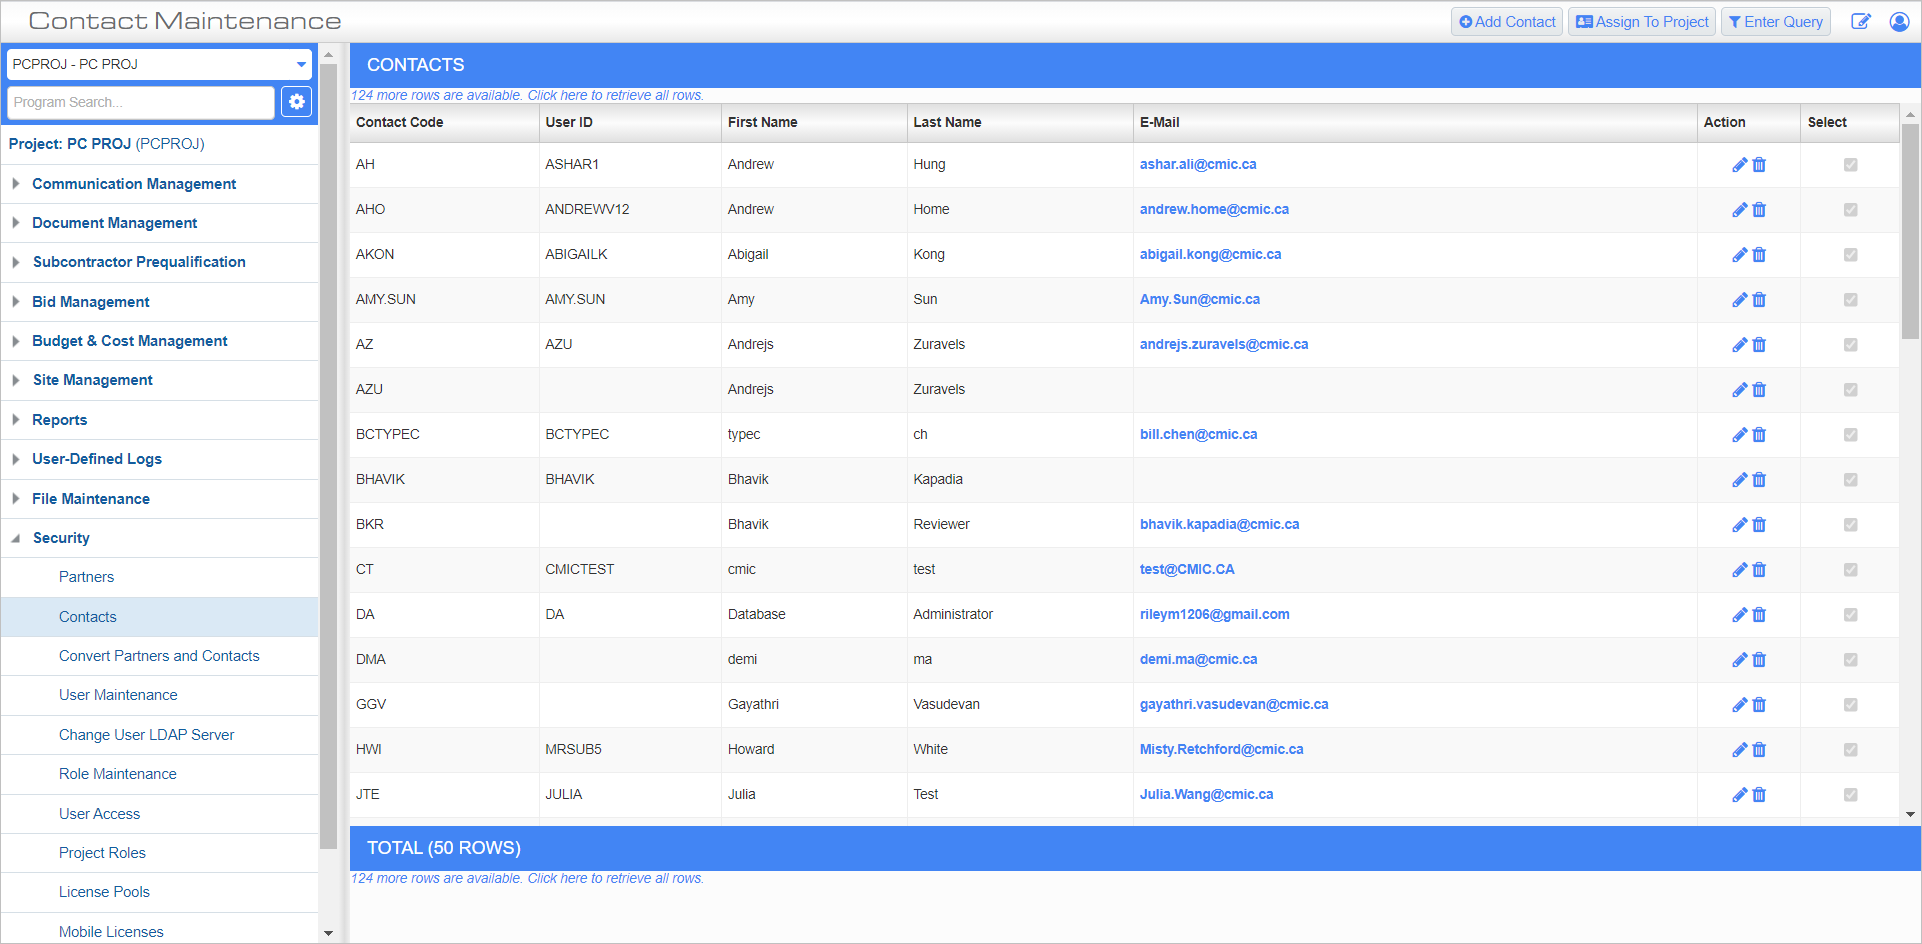
This screen is used to manage contacts at the system level. It shows those contacts who share the same company or partner code as the logged-in user. To show contacts associated with other partners, use the Partners screen.
Users can assign existing contacts to a project, or create a new contact/user for CMiC Field only. To assign contacts to a project, check the 'Select ' box for any contacts you wish to assign to the project and press the [Assign To Project] button to add them to the current project.
NOTE: When a system contact is assigned to a project via the [Assign To Project] button, the 'Collab User' box is automatically enabled on the Project Contact Detail tab of the CMiC Field - Project Contact Directory screen.
System contacts not assigned to a project can perform project-level activities as long as they have the privilege for the project role that is assigned to them. In addition, multiple project roles can be assigned to a system contact by using the Additional Roles link that is displayed next to the project role.
NOTE: The Additional Roles link does not display until the contact record has been saved.
System Contact Info – Tab

Contacts; standard Treeview path: CMiC Field > Security > Contacts – System Contact Info tab
When the system contact is brought into a project, it will keep all its associated project roles.
Project roles are used as follows: if the user is a project contact, then the system will use the project contact project roles to determine access. If the contact does not exist on the project, the system will use the system contact level project roles to determine access.
HR Role
An HR role may be assigned to a user and determines the privileges and functions the user will have in Employee Self Service. Field security can be applied to this field. HR roles are defined in the Human Capital Management - HR Role Maintenance screen of the Human Capital Management (HCM) module. The HR role is associated with the user’s contact code in order to facilitate approval of change requests in HCM.
Primary Contact – Checkbox
This checkbox sets whether or not the contact should be the primary contact on a project. When addressing meeting minutes, subcontract, or submittals under the current project, the primary contact's information will be auto-populated in the contact fields.
Collab User – Checkbox
Check this box if the contact is a Collaborate user. It is used to control project access for external collaboration users. When a partner contact is set up with a collaboration user, this checkbox must be enabled at the project contact level for the user to have security access to this specific project. If this box is unchecked, the project contact will be used as a contact only and they will not have login collaborative access to the specific project.
This checkbox is not used for login access for internal type company users. Job/project security is used for internal users and this security access is assigned in the User Maintenance screen in the System Data module.
NOTE: If a project contact is assigned from a system contact to a project and the notification settings have not been adjusted since inherited from the system contact notifications, the 'Collab User' checkbox must be checked to receive email notifications. To receive notifications without having the 'Collab User' checkbox checked on your project contact, you must have project-contact level notification settings saved (by navigating to that tab on the project contact and clicking save).
[Apply to Projects] – Button
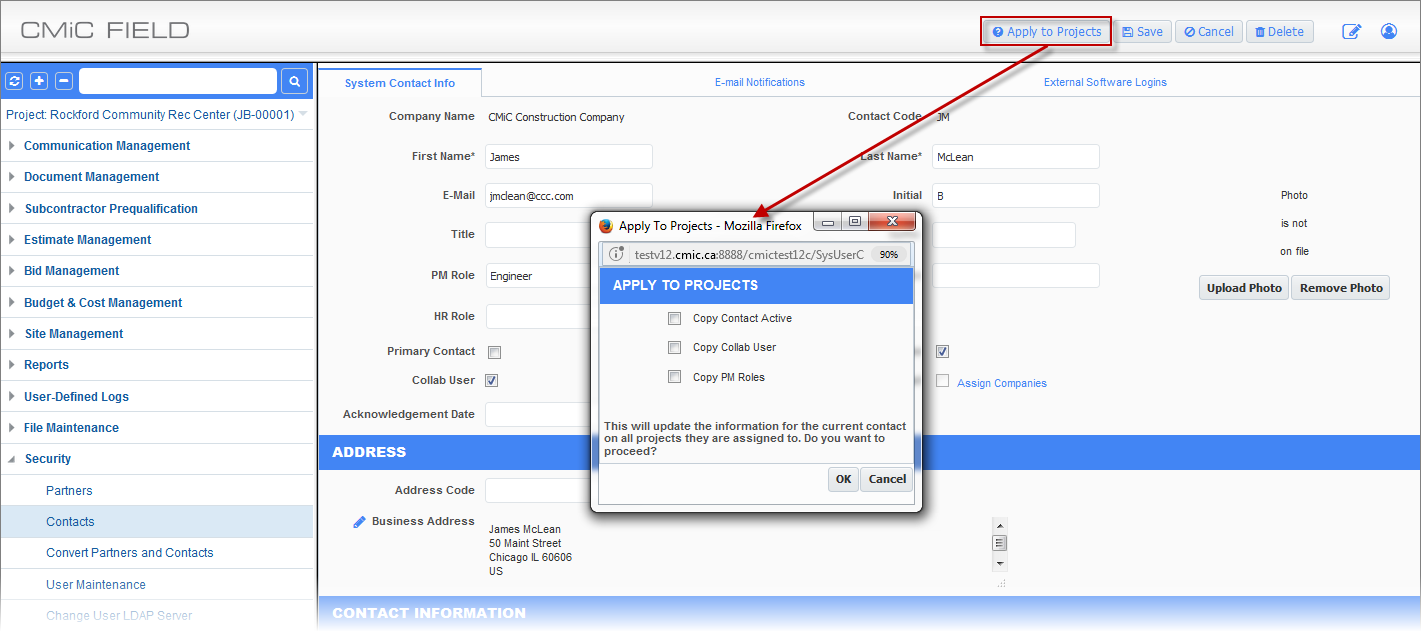
Example of pop-up window launched from [Apply to Projects] button on Contact screen
The [Apply to Projects] button allows the user to update changes to the contact’s address and contact data across projects, as well as updating the ‘Contact Active’ and ‘Collab User’ checkboxes and the PM Role at the project level with its current values at the system level.
NOTE: The [Apply to Projects] button does not display until the Contact record has been saved. After the record has been saved, click on the [Edit] button and the [Apply to Projects] the button will appear.
Address
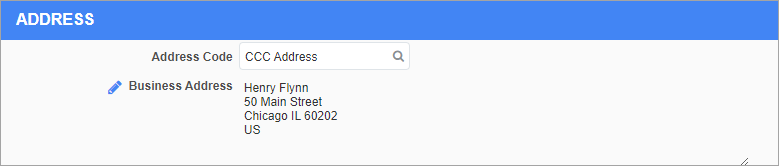
Address section
The contact's business information defaults from the company entered in the Company Name field but can be edited in this section.
Address Code
Enter/select an address code for the contact. This will automatically update the Business Address field. Address codes are maintained in the Address Codes screen (standard Treeview path: System > Global Tables > Address Code).
Business Address
Click the Edit icon (![]() ) to launch the Address pop-up to edit the address information for the contact.
) to launch the Address pop-up to edit the address information for the contact.
Contact Information

Contact Information section
This section is used to enter standard contact details and to indicate the contact's preferred contact method.
User Information

User Information section with 'User ID' box checked and security fields enabled
A user ID is required for any contact who will need to log into CMiC Field/Construct PM. Without a user ID, records can be assigned and correspondences can be sent to the contact, but they will be unable to log into the system and view the records directly.
User ID – Checkbox
Check this box to enable the security fields. Enter a user ID for the contact being created.
Password, Confirm Password
Enter and confirm a password for the contact being created.
Security Role
Click the Edit icon (![]() ) to launch the Security Roles pop-up to select a security role for the contact being created. Security roles are maintained in the Security Roles screen (standard Treeview path: CMiC Field > Security > Role Maintenance). For more information, please refer to CMiC Field - Security Roles.
) to launch the Security Roles pop-up to select a security role for the contact being created. Security roles are maintained in the Security Roles screen (standard Treeview path: CMiC Field > Security > Role Maintenance). For more information, please refer to CMiC Field - Security Roles.
E-mail Notifications – Tab
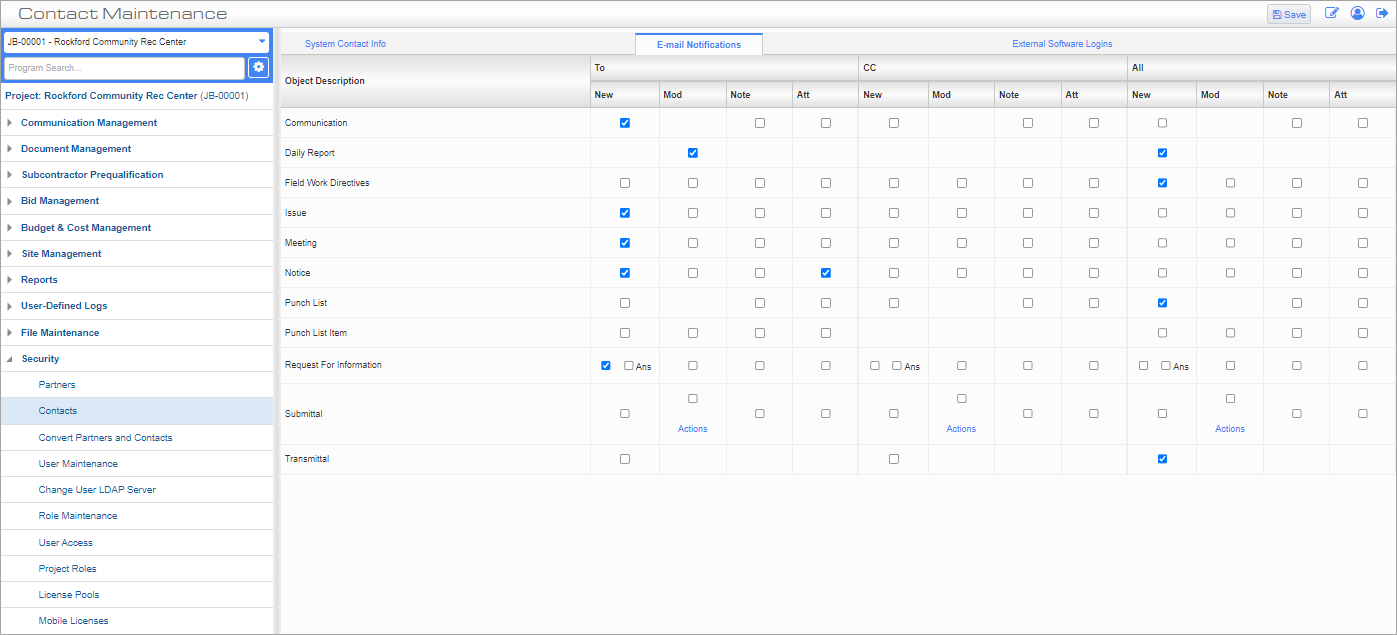
Contacts; standard Treeview path: CMiC Field > Security > Contacts - Email Notifications tab
This tab can be used to determine when the contact receives notifications about actions taken on objects within CMiC Field. For more information, please refer to PM Notifications. To receive notifications for a type of object within Field that the contact is associated with, check the relevant box on that object's row.
The E-mail Notifications tab is used to set when the user receives e-mail updates about the project. Any preferences saved in this screen apply to every project with which the user is associated. These options can be changed from project to project, via the CMiC Field - Project Contact Directory screen (standard Treeview path: CMiC Field > Communication Management > Project Contact Directory).
For each of the CMiC Field object types listed, users can choose whether to receive e-mails when they are the “To” person and when they are copied on the item. The options for each column are “New” and “None”.
The All column allows users to receive alert for a PM object who are neither “To” or “CC” on project correspondence, but who have the View privilege. This also applies to Restricted View All for RFIs.
As shown below, this tab’s drop-down boxes are changed to checkboxes when the PM Systems Options screen’s ‘Use Note/Attachment flags in Email Notification Setup’, box is checked. In this case, there are additional checkboxes to allow for email notifications when notes or attachments are added to a PM object. There is also a checkbox for when an RFI is answered.
To, CC, All
Check boxes in these sections to send notifications to the contact, depending whether they are entered in the To, CC fields. To send notifications regardless of the contact's role, check the relevant box in the All section.
New
Check a box of this type to receive email notifications when a new object of this type is created.
Mod
Check a box of this type to receive email notifications when an object of this type is edited.
Note
Check a box of this type to receive email notifications when a new note is entered for the object.
Att
Check a box of this type to receive email notifications when a new document is attached to the object.
Ans (RFIs)
Check a box of this type to receive email notifications when an RFI is answered.
Actions (Submittals)
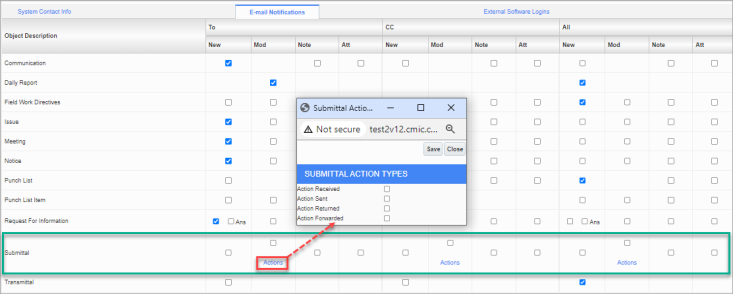
The "To" section in the Submittal's object description is tied to the current responsible contact (i.e., Ball in court/BIC contact). Being the responsible contact is a required condition for these settings to trigger.
This means the 'New' checkbox in this section will send a notification to the user if they are the “Sender” contact on any newly created submittals.
The 'Note' and 'Attachment' checkboxes will only notify the user of these items while they are the responsible contact.
Regarding the 'Modified' checkbox and the 'Actions' link pop-up:
If "All" action types are checked, notifications are triggered when:
• The submittal header status changes.
• The BIC contact changes.
NOTE: This can result in multiple notifications when a review is entered, as typically both events will occur.
If only a subset of the action types is selected:
• Notifications will only be triggered by changes in the submittal header status.
• Notifications are still generated when the 'Submittal Status Update by Last Submittal Review Cycle' checkbox is unchecked on the Submittal tab of the Project System Options screen. For more information, please refer to CMiC Field - Project System Options - Submittal - Tab.
• And if the 'Submittal Status Update by Last Submittal Review Cycle' checkbox is unchecked on the Submittal tab of the Project System Options screen, notifications will only be triggered by changes to the BIC contact and not by changes in the submittal header status. For more information, please refer to CMiC Field - Project System Options - Submittal - Tab.
• Notifications will also only be generated while the submittal is in the corresponding action type/stage.
The submittal action type/stage is determined by the last action entered on the record. Refer to the Edit History pop-up window below.
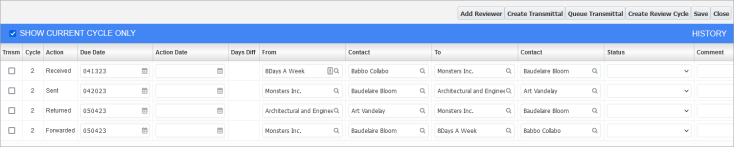
The initial default action type of a submittal is “Received”, and that doesn’t change when a “Received” action is entered. However, when the following “Sent” action is entered, that becomes the submittal action type (i.e., the submittal only moves into “Sent” once an action is taken by the following reviewer in step 2 (Manager). The action type will then be “Sent” until an action has been entered for the “Returned” reviewer, etc.
User Defaults – Tab
![]()
User Profile pop-up window – User Defaults tab
This tab is used to enter contact-specific values for different default properties in Field. To set user defaults for different users, please use the User Defaults Maintenance screen.
Session Expiration Time (Minutes), Timeout Warning Appears (x) Minutes Before Timeout
These two fields allow the user to set the expiration time for each session, as well as the timeout warning before a session expires. These default settings are optional though, as system-level defaults already exist.
These settings allow users to work longer than their standard working hours and extend their personal session expiration time. Also, some users perform data intensive activities where they require a timeout message greater than the system standard.
System-level timeouts and expiration times are used unless an override is set at this specific user level. System-level expiry and warning times are set on the General tab of the System Options screen, as shown below.
![]()
Pgm: SYSOPT – System Options; standard Treeview path: System > Setup > System Options > General tab
Initial number of rows in the log
This field allows the user to set the default number of records that are to be shown in the logs. Like the fields above, a system-level value is used for this field unless it is changed here at the user level.
NOTE: Changes to this field could result in slower performance when retrieving additional records.
Display Date in Time Zone
This field allows the user to set a user-defined time zone rather than using the system’s default time of EST, to accommodate localization requirements.
NOTE: As this is a user-defined field, it should be set up manually in each user account by which it is being used. To simplify the process of setting up a user-defined time zone setting in multiple user accounts, use the User Default Maintenance screen (standard Treeview path: CMiC Field > File Maintenance > User Default Maintenance).
Forgot Password Question, Forgot Password Answer
These two fields allow the user to create a default security question to be used when resetting their user account password. If a security question and answer are entered in these fields, the user will be prompted with this security question if they click on the “Having trouble logging in” link on the System Login page. If the user answers the security question correctly, the system will send the user an email with instructions for resetting their password. If the user fails to answer the security question after three attempts, the account will be locked, and the user will need to contact support.
Language
This field is used to set the default language in CMiC Field. Once the default language is specified, further adjustments to the message prompts in CMiC Field can be made using the Field Prompt Maintenance screen. Refer to CMiC Field - Prompt Maintenance for more details.
NOTE: If this field is left blank, the default for P-type (Partner) contacts is English. For C-type (Company) contacts, the language defaults from the one specified in the Default Locale field located on the User Preferences screen in the System Data module. Refer to
External Software Logins – Tab
![]()
User Profile pop-up window – External Software Logins tab
The External Software Logins tab is used to store usernames and passwords for third-party software (e.g., Bluebeam, BIM360, DocuSign) integrated with CMiC Field.