Overview
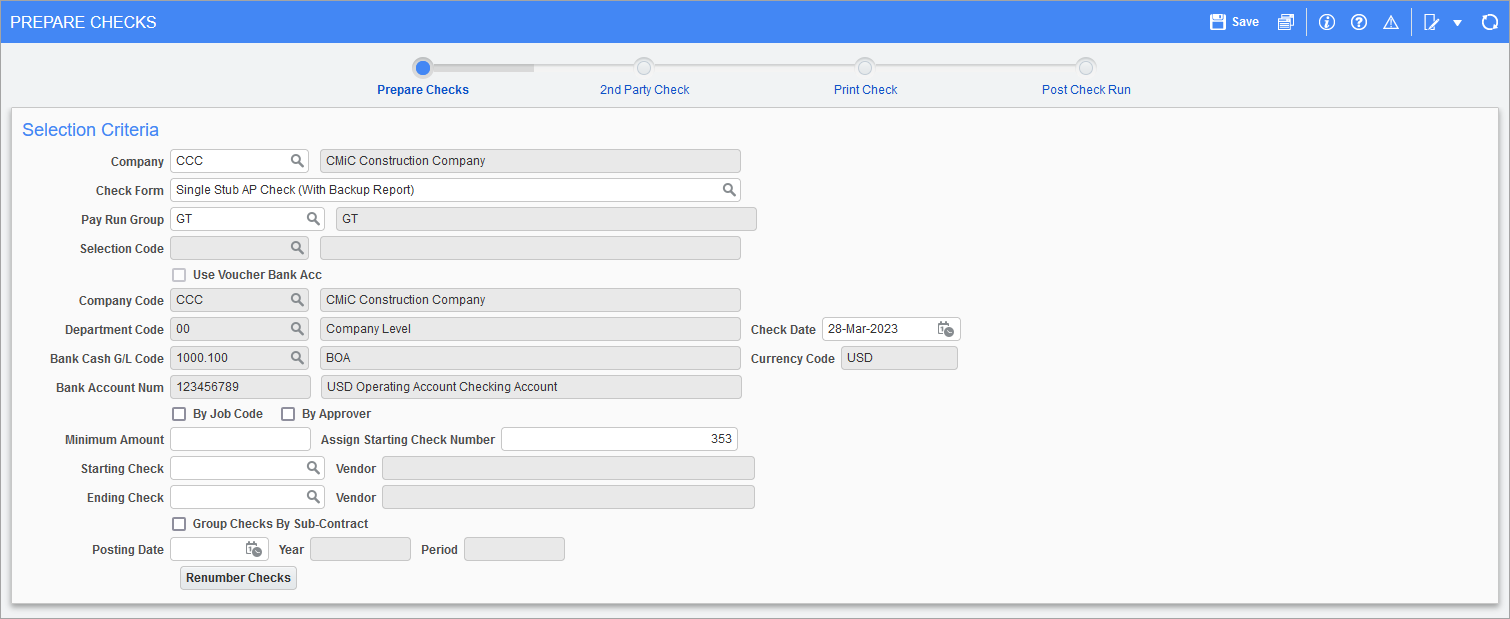
Pgm: APCHQPRE – Prepare Checks; standard Treeview path: Accounts Payable > Check > Print Checks
This screen is used to prepare the checks/electronic payments for the vouchers that have been selected for payment using either an AP pay run group or a payment selection code.
During the preparation process, depending on the settings related to checks, all voucher payments for a single vendor are consolidated into one payment, or a separate payment is made for each of the voucher for the vendor. Settings for the generation of checks (payments) are set on the Check tab of the AP Control File, and on the Accounting tab of Vendor records. Also, checks can be grouped by subcontract codes for the same vendor by checking the ‘Group Checks By Sub-Contract’ checkbox.
In addition, if the ‘Group AP Checks by Selection’ box is checked (standard Treeview path: System > Setup > System Options – Financial tab), the AP checks will be printed with grouping by payment selection codes and then applying the other grouping logic as set by the controls. This is applicable to check printing with 'Payrun Group' where there may be several payment selections from different companies assigned. Users should note that this is a system level option which sets the rule for all companies.
The Prepare Checks screen can also be used to renumber checks. If vouchers associated with the AP pay run group or the selection code have already had their checks prepared and numbered via this screen, the [Renumber Checks] button is available instead of the [Prepare Checks] button.
NOTE: This screen handles check numbering, and the starting check number must always be verified
There are four nodes on this screen's processing train:
Prepare Checks
Company
Select the company under which the AP pay run group or selection code is defined.
Check Form
Check format to use to print checks.
Pay Run Group
Select the AP pay run group for which payment will be processed, or leave this field blank if a selection code is to be used to specify the vouchers for payment instead.
AP pay run groups are set up using the Accounts Payable - Create Payrun Groups screen, which is launched via the process train at the top of the Select Payments screen.
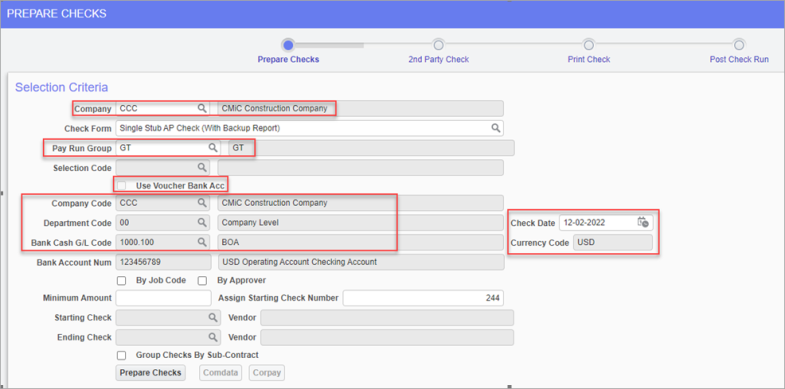
Example showing fields auto-populated when pay run group code selected
When a pay run group code is selected, pay run group banking details will auto-populate in the relevant fields, as shown in the screenshot above.
NOTE: If a pay run group code is unprepared, the check date selected in the pay run group code is removed from the system (refer to Accounts Payable - Unprepare Checks). When this happens, users must return to the Accounts Payable - Create Payrun Groups screen and enter a date in the Check Date field as required.
Selection Code
Select the selection code for which payments will be processed, or leave this field blank if an AP pay run group is to be used to specify the vouchers for payment instead.
Selection codes are set-up using the Select Payments screen.
NOTE: If a selection code does not have any associated vouchers, it will not be listed here. Also, if a selection code is associated with an AP pay run group, it will not be available here, as the AP pay run group must be used.
Use Voucher Bank Acc – Checkbox
Check this box if the checks for this run are to be credited to the cash accounts associated with the vouchers rather than from a single cash account specified by the Company Code, Department Code, and Bank Cash GL Code fields (these fields are disabled if this box is checked).
NOTE: This field is only enabled if the pay run group selected is of the type "Non EFT Payments" or "EFT and Non EFT Payments". Please refer to the Accounts Payable - Select Payments for more information on these payment types.
Company Code
Select the company whose bank account will be used to pay the vouchers selected on this pay run. Since AP pay run groups allow for the combining of selection codes from various companies, this field allows you to specify which company will pay the vouchers.
Department Code
Enter/select the GL cash department of cash account.
Bank Cash GL Code
Enter/select the cash account to use for payment.
Check Date
Enter/select the check date for the check.
By Job Code – Checkbox
This option allows for separate checks for a vendor that has multiple vouchers that are tied to different job codes. For example, if a single vendor has two vouchers tied to two different jobs on the same check run, two checks will be generated.
By Approver – Checkbox
The setting for this checkbox defaults from the 'Group Checks By Approver' checkbox located on the Check tab of the AP Control File. The default setting can be overridden here if required.
When checked, the Prepare Check process will continue to work as per the standard logic, in that when two invoices exist for the same vendor but have two separate approvers, the system will generate two checks. When unchecked, invoices with different approvers will be prepared on the same check.
Minimum Amount
Enter a minimum check amount to be used as the criteria for generating a check. Any checks that have a total payment amount less than the amount entered in this field will not be generated.
Leave this field blank if all checks should be generated regardless of the total payment amount on that check. Vouchers that are linked to checks that fall into this category are considered paid.
Assign Starting Check Number
This field is disabled if the ‘Use Voucher Bank Acc’ box is checked.
The system will default the starting check number for this run by incrementing the last check number associated with the bank account by one. Each subsequent check number generated will increment sequentially.
Modify this number if the first check number on this check run should be different than the default number within this field.
The last used check number associated with the selected bank account is stored in the Last Check Number field of the Bank Account record, which can be viewed or edited via the Bank Account Maintenance screen of the System Data module (standard Treeview path: System > Global Tables > Banking > Bank Account).
Starting Check, Ending Check
This fields are disabled unless the vouchers associated with the AP pay run group or the payment selection code have already had their checks prepared and numbered via this screen; otherwise these fields are available to specify the range of checks to renumber, and the [Renumber Checks] button becomes available to initiate the renumbering process. If the Start Check field is blank, the first check (by check number) is assumed, and if the End Check field is blank, the last check is assumed.
This functionality is also only applicable if the check stock is pre-numbered.
Posting Date
The Posting Date field is added when the Retrieve the Currency Exchange Rate as per the Transaction Posting Date box is checked on the Global tab of the System Options screen, allowing the user to set the post date on the Prepare Checks screen. The Posting Date field will be disabled in the Post Check Run screen and the GL Summary Report will show the currency exchange rate used is based on the posting date.
Group Checks by Sub-Contract – Checkbox
The checkbox state is defaulted from the ‘Group Checks by Sub-Contract’ checkbox on the AP Control File’s Check tab. When checked, the screen groups checks for vouchers that are associated with sub-contracts.
[Prepare Checks], [Renumber Checks] – Button
Click the [Prepare Checks] button to generate the checks that apply to the check run being processed. Once the system has completed this process, a message will appear at the bottom line of this screen indicating the number of checks that were generated.
If vouchers associated with the AP pay run group or the selection code have already had their checks prepared and numbered via this screen, this button become the [Renumber Checks] button to initiate the renumbering process.
Assign 2nd Parties to Checks

Pgm: APCHQ2ND – Second Party Checks; standard Treeview path: Accounts Payable > Check > Print Checks
Use this screen to assign alternate names to checks prepared through the automated Prepare Checks functionality. This screen allows the modification of the payee name(s) prior to printing. The system creates 2nd party checks by changing the name to which the check will be issued, or by creating joint checks by simply adding a name to the check.
Section Criteria
Company
Select the company under which the AP pay run group or selection code is defined.
Pay Run Group
Select the AP pay run group for which the checks were prepared, or leave this field blank if a selection code is to be used instead.
Selection Code
Select the Selection Code for which the checks were prepared, or leave this field blank if an AP Pay Run Group is to be used instead.
Check Details
To change the name on the check that is to be issued, delete the vendor name from the Name 1 field and enter the name that you want to appear on the check. If a second name is required to prepare a joint check, enter that name in the Name 2 field.
NOTE: The joint payee will be validated against the Business Partner LOV if the 'Enable Joint Payee Validation' box is checked on the Financials tab of the System Options screen. For more information, please refer to System Data - System Options - Financials - Tab.
Also, the address fields are editable to allow the address to be changed.
The Issued To field will contain the name on the check for history purposes.
Print Check
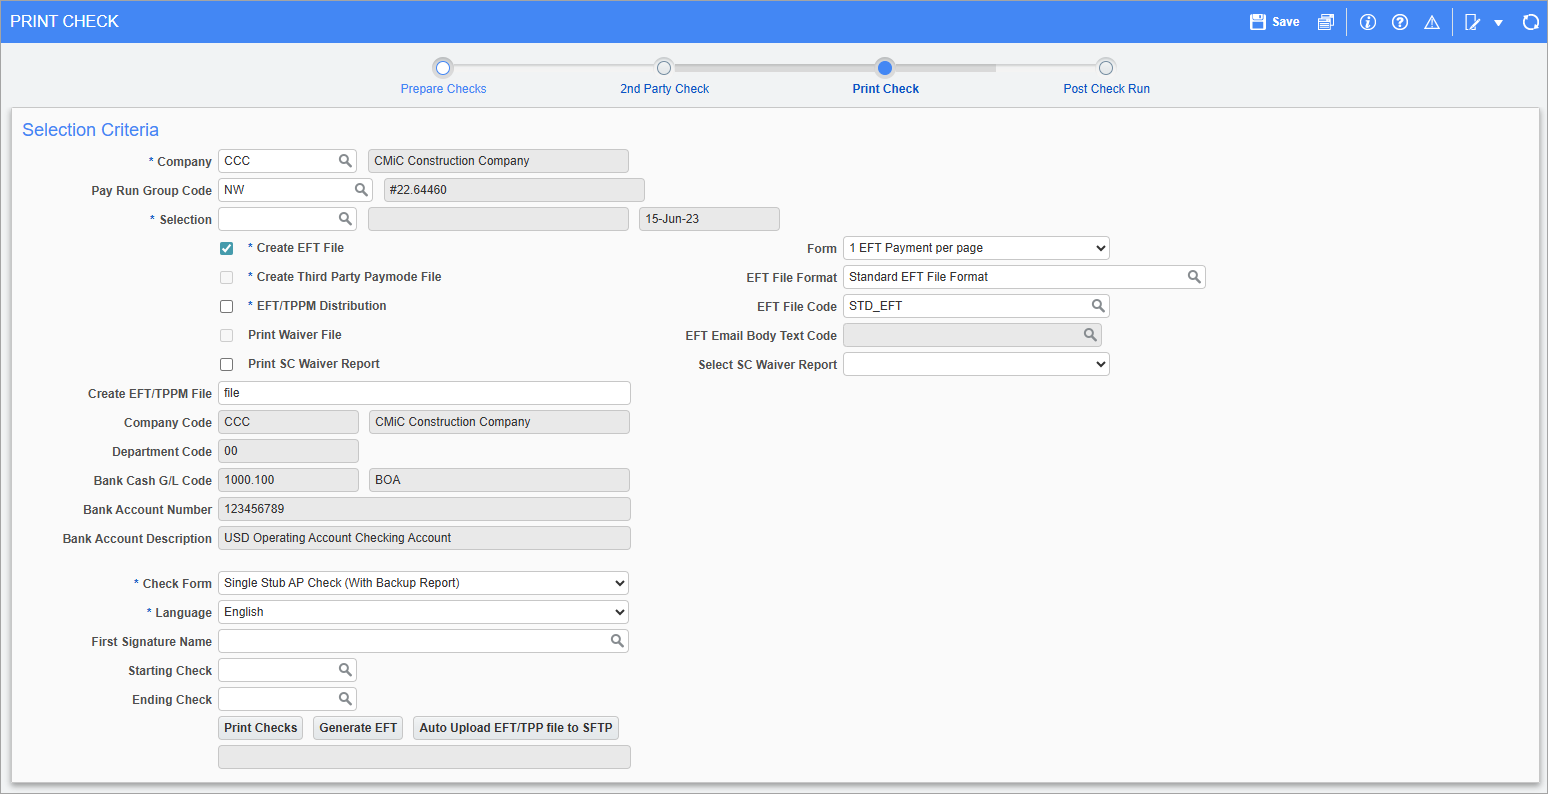
Pgm: APCHQPRT – Print Checks; standard Treeview path: Accounts Payable > Check > Print Check
For the prepared checks associated with either an AP pay run group or a selection code, this screen is used to either physically print the checks and check stubs, to create an EFT file for payment, or to create a Third Party Paymode file for payment.
NOTE: Printing the checks does not decrease the outstanding amount in the system until the Post Check Run screen is used to post the payments. The payment selection code will be automatically deleted from the system only after posting the payments.
Company
Enter/select the company under which the AP pay run group or selection code is defined.
Pay Run Group Code
Enter/select the AP pay run group for which the checks were prepared, or leave this field blank if a selection code is to be used instead.
Selection
Enter/select the selection code for which the checks were prepared, or leave this field blank if an AP pay run group is to be used instead.
Create EFT File – Checkbox
Check this box if the payments are to be made via an EFT file; if checked, the ‘EFT/TPPM Distribution’ checkbox is enabled.
Form
This drop-down menu contains EFT file generation options.
Create Third Party Paymode File – Checkbox
Check to create a Third Party Paymode file for payment. If the ‘Create EFT File’ box is checked, uncheck it to enable this checkbox.
EFT File Format
Enter/select a bank-specific EFT file format.
EFT/TPPM Distribution – Checkbox
If checked and the “E-Mail” option is selected for the vendor via their Vendor record’s EFT/TPPM Distribution field on the Accounting tab, an e-mail to notify the vendor of the EFT payment will be sent.
It will be sent with a subject line of “ACH Payment Notification”, and it will be sent to the e-mail specified by the EFT E-mail field on the Accounting tab of the Maintain Vendors screen. Refer to Accounts Payable - Emailing Vendor Pay Stubs When Printing an EFT File to learn more about the email payment notification process and the setup required for vendors on the Vendor record.
The sender’s e-mail will be the e-mail specified via the Default ACH Email field on the Check tab of the AP Control File. Refer to the Check tab of the AP Control File screen to learn more about using the Default ACH Email field.
Also, if the ‘Send a Copy of EFT to E-mail Address Below’ box is checked on the Check tab of the AP Control File, a BCC e-mail will also be sent to the e-mail specified under the ‘Send a Copy of EFT to E-mail Address Below’ checkbox (which, for instance, may be used as a copy for historical purposes). Refer to the Check tab of the AP Control File screen to learn more about using the ‘Send a Copy of EFT to E-mail Address Below’ checkbox.
User can verify that EFT emails were sent by using the Email tab in the Report Action Status screen in the System Data module (standard Treeview path: System > Utilities > Report Action Status). For more information, please refer to System Data - Reports Action Status.
EFT File Code
This drop-down field lists the different versions of the selected bank-specific EFT file format.
EFT File Codes are set-up via the EFT Formats screen. Please refer to Accounts Payable - EFT File Format.
EFT Email Body Text Code
This field is used to select the text that will be used in the body of the EFT email notification. This field is enabled when the 'EFT/TPPM Distribution' checkbox on this screen is checked.
Refer to Accounts Payable - Customizing EFT Email Notifications for more information on how this field is used.
Print Waiver File – Checkbox
Check to print the waiver file.
Print SC Waiver Report – Checkbox
Check to print SC waiver report.
Select SC Waiver Report
Select the SC waiver report to be printed.
Create EFT File
Name of generated EFT file. Once the EFT file is generated, a pop-up appears to open or save the EFT file to a user specified location, and its AP Check report will be available on a new tab of your web browser.
Company Code
Display-only field, displaying company, entered via Prepare Checks screen, to which cash account belongs. If the ‘User Voucher Bank Acc’ box was checked on the Prepare Checks screen, this field will be blank as the cash account info comes from the Voucher records.
Department Code
Display-only field, displaying department, entered via Prepare Checks screen, to which cash account belongs.
Bank Cash GL Code
Display-only field, displaying cash account, entered via Prepare Checks screen, against which payments are made.
Bank Account Number
Display-only field, displaying cash account’s account number.
Bank Account Description
Display-only field, displaying cash account’s description.
Check Form
Check format to use to print checks.
Language
The language will default to English, but can be changed to French or Spanish if required.
First Signature Name
Select a first signature image, which is associated with the selected bank account.
First signature images are associated with bank accounts via the Bank Account Maintenance screen in the System Data module.
Starting Check, Ending Check
These fields are used to specify the starting and ending check numbers for check printing.
[Print Checks] – Button
This button is used to initiate the printing process. The first launched pop-up is used to select the printing destination and format.
If “Preview” is selected, your web browser’s print preview functionality will display a preview of what will be printed on a new tab. Actual printing can then be done via the web browser’s print preview functionality.
Checks will print sorted by bank account and job code, and according to the check printing settings on the Check tab of the AP Control File, and on the Accounting tab of Vendor records. Also, checks can be grouped by subcontract codes for the same vendor by checking the ‘Group Checks By Sub-Contract’ checkbox at the bottom of the Prepare Checks screen.
NOTE: Currency symbols can be assigned on the System’s Currency Maintenance screen (standard Treeview path: System > Global Tables > Banking > Currencies). Users can map the required currency name/symbol against their currency codes so that reports such as ‘check printing’ can read those mapped values and print accordingly.
[Generate EFT] - Button
This button is used for generating EFT files. This feature is useful if an EFT file is misplaced/lost because it allows it to be re-generated.
[Auto Upload EFT/TTP file to SFTP] – Button
This button is used to automatically upload the generated EFT/TPP file through SFTP to an external server. To use this feature, the external web servers need to be set up through the database using the [External Web Servers] button on the General tab of the System Options screen in the System Data module. Please note, only one server can be used at a time for uploading EFTs. For more information, please refer to System Data - System Options - General - Tab.
Post Check Run
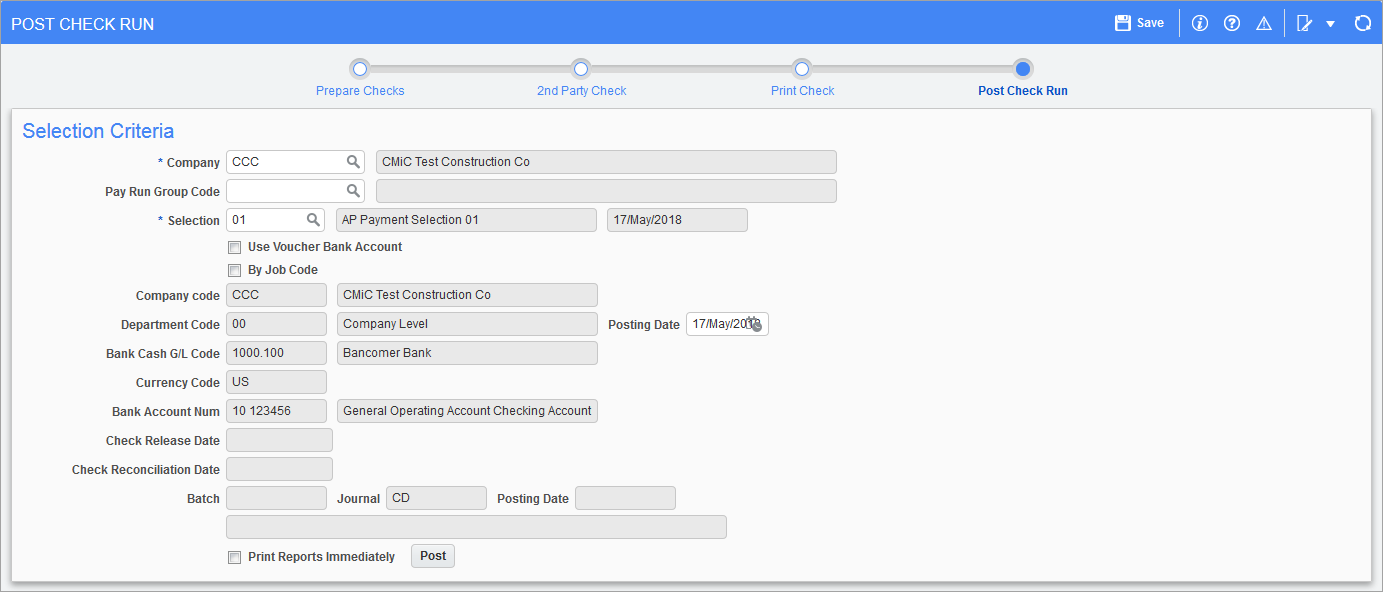
Pgm: APCHQPST – Post Check Run; standard Treeview path: Accounts Payable > Check > Print Checks
This screen is used to post payments once the checks have been correctly printed or the electronic payment files have been created properly.
After selecting the AP pay run group or the payment selection code that applies to the check run being posted, the system will default the information that pertains to this check run in the relevant fields.
The system will create the GL transactions to reflect the cash disbursements and update the vendor records with the appropriate payments.
The post checks option will update the Wasted Check table with the check numbers used for overflow checks; “STUB ONLY” will be the description on these checks. The Wasted Checks screen is available in the Wasted Checks screen.
Use Voucher Bank Account – Checkbox
Check this box if the checks for this run are to be credited to the cash accounts associated with the vouchers rather than a single cash account specified by the Company Code, Department Code, and Bank Cash GL Code fields (these fields are disabled if this box is checked).
By Job Code – Checkbox
This option allows for separate checks for a vendor that has multiple vouchers that are tied to different job. For example, if a single vendor has two vouchers tied to two different jobs on the same check run, two checks will be generated.
Posting Date
Enter the date to record for the posting of these payments to the General Ledger.
Check Release Date
Enter/select the check’s release date.
If the ‘Use Check Release Feature’ box is checked on the Check tab of the AP Control File and the ‘Use Check Release Date’ box (shown below) is checked, the system will use the check release date of checks instead of their check date to determine if they are to be included in the Positive Pay file.
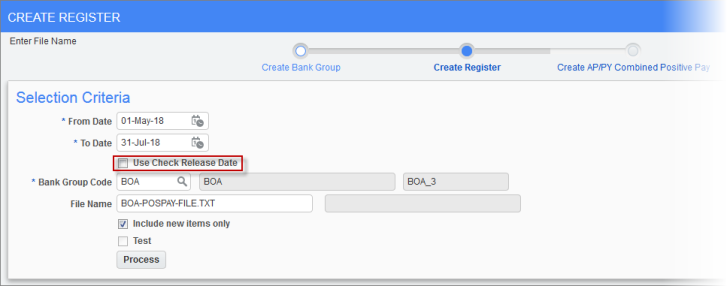
Pgm: APPOSPAY – Create Positive Pay Register/File
Check Reconciliation Date
This date field is enabled and mandatory for posting if the ‘Automatically Populate Check Reconciliation Date’ box is checked on the Check tab of the AP Control File. Also, this date is only relevant to EFT payments.
Print Reports Immediately – Checkbox
Check this box if the posting report is to be printed as part of the posting routine. If this field is not checked, the posting report will not print automatically after posting, but it can be printed at a later time using the Print Posting Reports utility.
[Post] – Button
Click this button to initiate the posting process. Any messages about the posting will be displayed in the field just above this button.
Posting Reports
Posting reports can be printed using the 'Print Reports Immediately' checkbox or at a later time from the Print Posting Reports utility (standard Treeview path: Accounts Payable > Utilities > Print Posting Reports).
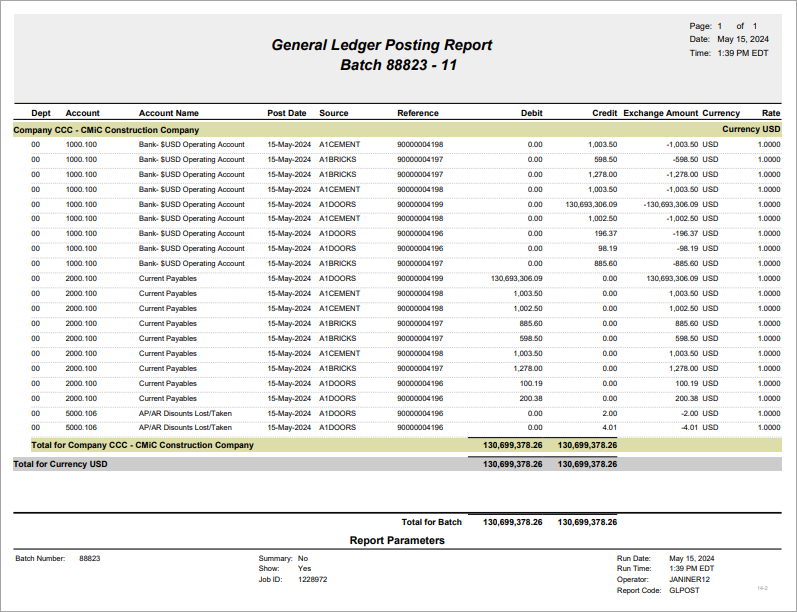
General Ledger Posting Report (GLPOST)
Check Register – Posting Report (AP260)
