Overview

Pgm: APCTRLFM – AP Control File; standard Treeview path: Accounts Payable > Setup > Local Tables > Control File Options – System Defaults tab
The AP Control file is used to declare the default information for each company set up for the Accounts Payable module. All information entered in this screen will be specific to the company specified at the top of the screen.
The [Copy Control File] button can be used to copy the AP Control File settings from one company to another.
This screen contains the following tabs:
System Defaults – Tab
Current Year and Period
Set the current year and current period for the Accounts Payable module. These fields are set independent of the General Ledger and should be updated on a period basis.
Allow To Post to Future Periods – Checkbox
Check this box if the user is allowed to post transactions into a period ahead of the current period. The period checks will be as follows:
-
Does the transaction posting date fall within the current or future AP period?
-
Does the transaction posting date fall within the current or future company period?
-
Does the transaction posting date fall within the open periods allowed in GL period dates?
-
Is there a ‘J’ type distribution on the transaction being posted? If yes, does Job Cost Control File have a period set up? If no, the period will be ignored but the ‘Allow Posting To Future Periods’ checkbox will be used. If yes, does the transaction posting fall within the current period on the Job Cost Control File? Does Job Costing have the ‘Allow Posting To A Future Period’ box checked?
-
Is there an inter-company distribution on the transaction being posted? Is the period date for this company open? Do the Job Costing Control File and/or the Equipment Costing Control File of this company have a period date entered and is the ‘Allow Posting To Future Periods’ box checked? The AP period will not be checked for this company.
-
Is there an ‘E’ type distribution on the transaction being posted? If yes, does the Equipment Costing Control File have a period set up? If no, the period will be ignored but the ‘Allow Posting To Future Periods’ checkbox will be used. If yes, does the transaction posting fall within the current period on the Equipment Costing control. Does Equipment Costing have the ‘Allow Posting To A Future Period’ box checked?
Default Post Date Into Posting And Check Printing Programs – Checkbox
If this box is checked, the Check Printing and Posting screens will have the Posting Date field default to the current date if the current date is within the open AP period, or to the last day of the AP period otherwise. If not checked, no date will default to the Posting Date field.
Batch Control Total – Checkbox
If checked, users are required to specify a control amount when creating a batch of vouchers. When posting the vouchers, the system will then compare the batch’s total to the control amount entered when the batch was created. When the two totals are exact, the posting will be allowed. When the totals do not match, a user must have the override system privilege ‘APBCHAMT’ for posting to occur.
Also, if this box is checked, the Calculated On field is enabled in order to choose the calculation method to use to calculate the batch’s total that is compared against the batch control total.
Calculated On
If the ‘Batch Control Total’ box is checked, this field becomes enabled in order to choose the calculation method to use to calculate the batch’s total, which is compared against the control amount when the batch of vouchers is posted.
The following are details about the two calculation methods for calculating a voucher’s amount, which is used to calculate a batch total.
NOTE: While using credit taxes or tax on taxes, the retainage amounts on Tax1 & Tax2 are not included in the voucher pay amount. This is applicable for all types of tax setup and irrespective of the status of AP Control flags ‘Tax 1 is credit tax’ and ‘Calculate Retainage on Tax 2’.
Original Invoice Amount (Including Retainage)
Voucher Amount = Invoice Amount + Tax Amount(s)
Voucher Invoice Outstanding Amount
Voucher Amount = Invoice Amount + Tax Amount(s) – Retainage
Journal Options
There are two default journal codes used by the AP system, depending on the type of transaction being posted to the General Ledger. Both can be the same, or you can differentiate them if required. Enter the journal code to be associated with AP purchases and CD cash disbursements.
Tax Options
Calculate Tax On Net Amount – Checkbox
If this box is checked, tax will be calculated on the net amount, and tax on the retainage release amount will be calculated at the time of release retainage using the current tax rate. Also, if checked, the ‘Tax1 Is Credit Tax’ (GST in Canada) and ‘Calculate Retainage On Tax2’ boxes must be unchecked.
The following are further details about this option:
-
Registry, Voucher, Memo, and Recurring Voucher Entry screens create vouchers using this tax option.
-
This AP Control File tax option defaults to the SC Contract Entry and PM Contract Entry screens. Note, however, if this tax option is used, the Contract-Level Retainage Release functionality is not allowed for subcontracts.
-
The Pay Request Entry screen will also use this tax option.
-
During the retainage release process, the Voucher Entry screen only allows the selection of invoices with the same type of taxes.
-
Currently, this option does not apply to the following invoice types: Registered invoices from Imaging, MS Truckers Payroll invoices, AP Rental Equipment invoices, and MS Internal/External Material invoices. This option does not apply to the Purchase Order Distribution screen – the distribution always has taxes calculated on the gross amount.
Tax1 Is Credit Tax (GST in Canada) – Checkbox
This box is applicable to companies operating in Canada only. Check this box if the goods and services tax (GST) should be the first tax to be calculated during the voucher entry process.
Do Not Allow Different Tax Percentages – Checkbox
This box is applicable to taxes being applied to subcontracts in Project Controls. Check this box to not allow the user to create an AP invoice with different tax percentages (e.g., regular and payment taxes). This box is checked by default.
NOTE: The 'Do Not Allow Different Tax Percentages' checkbox is hidden by default and can be added using Lite Editor.
Calculate Retainage On Tax2 – Checkbox
This box is applicable to companies operating in Canada only and is currently only applicable in Quebec. Check this box if the provincial tax allows holdback.
Calculate Discount On Taxes At Time Of Payment – Checkbox
This field allows the user to calculate discounts on taxes at the time of payment, whether through AP invoices or through the RFP workflow. This box is unchecked by default.
This box must be checked to enable the 'Calculate Discount On Taxes At Time Of Payment' checkbox and Discount On Tax Department, Account fields in the Payable Invoices section of the Tax Table Maintenance screen in the System Data module. For more information, please refer to System Data - Tax Codes.
NOTE: The 'Calculate Discount On Taxes At Time Of Payment' box is hidden by default and can be added using Lite Editor. As well, the Invoice Method field must be set to "Gross Method" on the Voucher tab to enable this checkbox.
Generate Direct Tax Voucher – Checkbox
If the system is to automatically create a payable to the tax authority every time a voucher that includes a direct pay tax is posted, check this box. If this box is not checked and direct pay taxes are used, the payment of this tax is a manual process.
When this box is checked, the Direct Tax Voucher Series Code field is enabled to enter the Invoice Series Code to use when creating vouchers for direct pay taxes.
Direct Tax Voucher Series Code – Checkbox
This field is enabled when the ‘Generate Direct Tax Voucher’ box is checked, and it is used to enter the invoice series code that will be used when creating vouchers for direct pay taxes.
When vouchers in the Accounts Payable or Subcontract modules are posted with a direct pay tax, the system will post them and then create secondary vouchers for the direct pay tax amount.
Voucher – Tab
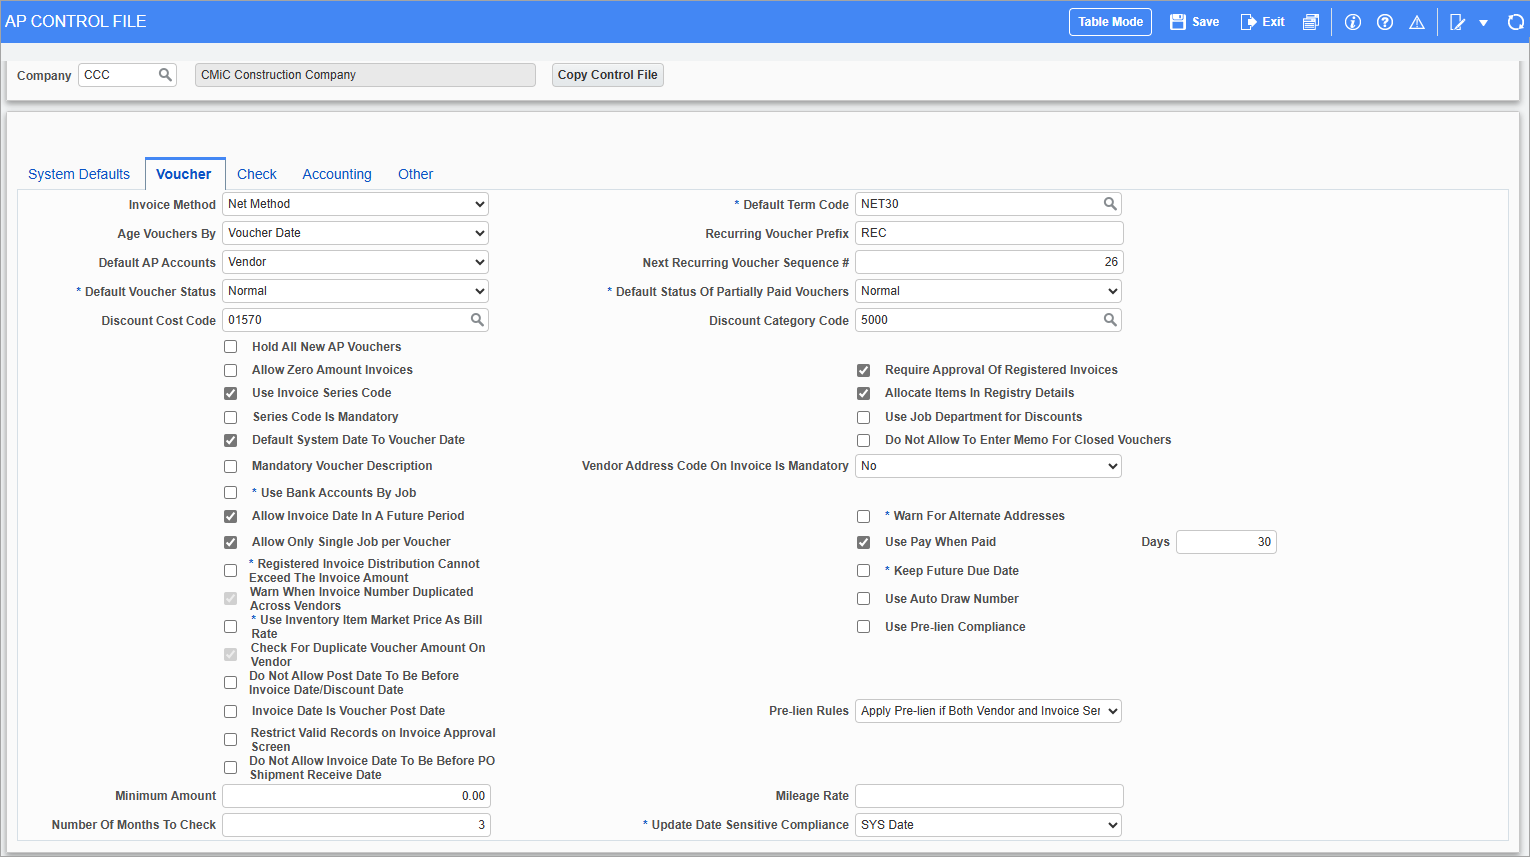
Pgm: APCTRLFM – AP Control File; standard Treeview path: Accounts Payable > Setup > Control File Options – Voucher tab
Invoice Method
Select whether discounts are calculated and taken when vouchers are entered (net method) or when checks are paid (gross method).
The net method will automatically debit the Discounts Taken GL account for the amount of the discount when entering a voucher. The voucher will appear in the sub‑ledger with an amount equal to the original invoice amount less the discount taken.
The gross method will not process the discount until checks are paid. The GL account distribution will not reflect the discount and the voucher will appear for its full amount. This is the most common method.
Age Vouchers By
The system allows for the aging of vouchers by voucher date or by due date in aged reports.
Default AP Accounts
Select from where the system should default the required AP accounts. The system allows for three options: “Vendor”, “Currency”, and “Invoice Series”.
Select “Vendor” if the system is to use the General Ledger accounts set up on the Vendor File when generating General Ledger distributions.
Select “Currency” if the system is to use the General Ledger accounts defined by currency in the Currency Accounts screen when generating General Ledger distributions.
Select “Invoice Series” if the system is to use the General Ledger accounts defined on the Invoice Series Code screen when generating General Ledger distributions.
Default Voucher Status
Select the payment status to default to the Default Voucher Status field on the Voucher tab of all new (not existing) vendor records created under the company selected on this screen. This default for the vendors then defaults to all new vouchers entered for the vendors.
The following are the two possible defaults for a voucher’s payment status (there are other statuses, but only these two can be initial statuses):
“Permanent Deferral” (P) indicates that a Voucher is deferred until its Payment Status is changed via the Adjust Voucher Status screen (deferred vouchers are listed on the Deferred Vouchers tab).
“Normal” (N) indicates that the voucher’s due date is used to determine when the voucher will be paid.
Discount Cost Code
If the “Job Discount Cost Code and Category” discount allocation method is being used, a default cost code must be selected via this field. After the discount is taken during payment processing, and the payment is posted, the discount will be allocated to the job department, and associated with this cost code and the category code selected via the Discount Category Code field.
Hold All New AP Vouchers – Checkbox
If this box is checked, it does not matter what the voucher’s payment status is, as the voucher will not be paid until the hold is manually released through the Adjust Held Voucher Status screen.
Allow Zero Amount Invoices – Checkbox
If checked, users can create and post zero amount invoices on the Enter Vouchers screen. If unchecked, the system will alert users that the invoice has a zero amount and cannot be posted. The default value is unchecked.
NOTE: This box is hidden by default and can be added using Lite Editor.
Use Invoice Series Code – Checkbox
Check this box if invoice series codes can be entered within the Register Invoices and Enter Vouchers screens.
Invoice series codes can be used to group vouchers for reporting purposes, or as a means to generate pre-defined GL distributions.
Series Code Is Mandatory – Checkbox
This box is enabled only when the ‘Use Invoice Series Code’ box is checked. When checked, invoice series code entry is mandatory during voucher entry.
Default System Date to Voucher Date – Checkbox
Check this box if the system date is to default as the voucher date within the Voucher Entry screen. If unchecked, the user will be required to enter a voucher date.
Mandatory Voucher Description – Checkbox
If the user is not allowed to enter a voucher without a description, check this box.
Use Bank Accounts by Job – Checkbox
If this box is checked, the Job Bank Account feature is activated, which is used to have the default cash account for a new voucher or request for payment come from the job instead of the vendor.
If checked, the system will retrieve the cash account for a voucher according to the cash account set for the job, via the Bank tab of the Enter Job screen (shown below), rather than the one set for the vendor or currency:

This feature is also available in the Subcontract Management module. In the Subcontract Management module, it is activated with the ‘Use Bank Accounts By Job’ checkbox on the RFP Defaults tab of the SC Control File screen (standard Treeview path: Subcontract Management > Local Tables > Control).
NOTE: If this feature is activated in the Subcontract Management module, it also needs to be activated in the Accounts Payable module.
Allow Invoice Date In A Future Period – Checkbox
If this box is unchecked, the system will not allow the user to enter a voucher where the voucher date is in a period ahead of the current AP period. This applies to vouchers entered via the Invoice Registry, Voucher Entry, or Subcontract Pay Request screens.
Allow Only Single Job Per Voucher – Checkbox
When checked, a separate voucher number will be generated for each line of an invoice, distributed to a separate job code when entered in the [Details] button pop-up window of registered invoices or through the SC RFP.
When entering a registered invoice in the Register Invoice screen, multiple vouchers will be created (i.e., as many as the distinct number of jobs) under the same invoice code in the following three scenarios:
- Registry entry with a subcontract code in the header and the related jobs in the [Detail] button’s pop-up window
- Registry entry with multiple jobs in the [Detail] button’s pop-up window
- Registry entry for a PO which has multiple jobs
When the [Details] pop-up is not used for allocation of the expense amount, then only one voucher will be created.
Once split vouchers are created from the same invoice number, users will be prevented from deleting individual vouchers that belong to the group. If an attempt is made to delete a single voucher, a message will be issued to indicate that users may delete all vouchers with the same invoice number or cancel the action. To learn more about this functionality, refer to Accounts Payable - Allow Single Job per Voucher.
Registered Invoice Distribution Cannot Exceed The Invoice Amount – Checkbox
When checked, the system validates during registered invoice distribution and, if users enter an amount that is in excess of the invoice amount, issues a warning and forces the user to adjust the amount to be same as the invoice amount.
Warn When Invoice Number Duplicated Across Vendors – Checkbox
If checked, the system will issue a warning message every time an invoice number is duplicated, regardless of the vendor associated with the invoice, as invoice numbers are used to identify vouchers in the various Accounts Payable screens (voucher numbers are auto-generated by the system and used in the backend). The system standard is to not allow duplicate invoice numbers for a vendor within a company.
Use Inventory Item Market Price As Bill Rate – Checkbox
When this box is checked, and an invoice is entered for a PO with an inventory item, the AP Voucher Distribution pop-up billable amount for the transaction will be populated by the item market price that was entered in the Inventory module.
Check For Duplicate Amount on Vendor – Checkbox
If checked, the system will verify that the amount being entered for a specific vendor/voucher combination has not been previously entered. Also, if checked, the Minimum Amount and Number Of Months To Check fields become enabled to specify the minimum dollar amount of a voucher in order for it to be checked for a duplication, and the number of months to go back and check for duplications. This feature is useful if there are vendors that tend to duplicate invoices.
Do Not Allow Post Date To Be Before Invoice Date/Discount Date – Checkbox
If checked, the system will verify that the invoice post date is not earlier than the invoice date/discount date when posting invoices. This field is hidden by default and can be added using Lite Editor.
Invoice Date Is Voucher Post Date – Checkbox
If checked, the system uses the invoice date as the voucher posting date, unless the invoice date is in a closed period, in which case posting is prevented. If unchecked, the system works as usual, using the batch posting date as the official voucher posting date.
This checkbox affects all invoices, including those created in the Imaging module, the Subcontract Management module’s Enter Request for Payment screen, and in the Invoice Register screen.
For an example of this checkbox’s functionality, refer to Accounts Payable - Use Invoice Date as Voucher Post Date.
NOTE: No other transaction types, such as debit/credit notes, manual checks, or invoice adjustments have been modified to alter the voucher posting date in such a way. They all continue to use the voucher posting date as associated with the batch.
Restrict Valid Records on Invoice Approval Screen – Checkbox
This checkbox is used to control how valid and invalid invoice records are filtered in the Accounts Payable - Approve Registered Invoices screen. If unchecked, both valid and invalid invoice records will be displayed. If checked, only valid invoice records will be displayed. By default, this box is unchecked.
Do Not Allow Invoice Date To Be Before PO Shipment Receive Date – Checkbox
If checked, the system will verify that the invoice post date is not earlier than the PO shipment's receiving date when posting invoices. The default value is unchecked. This field is hidden by default and can be added using Lite Editor.
The PO shipment receiving date is entered on the Date field on the General tab of the Shipment Receiving screen (standard Treeview path: Purchase Order > Receipt > Enter Warehouse Receipt). For more information, please refer to
Minimum Amount
If the ‘Check For Duplicate Amount on Vendor’ box is checked, this field becomes enabled in order to specify the minimum dollar amount of a voucher in order for it to be checked for a duplication.
Mileage Rate
Enter a mileage rate. Mileage expenses are calculated in the Construct ESS app.
Number Of Months To Check
If the ‘Check For Duplicate Amount on Vendor’ box is checked, this field becomes enabled in order to specify the number of previous months to check for a duplication of the voucher.
Reverse Tax Charge Flag – Checkbox
This checkbox is used in the calculation of VAT payments for international clients. By default, this box is unchecked.
Default Term Code
Select a default payment term for this company. This value is defaulted to every new vendor created for the company. It can of course be changed on the vendor record.
Payment terms are maintained via the Payment Terms screen in the System Data module (standard Treeview path: System > Global Tables > Payment Terms).
Recurring Voucher Prefix
Enter a prefix for vouchers generated via the Recurring Payables functionality (Process Recurring Entries screens) to help distinguish between invoice numbers generated for recurring vouchers and regular vouchers. Leave this field blank if a prefix for invoices generated by the Recurring Invoices functionality is not required.
Next Recurring Voucher Sequence #
Enter the next available recurring voucher sequence number.
Default Status Of Partially Paid Vouchers
Select the default payment status of a voucher that was partially paid. This feature can be used to automatically defer all partially paid vouchers. If this is not required, leave the default as “Normal (N)”.
Discount Category Code
If the “Job Discount Cost Code and Category” discount allocation method is being used, a default category code must be selected via this field. After the discount is taken during payment processing, and the payment is posted, the discount will be allocated to the job department, and associated with the cost code selected via the Discount Cost Code field and this category code.
Require Approval of Registered Invoices – Checkbox
This box should be checked if registered invoices must be approved before they can be converted into vouchers.
Allocate Items In Registry Details – Checkbox
Instead of just entering the lump sum invoice amount in invoice registry, check this box. If checked, the user will be able to enter the line item detail of the invoice including taxes when entering invoices in the registry.
Use Job Department for Discounts – Checkbox
This checkbox is used for the Accrue AP Discounts to Job functionality. For details, please refer to Accounts Payable - Accrue AP Discounts to Job.
Do Not Allow To Enter Memo For Closed Vouchers – Checkbox
If checked, users will not be allowed to enter a memo for closed vouchers on the AP Enter Memo screen (standard Treeview path: Accounts Payable > Voucher > Enter Debit/Credit Memos). By default, this field is unchecked.
Vendor Address Code On Invoice Is Mandatory
If it is necessary to force the entry of a vendor address code on every voucher/invoice entered into the system, then select appropriate option from the drop-down menu. The available options are:
-
Yes (Address Code is Mandatory) – A message will pop up when tabbing out of the field until a valid entry is made or selected from the LOV.
-
No (Not Required) – Users may either prefer to enter the code or leave it blank. There will not be any message stopping the user.
-
Yes, If Alternate Address Exists – If an alternate address code exists for a vendor, then it is mandatory to make an entry, otherwise users are allowed to proceed.
The address associated with the vendor address code, which is entered during voucher entry will be the address printed on the payment for the voucher. This feature applies to Voucher Entry and the Invoice Registry screens only.
Warn For Alternate Addresses – Checkbox
This checkbox will cause a soft warning to alert users that alternate addresses exist for this business partner when entering vouchers. This warning will only appear if the business partner has at least one alternate address code defined.
Use Pay When Paid – Checkbox
If this box is checked, when entering a voucher via the Enter Vouchers screen, the system will automatically mark vouchers as using the Paid When Paid feature if there is a job entered on the voucher. If this is active, the user will be able to adjust the number of days and indicate the matching AR draw number when entering a voucher.
Days
Enter the default number of days that a voucher using the Pay When Paid feature will become due for payment after the hold on its payment is removed.
Keep Future Due Date – Checkbox
If this is checked, the due date for the PWP voucher will be kept, should the AR invoice be paid prior to the expected date. If unchecked, the voucher due date will recalculate using the AR invoice payment date plus the PWP days.
Use Auto Draw Number – Checkbox
This checkbox is used in conjunction with the Pay When Paid feature. If the ‘Use Auto Draw Number’ box is checked, when entering a voucher via the AP Enter Voucher screen the draw number associated with the ‘Use Paid When Paid’ is not mandatory and may be left as null. When the Job Billing invoice is produced, the draw number will be automatically associated with the voucher. If the Job Billing invoice is subsequently voided, the draw number will be automatically removed and the next billing draw number will be applied.
Use Pre-lien Compliance – Checkbox
If checked, the compliance code selected for the Compliance Code to be Used in Pre-lien Set-up field on the Financials tab of the System Options screen will be assigned to the vendor invoice.
In addition, there are six options by which pre-lien related vouchers can be generated, and the default is selected via the below Pre-lien Rules field.
Pre-lien Rules
Ensure that the ‘Use Pre-lien Compliance’ box is checked, and then select the underlying rule for applying pre-lien compliance to vouchers via this field.
Update Date Sensitive Compliance
The setting of this field will be used in the Update Date Sensitive Compliance screen. If the “SYS Date” option is chosen, specified compliance records will be updated based on the system date, and if the “Invoice Date” option is chosen, the update will be done based on the invoice date. For example, if the invoice date was March 15, 2018 and the date sensitive compliance record was valid from January 01, 2018 to June 06, 2018 and the update was done based on the SYS Date that was after June 01, 2018 the record would be marked as non-compliant, but if the update was done based on the invoice date the same record would be marked as compliant.
Check – Tab
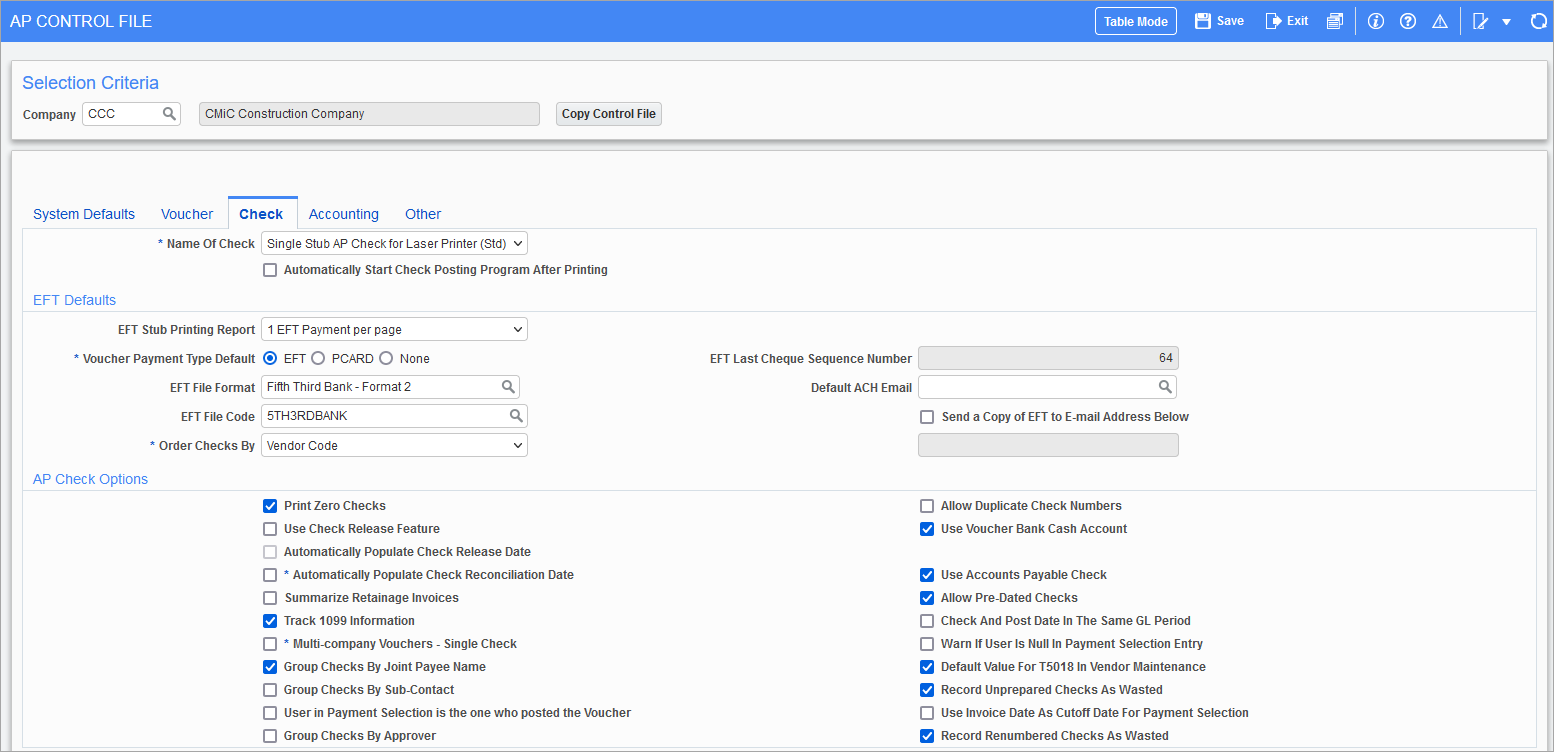
Pgm: APCTRLFM – AP Control File; standard Treeview path: Accounts Payable > Setup > Control File Options – Check tab
Name of Check
CMiC Enterprise comes with multiple standard check formats including “Single Stub AP Check for Laser Printer (Std)” or “Double Stub AP check for Laser Printer (Std)” and “Double Stub AP Check 16 Lines”, “Double Stub AP Check For Laser Printer 006”. Canadian standard versions include the description of ‘(CPA 006)’ at the end of the names and match to the Canadian Payments Association Standard 006.
Automatically Start Check Posting Program After Printing – Checkbox
If this box is checked, the system will automatically launch the Check Posting program after printing AP checks. This does not mean that the checks will be posted automatically, it just starts the Check Posting program. The user must still press the [Post] button.
EFT Defaults
EFT Stub Printing Report
Options for the printing of the Direct Deposit Stubs (EFT) report that is generated after the EFT file is generated via the Print Checks screen.
Voucher Payment Type Default
Select the default payment type. The available options are: “EFT”, “PCARD”, and “None”.
EFT File Format, EFT File Code
The EFT File Format drop-down field lists the different bank-specific EFT file formats that CMiC currently supports. The EFT File Code drop-down field lists the different versions of the selected bank-specific EFT file format.
EFT File Codes are set-up via the EFT Formats screen. Please refer to Accounts Payable - EFT File Format.
Order Checks By
Select whether the system prints AP checks by vendor code or vendor name.
Default ACH Email, Send a Copy of EFT to E-Mail Address Below – Checkbox
When making EFT payments via the Print Check screen, if the ‘EFT/TPPM Distribution’ box is checked on Print Check screen, and the “E-Mail” option is selected for a vendor via their Vendor record’s EFT/TPPM Distribution field on the Accounting tab, an e-mail to notify the vendor of the EFT payment will be sent. This field’s e-mail will be the sender’s e-mail for the sent e-mail.
Also, if the below checkbox, ‘Send a Copy of EFT to E-Mail Address Below’, is checked, a corresponding BCC e-mail will be sent to the e-mail specified under it.
Set Up Default ACH Email Addresses (Enterprise Only)
NOTE: This process is for Enterprise clients only and does not apply to Cloud clients.
To set up the values for the Default ACH Email field’s LOV, launch the System Options screen (standard Treeview path: System > Setup > System Options), and on the General tab, click the [Web Servers] button, shown below:

Pgm: SYSOPT – System Options; standard Treeview path: System Data > Setup > System Options – General tab
In the Web Servers pop-up, shown below, insert a new row, provide a name for the new entry and check the ‘SMTP’ checkbox to enable the [Create ACH Email Address] button:

Pgm: SYSOPT – System Options; standard Treeview path: System > Setup > System Options – General tab – [Web Servers] button
Next, click the [Create ACH Email Address] button, and in the pop-up, insert the emails to be available in the Default ACH Email field:

Pgm: SYSOPT – System Options; standard Treeview path: System > Setup > System Options – General tab – [Web Servers] button – [Create ACH Email Address] button
EFT Last Check Sequence Number
NOTE: By default this field is hidden. See Lite Editor for more information on how to display hidden fields. When the field is initially displayed, it will be disabled. Users will require the APUPDEFCHQ security privilege assigned to be able to edit the EFT Last Check Sequence Number field. Refer to Security for more information on the system privileges available for Accounts Payable.
An input field that displays the sequence number for the last EFT check printed. The latest EFT check sequence number will be an increment to last check sequence number in AP Control File and the sequence number is automatically updated as soon as new checks are prepared. If checks are processed using a pay run group, the last check sequence number of the paying company will be used.
NOTE: Going forward, CMiC may have the same check sequence number across multiple companies. Previously, check sequence numbers were unique across all companies and hence the sequence number was used by Non-EFT and EFT checks. With this modification, EFT check numbers will have company-specific check sequence numbers. If EFT Last check sequence number is 0 or NULL, the next EFT check sequence number will be 1.
WARNING: Users normally should not be updating this field unless otherwise required and any updates should be performed by administrators. The field will be automatically updated to current last check sequence number in the system for all the companies with this installation.
AP Check Options
Print Zero Checks – Checkbox
If checked, the check-printing screens will print zero dollar checks, otherwise, zero dollar checks will not print.
NOTE: A zero-dollar check cannot be processed alone in a batch and must be posted with another check that has a value. The two checks do not have to be related; they just need to be in the same batch. For more information, please refer to Post Zero-Dollar Checks.
Use Check Release Feature – Checkbox
This option provides a facility to approve the release of posted and printed checks prior to their release to the vendor, via the Release Checks screen.
Automatically Populate Check Release Date – Checkbox
This checkbox is enabled if the ‘Use Check Release Feature’ box is checked on this tab, and this checkbox is only relevant to EFT payments.
If this box is checked, the system will automatically fill in the Check Release Date field with the check date. The user may override this defaulted date, if required.
Automatically Populate Check Reconciliation Date – Checkbox
When checked, during check posting, the Check Reconciliation Date field is enterable, and users must enter the reconciliation date to post the check run. This Check Reconciliation Date field is only relevant to EFT payments.
Summarize Retainage Invoices – Checkbox
This field is not applicable to this version of the product.
Track 1099 Information – Checkbox
Check this box if the company is operating in the United States and is subject to filing 1099 federal/state tax returns at the end of the calendar year to the Internal Revenue Service.
Multi-company Vouchers – Single Check – Checkbox
Check this box to consolidate the payments of multi-company vouchers to a vendor by issuing a single check against a single company’s cash account; otherwise, the system will print a separate check from each company owing payment to the shared vendor.
Group Checks By Joint Payee Name – Checkbox
Check this box to allow pre-lien tiers to be included on the check.
Group Checks by Sub-Contract – Checkbox
If checked, the ‘Group Checks by Sub-Contract’ box on the Prepare Checks screen is automatically checked, to group checks by subcontract codes for the same vendor.
User in Payment Selection is the one who posted the Voucher – Checkbox
If checked, the only vouchers that will be available to a user in the Select Payments screen are the ones that were posted by the user.
Group Checks By Approver – Checkbox
When checked, the Prepare Check process will continue to work as per the standard logic, in that when two invoices exist for the same vendor but have two separate approvers, the system will generate two checks. When unchecked, invoices with different approvers will be prepared on the same check. This box is checked by default.
This setting defaults to the 'By Approver' checkbox on the Prepare Checks screen.
Allow Duplicate Check Numbers – Checkbox
Check this box to allow the printing of duplicate check numbers. Leave this box blank if duplicate check numbers are not allowed.
Use Voucher Bank Cash Account – Checkbox
Check this box if you want checks generated based on the voucher bank cash account rather than the bank account displayed on the Check Printing screen. This is only applicable if there is more than one cash checking account.
Leave this field blank if the checks are to be generated from the bank account listed on the payment selection when determining the payment bank.
Use Accounts Payable Check – Checkbox
If most of the manual checks are not related to AP invoices, then leave this box unchecked and the Manual Check screen will default the value “Not An AP Check” when the screen is entered.
Allow Pre-Dated Checks – Checkbox
If this box is unchecked, no validation between the check date and the check posting date will occur.
If checked, the system will allow a payment to be back-dated to any date prior to the system date. If left unchecked, the system will not allow the entry of a check date prior to the current system date. The system will default the check date to the current system date during payment selection. Any date modification can only be for future dates.
Also, the system will validate that the check date and the check posting date are in the same GL period, and where they differ, it will display an error message stating that the check and posting date must be in the same period; and the user will not be allowed to continue from either check printing or check posting, depending on when the posting date was changed.
Check And Post Date In The Same GL Period – Checkbox
If checked, to post checks, their check date and post date must be in the same GL period.
Warn If User Is Null In Payment Selection Entry – Checkbox
If checked, in the Payment Selection screen, if the User field is left blank, the following message will be displayed after clicking the [Select Invoices] button:

Default Value For T5018 In Vendor Maintenance – Checkbox
If this box is checked, the system sets the default value as “Y” of the T5018 field in Vendor Maintenance screen.
Record Unprepared Checks As Wasted – Checkbox
Check this box to have the Unprepare Checks utility record the check numbers as wasted, due to ruined checks, in the Wasted Checks table. The Wasted Checks table is available in the Wasted Checks screen. This may be useful towards any audit requirements.
For more information, please refer to Record Unprepared Checks as Wasted.
Use Invoice Date As Cutoff Date For Payment Selection – Checkbox
This checkbox changes the logic behind the Cut Off Date field on the Select Payments screen.
If this box is checked, the following applies to the Select Payments screen:
-
Instead of the cut off date being compared to a voucher’s due date, it will be compared to a voucher’s invoice date. So, if a voucher’s invoice date is on or before the entered cut off date, it will be selected.
-
Additionally, vouchers will be selected if their invoice date is after the cut off date, but before the next pay date.
-
If the ‘Discount Invoices’ box is checked, vouchers with a discount date on or later than the check date, but before the next pay date, will be selected.
-
The ‘Past Due Invoices’ and ‘Current Invoices’ checkboxes will be disabled and unchecked.
Record Renumbering Checks As Wasted - Checkbox
By default, this checkbox is unchecked. If checked, the renumbering checks are recorded as wasted checks. This is to maintain a proper audit trail of automatic check numbers generated/consumed by the system when the checks are renumbered.
Accounting – Tab
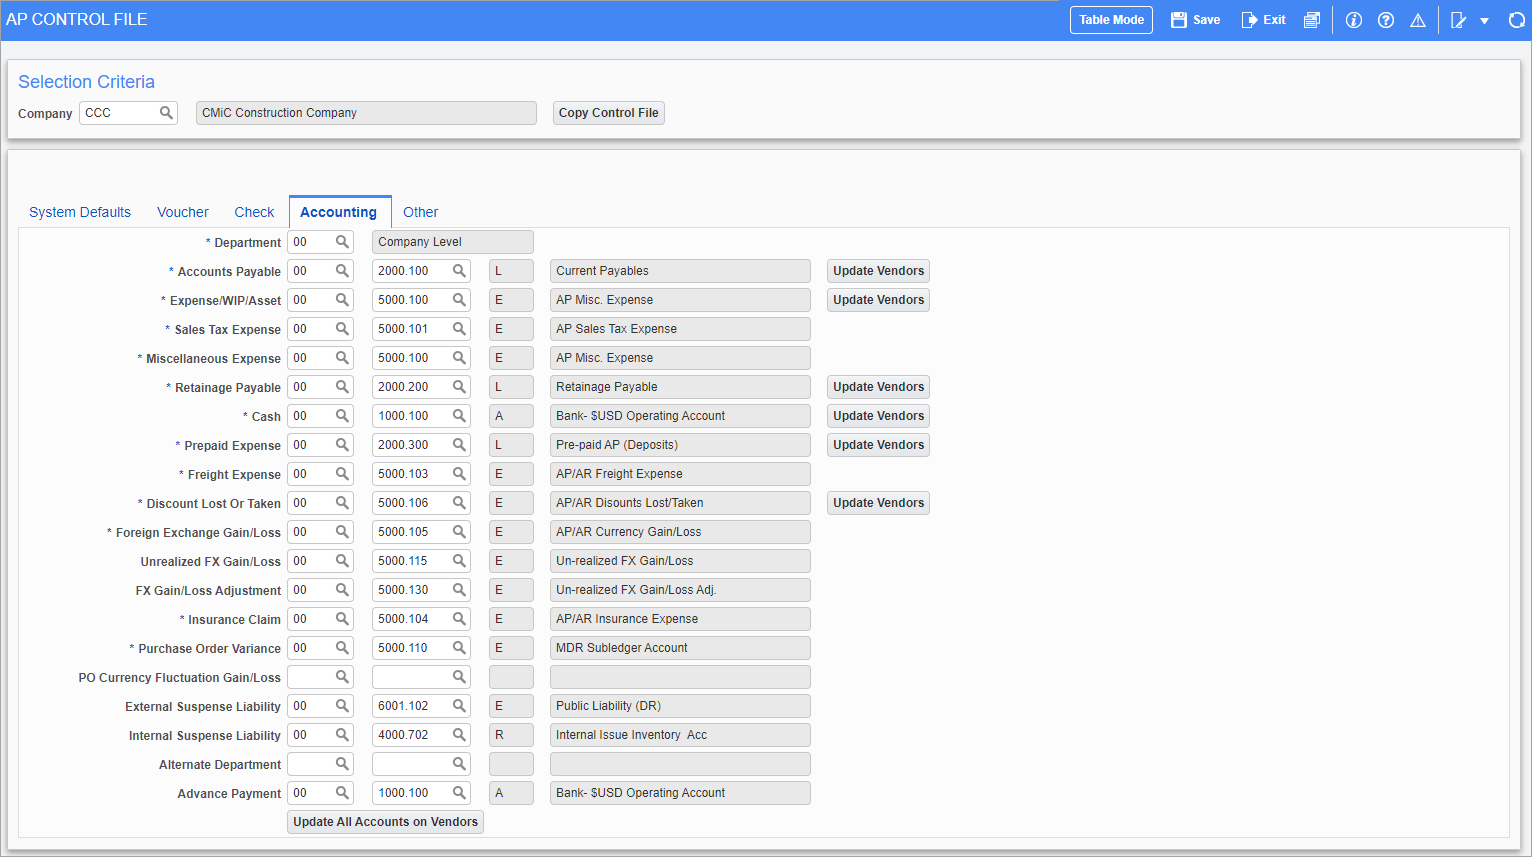
Pgm: APCTRLFM – AP Control File; standard Treeview path: Accounts Payable > Setup > Control File Options – Accounting tab
Enter the accounts to be used by the Accounts Payable system for automatic General Ledger distributions. The account has a field for the appropriate General Ledger Department for each default account defined. Enter a valid department code for the GL account being entered in the adjacent field.
The External Suspense Liability and Internal Suspense Liability fields are only required if AP Receiver entry will be used.
NOTE: The account entered as the Accounts Payable account should be entered as the Accounts Payable sub-ledger control in the Maintain Accounts screen of the General Ledger module.
Advance Payment

This account is used for creating the voucher distribution line for the deposit/amortization amount. For more details, please see the Advance Payment – Checkbox details in Subcontract Management - Enter Request for Payment - Details - Tab. The fields included are Advance Payment Department Code, Account Code, Account Type Code, and Account Name.
Note The Advance Payment field and its related fields are not available by default and can be added using Lite Editor. The Advance Payment field is called the "Deposit Payment Department Code" in Lite Editor.
Advance Payment creates separate transactions that are posted to accounts at separate stages. It is different than the current way CMiC handles deposits. The Advance Payment is an invoice that does not impact Job Costing.
When Advance Payment is posted:
DR Advance Payment Control account
CR AP Subcontractor Liability account (Accounts Payable)
When the Advance Payment check is posted:
DR AP Subcontractor Liability account (Accounts Payable)
CR Bank Cash account
When amortization of Advance Payment is posted:
DR Job Cost Expenses
CR AP Subcontractor Liability account (Accounts Payable)
CR Advance Payment Control account
CR Retainage Payable
When amortization of the Advance Payment check is posted:
DR AP Subcontractor Liability account (Accounts Payable)
CR Bank Cash account
PO Currency Fluctuation Gain/Loss
Enter an account to indicate where the currency fluctuation between the PO receipt and AP invoice will be posted. For further details on PO currency fluctuation gain/loss, please see Accounts Payable - Calculate and Post PO Currency Fluctuation Gain/Loss.
[Update Vendors] – Button
This button updates the corresponding account in vendor records to the AP Control File account.
[Update All Accounts on Vendors] – Button
This button updates all the accounts in vendor records to these AP Control File accounts.
Other – Tab

Pgm: APCTRLFM – AP Control File; standard Treeview path: Accounts Payable > Setup > Control File Options – Other tab
Default Invoice Registry Detail Distribution – Checkbox
If checked, in the Invoice Detail pop-up window in the Register Invoice Entry screen, the Distribution Type and the related Department/Account fields will default from the Vendor setup screen (as shown below).
If unchecked, then the distribution type and the related fields will be null.

Subcontract Controls
Is Subcontract Management Installed – Checkbox
Check this box if this company uses the Subcontract Management module.
Validate Subcontract Entry – Checkbox
Check this box to validate the module of a voucher against a subcontract during the voucher’s entry. With this option checked, a list of values will be available within the subcontract field of the Enter Vouchers screen in order to restrict the selection to valid subcontract for that vendor. Leave this box unchecked if this field is to be used for reference only, and no validation is required.
Validate Subcontract CostCode/Category Structure – Checkbox
If the user requires the ability to apply AP entered vouchers to subcontracts, but do not want the system to restrict the coding of the costs to only valid cost code/categories set-up on the contract, then leave this box unchecked. If checked, the system will restrict AP voucher distribution entry to valid subcontract task lines only.
Material Receipt
Automatic Numbering Of Material Receipt – Checkbox, Number Mask
If checked, the Receipt Number in AP Receivers Material Receipt will fill automatically with the number mask; otherwise, the receipt number must be entered manually.
The available pre-defined codes are:
|
b |
Business Partner Code (Customer) |
|
c |
Company Code |
|
y |
Year |
|
m |
Month |
|
d |
Day |
|
* |
Next Available Number |
NOTE: The predefined codes must be entered in lowercase, otherwise they will be assumed to be hard coded values. No spaces are permitted in masks.
Purchase Order Controls
Validate PO Entry – Checkbox
Check this option if you want to validate the module of a voucher to a Purchase Order during voucher entry. With this option checked, a list of values will be available within the purchase order field of the voucher entry screen in order to restrict the selection to a valid purchase order for that vendor. Leave this box unchecked if the purchase order field will be used for reference only, and no validation is required.
Automatically Close 0 Balance PO Lines – Checkbox
Check this option if the system should automatically close PO lines that have a zero balance. If this box is unchecked, the user will manually have to close the line. Leave this box unchecked if PO lines should be closed manually regardless of their balance.
Verify Invoice PO Amounts – Checkbox
Check this option if you want the system to check for a variance between the purchase order amounts and applied invoice amounts. This option is used in conjunction with the next three fields.
PO Line Variance Allowance
This field is enabled if the ‘Verify Invoice PO Amounts’ box is checked.
This field indicates the allowable variance between the PO receipt price and the AP Invoice price. For example, if a PO line was received at $100.00 and the AP invoice amount applied to the same line was $110.00, there would be a $10 dollar variance.
PO Line Variance Apply To Overages Only – Checkbox
When checked, only overages to the PO line variance allowance amount will display a message, under variances will be allowed. During PO receipt entry, any variance that is in excess of the allowed PO variance amount, system issues a warning and users have to adjust the amount within the variance limits.
Invoice Variance Allowance
This field is enabled if the ‘Verify Invoice PO Amounts’ box is checked.
This field indicates the allowable variance between the amount allocated to purchase orders and the invoice amount. For example, if the total dollars allocated to PO lines was $150.00 dollars and the invoice amount entered was for $200.00, there would be a $50 dollar variance.
Invoice Variance % Allowance
This field is enabled if the ‘Verify Invoice PO Amounts’ box is checked.
This field indicates the allowable % of variance between the amount allocated to Purchase Order lines and the invoice amount.
Raise Error when Variance Amount Is Exceeded – Checkbox
If checked, users will not be able to create a voucher where the variance exceeds any of the amounts entered in the previous three fields. There is a privilege code that can be assigned to roles or specific users that overrides this checkbox. Please refer to the System Data guide for more information.
Utilize Variance Privilege Code – Checkbox
There is a system privilege that restricts which users can access the PO Variance Window when matching a PO to a voucher. This checkbox determines if you want to use this privilege or just allow all users to be able to enter a variance. Leave this field unchecked if you want to automatically give every user access to the variance distribution entry. If checked, only those with the privilege to exceed the variance will have access to the Variance pop-up when matching a purchase order to a voucher.
Use PO Terms – Checkbox
This field determines from where the purchase terms are derived. This field only applies to vouchers that are related to purchase orders. If checked, the system will use the purchase terms as stated on the purchase order. If unchecked, the system will ignore the PO Terms and use the terms on the vendor.
Do Not Allow Closed PO To Be Assigned To The Voucher – Checkbox
This field is enabled if the Automatic Receipt functionality is enabled via the PO Control File (Normal Receiving setting set to Automatic on Posting tab), and its default state is unchecked.
When checked, the POs which were closed using the Close/Re-Open PO utility in the Purchase Order module will not be available in the LOVs in Voucher, Registry and PO Selection pop-ups. Also, manual entry will not be allowed.
Tax Code Controls
Default VAT Rate Code
Select the default VAT.
The available taxes are maintained via the Maintain Tax Code screen (standard Treeview path: System > Global Tables > Tax Code > Maintain Tax Code).
1099 Controls
Print Business Partner Legal Name on 1099s – Checkbox
If checked, business partner legal names will be printed on 1099s.