Overview
Pgm: PAYSEL – Select Payments; standard Treeview path: Accounts Payable > Payment > Select Payments
This screen is used to select a group of vouchers to pay on the next check run, by creating a payment selection code to which vouchers are associated. In many cases, this code is the initials of the person creating the selection.
NOTE: We recommend selecting either the 'EFT Payments' or the 'Non EFT Payments' radio button under one selection code. This way, you can create an EFT file for EFT invoices or print checks for non-EFT invoices.
The payment selection code is then used in the Prepare Checks screen to prepare the checks, and then in the Print Check screen to print them. Finally, it is used in the Post Check Run screen to post the payments. After posting the payments, the payment selection code is automatically deleted from the system so that it can be recreated and used again.
If payment selection codes have been defined for the selected company, but they have not yet been used to complete a check run (in other words, not yet deleted), this screen will initially display the first one defined. To navigate between a company’s current payment selection codes, use the [Previous] and [Next] buttons. To delete a payment selection code, click the [Delete] button.
Also, this screen allows the editing of a voucher’s Discount Taken, Payment Amount, and Next Status Ovrd fields, with the Payment Amount field allowing a partial payment amount to be specified.
Using Payment Selection Codes
The availability of payment selection codes in the various screens used for the payment process depends on what stage of the process they are being used.
After a payment selection code has been created in the Select Payments screen and at least one voucher has been associated with it, the code will be available in the Prepare Checks screen.
After the checks have been prepared in the Prepare Checks screen, the payment selection code will no longer be available in the Select Payments screen. It will only be available in the rest of the screens along the payment process.
Finally, after the payments have been posted, the payment selection code will be deleted from the system so that it can be recreated and used again.
Unprepare Checks
Once payments associated with a selection code have been prepared, the selection code will no longer be available in the Select Payments screen. To make the codes available in the Select Payments screen, the Unprepare Checks utility must be used.
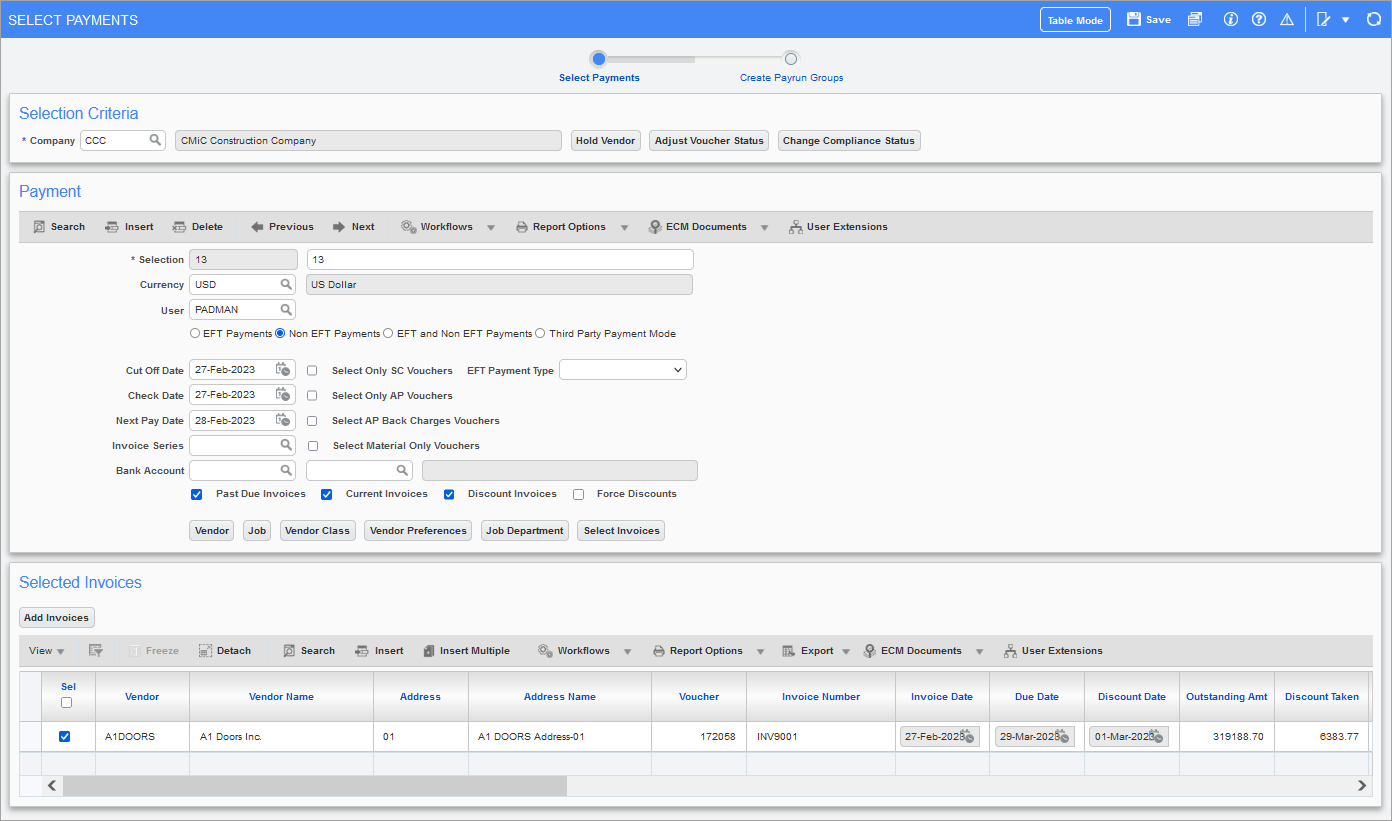
Selection Criteria
Company
Select the relevant company.
[Hold Vendor] – Button
This button launches the Hold Vendor screen. For details, refer to Accounts Payable - Hold Vendor.
[Adjust Voucher Status] – Button
This button launches the Adjust Voucher Status screen. For details, refer to Accounts Payable - Adjust Voucher Status.
[Change Compliance Status] – Button
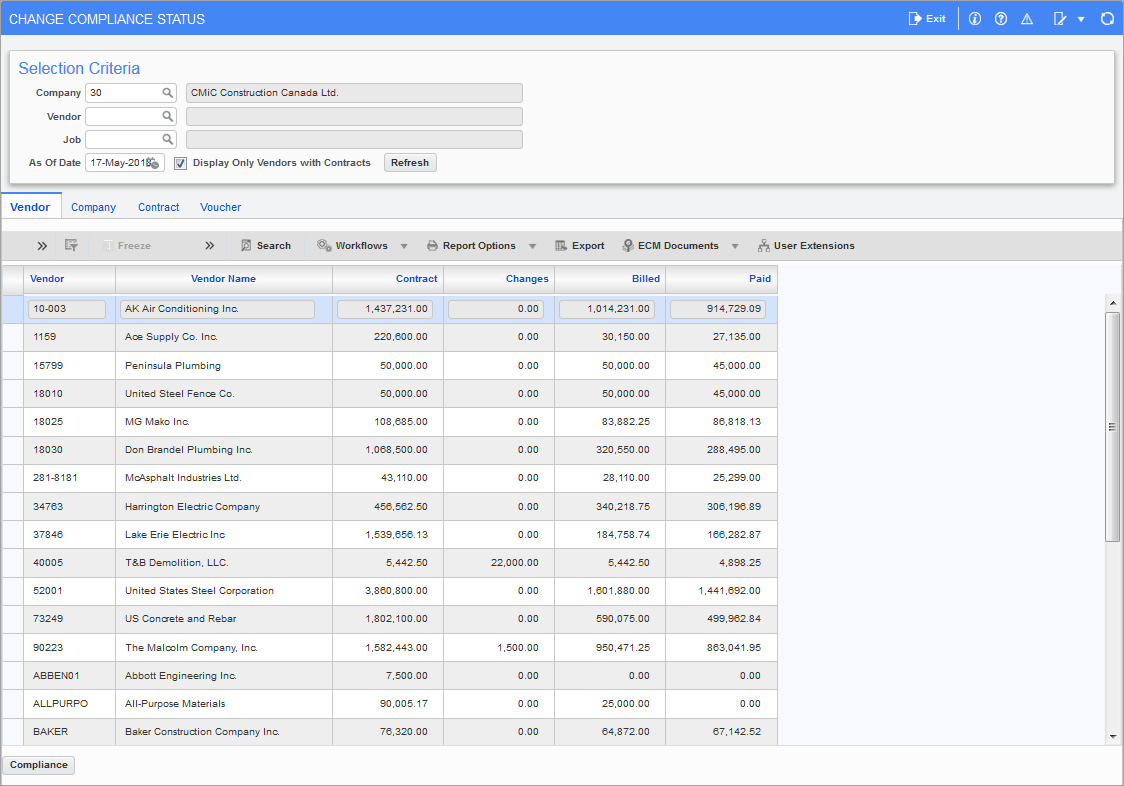
Pgm: SCTABCOM – Change Compliance Status; standard Treeview path: Accounts Payable > Payment > Select Payments – [Change Compliance Status] button
This screen is used to update default compliance code details and statuses for vendors at the system, company, and subcontract/PO Level. These updates can then be propagated down to the corresponding vouchers, en masse, via the popup’s [Apply Changes] button.
On the Voucher tab, the [Compliance] button’s pop-up can be used to update compliance details for individual vouchers.
For details about this screen, please refer to Change Compliance Status (System to Voucher Level).
Payment
This section is used to create a one-time payment selection code, and to specify a criteria to select vouchers to be associated with the payment selection code. Once the selection criteria is specified, the Select Invoices button is used to list the matching vouchers in the Select Invoices section, which will automatically have their 'Sel' box checked to associate them to the payment selection code.
NOTE: When a selection code is created and workflow approval is started for this code by clicking on the [Workflow] button on the Block Toolbar of the Payment section, the Select Payments screen will disable all fields and buttons to stop any changes being made.
If the 'User in Payment Selection is the one who posted the Voucher' box is checked on the Check tab of the AP Control File, only the vouchers that were posted by the user will be available.
The payment selection code is then used in the Prepare Checks screen to specify the vouchers to be paid. After the posting the check run, the payment selection code is automatically deleted.
Recall, if payment selection codes have been defined for the selected company, but they have not yet been used to complete a check run, this screen will initially display the first one defined. To navigate between them, use the [Previous] and [Next] buttons. Also, to delete a payment selection code, click the [Delete] button.
NOTE: If the [Select Invoices] button is used and the results are unexpected, verify the values entered in all of the fields in this section, and in the pop-ups launched by this section’s buttons.
Selection, Description
Enter a code for the payment selection being defined. All payment selection information defined on this screen will be associated with this code. The code must be unique within the company. In most cases, the payment selection code is the initials of the person creating the selection. By using this as a code, it makes sure that there are not uncompleted payment selections still outstanding.
If this selection code includes vouchers with posting dates after the payment date, and these vouchers are excluded from the payment selection, an alert displays the number of remaining vouchers.
The field to the right of the Selection field is used to enter a description for the payment selection code.
Currency
Enter/select the currency code for the payment selection. The system will default the company’s home currency as defined on the Company File. Only vouchers with the specified currency will be selected and associated with the payment selection code.
User
If a user is selected from the LOV, only vouchers created (as opposed to posted) by the specified user will be selected.
If the ‘Warn If User Is Null In Payment Selection Entry’ box is checked on the Check tab of the AP Control File, a soft warning message appears to notify the user of this violation.
EFT Payments – Radio Button
If this option is selected, only vouchers with the ‘EFT Flag’ box checked will be available for payment selection.
Non EFT Payments – Radio Button
This is the default option. If this option is selected, only vouchers with the ‘EFT Flag’ box unchecked will be available for payment selection.
EFT and Non EFT Payments – Radio Button
If this option is selected, both EFT and non-EFT vouchers will be available for payment selection.
NOTE: To assist with the payment selection process, the radio buttons above have been provided to help filter invoices based on EFT status. When the 'EFT and Non EFT Payments' radio button is selected, both types of invoices will be available to choose from. However, it's important to note that if you choose this option, you should only print paper checks and not generate an EFT file. If the 'EFT and Non EFT Payments' radio button is selected and EFT invoices are processed, the 'EFT Flag' will be unchecked on the invoices, causing issues with the EFT payment process. To avoid triggering any issues, we recommend selecting either the 'EFT Payments' or the 'Non EFT Payments' radio button under one selection code. This way, you can create an EFT file for EFT invoices or print checks for non-EFT invoices.
Third Party Payment Mode Option – Radio Button
If this option is selected, a third party payment mode drop-down box appears to select a third-party payment mode. Only vouchers to be paid via the selected mode will be selected.
Cut Off Date
Enter the cut‑off date for the vouchers to be selected for payment. For each voucher, the due date of the voucher is compared to this cut‑off date. If the due date of a voucher is on or before this cut‑off date, it will be selected. If the due date of the voucher is after this cut‑off date, it will not be selected.
NOTE: The ‘Use Invoice Date As Cutoff Date For Payment Selection’ checkbox on the Check tab of the AP Control File changes the logic behind this field.
Check Date
Enter the payment date for the checks that will be prepared. This date is also used to help determine whether a voucher selected for payment is “past due” or “current due”. If the system is set to not allow pre-dated checks, then this field will default to the system date which may be modified, but only to dates in the future. If the payment date entered is prior to the voucher date of any of the selected vouchers, a message will be displayed reading “There are selected Vouchers with post date after check print date, press continue to save, cancel to delete.” Pressing [Continue] will save the payment selection with vouchers, whereas [Cancel] will delete the vouchers selected, but will keep the selection code and selection criteria in the table, allowing the users to go back and make corrections and then select the payments.
NOTE: A voucher selected for payment is considered "current due" if the voucher due date is on or after the cut-off date and on or before the payment date. A voucher selected for payment is considered "past due" if the voucher due date is before or on the cut-off date.
Next Pay Date
Enter the payment date to follow the one entered in the previous field. This date is used in the calculation of discounts. Discounts are considered ‘taken’ when the discount date is on or after the check date (entered in the previous field) and before the next pay date (entered here).
If the discount date of the voucher falls outside of this range, or the discount has not been taken, the amount of the discount will appear in the Discount Lost column on cash requirement reports. Normally, the system will take any allowable discounts automatically for you. Discounts that have been taken will appear in the Discount Taken column on reports. You can use the Partial Payment Entry form to turn off a discount set to be taken or turn on a discount which has been lost.
Select Only SC Vouchers – Checkbox
This selection criterion allows the users to select vouchers that are associated with a subcontract. Vouchers created from SC payment request entry, AP Voucher Entry for a subcontract and those registered pay requests entered via imaging module are considered ‘SC Vouchers’. Field security can be applied to this checkbox, if required.
EFT Payment Type
By default this field is hidden and can be added via the Lite Editor if needed. All active payment types in the Payment Types screen are available in the EFT Payment Type drop-down list. The payment type selected in the Maintain Vendors screen is defaulted to the Image Manager, Registered Invoice, and Enter Voucher screens. Please see Accounts Payable - AP Payment Types for further details.
Select Only AP Vouchers – Checkbox
This selection criterion allows the users to select Vouchers that were created via AP Voucher Entry or Registered Voucher Entry screens without any reference to subcontracts.
Select AP Back Charges Vouchers – Checkbox
This selection criterion allows the users to select vouchers entered through custom flysheets from the Imaging module and pushed through to the AP Voucher system. This is still under development.
Select Material Only Vouchers – Checkbox
This selection criterion is used to select vouchers that were created via the Enter External Invoices screen of the Material Sales module (standard Treeview path: Material Sales > Material Invoice > Enter External Invoice).
Bank Account (Department, Account)
If the payment (check) run is only for vouchers that have a specific bank account, select the department via the first field and the account via the adjacent field.
Invoice Series
If the payment (check) run is only for vouchers with a specific invoice series code, select the required series code in this field.
Past Due Invoices – Checkbox
This option is used in conjunction with the ‘Current Invoices’ and ‘Discount Invoices’ boxes to determine which vouchers get selected for payment.
Check this box to select all vouchers whose due date is on or before the cutoff date for payment. Do not check this field if vouchers with due date on or before the cutoff date should not be selected for payment.
Current Invoices – Checkbox
Check this box to select all vouchers whose due dates are after the cutoff date, but on or before the payment date (as specified in this section).
Discount Invoices – Checkbox
This checkbox is relevant to paying vouchers with term discounts. Check this box to select vouchers with discounts that have check dates less than or equal to the discount date, and that have the discount date less than the next pay date.
Force Discounts – Checkbox
If you want the system to take the discounts on the selected vouchers, even if the discount date has expired, check this box. Otherwise, expired discounts will be ignored.
[Vendor] – Button
This button’s pop-up is used to filter vouchers based on the vendors associated with them. Only vouchers for vendors listed in this pop-up will be selected for payment. If this pop-up’s list is empty, vouchers will not be filtered by vendors.
[Job] – Button
This button’s pop-up is used to filter vouchers based on the job code associated with them. Only vouchers associated with job codes listed in this pop-up will be selected for payment. If this pop-up’s list is empty, Vouchers will not be filtered by jobs.
[Vendor Class] – Button
This button’s pop-up is used to filter vouchers based on the vendor class of their associated vendors. Only vouchers for vendors belong to the classes listed will be selected. If this list is empty, then vouchers will not be filtered by vendor classes.
NOTE: The vendor class filter can’t be used in conjunction with the job or vendor filters.
[Vendor Preference] – Button
This button’s pop-up is used to filter vouchers based on the vendor preference codes of their associated vendors. Only vouchers for vendors that have vendor preference codes listed here will be included in this payment selection. If this list is left blank, vouchers will not be filtered by vendor preference codes.
NOTE: This field can work in conjunction with the vendor class filter, but not the job or vendor filters.
[Job Department] – Button
This button’s pop-up is used to select vouchers with a job distribution, based on the job department. Using the pop-up, job departments are entered. Only vouchers with a job distribution that have the job’s default department being a job department listed via the pop-up will be selected.
[Select Invoices] – Button
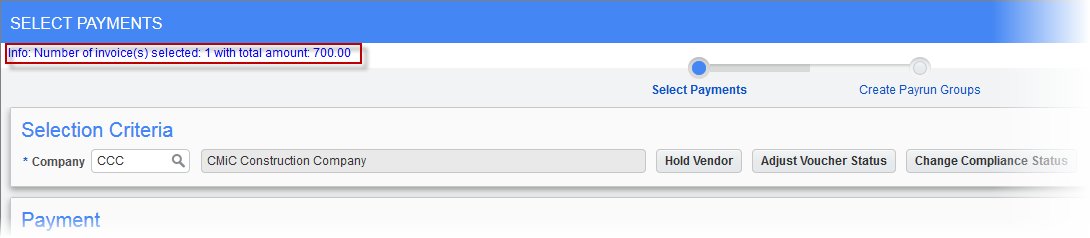
Once the criteria have been entered, use this button to start the voucher selection process. After the process finishes, a message will appear on the top-left corner of the screen indicating the number of vouchers selected, and the total dollar value of the selection.
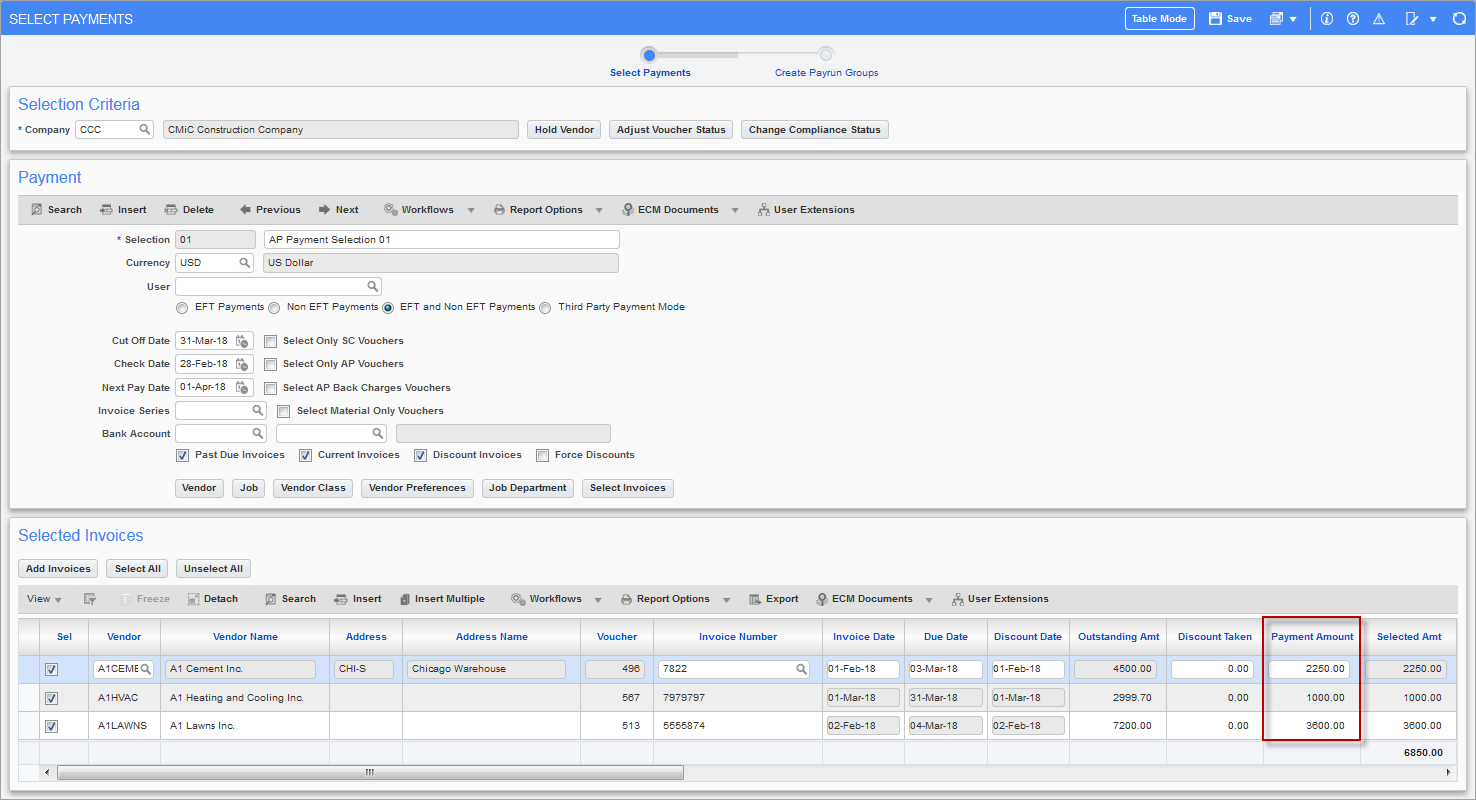
Selected Invoices
Once the selection criteria is specified, the Select Invoices button is used to list the matching posted vouchers in this section, which will automatically have their ‘Sel’ box checked to associate them with the payment selection code.
This section can be used to edit a Voucher’s Discount Taken, Payment Amount, and Next Status Ovrd fields, with the Payment Amount field allowing a partial payment amount to be specified.
[Add Invoices] – Button

Pgm: PAYSEL - Select Payments; standard Treeview path: Accounts Payable > Payment > Select Payments - [Add Invoices] Button
This button’s pop-up lists unpaid vouchers in the system for the selected company. Any of the listed vouchers can be selected and brought into this section.
Users can pick and choose which invoices they would like to pay or they can use the 'Select' checkbox option in the column header (as shown in the screenshot above) to select all of the unpaid invoices in one shot to have them added to the payment selection code for the group of vouchers to pay on the next check run.
Sel – Checkbox
Check to associate voucher to payment selection code. The checkbox on the header row of the table will select/deselect all 'Sel' boxes in the table.
Vendor
Vendor that this voucher is for.
Invoice Number
This is the voucher’s identifying invoice number, which is not the same as the voucher number. Voucher numbers are automatically generated by the system and they are used in the backend - they are not used to identify vouchers in the various AP screens.
Discount Taken
This field can be used to modify the discount amount for the voucher.
Discounts are taken when the discount date is on or after the check date, and before the next pay date. If the discount date falls outside of this range, or it has not been taken, the amount of the discount will appear in the Discount Lost column on cash requirement reports. Discounts that have been taken will appear in the Discount Taken column on reports.
Payment Amount
This field can be used to modify the payment amount for the voucher, and if necessary, it can be used to enter a partial payment against the outstanding amount.
Next Status Ovrd
This field can be used to override the voucher’s next default payment status.
NOTE: The Chq Payee Name field is disabled by default and can be enabled using Lite Editor but this not recommended. To enter a custom check payee, create a joint payee or a one-time vendor invoice in the Enter Vouchers screen (standard Treeview path: Accounts Payable > Voucher > Enter Voucher). For more information, please refer to Enter Vouchers - Joint Payee – Tab or One-Time Vendor Invoices.
Partial Payments
Pgm: PAYSEL – Select Payments; standard Treeview path: Accounts Payable > Payment > Select Payments
The Select Payments screen can be used to edit the amount to be paid for a voucher via the Payment Amount field, which can be a partial payment against the outstanding amount.