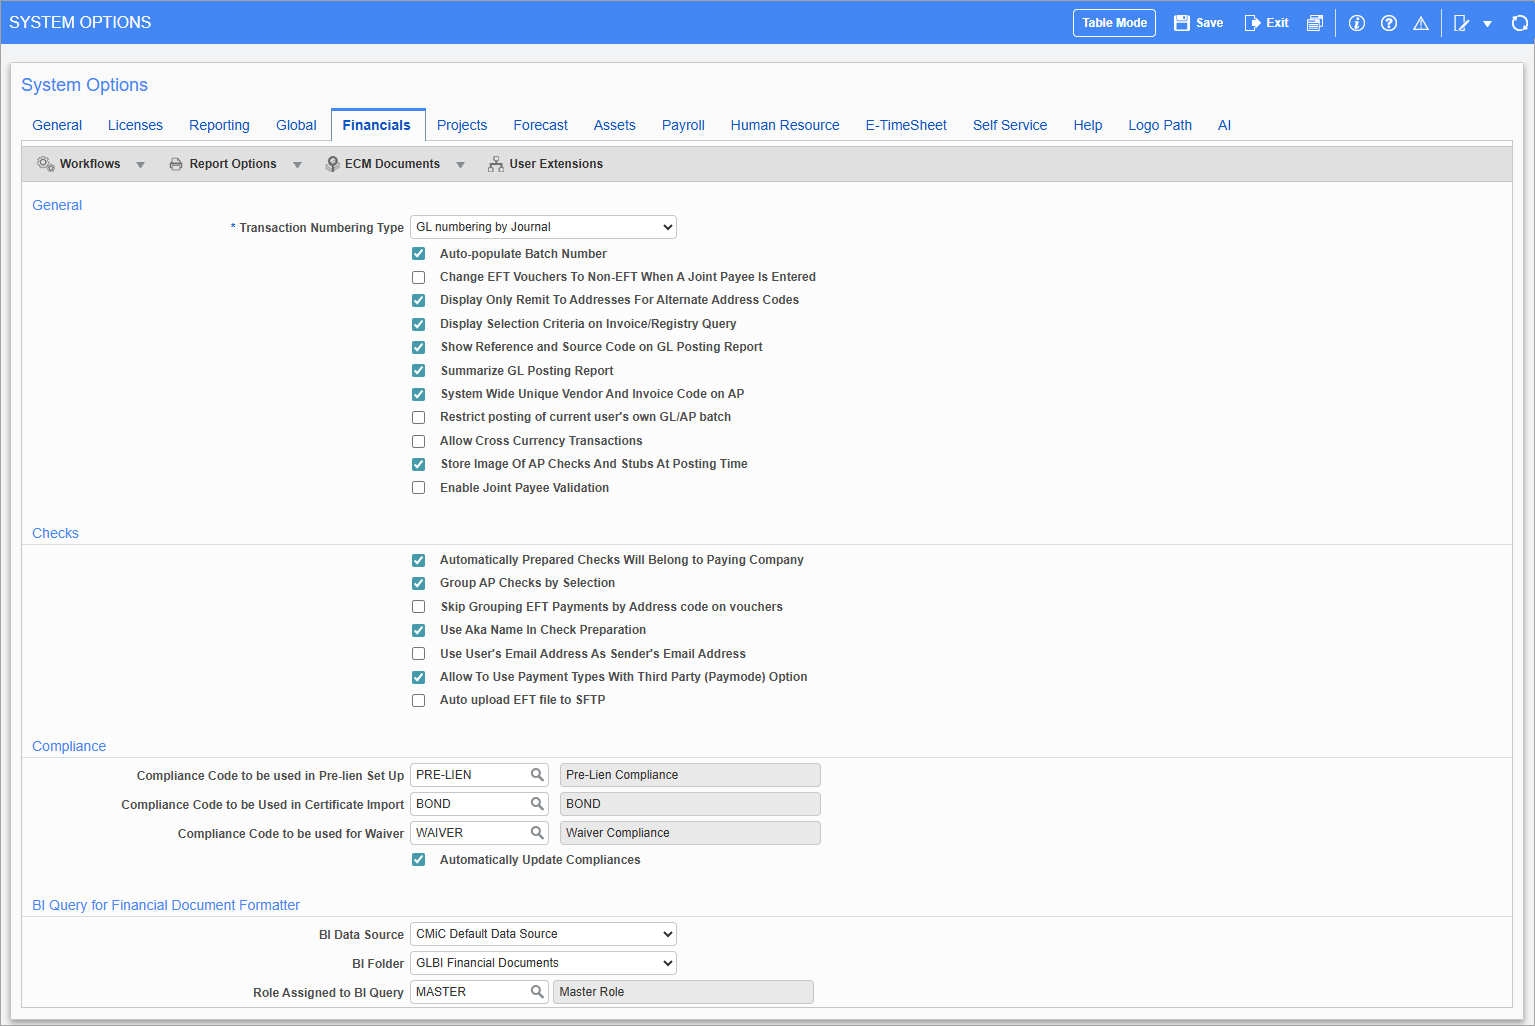
Pgm: SYSOPT – System Options; standard Treeview path: System > Setup > System Options – Financials tab
General
Transaction Numbering Type
Select the transaction numbering method to be used throughout the system. The transaction number is not a field that is referred to very often. Once a transaction is posted, this selection can’t be changed.
The system provides for the following options: GL Numbering by Journal, GL Numbering by Batch, GL Numbering across the System, and GL Numbering by Period. The default is GL Numbering by Journal, as this is the most commonly used option.
Auto-populate Batch Number – Checkbox
The default state of this checkbox is checked. This is a system level option, hence it is applicable to all companies.
If checked, in any screen with a Batch Number field and the ability to create new batches, the screen will load an unposted batch with the highest batch number created by the current user. If no unposted batches are found, the screen will load with a newly created batch, with an automatically generated batch number and batch name.
If unchecked, the Batch Number field will be left blank in any screen with a Batch Number field and the ability to create new batches.
Change EFT Vouchers to Non-EFT When A Joint Payee Is Entered – Checkbox
When checked, if users enter joint payee information against EFT vouchers, the voucher entry and adjust voucher status screens will update the EFT checkbox value as “N” (unchecked).
Display Only Remit To Addresses For Alternate Address Codes – Checkbox
Only display alternate addresses that are marked as ‘Remit To’.
When this checkbox is checked, the AP Voucher Entry, AP Recurring Entry, AP Invoice Registry, and Enter Subcontract/Change Order will validate the LOV for Alternate Addresses and display only the alternate addresses that are marked as "Remit To" on the Address tab of the Business Partner’s Maintenance screen.
Display Selection Criteria on Invoice/Registry Query – Checkbox
If checked, Department, Vendor and Job fields are displayed in the search criteria on the Registry/Invoice Query screen (standard Treeview path: Accounts Payable > Query > Registry/Invoice Query) and validated when the [Query Data] button is pressed. At least one of these fields must be entered to perform a query; otherwise, the system will issue an alert message.
When unchecked, Job and Department fields are removed from the search criteria and the Vendor field is no longer a required field.
Show Reference and Source Code in GL Posting Report – Checkbox
This ‘Show Reference and Source Code in GL Posting Report’ checkbox becomes visible to users only when the ‘Summarize GL Posting Report’ checkbox is checked on this tab.
When GL transactions are created from other modules, especially Job Billing, the report may contain many pages of detail lines. When users choose the option to summarize the GL transactions, they have an option either to print the reference and source codes or not. When the ‘Summarize GL Posting Report’ box is unchecked, then this checkbox will not be visible to the users and the report will print all the GL transaction details with reference and source codes for each line, if any.
Summarize GL Posting Report – Checkbox
If this field is checked, when posting from modules other than the General Ledger module, the GL Posting Report produced will summarize the GL transactions posted in the batch by department and account rather than list them all out.
If ‘Summarize GL Posting Report’ is checked, the ‘Show Reference and Source Code in GL Posting Report’ checkbox on this tab becomes visible.
System Wide Unique Vendor and Invoice Code on AP – Checkbox
This functionality controls whether unique invoice numbers are used across different companies using the same vendor. The flag is checked by default. If checked, an error message will be issued if the same invoice number is used in a different company for the same vendor, preventing the duplication of invoice numbers. If unchecked, the system will allow duplication of invoice numbers across different companies using the same vendor.
Allow to Close Work Items – Checkbox
This functionality allows a user to close a work item directly on the Close Work Items screen in the Preventative Maintenance module instead of using the [Close Detail] button (standard Treeview path: Preventative Maintenance > Close Out > Close Work Items).
If checked, when the work item type selected from the drop-down menu on the Close Work Items screen is “Equipment”, the [Close Detail] button will be disabled and the Meter Reading, Date Serviced and Close Work Item fields will become visible to enable closure of the work item.
For further details, please refer to the Preventative Maintenance reference guide.
Restrict Posting of Current User’s Own GL/AP Batch – Checkbox
This functionality is used to control transaction batch postings in the Accounts Payable and General Ledger modules by implementing segregation of duties to restrict users who create AP/GL transaction batches from posting their own batches, reducing the risk of unauthorized transactions. By default, this option is unchecked.
When checked, the following conditions will apply:
- In Transaction Entry Screens: Users will be able to edit their own batches but will be unable to view or edit the batches created by other users.
- In Print Edit List Screen: All the users’ batches will be visible in Print Edit List for all the users.
- In Posting Screens: Users will be able to post the batches created by other users but will be unable to post their own.
- Users will be able to print AP manual checks of other users but will be unable to print their own.
Only users with the following system privileges assigned will be able to view/edit transactions of other users, as well as post their own batches and the batches of other users in the AP and GL, respectively.
- APPOSTCUR – Allows current user to post their own AP batches
- GLPOSTCUR – Allows current user to post their own GL batches
This functionality applies to the following programs:
- GL – Enter Transactions (TRANENT)
- GL – Post Transactions (GLPOST)
- GL – Create Recurring Transactions (RECURPST)
- AP – Prepare Vouchers (APRGPUSH)
- AP – Enter Vouchers (VOUCHENT)
- AP – Enter Debit/Credit Memos (VMEMOENT)
- AP – Adjust Voucher (VOUADJ)
- AP – Process Recurring Entries (RECVCRE)
- AP – Post Batch (APPST)
- AP – Enter Manual Checks (APCHQMAN)
NOTE: When this system option is checked, the following system privileges will be ignored:
APPB – Allows the user access to AP batches belonging to other users
GLPB – Allows the user access to GL batches belonging to other users
GLRECENT – Allows the user access to GL recurring entries belonging to other users
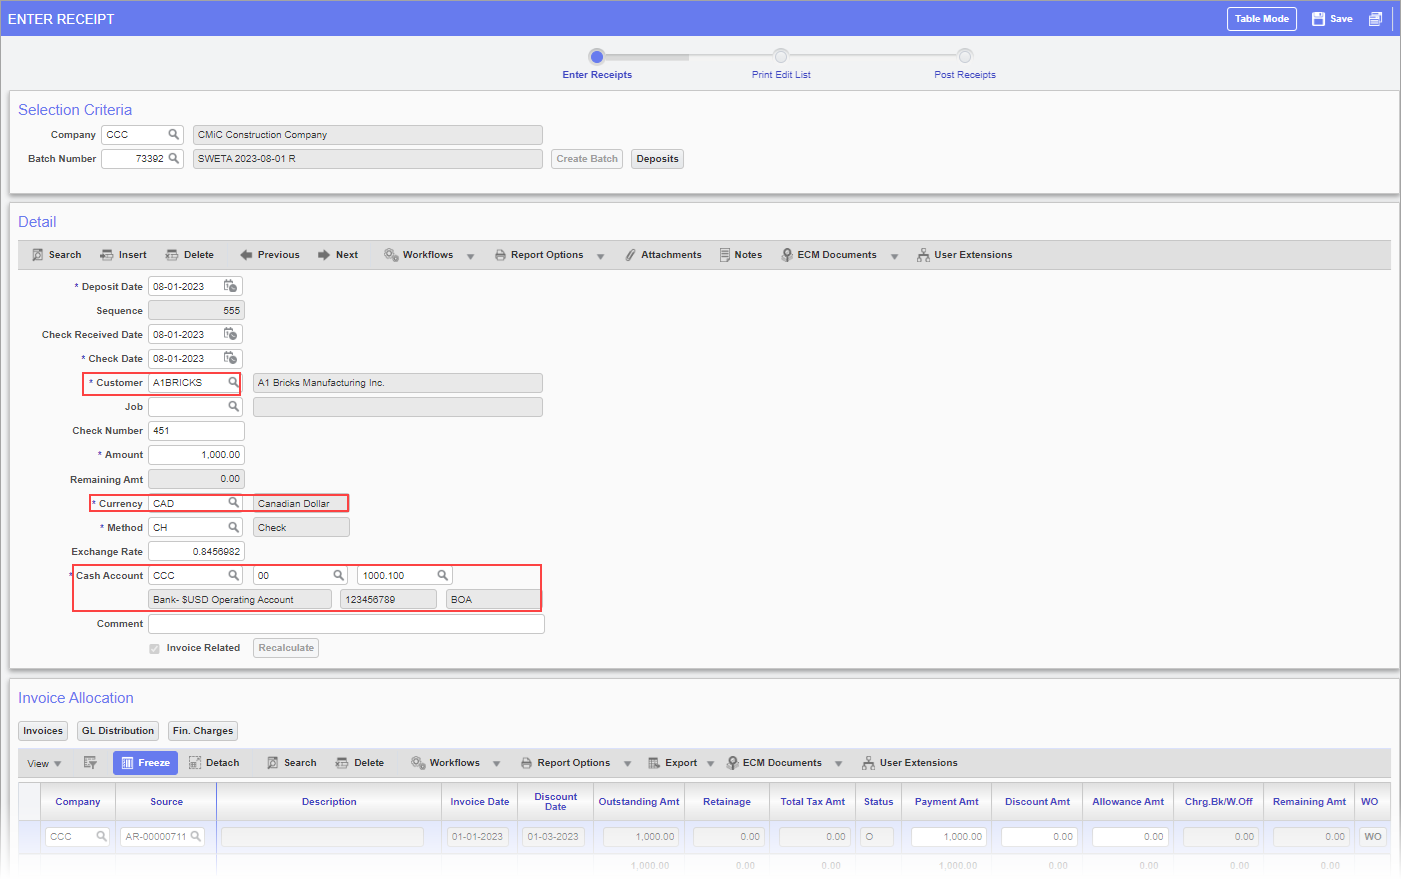
Allow Cross Currency Transactions – Checkbox
By default, this box is unchecked and hidden. Users can add this checkbox through the Lite Editor if needed. When this box is checked:
-
Cross currency transactions are allowed in Accounts Payable and Accounts Receivable.
-
In the Accounting tab of the Maintain Vendors screen, users can set the Cash Account field to an account using a different currency than the currency selected in the Currency field. For example, users are allowed to use a USD cash account if the Currency field is set to CAD.
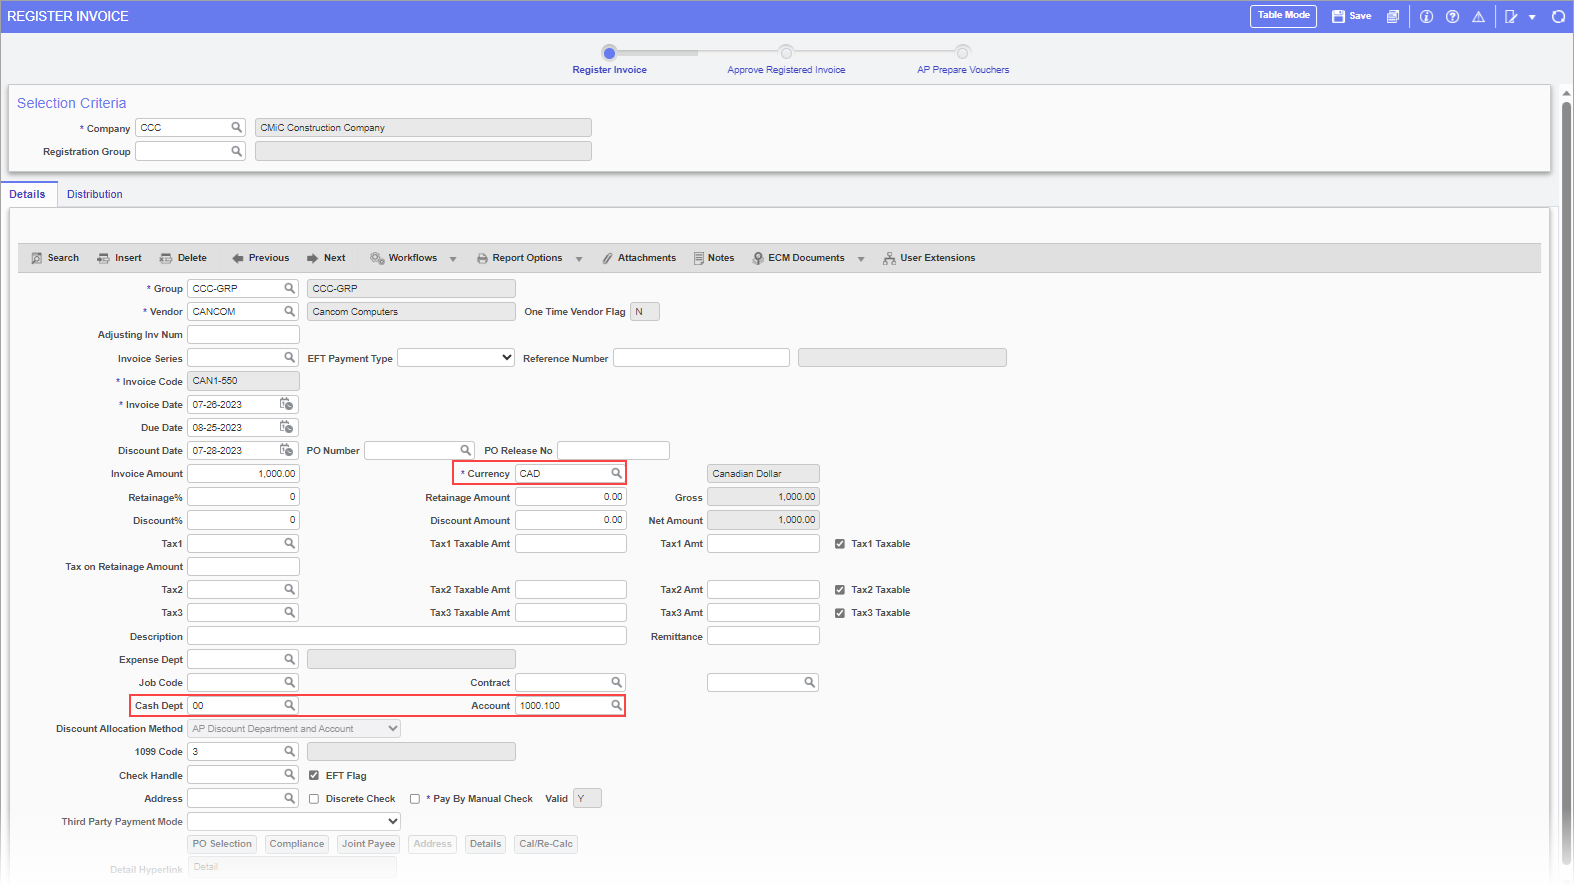
-
In the Register Invoices and Enter Voucher screens, an invoice with a currency that is different from the Cash Account currency is allowed.
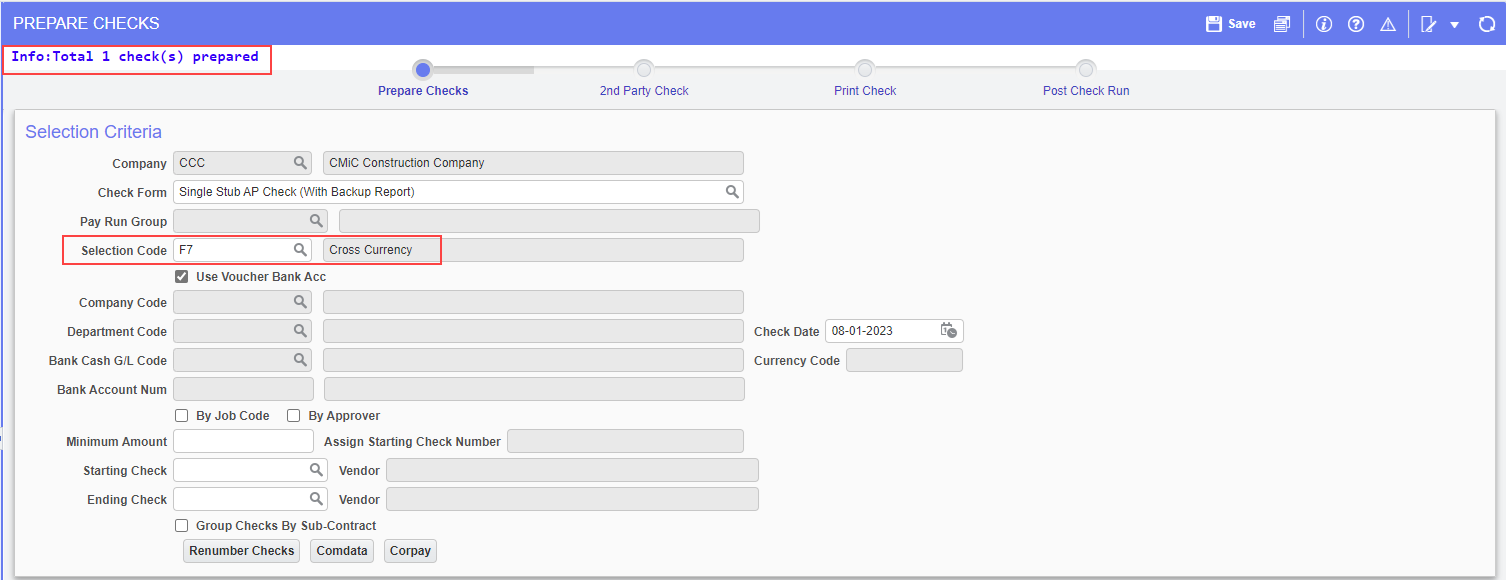
-
In the Prepare Checks screen, users are allowed to prepare and post checks in a different cash account currency than the voucher currency. For example, if the Currency field is set to CAD and the Cash Account field is set to a USD account, the user is still able to prepare and post checks for the same selection code.

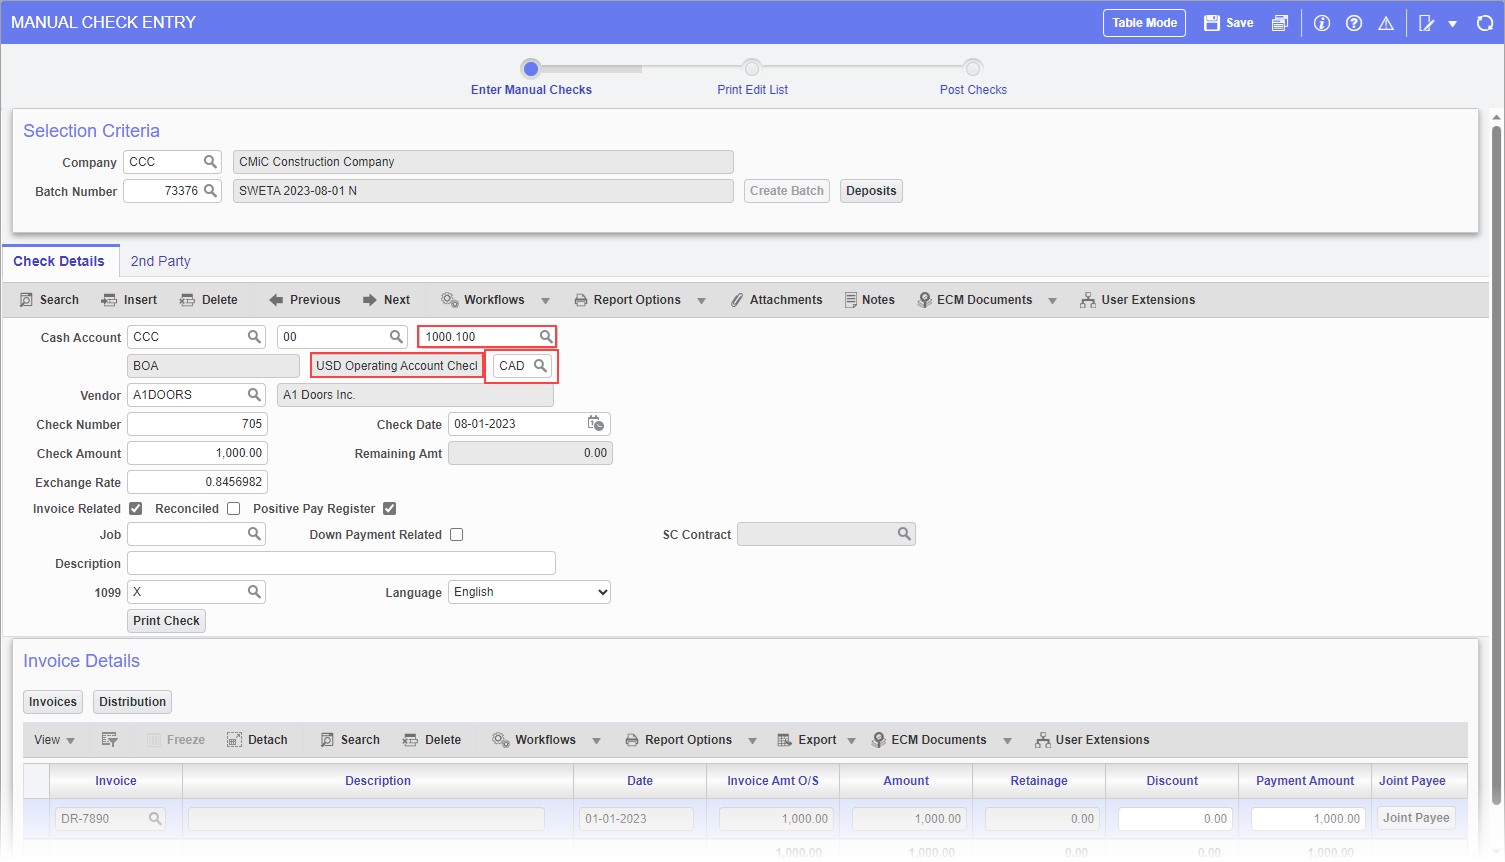
-
In the Enter Manual Checks screen, the Currency field is enabled to change the currency for the checks. The currency for the check can be different from the Cash Account currency.
-
In the Maintain Customers screen, users can set a currency for the customer that is different from the Cash Account currency.
-
In the Enter Receipt screen, the currency for the receipt can be different from the Cash Account currency. The Exchange Rate field can also be modified as required.
NOTE: The Pay Run Group functionality does not support cross currency transactions currently.
Store Image Of AP Checks And Stubs At Posting Time – Checkbox
This field is hidden by default and can be added via the Lite Editor if needed. Check this box to allow the storage of Accounts Payable checks into the Imaging module. See Imaging - Automating Storage of AP Checks to Imaging for more details.
Enable Joint Payee Validation – Checkbox
This field is hidden by default and can be added via the Lite Editor if needed. Check this box to validate the joint payee against the Business Partner LOV
If checked, the user must enter/select a valid name from the Business Partner LOV when entering joint payee information to avoid validation errors. If unchecked, the user can enter/select a name from the Business Partner LOV or enter a free-form value that will not be validated when entering joint payee information.
For details on the Joint Check Processing functionality in Image Manager, see Imaging - Joint Check Processing.
Checks
Automatically Prepared Checks Will Belong to Paying Company – Checkbox
This field is for custom handling of multiple company selections in a pay run selection processing of checks using the combine options.
Group AP Cheques by Selection – Checkbox
If checked, AP cheques will be grouped by payment selection codes when using payrun groups for AP’s check printing functionality. The default value is unchecked.
Skip Grouping EFT Payments by Address Code on Vouchers – Checkbox
If checked, prevents grouping EFT payments by vendor addresses on vouchers so that when multiple invoices are selected to be paid under the same vendor, separate checks will not be issued for each invoice that uses a different address code. Instead, for EFT payments, all invoices selected under the same vendor will be paid together under one check, even though alternate addresses may exist on the invoices.
The default value is unchecked. If unchecked, when making EFT payments, separate checks will be issued for the same vendor if different address codes exist on the selected invoices.
NOTE: If address codes are not populated for EFT vendors, the payments will not be separated and only one check will be issued.
Use AKA Name in Check Preparation – Checkbox
When this field is checked, the name entered in the Also Known As field (or AKA) on the Business Partner Maintenance screen will print on the check. If the AKA name is null on the business partner’s record, the business partner name will print on the check. An update to the AKA name or business partner name will not be allowed if there is an unposted check. If this is not checked, the system will use the business partner name on the check.
Use User’s Email Address As Sender’s Email Address – Checkbox
When making EFT payments using the Print Check screen in the Accounts Payable module, if the ‘EFT/TPPM Distribution’ box is checked on the Print Check screen, and the “E-mail” option is selected for a vendor via their Vendor record’s EFT/TPPM Distribution field on the Accounting tab, an email to notify the vendor of the EFT payment will be sent. The email address entered in the Default ACH Email field on the Check tab of the AP Control File will be the sender’s email address for the sent ACH email notification.
If the ‘Use User’s Email Address As Sender’s Email Address’ box is checked on the Financials tab of the System Options screen, then the email address of the user that processed the checks will be used as the sender’s email address for the sent ACH email notification. The user’s email address is defined in the Email field on the User Maintenance screen (standard Treeview path: System > Security > Users > User Maintenance – General tab).
Auto Upload EFT/TTP File to SFTP – Checkbox
When this box is checked, the [Auto Upload EFT/TTP File to SFTP] button will be enabled on the Print Check screen in the Accounts Payable module to allow users to automatically upload EFT files through SFTP to an external server (e.g., client server). This field is hidden by default and can be added with the Lite Editor.
Compliance
Compliance Code to be used in Pre-Lien Setup
This is applicable if the pre-lien functionality in Accounts Payable is being used.
Compliance Code to be Used in Certificate Import
Enter the compliance code to be used in Insurance Certificate Import utility of the Subcontract Management module (standard Treeview path: Subcontract Management > Utilities > Insurance Certificate Import).
The Insurance Certificate Import utility is used for importing insurance certificate statuses and expiry dates, and updating them for a particular compliance code, the value of which is set in this field.
Compliance Code to be used for Waiver
This is the compliance code which is to be used for PayMode Waiver in the Subcontract Management module. This compliance code will be used to update the subcontract compliance file during the AP Check posting for the PayMode process.
Automatically Update Compliances – Checkbox
If checked, a backend utility will run nightly to check all posted vouchers in the Accounts Payable module with date-sensitive compliance codes to update their date compliance states, and if necessary, their payment status states accordingly.
Also, to enable this nightly utility, the ‘SC Daily Compliance update’ checkbox (shown in the screenshot below) must be checked in the Job Queues pop-up launched by clicking the [Job Queues] button on the General tab of this screen:
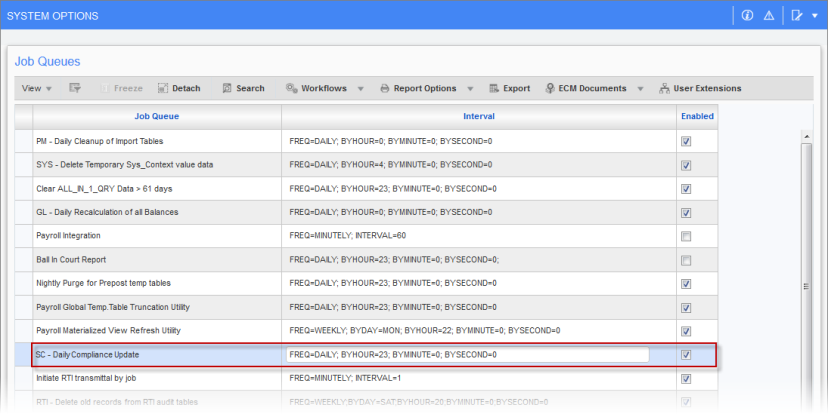
Pop-up window launched by the [Job Queues] button on the General tab of the System Options screen; standard Treeview path: System > Setup > System Options – General tab – [Job Queues] button
A voucher with a date-sensitive compliance code is date compliant if its invoice date or the system date, depending on the date selected via the Update Date Sensitive Compliance field on the Voucher tab of the AP Control File (standard Treeview path: Accounts Payable > Setup > Local Tables > Control File Options), is within the date-sensitive code’s start date and end date (coverage start & end dates).
BI Query for Financial Document Formatter
These fields are relevant to users who are creating BI queries in FDF 2.0 in the General Ledger module using the [Update Analytics] button.
BI Data Source
Enter/select a data source. For example "CMiC Default Data Source".
BI Folder
Enter/select a folder. For example "GLBI Financial Documents".
Role Assigned to BI Query
Enter/select a security role. The selected security role must be assigned when using the [Update Analytics] button in FDF 2.0.