Pgm: SYSOPT – System Options; standard Treeview path: System > Setup > System Options – Global tab
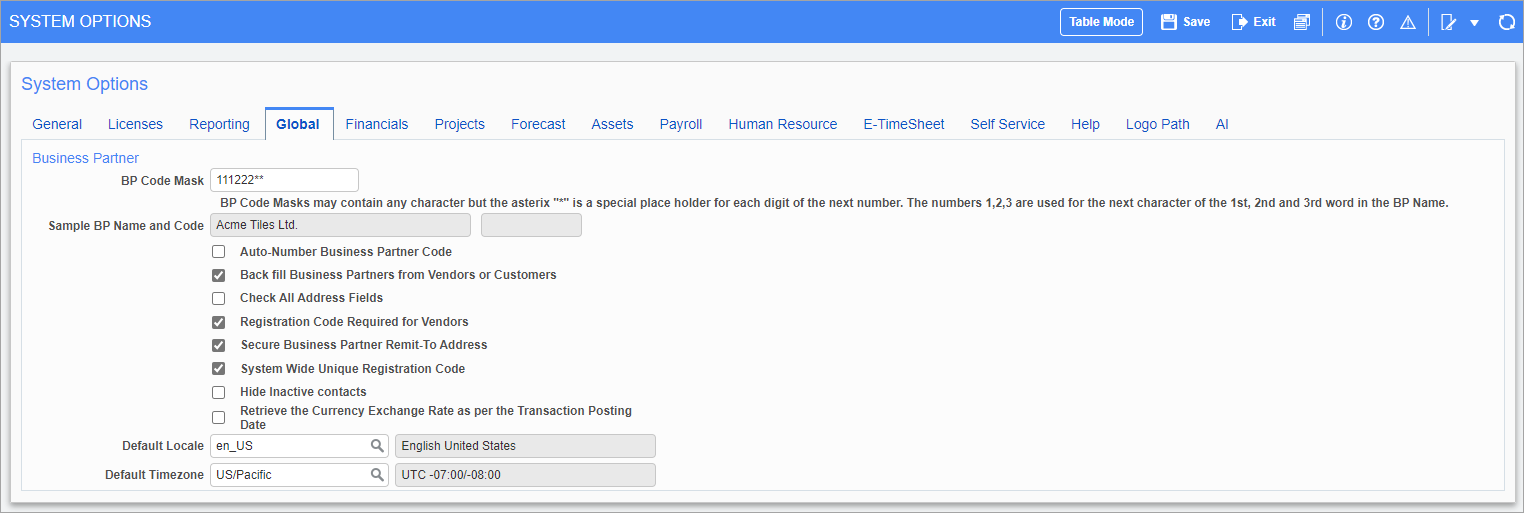
Business Partner
BP Code Mask (Business Partner Code Mask)
This field is only required if 'Auto-Number Business Partner Code' is checked on this screen. Enter the business partner mask required for the automatic numbering of business partners. The business partner mask is an 8-character, user-defined numbering system.
The business partner mask allows for the customization of the numbering system using specific placeholder variables within each of the 8 characters of the string. Any combination of numbers, letters and characters (except a space) can be used to create a business partner numbering string.
There are variables available. An asterisk “*” represents a number, and the number “1” represents a letter from the business partner name. The system will begin the numbering process from right to left based on the number of asterisk characters found within the mask. Asterisk characters found to the left of the total number will pre-fill with the number 0. For example, if the business partner code mask is BP******, and the business partner being entered is the eighth, then the system will begin the numbering at the right most asterisk and fill the number 0 into all asterisk characters found to the left. In this case, the business partner number created under this mask would be BP000008.
|
Mask |
Explanation |
Sample |
|---|---|---|
|
BP****** |
BP represents a business partner prefix |
BP012345 |
|
******** |
******** represents an 8-character numeric string |
12345678 |
|
1111**** |
1111 represents the first 4 letters in the first word of the business partner name **** represents a 4-digit numeric suffix |
ACME0001 |
NOTE: Masks may not contain spaces between characters.
Sample BP Name and Code (Sample Display Only)
This field is not enterable. It should be used to verify the entry in the BP Code Mask field. A sample business partner is used to generate the BP using the mask provided within the previous fields.
Auto-Number Business Partner Code - Checkbox
Check this box if the system is to automatically generate a business partners code. If this is checked, the business partner mask will be required.
Back fill Business Partners from Vendors or Customers - Checkbox
If checked, vendors and customers can be created directly, bypassing the creation of business partners. The Business Partner record will be “back filled” by the system. When all vendors or customers that are related to a business partner are deleted, the business partner will also be deleted.
NOTE: If the 'Back fill Business Partners from Vendors or Customers' box is checked, the Vendor Code and Vendor Name fields will be hidden in Table mode on the Maintain Vendors screen (standard Treeview path: Accounts Payable > Setup > Maintain Vendors). The workaround to view this information on the Maintain Vendors screen is to use the Lite Editor to add the following fields to the Table mode: BpvenBpCodeBf (Business Partner) and BPvenBpNameBf (Name). These fields will remain intact even when the 'Back fill Business Partners from Vendors or Customers' box is checked.
Check All Address Fields - Checkbox
If checked, the default value for all checkbox fields on the Update Address window will be checked. If this is not checked, the Update Order Address and Shipping address checkboxes will be unchecked when the window is opened.
Registration Code Required for Vendors - Checkbox
This field is the default value for the registration code required checkbox on the Business Partner Legal Entity screen. If this field is checked, all records created on the Legal Entity screen will by default have the registration code required checkbox checked, as shown in the screenshot below.
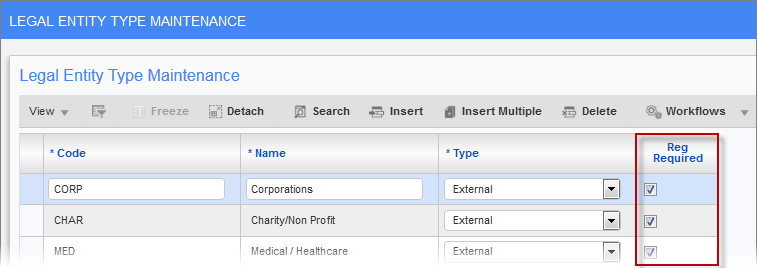
Pgm: BPLEGFM – Legal Entity Type Maintenance; standard Treeview path: can be launched from Setup menu from Accounts Payable, Accounts Receivable, and Purchase Order modules
If a business partner is assigned a legal entity code that has ‘Reg Required’ checked, then a registration code must also be entered on the Business Partner Maintenance screen or the business partner can’t become a vendor. Registration codes are Tax ID Numbers or Federal ID Numbers used in the US for 1099 reporting and in Canada this field is used for the Vendor GST Registration Number.
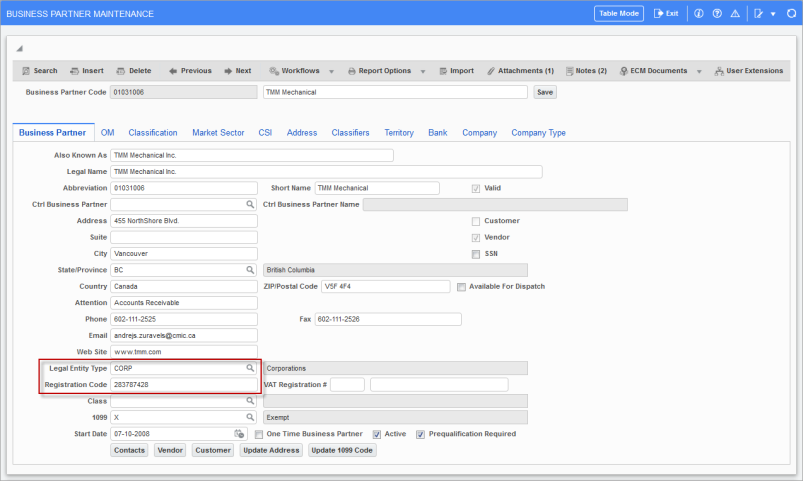
Example of Business Partner showing Legal Entity Type and Registration Code fields completed for it to become a Vendor
[Secure Business Partner Remit-To Address] - Button
This functionality limits users’ access to 'Remit-To' addresses in the OM Organization, Customer, Vendor and Business Partner Maintenance screens. By default, the checkbox is unchecked.
If checked, all business partner alternate addresses with the 'Remit-To' checkbox checked become secured. Only users with the system privilege ‘EDREMITADD: Allow Edit of Secured Remit-To Address’ will be able to edit these addresses, including checking the 'Remit-To' checkbox itself. For users without this privilege, all fields for business partner alternate addresses with the 'Remit-To' checkbox checked will be disabled.
NOTE: When the system option is checked, users without the system privilege EDREMITADD are still able to edit business partner alternate addresses that do not have 'Remit-To' checked, but they cannot change the status of the 'Remit-To' checkbox.
System Wide Unique Registration Code - Checkbox
If this field is checked, the Business Partner Maintenance screen will reject any registration code that is already used by an existing business partner. When unchecked (N), the system allows the user to create business partners with duplicate registration codes, but gives a soft warning in a pop-up, informing the user with a list of business partners with duplicate registration codes.
Hide Inactive Contacts - Checkbox
This checkbox provides functionality to hide or display inactive contacts. If checked, users are not allowed to view inactive contacts.
Retrieve the Currency Exchange Rate as per the Transaction Posting Date – Checkbox
By default, this checkbox is unchecked and hidden. It can be made visible by using the Lite Editor. The following checkboxes in the AP Control File must be set as follows, otherwise the functionality of the 'Retrieve the Currency Exchange Rate as per the Transaction Posting Date' checkbox may be affected:
-
The 'Check And Post Date In The Same GL Period' must be unchecked.
-
The 'Invoice Date Is Voucher Post Date' must be unchecked.
If checked, the 'Retrieve the Currency Exchange Rate as per the Transaction Posting Date' checkbox allows users to use the currency exchange rate based on the posting date rather than the reference date. When this box is checked, a Post Date field will be added by default to the following screens:
-
Accounts Payable - Prepare Checks (Automated Check Generation)
-
AP Setup Recurring Entries in
NOTE: Only new batches should be used and posted after this box is checked.
Default Locale
Enter/select a default locale/language for new users. This value will default into the Default Locale field on the User Preferences screen. For more information, please refer to System Data - Defining User Preferences.
Default Timezone
Enter/select a default timezone for new users. This value will default into the Default Timezone field on the User Preferences screen. For more information, please refer to System Data - Defining User Preferences.