Overview
The steps to prepare manual checks and deposits are as follows:
-
Prepare Batch: As with other Accounts Payable transactions, a batch must be created for manual check transactions.
-
Enter Manual Checks & Deposits: Manual checks are any checks that the system does not generate. Usually, a manual check is used when a supplier requires immediate payment, or an invoice is for a one-time only supplier. Within the same batch, deposits (pre-payments) can also be made for vendors (deposited into prepaid expenses account associated with vendors), before invoices are received from the vendors and used to create vouchers in the system. Later, after pre-paid invoices are received and their corresponding vouchers are entered into the system, deposits for the vendor can be used to associate the pre-payments to the vouchers.
-
Print Edit Listing: The edit listing is your proof sheet for the details to a specific batch. To avoid posting errors, the edit listing should be printed, and the details verified before each batch is posted.
-
Post Batch: This step will take the detail of all the invoice and payment information within a batch and apply them to the indicated supplier, General Ledger accounts, and jobs. Once a batch has been posted, it is no longer available for invoice entry.
-
Adjust Check Sequence Numbers: This step is done through the Bank Account Maintenance screen. This step must be done if the system generated checks and the manual checks are using the same checks. Change the number of the last check printed to match the last one issued on the manual check batch.
Enter Manual Checks

Pgm: APCHQMAN – Manual Check Entry; standard Treeview path: Accounts Payable > Check > Enter Manual Checks
Manual checks are checks that are prepared bypassing the system's automated check generation functionality.
Manual checks are normally required when a vendor must be paid immediately, when a one‑time only vendor needs to be paid, or to make a payment for which there is no voucher in the system.
This screen is also used to enter deposits (pre-payments, before invoice is received) for a vendor, and to pay vouchers in the system using deposits saved for the vendor.
This screen allows for inter-company expense allocations in the General Ledger distribution when allocating non‑AP checks. Remember not to confuse this with inter-company payment of invoices.
Also, this screen allows for multiple AP control accounts to be used in the same batch.
Create Manual Checks to Pay Vouchers
If a manual check is for the payment of one or more vouchers in AP, check the ‘Invoice Related’ checkbox. This causes the [Invoices] button in the Invoice Details section to become enabled, which is used to select the vouchers in AP being paid by the manual check.
Using Deposits (Pre-payments – Prepaid Expense Account)
This screen can also be used to make a deposit (pre-payment) to a vendor via a manual check before its associated invoice is received from the vendor. The pre-payment made to the vendor is entered into the system as a deposit, and it is deposited into the prepaid expenses account associated with the vendor.
Later, after the pre-paid invoice is received and entered into the system as a voucher, the Enter Manual Checks screen is used to associate the voucher to the entered deposit that paid it.
Issue Deposit (Pre-payment) to Vendor
There are two ways in which a deposit can be issued to a vendor via a manual check:
Method 1: Issue Manual Check for Deposit
To issue a deposit to a vendor via a manual check, enter the check details, check the ‘Invoice Related’ checkbox (even though no vouchers will be associated with the payment), and click [Save].
Since the entered check amount was not distributed to any vouchers, the system knows that the payment is a deposit, and the following message will pop up to notify the user:

The pre-payment will be entered into the system as a deposit and deposited into the prepaid expenses account associated with the vendor.
Method 2: Issue Manual Check for Voucher Payments & Deposits
If the check amount is greater than the amount distributed to the vouchers, the difference is deemed a deposit, and deposited into the prepaid expenses account associated with the vendor.
Associate Pre-Payment’s Voucher to Deposit that Paid It
Later, after an invoice for the pre-payment is received from the vendor and entered into the system as a voucher, the previously entered deposit that paid the voucher (via a manual check) is then associated with the voucher.
To associate the voucher to the deposit, click the [Deposits] button and select the deposit that paid the voucher and click [Commit]. This brings the deposit into the Manual Check Entry screen, with the Cash Account fields being populated with the prepaid expense account associated with the deposit, and the other fields loaded with the relevant deposit details. The next step is to select the voucher via the [Invoices] button in the Invoice Details section and saving the association.
Create Manual Checks for Payments Not Associated with Vouchers
Should the need arise to create manual checks for payments that do not have corresponding vouchers in the system, this screen can be used to do so. To do so, the ‘Invoice Related’ box must be unchecked. This causes the [Distribution] button to become enabled, which is used to enter the manual check’s GL distribution.
Selection Criteria
Select the relevant company and select a batch or create a new one. To create a new batch, clear the Batch field, then click the [Create Batch] button.
[Deposits] – Button
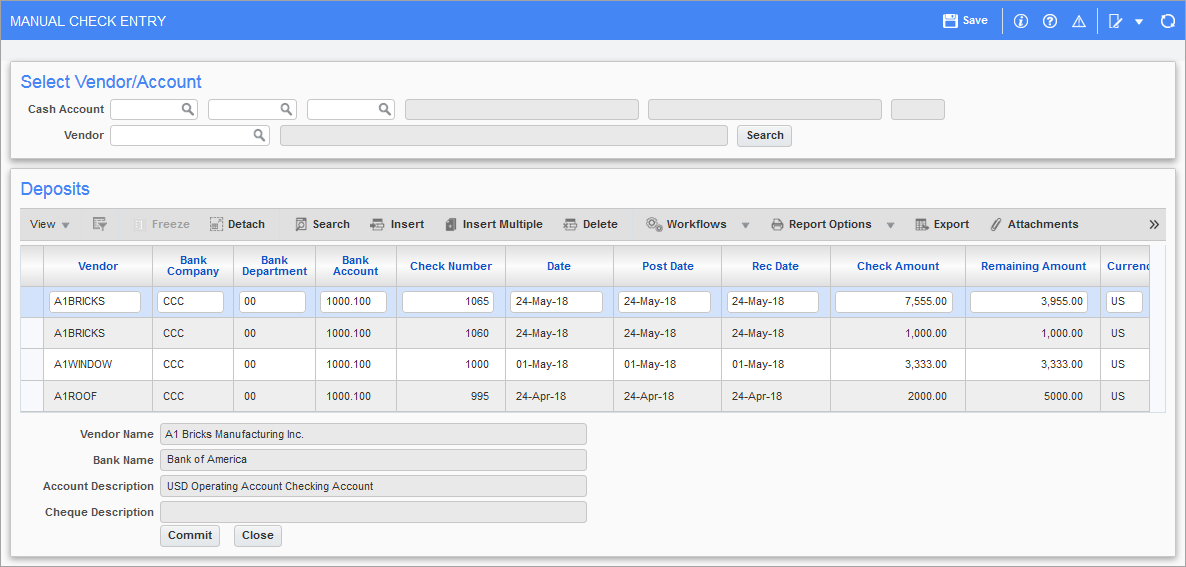
Pgm: APCHQMAN – Manual Check Entry; standard Treeview path: Accounts Payable > Check > Enter Manual Checks – [Deposits] button
This button’s pop-up is used to select an entered deposit for a vendor, in order to associate the deposit to its corresponding voucher via the Enter Manual Checks screen. To bring a deposit into the Enter Manual Checks screen, so that it can be associated with its corresponding voucher, select it and click the [Commit] button.
The Select Vendor/Account section can be used to filter the deposits listed under the Deposits section.
For details, please refer to the previous section: Using Deposits (Pre-payments – Prepaid Expense Account).
Posting Date
A Posting Date field is added when the Retrieve the Currency Exchange Rate as per the Transaction Posting Date box is checked on the Global tab of the System Options screen, allowing the user to set the post date in the Enter Manual Checks screen. The currency exchange rate used is according to the posting date instead of the check date. After entering the necessary details and saving, the Posting Date field is disabled for both the Enter Manual Checks and Post Checks screens.
Check Details – Tab
This tab contains the details of the manual checks in the selected batch.
To navigate between the manual checks in the batch, use this tab’s [Previous] and [Next] buttons; and to view the list of the manual checks, click the [Table Mode] button along the top of the screen.
To enter a new manual check into the batch, click this tab’s [Insert] button; and to remove one from the batch, click the [Delete] button.
Manual checks can be written by hand, in which case the [Print Check] button is not used, and payment details are just saved in this screen. After saving the payments, they are posted to the GL, like all other payments.
Cash Account (Company, Department, Cash Account, Bank Name, Account Description, Currency)
The cash account is the General Ledger account to credit for the full amount of the check.
The first two drop-down fields are used to select the company and department of the cash account, and the third one is used to select the cash account. To the right of these fields are display-only fields that display the bank’s name, a description of the cash account, and the currency of the account.
Vendor
Select the vendor for which the check is being entered.
Check Number
Enter the number of the check issued. This number is required for the reconciliation of manually entered checks.
Check Date
Enter the check date for the check. The check date will default from the system date.
Check Amount
Enter the amount of the check. The Remaining Amt display-only field displays the remaining amount, of the amount entered in this field that needs to be distributed to the Vouchers selected in the Invoice Details section.
If the Check Amount is greater than the amount distributed to the Vouchers, the difference is deemed a Deposit, and deposited into the Prepaid Expenses Account associated with the vendor.
Remaining Amt
This display-only field displays the remaining amount, of the amount entered in the Check Amount field, that needs to be distributed to the Vouchers selected in the Invoice Details section. This value is refreshed upon clicking the [Save] button.
Exchange Rate
This exchange rate is used to convert currency. The currency of the selected Cash Account is displayed by the last field in the row of fields that display details about the Cash Account.
Invoice Related – Checkbox
If the manual check is for the payment of a Voucher in AP, check this checkbox. This causes the [Invoices] button in the Invoice Details section to become enabled, which is used to select the Vouchers in AP being paid by the manual check.
If the manual check is for a payment that does not have a corresponding Voucher in AP, this checkbox must be unchecked. This causes the [Distribution] button to become enabled, which is used to enter the manual check’s GL distribution.
This checkbox’s default state is determined by the ‘Use Accounts Payable Check’ checkbox on the Check tab of the AP Control File.
Reconciled – Checkbox
Check this box to reconcile this check as soon as it is posted. If unchecked, this manual check is marked as un-reconciled. During the Check Reconciliation process, this check will appear and may be reconciled at that time. This checkbox’s default state is unchecked.
Positive Pay Register – Checkbox
Check this box to include this manual check in the Positive Pay file, or uncheck it to exclude this manual check from the Positive Pay file.
NOTE: The 'Positive Pay Register' box must be checked and the Cash Account field must be set up as a positive pay register account in order for the manual check to be included when automatically generating the AP Positive Pay file. For more information, please refer to Automatic Generation of Positive Pay Files.
Job
If the manual check is for the payment of costs being tracked in the Job Costing module, select the Job that this payment is for, otherwise leave this field blank.
Down Payment Related – Checkbox, SC Contract
These fields are related to the Down Payment and Amortization feature in CMiC Field. They are hidden by default but can be displayed using Lite Editor. The 'Down Payment Related' checkbox is a display-only field and the SC Contract field displays the subcontract against which the deposit is made.
Refer to CMiC Field - Down Payment and Amortization for more information.
Description
Enter the description for the check being defined. If the check is printed via the system, this will be the description on the check.
1099
Enter the 1099 code that applies to the selected vendor.
Language
Select the required check language from the drop-down list. The system will default English into this field.
[Print Checks] – Button
Press the [Print Check] button after fully completing the check entry, if it is necessary to print a system check rather than handwriting a check for the information just entered. If the system is not to print a check, or if this screen is being used to associate a deposit to one or more vouchers in the system, for their payment, click [Save] when the payment details have been entered; then perform the posting procedure.
The first launched pop-up is used to select the printing destination (Preview or Email) and format (PDF, HTML, CVC…).
If “Preview” is selected, your web browser’s print preview functionality will display a preview of what will be printed on a new tab. Actual printing can then be done via the web browser’s print preview functionality.
2nd Party – Tab
This tab contains the default payee details associated with the vendor for the check that you are entering. Use this tab to add a second payee name to the manual check being entered, or to change the payee name and address that will be printed on the check.
To change the name to who the check will be issued, use the Name 1 field. If a second name is required on the check, enter it in the Name 2 field. Also, the address fields can be used to change the payee address on the check.
Invoice Details
If the ‘Invoices Related’ box is checked, the [Invoices] button will be enabled to select the vouchers that are being paid by this check.
Otherwise, the [Distribution] button will be enabled to provide the GL distribution details, since there are no vouchers associated with this payment.
The following are details about the editable columns in this section’s table:
Discount Amount
Enter the discount amount.
If joint payees are entered for the selected voucher, the discount will be applied proportionally to each payee.
Payment Amount
Enter the amount of the manual check to be applied to this voucher. The system will allow the entry of any amount in this field but will continue to prompt for additional voucher numbers until the total amount of the check is distributed.
[Joint Payee] – Button
This button’s pop-up lists the joint payees entered for the voucher. To issue separate checks to the joint payees, check their corresponding ‘Manual Check Flag’ checkbox and click [Accept].
NOTE: The joint payee will be validated against the Business Partner LOV if the 'Enable Joint Payee Validation' box is checked on the Financials tab of the System Options screen. For more information, please refer to System Data - System Options - Financials - Tab.
[Invoices] – Button

Pgm: APCHQMAN – Manual Check; standard Treeview path: Accounts Payable > Check > Enter Manual Checks – [Invoices] button
This button is enabled if the ‘Invoice Related’ box is checked.
Its pop-up lists the outstanding vouchers available for payment for the selected vendor. To add vouchers to the payment, check their corresponding ‘Select’ checkboxes and press [Accept].
[Distribution] – Button
This button is enabled if the ‘Invoice Related’ box is unchecked.
NOTE: Information must be entered and saved in the Check Details tab before the [Distribution] button can be pressed, otherwise an error may be issued.
For details about the Distribution pop-up, please refer to the following:Accounts Payable - Enter Vouchers - [Distribution] - Button.
Should the user want to delete the entered check while in this pop-up, press the [Delete Check] button.
Print Edit List
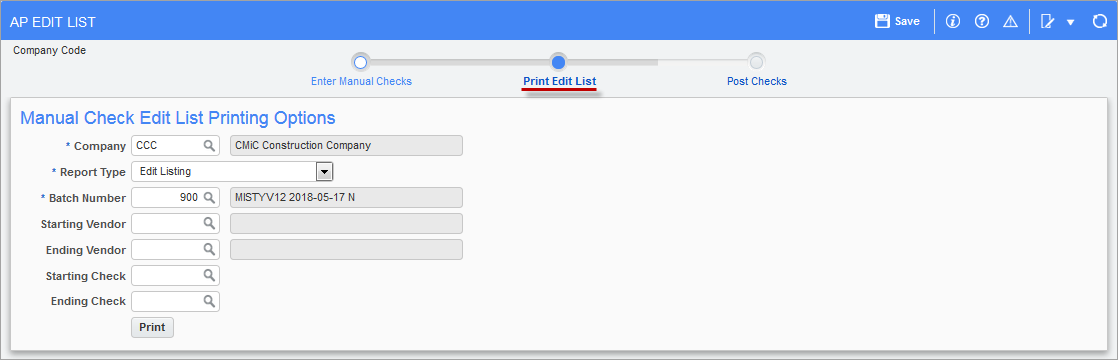
Pgm: APCHQMAN – AP Edit List; standard Treeview path: Accounts Payable > Check > Enter Manual Checks
This screen is used to verify the batch of manual checks by printing the edit listing, or to retrieve information about posted batches of manual checks by printing the Posting Report.
Company
Company for which the batch of manual checks was created.
Report Type
Edit Listing: information about manual checks in batch.
Posting Report: information about posted batch of manual checks.
Batch Number
Batch of manual checks.
Starting Vendor, Ending Vendor
Range of vendors to consider; if the Starting Vendor field is blank, the first vendor (by vendor code) is assumed, and if the Ending Vendor field is blank, the last vendor is assumed.
Starting Check, Ending Check
Range of manual checks within batch to consider; if the Starting Check field is blank, the first check (by check number) is assumed, and if the Ending Check field is blank, the last check is assumed.+
[Print] – Button
Use this button to initiate the printing process.
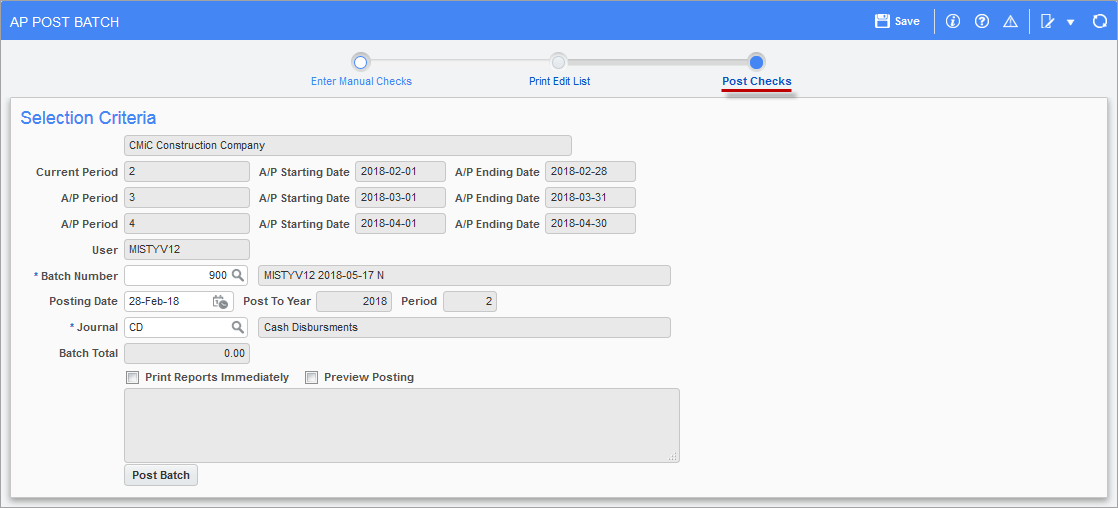
Post Manual Checks
Pgm: APCHQMAN – Manual Check; standard Treeview path:Added reports AP260 and GLPOST to > Check > Enter Manual Checks – [Invoices] button
This screen is used to post the batch of manual checks once they have been correctly printed. During posting, the system creates the GL transactions to reflect the cash disbursements, and it updates the vendor records with the appropriate payments.
Company
Company for which the batch of manual checks is being posted.
Current Period, AP Starting Date, AP Ending Date
The first display-only field displays the current AP period, as set by the Current Year and Period fields on the System Defaults tab of the AP Control File. The fields to the right display the current period’s start and end dates.
AP Period, AP Starting Date, AP Ending Date
These display-only fields display details about the AP period after the current period.
AP Period, AP Starting Date, AP Ending Date
These display-only fields display details about the AP period two periods after the current period.
Batch Number
This field is used to select the batch of manual checks to post.
The display-only field to the right of this field displays the batch’s name, which by default is composed of three parts: user ID, creation date of batch, and batch type code (“N” for batch of manual checks).
Posting Date
This is the posting date for the vouchers in the batch. The General Ledger dispositions and any distributions to sub-ledgers will be processed with this date.
The Post To Year and Period display-only fields to the right of this field display the AP year and period for the posting date.
If the ‘Default Post Date Into Posting And Check Printing Programs’ box is checked on the System Defaults tab of the AP Control File, this date will default to the current date if the current date is within the open AP period, or to the last day of the AP period otherwise; otherwise, if not checked, no date will default to this field.
If the ‘Allow To Post To Future Periods’ box is checked on the System Defaults tab of the AP Control File, posting to future periods will be allowed.
If the ‘Check And Post Date In The Same GL Period’ box is checked on the Check tab of the AP Control File, to post of checks, their check date and post date must be in the same GL period.
Journal
The system will default the journal code from the Accounts Payable control file. The journal code is used to group like transactions together so that they can be viewed in the GL under one query. The journal code usually represents the sub-ledger.
Batch Total
This display only field displays the batch’s total amount to post.
Print Reports Immediately - Checkbox
Check this box to print the posting report immediately after posting. If left unchecked the posting report will not print during the posting process, but it can be printed later using the Print Posting Reports utility.
Preview Posting - Checkbox
Check the ‘Preview Posting’ box and press the [Post Batch] button to review the posting reports without actually posting the batch. Once the reports have been verified, the [Post Batch] button must be pressed without the ‘Preview Posting’ box checked to actual post the invoices.
[Post Batch] – Button
Use this button to initiate the posting process. The display-only text field above this button displays messages about the posting process.
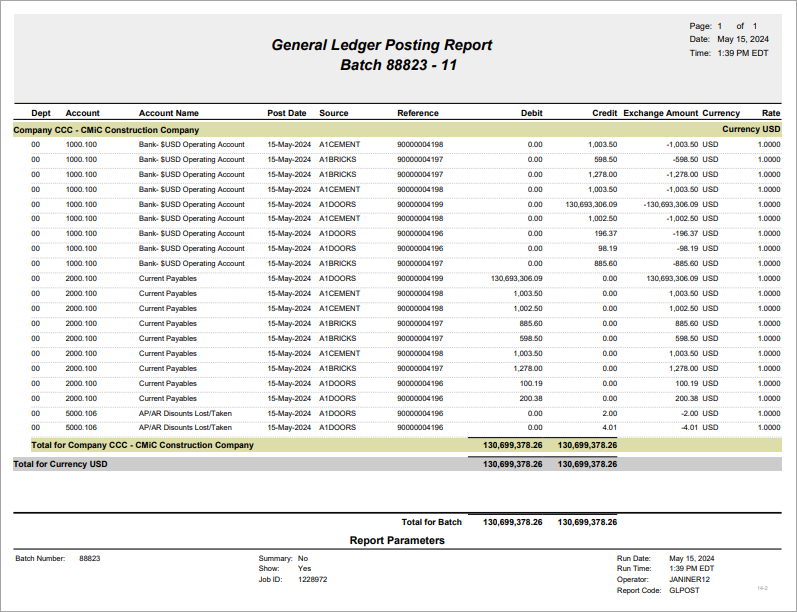
Posting Reports
Posting reports can be printed using the 'Print Reports Immediately' checkbox or at a later time from the Print Posting Reports utility (standard Treeview path: Accounts Payable > Utilities > Print Posting Reports).
General Ledger Posting Report (GLPOST)
Check Register – Posting Report (AP260)

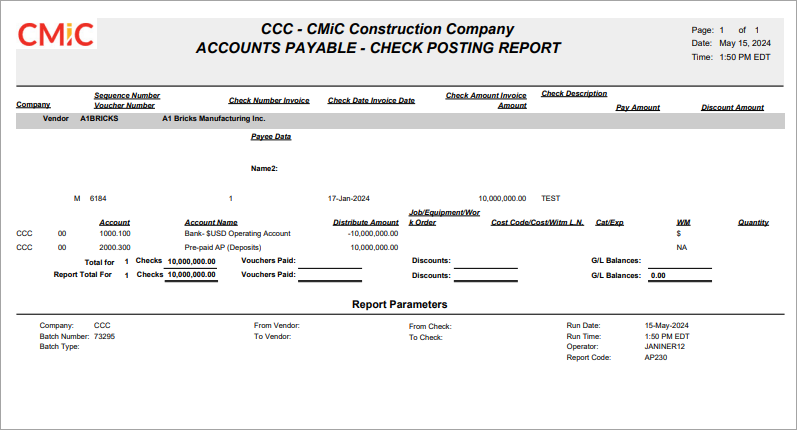
Manual Check Report (AP230)
Post Zero-Dollar Checks
To post zero-dollar checks, the user must have the 'Print Zero Checks' box checked in the AP Check Options section on the Check tab on the AP Control File (standard Treeview path: Accounts Payable > Setup > Control File Options – Check tab). For more information, please refer to AP Check Options.
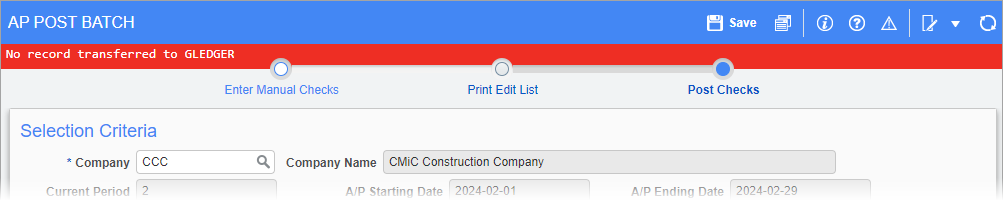
System-generated warning message in AP Post Batch
The system will generate a warning message if a zero-dollar check is posted by itself in a batch, as shown in the screenshot above. A zero-dollar check cannot be processed alone in a batch and must be posted with another check that has a value. The two checks do not have to be related; they just need to be in the same batch.