Pgm: ARCHQFM – Enter Receipt; standard Treeview path: Accounts Receivable > Receipt > Enter Receipts
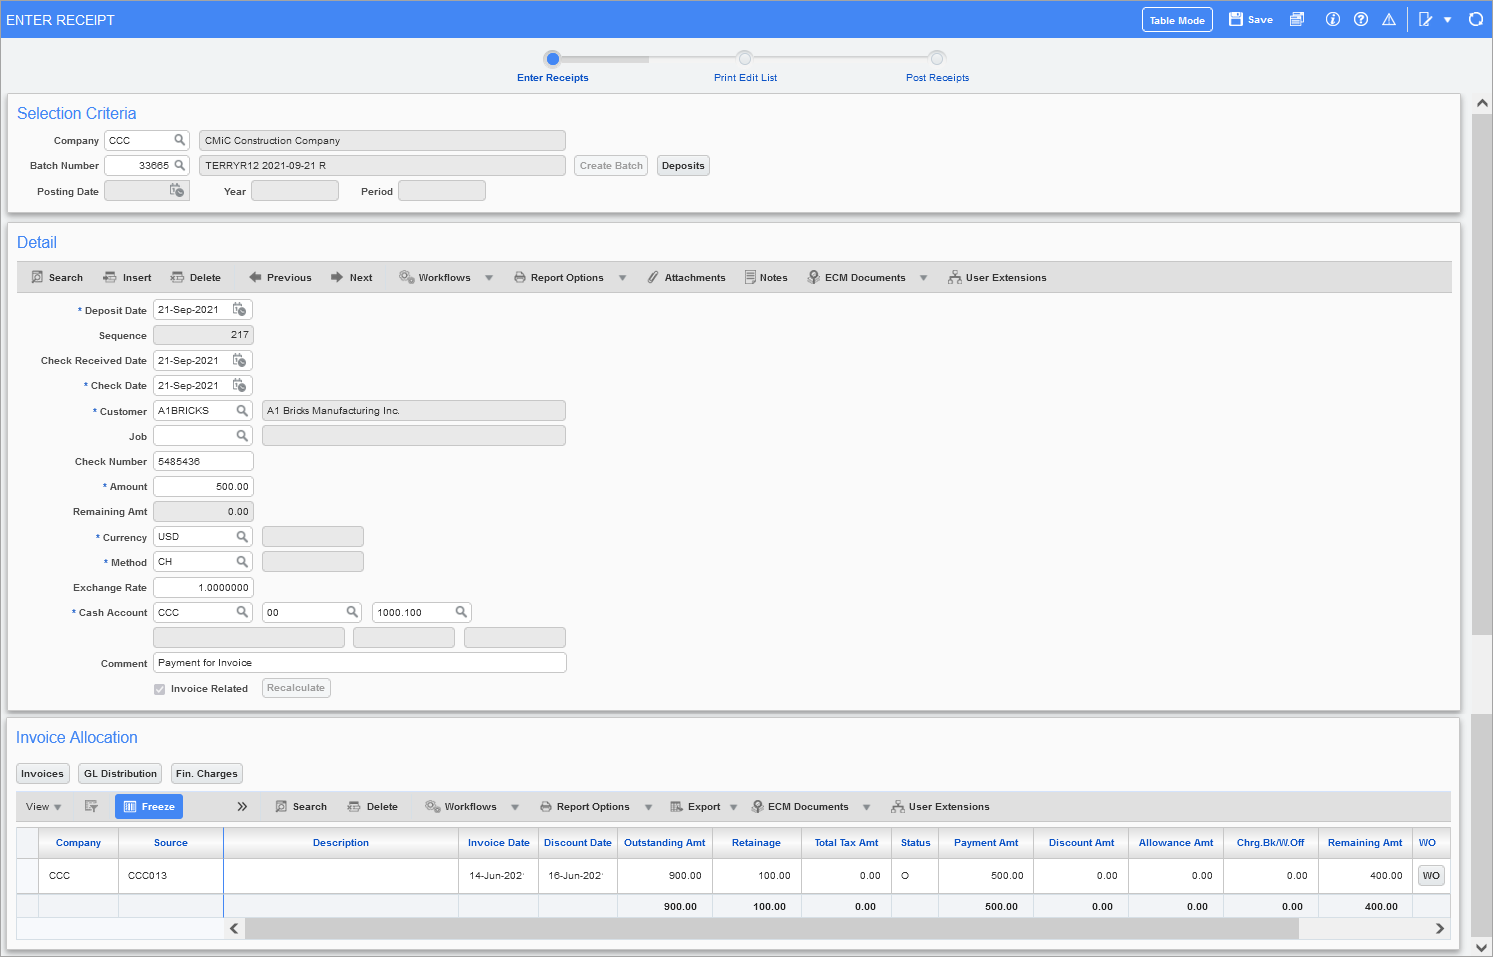
The Enter Receipts screen can be used to enter all cash receipts received from customers. After specifying a batch number for the transactions in the first section of the screen, the second section enables the operator to enter the customer, amount, type, and other relevant information pertaining to the cash receipt. Once the Detail section is complete, the Invoice section is used to select the invoices and/or financial charges (interest) being paid.
NOTE:To enter a new receipt for an invoice that is already linked to another receipt (e.g., to pay an invoice with multiple receipts), the user must first create a new, separate batch.
When the Retrieve the Currency Exchange Rate as per the Transaction Posting Date box is checked on the Global tab of the System Options screen, a Posting Date field is added to the Selection Criteria section. This allows the user to set the post date in the Enter Receipt screen and the currency exchange rate used is according to the posting date instead of the reference date. After entering the necessary details and saving, the Posting Date field is disabled for both the Enter Receipts and Post Receipts screens.
Detail
Deposit Date
Enter/select the date that this payment will be deposited to the bank account. This date may be different than the date of the payment itself, which is entered in the next field. The system date will default into this field.
Check Received Date
Enter/select the date the check arrived at the business office. This date is used on the Billing and Payment Status Report only (standard Treeview path: Accounts Receivable > Reports > Billing And Payment Status Report).
Check Date
This is usually used as the date of entry, but it can also be used to record the date of the check. The system will default the system date into this field. This date is not used as the posting date for General Ledger debits and credits.
Customer
Enter/select the customer code.
Job
If the receipt being entered is for a specific job, enter/select the job code in this field. This limits the list of invoices to those with the same job. In the case of a deposit check, this enables the AR aged report by job to match deposit checks to jobs.
Check Number
Enter the applicable check number or visa number.
Amount
Enter the amount of the payment. The amount should be entered in the currency of the payment itself, and not in the local currency.
If financial charges (interest) are being charged, this amount needs to be the original invoice amount plus the calculated interest charge. So, if the invoice amount is $100 and the interest is 10%, then the amount entered in this field is $110. In the Invoice Allocation section’s table, after the relevant invoices and financial charges have been selected, the original invoice amounts and financial charges will appear as separate entries.
Currency, Exchange Rate
As indicated in the previous step, the amount entered should be in the payment currency and not the local currency. Make sure that correct currency code is being used. The currency code defaults from the Customer Master file and the conversion rate defaults from the last entry in the currency table. The program will automatically convert the currency and process the correct GL accounts.
Method
Select the method of the payment. The system will default “CH” (Check) into this field.
Cash Account
Enter the company, department, and GL account number representing the bank account to which the payment will be deposited to. The system will default the standard bank account to this field.
Comment
Enter any comments about the payment.
Invoice Related – Checkbox
Check this box if there is an invoice associated to the check being deposited. When checked, invoices associated to the customer will be available for selection in the Invoice Allocation section which can be allocated to the receipt.
When unchecked, this is a cash payment that will not affect the Accounts Receivable balance for this customer. This can occur when goods are sold, but no invoice is created. The payment pays the full amount owing from the transaction. This is also applicable for deposits returned that were originally costed to jobs. In this method, the Accounts Receivable module is unaffected, the GL is processed, the Job Costing module may be affected, and the check will appear on the checklist.
NOTE: If this checkbox is checked, the [Invoices] button is disabled, as there are no corresponding invoices for the receipt.
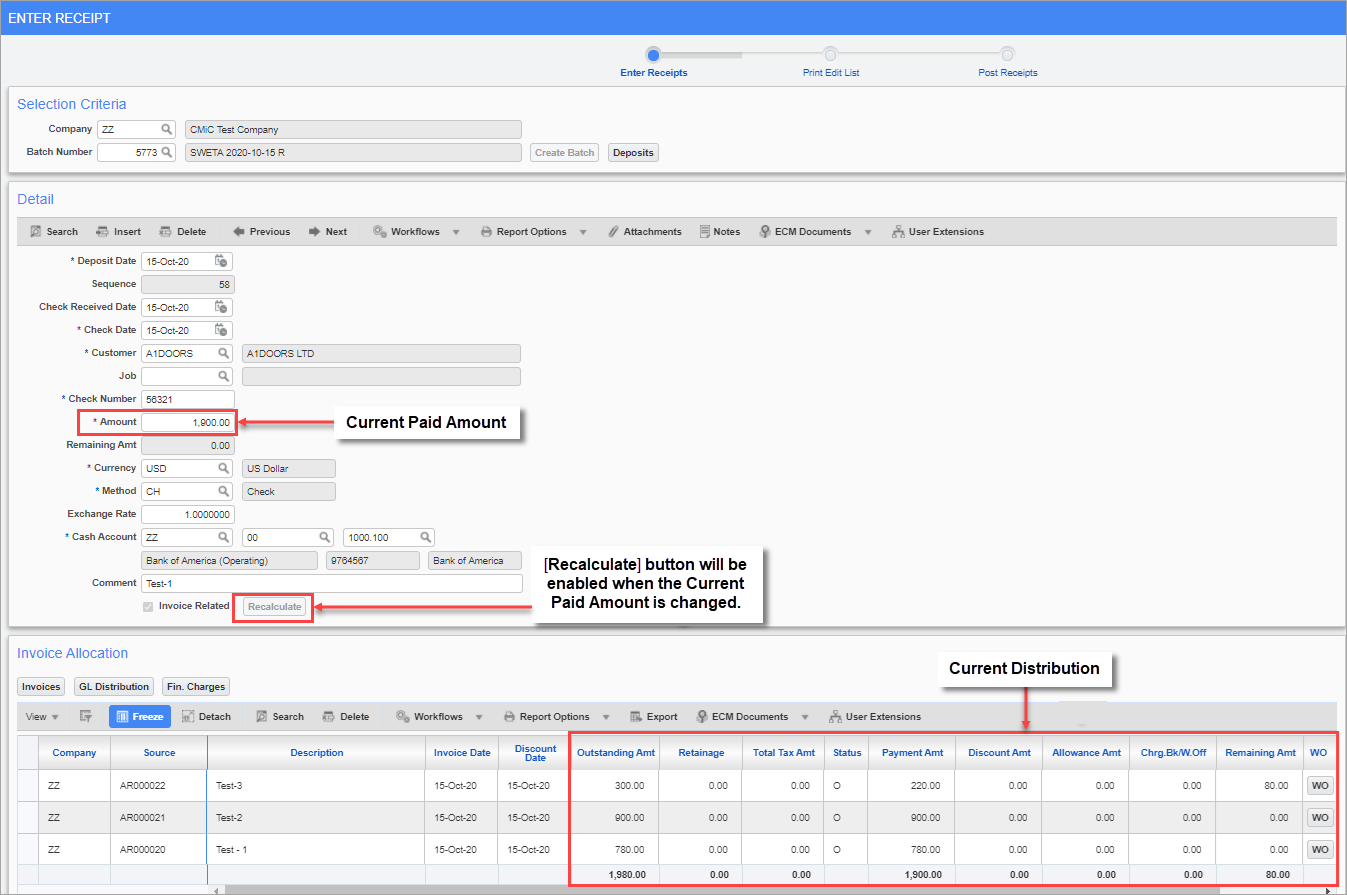
[Recalculate] – Button
Accounts Receivable > Receipt > Enter Receipts
The [Recalculate] button is initially disabled. When entering an AR Receipt, if the user updates the header amount after creating the distribution, the [Recalculate] button is enabled. When this button is applied, the payment amount and the write-off amount are recalculated within the distribution.
Accounts Receivable > Receipt > Enter Receipts
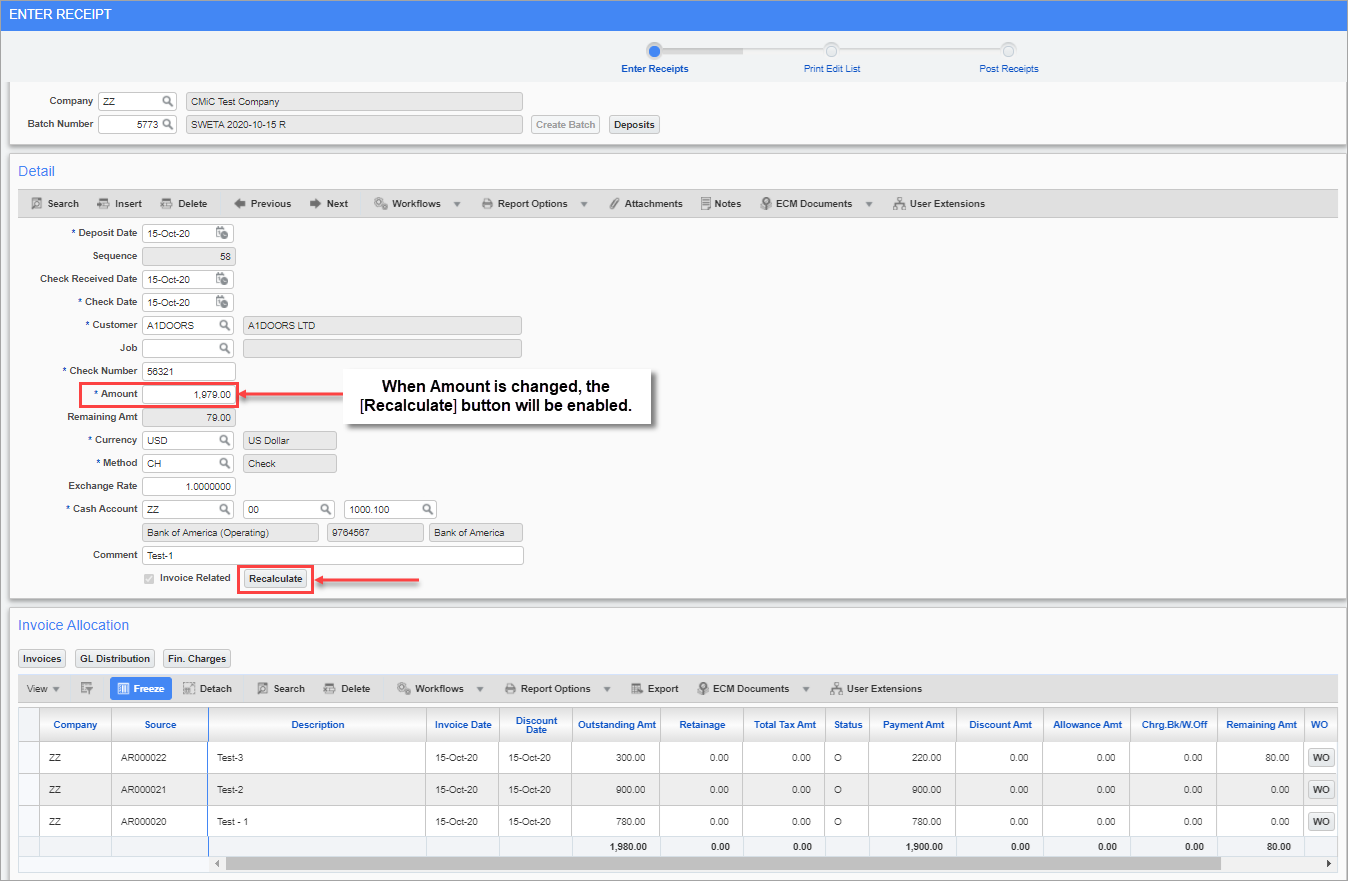
As soon as the current Amount is changed, the [Recalculate] button is enabled.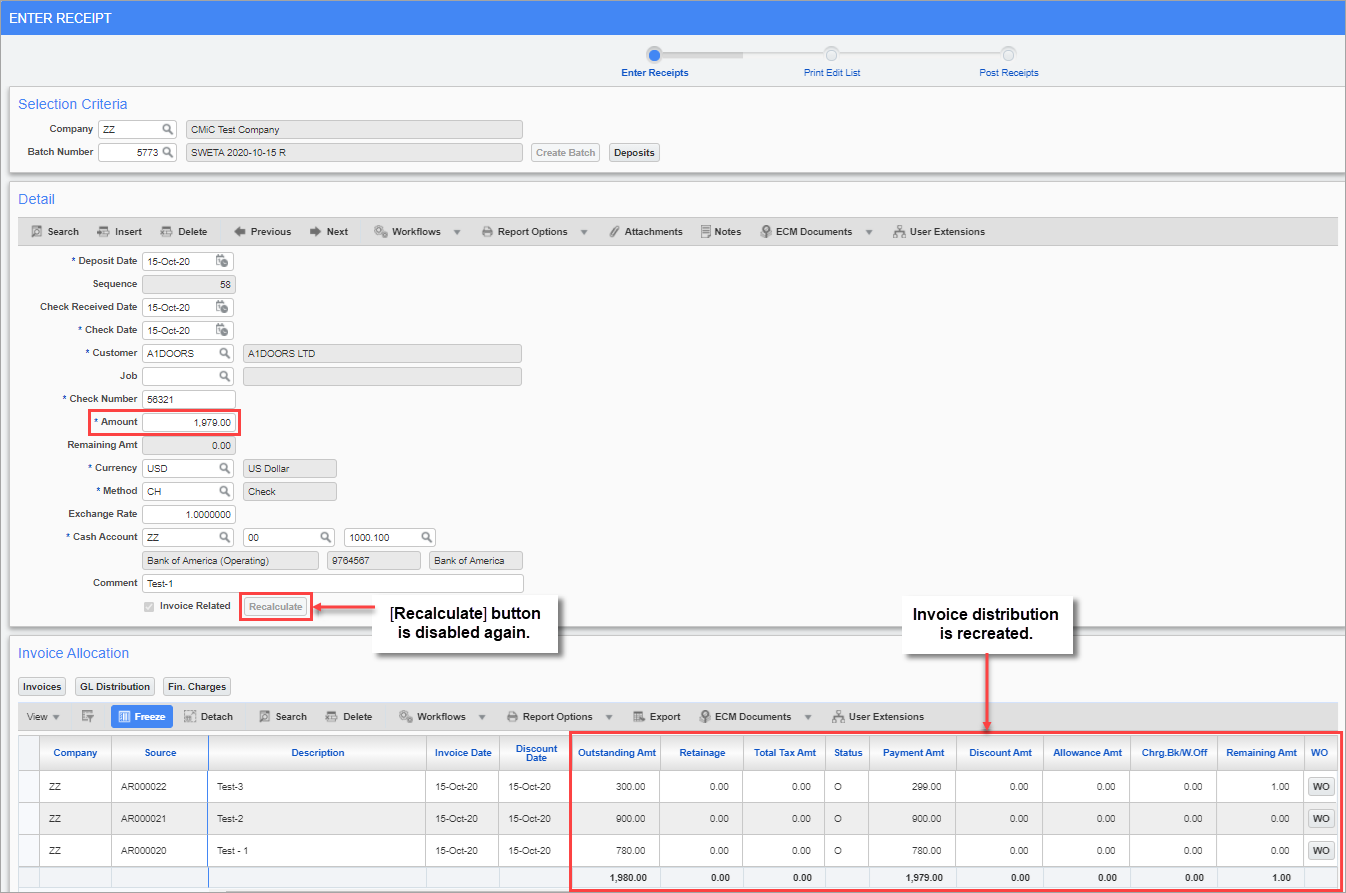
Accounts Receivable > Receipt > Enter Receipts
When the [Recalculate] button is pressed, the payment amount and the detail write off amounts get updated.
Invoice Allocation

Pgm: ARCHQFM – Enter Receipt; standard Treeview path: Accounts Receivable > Receipt > Enter Receipts
Use the [Invoices] button to select the necessary outstanding invoices for the current customer, and the [Fin. Charges] button to select any necessary financial charges (e.g. interest).
NOTE: Do not use this section if this payment is a deposit (a pre-payment to be billed at a later date) or an AP Deposit being returned.
After the Invoice Allocation Section has been populated with relevant invoices and financial charges, there will still be an opportunity to edit the Company, Source, Payment Amt, Discount Amt, and Allowance Amt fields.
Company
Enter/select the available company.
Source
Enter/select the invoice or financial charge number that this payment relates to from the invoice list.
Payment Amt
Enter the amount of the payment to be applied against this invoice. The system will default an amount to this field based on the payment amount and amounts already applied to other invoices.
Once an amount is entered in this field, the Balance to Disburse and Outstanding Amt fields are updated. The Outstanding Amt field shows the amount still owed on the invoice after this payment has been applied.
Discount Amt
Enter the amount of any payment discount given on the application of this payment to this invoice.
Allowance Amt
Enter the currency allowance amount.
[Invoice] – Button
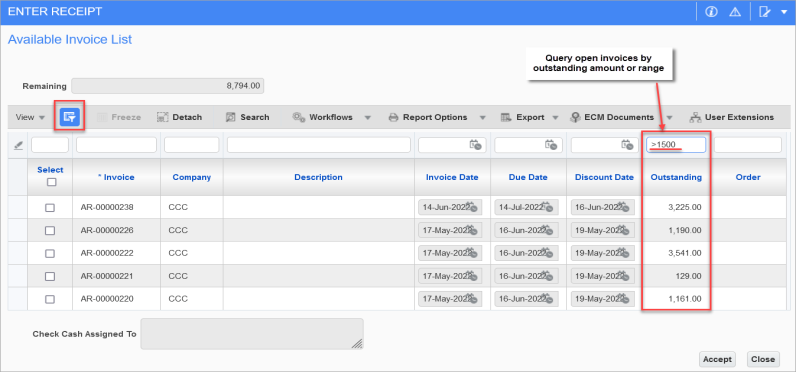
Pgm: ARCHQFM – Enter Receipt; standard Treeview path: Accounts Receivable > Receipt > Enter Receipts
Use the [Invoice] button to select outstanding invoices for the current customer. To help narrow the search, query open invoices by outstanding amount or amount range in the Outstanding column.
[WO] – Button
This button’s pop-up is used to enter a write-off against an invoice. For details, please refer to the following section, Accounts Receivable - Entering a Write-Off.
[Billing Info.] – Button
This button is used to launch a pop-up window where users can enter/view billing information for the invoice.
NOTE: As billing information is related to jobs, when receipts entered are related to job billing invoices, then billing information may be required to be entered, depending on if the ‘Check Billing Info While Receipt Posting’ box is checked on the Receipts tab of the AR Control File. If this box is checked, then users will be required to enter billing information for the invoice through the [Billing Info.] button; otherwise, they will be unable to post the payment receipt.