Pgm: ARINVFM – AR Invoice Entry; standard Treeview path: Accounts Receivable > Invoice > Enter Invoices
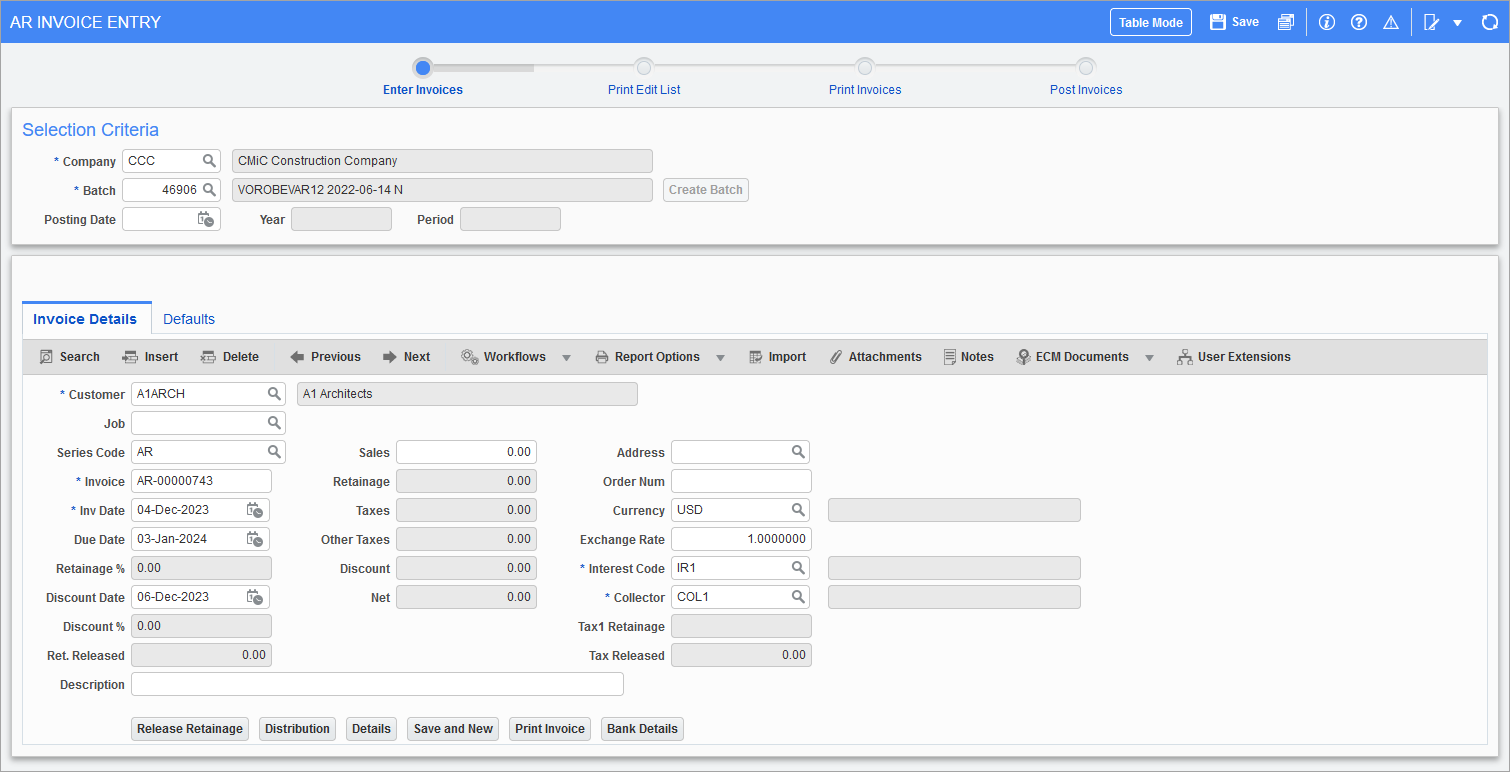
The Invoice Entry screen is used to enter invoices to send to customers.
To enter an invoice, use the Invoice Details tab to enter the invoice's details (customer code, amount, tax, retainage, discount, etc.), use the Defaults tab to change any defaults, then use the [Distribution] button to enter the GL distribution.
If using the Job Billing module, this screen is typically used for miscellaneous invoices only.
When the Retrieve the Currency Exchange Rate as per the Transaction Posting Date box is checked on the Global tab of the System Options screen, a Posting Date field is added to the Selection Criteria section. This allows the user to set the post date in the Invoice Entry screen and the currency exchange rate used is according to the posting date instead of the reference date. After entering the necessary details and saving, the Posting Date field is disabled for both the Invoice Entry and Post Invoices screens.
Invoice Details – Tab
Customer
Enter/select the customer code associated with this invoice.
Job
If the invoice being entered is for a specific job, enter/select the job code. If a job number is entered in this field, the system limits the distribution screen to only this specific job or its sub-jobs. Also, if using Invoice Series codes that have a ‘J’ format, the system will use this job number to create the invoice number. Only jobs that are defined with a Billing Method of “Manual AR Invoice” are available for selection.
Series Code
Invoice series codes are used to group like invoices by using similar invoice number sequence. They can also determine the AR Department and Account depending on the system setup.
This field is mandatory if the 'Invoice Series Codes Required' box on the Control File has been checked. If a Default Invoice Series code has been entered in the Control File, the system will default the series code automatically after entering the customer code. If Invoice Series codes were defined at the customer class level, this field defaults the correct invoice series code for the class assigned to the customer.
Invoice
If the ‘Invoice Series Codes Required’ box is checked in the Control file, the system defaults the next available invoice number (as defined by the invoice mask on the series code) and user-entry is disallowed. Otherwise, enter the invoice number. This must be a unique number for the company.
Inv Date
Enter/select the date the invoice was created. The current system date defaults to the invoice date field.
Due Date
Enter/select the date the invoice is due.
Retainage %
If a retainage percentage was entered on the Accounting tab of the Maintain Customers screen it is displayed here.
Discount Date
If a discount applies to this invoice, enter the date the discount takes effect.
Discount %
If a discount percentage was entered on the Accounting tab of the Maintain Customers screen it is displayed here.
Description (Invoice Description)
Enter a short description for the invoice. This field has a limit of 60 characters. If a more extensive description is required, the Details button can be used to open the Details pop-up window where the Description field (which supports up to 4000 characters) is available to enter individual descriptions for each line item. For further information, refer to the [Details] – Button subsection.
Remarks (Invoice Remarks)
This is a user-defined field (UDF) for entering any additional remarks about the invoice.
Sales
Enter the amount of the invoice, in the currency being used on the invoice.
Once the amount has been entered, the system will automatically calculate and display the amount of retainage, taxes, discounts, and other charges on the invoice. These amounts may be edited using the Defaults tab. On the Defaults tab, any of the default amounts listed on the invoice screen can be changed, such as: retainage, freight, insurance, miscellaneous charges, taxes, discount amounts, and other default invoice information.
NOTE: The amount of the invoice does not have to be entered into the Sales field if the [Details] button is used to enter line items purchased by the customer. In this case, the invoice amount will be determined by the sum of the line items entered (see [Details] – Button subsection for further details).
Address
This field is used to override the customer’s default address. The new address code must have already been created against the business partner.
Order Number
If the invoice being entered is associated with a purchase order, enter the purchase order number being billed by this invoice.
Currency
Enter/select the currency type of value entered in the Sales field.
Exchange Rate
Enter the conversion rate from the normal company currency to the currency of this invoice. The system will default the current currency factor defined in the Currency Exchange Rate table. If the currency of the invoice is the same as the currency of the company then the value of this field is "1".
Interest Code
Enter the code to determine the type and rate of interest applied to this invoice if overdue. These codes can be set in the Interest Codes screen (standard Treeview path: Accounts Receivable > Setup > Local Tables > Interest Codes).
Collector
Enter/select the person responsible for the collection of this invoice if it becomes overdue. Collector codes can be set in the Collector Codes screen (standard Treeview path: Accounts Receivable > Setup > Local Tables > Collector Codes).
Tax1 Retainage
This is a display-only field that indicates the amount of tax that is being withheld due to retainage. This is only applicable for tax credit style taxes such as VAT and GST taxes.
Tax Released
This is a display-only field that indicates the amount of tax that is being released.
[Release Retainage] – Button
This button allows retainages to be released from several invoices into a single invoice. During this process, a single invoice with a zero invoice amount and a negative retainage amount is generated. Invoices that have been selected for retainage release have their Retainage Released amount updated by the amount indicated. Partial retainage release against a single invoice is supported.
Retainage release for Job Billing invoices is handled within the Job Billing module.
Leave the Sales field blank on the AR Invoice Entry screen before pressing this button.
NOTE: The distribution type of the retainage release invoice should match the original invoice.
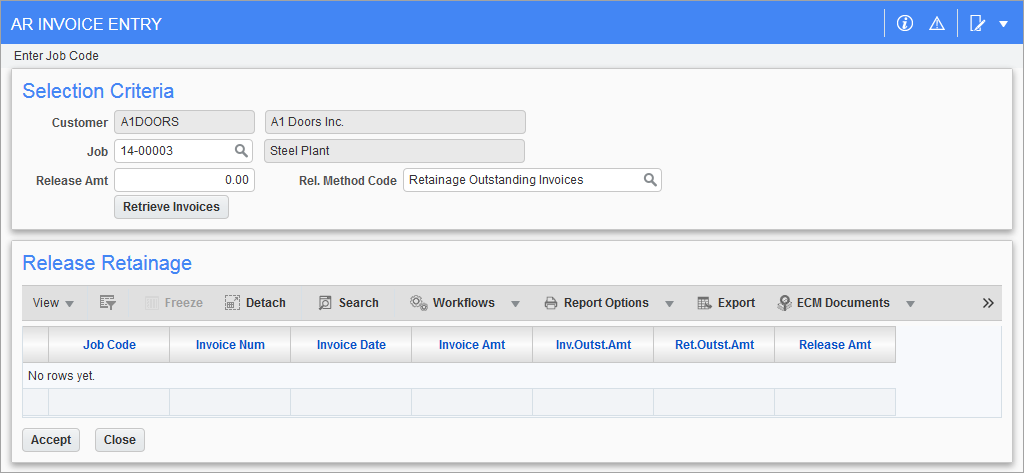
Pgm: ARINVFM – AR Invoice Screen; standard Treeview path: Accounts Receivable > Invoice > Enter Invoices – [Release Retainage] button
Release Amt
Enter the total amount of retainage to be released. This release amount acts like a control total, ensuring that the details of the release match this amount.
The value entered should not include any tax amounts. Retainage tax will automatically be applied if required.
Rel. Method Code
Enter/select the release method that applies to the retainage release being generated. The system allows selection between two release methods:
-
Select “Positive Retainage Outstanding Invoices” when the list of available invoices is to be limited to invoices with a positive retainage amount.
-
Select “ALL Outstanding Invoices” if the list of available invoices should include all invoices with either positive or negative retainage amount.
[Retrieve Invoices] – Button
Press this button to populate the Release Retainage section, based on the entries made in the Selection Criteria section.
Verify/Modify the Release Amounts
Once in the Release Retainage section, the system displays all the invoices with outstanding retainage amounts. The system automatically releases amounts from the oldest to the newest invoice up to the value entered in the Release Amount field. Verify/modify the amounts to be consistent with the release requirements and use the [Accept] button to save the information when finished.
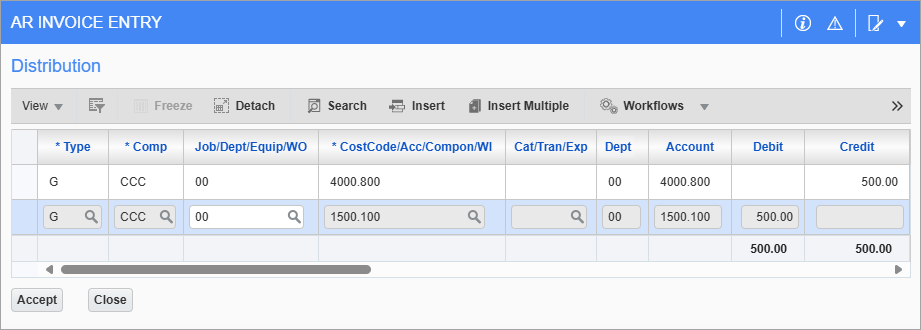
Pgm: ARINVFM – AR Invoice Entry; standard Treeview path: Accounts Receivable > Invoice > Enter Invoices – [Distribution] button
Press the [Distribution] button to apply the invoice amount to specific General Ledger accounts and to apply revenue to specific jobs or equipment.
Using default information from the customer, invoice series codes, and control files, the system automatically distributes invoice amounts amongst the various General Ledger accounts pre-set for Accounts Receivable, taxes receivable, retainage receivable, discounts taken, etc., as required.
Please note that the system does not allow unbalanced transactions to be committed.
Type
Select the distribution type of the invoice from the following options:
-
Enter/select “J” to distribute dollars to a specific job, cost code, and category.
-
Enter/select “G” to distribute dollars to a specific General Ledger revenue department and account.
-
Enter/select "E" to distribute dollars to a specific piece of equipment and cost category.
-
Enter/select “C” to distribute the dollars as negative cost invoice instead of a revenue invoice to a job/cost code/category
Comp
Enter/select the company to which to distribute an amount of the invoice. This defaults to the same company as the invoice is entered against, but there may be times when an invoice spans two or more companies. If the code is changed, the system validates the department, account, job, cost code, category, and equipment codes against the new company.
The system automatically creates the inter-company distributions required (at posting time) to balance the transactions. An inter-company distribution requires the use of inter-company clearing accounts, so that the General Ledger distribution of each entity is in balance. Also, to distribute amounts to multiple Companies, Inter-Company setups are required for the Companies involved. This is done via the [Inter-Company Setup] button on the Maintain Companies screen in the General Ledger module (standard Treeview path: General Ledger > Setup > Local Tables > Maintain Companies).
When posted, the inter-company transactions for the above distribution will create the following GL transactions:
DR Company CCC Accounts Receivable 945
DR Company CCC Retainage Receivable 100
CR Company CCC Tax Receivable 45
CR Company CCC Inter-Company Clearing 1000
Job/Dept/Eqp/WO
Depending on the entry in the Type field, enter/select the relevant job, department, piece of equipment, or work order for the distribution line.
Cost Code/Account/Compo/WI
Depending on the entry in the Type field, enter/select the relevant cost code, account, component, or work item for the distribution line.
NOTE: Accounts defined as Subledger Control Accounts cannot be used in distributions.
Cat/Tran/Exp
Depending on the entry in the Type field, enter/select the relevant category code, transaction code or expense code.
Debit, Credit
Depending on the transaction, Enter the amount of the invoice to be applied to the line. The complete amount does not have to be distributed in one line. The system will not allow the record to be saved unless the complete invoice amount has been fully distributed.
WBS/TAC Code 1,2,3,4
The WBS/TAC Code and Name fields are active for a G-line and then only if the account is utilizing TAC codes. This is where the user can enter/modify the transaction allocation code associated with this transaction and account. TAC codes can be updated but not deleted from this screen. For more information, please refer to General Ledger - Transaction Allocation.
These fields are hidden by default and can be added using the Lite Editor.
NOTE: Once an invoice has been saved, if it is deleted before posting, the system will track the invoice in a Deleted Invoice table that can be viewed via the AR Invoice Query screen (standard Treeview path: Accounts Receivable > Query > Query Invoice).
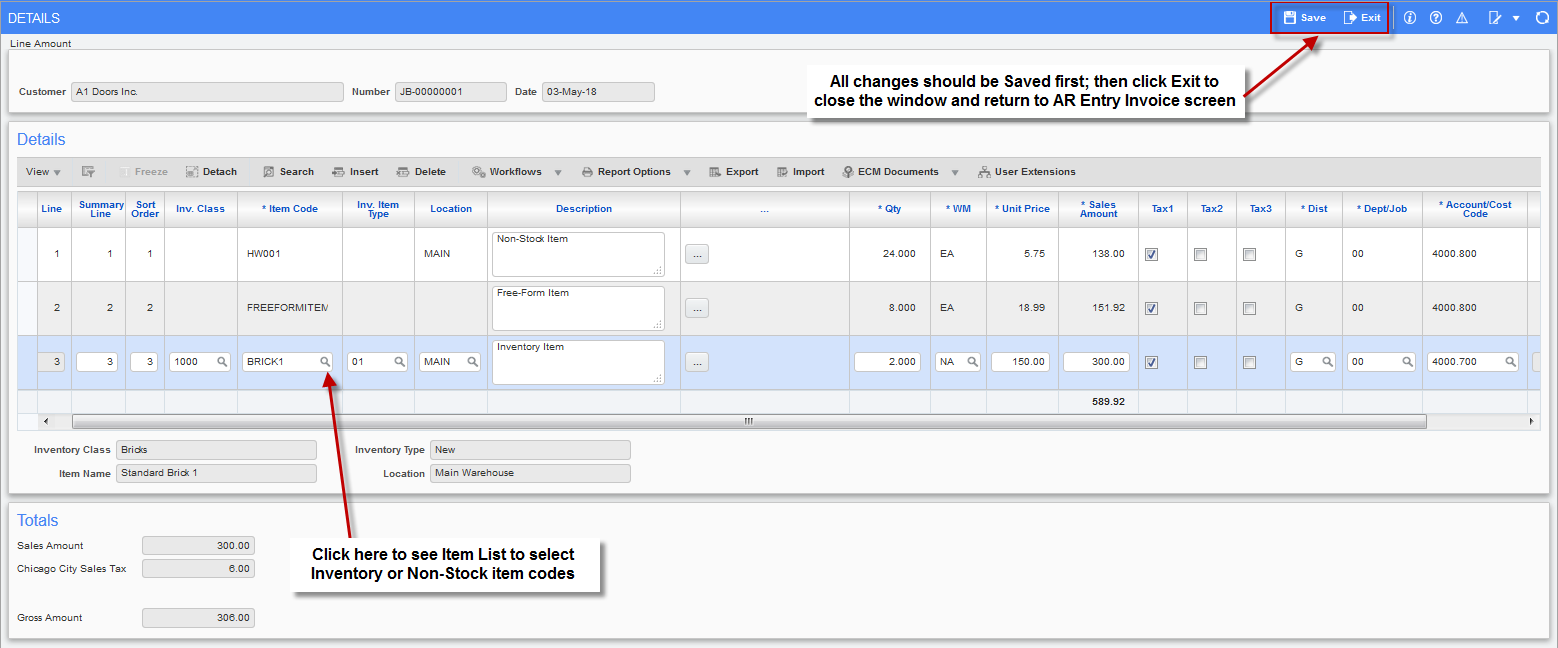
Pgm: ARINVOICEDETAILS – AR Enter Invoices; standard Treeview path: Accounts Receivable > Invoice > Enter Invoices – [Details] button
Press the [Details] button to enter the items purchased by the customer. This screen provides the ability to invoice customers for items sold from inventory, non-stock items, or free-form items.
NOTE: Inventory items are set up within the Inventory module while non-stock items should be entered through the Maintain Non-Stock Items screen (standard Treeview path: Account Receivable -> Setup > Maintain Non-Stock Items).
The Detail screen allows for the entry of the detailed line items associated with the invoice. Line items are distinguished by the inventory class which determines whether the line relates to an inventory item or non-inventory item. Non-inventory items will have the class field left blank, while the inventory items will have a class associated with them. Inventory and non-stock item codes should be chosen in the Item Code field, while the free-form item code should be entered into the Item Code field.
Once the item is selected for the line, its quantity can be entered. The Unit Price field defaults from the item itself for inventory and non-stock items (but can be overwritten); the unit price for the free-form items should be always entered. Then the value of the line item is calculated and displayed by multiplying the quantity by the unit price. Taxes and distribution are defaulted, although the defaults can be overwritten.
When all data is entered, click the [Save] button, then click [Exit] to close the Details screen and return to the AR Invoice Entry screen.
NOTE: Upon saving this screen, the Sales, Retainage, and Taxes fields on the main AR Invoice Entry screen become disabled, if they were not disabled already. The values entered in the [Details] button screen are inherited to these fields.
[Bank Details] - Button
This button is a custom report option and does not apply to standard reports.
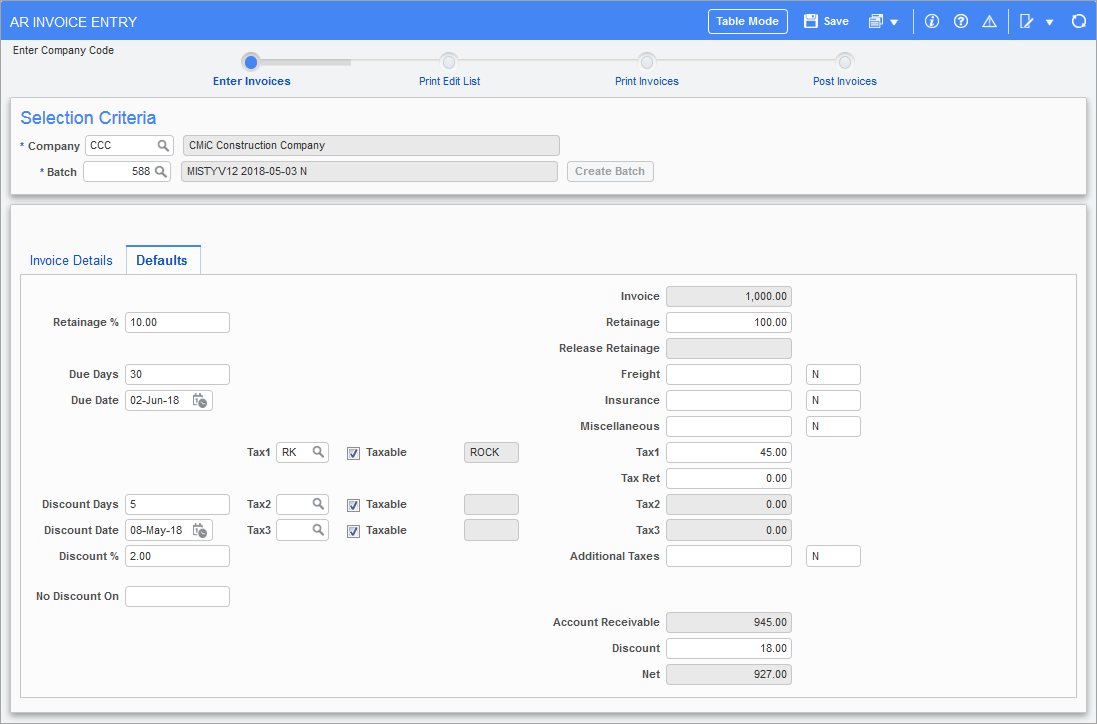
Pgm: ARINVFM – Modifying Invoice Amounts and Defaults; standard Treeview path: Accounts Receivable > Invoice > Enter Invoices – Defaults tab
Use this screen to enter default values that appear when creating new invoices in the Invoice Details tab.