The access codes created and used in the E-Time module can be thought of as login IDs. These can be applied in various ways depending on personal security requirements.
Access codes are designed to group similar employees together into one set of login credentials without having to create a user in the Enterprise database for each employee.
Creating Access Codes
To assign an access code to an employee, please follow the below steps:
-
Create a new user ID on the User Maintenance screen.
-
Check the 'Access to Etime' checkbox for the user ID on the Employee Maintenance screen found in the Human Capital Management module.
-
Users will then receive an email containing a link to the E-Time log in screen. They can then log in with the username and password created on the User Maintenance screen.
-
Upon clicking this link, a new access code is created, which can then be edited on the Access Codes screen, detailed below.
NOTE: If using the Expense Entry screen rather than the Quick Expense Entry functionality in the Timesheet Entry screen, first create an access code for every employee who using E-Expense Entry.
Group and Personal Access Codes
Users without a personal access code linked to their profile can still log in with a group access code, which can be created using the Access Code Maintenance screen, shown below. While logged into E-Time, users can switch between using group and personal access by pressing the Switch Access Codes icon (![]() ), found at the top-right of the screen.
), found at the top-right of the screen.
Access Code Maintenance
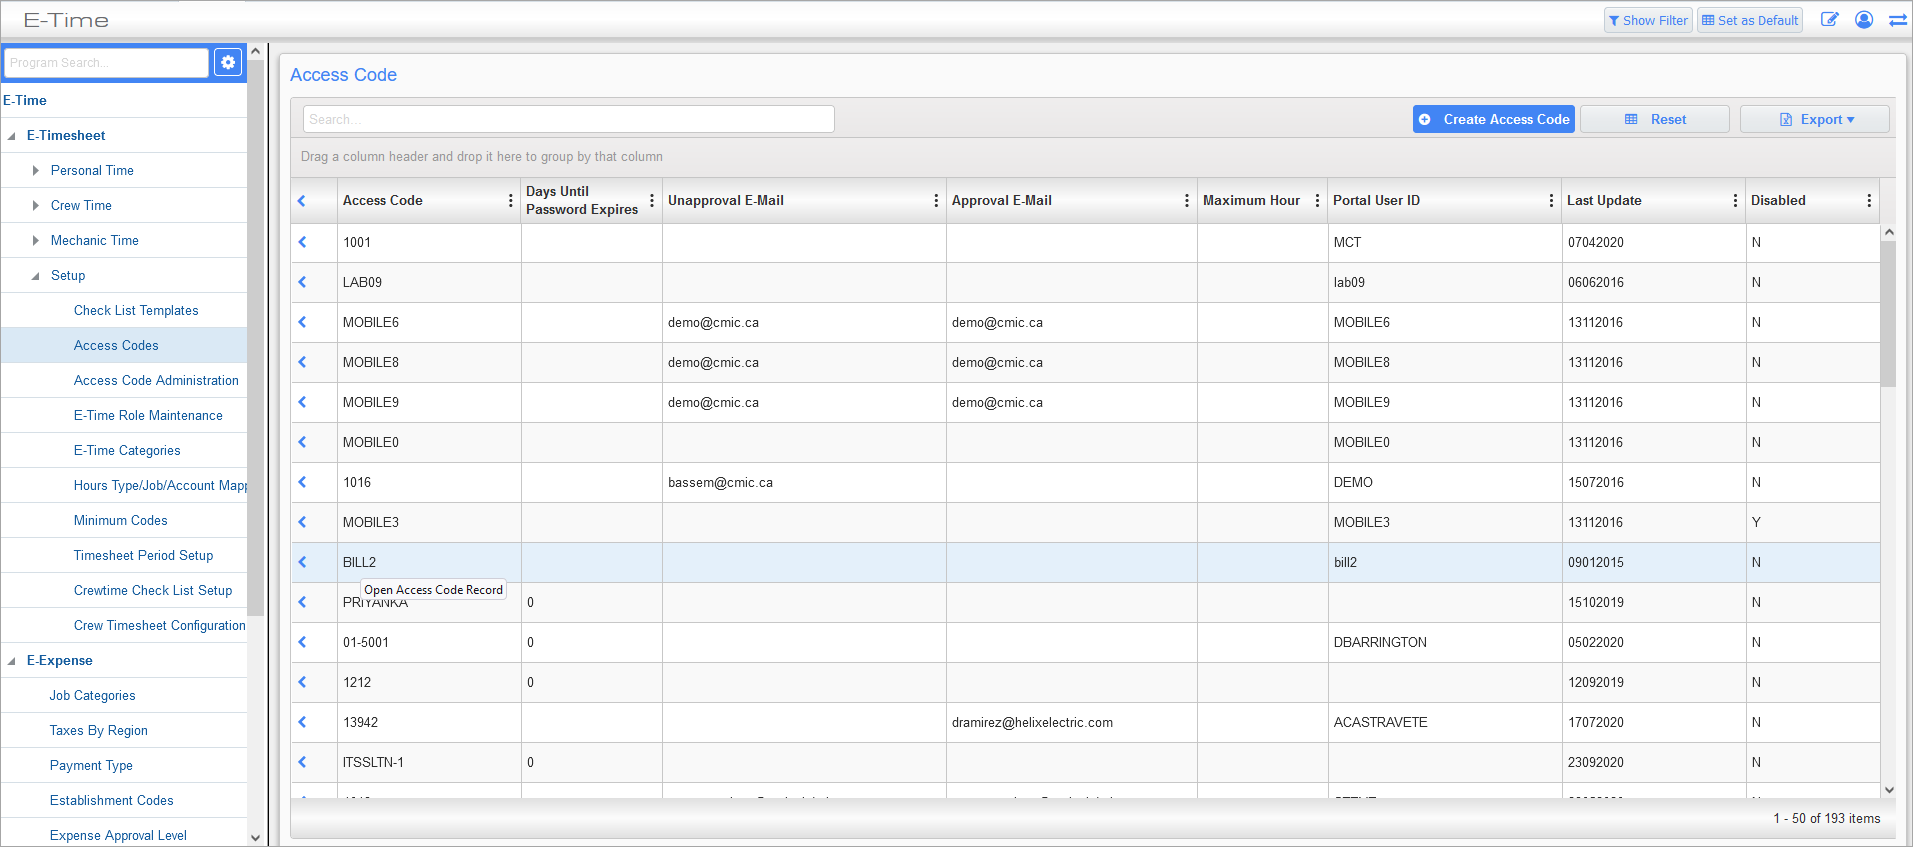
Access Code Setup; standard Treeview path: E-Time > E-Timesheet > Setup > Access Codes
The user can click the [Create Access Code] button to create a new group access code, or click on an existing access code in the log in order to edit it. The Access Code Setup screen is shown below.
The screen allows the modification of access code privileges, email accounts, and other information required to use E-Time by employees and administrators. Click on an access code link to edit the fields for that code.
NOTE: The following fields cannot be edited in the Access Code Setup screen: Access Code, Employee Number, Type, User, and Use Employee Profile Email.
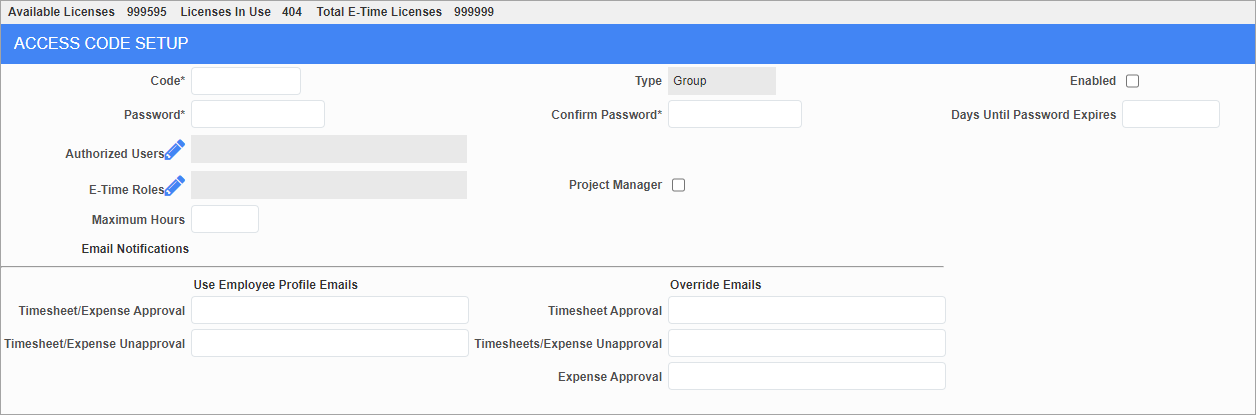
Code
Enter the code the user will enter to access E-Time
Type
This field shows the type of access code. Only group access codes can be created in this screen. Personal access codes are created using the steps described in the Creating Access Codes section.
Check this box to
Password, Confirm Password
Enter the password for the access code. Enter the same password in the Confirm Password field.
Days Until Password Expires
Enter the number of days until the password expires. This can be set from 0 to 9999. To have a password last indefinitely, leave this field blank or enter “0”.
NOTE: Leaving this field blank will prevent expiry but if SSO is turned on and an expiry has been set at the user maintenance level, a password reset may be triggered.
Change Password - Checkbox
Once an access code is saved, the 'Change Password' checkbox appears, allowing the user to change the access code's password.
NOTE: The 'Change Password' checkbox is only available for group access codes. Passwords can only be edited if the access code is a group-type access code. If the access code is a personal-type access code, the password is system-generated and cannot be changed in the Access Code Setup screen.
Employee No
A read-only field showing the employee number who's assigned the access code.
NOTE: This field is hidden for group access codes.
User
Enter the SSO for a portal user. The same portal user ID can be added to multiple E-Time access codes. If the mapping is one-to-one, then the portal user is not prompted for their E-Time login. If the mapping is many-to-one, or if the portal user ID is null, then the user is prompted for their login information.
NOTE: This field is hidden for group access codes.
Authorized Users
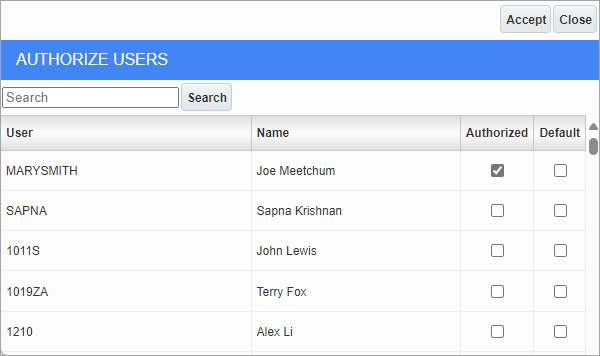
Select the Pencil icon to launch the Authorize Users pop-up to authorize access to the group code and/or to assign a default user for auto-login. If a user has a personal access code, that will always be the default code. Multiple users can be assigned to the group code and authorized users appear at the top of the list.
NOTE: The Authorized Users field is only available for group access codes.
E-Time Roles
Select the Pencil icon to launch the E-Time Roles pop-up to assign E-Time roles to the access code.
Project Manager - Checkbox
If members of this access code have the right to approve timesheets, check this box.
Maximum Hours
If the employees registered to this access code have a maximum number of hours for which they can post timesheets, enter that number here.
Email Notifications
Use Employee Profile Emails (Based on Access Code Approval)
This section of the screen is used to manually enter email addresses for the user of that access code and for the approver of that access code. We do not recommend using this option, as it would overwrite the emails used with these “hard-coded” ones instead of a dynamically updated one associated with the employees profile.
Timesheet/Expense Approval
The email address entered here will be the one used for approving the timesheets
Timesheet/Expense Unapproval
The email address entered here will be the one used if a timesheet
Override Emails
When email addresses are not manually entered (hardcoded) in the Use Direct Access Code Emails section of the screen, the email addresses shown in this section will be used. This is the recommended setting.
Timesheet Approval
This email is based on the approver assigned to the access code with the highest priority level (i.e., priority level 1), as defined in the Approver’s tab of the E-Time - Access Codes Administration screen. For this approver’s access code, the email of the employee linked to it (from their personal access code) will be taken. Additionally the email used could be either a work email or personal email based on a company control flag.
Timesheets/Expense Unapproval
This email is based on the employee that is assigned to this very same access code (as it is their personal access code). Additionally, the email to be taken from the employee could be either a work email or personal email based on a company control flag.
Expense Approval
The email address entered here will be one used for approving the expenses for this access code (based on the access codes security groups).