General – Tab
Header Detail
Requester
Enter/select the user requesting the items being purchased.
Requesters are defined within the Purchase Order Roles maintenance screen (standard Treeview path: Purchase Order > Setup > Local Tables > Purchase Order Roles). For details, refer to Purchase Order - Purchase Order Roles.
If the ‘Undefined Requestors’ box is checked in the PO Control screen (standard Treeview path: Purchase Order > Setup > Local Tables > Control), the system will allow the entry of a requestor that has not been defined as a valid user within the Purchase Order module. An undefined requestor will not have an approver defined, and one will have to be manually selected.
Buyer
Enter/select the name of the buyer. Only valid buyers can be selected within this field. Buyers are set up via the User ID Cross-Reference and Purchase Order Roles maintenance screens.
Normal Receiving – Manual/Automatic Radio Buttons
The option for manual/automatic receiving of purchase orders is defaulted in from the PO Control screen, which users may override.
NOTE: If a PO is set for manual receiving, its corresponding change orders should also be set for manual receiving. However, if the PO is set for automatic receiving, its corresponding change orders can be set for either manual or automatic receiving.
Vendor Code
Enter/select vendor to be assigned to this purchase order.
Contact
If a contact has been associated to this vendor via the Business Partner Maintenance screen, it can be selected in this field.
Lump Sum PO
Check this box if entering a lump sum PO. If this box is checked, then at least one line in the Purchase Order Detail section must be flagged as lump sum. This checkbox is hidden by default and Lite Editor can be used to make it visible if using this feature. Refer to Purchase Order - Using Lump Sum POs for more information on using this functionality.
Status
The status will appear in the Header Detail section once the record is saved.
Distribution Detail
PO Comp-Job Code
These adjacent fields, the first for the Company Code and the second for the Job Code, can be used to limit the detail section to one controlling job and associated sub-jobs only. They represent the company and job that the costs from the PO will be charged against.
Both the job code and company code will default into the Purchase Order Detail section when a ‘J’ distribution type is selected.
NOTE: When the 'Job Code' box is checked on the Requisition Control screen for PO creation grouping, the PO Comp, Job Code, and Job/Dept fields will display the respective values from the Requisition Entry screen. For more details, see Requisitions - Control File Setup.
Distribution Type
Select an applicable distribution line from the drop-down list. The selection made here determines which remaining fields become enabled/disabled. The Distribution type and any further fields that are entered will default into each new detail line of the PO, but can be changed if required.
The following options are available:
-
Equipment Line
-
General Ledger Line
-
Inventory Line
-
Job Line
-
Work Order Line
-
Multi Distribution
NOTE: If a J-line
Job/Dept
Enter/select applicable job/dept.
NOTE: When the 'Job Code' box is checked on the Requisition Control screen for PO creation grouping, the PO Comp, Job Code, and Job/Dept fields will display the respective values from the Requisition Entry screen. For more details, see Requisitions - Control File Setup.
Cost Code/Account
Enter/select relevant cost code/account.
Category
Enter/select relevant category.
Order Date
The system defaults the current date to represent the formal order date for the procurement of items.
Enter the actual date when the order was first issued. This is a reference date to determine how long a Purchase Order has been on file and to calculate the expected date the items will actually be received, based on the lead times associated with the items.
Expected Date
Enter the date on which the merchandise is expected to be received. It may be the request date or a date set by the vendor.
Routing Company
Enter/Select a Routing Company. This field is used by custom workflow for PO approval. This is not a mandatory field and may be left blank.
Routing Job
Enter/Select a Routing Job. This field may be populated with the job code, when selecting the routing company field. This is not a mandatory field and may be left blank.
PO Number
Manually enter a purchase order number if automatic numbering was not set up in the PO Control screen (standard Treeview path: Purchase Order > Setup > Local Tables > Control – Purchase Order Defaults tab). If automatic numbering was set, then this field will be display-only, and the next consecutive PO number will appear once the purchase order is saved.
Reserve groups require that a purchase order number be selected from the LOV. The LOV will display all purchase order numbers available for the group entered in the Selection Criteria section of the screen. The numbers may be selected out of sequence. To learn more about how reserve group numbers are generated, refer to Purchase Order - Using Unused Reserved PO Numbers.
Blanket purchase order numbers were manually entered at the time of setting up the blanket PO. An LOV will display the numbers available for the vendor.
Total (Purchase Order)
Total for purchase order, according to details under the Purchase Order Detail section.
Currency
This field defaults from the vendor but can be changed if required.
NOTE: Users should only update the currency code to be different from the vendor currency if required. The Accounts Payable invoice currency will be required to match with the Purchase Order currency for invoicing.
Type
Select the PO type. There are two PO types available: “Standard” and “Blanket”. The default is “Standard”, so this field must be changed to “Blanket” if a blanket purchase order is being entered.
Release #
This field works in conjunction with the PO Number field. It is used to specify which release of the purchase order this is.
Discount %
This field can be added via the Lite Editor if needed. A discount percent can be entered here to apply discounts on the extended amount. This eventually flows to Accounts Payable where vendors need to be paid at a discounted amount. After entering a discount percent, click on the [Recalculate Discount %] button to apply the discount on each detail line of the purchase order.
Address
Vendor’s address. The LOV will be populated with the addresses from Business Partner Address tab of the Maintain Vendors screen, and with addresses from the Address tab of the Maintain Business Partners screen (used to maintain Vendor’s corresponding base Business Partner record).
[Recalculate Discount %] − Button
This field can be added via the Lite Editor if needed. If a discount has been entered in the Discount % field, click this button to apply the discount to each detail line of the purchase order.
[Retrieve Blanket PO] – Button
The [Retrieve
When a PO is being entered against an existing blanket PO, enter the blanket PO number in the PO Number field, select “Blanket” from the Type field, select the distribution type from the Distribution Type field, and click on [Retrieve
This button opens the Blanket Order Selection pop-up window showing a table containing all the detail lines for the Blanket PO, as shown in the example below.
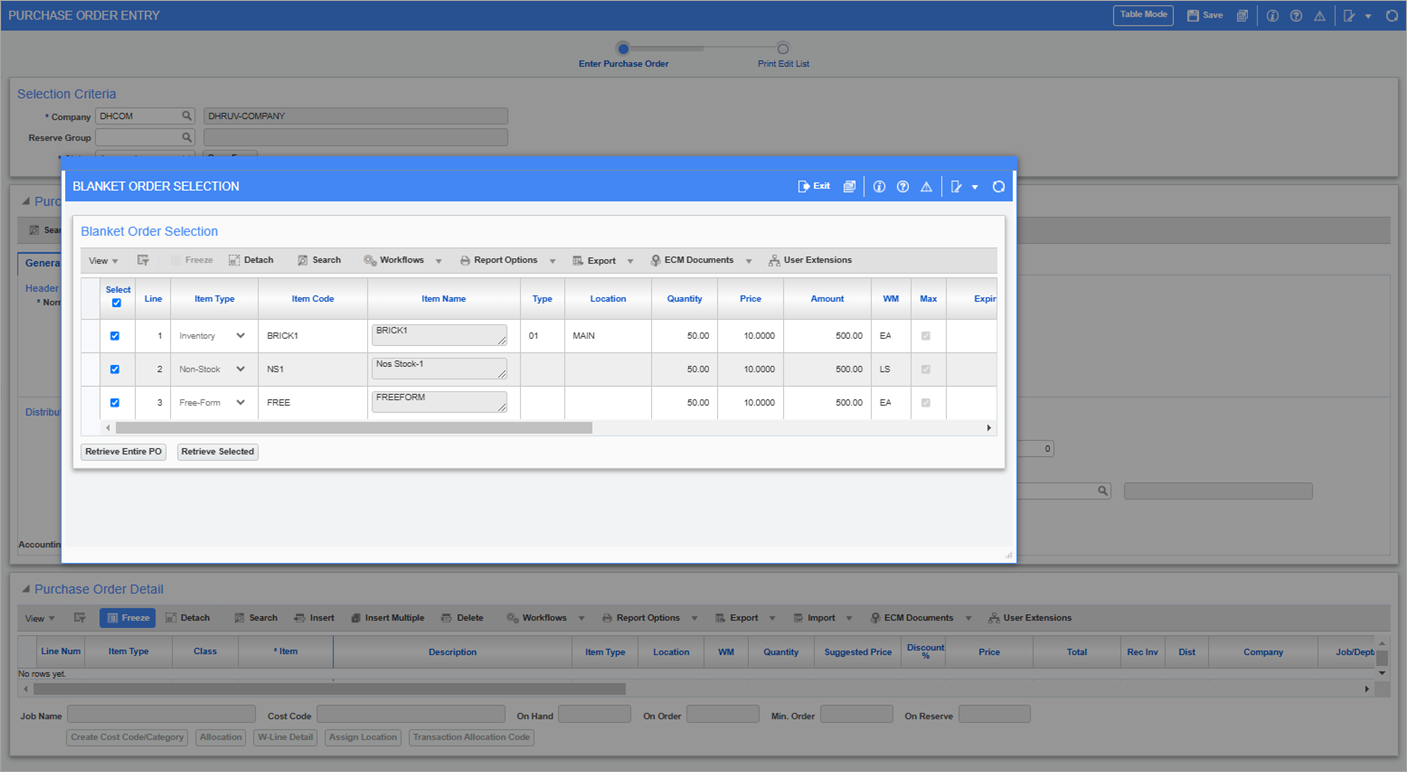
Pgm: POENTRYC – Purchase Order Entry (for Blanket PO); standard Treeview path: Purchase Order > Process > Enter Purchase Order - [Retrieve Blanket PO] button
All columns available in the Blanket Order Entry screen will appear in the Blanket Order Selection pop-up window. The user will be able to hide/show whichever columns they feel are relevant to their needs. By default, the following columns are hidden: Tax1, Tax2, Tax3, Taxable for 1,2,3, Tax Amount, Text Code, and Line Total. These columns can be enabled through the Lite Editor if necessary. Only the 'Select' checkbox will be editable for the user. The header checkbox will select every detail line if clicked, otherwise the user can select each row individually.
After doing so, the user has three options to proceed and close the pop-up window. These are to click the [Retrieve Entire PO] button which will populate every detail line for the Blanket PO regardless of selection, click the [Retrieve Selected] button which will populate only the detail lines that have the 'Select' box checked, and the [Exit] button along the top toolbar to cancel any changes and return to the Purchase Order screen.
NOTE: If required, the user can make changes to the quantity of the detail lines after retrieving to partially receive or fully receive some items. Upon doing so, when another Purchase Order release is created from the same Blanket PO, the detail lines will be updated accordingly and result in only the items that are still not fully received. When retrieved on another release, only the remaining item quantities will populate the Purchase Order detail lines.
If the blanket PO is using J-Line, then a J-Line must be used when creating the PO, otherwise the blanket PO will not be retrieved.
In addition, the blanket PO will not be retrieved if the Quantity field in the blanket PO (for the line item) is empty and ‘Limited to Line Items Only’ is checked in the Blanket Order Entry screen (standard Treeview path: Purchase Order > Setup > Blanket Purchase Order). Quantity must be specified in Blanket PO Detail because it compares Blanket PO Quantity against already released quantity and populates PO Detail with outstanding quantities.
[Change Vendor] – Button
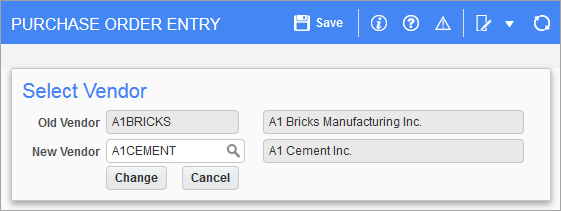
Pop-up window launched from the [Change Vendor] button on the Purchase Order Entry screen
This button is enabled for unapproved/unprocessed purchase orders to allow users to change the vendor assigned to the purchase order. After selecting the new vendor and clicking [Change] in the pop-up, the PO will be updated with the new vendor specific fields, such as compliance, terms, etc.
NOTE: The [Change Vendor] button is also enabled for automatically approved POs (i.e., POs with the 'Automatic PO Approval' box checked in the Purchase Order Control screen). This button is disabled for manually approved POs and processed, received, closed, and void POs. For more information on the 'Automatic PO Approval checkbox', please refer to Purchase Order - Purchase Order Control.
[Compliance] – Button
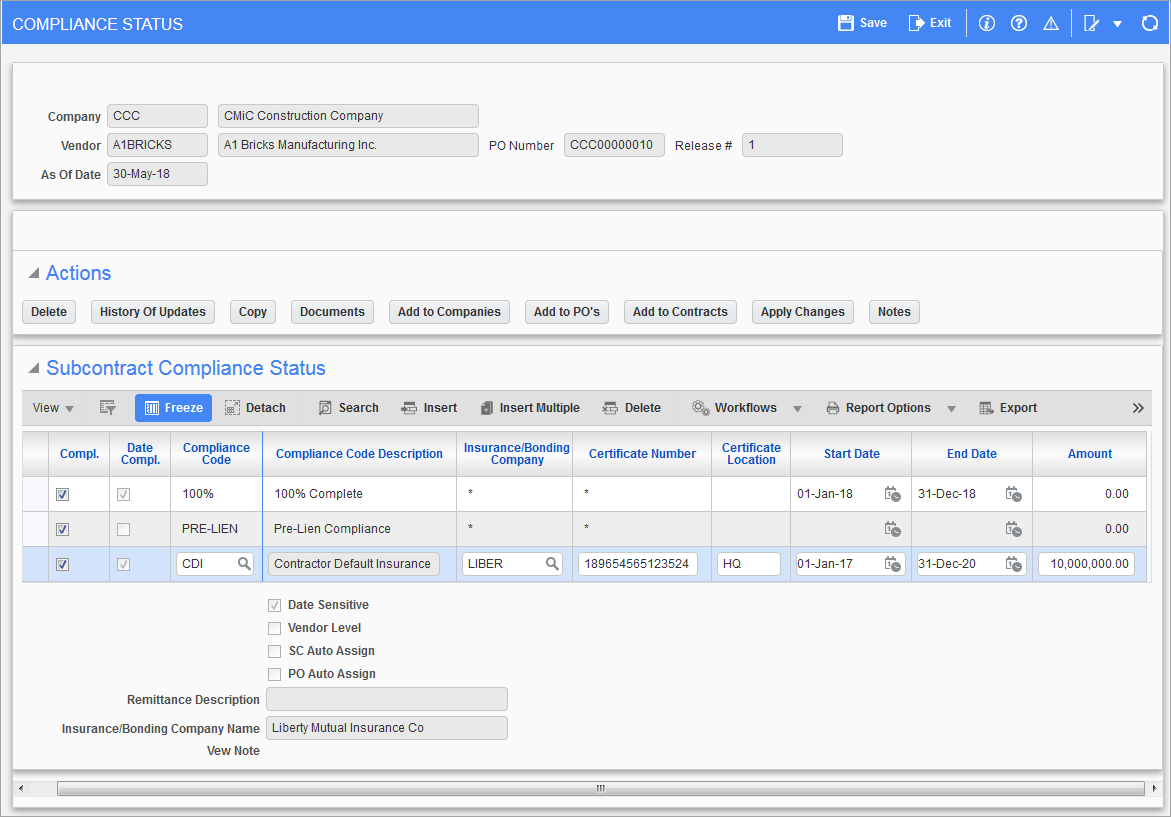
Pgm: INSINFO – Compliance Status; pop-up window launched from [Compliance] button on the Purchase Order Entry screen
This pop-up is also launched via the [Compliance] button on the Change Compliance Status screen (SCTABCOM), and it is also available in the Accounts Payable and Subcontract Management modules. What it displays and what functionality is available depends on where this pop-up was launched.
When launched from this screen (Purchase Order Entry), this pop-up displays the PO’s compliance codes at the PO level, which default to vouchers against the PO. The compliance codes displayed were automatically added to the PO based on the defaults set up for the vendor at the system, company or job (Compliance tab of Enter Job screen) level, or they were manually added to this particular PO.
Since these compliance details are at the PO level, the [Add to Companies], [Add to POs], and [Add to Contracts] buttons are disabled. The [Apply Changes] button is enabled, however, to allow changes to be propagated to existing Vouchers against the PO.
This pop-up can be used to:
-
Add or delete default compliance codes to or from a PO. These default compliance codes default to any new vouchers against the PO.
-
Change the compliance status (compliant/non-compliant) of a PO’s default compliance code, which becomes the code’s default status. The compliance code and its default compliance status will default to any new RFPs/vouchers against the PO. This is useful, for instance, if a vendor fulfills a compliance code’s requirement, and the user wants to set the compliance status of that compliance code to compliant, so that any new RFPs/vouchers created against the vendor’s POs will have that compliance code’s compliance status default to compliant.
-
Also, once a compliance code’s default status is changed, the [Apply Changes] button can be used to propagate the change to the existing RFPs/vouchers against the PO, en masse.
Actions
[Delete] – Button
Used to delete a selected compliance code.
[History Of Updates] – Button
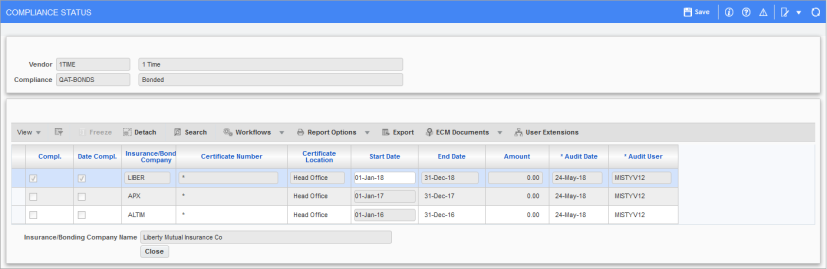
Pop-up window launched from the [History of Updates] button on the Compliance Status screen
Used to view the history of changes to a selected compliance code.
[Copy] – Button
Use the [Copy] button to copy the compliance code to a target vendor.
[Documents] – Button
The Documents pop-up can be used to maintain reference details (doc number, date, description, and amount) about documents associated to the selected compliance code.
[Add To Companies] – Button
This button is disabled when this pop-up (Compliance Status) is launched from the Enter Purchase Order screen, as it is only enabled when the pop-up is launched for a vendor at the system level.
[Add to POs] – Button
This button is disabled when this pop-up (Compliance Status) is launched from the Enter Purchase Order screen, as it is only enabled when the pop-up is launched for a vendor at the system or company level.
[Add to Contracts] – Button
This button is disabled when this pop-up (Compliance Status) is launched from the Enter Purchase Order screen, as it is only enabled when the pop-up is launched for a vendor at the system or company level.
[Apply Changes] – Button
This button is enabled if the pop-up was launched at the system, company, or subcontract/PO level.
At the PO level, which this pop-up is at, this button is used to update the details of compliance codes assigned to the vouchers associated to the PO. This is done by examining every voucher associated to the PO, and if any of these vouchers have the compliance code and the Insurance Company and Certificate # fields match, the compliance code’s details will be updated using these details.
At the PO level, this button can also be used to change a compliance code’s compliance status (‘Compliance’ checkbox) en masse for all vouchers against a PO.
To change the compliance status (‘Compliance’ checkbox) of a compliance code assigned to a single voucher, use the Adjust Voucher Status screen of the Accounts Payable module.
NOTE: For vouchers, a compliance code is added or updated only if the voucher’s payment status is “Compliance Hold (C)”. A voucher is automatically assigned the compliance hold payment status when it is posted and the system determines that it is not compliant. Once the payment status is changed to a different status, compliance codes can no longer be added to, or updated for the voucher via this screen.
[Notes] – Button
Used to view or add a note to the selected compliance code.
[Approvers] – Button
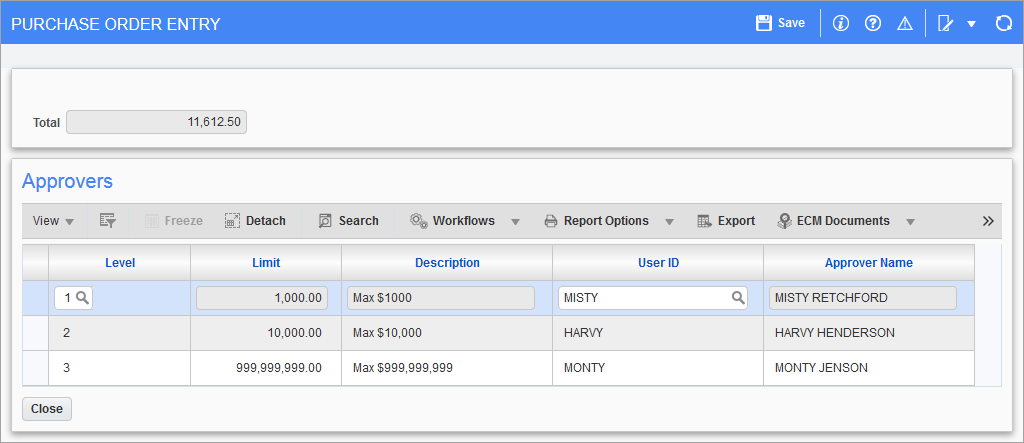
Pop-up launched by [Approvers] button on the Purchase Order Entry screen
Press the [Approvers] button to invoke Approvers pop-up window to view or assign individual(s) authorized to approve the specified purchase order.
Where default location approvers have been defined within the Location Maintenance screen, the system will default the location approvers for the line items specified within the detail section of this purchase order.
If automatic approvers functionality is being used, the approvers for a PO are automatically set up.
NOTE: This pop-up should only be accessed after the detail lines of the PO have been entered. If accessed prior to entering amounts for the detail lines, there will be no approvers declared as approvers are linked to dollar values.
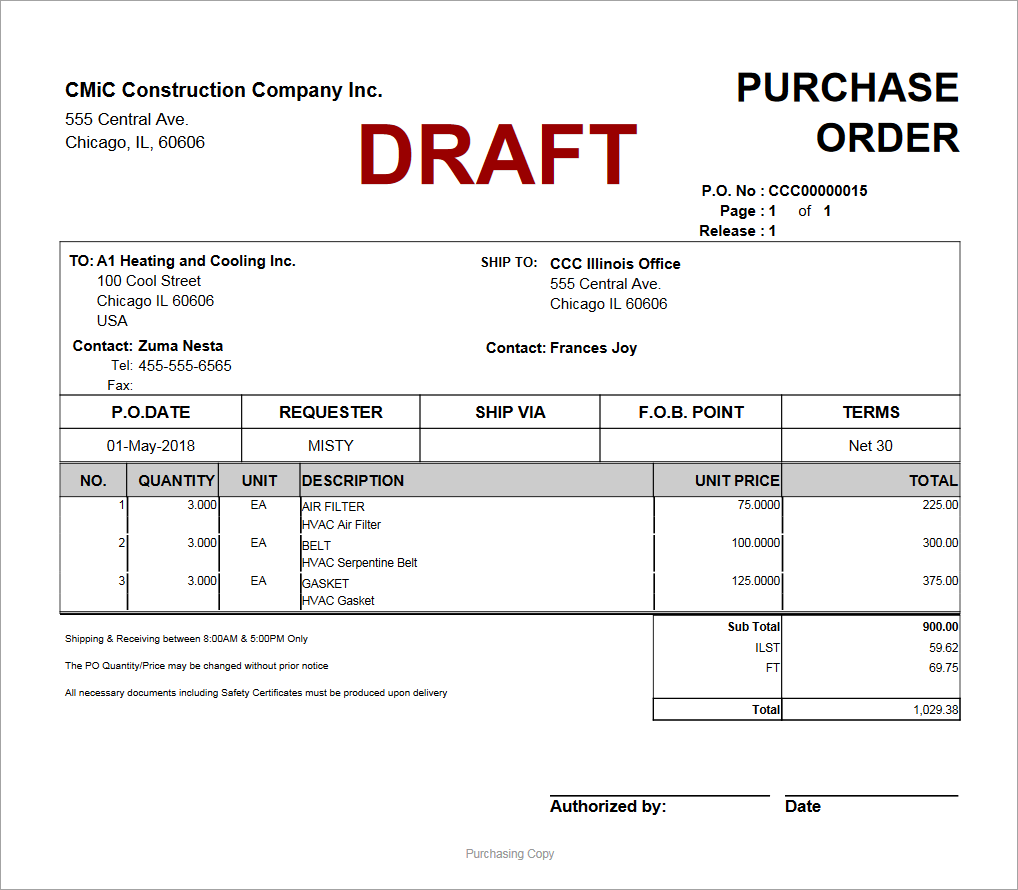
[Print] – Button
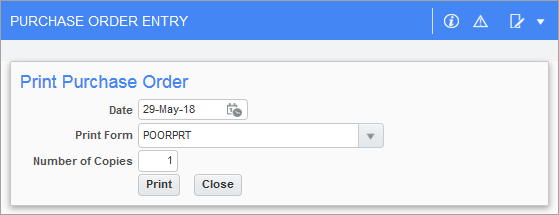
This button is used to print the PO’s details with an Authorized by line for a signature, and a Date line for a date. If the PO’s status is “Not Approved”, the printed PO will have the word “DRAFT” printed on it in big, red, capital letters, as shown below:
[Post] – Button
This button launches the pop-up to post an approved PO as a committed cost.
Once the items of a PO are received and processed, a voucher is created for the PO in the Accounts Payable module.
NOTE: Vouchers created via purchase orders will only take the terms of the purchase order if the option “Use PO Term” is checked on the AP Control File screen (standard Treeview path: Accounts Payable > Setup > Local Tables > Control File Options – Other tab).
[Populate Summary] – Button
The [Populate Summary] button is used to view Purchase Order Details in a PO that was originally created in Forms, but is being opened in ADF and the PO details are not displaying.
When a PO is created in Forms, PO details are saved in a table labeled ‘PODETAIL’. When a PO is created in ADF, PO details are saved in a table labeled ‘POSUMMARY’. If a PO that was created in Forms is later opened in ADF, the PO details may be missing because the program will be looking for the PO details in ‘PODETAIL’. Clicking on the [Populate Summary] button will populate the details from ‘PODETAIL’ to ‘POSUMMARY’.
NOTE: The [Populate Summary] button is only enabled for POs with an "Approved" or "Not Approved" status in the Status field.
[View Requisition] – Button

Pop-up window launched from [View Requisition] button on the Purchase Order Entry screen
The Requisitions module can be used to automatically generate purchase orders based on information acquired from approved requisitions. Only requisitions that have been approved can be generated into purchase orders. The purchase order will then be picked up in the purchase order module and processed from there.
Clicking on the [View Requisition] button from the PO Entry screen will open a pop-up window displaying the corresponding requisition from which the PO was created.
If the PO does not have a corresponding requisition, the [View Requisition] button will be disabled.
NOTE: One or more POs can be created from one requisition. For example, a requisition could contain orders for two items from two different vendors. In this case, two POs would be created from one requisition number.
Defaults (PO Terms) – Tab
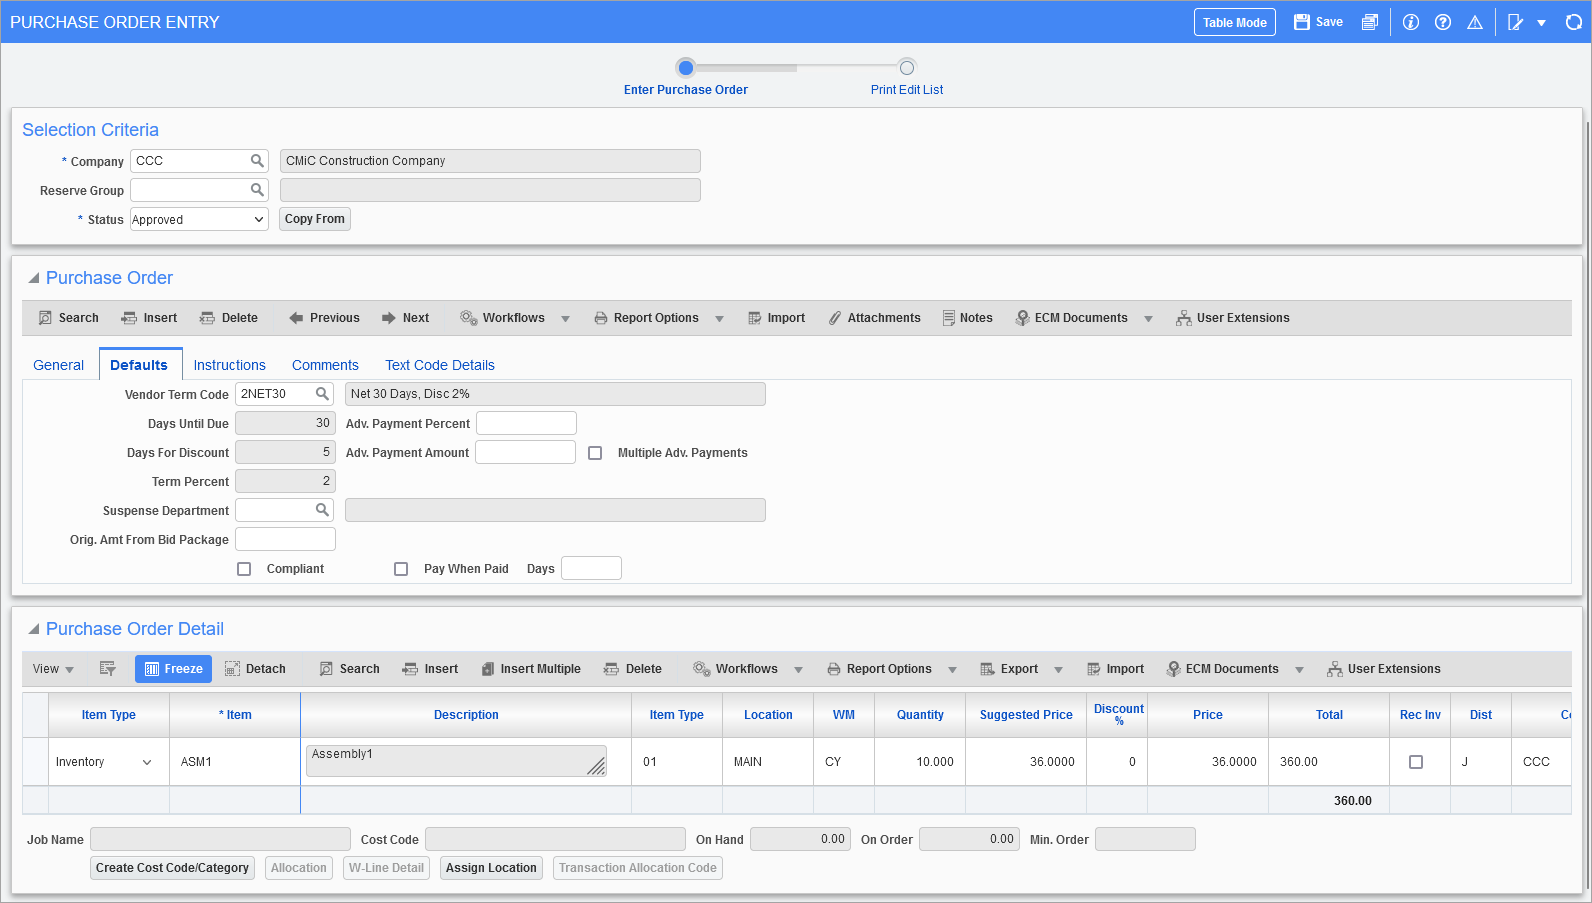
Pgm: POENTRYC – Purchase Order Entry; standard Treeview path: Purchase Order > Process > Enter Purchase Order – Defaults (Terms of Sale) Tab
The system defaults the vendor discount terms defined in the vendor master file for the specified vendor. Click the Defaults tab to access the PO terms details.
Vendor Term Code, Days Until Due, Days For Discount, Term Percent
If the defaulted terms are not those to be used for this particular purchase order, select a valid vender term code. Depending on the AP Control File screen setting ‘Use PO Terms’ (standard Treeview path: Accounts Payable > Setup > Local Tables > Control File Options – Other tab), the terms entered here will default to the accounts payable voucher when the purchase order is selected for payment. The term denotes the standard payment conditions applied to invoices. For example, Cash on Delivery, Net due in 30 days, etc. The terms rules are displayed in the Days Until Due, Days For Discount, and Term Percent fields.
Suspense Department
Enter/select a suspense department, if required, to override the department code as defaulted from the Posting tab of the PO Control screen for the suspense department and account.
Orig. Amt From Bid Package
This field is used by CMiC Field, where the purchase order is created using the CMiC Field bid package applications.
Compliant – Checkbox
This field indicates if the PO is compliant with its compliance codes.
Pay When Paid – Checkbox
This field is defaulted from the PO Control screen, which users may override.
Check the box to indicate that the payment must be held until the owner payment is made.
Days
The Days field contains the value of days to be used in conjunction with the Pay When Paid functionality.
This value represents the number of days to add from the receipt of the customer payment before making the PO payable.
Enter zero to have Pay When Paid payables due immediately on payment receipt from the customer.
Advance Payment
The Advance Payment functionality can be used in the Defaults tab of the Purchase Order Entry screen and is limited to credit taxes (VAT) only. The 'Advance Payment' box must be checked in the Accounts Payable Control File to use this functionality. Users must ensure that taxes in the Accounts Payable Enter Vouches screen matches the taxes in the Purchase Order Entry screen. The following fields are hidden by default and can be made visible using the Lite Editor if needed.
For Advance Payment fields in Accounts Payable, see Accounts Payable - Enter Vouchers.
Advance Payment Percent
The Advance Payment percentage can be entered in this field to be applied on the Purchase Order total. If the Advance Payment percentage is entered, the system will calculate the Advance Payment amount based on the Purchase Order total.
NOTE: This field will be disabled once the Purchase Order is posted.
Advance Payment Amount
The Advance Payment amount can be entered in this field to be applied to the specific Purchase Order and the system will calculate the Advance Payment Percentage field automatically. This is the total Advance Payment amount including taxes.
NOTE: This field will be disabled once the Purchase Order is posted.
Multiple Adv. Payments − Checkbox
If this box is checked, multiple Advance Payment invoices can be entered for the Purchase Order. The Advance Payment invoice amount in the Accounts Payable invoice for the very first invoice will be non-editable and equal to the Advance Payment amount. Users can override the Advance Payment invoice amount for subsequent Advance Payment invoices.
If this box is unchecked, the user will not be allowed to enter multiple Advance Payment invoices for the specific Purchase Order. The Advance Payment Invoice field in the Accounts Payable invoice will be non-editable and equal to the Advance Payment amount.
NOTE: This field will be disabled once the Purchase Order is posted.
Instructions (Shipping) – Tab
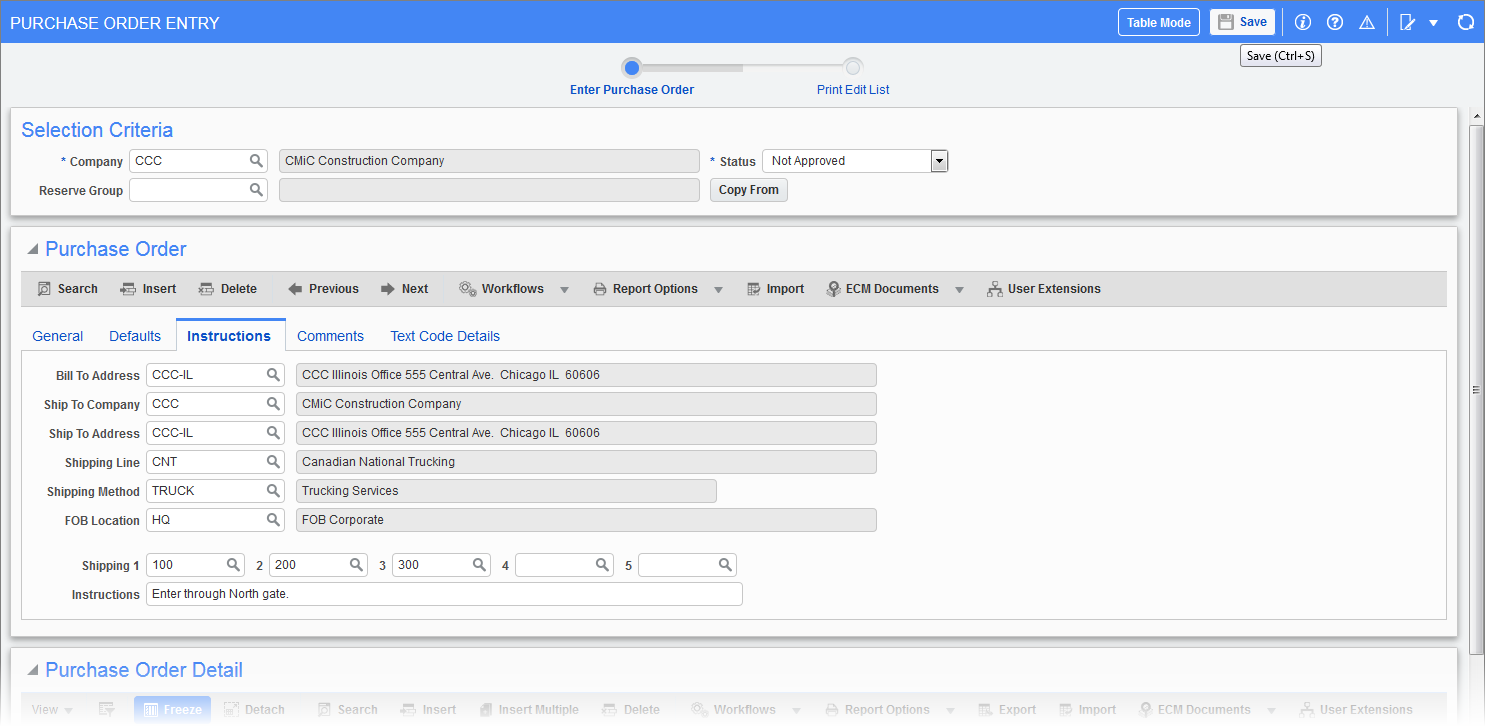
Pgm: POENTRYC – Purchase Order Entry; standard Treeview path: Purchase Order > Process > Enter Purchase Order – Instructions (Shipping) tab
Bill To Address, Ship To Address
If address codes have been entered on the Purchase Order Defaults tab of the Purchase Order Control screen in the Default Bill To Address Code and the Default Ship To Address Code fields, the codes will default into each field (standard Treeview path: Purchase Order > Setup > Local Tables > Control – PO Defaults tab). If these fields have been left as null on the Purchase Order Control screen, there is no default but a billing address can be selected from the LOV.
If the 'Ship To Address Code From Job' box is checked on the Purchase Order Defaults tab of the Purchase Order Control screen, the Ship To Address field will default from the location address entered on the job.
Enter the code for the shipping address of the items defined on this purchase order. The name, first address line and postal/zip code for the address displays in the adjacent fields, if found. The code entered within this field will default to the individual line items on the purchase order, but can be changed on a line-by-line basis.
In the Ship to Address LOV, when the [Add New] button is clicked, the system will display either the Job Alternate Ship-To Address screen or the Address Code screen, depending on the setup defined in the Purchase Order Control screen.
If the 'Use Dedicated Ship To Address for Job PO' box is checked and a job code is specified in the General tab of the Enter Purchase Order screen, the system will open the Job Alternate Ship To Address screen. This behavior also applies to the Enter Change Order and Blanket Order Entry screen. For more information, see
If the 'Default Ship To Address Code from Job Location' box is checked, the system will open the Address Codes screen instead. For more information, see System Data - Address Codes.
When the [Add New] button is clicked, the Job Alternate Ship To Address screen will auto populate the job code in the Selection Criteria section of the General tab in the Enter Purchase Order and Blanket Purchase Orders screens.
Shipping Line (Carrier Code)
Enter/select the code for the carrier to be used to transport the items for this purchase order, if applicable.
If entering a blanket purchase order, this information may have been entered on the blanket default pop-up. In that case, the shipping code will default into this field.
Shipping Method
Enter/select the code for the mode of transportation to be used (motor, rail, air, etc.) for this purchase order, if applicable.
FOB Location (Freight On Board Code)
The FOB location code represents the physical point of delivery where the liability for loss or damage to the goods delivered transfers from the supplier to the purchaser.
Enter/select a valid code for the FOB location for this purchase order. The descriptive name of the FOB code displays in the adjacent field.
When an FOB location has been entered in the default screen of a blanket purchase order, the information will default the location into this field.
Shipping 1 (Shipping Text Reference Code 1)
Enter/select the first text reference code to be printed at the bottom of the purchase order. Only the text reference codes associated with the shipping text type code defined in the PO Defaults tab of the PO Control screen can be selected (standard Treeview path: Purchase Order > Setup > Local Tables > Control – PO Defaults tab).
Shipping 2-5 (Shipping Text Reference Codes 2 – 5)
Enter the second, third, fourth and fifth shipping text reference codes to be printed in the sequence recorded at the bottom of the purchase order which describes extra shipping instructions. Only the text reference codes associated with the shipping text type code defined in the PO Defaults tab of the PO Control screen can be selected.
Instructions (Shipping)
Enter the descriptive text describing distinct shipping instructions for the purchase order. The descriptive text will print at the bottom of purchase order in the sequence recorded. The instructions can consist of a maximum of sixty (60) alphanumeric characters in length.
Comments – Tab
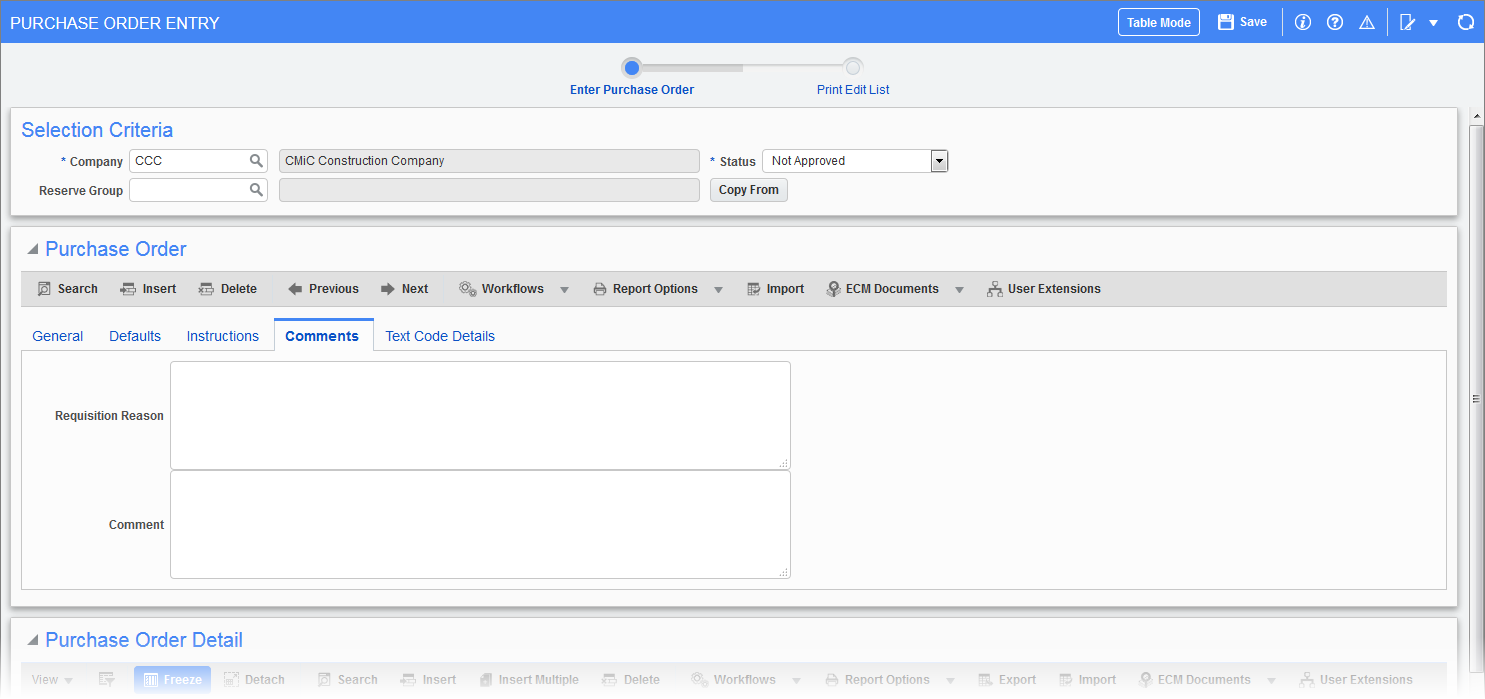
Pgm: POENTRYC – Purchase Order Entry; standard Treeview path: Purchase Order > Process > Enter Purchase Order – Comments tab
Enter any subsequent instructions and/or messages. Space for additional comments is provided so that specific instructions to the vendor can be communicated without setting up text reference codes for them. The comments will print at the bottom of purchase order in the sequence recorded.
Text Code Details (Additional Predefined Text) – Tab
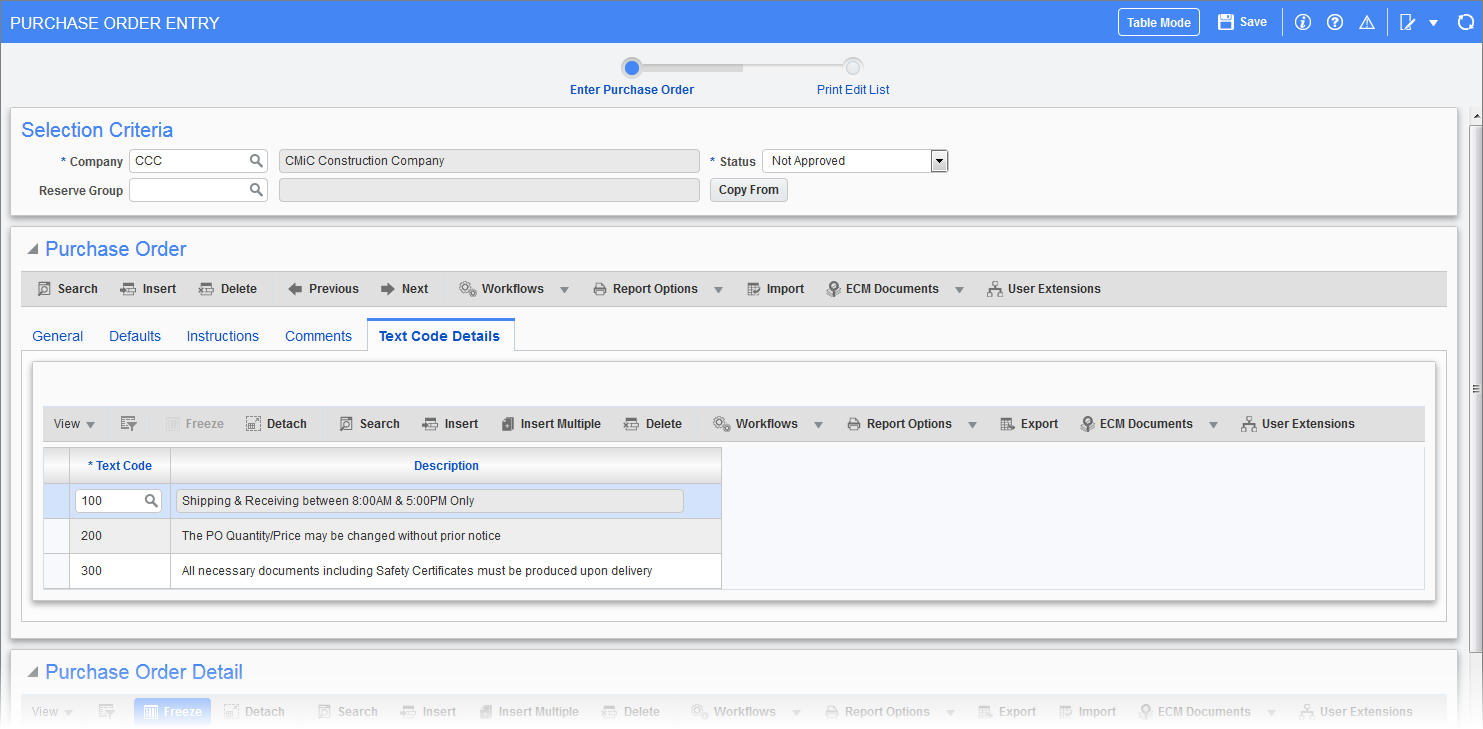
Pgm: POENTRYC – Purchase Order Entry; standard Treeview path: Purchase Order > Process > Enter Purchase Order – Text Code Details tab
The Text Code Details tab is used to assign text codes for the specified purchase order. Only the text reference codes associated with the text type code defined in the Purchase Order Control screen can be selected (standard Treeview path: Purchase Order > Setup > Local Tables > Control – PO Defaults tab).
Text codes are maintained in the System’s Global Tables (standard Treeview path: System > Global Tables > Text Code).