Pgm: POCTRLFM – Purchase Order Control; standard Treeview path: Purchase Order > Setup > Local Tables > Control – Purchase Order Defaults tab
The Purchase Order Control screen is used to configure the Purchase Order module for a company, and to set its defaults for new POs, PO receipts, and PO postings. For instance, users can set up PO numbering masks, set the default WM code, and enter default shipping instructions or notes. Also, advanced features, like undefined requestors and automatic PO approval, can be enabled or disabled.
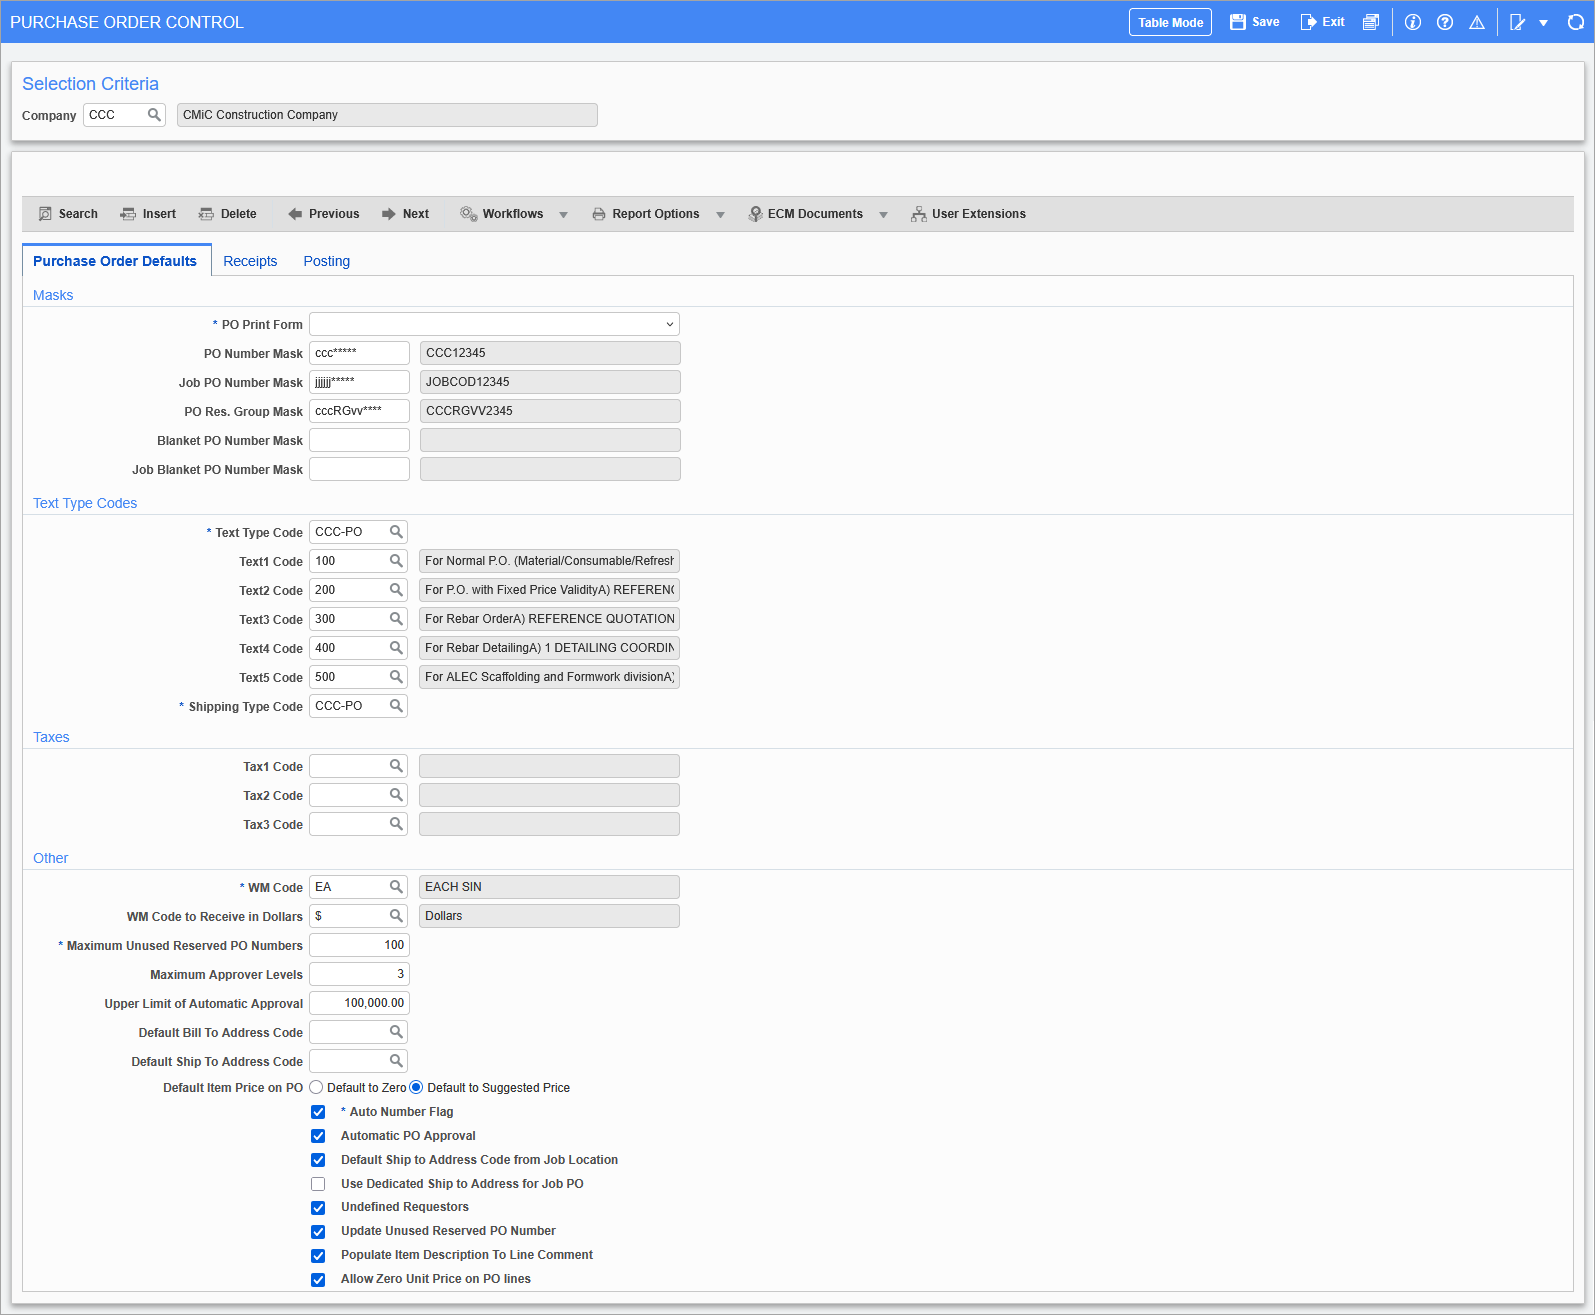
Purchase Order Defaults – Tab
Masks
PO Print Form
Enter/select the form name from the drop-down list to identify the PO printing program to be used.
Numbering Masks
The user-defined numbering masks are only applicable if using automatic numbering. The masks can consist of a maximum of 11 characters.
Mask Entry Rules
NOTE: The PO Res. Group Mask field is used with the 'Update Unused Reserved PO Number' checkbox, located in the Other section of the Purchase Order Defaults tab. When this box is checked, if entering a purchase order with a reserve group selected in the Reserve Group field, then the system will use unused numbers from the selected reserve group but will apply the mask defined in the PO Res. Group Mask field. To learn more about how this feature works, refer to Purchase Order - Using Unused Reserved PO Numbers.
The following entry rules are the same for each of the numbering mask fields (PO Number Mask, Job PO Number Mask and PO Reserve Group Mask).
The PO masks allow the numbering system to be customized for each of the 11 digits of the string.
The asterisk (*) is used to indicate the placeholder for the numbers within the string.
Any combination of numbers, letters and characters can be used to create a PO numbering string.
The system has pre-defined codes which may be used in combination with user-defined numbering/lettering or to provide a unique combination.
The pre-defined codes are in lowercase. Any code entered other than the following will be taken as fixed text and converted to uppercase.
The lowercase options available for PO masks are:
- b Business partner code (customer)
- c Company code
- y Year
- y = Last digit of a 4-digit year
- yy = Last 2 digits of a 4-digit year
- yyy = Last 3 digits of a 4-digit year
- yyyy = All 4 digits of the year
- m Month
- mm = Month of the year (i.e. December is 12)
- d Day
- d = Day of the week where 1 is Sunday
- dd = Day of the month
- ddd = Day of the year (i.e. 365 is December 31 unless a leap year)
- j Job code (only available for Job PO Number Mask field)
- * Next available number (Only use if sub-jobs have independent numbers)
Samples:
If the company had a vendor code “VAB401”, company code “CM”, year “2018”, job code “5746”, and the date is August 16, 2018:
-
If the PO Number Mask field is “ccbbb*****”, the PO code will appear as “CMVAB00001”.
-
If the PO Number Mask field is “yymmdd***”, the PO code will appear as “180816001”.
-
If the PO Number Mask field is “**********”, the PO code will appear as “0000000001”.
-
If the Job PO Number Mask field is “JJJJ*******”, the job PO code will appear as “57460000001”.
-
If the PO Reserve Group Mask field is “RG******”, the reserve group PO code will appear as “RG000001”.
The system will begin the numbering process from right to left based on the number of asterisk characters found within the mask. Asterisk characters found to the left of the total number will pre-fill with the number 0.
For example, if the invoice mask is PO*****, and the last purchase order number is PO00010, then the system will begin the numbering at the right most asterisk and fill the number 0 into all asterisk characters found to the left. In this case, the next purchase order number created under this mask would be PO00011.
Job Blanket PO Number Mask
This field allows users to generate an entry mask for blanket orders with job codes, distinguishing them from blanket orders without a job code. This distinction helps users manage job code blanket orders separately from regular distribution blanket orders, where no job code is included. The functionality is similar to other Mask fields, accepting specific characters as mask entries to generate the mask according to user preferences.
The lowercase options available for PO masks are:
-
Using "j" will refer the job code
-
Using "b" will refer the vendor code
-
Using "c" will refer the company code
-
Using "*" will generate a numerical value
-
Using any variant with "dd" or "mm" or "yyyy" will refer to the current date, e.g. "ddmmyyyy" will generate "21032025". Date, Month, and Year must be set as pairs or year set as four "y" characters, otherwise it will error out due to incorrect date.
-
Using any other character, or the above capitalized, will not refer to any special condition and will display in the mask as is.
After entering the special cases as mentioned above, the resulting mask will be displayed within the description box beside the Job Blanket PO Number Mask field.
Text Type Codes
Text Type Code
Enter/select the text type to be used in purchase order fields that refers to non-shipping instruction text.
Text Code 1, Text Code 2, Text Code 3, Text Code 4
Enter/select one to four text codes to default into every new purchase order.
- If the terms and conditions on all purchase orders are the same, then this is where the text code for those terms is entered.
- The text associated with the code will appear in the display field beside the selected code.
- The text will print on the bottom left-hand side of the first page of the purchase order form.
Shipping Type Code (Shipping Instructions Text Type)
Enter/select the text type to be used for shipping instructions.
Taxes
Tax Codes
Enter/select the required tax codes applicable to purchases from a vendor. The name and the tax percentage value for the tax are displayed in the adjacent field. The entry made on this field establishes the default tax, which the system will use; however, this tax can be overridden on a line-by-line basis during purchase order entry.
If this field is left blank, the user must manually enter the different level of tax applicable during purchase order entry.
Tax codes are defined using the Tax Maintenance screen in the System Data module (standard Treeview path: System > Global Tables > Tax Code). See the System Data guide for details on entering tax codes.
WM Code (Weight Measure)
Enter/select the default unit in which quantitative information for the purchased or stocked item will be measured.
WM Code to Receive in Dollars (Weight Measure)
This field is used by the Accounts Receivable module to indicate if the item being received is to be received in dollars only. If the item ordered has the WM code assigned for dollars, then it must be received in dollars only.
NOTE: The inventory items cannot be purchased with this weight measure code in either blanket or standard orders.
When an item is received in the WM specified by this field, the receiving system will only allow the user to enter an amount into the amount field, but the quantity will revert to one (1).
Maximum Unused Reserved PO Numbers
The default value of 100 unused PO numbers for a reserve group is editable based on needs. This limits how many unused PO numbers may exist for a given reserve group.
Maximum Approver Levels
Enter the maximum number of approver levels required for a purchase order to pass through the approval process. The PO approval process varies substantially from company to company. There are a large variety of different setups for the PO approval process. For example, some companies simply have two levels of approvals. Others have different levels of approvals for different amounts. Some companies route approval according to department or job.
The approval number entered within this field will limit the number of approval levels that can be set up within the Approval Levels screen (standard Treeview path: Purchase Order > Setup > Local Tables > Approvers > Approver Levels).
Upper Limit of Automatic Approval
If the ‘Automatic PO Approval’ box is checked on this screen, this field must be entered (i.e. it cannot be left as null); otherwise, automatic approvals will not work. If the ‘Automatic PO Approval’ box is not checked, this field is disabled.
The system will automatically approve all purchase orders with a total amount up to and including the value entered within this field.
Default Bill To Address Code, Default Ship To Address Code
Enter/select either a bill to address code or a ship to address code. Entering the address codes signals a default into the Bill To and Ship To Address Codes in the Shipping Instructions pop-up on the Purchase Order and Change Order Entry Screens, and in the Ship To Address field in Blank Purchase Order Set Up Default pop-up. The codes will also be used by standard purchase order documents.
If the ‘Ship To Address Code From Job’ box is checked, the Ship to Address field will default from the Location Address entered on the job (if entered in the Job Setup).
Leave these field blanks to use the addresses entered at the company level.
Default Item Price on PO – Radio Button
This is the default item price on the Purchase Order. Users can either set the default price to zero or it can be set to the suggested price for the item.
Auto Number Flag – Checkbox
Check the automatic numbering box when the system should automatically number Purchase Orders. Manual entry of a purchase order number will be required for each purchase order if this checkbox is not used.
The exception would be Reserve Group Numbering, which is explained in the processing chapter of this guide.
Automatic PO Approval – Checkbox
Check the Automatic PO Approval box if the system is to automatically approve the entered Purchase Orders. If Automatic PO Approval is checked, as soon as the user exits the PO entry screen, the PO is automatically approved and the PO can be processed.
NOTE: If the automatic approval has been checked, then the Upper Limit on the total value of the Purchase Orders must be completed or the purchase order will not be approved.
Leave this box unchecked when purchase orders are to be approved manually by one or more approvers.
When left unchecked, the Upper Limit of Automatic Approval becomes a display-only field.
Default Ship to Address Code from Job Location – Checkbox
If checked, the job location address code entered in the Location field on the Job Detail tab of the Job Setup screen in the Job Costing module (standard Treeviw path: Job Costing > Job > Enter Job – Job Detail tab) defaults to the Ship To Address field on the Instructions tab of the Purchase Order Entry screen (standard Treeview path: Purchase Order > Process > Enter Purchase Order – Instructions tab).
Use Dedicated Ship to Address for Job PO – Checkbox
When this checkbox is checked, the Ship To Address LOV will retrieve addresses from the Job Alternate Ship To Address screen instead of the Address Code screen in the System Data module. For more information, see
This functionality applies to the following screens:
-
Enter Purchase Order
-
Enter Change Order
-
Blanket Purchase Orders
NOTE: The 'Default Ship to Address Code from Job Location' and 'Use Dedicated Ship to Address for Job PO' checkboxes are mutually exclusive. If one checkbox is checked, the other will be automatically deselected by the system to prevent conflicts from address sourcing behavior.
Undefined Requestors – Checkbox
Do not check the ‘Undefined Requestors’ box if a decision has been made that requestors must be set up in the Purchase Order module.
Check the ‘Undefined Requestors’ box if non-defined requestors are permitted to make entries within the purchase order module.
Update Unused Reserved PO Number – Checkbox
This checkbox is used in combination with the PO Res. Group Mask field, which is also located on the Purchase Order Defaults tab. When this box is checked, if entering a purchase order with a reserve group selected in the Reserve Group field, then the system will use unused numbers from the selected reserve group but will apply the mask defined in the PO Res. Group Mask field. To learn more about how this feature works, refer to Purchase Order - Using Unused Reserved PO Numbers.
Populate Item Description To Line Comment – Checkbox
By default, this checkbox is unchecked and hidden but can be added using Lite Editor if required. This box is used to control whether the item description details entered for inventory and non-stock items automatically default to the Comments field when entering requisitions in the Requisition Entry screen and purchase orders in the Purchase Order Entry screen.
If unchecked, the item description details for inventory and non-stock items will not default to the Comments field when entering requisitions and purchase orders. If checked, the item description details for inventory and non-stock items will automatically default to the Comments field. For multi-distribution, comments will also be populated in the [Allocation] button's pop-up window.
Allow Zero Unit Price on PO lines − Checkbox
This box is used to control whether users can enter a zero-unit price in the Price field in the Purchase Order Detail section of the Purchase Order Entry screen. When unchecked, the system will prevent users from entering a zero-unit price and will display an error message, regardless of whether the purchase order was created from a requisition or a blanket purchase order. By default, this checkbox is unchecked.
Receipts – Tab
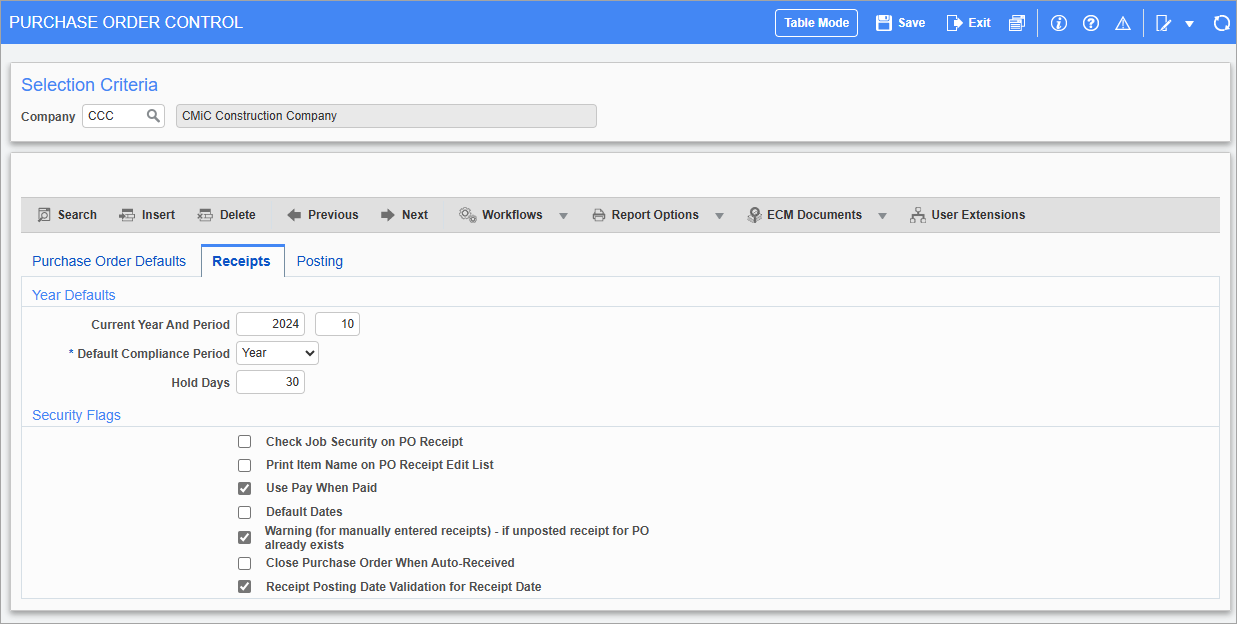
Pgm: POCTRLFM – Purchase Order Control; standard Treeview path: Purchase Order > Setup > Local Tables > Control – Receipts tab
Year Defaults
Current Year and Period
These two fields are used to set the default year and period for transaction post dates.
Default Compliance Period
This field determines the expiry date of date sensitive compliance codes used on purchase orders. The system defaults “Year” into this field, but it may be changed to “Day”, “Week”, “Month” or “Non-Compliant”.
Hold Days
Enter the number of days to hold payment after the owner payment is made.
Security Flags
Check Job Security on PO Receipt – Checkbox
When checked, the job security of the current user will be validated in the PO receipt screens: Warehouse Receipt, Job Receipt and Cost Receipt.
By default, this box is unchecked. If checked, job security will be applied to any PO receipt that has a PO with a job code in its header. When no job code is specified in the header, yet there is a “J” line in the distribution, the purchase order will show up in the PO Receipt LOV, as it does with no job security.
Print Item Name on PO Receipt Edit List – Checkbox
When checked, the item name will be printed when printing PO Receipt Edit Listing.
Use Pay When Paid – Checkbox
Check this box to indicate that the payment must be held until the owner payment is made.
Default Dates – Checkbox
If checked, the start date will be the system date and the end date will be the system date plus one year. This is for compliances setup as auto assign and date sensitive at the compliance code level only. If the compliance is set up at the vendor level, those dates will default. If this checkbox is unchecked, no dates will default.
Warning
If checked, the system issues a warning if an unposted receipt
NOTE: This box must be checked before the PO has been created, approved, processed, and/or posted.
Close Purchase Order When Auto-Received
If checked, a PO’s status is set to “Closed” when the PO is automatically received.
Receipt Posting Date Validation for Receipt Date − Checkbox
If checked, the system will validate the receipt date against the posting date in the PO Post Receipts screen. This will prevent receipts created with dates later than the post date (i.e., with future receipt dates) from being posted. For more information, please refer to Purchase Order - Posting Receipts.
This field is hidden by default and can be added using Lite Editor.
Posting – Tab
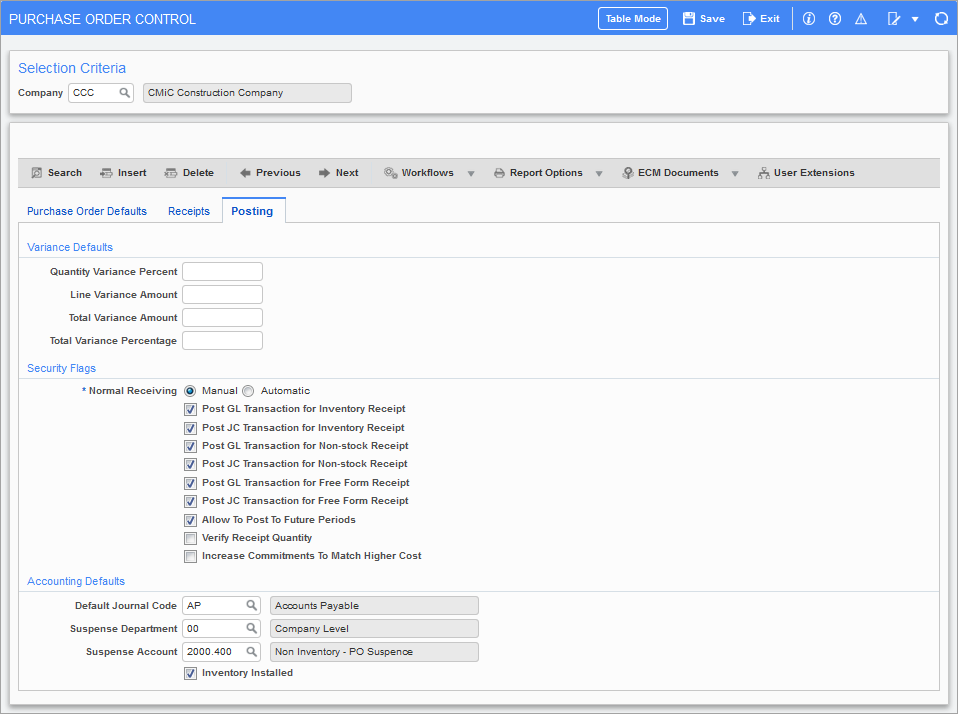
Pgm: POCTRLFM – Purchase Order Control; standard Treeview path: Purchase Order > Setup > Local Tables > Control – Posting tab
Variance Defaults
Quantity Variance Percent
The Quantity Variance Percent field is used to determine the variance allowed on a line-by-line basis. Quantity variance will be validated during entry of the Purchase Order receipt. As soon as received quantity is entered, the system will validate it against the allowed quantity variance in the Purchase Order Control screen and trigger a validation if the quantity variance is exceeded. The quantity variance is applicable to all three receipt screens: Warehouse Receipt, Job Receipt, and Cost Receipt.
Line Variance Amount
The Line Variance Amount field will be validated upon saving of the Purchase Order receipt. As soon as received is entered and saved, the system will validate it against the allowed line variance amount in the Purchase Order Control screen and trigger a validation if the line amount variance is exceeded. The Line Variance Amount field is applicable to all three receipt screens: Warehouse Receipt, Job Receipt, and Cost Receipt.
Total Variance Amount
The Total Variance Amount field on receipts will be validated during the posting of receipt. If the total receipt amount goes beyond the allowed total variance amount, the validation message displays, "Total receipts for PO number PO#####, Release No. #, exceed the allowed total variance amount of x". The Total Variance Amount field is applicable to all receipt screens: Warehouse Receipt, Job Receipt, and Cost Receipt.
Total Variance Percentage
The Total Variance Percentage field on receipts will be validated during the posting of receipt. If the total receipt variance percent goes beyond the allowed total variance percent, the validation message displays, "The total receipt amount for PO number PO#####, Release No. # has exceeded the allowed total variance percentage of x%". The Total Variance Percentage field is applicable to all receipt screens: Warehouse Receipt, Job Receipt, and Cost Receipt.
Security Flags
Normal Receiving (Manual or Automatic Receipt) – Radio Buttons
This option controls the Automatic Receipt functionality, which determines how receipts for POs are created: manually or automatically.
If “Automatic” is selected, the Automatic Receipt functionality is enabled, and a receipt is automatically generated when the purchase order is processed; and it is immediately accessible in the Accounts Payable module for processing. Also, the ‘Do Not Allow Closed PO To Be Assigned To The Voucher’ checkbox becomes enabled on the Other tab of the AP Control File screen (standard Treeview path: Accounts Payable > Setup > Local Tables > Control File Options – Other tab).
If “Manual” is selected, the receipt must be entered via either the Enter Warehouse Receipt or Enter Job Receipt screens (standard Treeview path: Purchase Order > Receipt). Once the receipt is posted, it will become accessible in the Accounts Payable module for processing.
Post GL Transaction for Inventory Receipt – Checkbox
An Inventory item is a complete list of items available for sale, such as property, goods in stock, or the contents of a building. Inventory is an accounting term that refers to goods that are in various stages of being made ready for sale, including finished goods that are available for sale, work-in-progress, in the process of being made.
If this box is checked, the receipt will create an immediate debit to expense in the General Ledger and a credit to the purchase variance account. When the purchase order is matched to the voucher in the Accounts Payable module, the entry will be credit accounts payable and debit purchase order variance.
If this box is unchecked, the Inventory item will be treated the same as any purchase order with the expense not being recorded in the general ledger until the purchase order is matched to a voucher in the Accounts Payable module. The user will not see an entry to the General Ledger at the time of receipt of the purchase order. The entry in the Accounts Payable module will be credit accounts payable and debit expense in the general ledger.
The general ledger expense account defaults from the Inventory item setup screen or is entered/changed at purchase order entry.
Post JC Transaction for Inventory Receipt – Checkbox
If checked, the job will have the commitment removed and a cost transaction created.
If unchecked, the job will have a commitment, but the actual cost will not be recorded on the job until the purchase order is matched to the voucher in the Accounts Payable module.
NOTE: The 'Post JC transaction for Inventory Receipt' checkbox works in conjunction with the 'Post GL Transaction for Inventory Receipt' checkbox.
Post GL Transaction for Non-stock Receipt – Checkbox
A non-stock item is an item that is low in cost but purchased on a frequent basis in small quantities or an item to be purchased for a short period of time and should not become a permanent item in the Inventory module.
If checked, the receipt will create an immediate debit to expense in the General Ledger and a credit to the purchase variance account. When the purchase order is matched to the voucher in the Accounts Payable module, the entry will be credit accounts payable and debit purchase order variance.
If unchecked, the non-stock item will be treated the same as any purchase order with the expense not being recorded in the General Ledger until the purchase order is matched to a voucher in the Accounts Payable module. The user will not see an entry to the General Ledger at the time of receipt of the purchase order. The entry in the Accounts Payable module will be credit accounts payable and debit expense in the general ledger.
The General Ledger expense account defaults from the non-stock item setup screen or is entered/changed at purchase order entry.
Post JC Transaction for Non-stock Receipt – Checkbox
If checked, the job will have the commitment removed and a cost transaction created.
If unchecked, the job will have a commitment but the actual cost will not be recorded on the job until the purchase order is matched to the voucher in the Accounts Payable module.
NOTE: The ‘Post JC Transaction for Non-sock Receipt’ checkbox works in conjunction with the ‘Post GL Transaction for Non-sock Receipt’ checkbox.
Post GL Transaction for Free Form Receipt – Checkbox
A free-form item is used to purchase product which will be bought one or two times and rarely if ever again.
If checked, the receipt will create an immediate debit to expense in the General Ledger and a credit to the purchase variance account. When the purchase order is matched to the voucher in the Accounts Payable module, the entry will be credit accounts payable and debit purchase order variance.
If unchecked, the free-form item will be treated the same as any purchase order with the expense not being recorded in the General Ledger until the purchase order is matched to a voucher in the Accounts Payable module. The user will not see an entry to the General Ledger at the time of receipt of the purchase order. The entry in the Accounts Payable module will be credit accounts payable and debit expense in the General Ledger.
The General Ledger account is entered at the time of purchase order entry.
Post JC Transaction for Free Form Receipt – Checkbox
If checked, the job will have the commitment removed and a cost transaction created.
If unchecked, the job will have a commitment but the actual cost will not be recorded on the job until the purchase order is matched to the voucher in the Accounts Payable module.
NOTE: The ‘Post JC Transaction for Free-Form Receipt’ checkbox works in conjunction with the ‘Post GL Transaction for Free Form Receipt’ checkbox.
Post EC Transaction for Inventory Receipt – Checkbox, Post EC Transaction for Non-Stock Receipt – Checkbox, Post EC Transaction for Freeform Receipt – Checkbox
Checking these boxes provides the user the ability to post an Equipment Costing (EC) transaction during Purchase Order (PO) receipt posting for inventory, non-stock, and free-form items. This ensures that EC transactions are recorded more efficiently, aligning with business processes.
When checked, the EC transaction will be posted at the time of receipt for the respective item in the E-type distributions purchase order. When unchecked, the existing functionality remains unchanged, and EC transactions will be posted at the time of AP invoice posting.
The necessary General Ledger (GL) account information is derived from the Transaction Code table and pre-defined AP/PO defaults. The transaction code specified in the E-type detail line within the PO will dictate the appropriate GL account movements.
Allow To Post To Future Periods – Checkbox
This control option is used by all applications where an I, J, E, G or W distribution is allowed.
The check will be as follows:
Check this box if for this company the user is allowed to post transactions into a period ahead of the current period. The period checks will be as follows:
-
Does the transaction posting date fall within the current or future purchase order period?
-
Does the transaction posting date fall within the company current or future period?
-
Does the transaction posting date fall within the open periods allowed in GL period dates?
-
Where distribution is used, the ‘Allow to Post To Future Periods’ checkbox checked will allow the user to post to the current or future period as shown on the Purchase Order Control. If the current period is not set up, it will be ignored but the checkbox ‘Allow To Post To Future Periods’ will be considered. If unchecked, a distribution will not be allowed to a future period.
-
Is there an inter-company distribution on the transaction being posted? Is the period date for this company open? Does the Purchase Order Control of this company have a period date entered and is the ‘Allow To Post To Future Periods’ checkbox checked?
Verify Receipt Quantity – Checkbox
This checkbox will determine whether variances are to be validated on purchase order receipts.
Increase Commitments To Match Higher Cost – Checkbox
If checked, the commitment to the job for the dollar amount will be increased to match the voucher dollar amount when either the line is closed in the Assign Voucher to PO utility, or when the purchase order is closed using the Close/Re-Open Purchase Order utility.
When this box is checked, the PO must be received by entering a cost receipt using the Shipment Cost Receiving screen, then the invoice must be assigned to the PO using the Assign Posted Voucher to PO utility. This way, the cost posted during voucher entry will be reversed. The new cost will be posted to the job, and commitment will be increased and posted to the job. For further details, see Purchase Order - Increasing Commitments to Match Higher Cost.
If this checkbox is unchecked, then only quantity will be taken into consideration.
NOTE: If the PO items are non-stock or free-form items and the PO Control checkboxes are checked to post the cost of these items to the job at PO receipt, the user will not be allowed to close these lines but will be forced to use the Close/Re-Open Purchase Order utility.
Account Defaults
Default Journal Code
Enter/select the journal code that should default to the posting programs as the General Ledger journal in which transactions will post.
Suspense Department, Suspense Account
Enter/select the department and account that will be used as the accrued liability account for the posting of non-stock and free-form items. The Purchase Order will credit this account upon the posting of a receipt of a non-stock or free-form item.
The Accounts Payable will debit this account as it clears the liability during the matching of the invoice to the purchase order.
Inventory Installed – Checkbox
Check the 'Inventory Installed' box if the Inventory module is installed. The system assumes inventory items exist for the company and consequently all programs and files can be accessed.
Leave this field blank if the Inventory module is not installed and all items (inventory, and non-stock and free-form items) must be entered using the Non-Stock Item screen.
If the box remains unchecked, PO receipts against a selected warehouse will only be possible if the warehouse is pre-set in the PO Set User Defaults screen.