Overview
The Personal Timesheet menu option launches the Timesheet Entry screen, where users can enter, save, and submit timesheets. It allows users to efficiently log time for various activities related to jobs, equipment, work orders, and overhead, and manage their time entries, tasks, and employee time records with ease.
Timesheet Entry
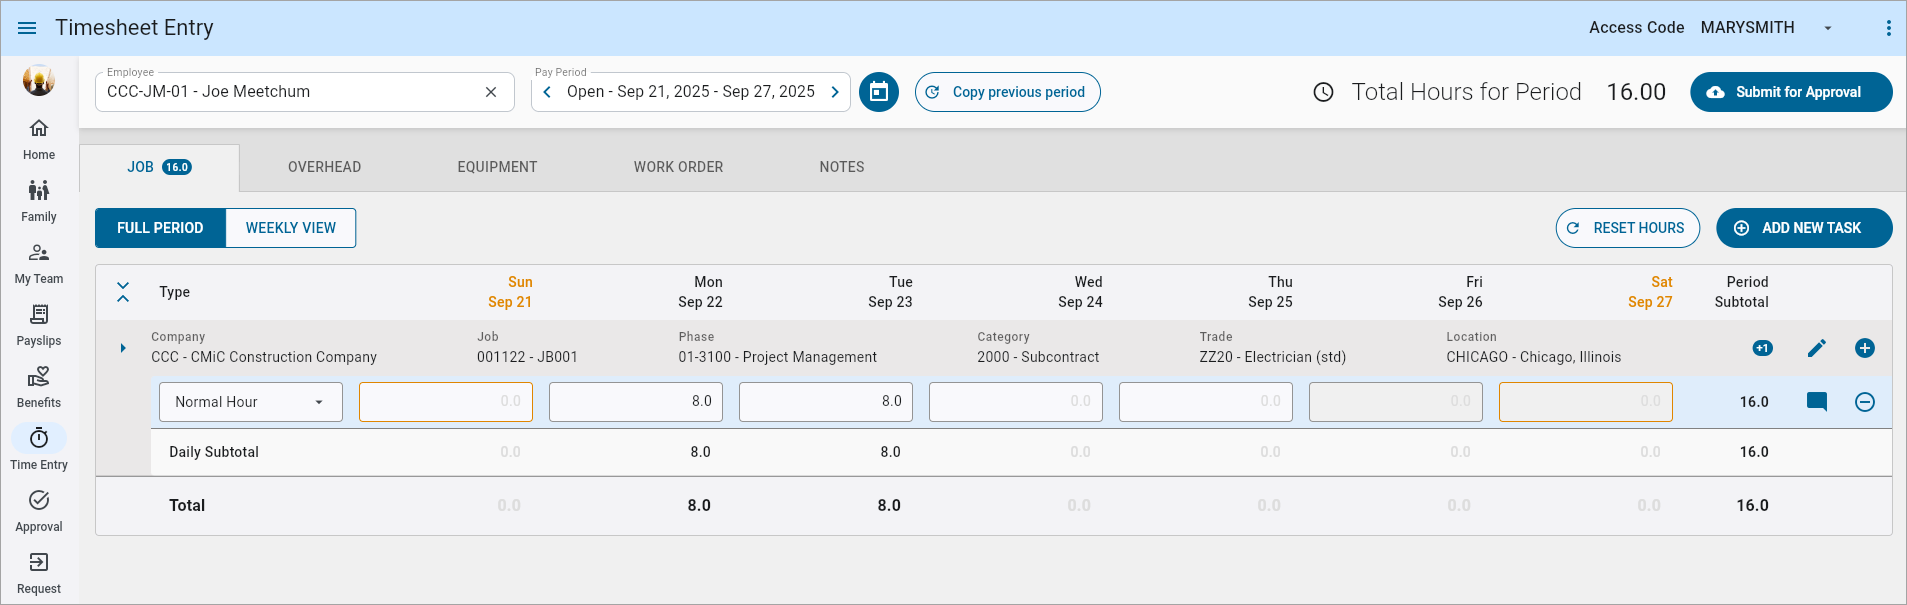
Timesheet Entry screen
Upon launching the Timesheet Entry screen, the system will automatically display the employee associated with the logged-in access code.
Users can enter time for themselves or for any employees they are responsible for. If a user has no access to other employees, they can only enter their own time.
The Employee field's List of Values (LOV) will be filtered based on the user's access rights as defined under the Employee tab and the Pay Run tab in the Access Codes Administration screen in the E-Time module.
Refer to E-Time - Access Codes Administration for more information.
Access Code
Use this drop-down to switch between access codes. Available options include the user's personal access code, authorized group access codes, and a manual login option which allows for manual authentication. Group access codes are created and maintained in the E- Time Access Codes screen.
For more information, please refer to E-Time - Access Codes.
Enter Missed Hours
This option is available from the Options menu ( ) and allows users to enter a different actual work date when entering hours, such as a prior date. Users require the E-Time Role Maintenance permission 'Allow Actual Work Date' to access this option. For more information, please refer to E-Time - Role Maintenance (E-Time Roles).
For more information, please refer to Actual Work Date.
Employee
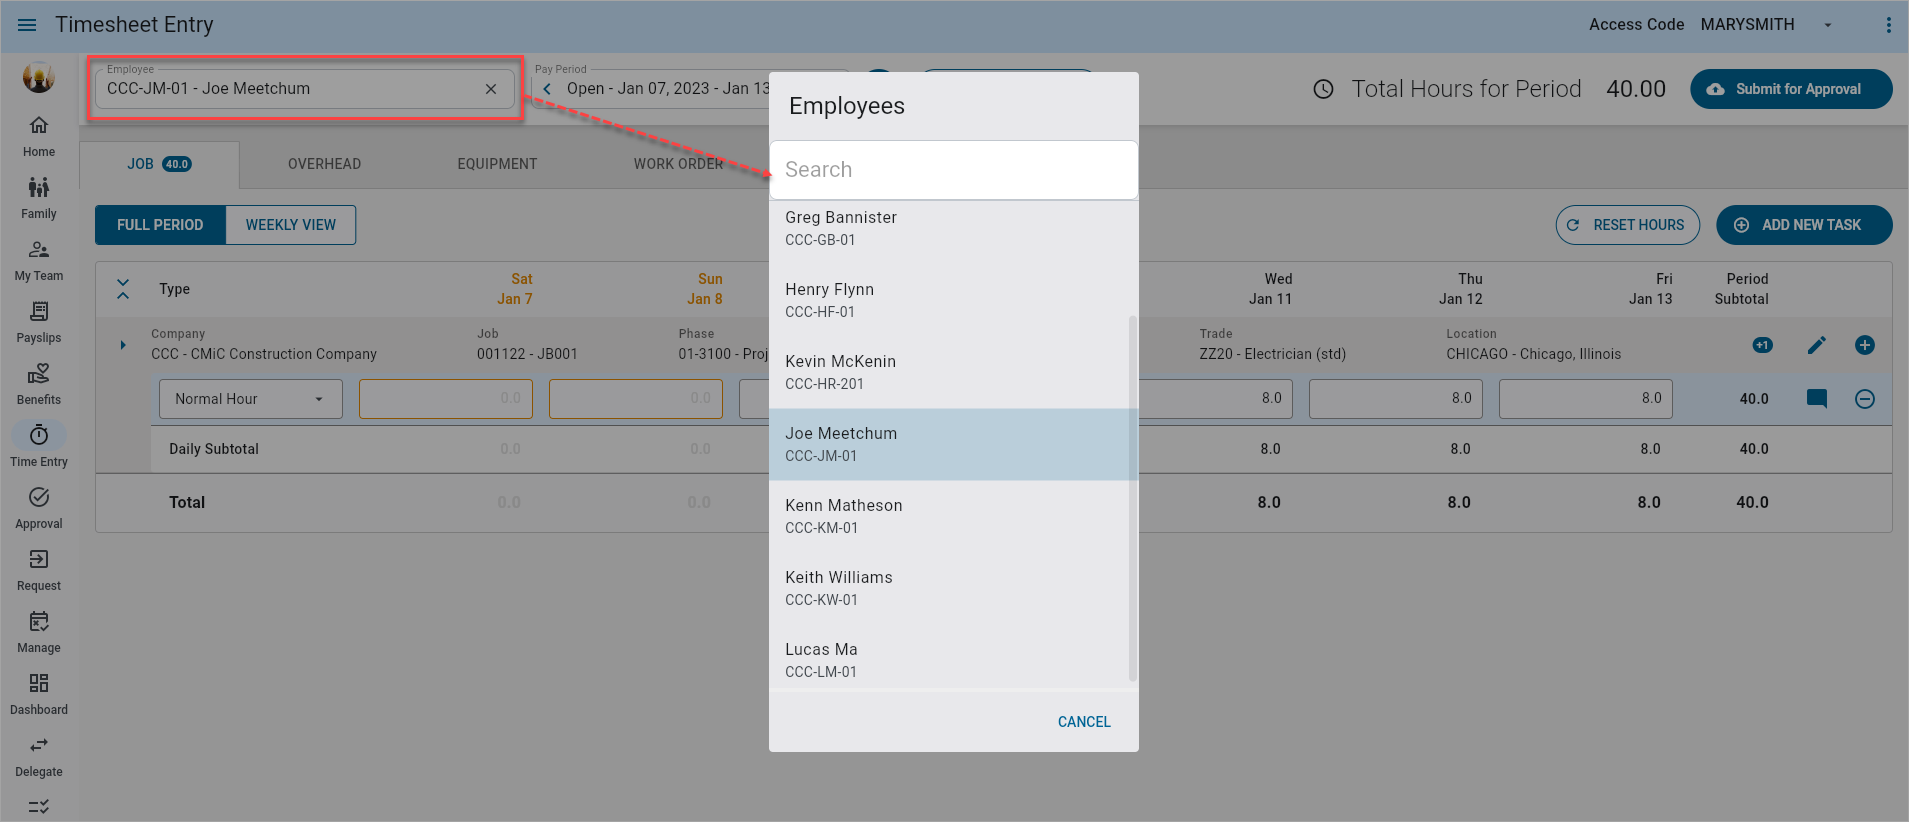
Pop-up window launched from the Employee field
The Employee field's LOV displays only the employees that the user has access to. If no other employees are linked to the user under the Employee and Pay Run tabs of the Access Codes Administration screen in the E-Time module, the LOV will only show the employee attached to the logged-in access code. This also includes the employees where the access code has access as an approver.
Pay Period
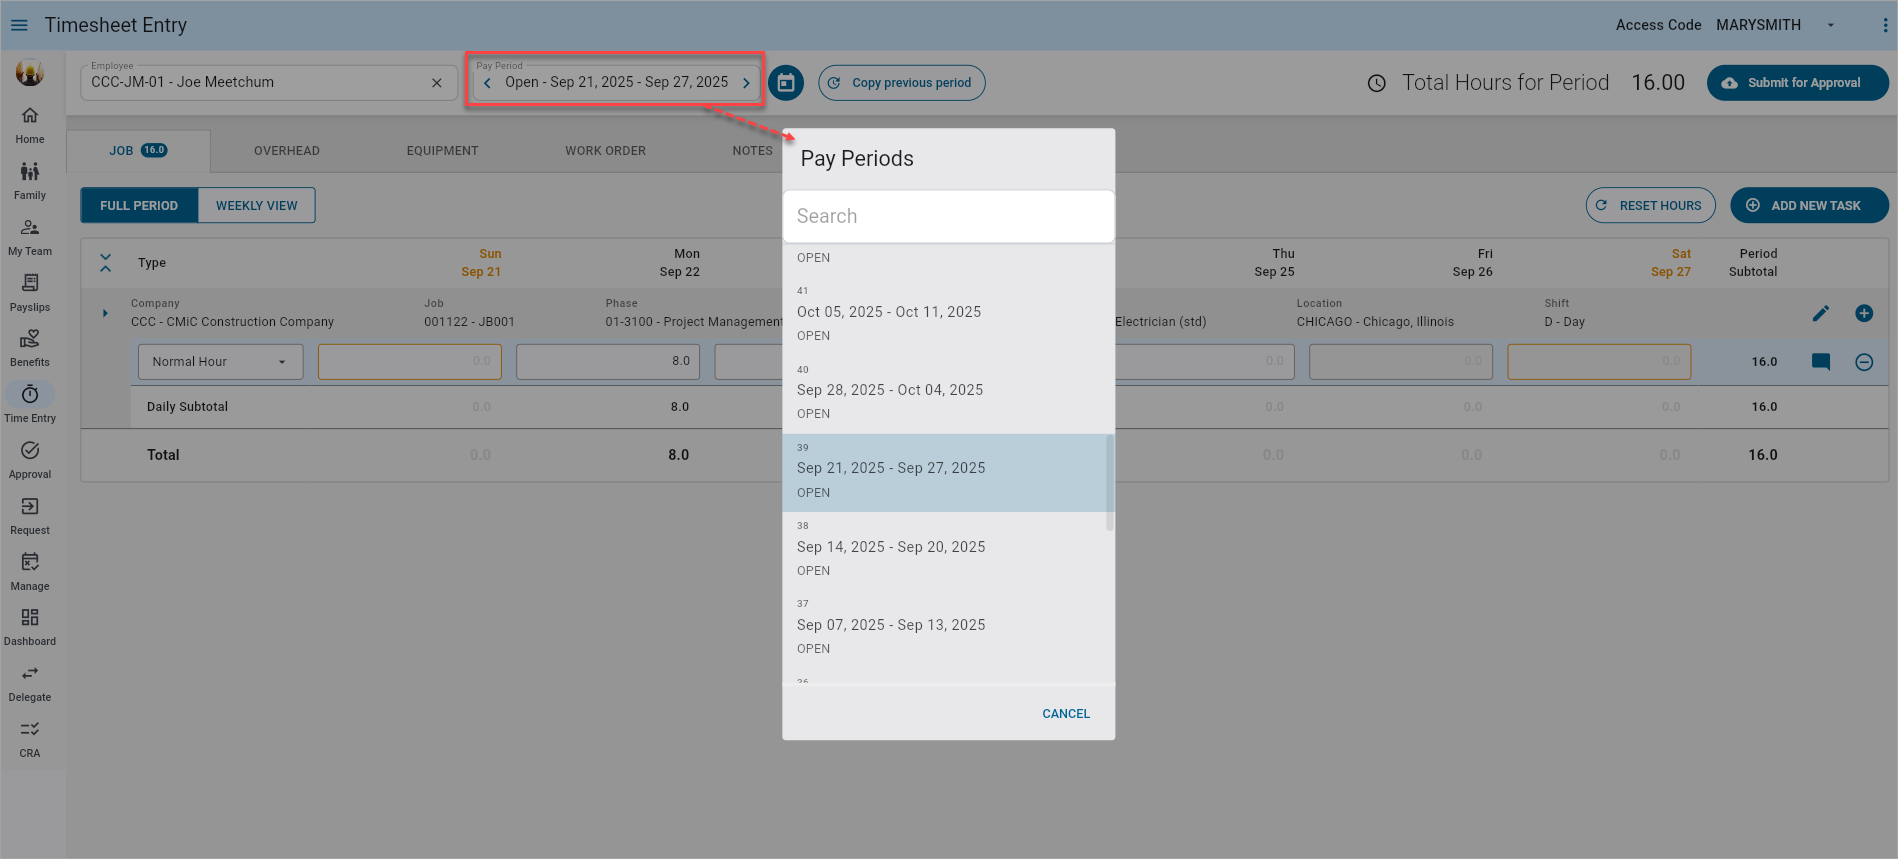
Pop-up window launched from the Pay Period field
When selecting a period, the system will display the current open period from the company pay period setup, as defined in the Pay Periods screen in the US Payroll module. If not defined, the period where the current date falls will be shown. The Pay Period field's LOV includes the following details:
-
Year
-
Period Number
-
Period Start Date
-
Period End Date
-
Period Status (Open/Closed)
Users can search for and view past posted/closed periods using the Search bar at the top of the pop-up window.
-
Final Posted and Closed Periods: The screen will be read-only, and the user can view but not edit the data.
-
Temporarily Closed Periods: A banner will indicate "Period is Closed for All Activities." The screen will be read-only, and the user can view but not edit the data.
For convenience, when accessing the Pay Period field's LOV, the system will auto-scroll and highlight the period currently selected in the Pay Period field.
[Copy Previous Period] – Button
![Screenshot of pop-up window launched from [Copy Previous Period] button.](../../../../Resources/Images/ESS_App_R12/ConstructESS_TimeEntry6_v1.2.9.png)
Pop-up launched from [Copy Previous Period] button
This button is used to copy time entries from the previous week to the current period. The Copy from Previous pop-up window gives users the option to copy tasks only by pressing the [Copy Tasks] button, or to copy tasks and hours using the [Copy Tasks & Hours] button.
NOTE: In the previous JSP Time Entry screen, users were allowed to enter time entries with zero hours, primarily as a workaround to avoid re-entering the same job, phase, and category each day. Users would populate their timesheet with zero-hour entries, copy the timesheet to future weeks, and then fill in the actual hours worked. While this method offered convenience, this approach has been improved in Construct ESS by restricting zero-hour entries entirely. Time entries without any hours are not saved or displayed, ensuring only meaningful work records are captured. To maintain ease of use, Construct ESS provides a Copy Task feature which allows users to copy previously used job, phase, and category details without entering hours and then simply add the actual hours worked for each day.
[Submit
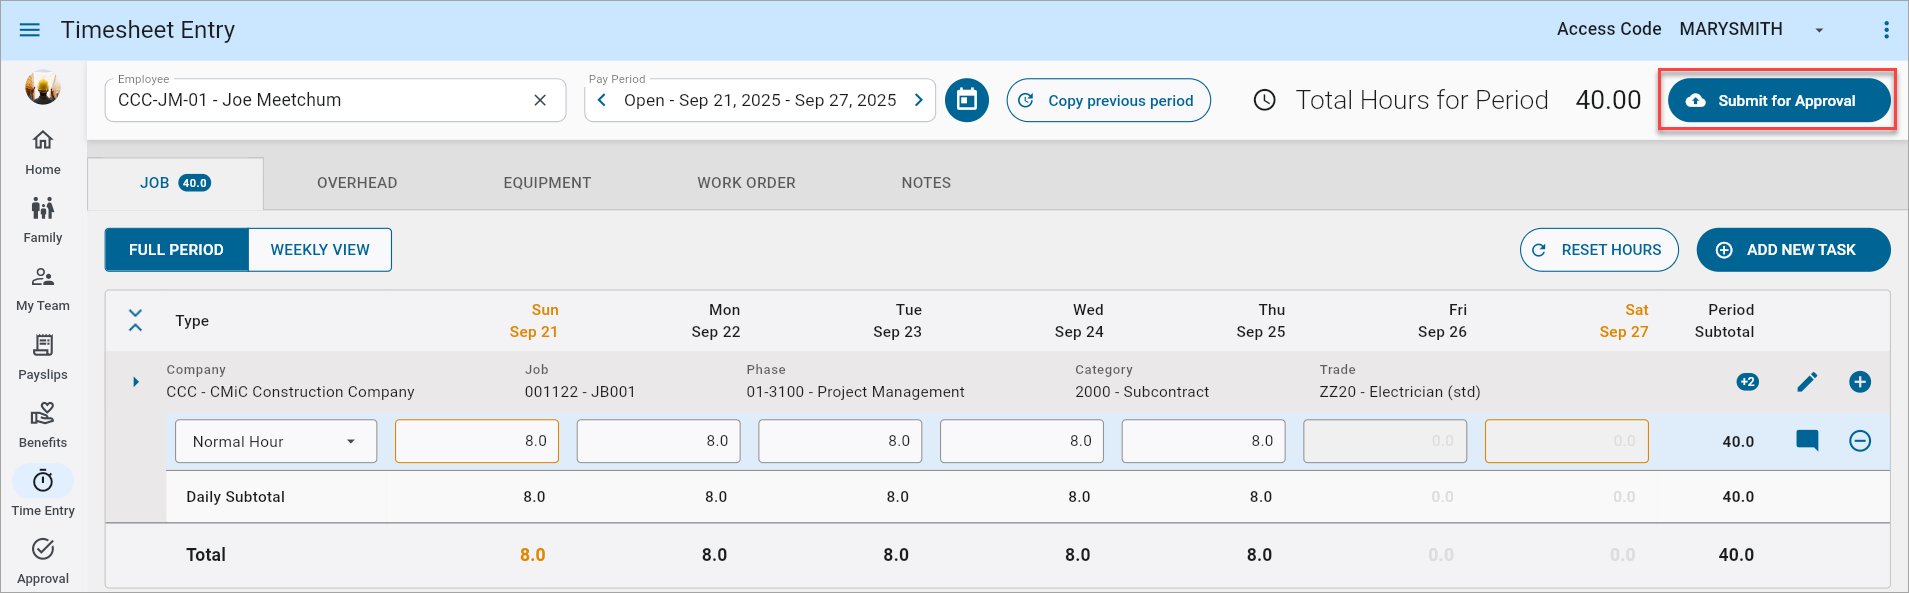
Clicking the [Submit
Job, Overhead, Equipment, and Work Order – Tabs
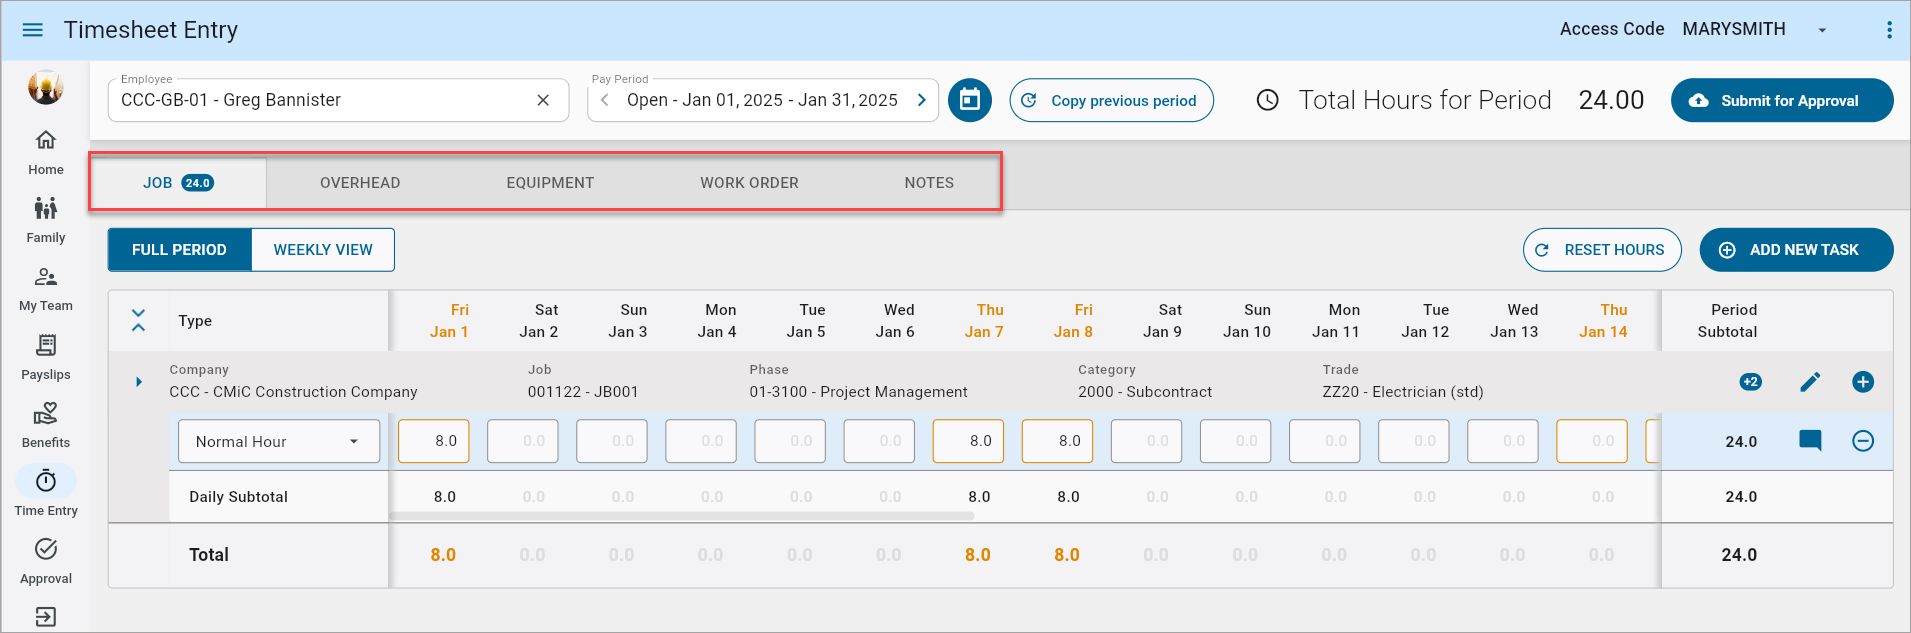
Job, Overhead, Equiment, and Work Order tabs on the Timesheet Entry screen
Time entered against each data type will be displayed on each tab indicating the employee total hours entered against each transaction.
Entries made on handheld devices are synced and displayed on the desktop screen under the appropriate tabs. These entries are consolidated into a single row, reflecting the total time for the respective period.
NOTE: Visibility of tabs and fields is controlled by security permissions set in the E-Time Role Maintenance screen in the E-Time module. These permissions include the following checkboxes: Allow E-Timesheet for Job, Allow E-Timesheet for Overhead, Allow E-Timesheet for Equipment, and Allow E-Timesheet for Work Order. Fields like Trade, Work Location, WBS, and others will be accessible based on these settings.
Refer to E-Time - Role Maintenance (E-Time Roles) for more information.
[Full Period View] – Button
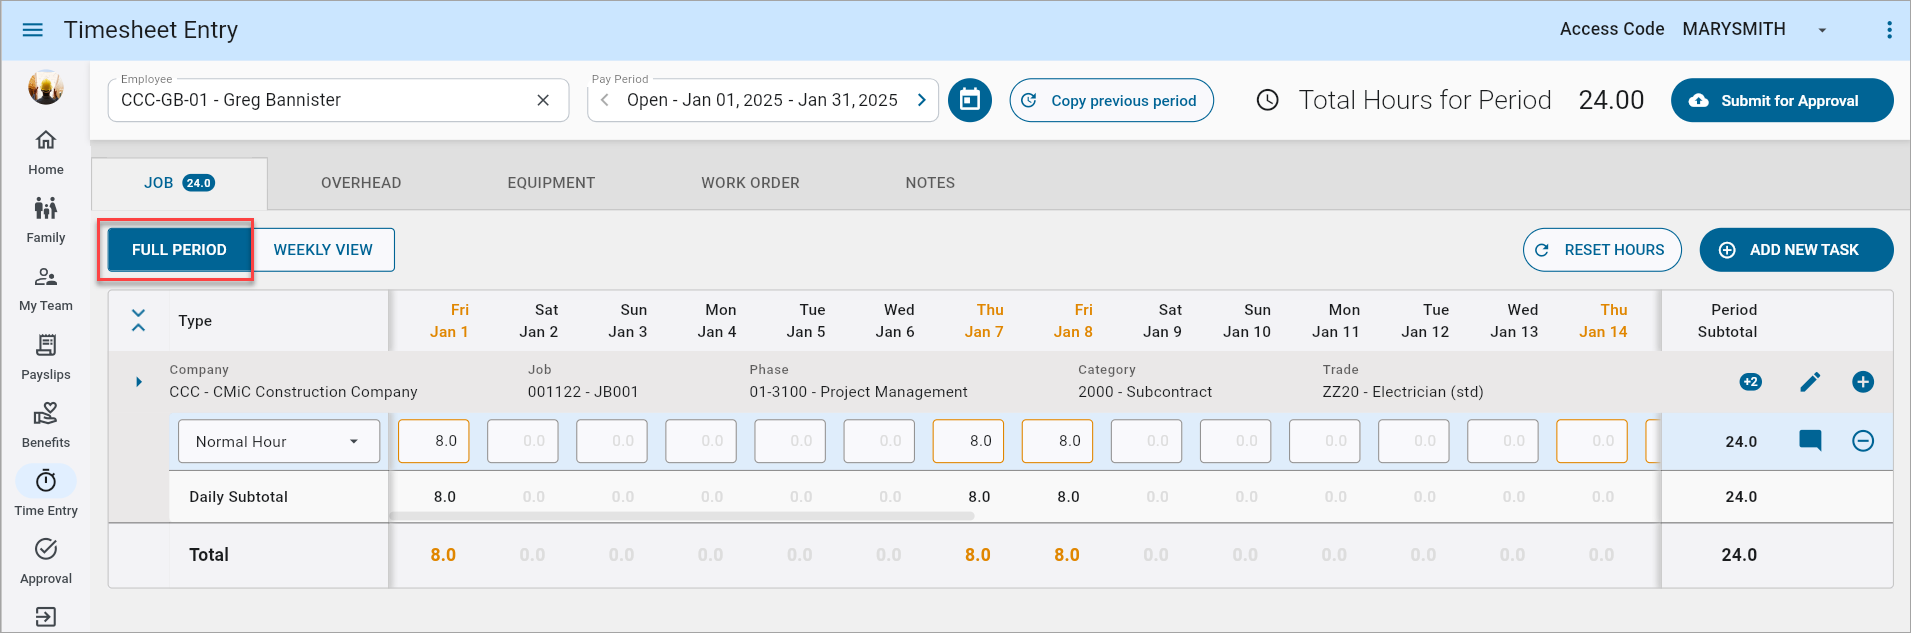
Timesheet Entry screen - Full Period view
The Full Period view provides a comprehensive overview of an employee’s payrun. Whether the employee is part of a monthly or biweekly payrun, the Timesheet Entry screen enables users to view the entire payrun in a single row. This feature allows users to scroll through the entire record, making it easier to review or enter the employee’s hours efficiently.
[Weekly View] – Button
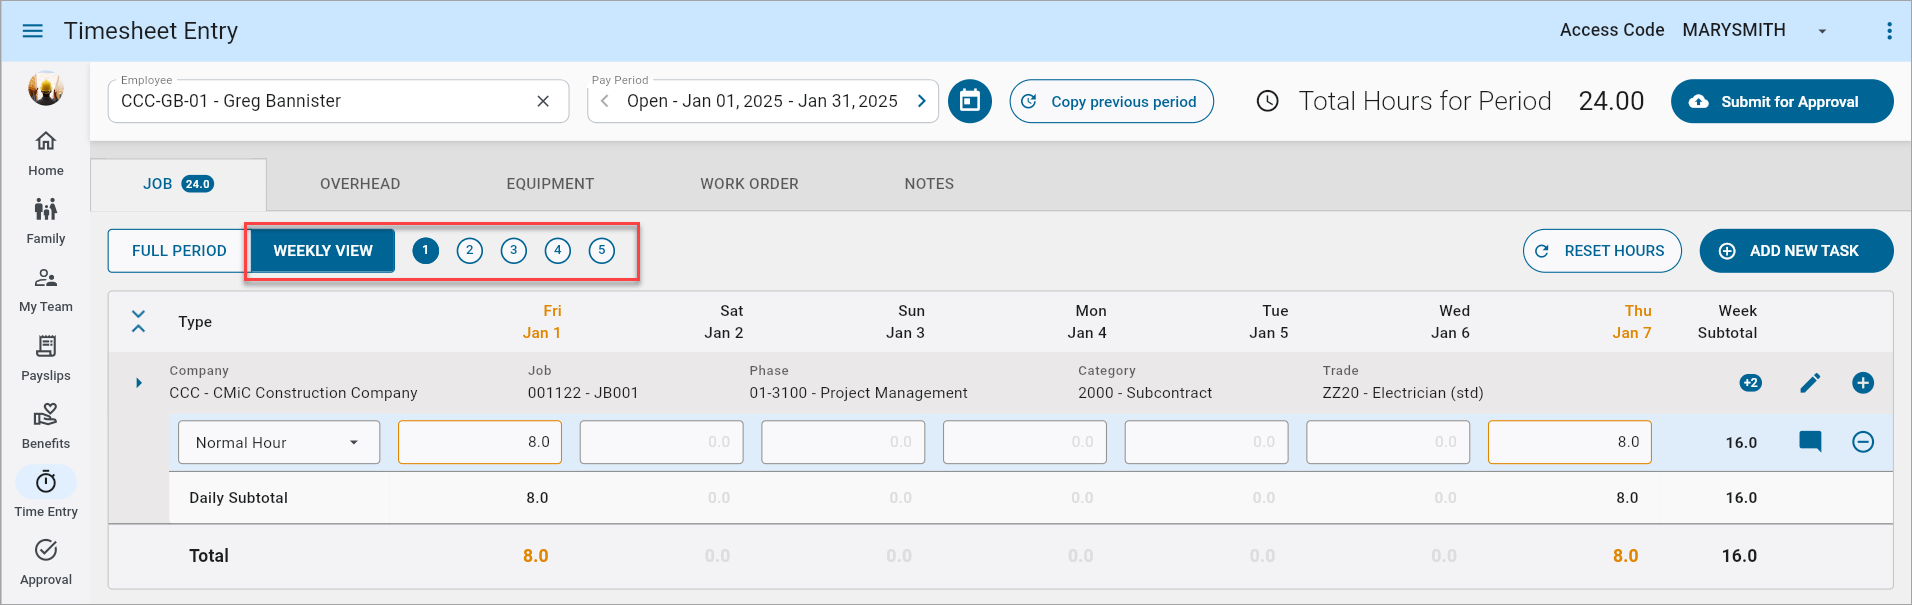
Timesheet Entry screen - Weekly View
The Weekly View provides a comprehensive overview of the employee's pay run. Regardless of whether the employee belongs to a monthly or biweekly pay run, the Timesheet Entry screen displays the entire pay run in a single row. This view allows users to scroll through the entire record to review or enter the employee's hours seamlessly. When selecting the Weekly View, only the hours for the chosen week are displayed. Users can navigate between weeks by selecting the desired week number, enabling them to easily move to the next week's view.
[Reset Hours] – Button
![Screenshot of Timesheet Entry's [Reset Hours] button.](../../../../Resources/Images/ESS_App_R12/ConstructESS_TimeEntry17_v1.2.9.png)
Timesheet Entry screen - [Reset Hours] - button
This button is used to reset the timesheet, which removes all entries for the respective tab.
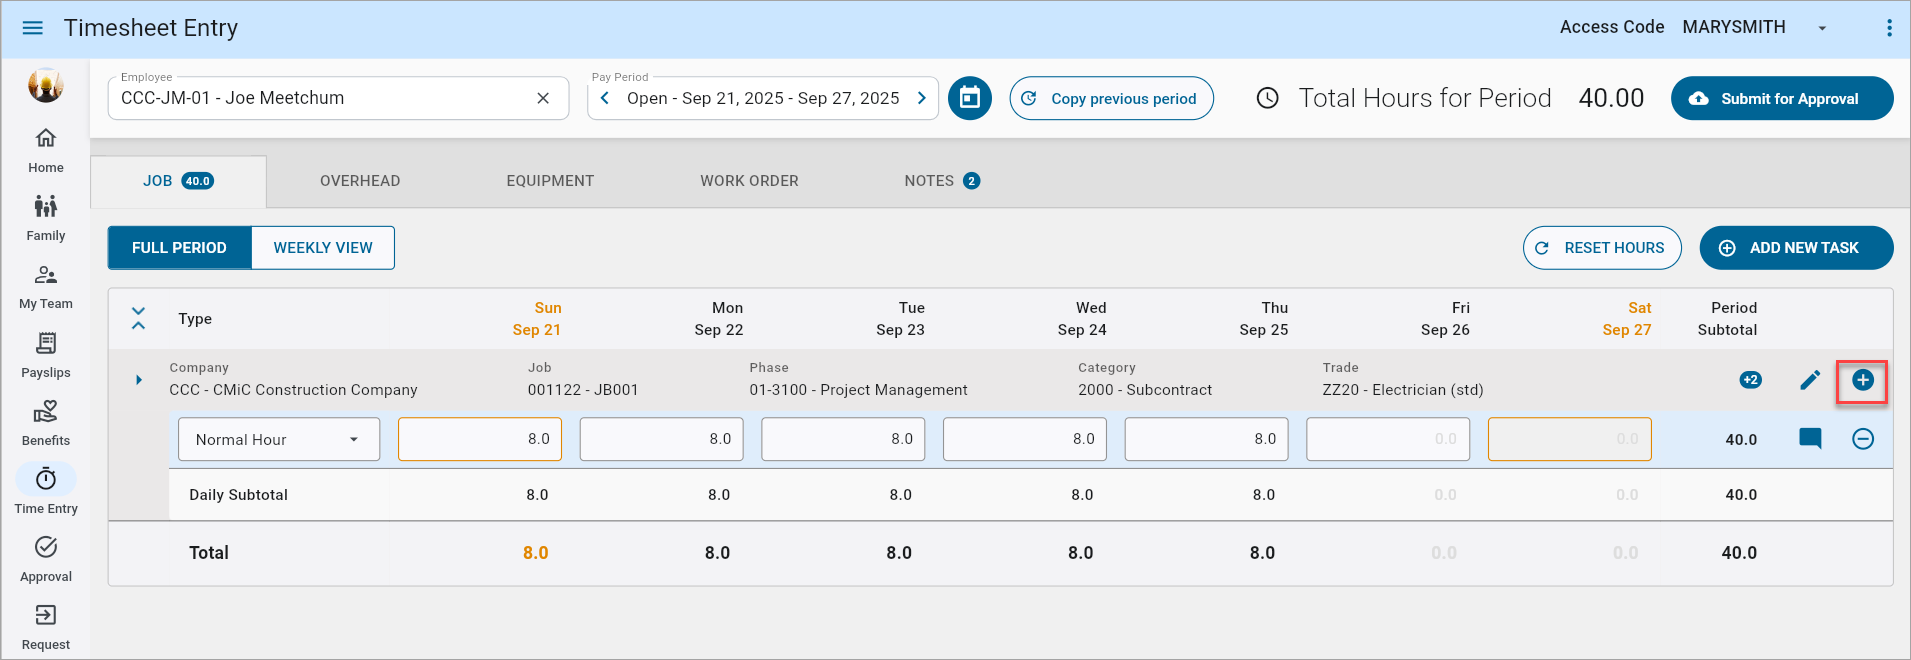
[Add New Task] – Button
![Screenshot of Add Task pop-up window launched from [Add New Task] button.](../../../../Resources/Images/ESS_App_R12/ConstructESS_TimeEntry18_v1.2.9.png)
Pop-up window launched from [Add New Task] button
Tasks can be added for various categories. Pressing the [Add New Task] button launches a pop-up where task details can be entered and the fields available depend on the selected tab.
For example:
-
Job Tab: Hour Type, Company, Job, Phase, Category.
-
Equipment Tab: Hour Type, Company, Equipment, Category, Transaction Code.
-
Overhead Tab: Hour Type, Company, Department, Account.
-
Work Order Tab: Hour Type, Company, Work Order, Work Item, Expense.
Equipment Location
The Equipment Location field
NOTE: The Equipment Location field is only available on Construct ESS web.
The Equipment Location field will default from the Original Location field in the Equipment Maintenance screen in the Equipment Costing module if the 'Auto Default Equipment Location in E-Timesheet' box is checked on the System Options screen in the System Data module. For more information, please refer to System Data - System Options - E-Timesheet - Tab.
Users require the E-Time Role Maintenance permission 'Allow Equipment Location' to access this field. For more information, please refer to E-Time - Role Maintenance (E-Time Roles).
WBS Fields
The WBS fields allow users to view and edit WBS codes as required.
NOTE: The WBS fields are only available on Construct ESS web.
Users must have the 'Show WBS Code on E-Timesheet (JSP) Entry' box checked on the E-Timesheet tab of the System Options screen in the System Data module to access the WBS fields. For more information, please refer to System Data - System Options - E-Timesheet - Tab.
TAC Fields
The TAC fields allow users to view and edit TAC codes as required.
NOTE: The TAC fields are only available on Construct ESS web.
Users must have the 'Show TAC Code on E-Timesheet (JSP) Entry' box checked on the E-Timesheet tab of the System Options screen in the System Data module to access the TAC fields. For more information, please refer to System Data - System Options - E-Timesheet - Tab.
Shift
The Shift field
The Shift Code LOV and field default from the setup in the E-Timesheet tab on the Payroll Control screen in the Payroll module. A system-wide default may also be set up in the Shift Selection section of the Payroll tab of the System Options screen in the System Data module.
For more information, please refer to US Payroll - Payroll Control and System Data - System Options.
Users require the E-Time Role Maintenance permission 'Allow Shift codes in E-Time' to access this field. For more information, please refer to E-Time - Role Maintenance (E-Time Roles).
Exclude from Overtime – Checkbox
The 'Exclude from Overtime' checkbox
When unchecked, the task will be processed normally and included in OT processing.
NOTE: The 'Exclude from Overtime' checkbox is only available on Construct ESS web.
Users require the E-Time Role Maintenance permission 'Exclude from OT Processing' to access this field. For more information, please refer to E-Time - Role Maintenance (E-Time Roles).
Notes – Tab

Notes tab on the Timesheet Entry screen
The Notes tab displays all notes entered for the selected employee, enabling users to view, add, reply, edit, and delete notes. It is designed to mirror the functionality of the PM Notes.
NOTE: The Notes tab on the Timesheet Entry screen is only available for Construct ESS web.
All notes associated with the employee are displayed in chronological order. Each note displays the author's photo, name, and the date and time when the note was entered.
[Add a Note] – Button
This button is used to add a new note for the selected employee. Clicking the [Add a Note] button opens a pop-up window where the content of the new note is added. After pressing [Okay], the note is added to the list, and the author's photo, name, and the current date and time are displayed alongside the note.
Reply, Edit, and Delete icons are provided for managing notes.
-
Reply (
 ): The Reply icon allows users to reply to an existing note. Clicking the Reply icon next to a note opens a pop-up window where a reply can be entered. After submitting the reply, it appears directly below the original note in the list.
 -
Edit (
 ): The Edit icon is visible only to the owner of the note. It allows the note's owner to modify the content of an existing note. After editing, the changes are saved, and the updated note is displayed.
 -
Delete (
 ): The delete icon is visible only to the owner of the note. It allows the note's owner to delete an existing note. Clicking the delete icon prompts a confirmation pop-up window. If the user confirms, the note is permanently removed from the list.
Entering Time
The Timesheet Entry screen allows users to manage their time entries. It provides features to add rows, edit tasks, and delete rows. What features are available depend on a user's security privileges. Refer to E-Time - Role Maintenance (E-Time Roles) for more information.
Select the tab where time should be assigned (e.g., Job, Overhead, Equipment, or Work Order) and locate the task under which the time will be entered.
NOTE: For information on entering timesheets using daily in and out times, refer to In/Out Time Entry.
Adding a Time Entry
Adding a timesheet entry
Click the Add ( ) icon to insert a new row under a specified task. Once the row is added, time can be entered under the specific days. The default hour type is Normal Hour, but users can select from Normal Hour (NWHR), Over Time Hour (OVHR), Double Overtime Hour (DTHR), Other Hour (OTHR), Job Cost Hour (JCHR), Non-Billable Hour (NBHR), etc., depending on their security privileges.
NOTE: In the previous JSP version of the Timesheet Entry screen, time submitted from handheld devices was displayed in a multi-row format with each day’s hours occupying separate rows. Now in Construct ESS, the Timesheet Entry web version displays time submitted from the Timesheet Entry app version in a single-row format.
Deleting a Time Entry
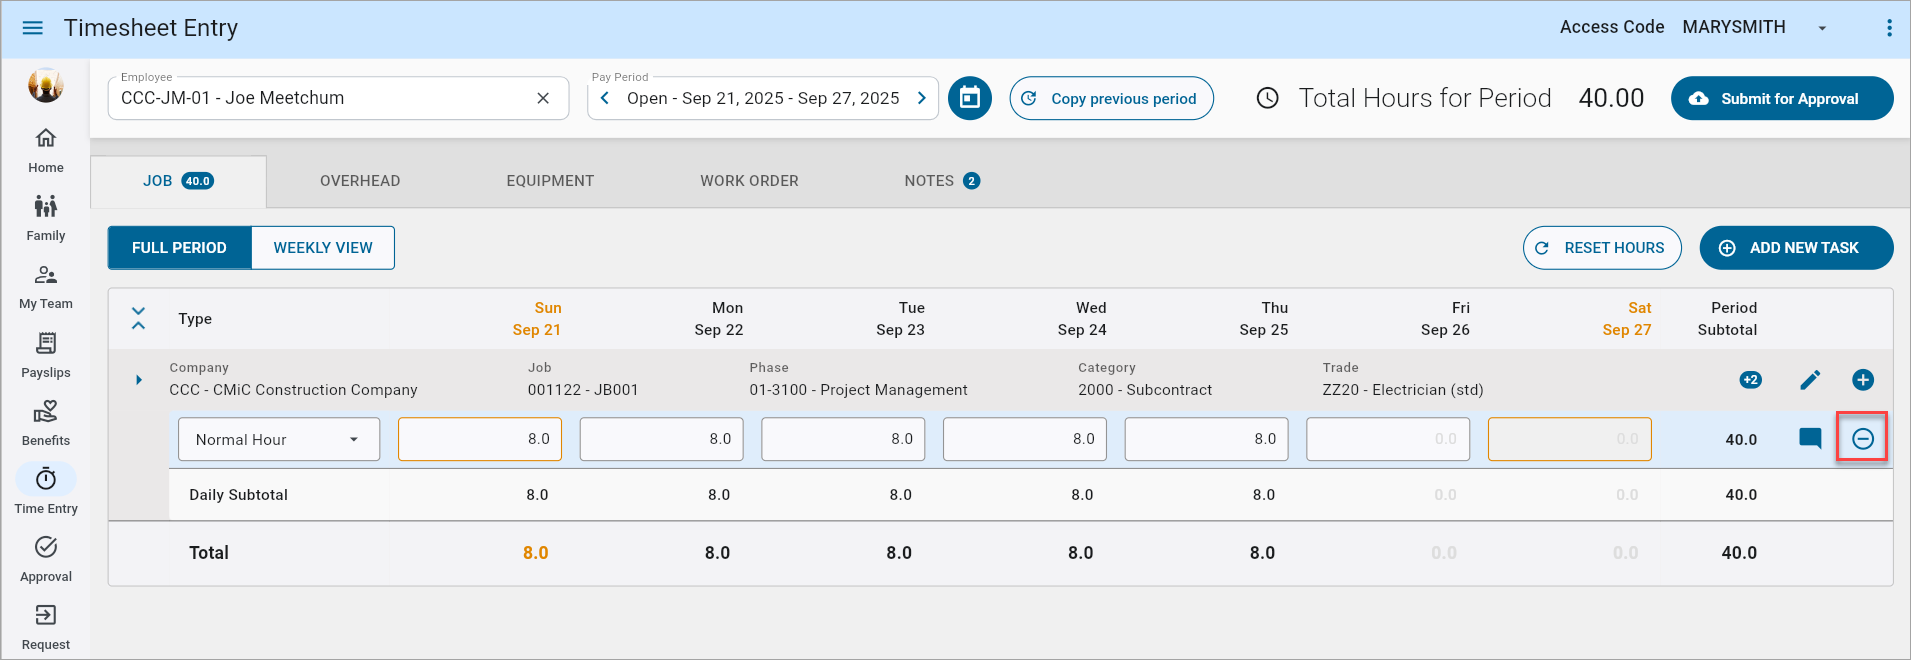
Deleting a timesheet entry
Click the Delete icon () to remove a row under a specified task. Deleting is only allowed if the row is not in Submitted or Approved status.
Editing a Task

Editing a task
Click on the Edit icon () to edit the specific task.
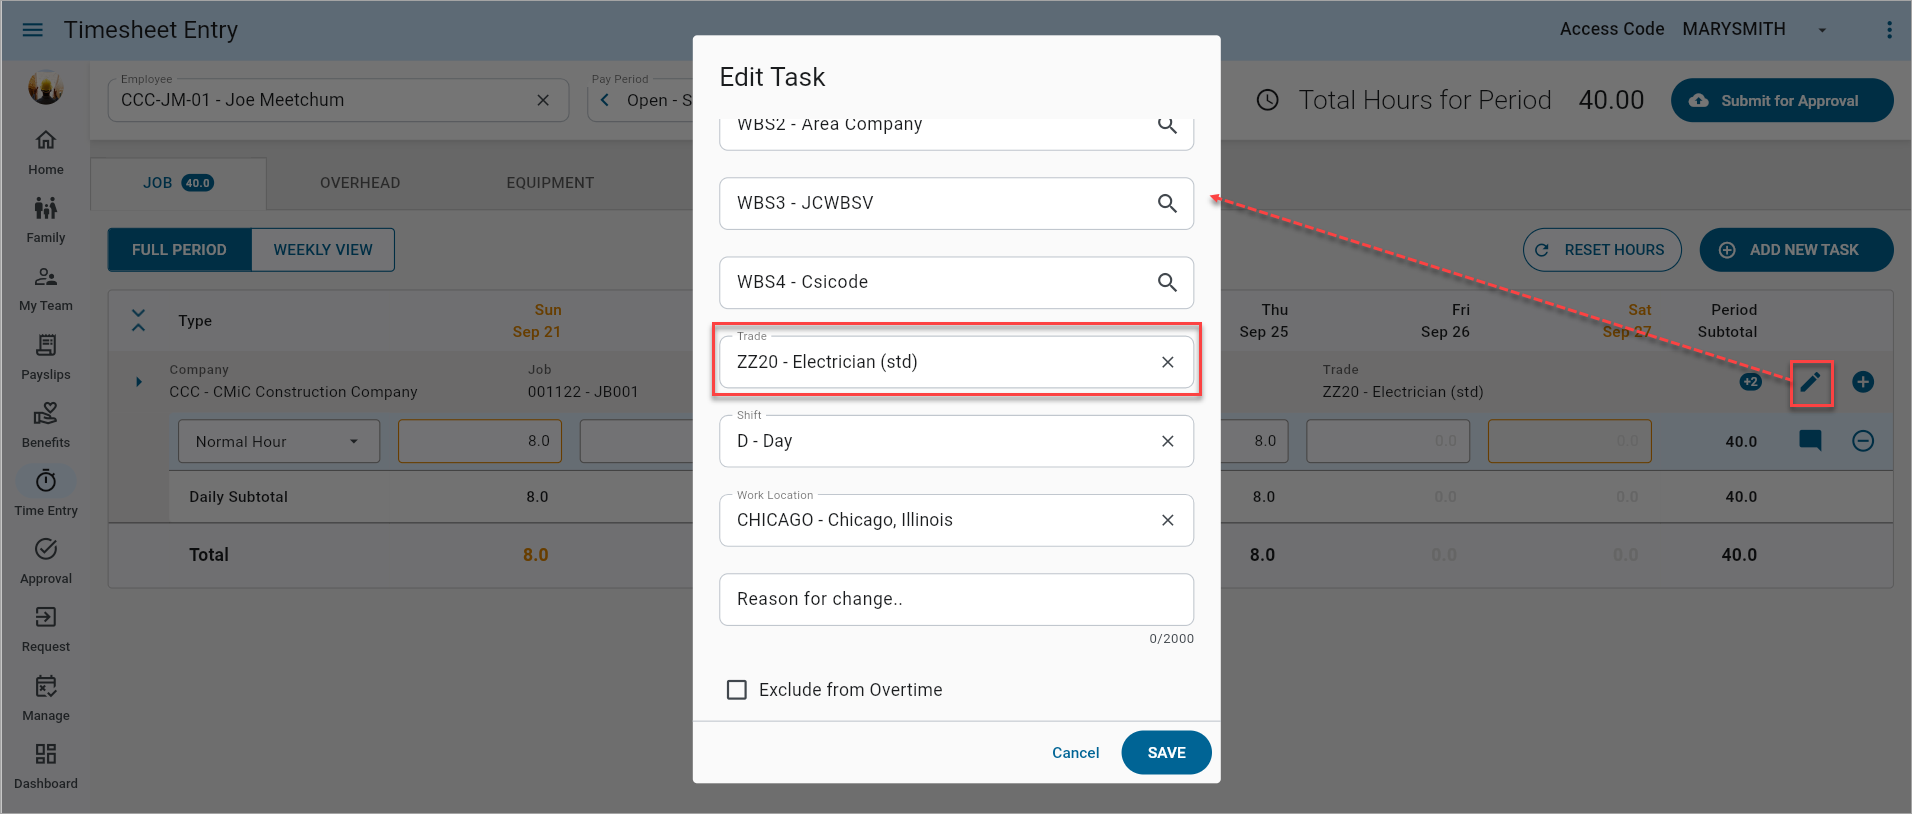
Editing a task
In the Edit Task pop-up window, make any updates to the selected task and click on [Save]. Users must have the 'Allow Modifying Trade Code' security permission assigned to edit the employee default trade in the Trade field.
Refer to E-Time - Role Maintenance (E-Time Roles) for more information.
Hiding/Unhiding Fields
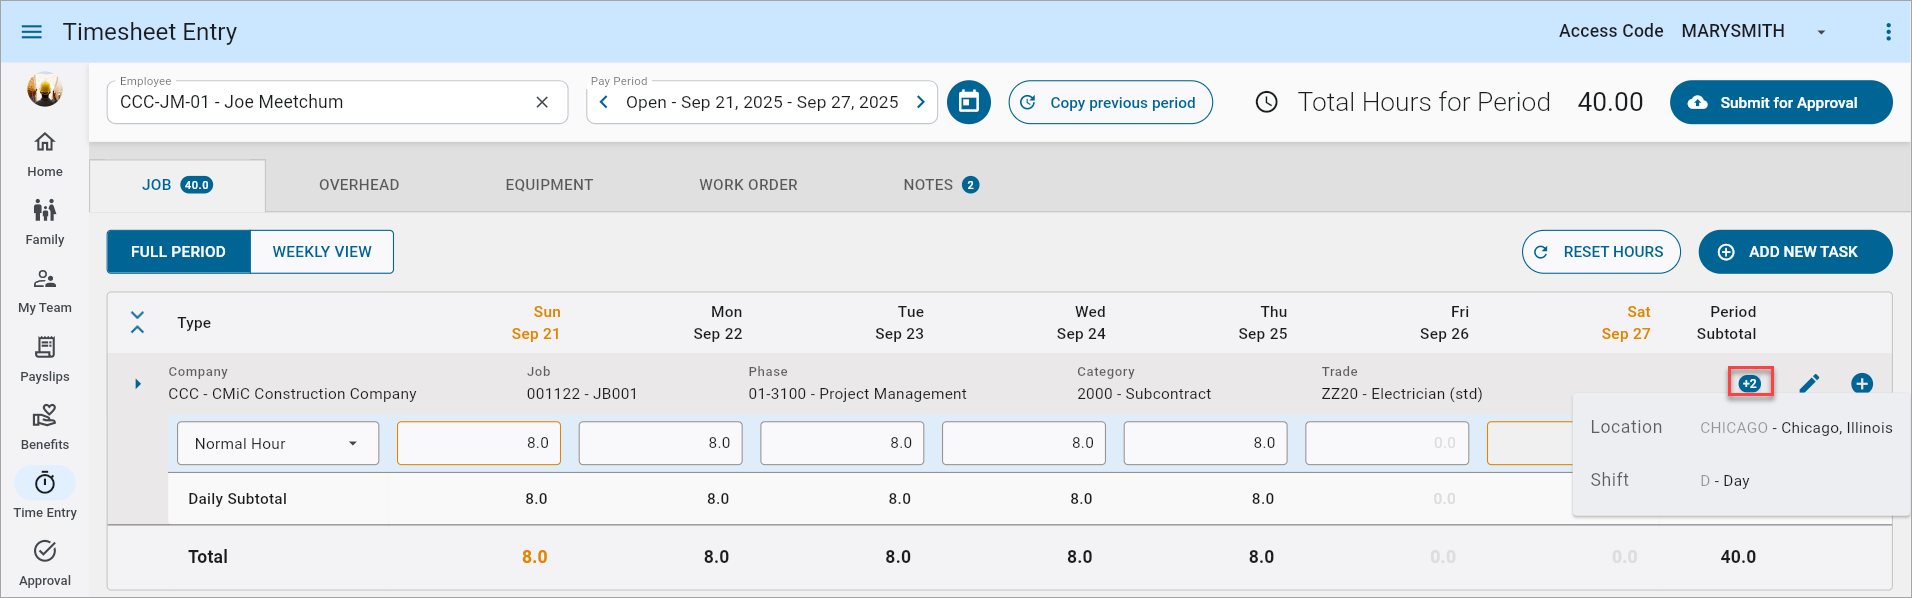
Re-sizing screen may hide/display columns
Re-sizing your screen may hide/display columns. If any columns are hidden due to screen size, a Badge icon ( ) will appear with a value to indicate the number of fields that are hidden. Hovering over the badge will display the list of the hidden fields.
Adding Comments
Users can add and manage comments at both the row and cell levels. Comments can be accessed via a right-click context menu or existing Comment icons. Comments can be flagged as mandatory based on the 'Comments - E-Time' checkbox, located on the E-Timesheet tab of the Payroll Control screen.
Refer to US Payroll - Payroll Control for more information.
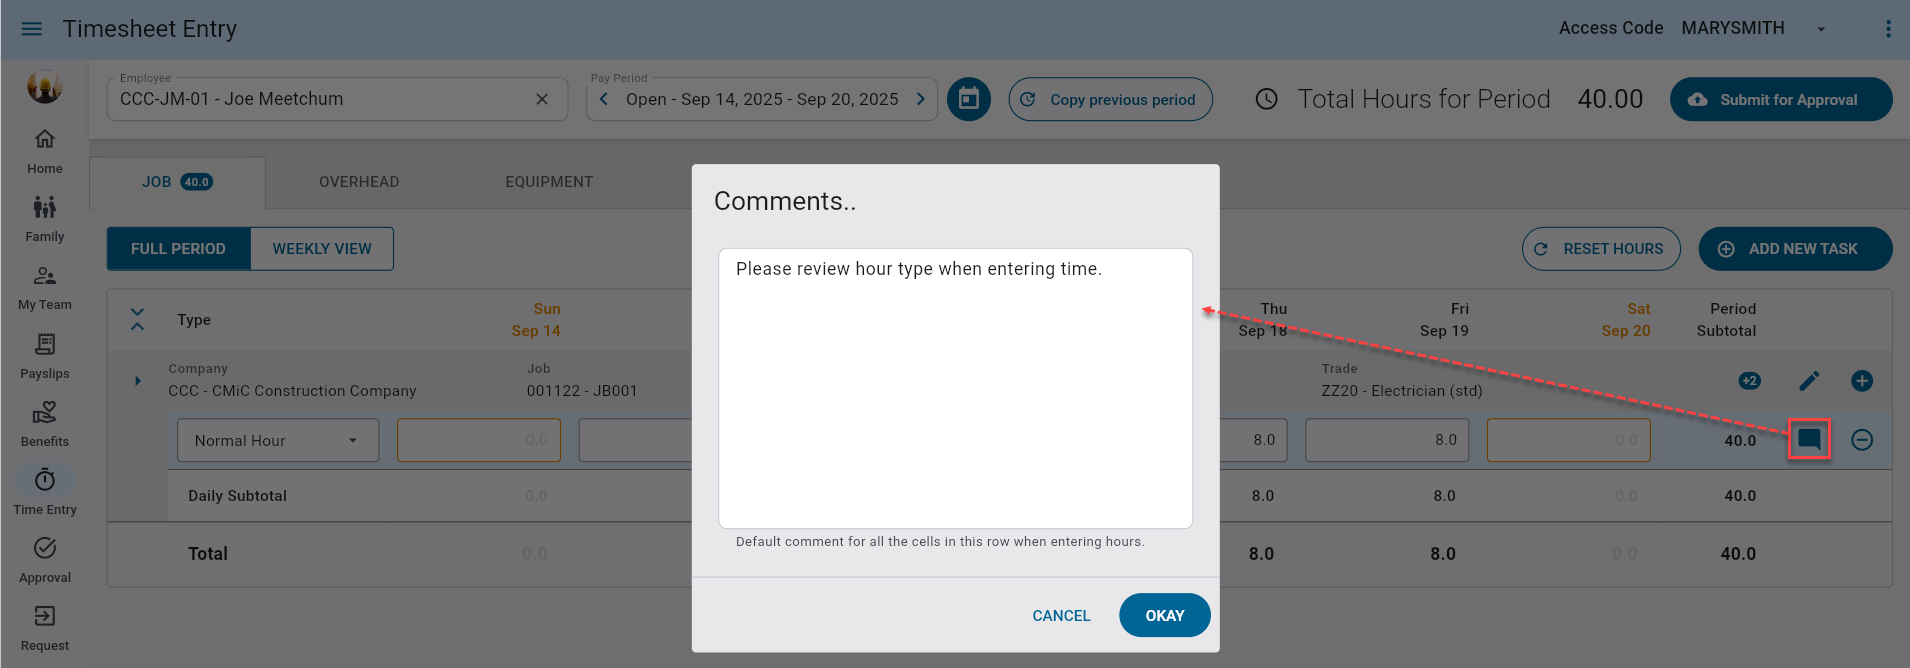
Row-specific comments
The default comment will apply to all cells within a row.
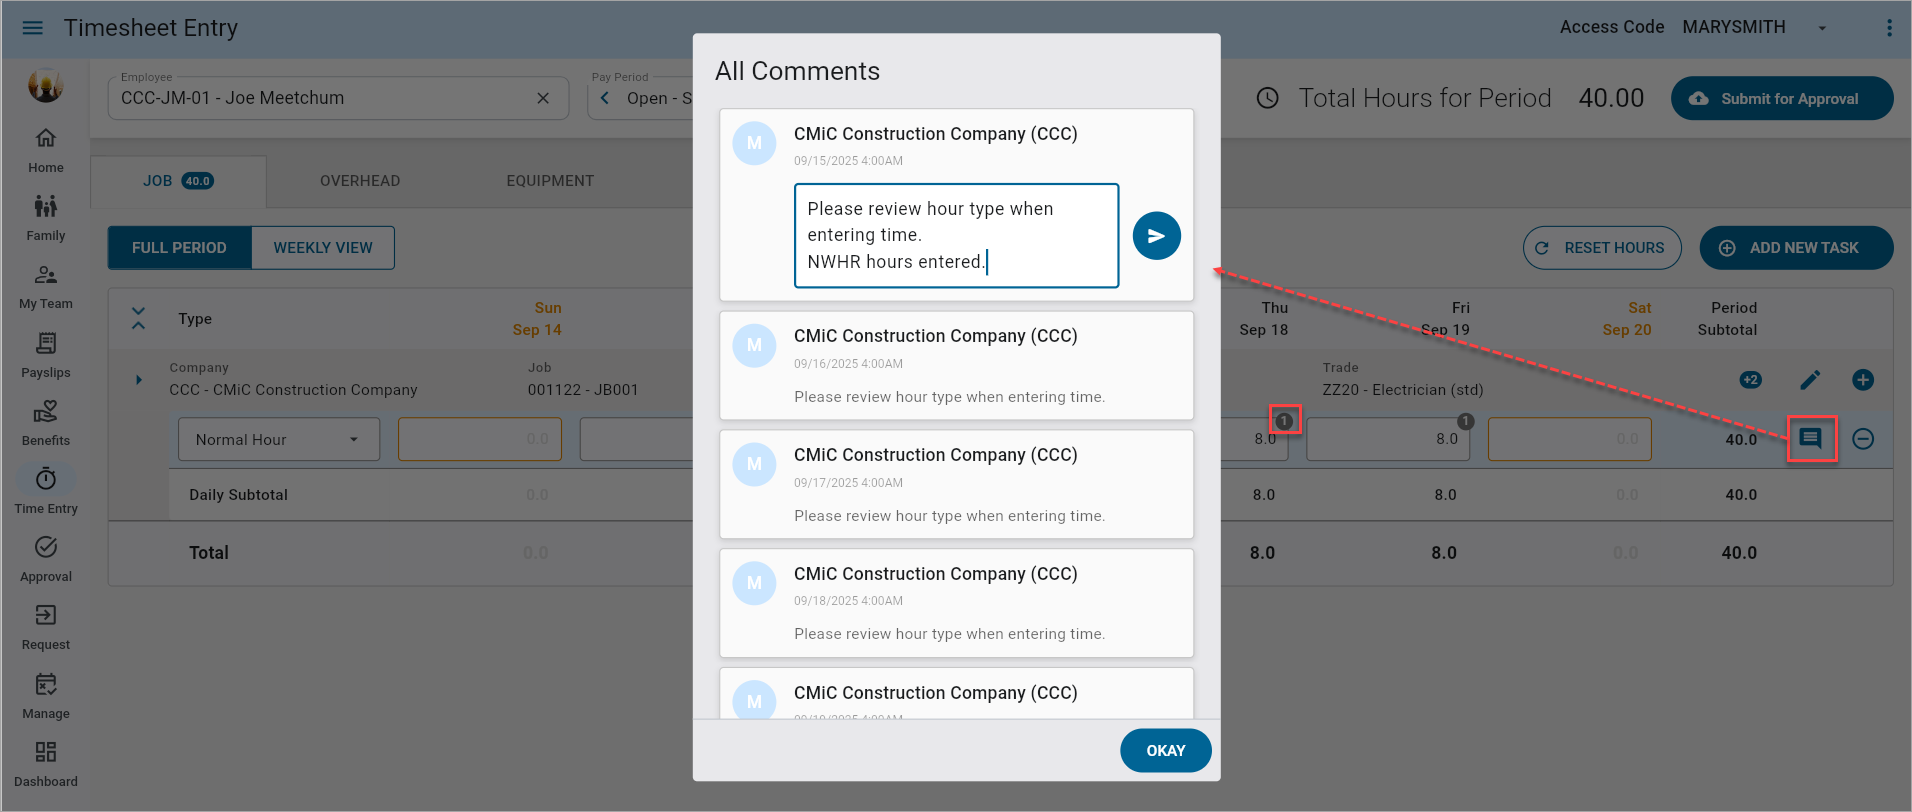
All Comments pop-up
Cell-specific comments are managed individually in the All Comments pop-up, with a badge indicating that comments exist for the cell.
In/Out Time Entry
Employees can enter timesheets by entering their daily in and out times if the setup described in this section is completed. When entering time, a clock interface will appear, allowing the employee to select the appropriate time in and time out for their work hours. The system will automatically calculate the total hours worked based on the entered in/out times.
Setup for In/Out Time Entry
Access to entering in/out times in employee timesheets is controlled at the system level, and then granted to users based on settings at the employee profile level. Access can also be controlled at the HR level using the Employee Dashboard screen, and this setting ultimately takes precedence over the system and profile levels. After access has been granted, the types of hours that are available for in/out time entry can also be defined. The settings, which are located across several screens, are described in more detail below.
System Options
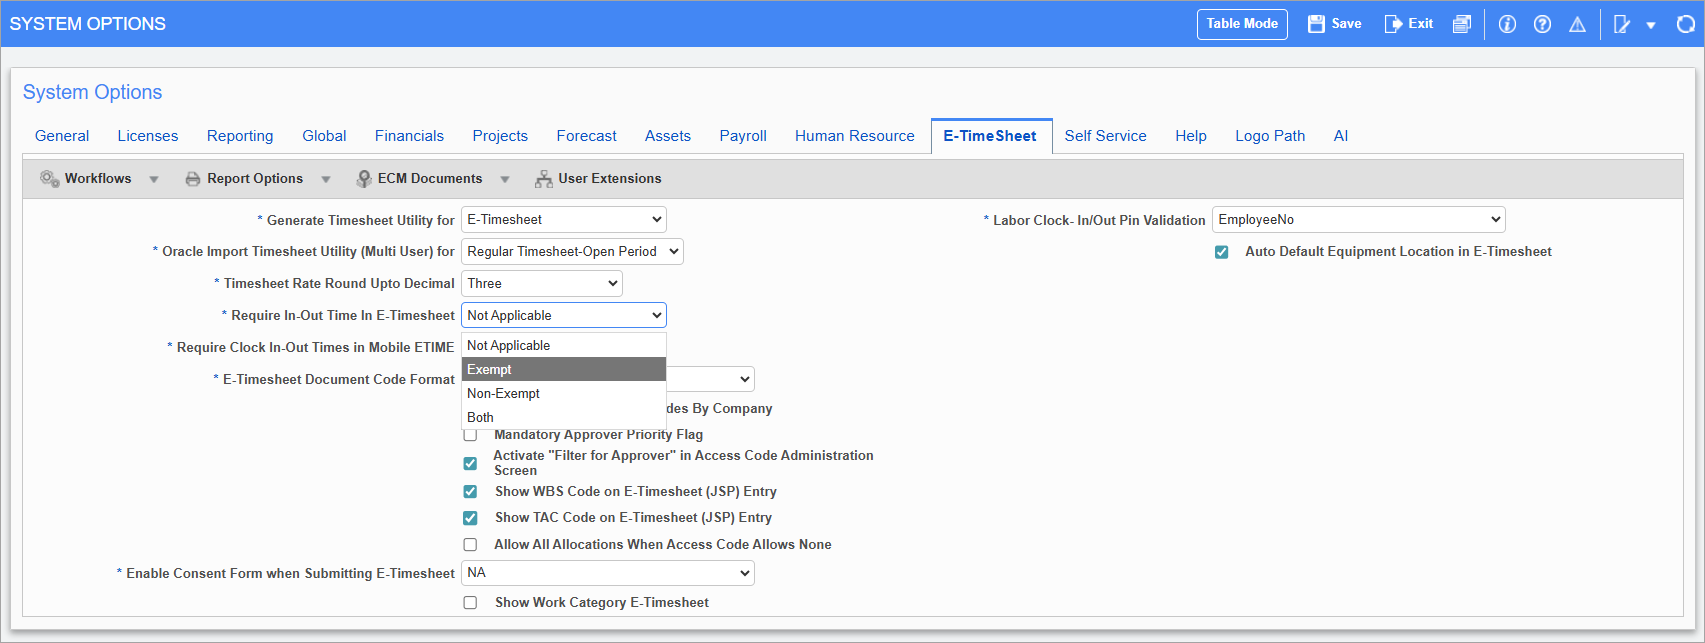
Pgm: SYSOPT – System Options; standard Treeview path: System > Setup > System Options – E-TimeSheet tab
The In/Out Time Entry feature is used to control whether in-out times are used during timesheet entry. It must be enabled at the system level to allow employees to enter in-out times in the Timesheet Entry screen. This feature is enabled using the Require In-Out Time in E-Timesheet field located on the E-Time Sheet tab of the System Options screen in the System Data module. From the field's drop-down menu, selecting an FLSA type of “Exempt”, “Non-Exempt”, or “Both” will give employees with that FLSA type assigned on their Employee Profile record, access to the Time In and Time Out fields in the Timesheet Entry screen. If this field is set to “Not Applicable”, the In/Out option will not be available to employees when entering timesheets.
Employee Profile
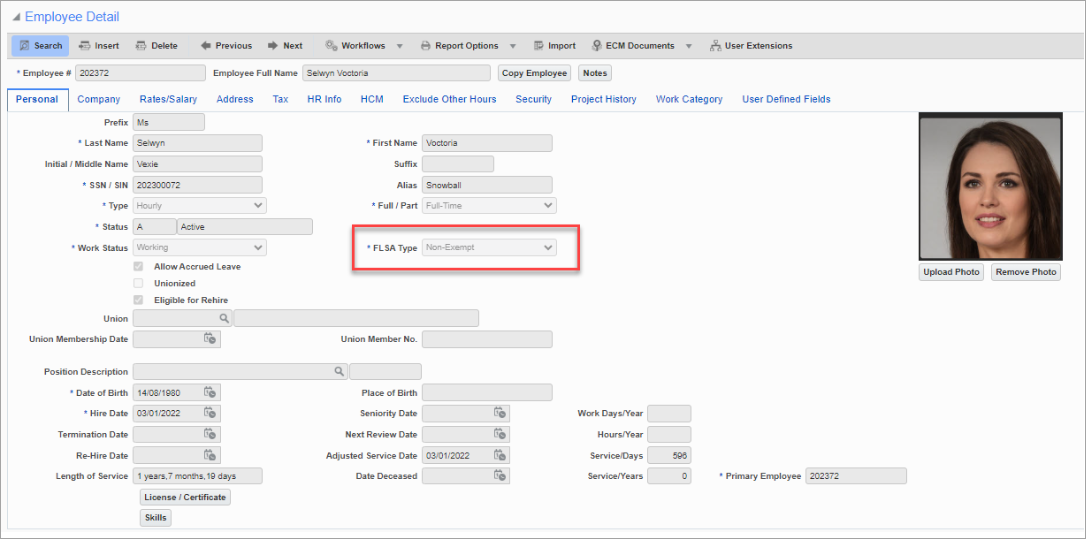
Pgm: PYEMPLOY – Employee Profile; standard Treeview path: US Payroll > Setup > Employees > Employee Profile – Personal tab
An employee's FLSA type is assigned in their Employee Profile record, as shown in the screenshot above. If the In/Out Time Entry feature is enabled at the system level, an employee's ability to enter in-out times during timesheet entry will depend on the FLSA type selected here.
Employee Dashboard
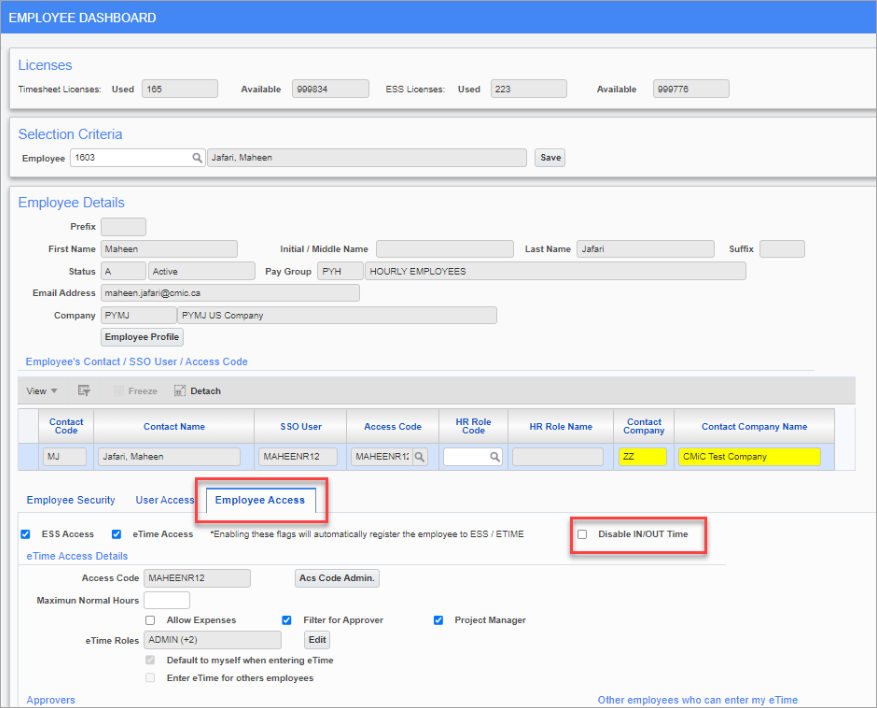
Employee Dashboard; standard Treeview path: Human Resources > Personnel > Employee Dashboard
The Employee Dashboard, located in the Human Resources module, is used to configure access restrictions for an employee's time entries at the HR level. The setting on this screen takes precedence over the system and profile levels.
To configure access for a specific employee at the HR level, navigate to the Employee Dashboard screen and open the Employee record. In the Employee Details section of the screen, click on the Employee Access tab and use the 'Disable IN/OUT Time' checkbox to enable/disable access to the In/Out Time Entry feature when entering timesheets.
Hour Types
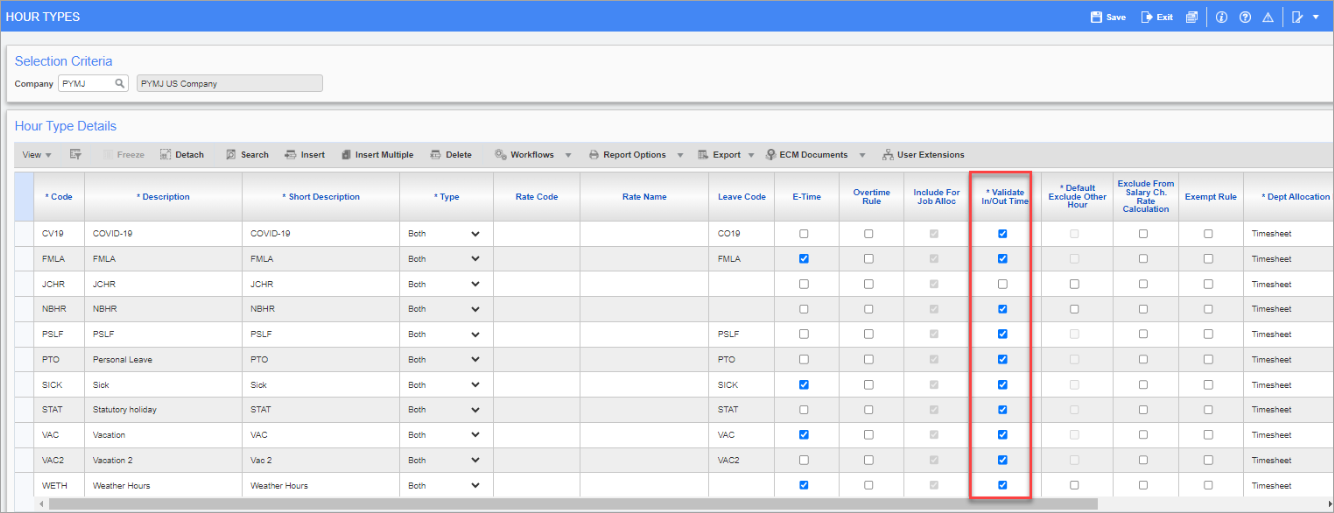
Pgm: PYHRTYPE – Hour Types; standard Treeview path: US Payroll > Setup > Company > Hour Types
The Validate In/Out Time field is used to select which hour types will be available when entering in-out times in the Timesheet Entry screen. Hour types with this box checked will be available to be used with this feature, however any hour types left unchecked will not. For example, when selecting an hour type in the Hour Type field while entering a timesheet, the screen will only replace the hours input field with Time In and Time Out fields if the selected hour type has the 'Validate In/Out Time' checked in the Hour Types screen.
Auto Create Timesheets for Future Approved Leave Requests
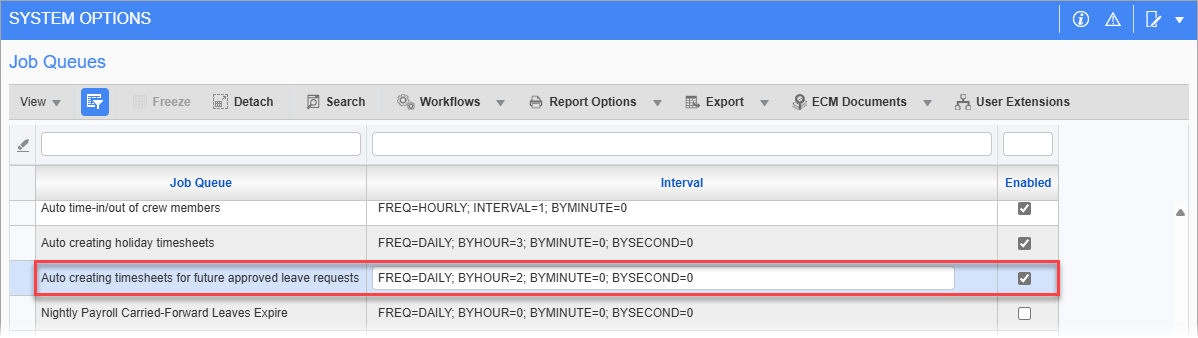
Pop-up window launched from [Job Queues] button on System Options screen; standard Treeview path: System > Setup > System Options – General tab
To populate the Timesheet Entry screen with approved leave entries, the 'Auto creating timesheets for future approved leave requests' box must be checked on the [Job Queues] button’s pop-up on the General tab of the System Options screen in the System Data module. Once the period is open, the job queue will run based on the frequency assigned and trigger the approved leave to be displayed in the timesheet.
For more information, please refer to System Data - System Options - General - Tab.
Actual Work Date
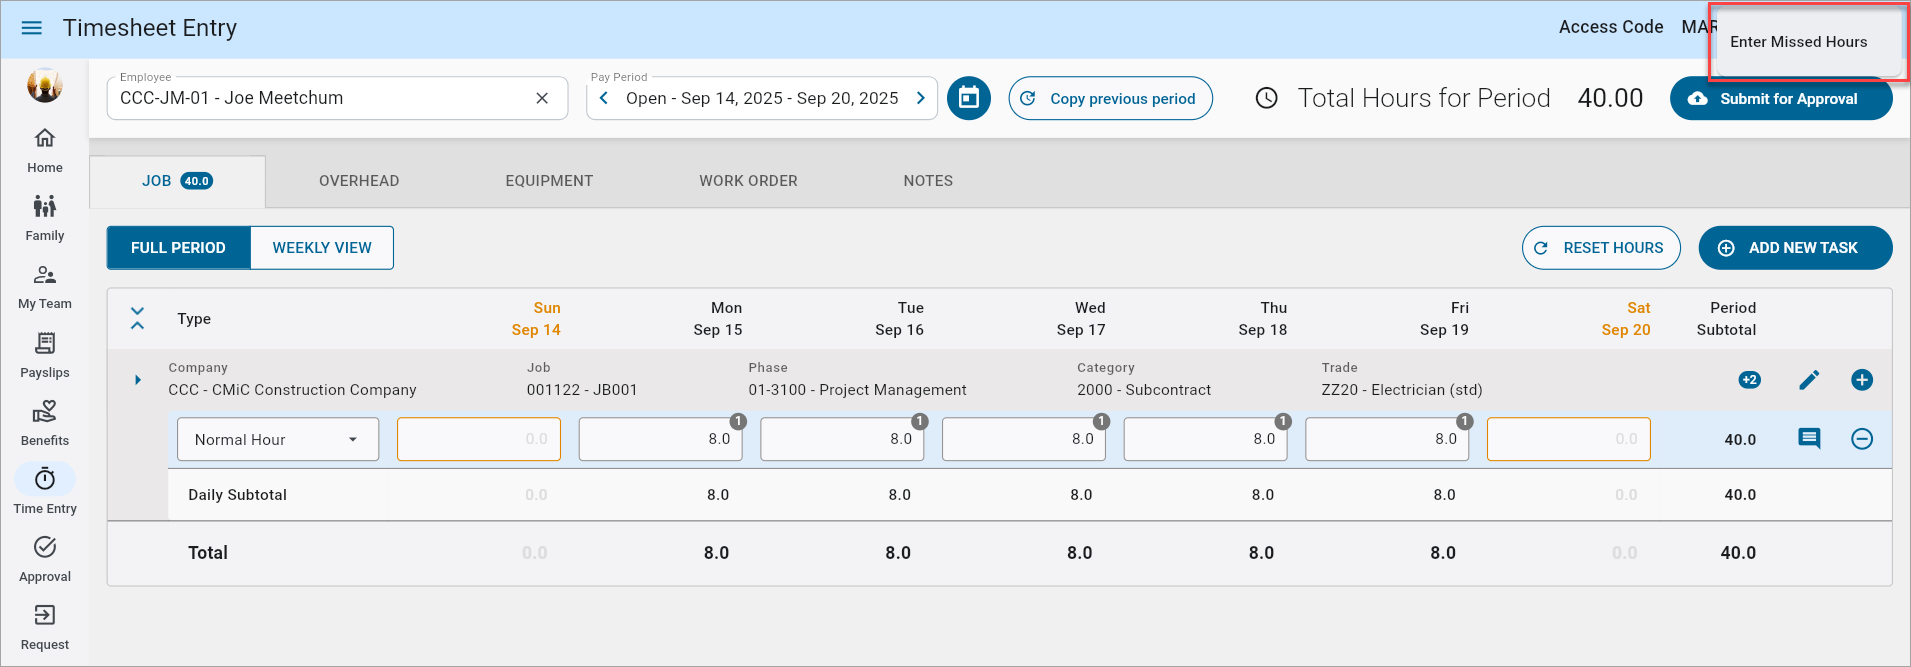
The Enter Missed Hours feature in the Construct ESS Timesheet Entry screen allows users to enter hours for prior periods that were previously missed. This option is available from the Options menu () and includes a date picker limited to past periods only. Users require the E-Time Role Maintenance permission 'Allow Actual Work Date' to access this option. For more information, please refer to E-Time - Role Maintenance (E-Time Roles) .
NOTE: The Enter Missed Hours feature is only available in Construct ESS web.
Enter Missed Hours
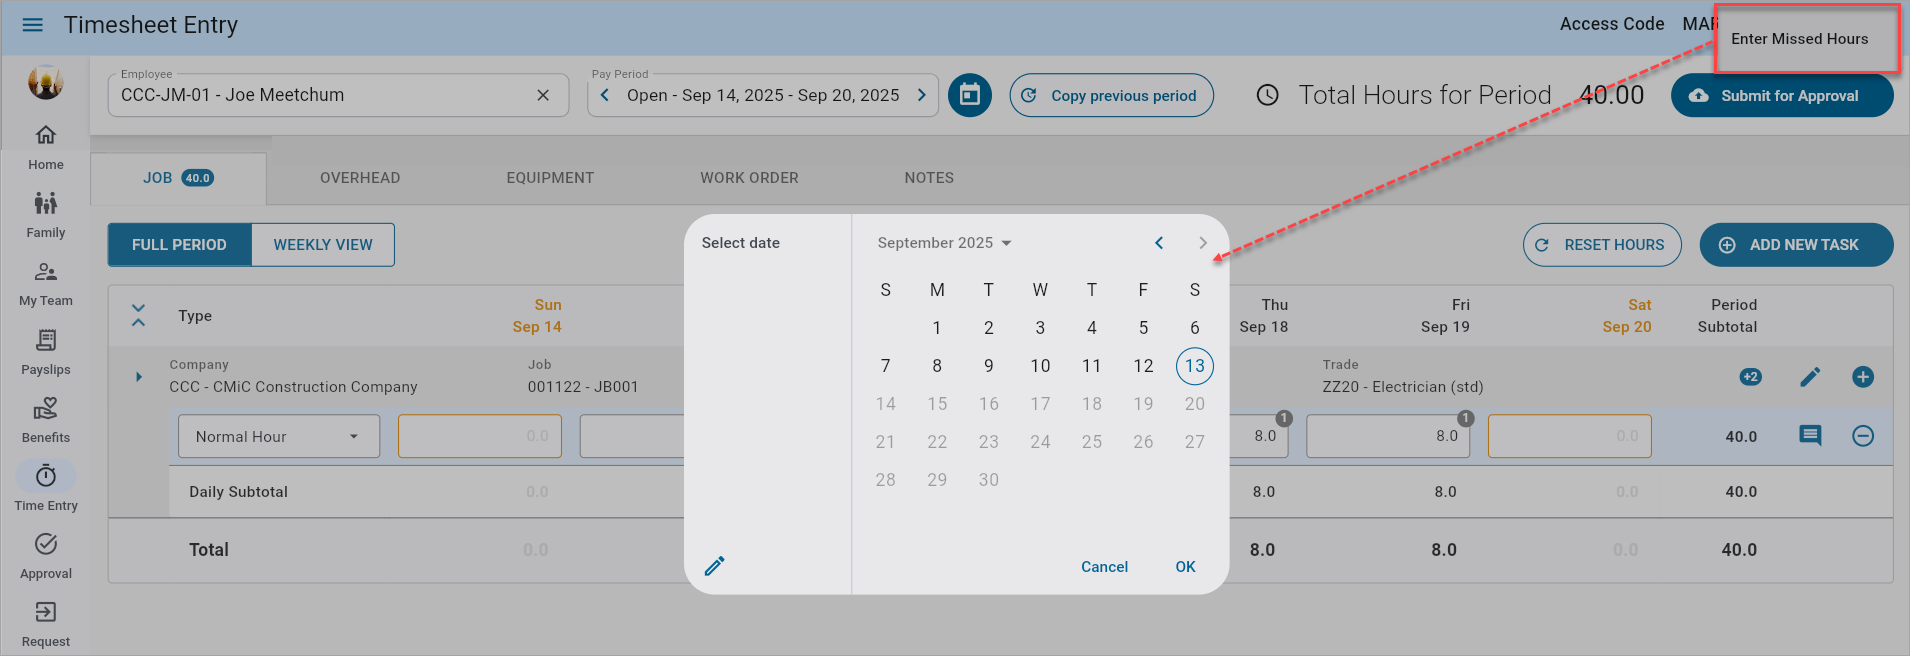
Select the "Enter Missed Hours" option and then select any date from a closed, prior period. Current or future dates are not allowed (i.e., these dates are grayed out and are unavailable for selection).
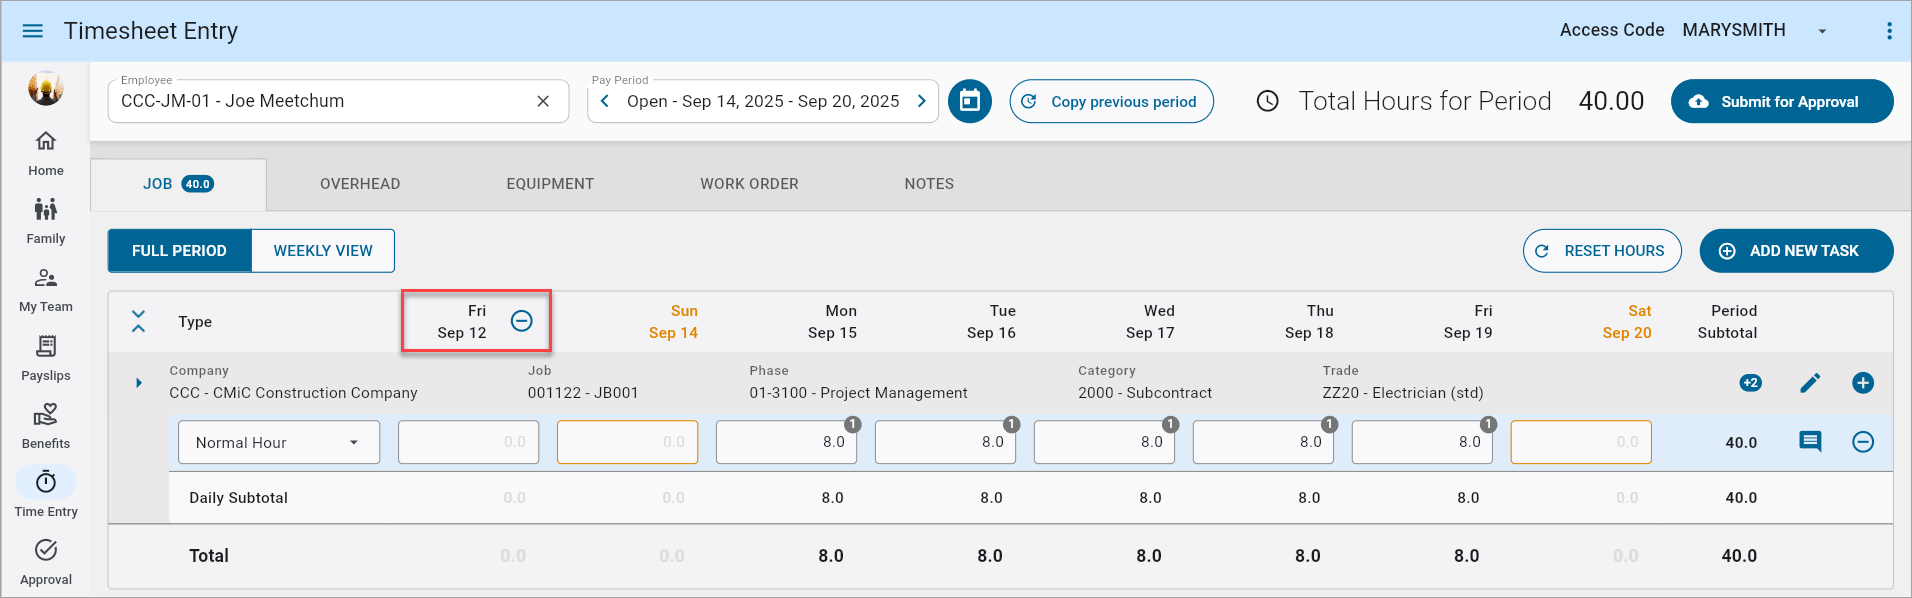
Once a valid date is selected, a new column will be added to the header section. This column represents the prior period's date and is placed before the current period's dates/columns. Users can enter employee time entries as usual and the system will treat the added column as part of the standard E-Time workflow, with full data validation.
A Delete icon ( ) is available beside each newly added column and is only available for columns added using the Enter Missed Hours feature. Default period dates cannot be deleted.