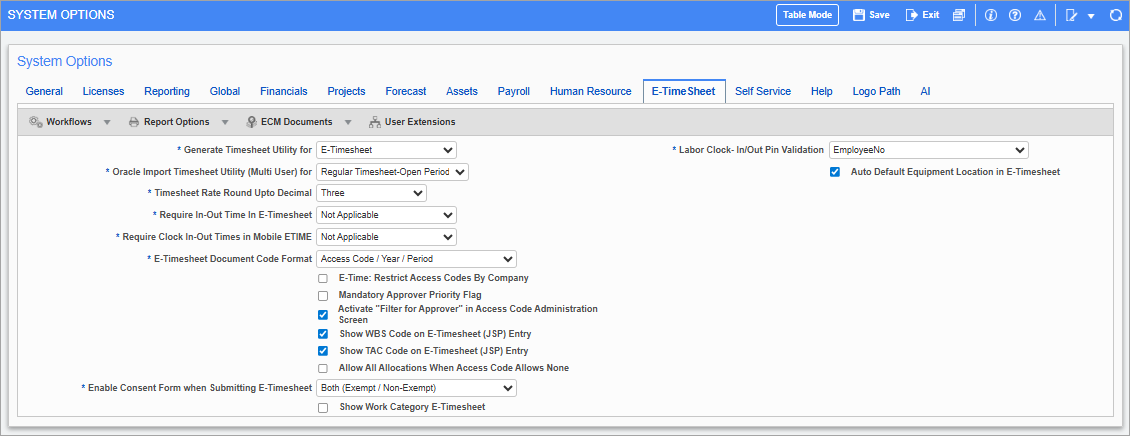
Pgm: SYSOPT – System Options; standard Treeview path: System > Setup > System Options – E-TimeSheet tab
Generate Timesheet Utility for
The options are “Regular Timesheet” or “E-Timesheet”. There may be a [Generate Regular Timesheet] button or [Generate E-Timesheet] button in the Generate Timesheets screen depending on the setting in System Options.
This functionality allows the user to also generate regular timesheets for any type of pay period. The number of hours depends on the number of working days assuming 8 hours per day. The document code must be selected in order to view the timesheets. If “E-Timesheet” is selected, the user can generate E-Timesheets for any type of pay period provided the checkbox is checked in the history record for the employee.
Oracle Import Timesheet Utility (Multi User) for
This field is used to select the type of timesheet data to be imported in the Import Timesheets from Oracle (Multi-User) screen in the US Payroll module (standard Treeview path: US Payroll > US Payroll > Utilities > Import Timesheets from ORACLE (Multi User)). Users can select whether they are importing timesheet data into the regular Timesheet program or the E-Timesheet program. Three options are available in the drop-down menu:
-
Regular Timesheet: This option is used for importing timesheet data into the regular Timesheet program and data will be imported for any date in any open period.
-
Regular Timesheet - Open Period: This option is used for importing timesheet data into the regular Timesheet program but data will only be imported into the first open period of the year, regardless of the date on the CTL or text file.
NOTE: If a previous period has been opened for adjustment, this setting will import the timesheet into that period.
-
E-Timesheet: This option is used for importing into the E-Timesheet program.
NOTE: When the screen is initially accessed, this field will default to a blank value. A blank value is equivalent to “Regular Timesheet - Open Period”. Depending on the type of timesheet data being imported, users should select the timesheet program option accordingly.
Users should ensure that the option selected matches the type of data being imported, otherwise imported records will not be inserted into the appropriate timesheet table. For example, if E-Timesheet data is being imported, and “Regular Timesheet - Open Period” is selected in this field, records will not be successfully imported into the E-Timesheet table.
Timesheet Rate Round Up to Decimal
The standard of three decimals is used when setting up payroll, however with this option, users can select to round at the Timesheet Rate level, the value to either the default three, or optionally only two decimals.
Require In-Out Time In E-Timesheet
In-out times will be required in JSP E-Timesheet entry for the type of employee selected from this drop-down list. The options are “Exempt”, “Non-Exempt”, “Both”, or “Not Applicable”. The employee type is the FLSA type on the Personal tab of the Employee Profile.
Require Clock In-Out Times in Mobile E-Time
NOTE: This functionality is currently not supported in Patch 22. By default, the setting is configured as "Not Applicable". Do not enable this option in Patch 22. Changing this setting to any other value in the drop-down menu will impact both desktop and mobile E-Time entry. Users will be prompted to enter Time In and Time Out, which may disrupt standard time entry workflows. This setting is intended exclusively for the Clock In / Clock Out feature and will be fully supported in Nexus 1.
E-Timesheet Document Code Format
Format mask used to define document codes for E-Timesheets:
-
<A>: Access Code/Year/Period
-
<Y>: Year/Period/Access Code
E-Time: Restrict Access Code by Company – Checkbox
If checked, only access codes with the company of the user’s access code or access codes with no company assigned will be displayed when the user enters the E-Time Access Code Setup screen.
Mandatory Approver Priority Flag – Checkbox
If checked, the priority rating for at least one approver will be mandatory in the E-Time Access Code Administration screen.
Activate "Filter for Approver" in Access Code Administration Screen – Checkbox
If checked, the Filter for Approver functionality will be activated on both the Employee and Pay Run tabs of the Assign Access Code administration screen in the E-Time module. This feature is considered during the approval process to determine which employees are displayed for the approvers in the Timesheet Approval screen.
Once this functionality is activated via this checkbox, administrators can enable/disable the 'Filter for Approver' checkboxes on the Employee and Payruns tabs of the E-Time Access code Administration screen (sample shown below). For more information, please refer to E-Time - Using Filter for Approval.
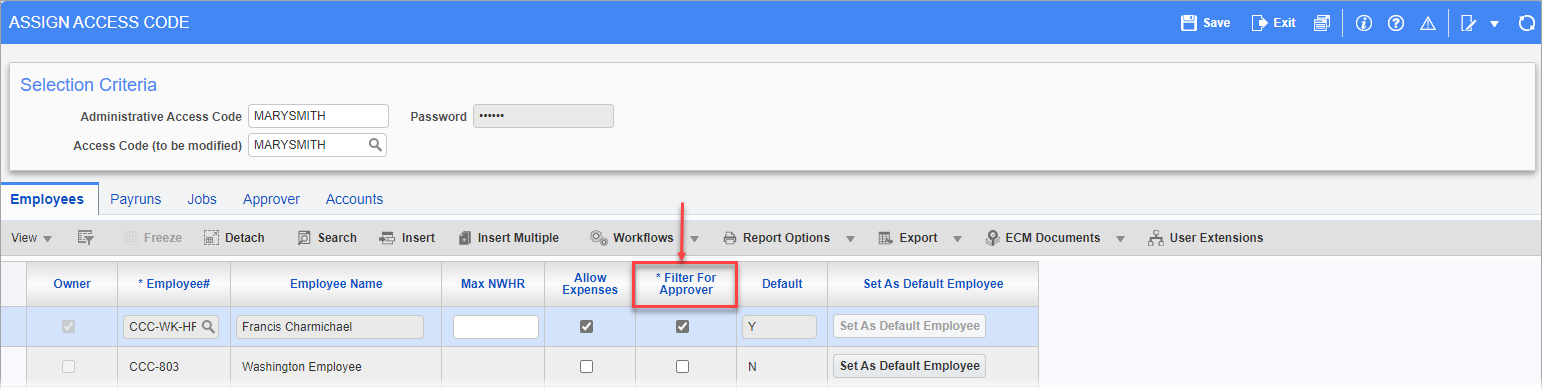
PYACSGRP – Assign Access Code; standard Treeview path: E-Time > E-Timesheet > Access Code Administration – Employees tab
Show WBS Code on E-Timesheet (JSP) Entry – Checkbox
If checked, WBS codes are shown on the JSP E-Timesheet Entry screen.
NOTE: These codes will also be available in the Construct ESS web version.
Show TAC Code on E-Timesheet (JSP) Entry – Checkbox
If checked, TAC codes are shown on the JSP E-Timesheet Entry screen.
NOTE: These codes will also be available in the Construct ESS web version.
Allow All Allocations When Access Code Allows None
If checked, all allocations are allowed when the access code allows no allocations.
Enable Consent Form when Submitting E-Timesheet
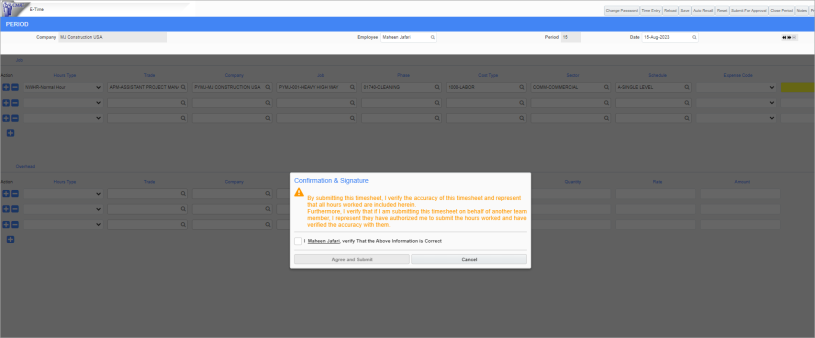
Confirmation & Signature pop-up window that appears in E-Time Entry screen when this option is enabled
This field is used to control whether a user is required to sign off on the hours they are reporting when submitting a timesheet in the E-Time Entry screen. If enabled, a Confirmation & Signature pop-up window will appear, as shown in the screenshot above.
The options available in this field's drop-down menu are:
-
N/A - Users will not be required to complete a consent form.
-
Both (Exempt / Non-Exempt) - Both exempt and non-exempt users will be required to submit a consent form.
-
Exempt only - Only exempt employees will be required to submit a consent form.
-
Non-Exempt only - Only non-exempt employees will be required to submit a consent form.
NOTE: An employee's FLSA exemption status is defined in the FLSA Type field on the Personal tab of their Employee Profile record.
Show Work Category E-Timesheet - Checkbox

Work Category field located on the E-Time Entry screen when this option is enabled
When this checkbox is enabled, the Work Category field will be displayed on the E-Time Entry screen. This field will be available to select work categories when entering timesheet details.
Labor Clock-In/Out Pin Validation
This field is used for the validation of pin codes in the Construct CHK app. The options available are "EmployeeNo" and "Last Six Digits of SSN/SIN". The option selected here will apply at the company level and will determine whether the pin code being used by employees to log into the Construct CHK app will be their employee ID number or the last six digits of their social security number.
Auto Default Equipment Location in E-Timesheet – Checkbox
This field is used to automatically default the equipment location in the Equipment Location field in the Construct ESS Timesheet Entry screen. The equipment location defaults from the Location fields on the General tab of the Equipment Maintenance screen in the Equipment Costing module (standard Treeview path: Equipment Costing > Setup > Enter Equipment).