The purpose of the CMiC alert system is to provide a way for users to receive messages informing them that specific conditions exist in the database. Currently, alerts are used for action items, workflow notifications, and timesheet approvals.
Alert recipients can be defined in three ways, depending on the alert type.
-
For ACT alerts (or Action Item alerts), the recipient of the alert has been identified as a contact of an action item created in either CMiC Field or the OM module and the action item’s Alert Date and Alert Time fields have been completed.
NOTE: OM action items have two types of notices available: alerts and notifications. The alerts being discussed here are plain text emails and they are enabled in the System Data module, as described below in Custom Alerts. In addition to this alert, there is also an HTML email notification which can be enabled in CMiC Field, by checking the 'Send PM Notifications for Action Items' checkbox in the General tab of the Project System Options screen.
-
For ETA alerts (or E-Time Alerts), the recipient is the timesheet approver as set up in the Payroll module. (For more information, please refer to the E-Time Email Alerts Setup quick guide in the E-Time reference guide.)
-
For WFN alerts (or WorkFlow Notification alerts), the recipient of the alert is the recipient of the notifications contained in the alert.
NOTE: The users list includes non-Enterprise users as well. The LOV displays user name and the type as either “Enterprise” or “External”.
Workflow Email Notifications Hierarchy
Hierarchy for Sender’s Email
-
System uses DA’s e-mail address in E-mail field on the General tab of the User Maintenance screen in the System Data module (Pgm: SDUSRMNT; standard Treeview path: System > Security > Users > User Maintenance – General tab).
-
If above field is null, system uses e-mail address on Contact Info tab of DA’s Contact record (Pgm: SYSCNTCT – Contact Management).
-
If the above field is null, the system uses the Default Email Account field (SYS_DEFAULT_EMAIL), which is under the [Alert Settings] button on the General tab of the System Options screen in the System Data module (Pgm: SYSOPT; standard Treeview path: System > Setup > System Options – General tab).
-
If above field is null, system uses: mPOWER_Alert@cmic.ca.
NOTE: If an email address is entered in the Alert Sender Email Override field on the Imaging Controls screen in the Imaging module (standard Treeview path: Imaging > Setup > Imaging Control > Imaging Controls - Tab > Workflow Notifications & Display Options), the email specified in this field will override the default sender email that would otherwise be selected based on the Workflow Email Notifications Hierarchy.
Hierarchy for Receiver’s Email
-
System uses user’s e-mail address in E-mail field on the General tab of the User Maintenance screen in the System Data module (Pgm: SDUSRMNT; standard Treeview path: System > Security > Users > User Maintenance – General tab).
-
If above field is null, system uses e-mail address on the Contact Info tab of receiver’s Contact record (Pgm: SYSCNTCT – Contact Management).
NOTE: The Contact Management screen can be accessed from more than one module. For example, it can be reached from the Opportunity Management module (standard Treeview path: Opportunity Management > Contacts), as well as the General Ledger module (standard Treeview path: General Ledger > Maintain Companies – [Contacts] button).
Alert Types
There are three types of alerts: ACT, ETA, and WFN. One or more instance of these alerts can be defined per recipient by specifying a set of parameters. The nature of the parameters depends on the alert type.
NOTE: ACT, ETA, and WFN alerts are the only types of alerts supported in ADF. All other types of alerts have been deprecated.
The following table summarizes ACT, ETA and WFN alert types and describes their parameters.
|
Alert Type |
Parameter |
Parameter Description |
|---|---|---|
|
ACT Action Item to be reviewed |
Receive E-mail |
If checked, send the recipient an email as well as add a message to the alert table. |
|
ETA
|
Receive E-mail |
If checked, send the recipient an email as well as add a message to the alert table. |
|
WFN
|
Include all open notifications |
If checked (recommended), all open notifications are listed. Otherwise, only new ones are shown. |
|
Item Type (optional) |
Enter a workflow item type if you only want to see notifications for one type of workflow. |
|
|
Next Execution Time |
When the next alert will be sent. |
|
|
Time Interval |
A SQL expression defining how to calculate the next execution time. |
Alert Instances
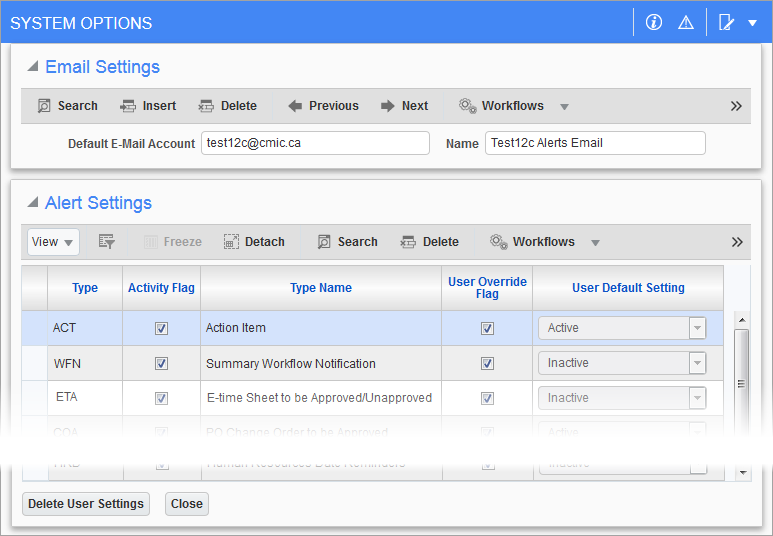
Pop-up window launched from the [Alert Settings] button on the System Options screen (standard Treeview path: System > Setup > System Options – General tab - [Alert Settings] button)
Press the [Alert Settings] button from the System Options screen to define the alert settings for the ACT, ETA, and WFN alert types.
Default E-mail Account, Name
These fields should be set to a generic e-mail account/descriptive name. The email field is used as a default e-mail from account for alerts and e-mailing within collaboration if there is no e-mail account associated with the user.
Type, Type Name
This is the alert type and name.
Activity Flag – Checkbox
If this box is checked, it indicates that the alert is available and active.
User Override Flag – Checkbox
Check this box if the users are allowed to override the defaults for the alert via the User Preferences screen (standard Treeview path: System > Preferences > User Preferences).
NOTE: Some of the Alert fields are not applicable in UIRuntime and do not appear on the User Preferences screen. If required, use the Lite Editor tool to make them visible on the screen.
User Default Setting
This is a pre-defined field that indicates if the alert is defined as automatically available to all users. If the field indicates “Active”, then all users will automatically have this alert available. If it indicates “Inactive”, then the alert will have to be made active for each user who requires it.
[Delete User Settings] – Button
This button will remove any user-applied preferences for the current alert. This has the effect of setting the alert back to the system-defined defaults. This sets each alert individually – if all alerts need to be set back to the default settings, this button will need to be activated for each alert.
Assigning Users to Alert Groups
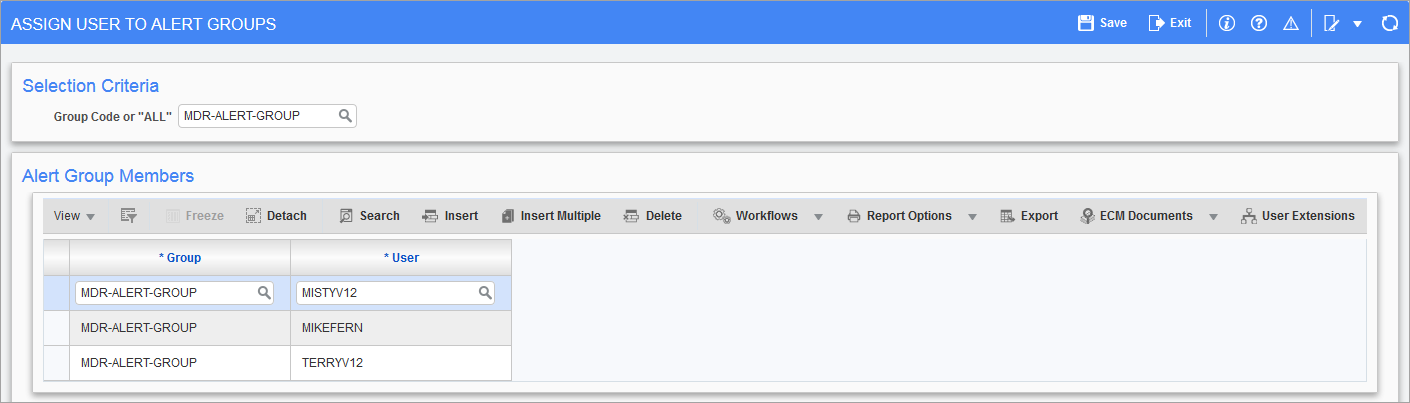
Pgm: SDALRTGP – Assign User to Alert Groups; standard Treeview path: System > Alerts > Assign Users to Alert Group
This screen is used to create alert groups. Alert groups can be used as roles where the specific user that is to receive a set of alerts may change over time, but the alerts for a specific role are fixed. It can also be used to send one or more alerts to a large number of users without requiring that the alerts be assigned to each user individually.
Group Code or “All”
Select a single alert group or “ALL” to see the members of all alert groups at the same time.
To create a new alert group, type the name of the group in this field and press Enter on your keyboard. An Alert pop-up window will be launched.
Pop-up window launched when creating a new alert group
In the Alert pop-up window, press [Yes] to create the new alert group.
NOTE: The name of the special master alert group must not be entered here because this group should never have any members.
Group, User
In the Alert Group Members section of the screen, select pairs consisting of an existing alert group and an existing user. Queries may be made by either group or user.
Show Past Alerts
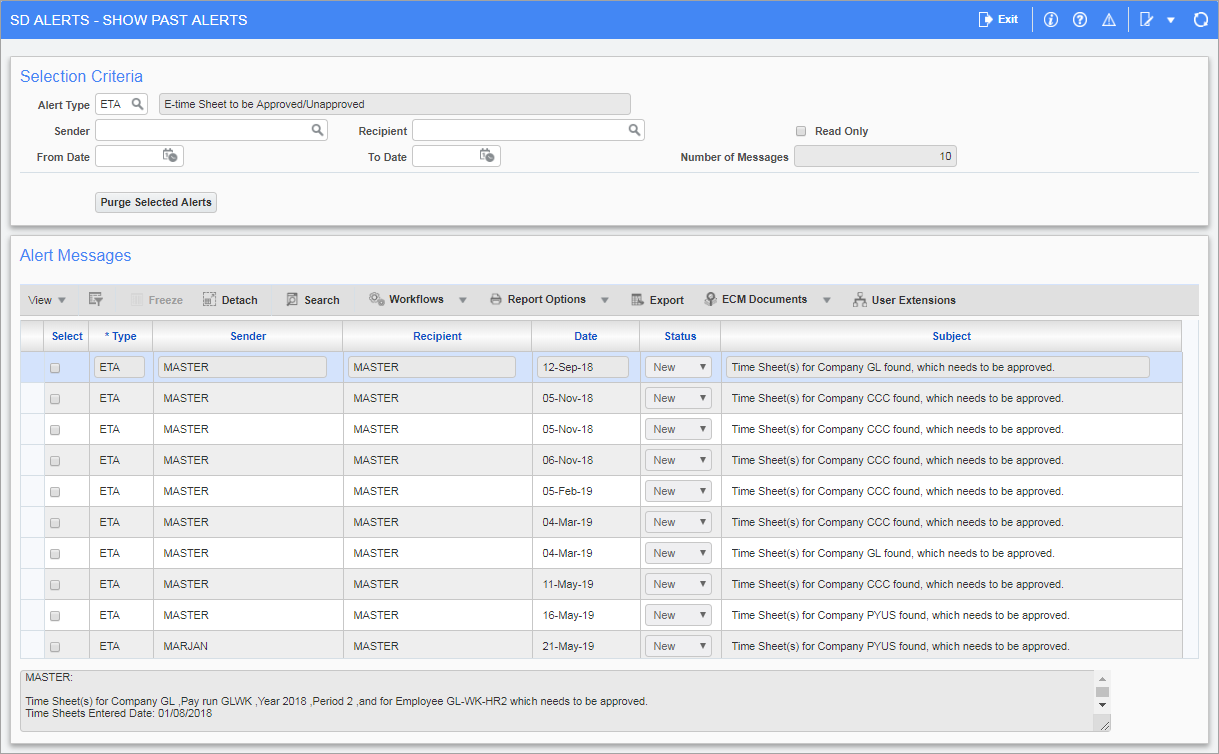
Pgm: SDALERTS – Show Past Alerts; standard Treeview path: System > Alerts > Show Past Alerts
This screen is used to review alerts using filtering criteria and allows for a full purging of the results of a filtered display of alerts.
Alert Type
Enter/select the alert type to be queried.
Sender/Recipient
Enter/select a sender/recipient (Enterprise or External) by which to filter the data being queried.
From Date, To Date
Enter a from and/or to date to apply additional filters to the query.
[Purge Selected Alerts] – Button
To purge past alerts, use the ‘Select’ checkbox next to each alert message to be purged and click on the [Purge Selected Alerts] button.
NOTE: The Show Past Alerts screen only shows alert messages that have been sent. If the alerts are purged from here, the history of alerts will be cleared, but if there are open notifications in the system, then these will be sent out to the relevant users when the Alert Processor is turned on (in System > Setup > System Options – General tab – [Job Queues] button). There isn’t a table that holds the list of alerts that will be sent out. The system looks at the notifications and works out what alerts need to be sent each time the process runs.
Custom Alerts
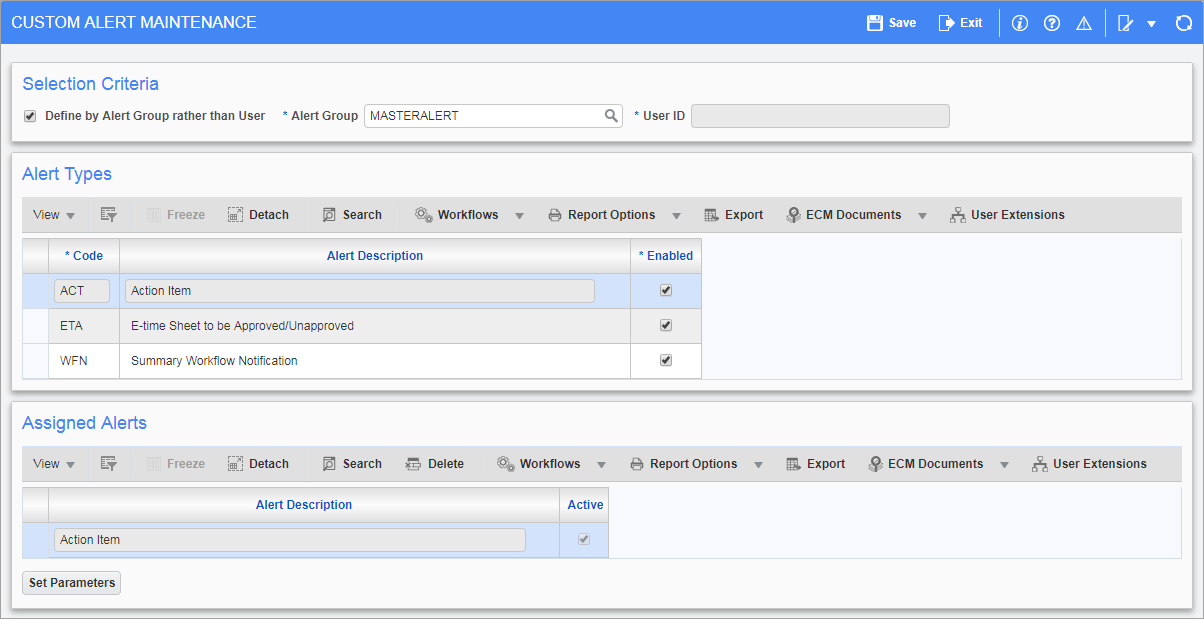
Pgm: SDAGENMT – Custom Alert Maintenance; standard Treeview path: System > Alerts > Define Custom Alerts
Selection Criteria (User or Alert Group) – Section
This section is accessible if the user has been granted the system privilege ‘ALERTDEF - SD: Allows the user to define alerts for all users and groups’. Without the privilege, the user’s ID will automatically default in the User ID field and will be display-only.
In this section, specify the user or group of users to be the recipients of the alert or alerts being defined.
If the ‘Define by Alert Group rather than User’ checkbox is checked, an alert group code must be entered in the Alert Group field. A new alert group can be defined on the fly here or an existing one selected from the LOV.
If the box is left unchecked, a valid user ID must be entered in the User ID field.
Alert Types – Section
This section displays all alert types for which customization is possible. As records are selected in this section, the currently defined instances of that type of alert are shown in the Assigned Alerts section of the screen.
The ‘Enabled’ checkbox is used to globally disable an alert regardless of the user’s settings. Normally this box is checked, but the ‘Enabled’ checkbox can be unchecked to disable the alert. When an alert is disabled, the following occurs:
-
The processing routines for disabled alerts will not be run, so no new messages of this type will be generated.
-
Previously processed alert messages of this type will remain and must still be deleted by the recipient.
Assigned Alerts (Alerts Assigned to User or Group) – Section
The Assigned Alerts section contains a list of all the instances of the alert specified in the Alert Types section for the recipient user or group specified in the Selection Criteria (User or Alert Group) section. Instances can be added, deleted, and modified in this section.
The Alert Description is a required field and should be used to adequately describe this particular instance of the alert so it can be identified without looking at its parameters.
Click on the [Delete] button on the Assigned Alerts Block Toolbar to remove the corresponding alert from this list.
Uncheck the ‘Active’ checkbox to temporarily disable an instance without deleting it.
[Set Parameters] – Button
Clicking on the [Set Parameters] button opens the parameter pop-up window for the selected alert instance. The number and nature of the parameters differ depending on the type of the alert.
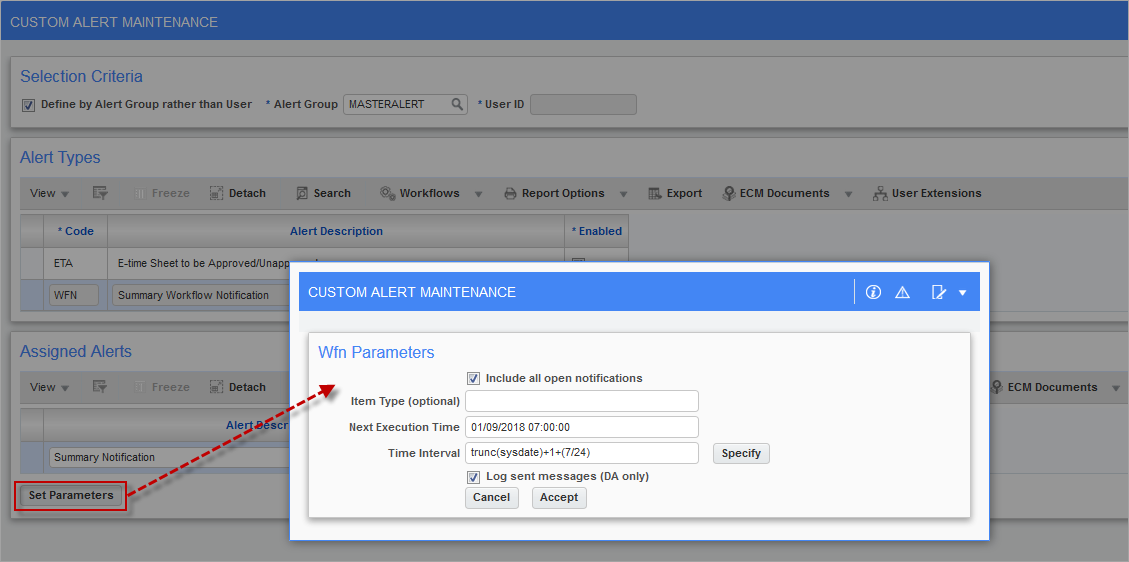
Pop-up window launched from [Set Parameters] button on Custom Alert Maintenance screen for a WFN alert
Include all open notifications – Checkbox
It is recommended to keep this box checked. If unchecked, the only notifications shown in the daily email will be the new ones for that day.
Item Type (optional)
This parameter is used to restrict the setup to one specific workflow.
Next Execution Time
The Next Execution Time parameter specifies the next time that the conditions for the alert will be tested. If it specifies a date in the past, the alert will run immediately (i.e. the next time the main alert processing program runs – usually within a minute, but this can be changed using the System Options screen).
NOTE: This date and time is always specified using format “DD/MM/YYYY HH:MI:SS”.
Time Interval
The Time Interval parameter determines how frequently the conditions for the alert are to be tested.
Time interval can be specified in two ways – either as a SQL date expression, as shown in the screenshot above, or as a mnemonic phrase. Any such phrase that is not understood is treated as SYSDATE+1 (i.e. run next at the same time next day.)
If the time interval is entered manually, the following mnemonic phrases and some variations on them are understood:
-
Every [n/other/second/third/fourth/2nd/3rd/4th] day[s]/week[s]/month[s]/year[s]
-
Daily / Weekly / Biweekly / Monthly / Bimonthly / Annually / Biannually / Semiannually
All of these standard time intervals cause the alert to run at midnight.
To schedule an alert for a specific day of the month either use the [Specify] pop-up window, or set the Next Execution Date parameter to the next occurrence of that day and set the Time Interval to the desired variation of “Monthly”.
To schedule an alert for a specific date of the year or day of the week, set both the Next Execution Date and Time Interval as appropriate.
Log sent messages (DA only) – Checkbox
This parameter does not apply to most users and should be left unchecked.
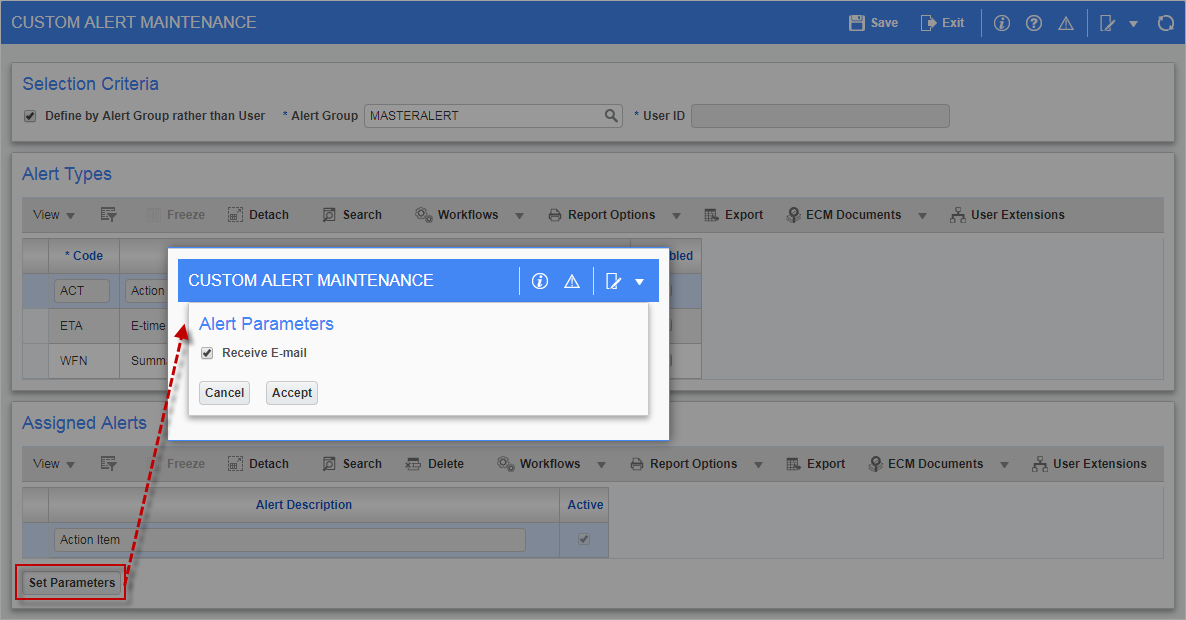
Pop-up window launched from [Set Parameters] button on Custom Alert Maintenance screen for ACT and ETA alerts
Receive E-mail – Checkbox
If this box is checked, the recipients of the alert will have it emailed to them as well as having it added to the database to be viewed via the alert window. If it is unchecked, no email will be sent.
The address or addresses to which the email will be sent are specified on the User Preferences screen (standard Treeview path: System > Preferences > User Preferences). Note that the email addresses are associated with the actual recipient, not the alert group. However, it is possible to specify a list of email addresses (separated by semicolons) for each recipient. Therefore, it is possible to have a single user as the recipient of the alert, with the email (only) being sent to several other users or even non-users of CMiC software.
Error Log

Pgm: SDALRTER – SD Alert Error Log; standard Treeview path: System > Alerts > View Error Log
The error log provides a way to see if the alerts are failing and displays errors encountered in attempting to send email. Other types of errors may also be logged in the future.
Code
The Code column indicates which alert type had the error.
Date
The Date column indicates the date and time of the error.
Error Message (Details)
The Error Message column contains two different pieces of information. One line gives the error message and the other indicates the data that was in error.
[Purge] – Button
The [Purge] button can be used to empty the error log table.
Manually Running Alert Processor to Obtain Diagnostic Output for Workflow Alerts
This section contains procedures for manually running the alert processor to obtain a diagnostic output for workflow alerts. For example, this process would be useful to send Workflow Notification Summary emails manually to check for any errors immediately rather than waiting until the next day.
1. Disable the Alert Processor. This is accomplished by clicking on the [Job Queues] button located on the General tab of the System Options screen, which launches a pop-up window where the ‘Enabled’ checkbox can be unchecked for the Alert Processor.
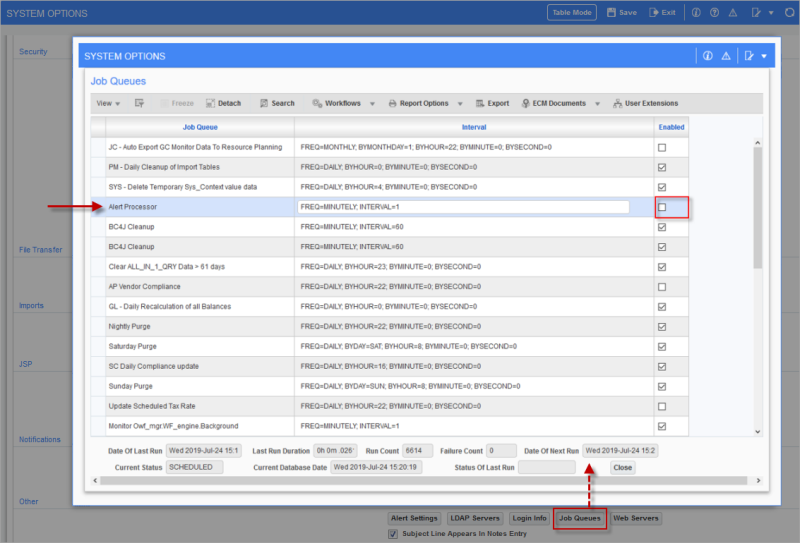
Pgm: SYSOPT – System Options; standard Treeview path: System > Setup > System Options – General tab – [Job Queues] button
2. In the Custom Alert Maintenance screen, use the [Set Parameters] button to open the parameters for an alert assigned to the specified user.
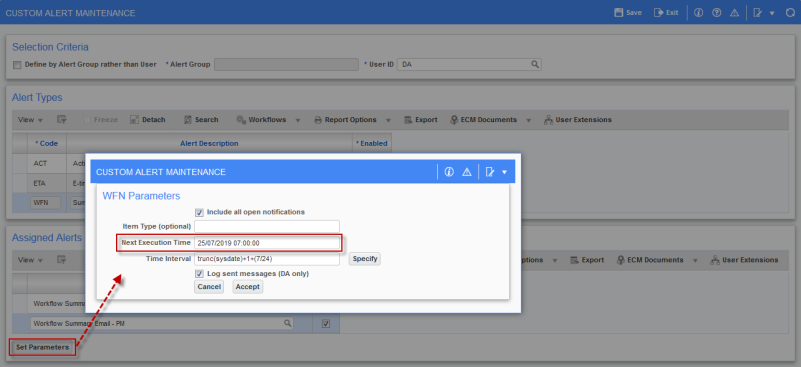
Pop-up window launched from [Set Parameters] button on Custom Alert Maintenance screen; standard Treeview path: System > Alerts > Define Custom Alerts – [Set Parameters] button
Reset the time in the Next Execution Time field to a time in the past. One day in the past will suffice.

3. Log into SQL Plus as DA and execute the following commands:
set serveroutput on size 1000000 -- this turns on diagnostic output
exec da.dbk_sd_alert_proc_wfn.process; -- this runs the WFN alert processor
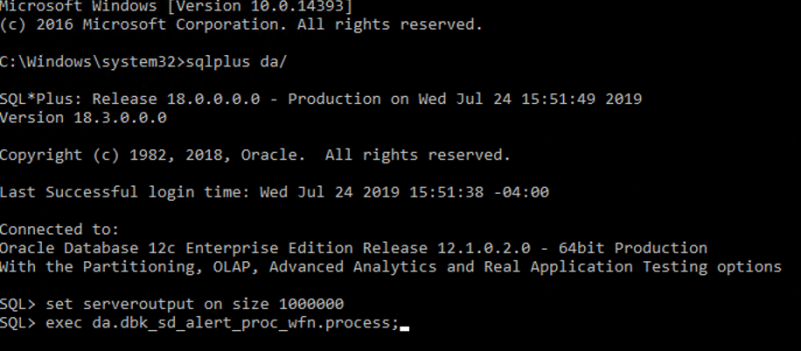
If there are any errors sending the alerts, they will appear at this point.
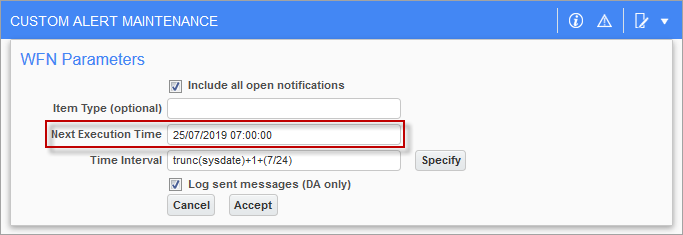
4. After running the command manually, the date in the Next Execution Time field in the parameters pop-up window will automatically be updated to the next scheduled alert time:
5. When finished running the alert processor manually, turn the Alert Processor back on by checking the ‘Enabled’ checkbox the Alert Processor in System Options.

Pgm: SYSOPT – System Options; standard Treeview path: System > Setup > System Options – General tab – [Job Queues] button