Overview – Detail Screen
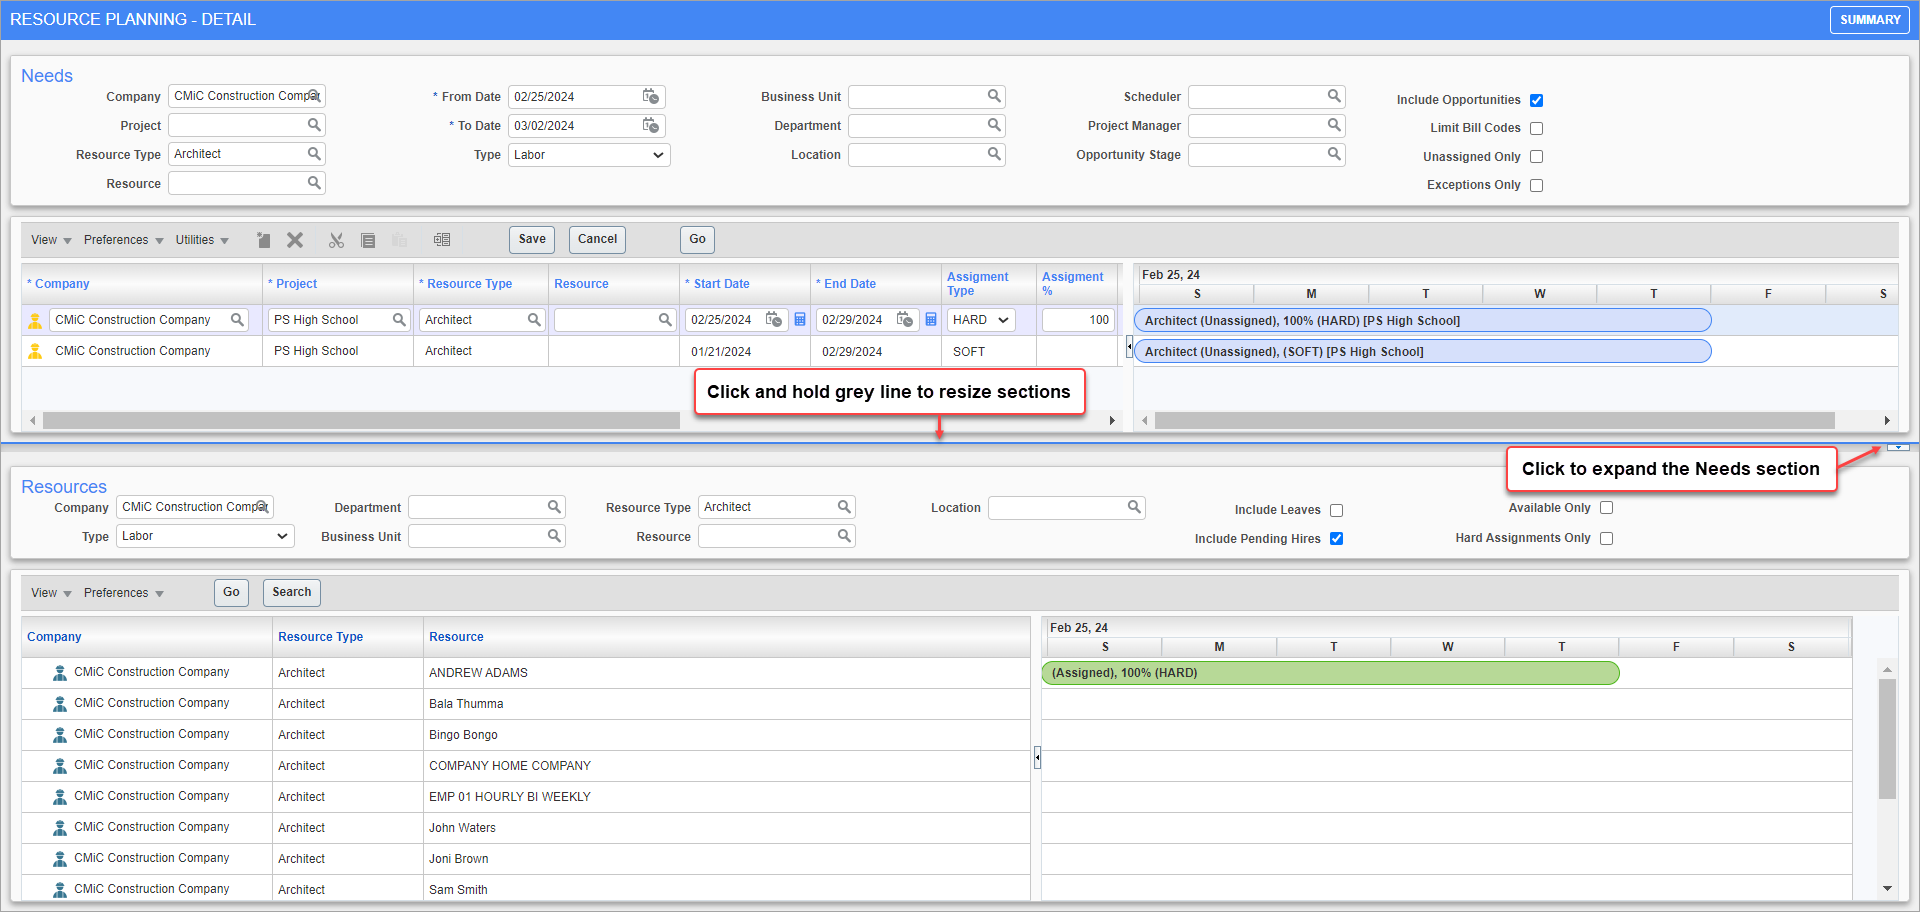
The Details screen is used to assign resources to projects needs and to view assignment details of needs over a range of dates.
The screen has two sections: Needs and Resources, with each having its own filter fields and drop-down menus. The Needs section is used to assign resources to needs and the Resources section is used to find and list relevant resources for assignment.
The grey line between the two sections, shown above, can be used to control their relative height. The down arrow at the right-most end of the grey line, also shown above, can be used to expand the Needs section.
Customizing Table Columns
The columns of the tables in the Needs and Resources sections can be hidden, resized, or rearranged. New table layouts can be then be saved.
Set Column Visibility
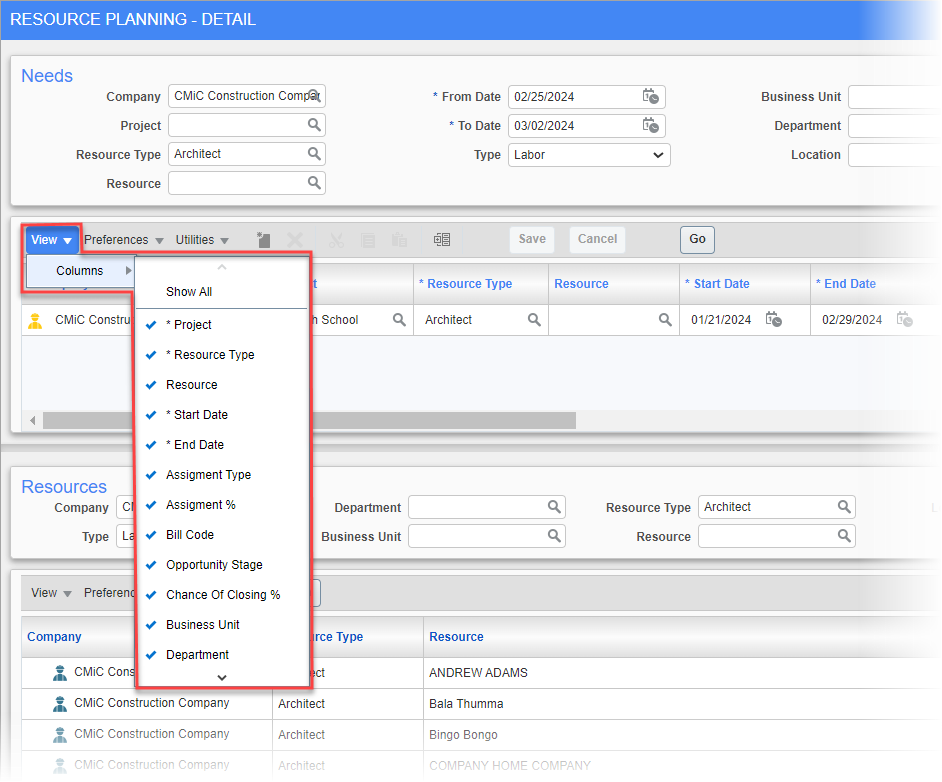
To set which columns are visible, click the table’s View drop-down menu, hover over the Columns option, then check a column name to display it or uncheck it to hide it.
Resize Column

To resize columns, hover between column headers to display the Resize ( ) icon, then click and drag the column border to its new position.
Reorder Columns

To reorder columns, select the column to move by clicking its column header, as shown above.
NOTE: Do not click and hold, just click to select the column.

Move the cursor to reveal the Move icon, then click and drag the column to its new position. As you drag the column around, an empty column will be shown to indicate where it will go when released.
Save or Reset Table Layout
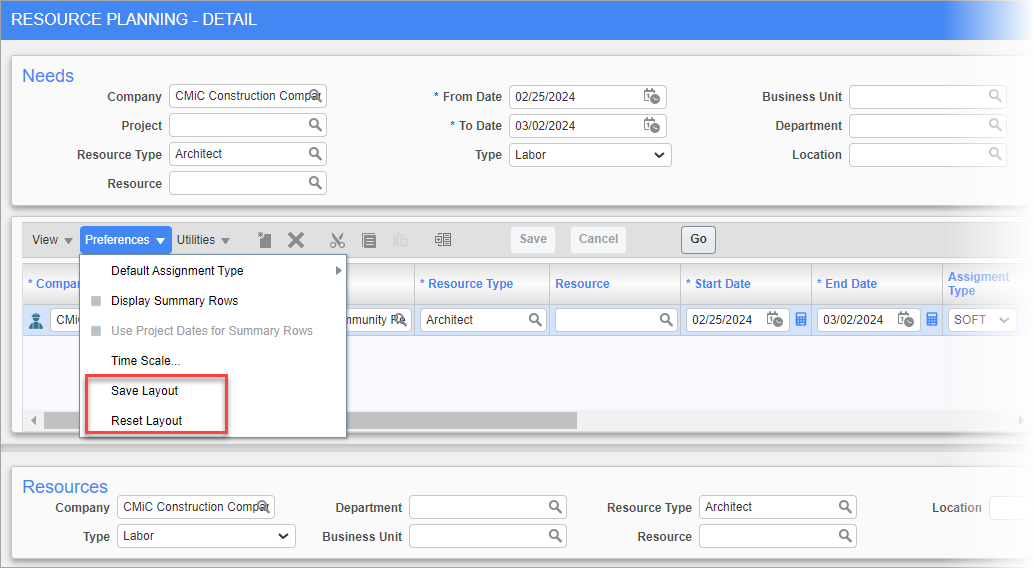
To save or reset a table’s layout, click the table’s corresponding Preferences drop-down menu, then select the "Save Layout" or "Reset Layout" option.
Needs – Section

Sample of Needs section displaying needs for selected opportunity and date range

Sample of Needs section displaying all projects and opportunities with needs in selected date range
The Needs section is used to assign resources to the needs of projects or opportunities. This section’s table displays needs (first screenshot) or project/opportunity summary rows (second screenshot) that can be expanded to show their needs.
To the right of the table is a Gantt chart with rows that correspond to the rows of the table, and with a date range that spans over the dates specified by the From Date and To Date fields. When the table displays needs, the Gantt chart uses colored bars to span the relevant dates. When the table displays projects and opportunities, the Gantt chart uses black bars to span over their start and end dates.
The Filter section above the table controls what projects/opportunities and needs are listed and the options in the View and Preferences drop-down menus control various display options.
As shown below, when a field in a Need row is changed, the row’s background color is set to light blue until it is saved.

This section can be resized by clicking and holding the grey line between the two sections and moving it up or down.
Filter Fields

The Filter section controls, among other things, which projects and resource types are included in the section’s table. When the filters are applied by pressing the [Go] button, the entered parameters are saved and are reloaded the next time the screen is launched.
NOTE: If a filter field is changed, the [Go] button must be clicked to refresh the display. If there are unexpected results in the table, it may be due to forgotten or unnoticed filter field settings.
The following are descriptions for this section’s filter fields.
Company
Filter projects/opportunities by their company. Only those belonging to specified company will be included in the table.
The companies available in this LOV are those in the system for which the user has security access. For further details, please refer to the Access to Companies in Resource Planning subsection in Resource Planning - Setup & Maintenance - Resource Planning.
Location
Filter projects/opportunities by their location. Only those in the specified location (state/province) will be included in the table.
Codes from this field are maintained in the
Business Unit
This field is used to filter projects/opportunities by a business unit. Only projects/opportunities handled by the selected business unit will be included. Business units are used if projects/opportunities are grouped by business units instead of departments.
Specifically, since business units are indirectly associated to projects/opportunities through departments, as each Business unit is linked to only one department, projects and opportunities are filtered by the department associated to the selected business unit.
For opportunities, the Job Dept. field on the Accounting tab of the Opportunity screen is used by this filter. For projects, their associated Job’s Default Department field on the Job Detail tab of the Enter Job screen is used by this filter.
Business Units Maintenance: General Ledger > Setup > Global Tables > Business Units
Department Maintenance: General Ledger > Setup > Local Tables > Maintain Departments
Scheduler
Filter projects/opportunities by their scheduler.
The schedulers available in this LOV are all of the key players for projects/opportunities that have the "SCHEDULER" Project Management role code. Please refer to the Resource Planning Scheduler subsection under Resource Planning - Setup & Maintenance - Resource Planning for details.
Project Manager
Filter projects/opportunities by their project manager.
The project managers available in this LOV are all of the key players that have the "MNGR" Project Management role code for the project/oppurtunity.
Opportunity Stage (Sales Stage)
Filter projects/opportunities by their opportunity stage (sales stage).
Codes can be set in the
From Date, To Date
These fields are used to set the range of dates to consider for scheduling (filter needs by dates). The table’s corresponding Gantt chart, to the right of the table, ranges over these dates.
There are limits to the date range that depend on the selected time scale (set via the Preferences drop-down menu), as follows:
|
Time Scale |
Date Range Limit |
|
Days |
2 months |
|
Weeks |
1 year |
|
Months |
2 years |
If a user has selected the "Days" and the user specifies a date range using these fields that is greater than the range allowed for the selected time scale, an error message will display.
Project
Used to filter projects/opportunities.
A company must be selected via the Company field to populate this field’s list.
Include Opportunities − Checkbox
Controls whether or not opportunities are included in the table and in lists of projects and opportunities.
Limit Bill Codes − Checkbox
If checked, only needs with Bill Codes with categories having the 'Available On GC Monitor' box checked and having their Cost Type field set to "Labor" or "Equipment" in the Maintain Categories screen (shown below) are listed. The Bill Code LOV in the Needs table is also being filtered in the same way. Needs with no assigned Bill Codes are also listed.
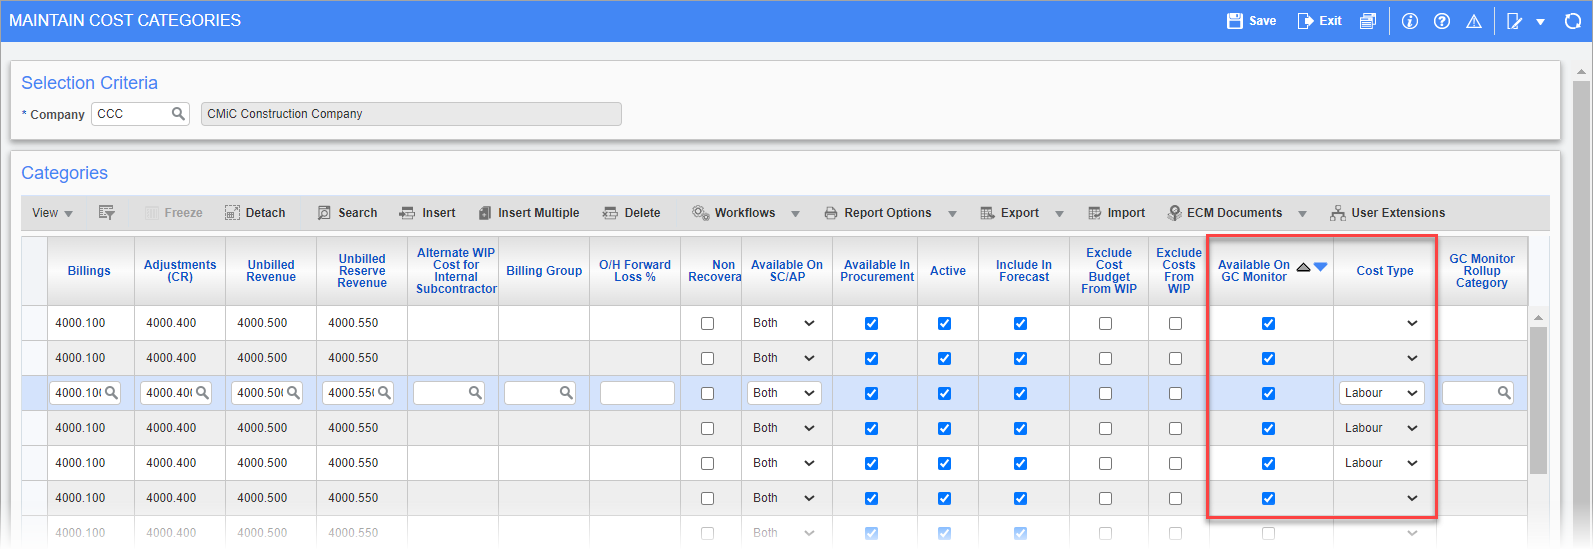
Pgm: JCCATFM – Maintain Cost Categories; standard Treeview path: Job Costing > Setup > Local Tables > Enter Category
Labor, Equipment, Both − Radio Button
Filter projects by Labor and Equipment resource types.
Exceptions Only − Checkbox
Used to identify Need rows (assignments) with at least one of the following issues:
-
Over-Assignment: Assignment is hard assigned more than 100% on overlapping Need lines.
-
Dates Issue: Assignments where end date is before start date (this situation can happen when one of the dates is synched with a project and later changed outside of Resource Planning).
Unassigned Only − Checkbox
If checked, only unassigned needs are displayed.
Department
Filter projects by their department.
A company must be selected via the Company field to populate this field’s LOVs. Departments available in this LOV belong to the company selected via the Company field.
NOTE: LOV only lists departments actually used on a project.
Resource Type
Filter by resource type.
Resource
Filter needs by assigned resources.
Menus & Buttons
| Menu/Button | Description | ||||||||||
|---|---|---|---|---|---|---|---|---|---|---|---|
|
View |
Contains the Columns option, used to set which of the table’s columns are visible. |
||||||||||
|
Preferences |
This drop-down menu has the following options: 1. Default Assignment Type: set the default assignment type - Hard or Soft. 2. Display Project Summary Rows: set whether or not project summary rows are used, which are expandable to reveal and hide their needs; if not used, only Needs satisfying the filter settings are displayed, for the filter settings. 3. Time Scale: set Gantt chart’s time scale - blocks of time can be a day, a week, or a month long. 4. Save Layout: save table’s current layout for user. 5. Reset Layout: reset table’s layout to default layout. |
||||||||||
|
Utilities |
This drop-down menu has the following options: 1. Modify Project Dates: modify the start and end dates for a selected project. 2. Add Project Needs: add needs to a selected project using a Needs template. 3. Remove Project Needs: remove all needs from a selected project/opportunity. 4. Maintenance (submenu):
|
||||||||||
|
|
Create Need: creates a new Need row in the table. If a project/opportunity is selected via the Project filter, the Project field will be populated for the need. |
||||||||||
|
|
Delete Need: delete a selected need from a project/opportunity. |
||||||||||
|
|
Cut: cut selected need from project in order to paste it to a different project/opportunity. |
||||||||||
|
|
Copy: copy selected need in order to paste it to a different project/opportunity. |
||||||||||
|
|
Paste: paste copied or cut need to selected project/opportunity. |
||||||||||
|
|
Group and Go: group needs by projects/opportunities in the same way the Display Project Summary Rows setting under the Preference drop-down menu does, until the Go button is clicked. This button does not change the Display Project Summary Rows setting. |
||||||||||
|
|
Save entered data; only enabled when data has been changed. When a Need row’s field is changed, the row’s background color is set to light blue. |
||||||||||
|
|
Undo unsaved changes. |
||||||||||
|
|
Refresh the section according to the filter fields. If a filter field is changed, this button must be used to refresh the display. |
Needs Table

The Needs table is used to assign resources to needs and to review details about a need’s assigned resources.
As shown above, if any field in a Need row is changed, the row’s background color will change to light blue to indicate that its data has been altered and not yet saved. Also, clicking a Need icon filters the Resources section to the type required by the need.
The Needs table has two display modes, controlled by the Display Project Summary Rows setting found in the Preferences drop-down menu. If the Display Project Summary Rows setting is not checked, the table displays Need rows according to the filter settings, as shown in the previous screenshot. If the setting is checked, the table displays project/opportunity summary rows (first screenshot below) according to the filter settings, which can be expanded to reveal their needs (second screenshot below), then collapsed to return to the list of projects and opportunities.


The following provides details about the columns of the Needs table.
NOTE: The Columns setting, under the View drop-down menu, is used to set the visibility of columns. If a column is not visible, check the Columns settings.
| Field | Description |
|---|---|
|
Company |
Company handling the project/opportunity. |
|
Project |
Project/opportunity with resource need. |
|
Resource Type |
Trade or Equipment Class required for need. Only types made available for Resource Planning are listed. Please refer to the following sections for details: I) Select Trades for Resource Planning II) Select Equipment Classes for Resource Planning |
|
Resource |
Employee or equipment assigned to need. Note, a selection must first be made for the Resource Type field in order for this field’s LOV to be populated. |
|
Start Date |
Start date of resource assignment. |
|
End Date |
End date of resource assignment. |
|
Assignment Type |
Soft or hard assignment types. Refer to the details below for the Assignment % field. |
|
Assignment % |
Percentage of time a resource is assigned to this particular need. If the Assignment Type field is set to "Soft", no verification is done. If the Assignment Type field is set to "Hard", the system checks to ensure the resource is not assigned to needs for more than 100% of its total available time. For the Summary screen’s resource usage breakdown, this value is factored when counting the number of assignments of a particular resource type, and it is factored into the calculation of the quantity of needs for a particular resource type. Hence, this value must be kept updated to keep all dependent calculations updated. For further details, please refer to the Resource Planning - Summary - Screen. |
|
Bill Code |
Bill code for the cost of using the resource, required for Job Costing. The bill codes available in this LOV are those entered for the project’s associated Job Billing contract. |
|
Opportunity Stage |
Display-only field, displaying the Current Sales Stage field on an Opportunity’s General tab. |
|
Chance of Closing % |
Relevant to opportunities only. Display-only field, displaying the Get (%) field on the General tab of the Opportunity screen. For opportunity needs, this percentage is taken into consideration by the Summary screen when counting the number of needs for a particular resource type, which is used in its breakdown of resource usage. Therefore, the Get (%) field for opportunities must be kept up-to-date to keep the Summary screen’s resource usage breakdowns updated. See the Resource Planning - Summary - Screen for details. |
|
Business Unit |
Business units are used if projects/opportunities are grouped by business units instead of departments. Also, business units are indirectly associated to projects/opportunities through departments, as each business unit is linked to only one department. For an opportunity, the Job Dept. field on the Accounting tab of the Opportunity screen associates it to its business unit. For a project, its corresponding Job’s Default Department field on the Job Detail tab of the Enter Job screen associates it to its business unit. "Non Business" indicates that a business unit is not applicable. Business Units Maintenance: General Ledger > Setup > Global Tables > Business Units Department Maintenance: General Ledger > Setup > Local Tables > Maintain Departments |
|
Department |
Job Department handling project/opportunity. For a project it is the department entered in the Default Department field on the Job Detail tab of the project’s corresponding job; for an opportunity, it is the department entered in the Job Dept. field of its Accounting tab NOTE: Bid Job Departments are not used. |
|
Comments |
Comments about the resource assignment. |
Project Needs vs Opportunity Needs
The needs for both projects and opportunities are included in the table. Needs for projects have blue Need icons, whereas needs for opportunities have yellow Need icons (see the following section).
Needs can be entered for an opportunity while it is in the opportunity management stage and the system will update the corresponding Project record. This allows for an early start to the entry of a project’s needs. When the bid is won and a corresponding job record is created, the needs in Resource Planning will no longer be for an opportunity, but for a project.
Need Icons
| Icons | Description |
|---|---|
|
|
Labor Need: blue indicates need is for a project, yellow indicates need is for an opportunity. |
|
|
Equipment Need: blue indicates need is for a project, yellow indicates need is for an opportunity. |
Clicking a row’s Need icon causes the resources under the Resources section to be filtered to just the type required by the need.
Resource Assignments
There are two resource assignment types, Hard and Soft, and assignments can be made for a percentage of a resource’s total available time.
Hard Assignments vs Soft Assignments
Hard assignments are checked by the system to ensure that no scheduling conflicts exist for the resource. In contrast, Soft assignments are not checked by the system for conflicts, as they are typically used for preliminary scheduling.
Multiple Assignments of Resource for Same Project/Opportunity
If a single resource is assigned to more than one need within a time period without its Assignment % field exceeding 100%, there will be one line per assignment.
Drag & Drop Resource for Assignment
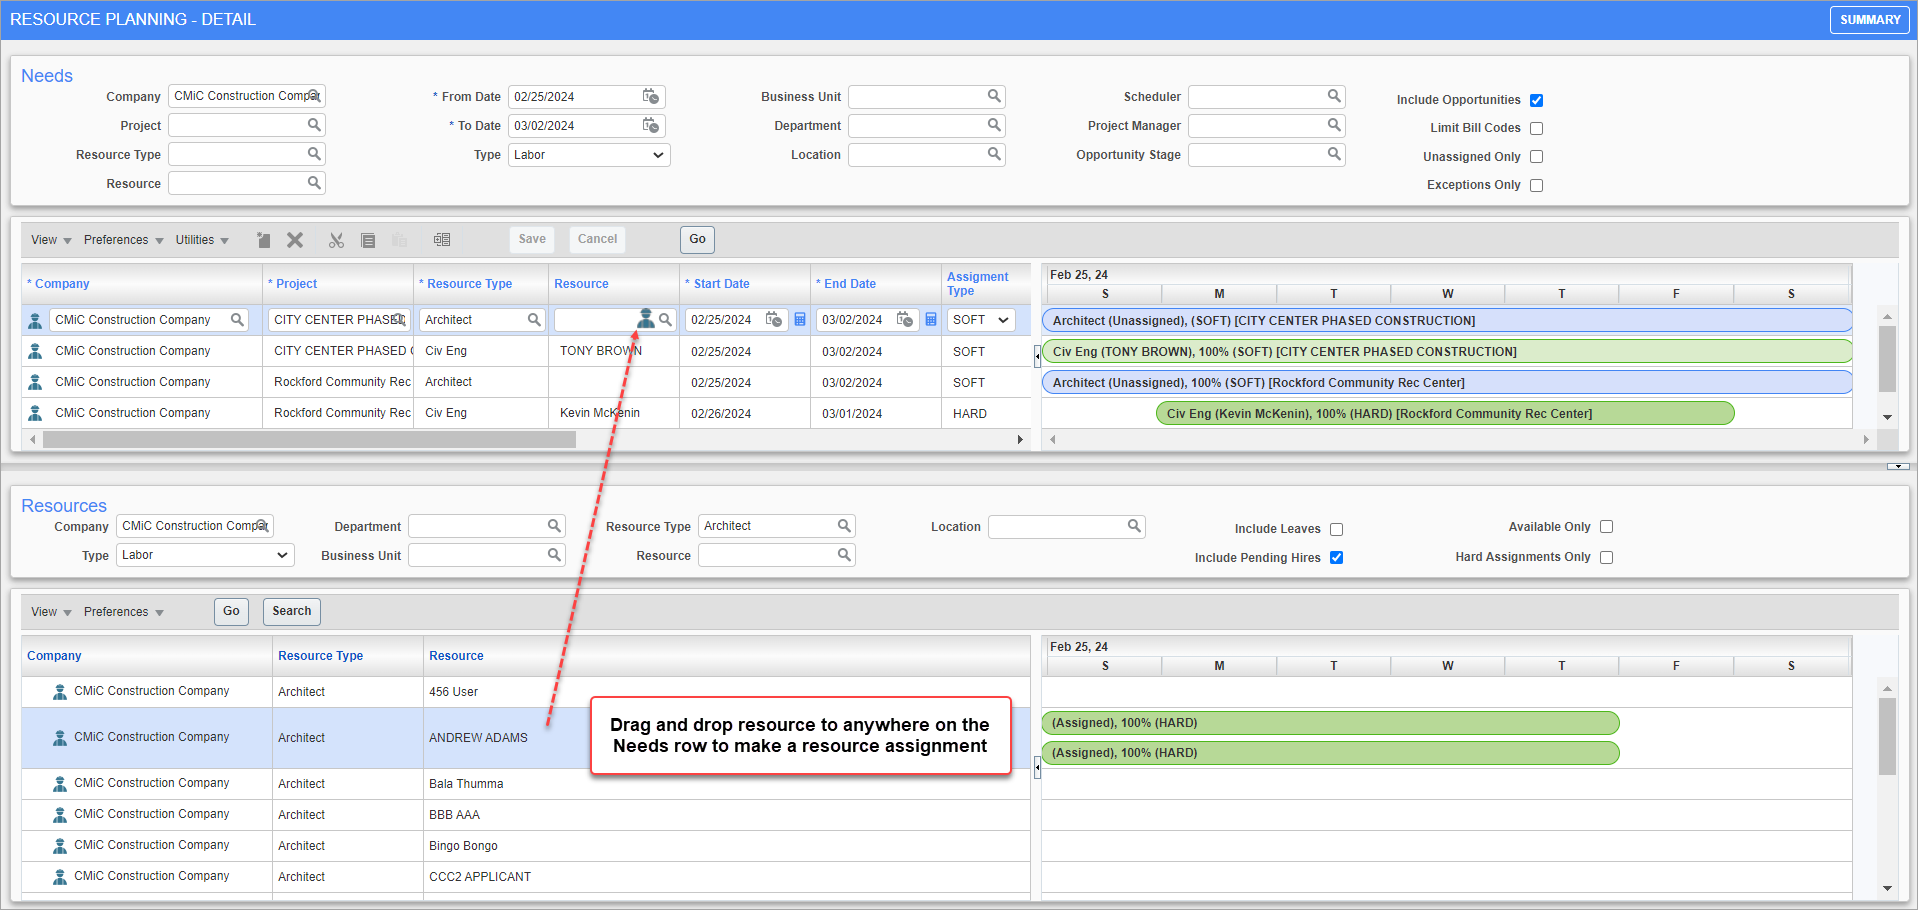
Resources may be dragged and dropped from a resource row to anywhere on a Need row to make a resource assignment.
If a resource is dropped onto a Need row that already has an assigned resource, a prompt will ask if you want to make a reassignment.
Click Resource Icon for Assignment
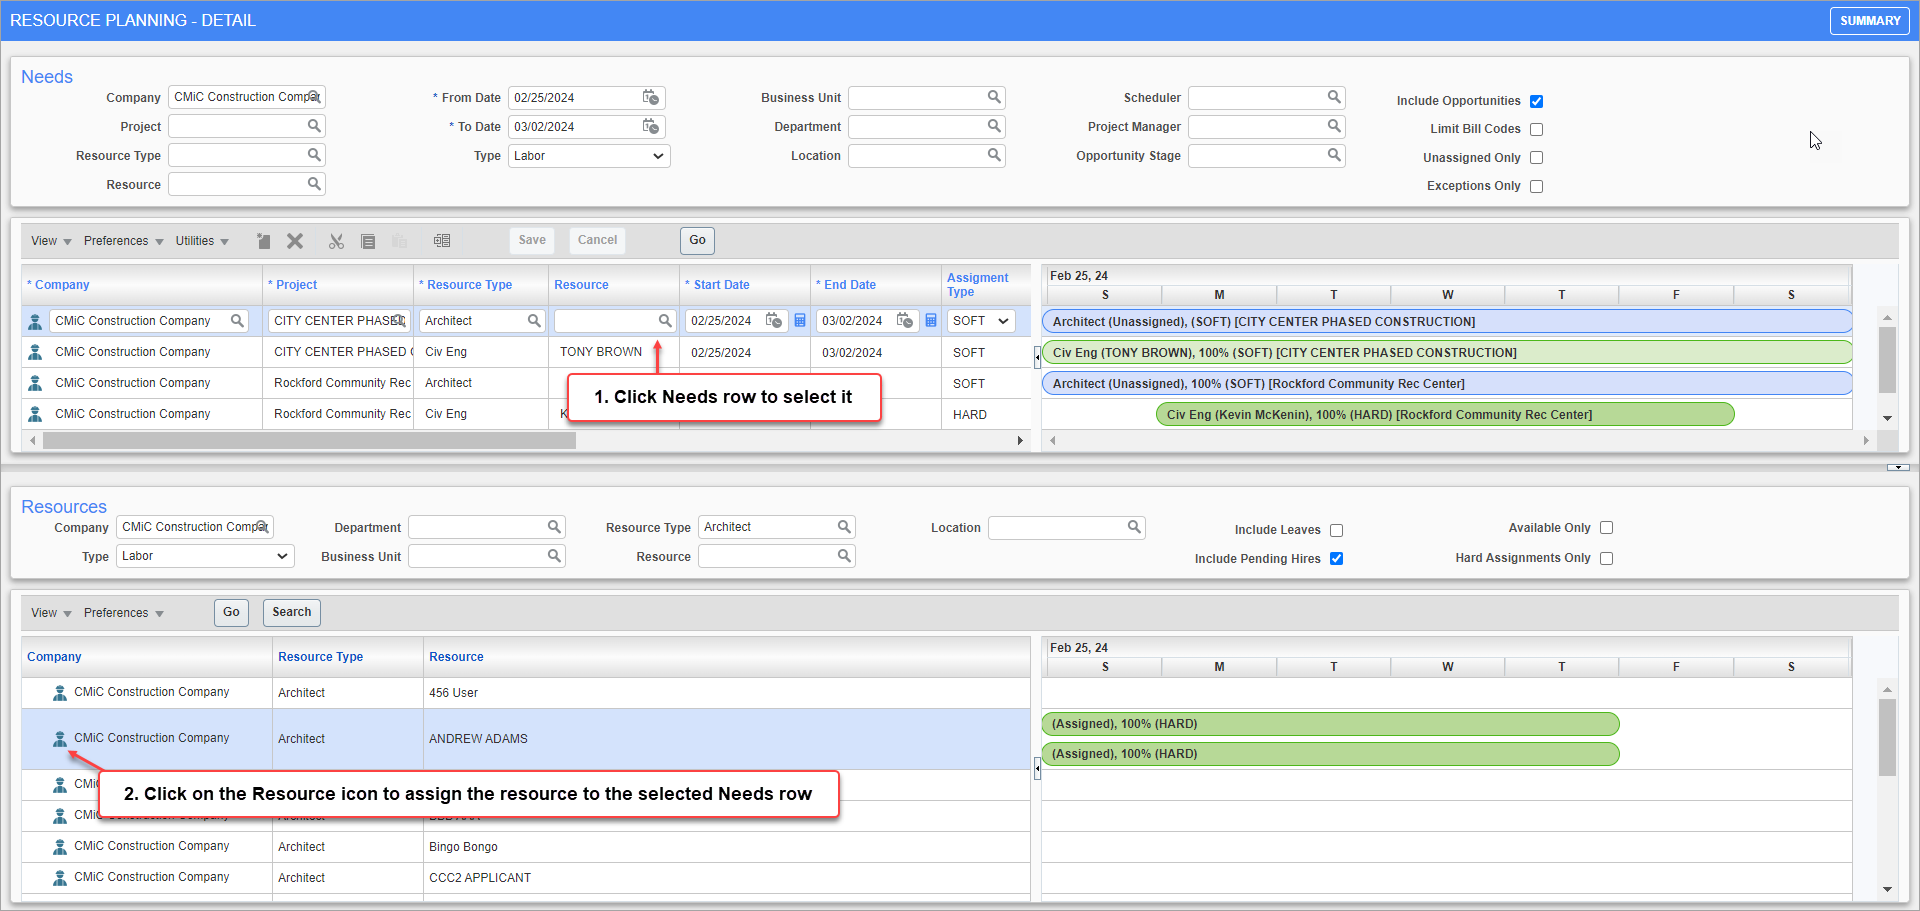
Resource icons can also be used to make assignments. Click anywhere on a Need row to select it and click a Resource icon to assign the resource to the selected need.
Gantt Chart – Needs
To the right of the Needs table is a pane containing a Gantt chart, with rows that correspond to the rows of the Needs table. The rows of the Gantt chart use colored bars to span the dates for which the need exists for the project. The color of the bars indicates the type of assignment. The range of dates for which needs are displayed by the Gantt chart is specified by the From Date and To Date fields.
This pane can be expanded by clicking the Collapse Pane control ( ).
).
| Color | Representation |
|---|---|
|
|
Project detail line |
|
|
Unassigned (needed) |
|
|
Soft assignment of resources |
|
|
Hard assignment of resources |
|
no color |
Resource is not needed for the corresponding date(s) |
Resources – Section

The Resources section is used to list and find relevant resources to fill the needs.
As shown below, you can click a Need icon in the Needs section to have resources of the required type to fulfill the need listed in the Resources section:
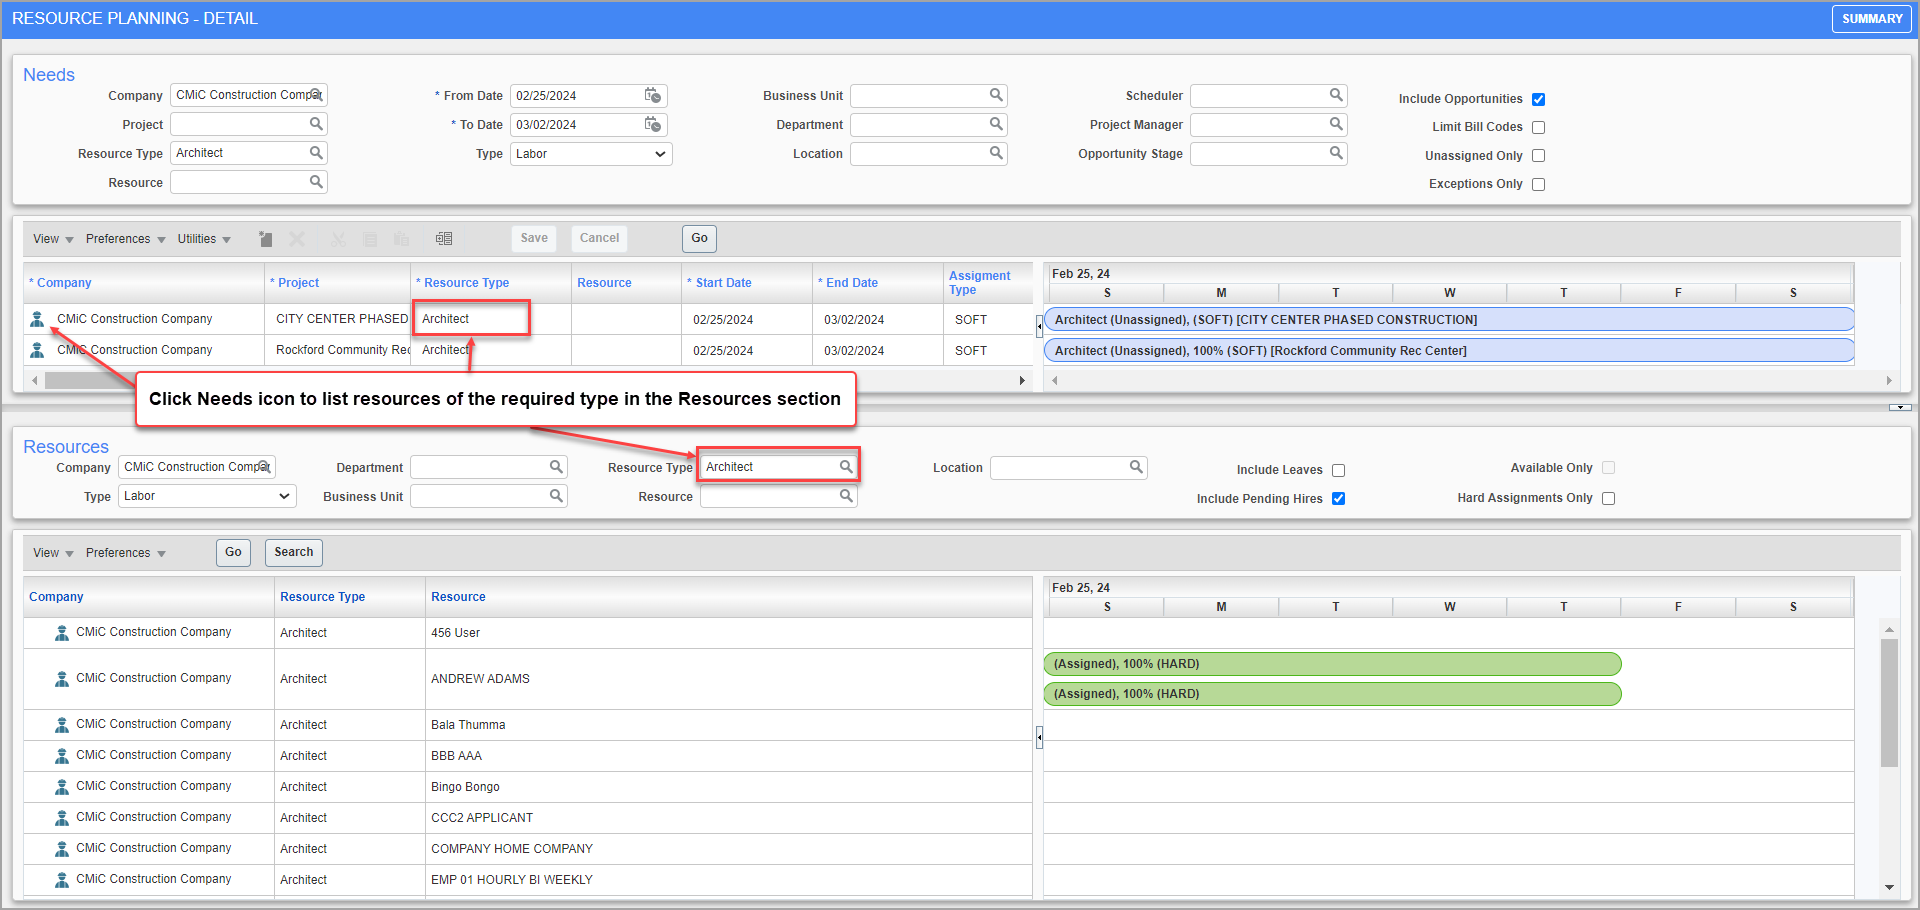
Filter Fields

The Filter section is used to control which resources are included in this section’s table for the purpose of assigning them to needy projects.
NOTE: If a filter field is changed, the [Go] button must be clicked to refresh the display.
The following are descriptions for this section’s filter fields:
| Field | Description |
|---|---|
|
Company
|
Filter resources by their company. |
|
Location |
Filter resources by their location. |
|
Department |
Filter resources by their department. NOTE: This LOV only lists departments associated with equipment and departments used as Home Departments for employees. |
|
Available Only (checkbox) |
Only enabled if a need is selected in the Needs section, as this option is used to find available resources for a selected need, based on its start and end date and the availability of resources during that range. If checked, resources that have hard assignments during the date range are filtered out. NOTE: The value of the Assignment % field of a resource assignment is not taken into consideration; if a resource has a hard assignment of any percentage during the need’s start and end date, it is filtered out. If required, the Tolerance field that becomes available can be used to select the number of days away from when the resource will be available, and for new hires the number of days away from their start date. If resources will be available given the specified tolerance value, they will be included in the Resource section’s table. |
|
Business Unit |
Business units are used here if resources at your company are grouped by business units instead of departments. For employees, the Home Dept. field on the Company tab of the Employee Profile screen is used by this filter. For equipment, their associated Home Location’s Department Code field on the Home Locations screen is used by this filter (Equipment Costing > Setup > Local Tables > Home Locations). |
|
Include Leaves |
When checked, if an employee has approved leaves, the corresponding Gantt chart will display a black bar for the range of days the employee is on leave. This box is only enabled if the Labor resource type is selected. NOTE: Display of employee leaves is for informational purposes only; since an employee on a leave can be assigned to a need if necessary, leaves do not affect availability. |
|
Labor, Equipment |
Filter projects by Labor and Equipment resource types. Only projects with resource needs that are of the selected type will be included in the table. |
|
Hard Assignments Only (checkbox) |
Set whether or not only hard assignments are shown. |
|
Resource Type |
Filter projects by resource type. |
|
Include Pending Hires |
Controls whether or not hires with dates after the current date are included in lists of labor resources. |
|
Resource |
Search for a particular resource in the table. |
Menus & Buttons
| Menu/Button | Description |
|---|---|
|
View |
Settings for the visibility of columns. |
|
Preferences |
This drop-down menu has the following options: 1. Time Scale: set Gantt chart’s time scale - blocks of time can be a day, a week, or a month long 2. Save Layout: save table’s current layout for user 3. Reset Layout: reset table’s layout to default layout |
|
|
Refresh the table according to the filter fields. If a filter field is changed, this button must be used to refresh the display. |
|
|
Launches the Resource Search screen, to broadly search for qualified personnel, including employees that were key players for past projects. Personnel can be searched against the following: Skills, Training, Licenses and Certifications, Education, and Memberships. Refer to Resource Planning - Resource Search - Screen for more details. |
Resources Table

The following provides details about the columns of the Resources table.
NOTE: The Columns option, found under the View drop-down menu, can be used to control which columns are visible. If a column is not visible check the option’s settings.
| Field | Description |
|---|---|
|
Company |
Company to which the resource belongs. |
|
Resource Type |
Subtypes of Labor or Resource types. |
|
Resource |
Employee or equipment assigned to need. |
|
Business Unit |
Business unit handling resource. |
|
Effective Start Date |
For Labor resource types, if an employee is a new hire, this is the date the employee will be available. |
|
Location |
Location of (state/province). |
|
Department |
Department handling resource. |
Resource Icons
| Icons | Description |
|---|---|
|
|
Labor Resource: blue indicates Labor Resource is not a pending hire, yellow indicates Labor Resource is a pending hire. NOTE: If the Include Pending Hires box is not checked, pending hires are not displayed. |
|
|
Equipment Resource: all equipment resources are blue |
Gantt Chart – Resource Availability
To the right of the Resource table is a pane containing a Gantt chart, with rows that correspond to the rows of the Resource table. The rows of the Gantt chart use colored bars to span the dates for which the resources have either a Soft or Hard assignment. The color of these bars indicates the type of assignment, and the absence of a bar indicates that the resource is unassigned and available. The range of dates displayed by this Gantt chart is also specified by the From Date and To Date fields of the Needs section.
This pane can be expanded by clicking the Collapse Pane control ( ), as shown in the previous screenshot.
| Color | Representation |
|---|---|
|
|
Soft assignment of resource. |
|
|
Hard assignment of resource. |
|
|
For labor resources only; indicates employee is on leave for bar’s range of days. |
|
no color |
Resource has no assignment for corresponding dates. |


 /
/ 
 /
/ 
 black
black blue
blue light green
 dark green
