Needs Templates
Overview – Needs Templates
A Needs Template is a template of related needs, which can be a mixture of labor and equipment resource needs for a general type of work, such as foundation or construction. Once created, a Needs Template can then be used to add all of its needs to projects that require that general type of work or need.
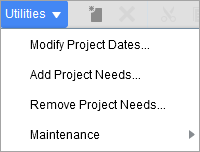
For instance, a Needs Template can be created for general foundation work, containing various labor and equipment resource needs required for that type of work. Then, to add all of these needs to a project that requires foundation work, users can use the Add Project Needs utility to select and apply the Needs Template for foundation work to the project. The Add Project Needs utility is found under the Utilities drop-down menu, shown below, which is under the Needs section of the Detail screen.
Create Needs Templates
To create a Needs Template, launch the Resource Planning Needs Template screen by selecting the "Need Templates" option from the Maintenance submenu, under the Utilities drop-down menu on the Needs section of the Detail screen (shown below).
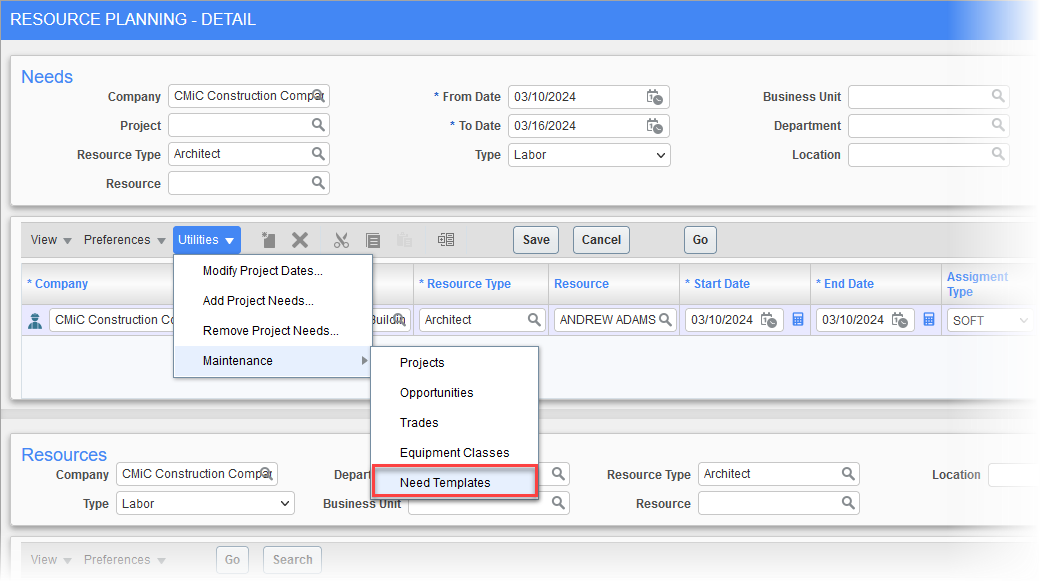

Sample of Resource Planning Needs Template screen (program: RPNEEDTEMP)
To create a new Needs Template, click [Insert] on the Template section’s Block Toolbar, then enter a name for the template via the new Description field. The needs under the Resource section correspond to the selected template in the Template section.
Next, click [Insert] on the Resource section’s Block Toolbar, and use the new row to detail a need.
Schedulers

Resource Planning - Summary > Scheduler field
Optionally, to help with organization and to assign responsibility, a PM Scheduler role can be used in Resource Planning to group needy projects by PM Schedulers, and to assign employees to resource scheduling tasks. This allows the opportunities and projects listed by the Summary and Details screens to be filtered by schedulers, via the Scheduler field (sample shown above).
Add Scheduler Role in System
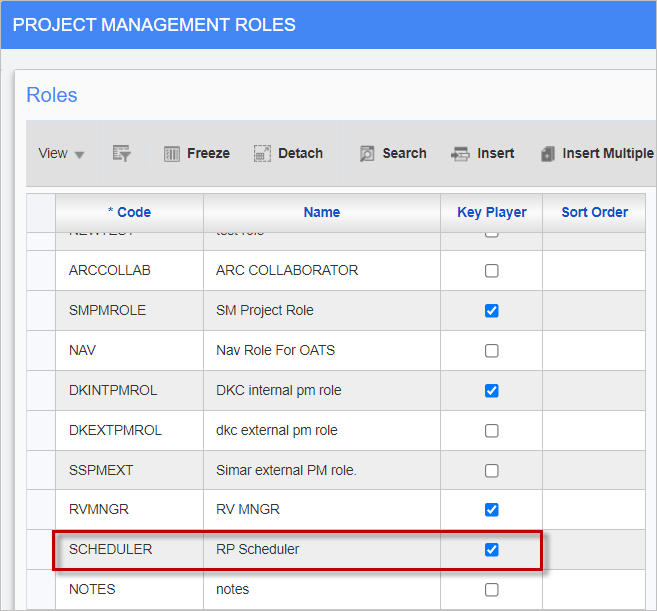
The Scheduler role used by RP is added via the Job Costing - Project Management Roles (standard Treeview path: Job Costing > Setup > Local Tables > Project Management Roles). The code for the Resource Scheduler role in RP must be entered as “SCHEDULER”, and the 'Key Player' checkbox must be checked, as shown above.
Assign Employee to Scheduler Role
PM Schedulers are Key Players for opportunities and projects.
For projects, an employee is assigned to the PM Scheduler role via the Key Players tab on the Projects screen.
For opportunities, an employee is assigned to the PM Scheduler role via the Team tab on the Opportunities screen.
Assign Employees to Trades
For current employees, they are assigned to trades via the Employee History screen, using the Trade field on the Company tab. For new employees this is done via the same tab and field on the Employee screen.
Select Trades for Resource Planning
Initially, no labor resource types (trades) and instances of these types (employees) are be available in Resource Planning, as not all trades may be relevant in this module.
The US Payroll - Trade Codes screen (standard Treeview path: US Payroll > Local Tables > Trades) is used to select which labor resource types, and instances of them, are available in Resource Planning. It can be conveniently launched via the Trades menu option under the Utilities drop-down menu on the Detail screen, shown below:
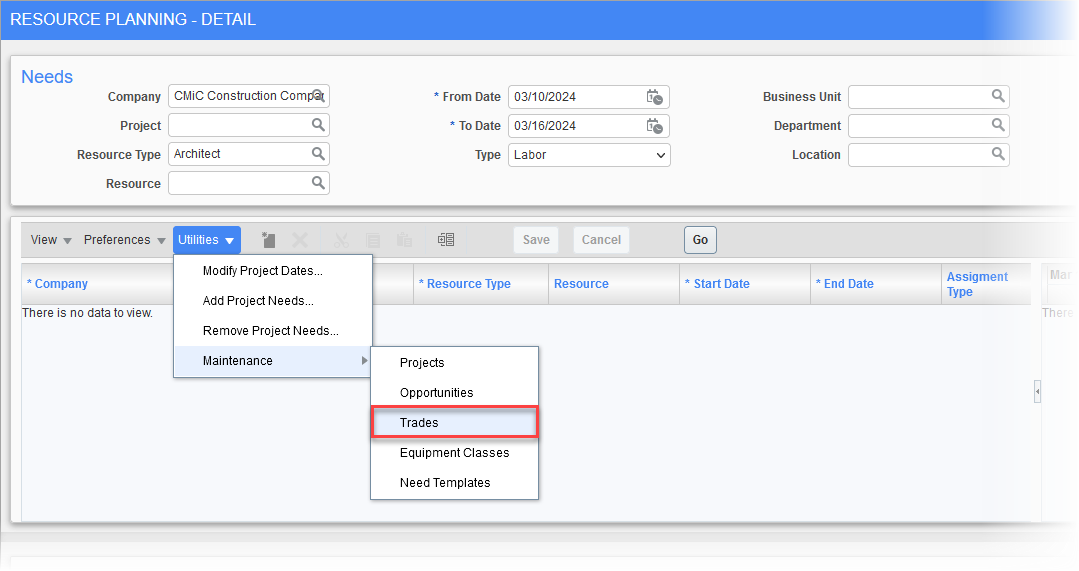
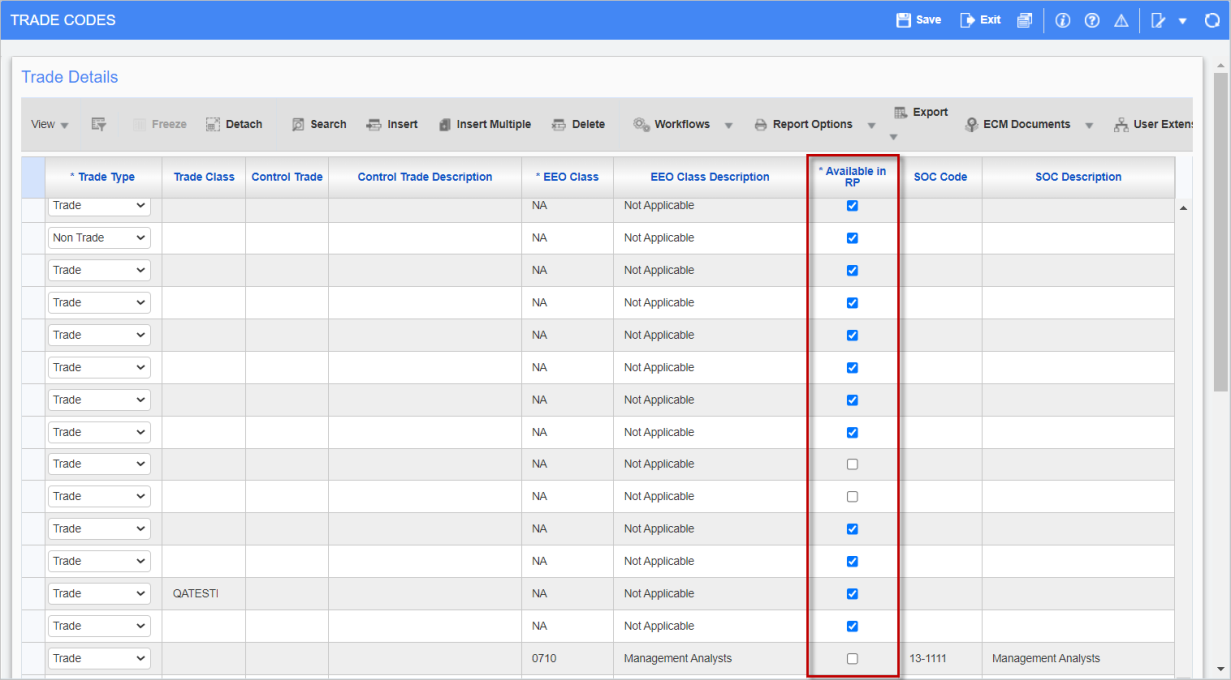
Pgm: PYTRADES; standard Treeview path: US Payroll > Setup > Local Tables > Trades
To make a particular trade available in Resource Planning, click its 'Available in RP' checkbox, shown above.
Select Equipment Classes for Resource Planning
Initially, no equipment classes and instances of them are available in Resource Planning, as not all equipment classes may be relevant in this module.
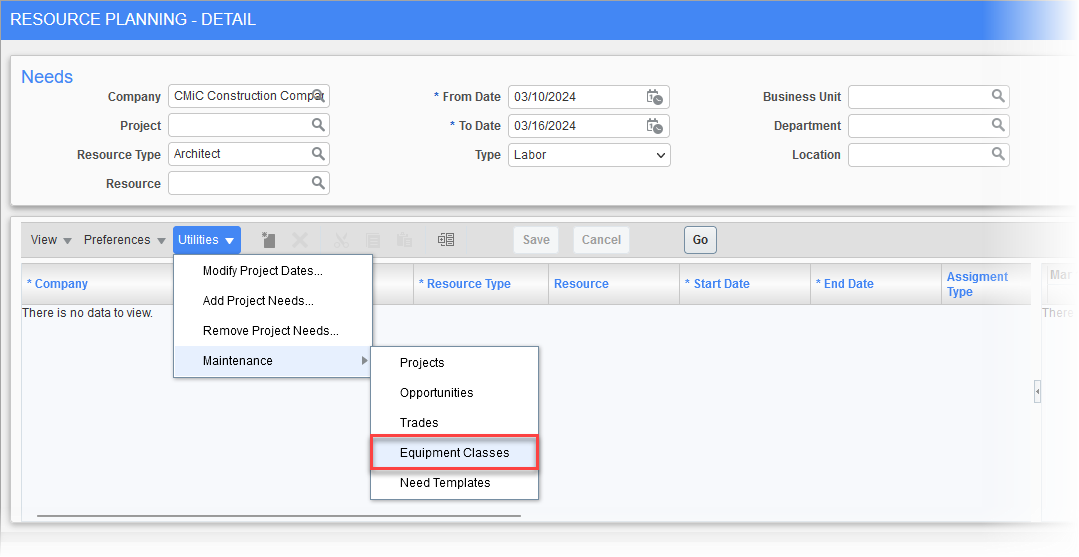
The Equipment Costing - Equipment Classes screen (standard Treeview path: Equipment Costing > Setup > Equipment Classes) is used to select which equipment classes, and instances of them, are available in Resource Planning. It can be launched via the Equipment Classes menu option under the Utilities drop-down menu on the Detail screen, shown below:
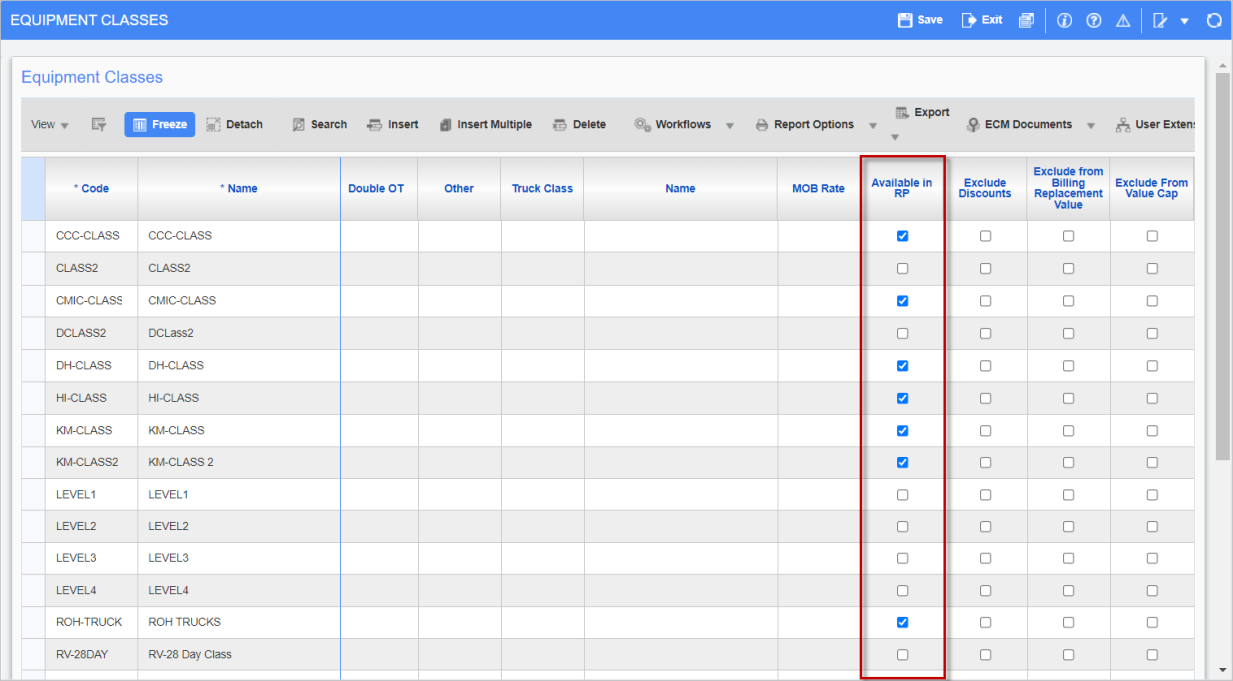
Sample of Equipment Classes Maintenance screen (program: EMCLASS; standard Treeview path: Equipment Costing > Setup > Local Tables > Equipment Classes)
To make a particular equipment class available in Resource Planning, click its Available in RP checkbox, shown above.
Security
System Privileges for Resource Planning
To use Resource Planning, a user must be given the appropriate system privileges. This is done through the System Privileges tab on the System Data - User Maintenance screen (standard Treeview path: System > Security > Users > User Maintenance), detailed in the following subsections.
Option 1: Add System Privileges for RP to User ID

Program: SDUSRMNT; standard Treeview path: System Data > Security > User Maintenance screen – System Privileges tab
For Resource Planning, a user can be granted either full access or read-only access. This is done on the System Privileges tab of the User Maintenance screen (shown above).
To grant full access, select the RPFULLACCS code, and to grant read-only access, select the RPREADONLY code.
Option 2: Add System Privileges for RP to Security Role

standard Treeview path: System Data > Security > Roles > Define Roles - System Privileges button
To add system privileges for Resource Planning to a Security Role, launch the Define Roles screen , select the relevant Role, then scroll to the bottom of the screen and click the [System Privileges] button, framed above.
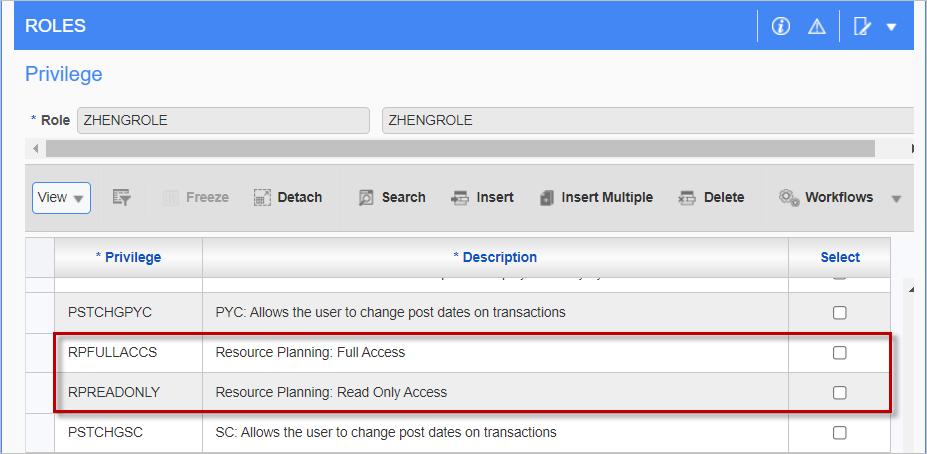
The above screenshot shows the two privileges for Resource Planning in the System Privileges popup.
To grant full access select the RPFULLACCS code, and to grant read-only access select the RPREADONLY code.
Access to Companies in Resource Planning
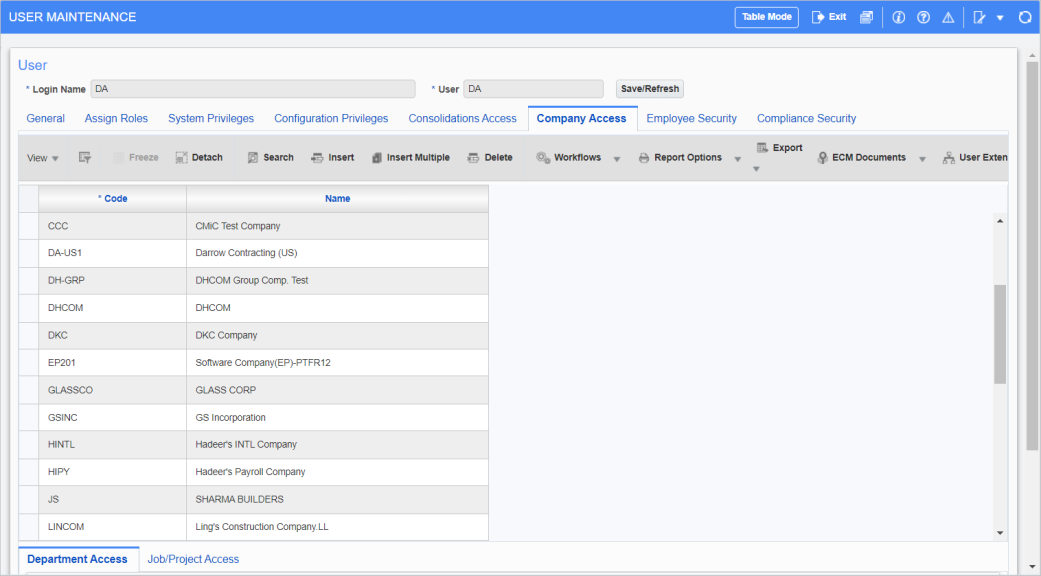
Program: SDUSRMNT; standard Treeview path: System Data > Security > Users > User Maintenance screen – Company Access tab
To access data from a company in Resource Planning, a user must have security access to the company. This is done on the Company Access tab of the User Maintenance screen.
To grant a user security access to a company, click [Insert] on the upper Block Toolbar to insert the required company. To remove a user’s access to a Company, select it and click [Delete] on the upper Block Toolbar.
Access to Needs Template Maintenance & Resource Planning Search Screens
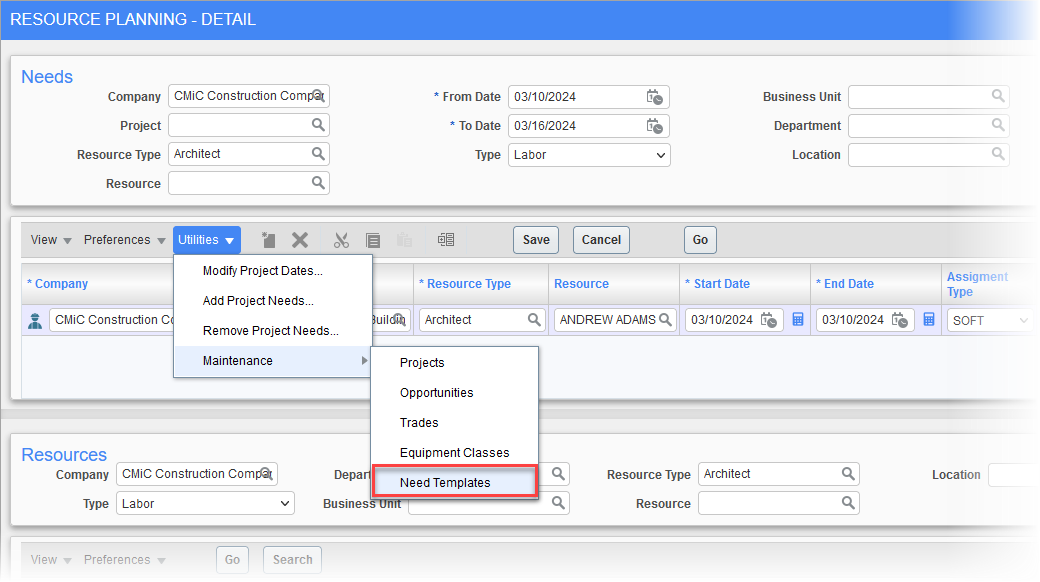
Need Templates menu option under Needs section of Detail screen

[Search] button under the Resources section of the Detail screen
In the Detail screen, to access the Needs Template Maintenance and Resource Planning Search screens, shown above, Insert, Update, and Delete privileges for the screens must be granted. This is done using either of the following two options.
Option 1: Grant Security Role Access to Screens Individually
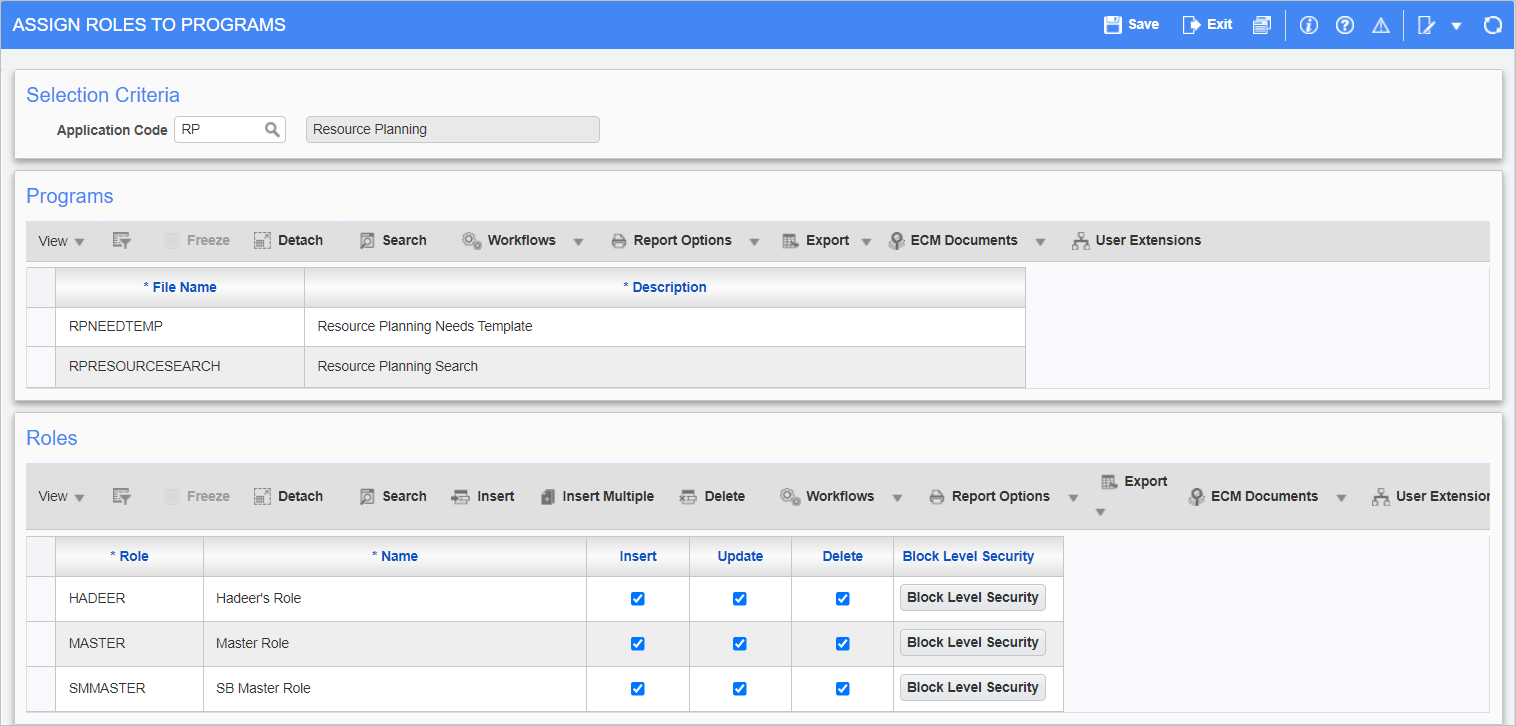
Assign Roles to Programs; standard Treeview path: System Data > Security > Roles > Assign Roles to Programs
To grant a role access to the Needs Template Maintenance and Resource Planning Search screens individually, launch the Assign Roles to Programs screen, and select or enter RP via the Application Code field, under the Selection Criteria section.
Under the Programs section, the Resource Planning Needs Template (RPNEEDTEMP) and Resource Planning Search (RPRESOURCESEARCH) security settings become available. When one of these options is selected, the Roles that have access to it are displayed under the Roles section. To grant a role access to the option, insert the role in the table under the Roles section, then configure the Insert, Update, and Delete privileges for the role.
Option 2: Grant Security Role Full Access to Screens in Bulk
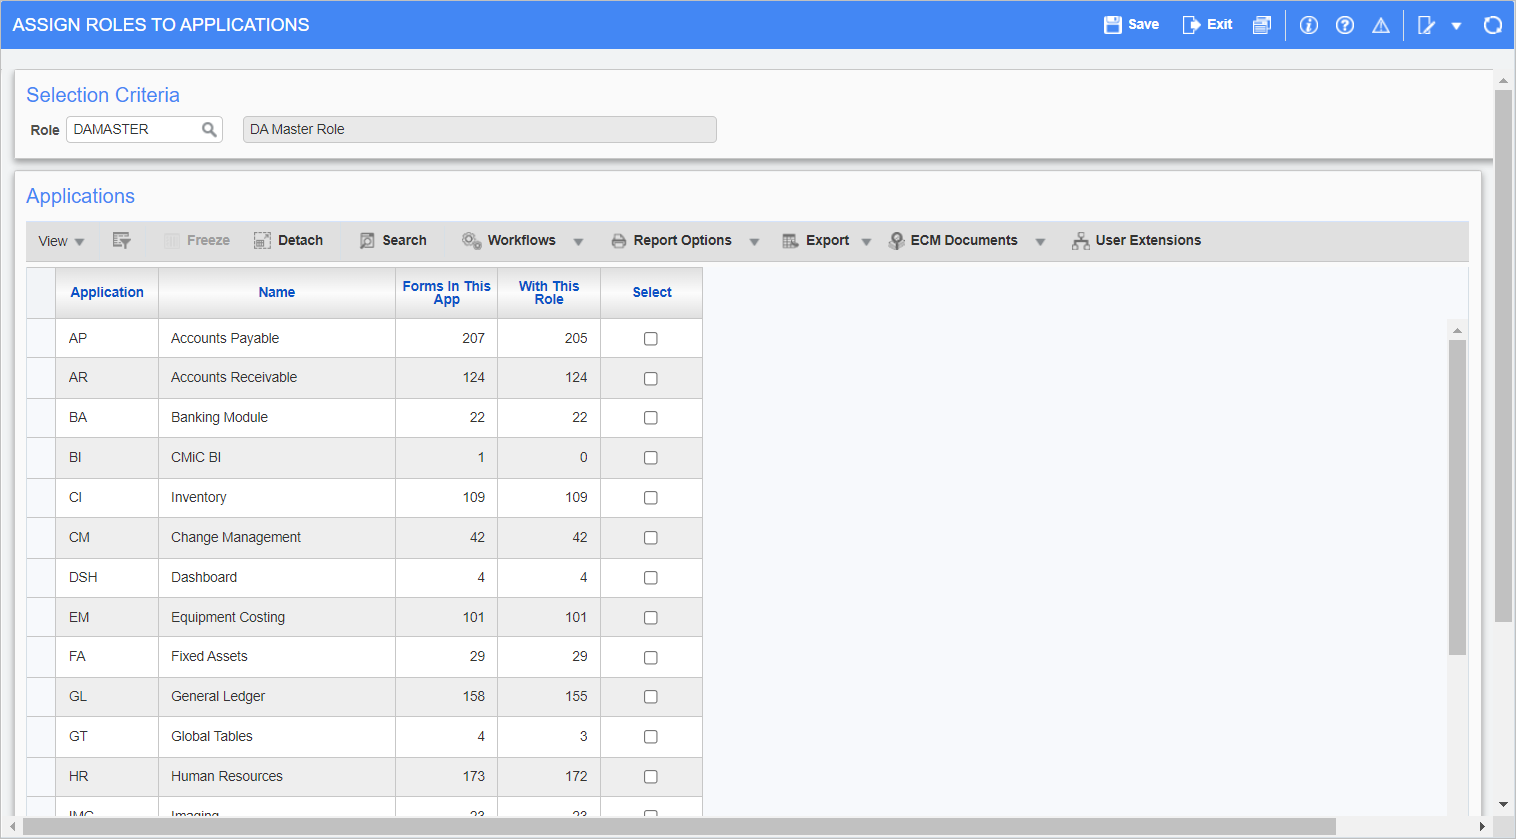
Assign Roles to Applications; standard Treeview path: System Data > Security > Roles > Assign Roles to Applications
To grant a role full access (insert, update & delete privileges) to the Needs Template Maintenance and Resource Planning Search screens in bulk, launch the Assign Roles to Applications screen, and select or enter the role via the Role field, under the Selection Criteria section.
Under the Applications section, select the Resource Planning application, check the row’s Select checkbox, then click the [Add Role] button, along the bottom of the screen. This grants insert, update, and delete privileges for the Role, for both the RPNEEDTEMP (Needs Template Maintenance) and RPRESOURCESEARCH (Resource Planning Search) security settings for the screens.
Project Security
A user’s access to projects is controlled by the System Data - Job/Project Security screen (standard Treeview path: System > Security > Job/Project Security).
Step 1: Create Job/Project Security Group

Create Security Group; standard Treeview path: System Data > Security > Job/Project Security > Create Security Group
This screen is used to create job/project security groups, which are associated to jobs and projects, and to users that are to have access to the associated jobs and projects.
Step 2: Assign Users to Job/Project Security Groups

Assign Users to Security Groups; standard Treeview path: System Data > Security > Job/Project Security > Assign Users to Security Groups
This screen is used to associate users to a job/project security group, to grant them access to the jobs and projects associated to the security group.
To add users to a job/project security group, select the relevant company via the Company field and group via the Group field, then insert the users in the table under the Users section.
Step 3: Assign Jobs & Projects to Job/Project Security Groups
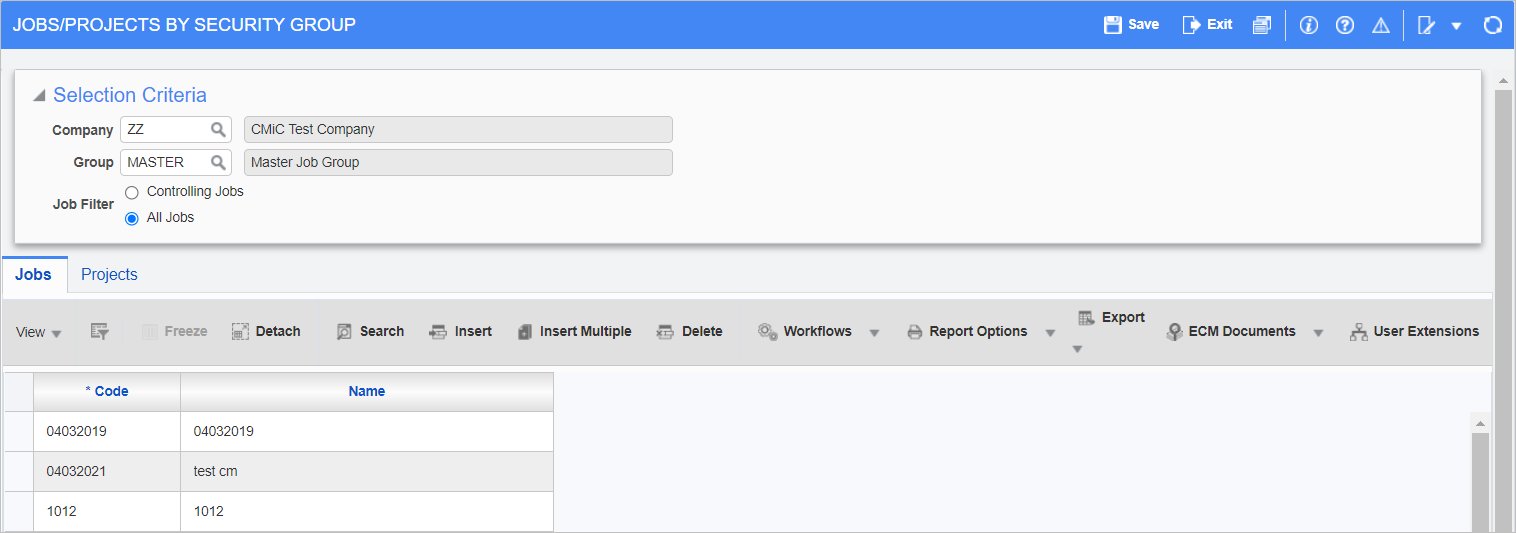
Assign Jobs/Projects to Security Groups; standard Treeview path: System Data > Security > Job/Project Security > Assign Jobs/Projects to Security Groups
This screen is used to associate jobs and projects to a job/project security group, so that users assigned to the group have access to them.
To add jobs and projects to a job/project security group, select the relevant company via the Company field and group via the Group field. Then, using the Job Filter radio buttons, select whether you want only controlling jobs or all jobs available in the Jobs tab.
Use the Jobs tab to insert jobs the group may access, and use the Projects tab to insert projects the group may access.
Deep Linking: URLs with Parameters to Launch RP
This section provides details about how to format URLs to launch the Summary and Details screens of Resource Planning using filters.
Filtered by Project
The Summary and Details screens can be loaded for a particular project. To identify the project to filter a screen by, a project’s ORASEQ number is used, as it is unique across all companies.
| Replacement Field | Description |
|---|---|
| <Environment URL> | URL location of database |
| <Project ORASEQ> | identifying ORASEQ number of Project |
Summary Screen Filtered by Project
<Environment URL>/RpResourcePlanner/faces/forwarder.jsf?initialPage=summaryPage&project-oraseq=<Project ORASEQ >
Example (using above screenshot):
prodv12.SomeCompany.com:7785/SomeCompanyProd/RpResourcePlanner/faces/forwarder.jsf?initialPage=summaryPage&project-oraseq=448957755
Details Screen Filtered by Project
<Environment URL>/RpResourcePlanner/faces/forwarder.jsf?initialPage=detailsPage&project-oraseq= <Project ORASEQ>
Filtered by Resource
The Details screen can be loaded for a particular resource, in which case the Needs section’s Resource Type field is set to the resource’s type, and the Resources section’s Resource Type and Resource fields are set to the resource’s type and name respectively.
To load the Details screens for a particular resource, the URL must specify the following:
-
Whether resource is of the Labor or Equipment variety, using keyword “TRADE” for Labor, and keyword “EQP” for Equipment.
-
Code identifying the resource
As shown below, hover over the Resource field (in Resources section) to reveal the code, or click the field’s Search (![]() ) icon to launch the LOV to view the list of resources and their codes.
) icon to launch the LOV to view the list of resources and their codes.

| Replacement Field | Description |
|---|---|
|
<Environment URL> |
URL location of database |
|
{TRADE/EQP} |
|
|
<Resource Code> |
code identifying particular Resource |
Detail Screen Filtered by Resource
<Environment URL>/RpResourcePlanner/faces/forwarder.jsf?initialPage=detailsPage&type=
{TRADE/EQP}&resource-code=<Resource Code>
Example:
prodv12.SomeCompany.com:7785/SomeCompanyProd/RpResourcePlanner/faces/forwarder.jsf?initialPage=detailsPage&type=EQP&resource-code=EXC473
Filter by Resource Type
The Summary and Details screens can be loaded for a particular Resource Type (e.g., Carpenter, Electrician, Crane, Front Loader…). To do so, the URL must specify:
-
Whether resource type is of the Labor or Equipment variety, using keyword “TRADE” for Labor, and keyword “EQP” for Equipment.
-
Code of resource type
To view the codes for resource types, click the Resource Type field’s up-arrow ( ) to launch its popup, which lists resource types and their codes.
| Replacement Field | Description |
|---|---|
|
<Environment URL> |
URL location of database |
|
{TRADE/EQP} |
|
|
<Resource Type Code> |
code identifying particular Resource Type |
Summary Screen Filtered by Resource Type
<Environment URL>/RpResourcePlanner/faces/forwarder.jsf?initialPage=summaryPage&type=
{TRADE/EQP}&resource-type-code=<Resource Type Code>
Example:
prodv12.SomeCompany.com:7785/SomeCompanyProd/RpResourcePlanner/faces/forwarder.jsf?initialPage=summaryPage&type=TRADE&resource-type-code=GLAB
Detail Screen Filtered by Resource Type
<Environment URL>/RpResourcePlanner/faces/forwarder.jsf?initialPage=detailsPage&type=
{TRADE/EQP}&resource-type-code=<Resource Type Code>
Filter by Needs Company
The Summary and Details screens can be loaded for a particular Needs Company.
Hover over the Company field to reveal the code, or click the field’s up-arrow  to launch the popup to view the list of Companies and their codes.
| Replacement Field | Description |
|---|---|
|
<Environment URL> |
URL location of database |
|
<Company Code> |
code identifying Needs Company |
Summary Screen Filtered by Needs Company
<Environment URL>/RpResourcePlanner/faces/forwarder.jsf?initialPage=summaryPage&ncc=
<Company Code>
Example:
prodv12.SomeCompany.com:7785/SomeCompanyProd/RpResourcePlanner/faces/forwarder.jsf?initialPage=summaryPage&ncc=CCC
Detail Screen Filtered by Needs Company
<Environment URL>/RpResourcePlanner/faces/forwarder.jsf?initialPage=detailsPage&ncc=
<Company Code>
Filter by Resources Company
The Summary and Details screens can be loaded for a particular resource's company.
Hover over the Company field to reveal the code, or click the field’s up-arrow ( ) to launch the popup to view the list of companies and their codes.
| Replacement Field | Description |
|---|---|
|
<Environment URL> |
URL location of database |
|
<Company Code> |
code identifying Resources Company |
Summary Screen Filtered by Resource Company
<Environment URL>/RpResourcePlanner/faces/forwarder.jsf?initialPage=summaryPage&rcc=
<Company Code>
Example:
prodv12.SomeCompany.com:7785/SomeCompanyProd/RpResourcePlanner/faces/forwarder.jsf?initialPage=summaryPage&rcc=CCC
Detail Screen Filtered by Resource Company
<Environment URL>/RpResourcePlanner/faces/forwarder.jsf?initialPage=detailsPage&rcc=
<Company Code>
Filter by Scheduler
The Summary and Details screens can be loaded for a particular scheduler. To do so, the code for either the need company or the project is required.
Click the Scheduler field’s up-arrow (![]() ) to launch the LOV to view the list of schedulers.
) to launch the LOV to view the list of schedulers.
| Replacement Field | Description |
|---|---|
|
<Environment URL> |
URL location of database |
|
<Scheduler Name> |
first and last name of Scheduler; format: first name, space, last name (e.g. “Joe Smith”) |
|
<Needs Company Code> |
code identifying Needs Company |
|
<Project ORASEQ> |
identifying ORASEQ number of Project |
Summary Screen Filtered by Scheduler
-
Using Needs Company Code:
<Environment URL>/RpResourcePlanner/faces/forwarder.jsf?initialPage=summaryPage&ncc=
<Needs Company Code>&sclr=<Scheduler Name>Example:
prodv12.SomeCompany.com:7785/SomeCompanyProd/RpResourcePlanner/faces/forwarder.jsf?initialPage=summaryPage&ncc=ZZ&sclr=KanReeve
-
Using Project ORASEQ:
<Environment URL>/RpResourcePlanner/faces/forwarder.jsf?initialPage=summaryPage&project-oraseq=<ProjectORASEQ>&sclr=<Scheduler Name>
Detail Screen Filtered by Scheduler
-
Using Needs Company Code:
<Environment URL>/RpResourcePlanner/faces/forwarder.jsf?initialPage=detailsPage&ncc=
<Needs Company Code>&sclr=<Scheduler Name>Example:
prodv12.SomeCompany.com:7785/SomeCompanyProd/RpResourcePlanner/faces/forwarder.jsf?initialPage=detailsPage&ncc=ZZ&sclr=KanReeve
-
Using Project ORASEQ:
<Environment URL>/RpResourcePlanner/faces/forwarder.jsf?initialPage=detailsPage&project-oraseq=<Project ORASEQ>&sclr=<Scheduler Name>
Filter by Department
The Summary and Details screens can be loaded for a particular needs or resources department.
| Replacement Field | Description |
|---|---|
|
<Environment URL> |
URL location of database |
|
<Needs Company Code> |
code identifying Needs Company |
|
<Needs Department Code> |
code identifying Needs Department |
|
<Resources Company Code> |
code identifying Resources Company |
|
<Resources Department Code> |
code identifying Resources Department |
|
<Project ORASEQ> |
code identifying Project |
Summary Screen Filtered by Department
Needs Department Filtering
-
Using Needs Department Code:
<Environment URL>/RpResourcePlanner/faces/forwarder.jsf?initialPage=summaryPage&ndc=
<Needs Department Code> -
Using Project ORASEQ & Needs Department Code:
<Environment URL>/RpResourcePlanner/faces/forwarder.jsf?initialPage=summaryPage&project-oraseq=<Project ORASEQ>&ndc=<Needs Department Code>
-
Using Needs Company Code & Needs Department Code:
<Environment URL>/RpResourcePlanner/faces/forwarder.jsf?initialPage=summaryPage&ncc= <Needs Company Code>&ndc=<Needs Department Code>
Resources Department Filtering
-
Using Resources Department Code:
<Environment URL>/RpResourcePlanner/faces/forwarder.jsf?initialPage=summaryPage&rdc=
<Resources Department Code> -
Using Needs Company Code & Resources Department Code:
<Environment URL>/RpResourcePlanner/faces/forwarder.jsf?initialPage=summaryPage&ncc= <Needs Company Code>&rdc=<Resources Department Code>
Detail Screen Filtered by Scheduler
Needs Department Filtering – Needs Section
-
Using Needs Department Code:
<Environment URL>/RpResourcePlanner/faces/forwarder.jsf?initialPage=detailsPage&ndc=
<Needs Department Code> -
Using Project ORASEQ & Needs Department Code:
<Environment URL>/RpResourcePlanner/faces/forwarder.jsf?initialPage=detailsPage&project-oraseq=<Project ORASEQ>&ndc=<Needs Department Code>
-
Using Needs Company Code & Needs Department Code:
<Environment URL>/RpResourcePlanner/faces/forwarder.jsf?initialPage=detailsPage&ncc=<Needs Company Code>&ndc=<Needs Department Code>
-
Using Project ORASEQ & Multiple Needs Department Codes:
<Environment URL>/RpResourcePlanner/faces/forwarder.jsf?initialPage=detailsPage&project-oraseq=<Project ORASEQ>&ndc=<Needs Department Code 1>&ndc=<Needs Department Code 2> &ndc=<Needs Department Code 3>
-
Using Needs Company Code & Multiple Needs Department Codes:
<Environment URL>/RpResourcePlanner/faces/forwarder.jsf?initialPage=detailsPage&ncc=<Needs Company Code>&ndc=<Needs Department Code 1>&ndc=<Needs Department Code 2> &ndc=<Needs Department Code 3>
Resources Department Filtering – Resources Section
-
Using Resources Department Code:
<Environment URL>/RpResourcePlanner/faces/forwarder.jsf?initialPage=detailsPage&rdc=
<Resources Department Code> -
Using Resources Company Code & Resources Department Code:
<Environment URL>/RpResourcePlanner/faces/forwarder.jsf?initialPage=detailsPage&rcc= <Resources Company Code>&rdc=<Resources Department Code>
-
Using Resources Company Code & Multiple Resources Department Codes
<Environment URL>/RpResourcePlanner/faces/forwarder.jsf?initialPage=detailsPage&rcc= <Resources Company Code>&rdc=<Resources Department Code 1>&rdc=<Resources Department Code 2>&rdc=<Resources Department Code 3>
Make RP Accessible
Add RP Link to Treeview
To add a Resource Planning link to a Treeview, please refer to the V12TOOLS ADF - UI Treeview Builder reference guide in conjunction with the following instructions.
In the UI Treeview Builder , after a new menu item has been added to Treeview RP, use the Item Properties section to set the Target Type field to “External URL”.
create a new Target of the “External URL” type and format the URL according to the details under this reference guide’s Deep Linking: URLs with Parameters to Launch RP section. Finally, select the created Target via the Target Name field.
Create New UI Console Tab for RP

To create a new tab on the UI Console to launch the screens of RP, as shown above, please refer to UI Console - R12 in conjunction with the following instructions.
With the UI Console in Edit mode, add a new tab then edit the Region Content so that the Content Type field is set to “Menu” and the Menu Type field is set to “v12 Menu”. After the Menu Description drop-down field becomes available, select “Resource Planning Menu”. To finish, save the UI Console.
Now, when the new tab is clicked, the Treeview region contains links to launch the screens of RP.