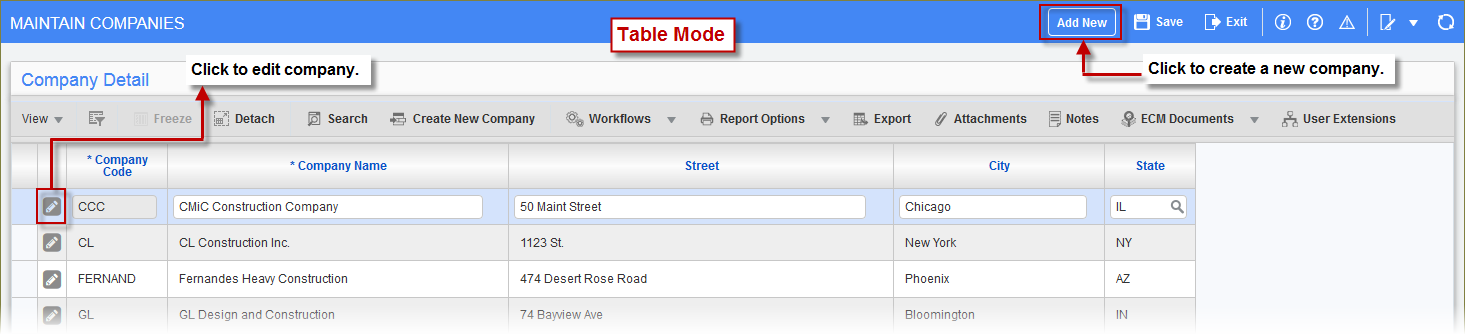
Pgm: COMPSETUP – Maintain Companies; standard Treeview path: General Ledger > Setup > Maintain Companies – Table Mode
The Maintain Companies screen will default to display all companies. Click [Add New] in table mode to create a new company, otherwise, select the Edit icon ( ) to edit any of the companies listed in the table.
Pgm: COMPSETUP – Maintain Companies; standard Treeview path: General Ledger > Setup > Maintain Companies
Companies are the different business entities whose accounts will be tracked using this module. Each company that is set up can run on a different fiscal year, and will have its own set of financial statements based on its own GL accounts.
[Create New Company] – Button
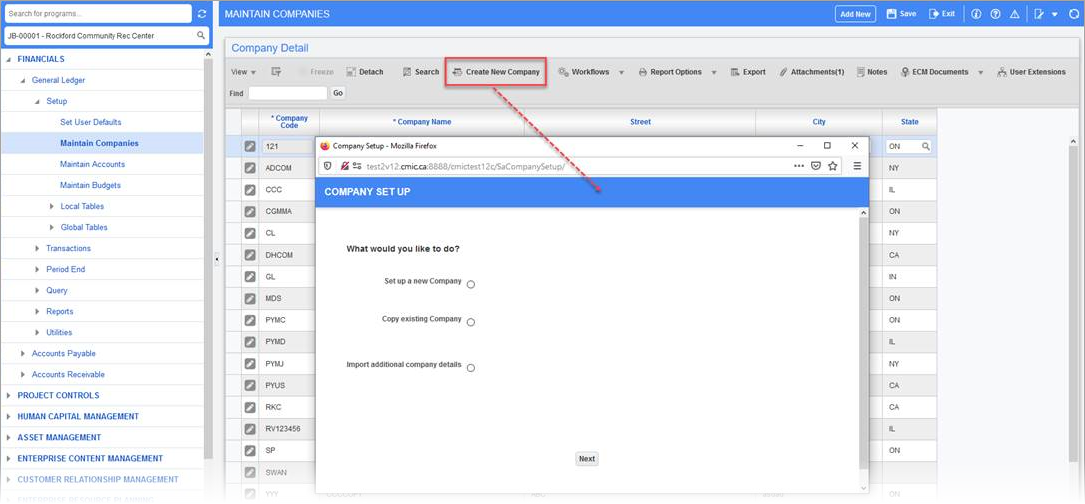
Pgm:COMPSETUP – Company Setup; standard Treeview path: General Ledger > Setup > Maintain Companies – [Create New Company] button
The [Create New Company] button opens a pop-up window that allows the user to set up a new company or use the existing information from another company to set up a new company. It can also be used to import additional company details to an existing company.
Set Up a New Company – Radio Button
When the ‘Set Up a New Company’ radio button is selected, the user will be prompted to enter a new company code and other details, as well as if the standard chart of accounts and standard set of cost codes should be used.
Copy Existing Company – Radio Button
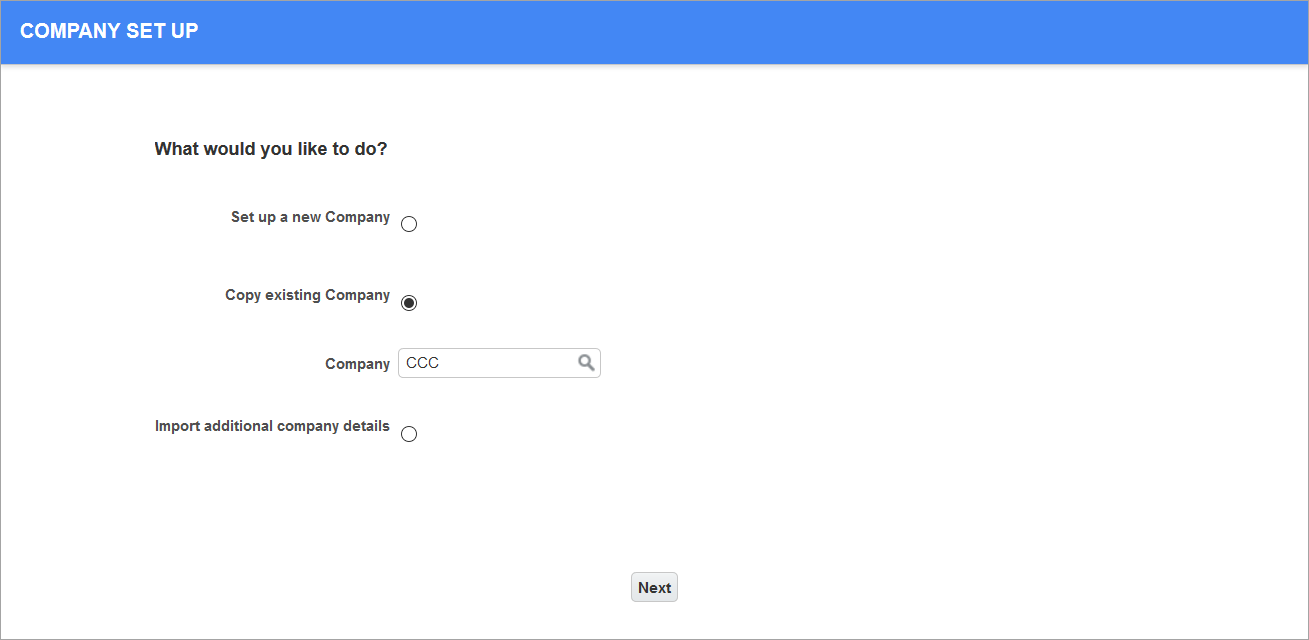
This radio button is used to create a new company using existing company information. When using this option, the GL periods must be set up for the current year in the source company in order for the Fiscal Year field and the Current Period field to be populated in the target company’s record after it is created. If the GL periods are not set up for the current year in the source company, these fields will be left blank in the target company’s record as these values are calculated based on the current system date.
When selected, the user will be prompted to choose a company to copy from the LOV. Click [Next] to continue.
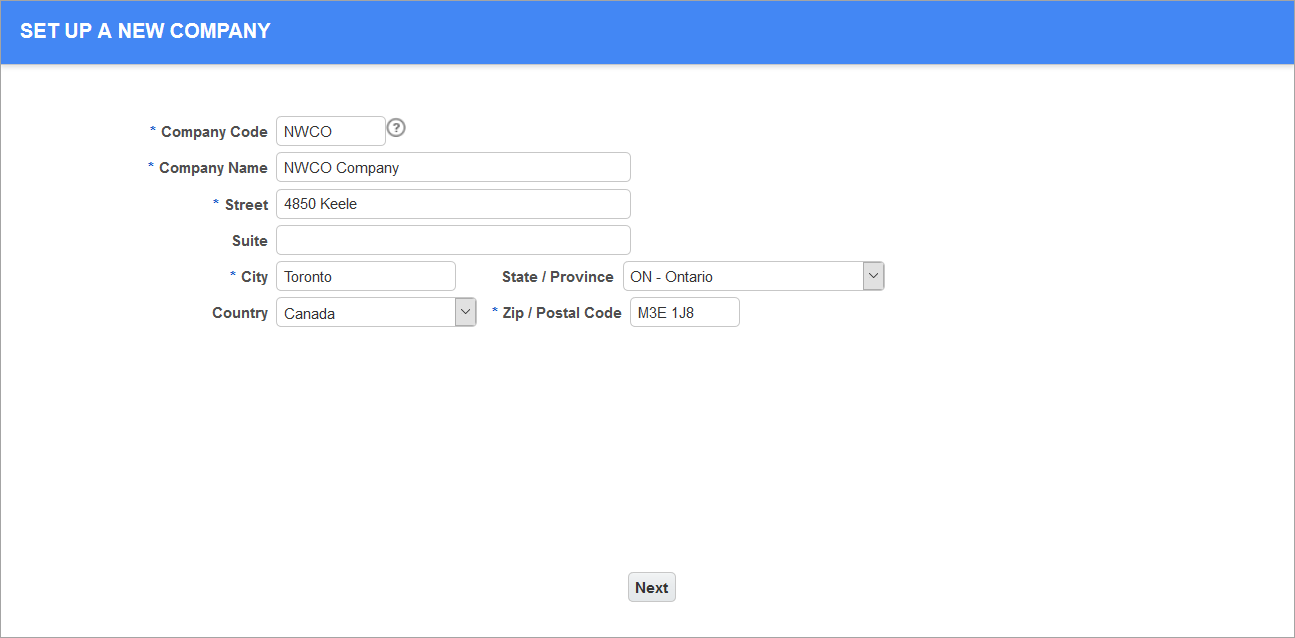
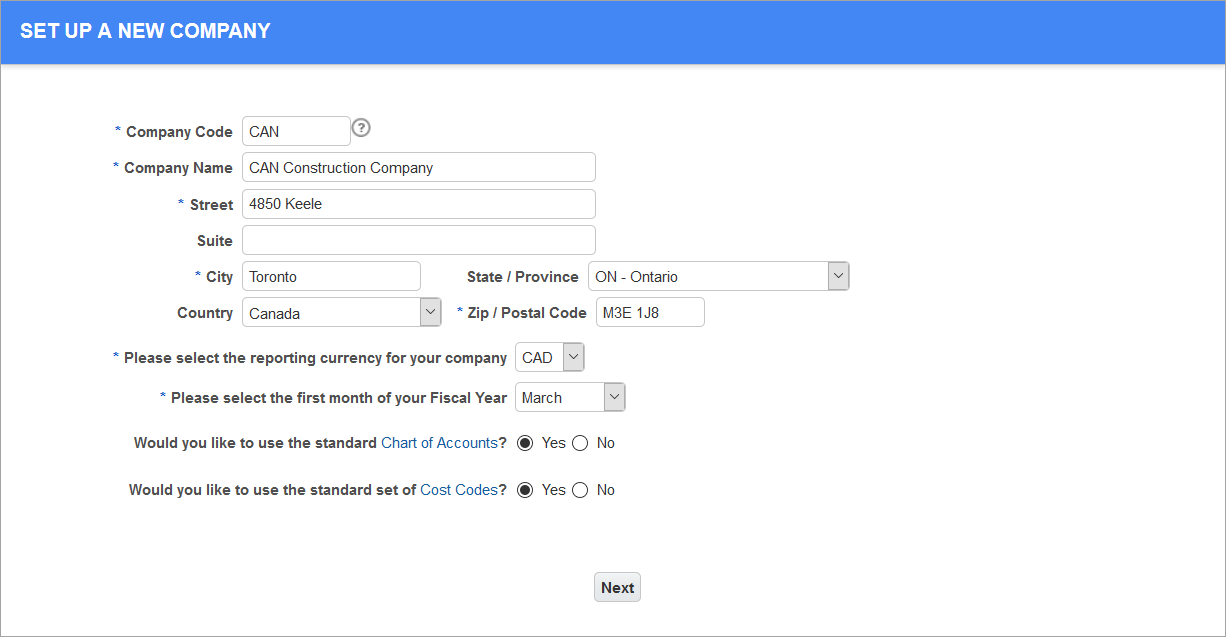
In the next screen, information for the new company must be entered, as shown in the screenshot above. Once all required fields have been filled, click [Next] to continue.
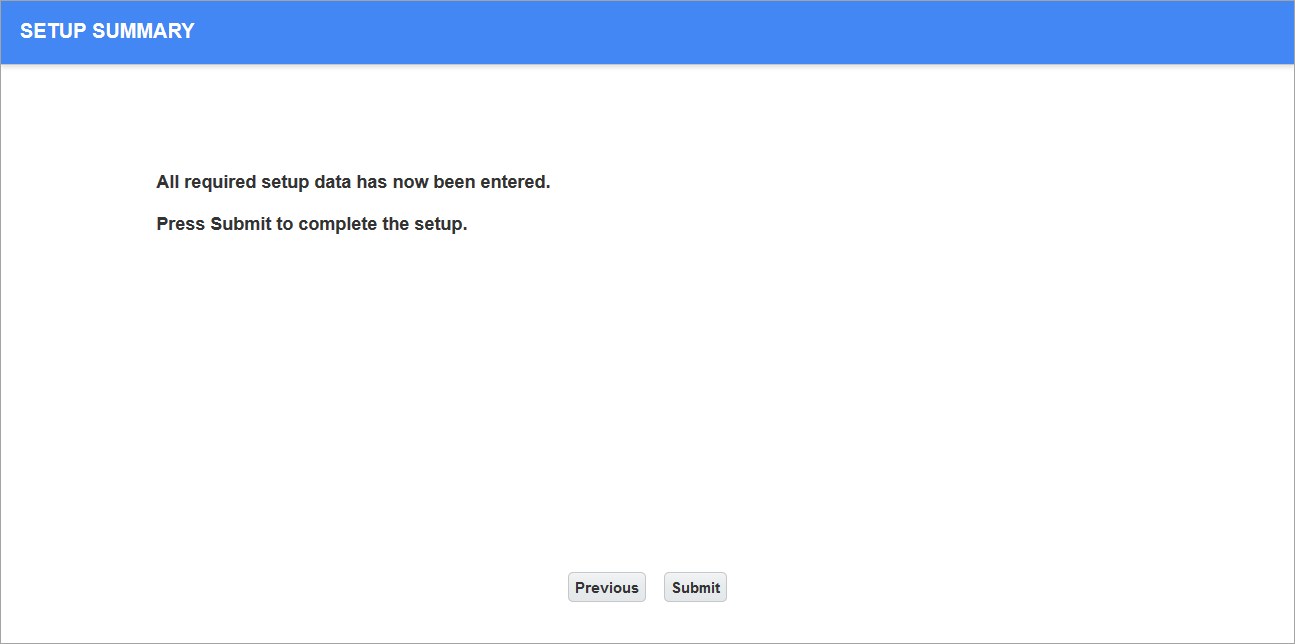
In the Setup Summary screen, click [Submit] to create the new company. The Process Complete screen will notify the user that the setup was completed. To view the company that was created, close the pop-up window to return to the Maintain Companies screen and click the Refresh icon on the top toolbar to refresh the page. Search for the company that was created and click the Edit icon to view the company details.
Import Additional Company Details – Radio Button
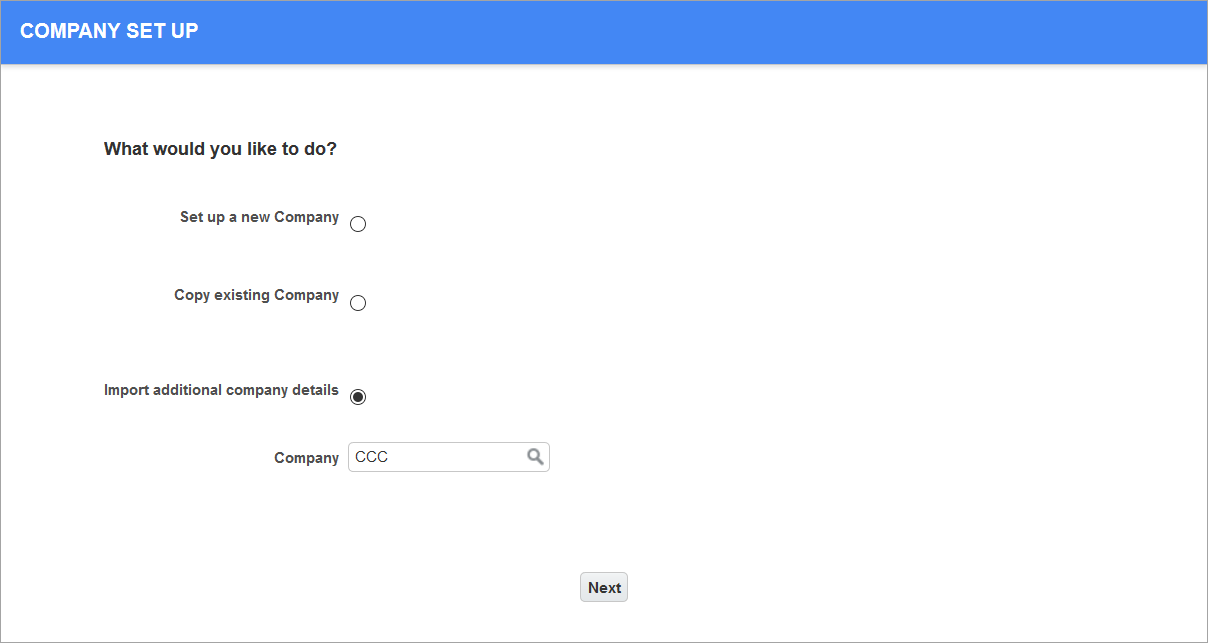
This radio button allows users to import additional company details to an existing company, such as the chart of accounts, cost codes, vendors, and customers.
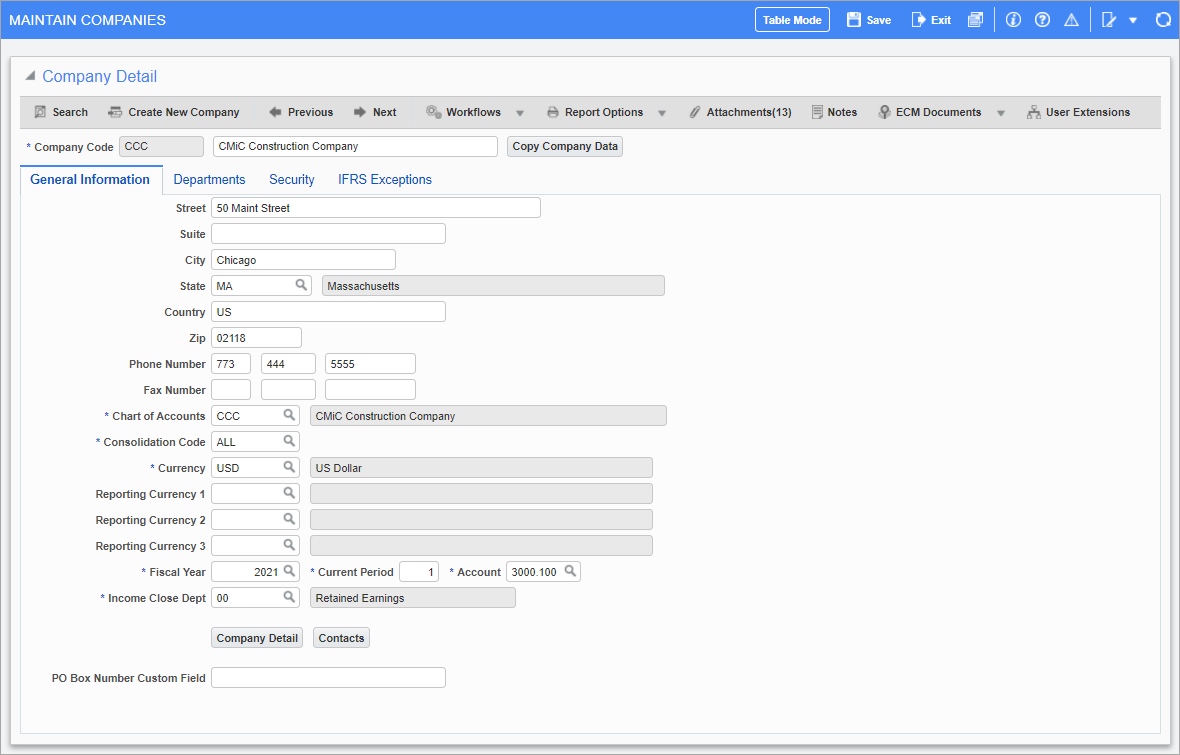
Company Detail
Company Code, Name
Enter an identifying company code for the new company and its name in the adjacent field. The code "00" is reserved and cannot be used. Lowercase letters will be converted to uppercase.
NOTE: Company codes must be unique across all clients in Cloud. If an attempt is made to create a company code that has already been used by another client on Cloud, an error message appears stating, "Company code already exists."
[Copy Company Data] – Button
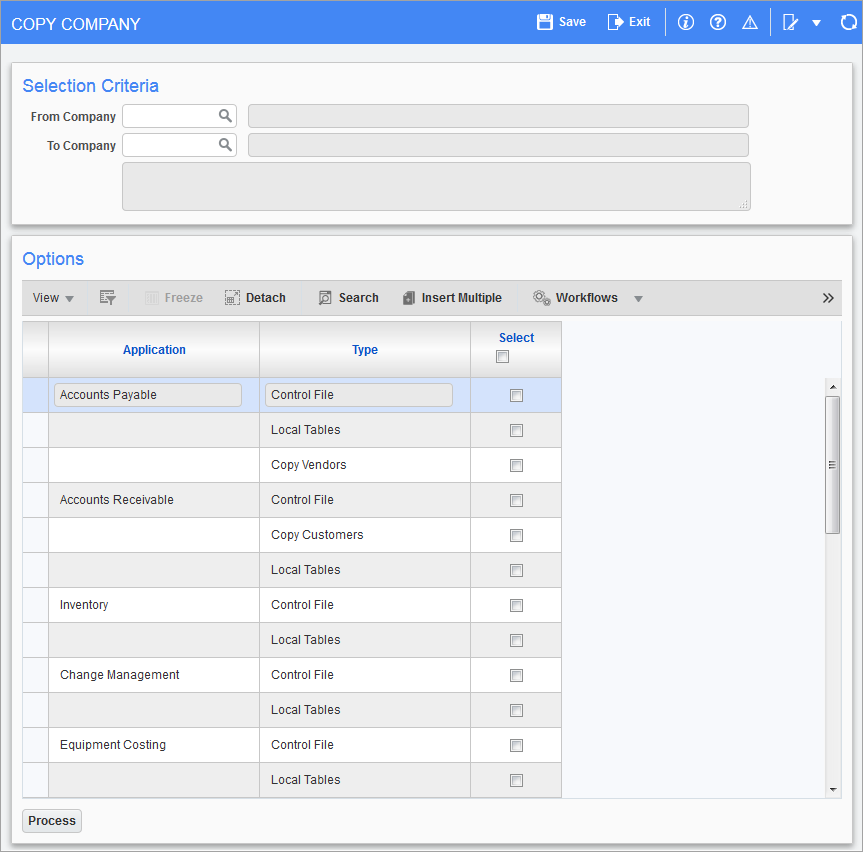
Pgm: COPYCOMPANY – Copy Company; standard Treeview path: General Ledger > Setup > Maintain Companies – [Copy Company Data] button
Use the [Copy Company Data] button to copy control files, local tables, and/or customers from one company to another company that uses the same chart of accounts. When a company is selected for the From Company field, the To Company field’s LOV only lists companies that use the exact same chart of accounts as the From Company.
First, select a company from the From Company field from which data will be copied, then select a company from the To Company field to which data will be copied. When finished, click the [Process] button.
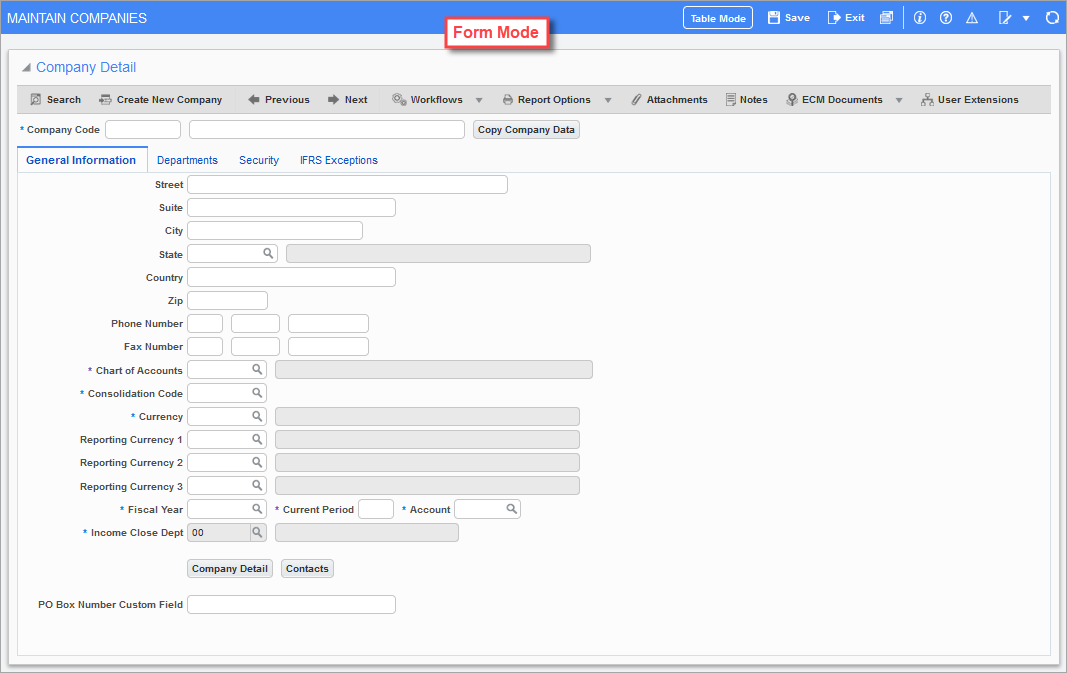
General Information – Tab
Pgm: COMPSETUP – Maintain Companies; standard Treeview path: General Ledger > Setup > Maintain Companies – General Information tab
Address Fields (Street, Suite, City, State, Country, Zip)
Use the address fields to enter the main address for this company.
To create address records for the company, use the [Address] button on the pop-up window launched by the [Company Detail] button.
Phone Number, Fax Number
Enter the company's telephone and fax numbers, broken down into their country code, area code, and local number.
Chart of Accounts
Enter/select the chart code to be used by this company. The chart code will tell the system the number of periods in the fiscal year for the company, and determine which accounts are available. As users can create multiple chart codes with different period dates in the Chart Codes and Period Dates screens, users should verify that the chart code selected in this field corresponds to the correct period dates for the company.
NOTE: Please be aware that changing chart codes can be challenging if posted transactions exist.
Consolidation Code
Enter/select the hierarchical consolidation code to be used by this company.
Currency (Code)
Enter/select the currency code to be used by this company for most transactions. A warning will be issued if the code entered is not on file. Make sure this currency is also defined in the Exchange Rate Maintenance screen of the System Data module (standard Treeview path: System > Global Tables > Banking > Exchange Rates).
Reporting Currency 1, 2, and 3
Enter/select the currency to be used for your company’s financial statements.
Fiscal Year, Current Period
Enter the current fiscal year and period the company is working in.
A company’s fiscal year and current period are key controls for financial reporting and transaction posting. The fiscal year defines the 12-month accounting cycle used for reporting (e.g., January to December or April to March). It sets the start and end dates for annual financial statements and ensures transactions are recorded in the correct year for compliance and auditing.
The current period represents the active accounting month within the fiscal year. It determines which transactions can be posted and, depending on system settings, may restrict posting to the current or other open periods.
Income Close Dept, Account
These two fields are used to enter the department and account that are used for reconciling the revenue and expense accounts when the year end procedure is run for this company. A warning will be issued that this account is required to save a new company record.
[Company Detail] – Button
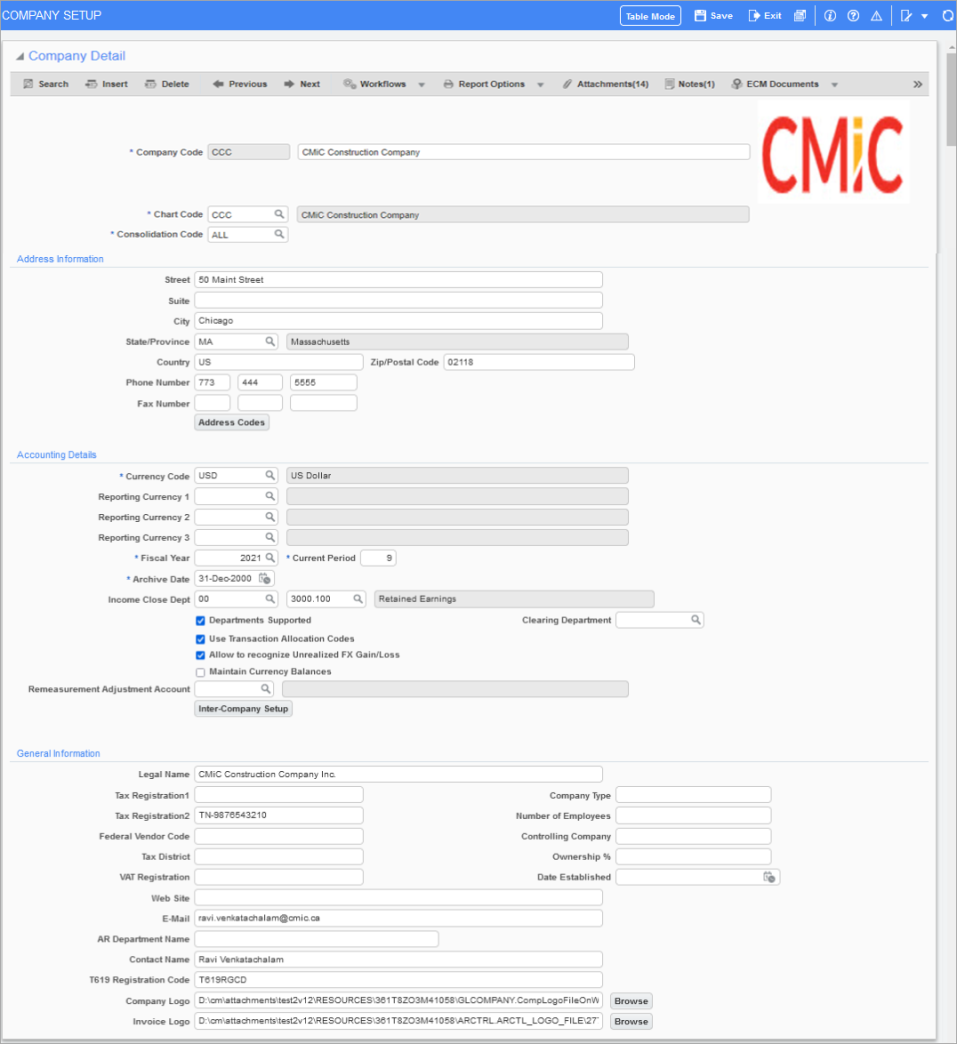
Pgm: COMPFRM – Company Detail pop-up window
This pop-up window provides access to the rest of a company’s details, such as the legal and tax company information, if required.
This section only describes additional company fields provided in the pop-up window.
Chart Code (Chart of Accounts Code)
Enter/select the chart code to be used by this company. The chart code will tell the system the number of periods in the fiscal year for the company, and determine which accounts are available.
Consolidation Code
Enter/select the consolidation code to be used for this company. The consolidation code will define the way this company will be grouped for access and reporting purposes.
Address Information
[Address Codes] – Button
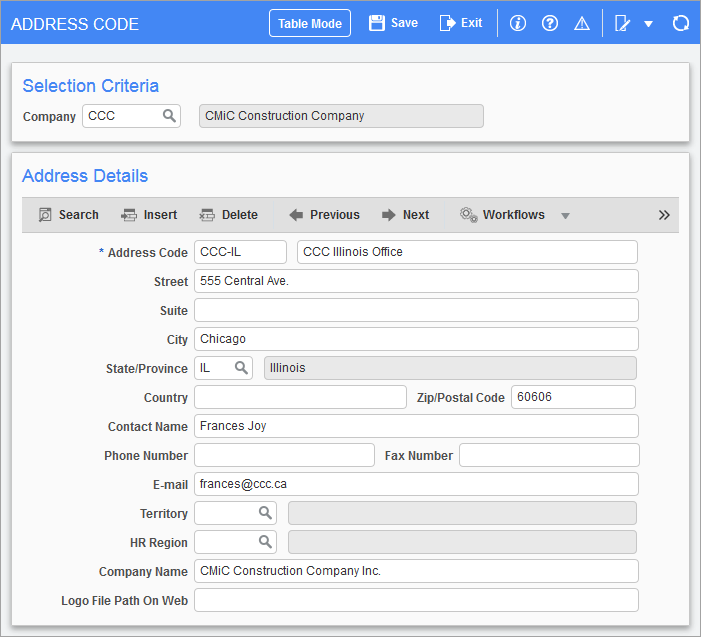
The [Address] button on the Company Detail pop-up window is used to create address records to associate to the company being created. The company’s address records are made available in company address LOVs throughout the system.
Use the [Previous] and [Next] buttons on the Block Toolbar to move from one record to another.
Use the [Insert] button to create a new address record, and [Delete] button to delete the selected record.
Address Fields
Use the address fields to enter the address for this record.
Contact Name
Name of primary contact for this address.
Phone Number, Fax Number
Enter the company's telephone and fax numbers, broken down into their country code, area code, and local number.
Email of primary contact for this address.
Territory
Enter/select the sales territory in which this address falls, if required. The list of territories is maintained in the System Data module.
Territory codes are used primarily for sales analysis purposes, and for the geographical distribution of products for the business entity. It should not be confused with the region code, which is simply the state/province of the address.
HR Region
Enter/select the HR region for this address, if required.
Company Name
Name of company to which the contact is associated.
Logo File Path on Web
Insert the direct URL path to the company’s logo for this address. Once the URL is entered, the associated logo will be displayed at the top of the Company Detail pop-up window.
Accounting Details
Archive Date
Transactions cannot be entered in the system with dates on or before this date.
Clearing Department
Enter the department to be used as the operating department for Inter-Departmental transactions.
Inter-Departmental Clearing requires that one department be declared as the “clearing (operating) department” at the company level, while the other departments are declared as “self-balancing” at the department level.
At period-end, an Inter-Department Clearing procedure is run to generate a balancing transaction from the Inter-Departmental clearing account of the “self-balancing” department, to the Inter-Departmental clearing account of the department indicated by this field.
NOTE: You cannot select a department that has been checked as Self-Balancing at the department level.
Departments Supported – Checkbox
This field is used to specify whether this company uses different departments for separating financial information within the company. If this field is not checked, access to the Create Department form is not allowed.
The system will automatically create department code 00 regardless of the value in this field.
Use Transaction Allocation Codes – Checkbox
Check the ‘Use Transaction Allocation Codes’ box if this company requires the use of Transaction Allocation Codes. Leave this box blank if TACs are not required.
Transaction Allocation Codes (TACs) provide a supplementary method to track and summarize transactions within the General Ledger. TACs are user-defined codes that can be assigned a set of values. These values define the attributes to be allocated to every General Ledger transaction. A maximum of four codes can be defined, and an unlimited set of values can be assigned to each code.
Please see the section on Transaction Allocation Codes for further details.
Allow to recognize Unrealized FX Gain/Loss – Checkbox
Check the 'Allow to recognize Unrealized FX Gain/Loss' box to allow the Process Unrealized FX Gain/Loss utility to generate gain/loss transactions. Please see the section on General Ledger - Process Unrealized FX Gain/Loss for further details.
Maintain Currency Balances – Checkbox
Check this box to indicate whether GL foreign currency balances will need to be calculated using the Remeasure Foreign Currency Balances screen. This box is unchecked by default. For more information, please refer to General Ledger - Remeasure Foreign Currency Balances.
Remeasurement Adjustment Account
This field is optional. Enter/select a low-level account for the company's chart code.
[Inter-Company Setup] – Button
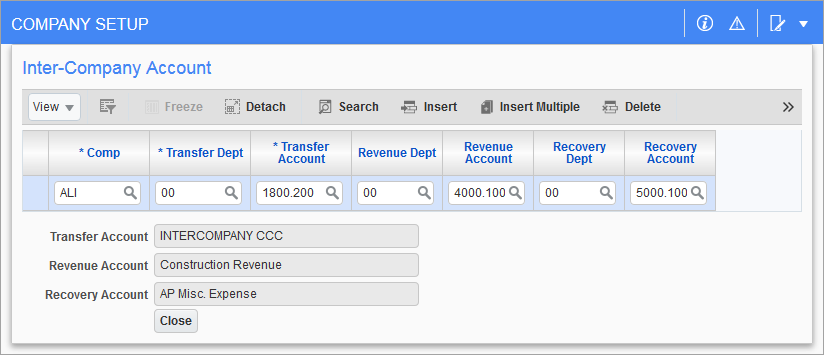
Pgm: COMPFRM – Inter-Company Setup
Inter-company account setup is only required for transactions that will be distributed between companies in the system. This refers not only to manually entered transactions, but also to automatically created inter-branch transactions as well.
When goods or services are sold by a parent to a subsidiary company or vice-versa, inter-company clearing accounts are required so consolidated statements do not include the same transaction twice.
Use this pop-up window to enter the General Ledger accounts that will be used for inter-company transactions between this company and its parent or subsidiary companies. When transactions are posted to the General Ledger module, which involve GL accounts from more than one company, the system will automatically reference the transfer accounts set up in this block for each of the companies involved, and post a transaction to these clearing accounts. This transaction will be printed on the GL posting report.
A very simple example will illustrate how the system will handle such transactions. Suppose company A and company B are two subsidiaries of company C. Company A has sold some land to company B that was recorded at $10,000 on company A’s books. We will assume no cash changed hands and that company A recognizes no gain or loss. The transaction is entered as follows:
DR Company B Land 10,000
CR Company A Land 10,000
If clearing accounts are entered in this block, when the transaction is posted, the system will automatically reverse the transaction in the following manner:
DR Company B Land 10,000
CR Company B Transfer Account 10,000
DR Company A Transfer Account 10,000
CR Company A Land 10,000
Transfer/clearing accounts are required, since most inter-company transactions must account for the gain or loss on the sale, as well as the effects of depreciation and tax. If clearing accounts were not used, consolidated statements could potentially double-count revenue or recognize revenue illegitimately.
For this reason, a transaction disposition for the account entered here will be automatically created whenever a transaction is posted that involves the company code specified at the left of this line. For example, suppose we are setting up company A and we enter company B at the left of this line. Then, we would enter the company A account here that will be used to clear any inter-company transactions between companies A and B.
In the example at the start of this section, we transferred some land from company A to company B. When the transaction was posted, the system automatically reversed out the land transfer using the clearing accounts that had been entered in this field for each of the companies.
Note that the department code is not currently in the system, and we recommend that the default "00" code is used until the departments for this company are set up. The user may return to this form to replace the default code with the valid department code.
The revenue department and account act in the same way as the transfer accounts, but are only used for a specific type of inter-company transaction called an inter-branch charge. These two fields only need to be filled in when it is time to use inter-branch labor charges.
General Information
Legal Name, Tax Registration 1, and Tax Registration 2 (Tax Setup Fields)
The Legal Name field, if filled in, will replace the Company Name field on any printed forms, such as purchase orders, invoices, and checks.
If this is a US company, and the Accounts Payable EFT functionality will be used, then the Tax Registration 2 field should be the originator ID, as defined by the bank. For Canadian users, the GST registration number is entered in the Tax Registration 2 field.
The VAT Registration field is for entering the value added tax registration number, if applicable.
Company Type
Enter the type of company.
Number of Employees
Enter the number of employees belonging to the company.
Federal Vendor Code
Enter the company’s federal vendor code.
Controlling Company
Enter the name of the controlling company, if applicable.
Tax District
Enter the company’s tax district.
Ownership %
Enter the ownership percentage of the company if it is part of a joint venture.
VAT Registration
Enter the VAT registration number of the company.
Date Established
Enter the date the company was established.
Web Site
Enter the web site address of the company.
E-Mail, Contact Name
Contact email and name of contact for the company.
T619 Registration Code (T619, Electronic Transmittal)
This field is relevant to our Canadian clients.
Company Logo
Path to company’s logo; this logo is used in Jasper reports.
Invoice Logo
Enter the direct path to company’s logo for invoices.
[Contacts] – Button
The [Contacts] button along the bottom of the General Information tab launches the Contacts screen used to create, view, or edit contacts. The screen is restricted to display contacts that have an address code associated with the current company, as well as any contact associated with the company that does not have any specified address codes.
For more details, please see General Ledger- Contacts.
Departments – Tab
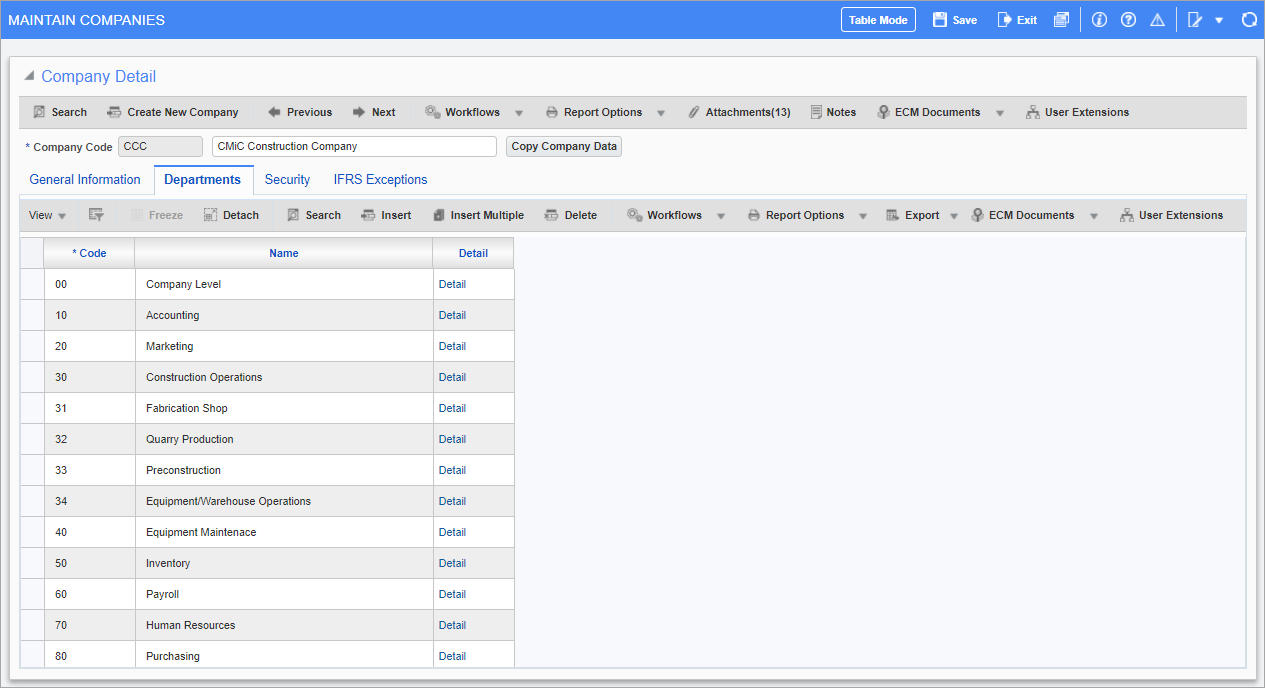
Pgm: COMPSETUP – Maintain Companies; standard Treeview path: General Ledger > Setup > Maintain Companies – Departments tab
On the Departments tab, use the [Insert] button to enter the required departments for the company.
Clicking a department’s Detail link opens the Maintain Departments pop-up window to add any required details and access groups for the department.
A company’s departments can also be maintained via the Maintain Departments screen (standard Treeview path: General Ledger > Setup > Local Tables > Maintain Departments).
Security – Tab
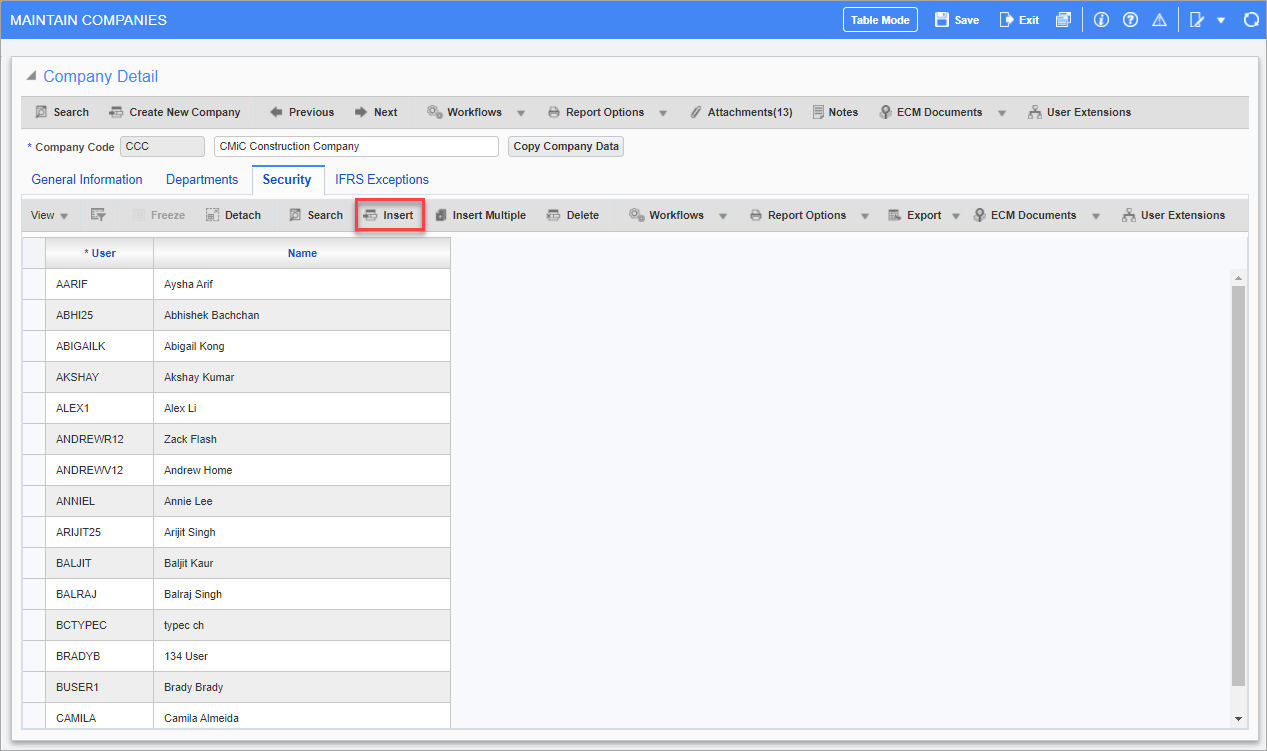
Pgm: COMPSETUP – Maintain Companies; standard Treeview path: General Ledger > Setup > Maintain Companies – Security tab
On the Security tab, use the [Insert] button to add user IDs for those to be granted access to the company and click [Save].
IFRS Exceptions - Tab
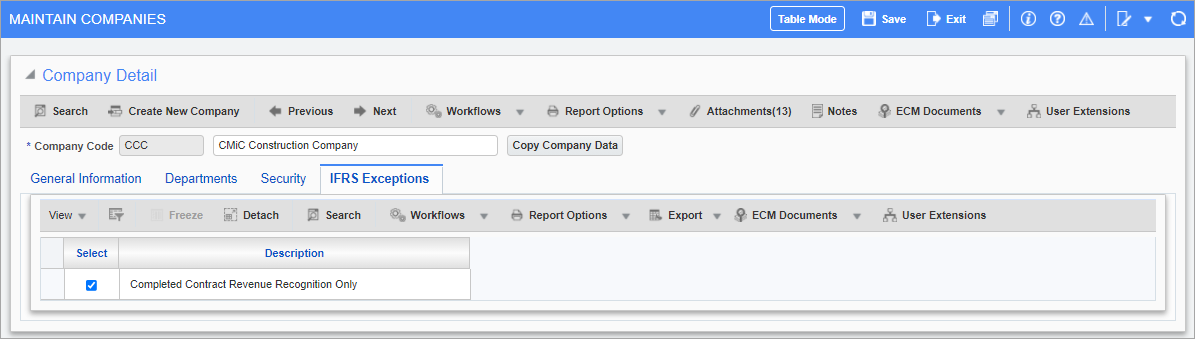
Pgm: COMPSETUP – Maintain Companies; standard Treeview path: General Ledger > Setup > Maintain Companies – IFRS Exceptions tab
This tab is used to present the selected company using a different accounting method. Each IFRS exception represents a specific difference between IFRS and another accounting method (e.g. Completed Contract Revenue Recognition Only).
Refer to General Ledger - Multi-Ledger Functionality for more information about how IFRS exceptions are used.