Overview
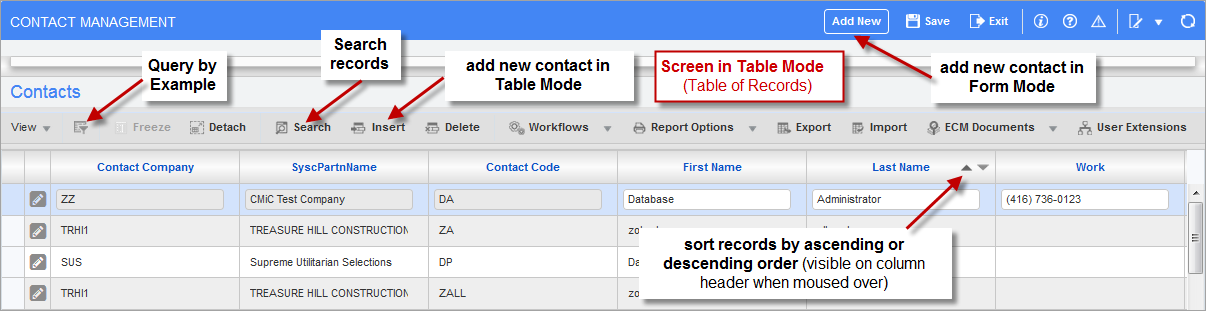
Sample of Contacts screen in table mode.
NOTE: If the enable de-duplication searching function is being used, new entries cannot be made when the screen is in table mode.
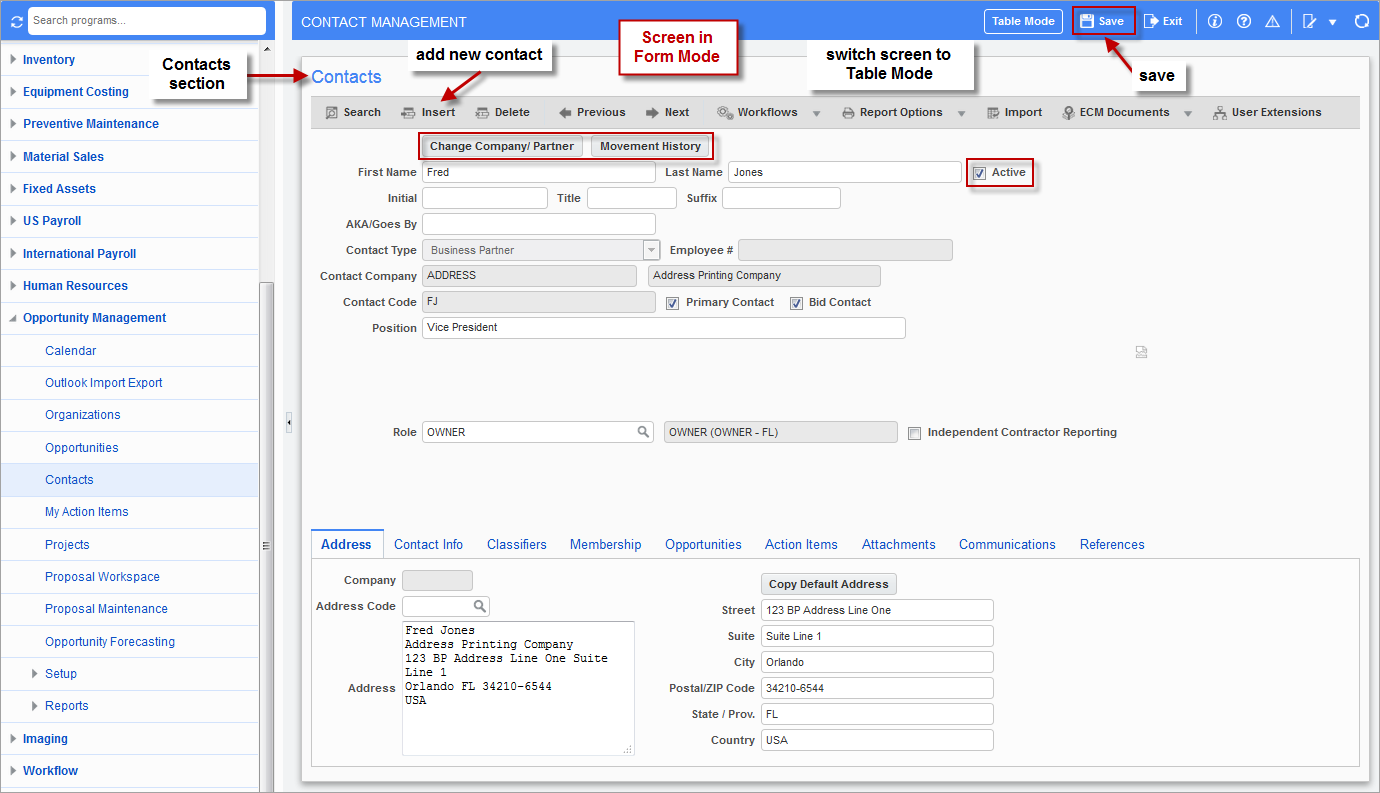
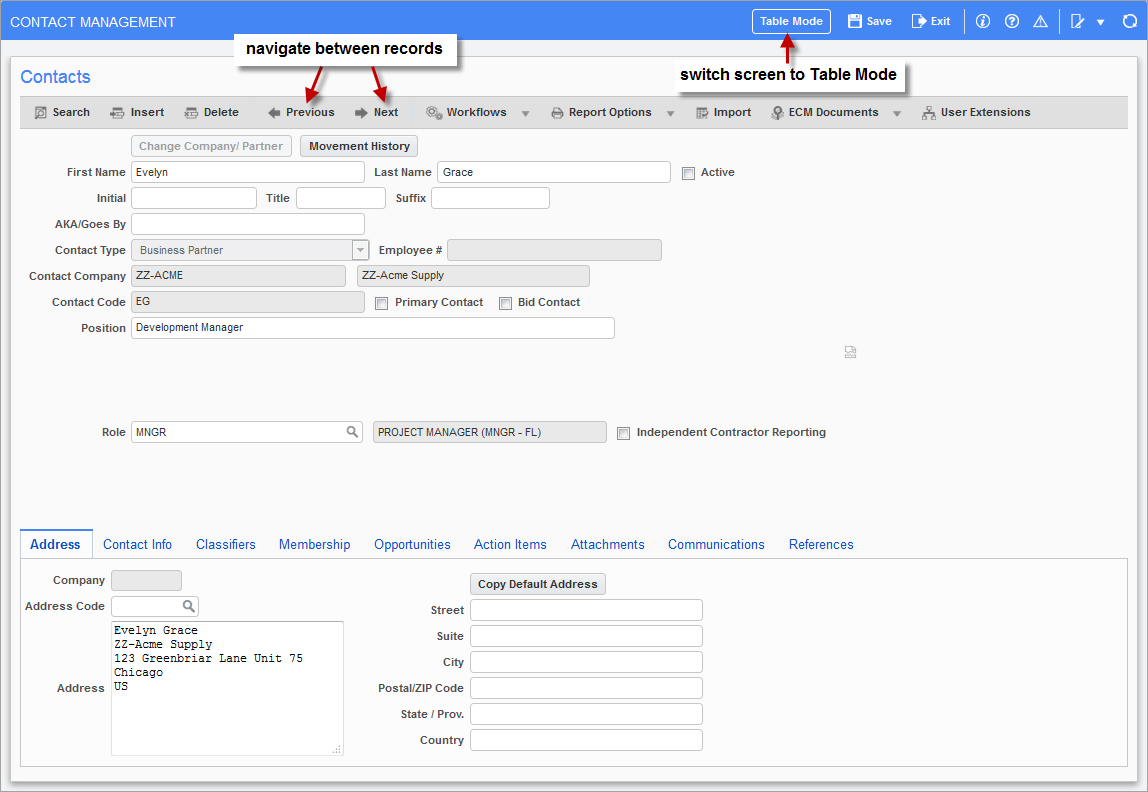
Sample of Contact screen in form mode
The Contact screen is used to create, view, and manage contact records, which can be associated to business partner, vendor, and customer records.
Contacts
The Contacts section displays the contact’s basic information. The following describes this section’s fields.
First Name
Contact’s first name.
Last Name
Contact’s last name.
Active
Indicates if contact record is active.
NOTE: When a contact’s contact company is changed, the contact’s previous record is saved as a separate record and its status is set to inactive. Also, inactive contacts records will not be seen if the user does not have the ‘SHWINACCNT’ system privilege.
Initial
Contact’s middle name initial.
Title
Title applicable to contact.
Suffix
Suffix applicable to contact’s name.
AKA/Goes By
Alternative name by which contact is also known.
Contact Type
Contact type: business partner, organization, or company, determined by the organization type of the organization with which this contact is affiliated. The selection made in this field determines what values are available for the contact company drop-down list.
Employee #
If the contact’s contact type is company (their company is also the user’s company or a company that is a member of the user’s company’s group), this field is enabled for an employee number to be entered, or to search for and select the contact’s employee number.
Contact Company
Business partner, organization, or company with which this contact is affiliated. The value selected by the Contact Type field determines what values are available in this list.
Contact Code
Code to identify this contact record.
Primary Contact
Indicates if the contact is the primary contact for organization specified by Contact Company field.
Bid Contact
Indicates if the contact is a bid contact for an opportunity’s bid process.
Position
Position within the organization specified by the Contact Company field.
Role
Project management role that the contact performs. The maintenance screen’s Treeview path is Job Costing > Setup > Local Tables > Project Management Roles.
Independent Contractor Reporting
Indicates if the contact is an independent contractor, whose services need to be reported on 1099-MISC tax forms. Also, it can indicate that this contact in an independent contractor whose information must be reported to California’s Employment Development Department (independent contractor reporting).
Address – Tab
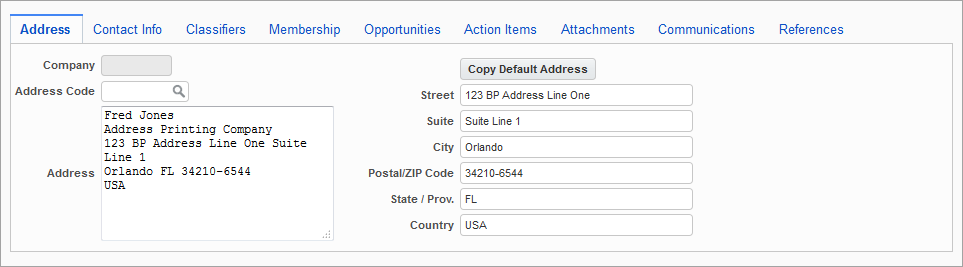
This tab displays a contact’s address, and the following describes this section’s non-standard fields.
Company
If the contact’s contact type is company (their company is also the user’s company or a company that is a member of the user’s company’s group), this field displays the contact’s company. Also, this field determines what values are available for the Address Code field.
Address Code
Contact’s address code, which populates the Address field. Lists all of the address records that have been created for the contact’s affiliated organization.
When a new contact is created, the Address field (display only) gets automatically populated with the address of the contact’s affiliated organization, as specified on the organization’s Detail tab.
Manually Enter Address
Use the address fields under the [Copy Default Address] button to manually change the contact’s address.
Overwrite Address to Organization’s Default Address
Use the [Copy Default Address] button to overwrite the contact’s address with the address of the contact’s affiliated organization, as specified on the organization’s Detail tab.
Use Organization’s Address Records to Set Contact’s Address
Use the Address Code drop-down list to select an address that has been entered for the contact’s affiliated organization. To create a new address record for the organization, which can then be selected from this field, use the affiliated organization’s Addresses tab.
Contact Info – Tab
This tab displays a contact’s standard contact information, except the ‘Send Email as HTML’ checkbox. This checkbox indicates if e-mails sent to the contact need to be in the HTML format.
After any entries or edits are made, click the Main Toolbar’s [NOTE] button.
Classifiers – Tab
If set up for the user’s company, this tab displays the user defined classifiers.
Membership – Tab

This tab displays any professional associations or organizations to which the contact belongs.
The following describes the fields on this tab.
Association
Professional association or organizations to which the contact belongs. The maintenance screen’s standard Treeview path is Human Resources > Setup > Local Tables > Organizations.
Name
Name of association or organizations.
Membership Type
Select membership type from list of values. The maintenance screen’s standard Treeview path is Human Resources > Setup > Codes > Membership Types.
Description
Description of membership type.
Membership No
Membership number.
Start Date
Date membership was issued.
Renewal Date
Date membership needs to be renewed.
Renewal Cost
Cost of renewing membership.
Add Entry
To add a new record, click the [Insert] button, enter the details, and click [Save].
Delete Entry
To delete a record, select its row using the selection area, framed by the red rectangle, and click the [Delete] button.
Export Membership Records to File
To create an XLSX (spreadsheet) file of the contact’s membership records, click the [Export] button. The web browser can then be used to specify where to save the file, or use it to open and print the file.
Attachments – Tab
This tab displays attachments added to this contact record. If there are any added attachments, the Block Toolbar’s [Attachments] button will indicate how many.
For details about this tab, which is common to various screens of the Opportunity Management module, please refer to the Attachments Tab sub-section of the Common Icons & Functionality section in the Opportunity Management guide.
Add New Contact
Ensure Contact Has Not Already Been Added
First, it is necessary to ensure that the contact about to be entered does not already exist so that already existing data is not duplicated, and to ensure that any important information is not missed. Refer to the sub-section Search for Record under the Common Functionality section of the Opportunity Management guide for instructions on how to search for a record to ensure that it does not already exist.
De-duplication Searching Function
The Enterprise system has a backend process that can be enabled to greatly reduce unintended duplications. The checkbox to enable this option is labeled ‘Enable De-Duplication Searching Function’, and it is found in the Company Control screen of the Opportunity Management module. For details about this option, please refer to the System Options subsection of the Company Control section in the Opportunity Management guide. The relevant subsections under the System Options section are: Enable De-Duplication Searching Function and De-Duplication Searching Function – Parameter List.
NOTE: If the ‘Enable De-Duplication Searching Function’ box is checked, new entries cannot be made when the screens to enter them are in table mode. This is necessary to prevent multiple records being saved at the same time, which cannot be handled by the de-duplication searching function.
Add Contact
There are two options to create a contact through the Contact screen, one option is available when the screen is in table mode (listing all contacts), and the other when the screen is in form mode (displaying a single contact). The creation of contact records can also be initiated through the Organizations and Opportunities screens, and when these options are used, the new record’s Contact Type and Contact Company fields are automatically populated.
To add a contact when the Contact screen is in table mode, click the Main Toolbar’s [Add New] button, as shown in the first screenshot of this section. This will switch the Contact screen to form mode, for the entry of the contact’s information. If the Block Toolbar’s [Insert] button is used, the entry of the contact’s information is done while the screen is in table mode. Click [Save] when finished the contact’s data entry.
To add a contact when the Contact screen is in form mode, click the Block Toolbar’s [Insert] button. Click [Save] when finished.
For details about the fields in the Contacts section and on each tab, please refer to the relevant sub-sections of this section.
View Contacts Associated to Record
If the Contacts screen was entered through a screen for records that can have associated contact records, such as the Business Partner, Vendor, or Customer screens, the list of contacts can be viewed associated to the record in table mode, or it is possible to move from one contact to another in form mode.
Sample of Contacts screen in table mode, listing all contact records associated to a business partner record.
The Contacts screen in table mode, if launched using the [Contacts] button on a record that can have associated contacts, lists all the contacts associated to the record. For instance, if the Contacts screen is launched through a business partner record, in table mode it will list all the contacts associated to the business partner.
If the screen is in form mode, click the [Table Mode] button to switch it to table mode, as shown in the following screenshot.
Sample of Contacts screen in form mode, displaying a single record associated to a business partner record.
The Contacts screen in form mode, if launched using the [Contacts] button on a record that can have associated contacts, displays the first contact associated to the record.
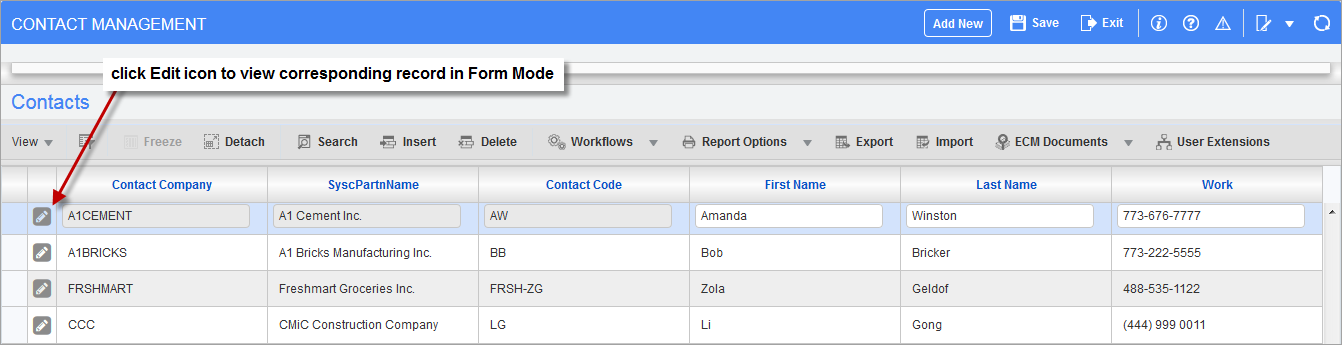
If the screen is in table mode, click a record’s corresponding Edit icon, as shown in the screenshot in the preceding Table Mode section, to switch the screen to form mode.
Navigate between Contact Records
To move between the contact records, use the [Next] and [Previous] buttons on the Block Toolbar, as shown in the above screenshot. When the last record has been passed, the fields will all be blank, and when at the first record, clicking [Previous] does not change the record.
Change Contact’s Company

To change the company with which the contact is affiliated, click the [Change Company/Partner] button (within red rectangle on second screenshot of this section).
NOTE: This operation cannot be done for inactive records.
When a contact’s Contact Company is changed and saved, the contact’s previous record is saved as a separate record, but its status is set to inactive (‘Active’ checkbox, under Contacts section, is unchecked). To view the history of changes to the contact’s contact company, click the [Movement History] button.
The following describes the non-name fields on this screen.
Contact Type
Contact type, business partner, organization, or company, is determined by the organization type of the organization with which this contact is affiliated. The selection made in this field determines what values are available for the Contact Company drop-down list.
Contact Company
Business partner, organization, or company with which this contact is affiliated. Value selected by Contact Type field determines what values are available in this list.
Contact Code
Code to identify contact.
To save any changes, click the [Process] button.
View Contact’s Movement History
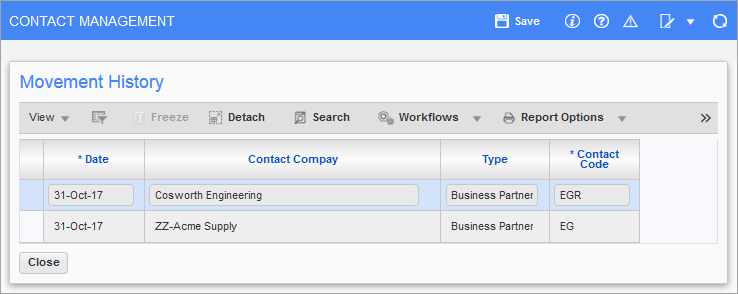
When a contact’s contact company is changed and saved, the contact’s previous record is saved as a separate record, and its status is set to inactive (‘Active’ checkbox, under Contacts section, is unchecked). Also, the contact’s previous contact company, contact type, and contact code, along with the date that the change was made, is saved as a movement history record.
To view a contact’s movement history records, click the [Movement History] button (within red rectangle on the second screenshot of this section).
Make Contact Inactive or Active
To inactivate a contact, uncheck the ‘Active’ box, and to activate a contact, check the ‘Active’ box.
NOTE: Inactivated contact records stay in the database, but the user will not be able to see them if they do not have the ‘SHWINACCNT’ system privilege to view inactive contact records.