Overview
Transaction allocation codes can be thought of as mini sub-ledgers. Any information to track against an account can be set up as a transaction allocation code (TAC). Each time that account is entered within transaction entry, entering a value against that code will be required. Once the transaction is posted to the General Ledger, information can be retrieved based on the transaction allocation code and value(s).
Each of the Chart Codes, Account Structures, Maintain Accounts, and Accounts by Department screens have [TAC] buttons available once TAC codes are defined for the chart and company. Use this button to access the pop-up window where default TAC values can be assigned/modified.
The transaction entry screens in the system validate entries to ensure that all required transaction allocation codes are assigned valid values, if they are used. Transaction allocation codes allow for the assignment of default values to each code at the chart code, account structure, account, and account by department levels.
Transaction allocation codes (TACs) are associated to a chart code, and they provide a supplementary method to track and summarize dispositions posted to the various accounts in the General Ledger.
Transaction allocation codes are user-defined, and each code is assigned a set of values to choose from (refer to the following TAC UDFs subsection below for details). These values define the attributes to be allocated to every disposition. A maximum of four transaction allocation codes can be defined, and an unlimited set of values can be assigned to each code.
The user-defined values for the TACs default the Editable and Validated checkbox states from the UDF Maintenance screen at the System Level. These fields are not editable and display only at the TAC Maintenance screen. However, in Account Maintenance, against each GL Account, users can override the checkbox states as desired.
TAC UDFs
In the Transaction Allocation Code screen, enter a code to represent the transaction allocation code being defined. Then assign user-defined fields to the TACs.
There are three types of user-defined fields which may be entered:
Free Form
When this field is left blank, this type of TAC allows the user to enter any data without validation against a pre-defined list of values. This is a free form text field that can be added to any job transactions.
Company Defined
Set the UDF to GLTAV for a company level TAC. This indicates that the valid data available for selection is unique within a company and is maintained within the General Ledger Transaction Allocation Values screen (standard Treeview path: General Ledger > Setup > Global Tables > Transaction Allocation > Transaction Allocation Values).
User Defined
This type of TAC is designed to use user-defined extension data, found in System > User Extensions > Field Maintenance. This means that this TAC can be linked to either the user’s own user-defined data or one of the pre-defined user extension fields, such as Employee Number. The data will be validated and LOV created against a user extension field.
Transaction Allocation Values
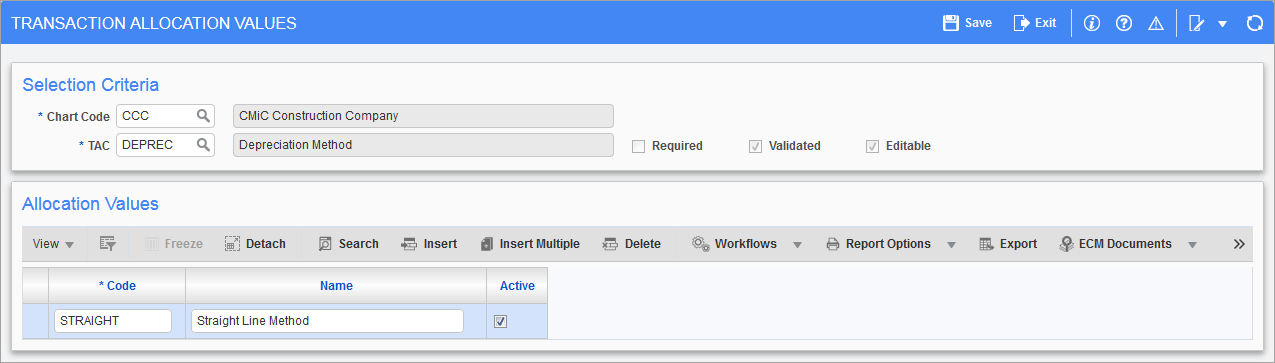
Pgm: GLTAVFM – Transaction Allocation Values; standard Treeview path: General Ledger > Setup > Global Tables > Transaction Allocation > Transaction Allocation Values
If a company defined (GLTAV) transaction allocation code (UDF type) has been created, then this program is where the valid data for the code is entered. An unlimited number of TAC values can be set up against each code.
Chart Code
Verify/modify the chart code for the chart of accounts to which the transaction allocation codes will be applied.
NOTE: Allocation values can only be deleted if they have not been used.
Transaction Allocation Code
Enter a transaction allocation code (TAC) to be associated with the set of allocation values being entered. A list of values is available on this field to view and select the desired allocation codes.
Allocation Value Code
Enter a transaction allocation value code defining an attribute of the TAC selected.
Allocation Value Name
Enter the name of the TAC value being entered.
Active – Checkbox
Check the ‘Active’ box if the allocation value being entered is currently active. Only those transaction allocation values having the ‘Active’ box checked will appear in the list of available values for the transaction allocation code.
Transaction Allocation Codes
![]()
Pgm: GLTACFM – Transaction Allocation Codes; standard Treeview path: General Ledger > Setup > Global Tables > Transaction Allocation > Transaction Allocation Codes
Use this screen to define the transaction allocation codes (TACs) that will be used as the prompt for the values assigned to each code.
Chart Code
Verify/modify the chart code that will be applied to the transaction allocation codes. The system will default the chart of accounts for the company defined in General Ledger > Set User Defaults.
Allocation Code, Name
Enter a code to represent the transaction allocation code being defined.
NOTE: If using TAC in earlier versions of the CMiC software, then the data will have been converted to this new type of TAC.
User Defined Field
If creating a company level TAC, select the value “GLTAV” from this field’s LOV. If creating a user defined TAC, then select the UDF from the list of values. This type of TAC is designed to use the user defined fields (user defined extension) defined in the System Data module’s Field Maintenance screen (standard Treeview path: System > User Extensions > Field Maintenance). This means that this TAC can be linked to either the user’s own user-defined data, or one of the pre-defined user extension fields, such as employee number.
Leave this field blank for free form types. The ‘Editable’ and ‘Validated’ checkbox states default from the UDF maintenance screen, which is not editable at this level, but users may override their state for their associated account in the Account Maintenance screen, if required.
Specify Code Restrictions
Required – Checkbox
Check this box if the value for the transaction allocation code will always be mandatory on any distribution line, in any application.
Validated – Checkbox
Check this box if valid entries must come from a list of values. Leave this box unchecked if the user can enter anything into the transaction allocation value.
Editable – Checkbox
Check this box if the user can enter a value, instead of picking a predefined one from the LOV.
Active – Checkbox
Check this box if the transaction allocation code that is being defined is currently active.
Assigning TACs
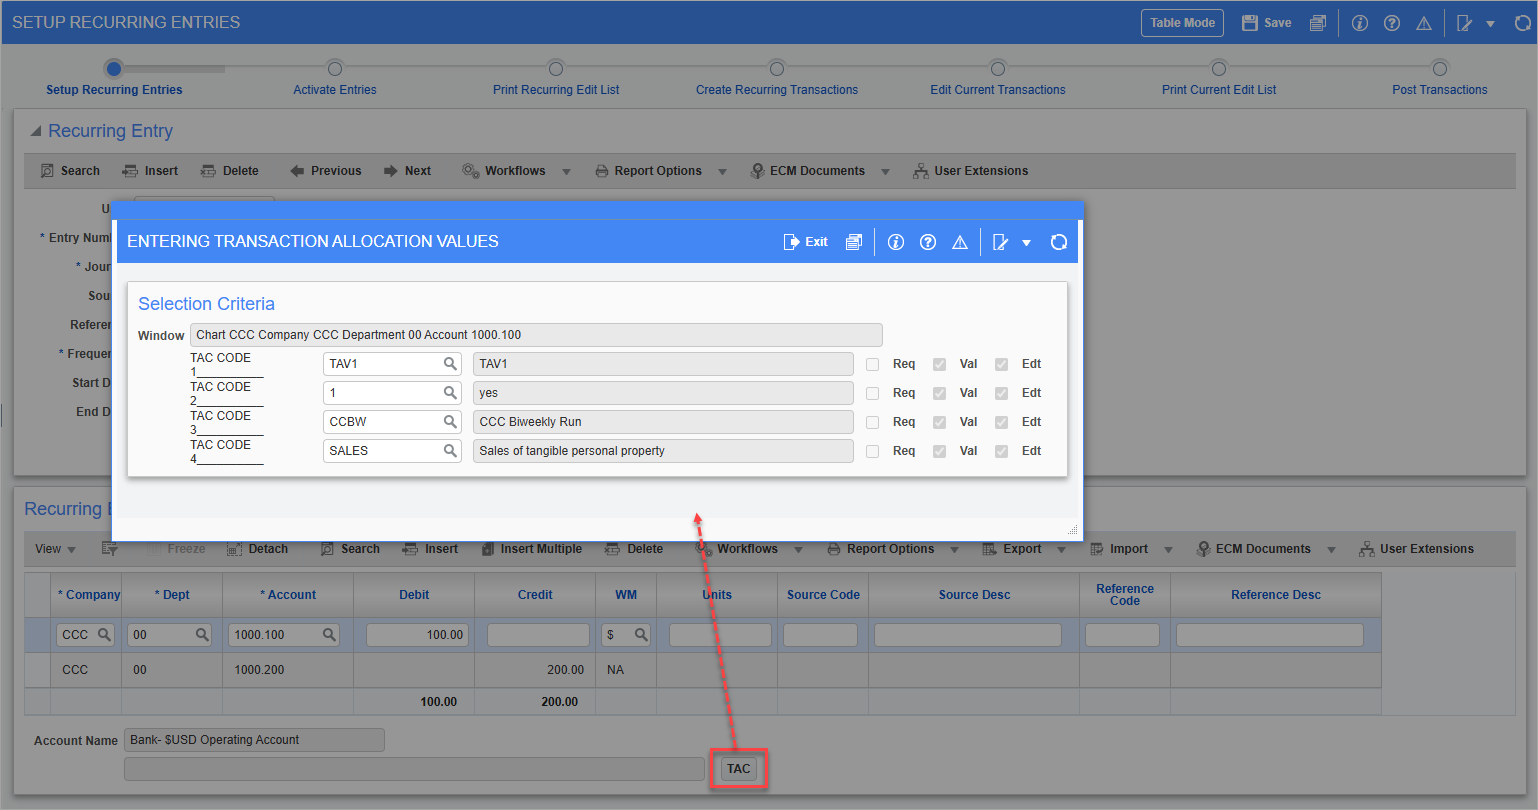
Pgm: RECURENT – Setup Recurring Entries; standard Treeview path: General Ledger > Transactions > Process Recurring Entries – Setup Recurring Entries node – [TAC] button
Transaction allocation codes can be assigned at many different levels in the system.
-
Chart Codes
-
Account Structures
-
Accounts
-
Accounts by Department
If they are assigned at the chart code level, then the TAC is available on every account within the chart. If assigned or modified at the account structure level, then each account within the chart that is the specific account type will be assigned the TAC and values.
The system will prompt the user when applying TACs at any level if the change should be propagated down the hierarchy.
Each of the chart codes, account structures, accounts, and accounts by department screens will have a [TAC] button available once TACs are defined for the chart and company. Use this button to open a pop-up window where default TAC values can be assigned.
Note that where there is existing data, the system will prompt the user with the following message:
“Do you want to update the related account, account type, and account by department data?” (The question changes depending on the level of the hierarchy)
-
Click [Yes] if the transaction allocation values should be assigned automatically to all accounts on the system.
-
Click [No] if the codes should be assigned manually to the accounts, account types, and accounts by department to which they belong.
Changing the Assigned Defaults
If the default TAC value, ‘Required’, ‘Validated’, or ‘Editable’ checkboxes are changed on any of the screens that assign defaults, a message will appear. This message asks: “Do you want to change the related data on the account types, accounts, and accounts by department?”
If “Yes” is selected, then the message will ask “Do you want to change the related data for the current TAC or for all the TACs on the account types, accounts, and account by department?” The screen will then provide the options of “ALL”, “Current”, and “Quit”.
The “ALL” option will wipe out all existing defaults for all the TACs at all lower levels and replace them with the defaults defined within this screen.
The “Current” option will replace only the changed value with the new default at all the lower levels.
Using TAC Codes in Transactions
![]()
Pgm: RECURENT – Setup Recurring Entries; standard Treeview path: General Ledger > Transactions > Process Recurring Entries – Setup Recurring Entries node – [TAC] button
Any Transaction Entry screen will validate the processing to ensure that all required TACs are assigned with valid TAC values. The [TAC] button will only appear for companies set up to use transaction allocation codes.
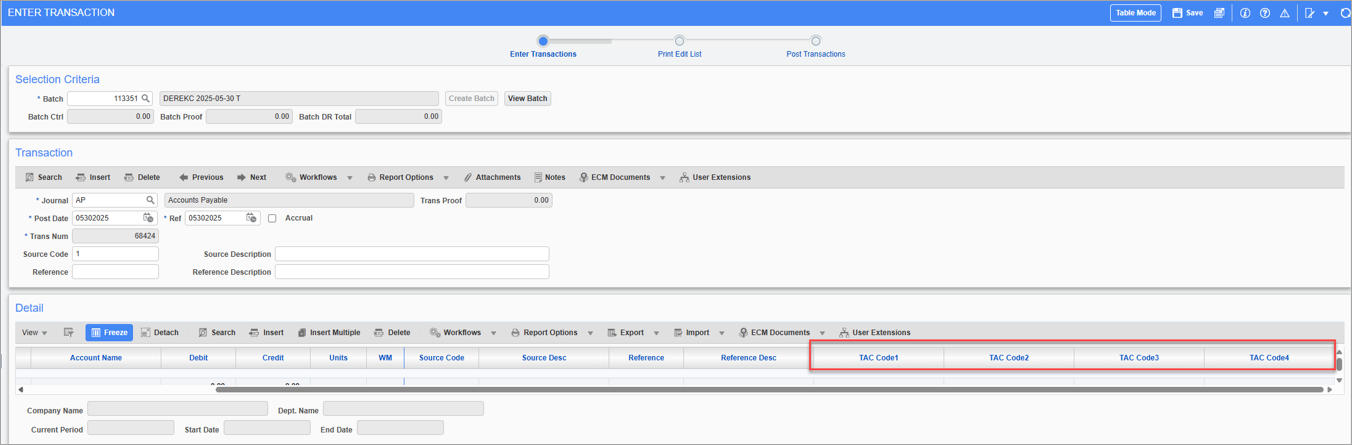
Pgm: TRANENT – Enter Transaction; standard Treeview path: General Ledger > Transactions > Enter Transactions
For some transaction screens, the TAC Code fields are available in the Detail section. These fields are hidden by default and can be added using the Lite Editor.
As each distribution line is entered, the system will examine the account to determine whether an entry must be made against a TAC, whether a default value exists, as well as the edit options available.
If a default exists or is not required, press the [TAC] button or use the TAC Code fields on the appropriate distribution line to modify or enter any values. If an entry is required and no default value exists, the system will alert users to make an entry in the relevant TAC Code field.
Regardless of the Transaction Entry screen or module, if there is a distribution associated with the General Ledger, the user will have access to the TAC information via the [TAC] button or TAC Code fields once the distribution block of the screen is opened. This is true of both transaction entry type screens and transaction setup screens, such as Recurring Transactions.
Using the TAC Code Fields
The TAC pop-up window and TAC Code fields are used to edit existing TAC values for accounts during transaction entry. If the account selected has an assigned TAC with the ‘Required’ box checked and with a default TAC value, the system will automatically default the appropriate TAC values for each entry. In this case, the operator does not need to use the TAC pop-up window or TAC Code fields unless modifications to the default TAC values are needed.
If the ‘Required’ box has been checked and no default value assigned, the system will alert users and force an entry before the distribution can be completed.
If the ‘Edit’ box has been checked, but not the ‘Required’ box, invoke the pop-up window by pressing the [TAC] button or use the TAC fields to enter/modify values during distribution entry.
If the ‘Edit’ box has not been checked, then the user is permitted to view the codes, but modifications are prohibited.