Pgm: DISTFRM – Enter Voucher; standard Treeview path: Accounts Payable > Voucher > Enter Voucher – Voucher Detail tab – [Distribution] button
The Distribution pop-up, launched by clicking the [Distribution] button, is used to view a voucher’s defaulted distribution setup and change it if necessary. The system will use the voucher’s defaulted distribution to automatically distribute the invoice amount amongst various GL accounts for accounts payable, taxes payable, retainage payable, discounts taken, etc., and if specified, to the Job Cost, Equipment Costs, and Work Orders (Preventive Maintenance) sub-ledgers.
Default Distribution Hierarchy
First, the default distribution setup on the Accounting tab of the AP Control File is used to automatically set the default distribution for a created vendor record. A vendor’s default distribution is then used to automatically set the distribution for vouchers created for the vendor.
This screen can be used to change this defaulted distribution. Ideally, however, a voucher’s defaulted distribution does not need to be altered.
Alternatively, an invoice series code, which has a distribution setup, can be used to override the voucher’s defaulted distribution (standard Treeview: Accounts Payable > Setup > Local Tables > Invoice Series Codes).
Change Voucher’s Defaulted Distribution
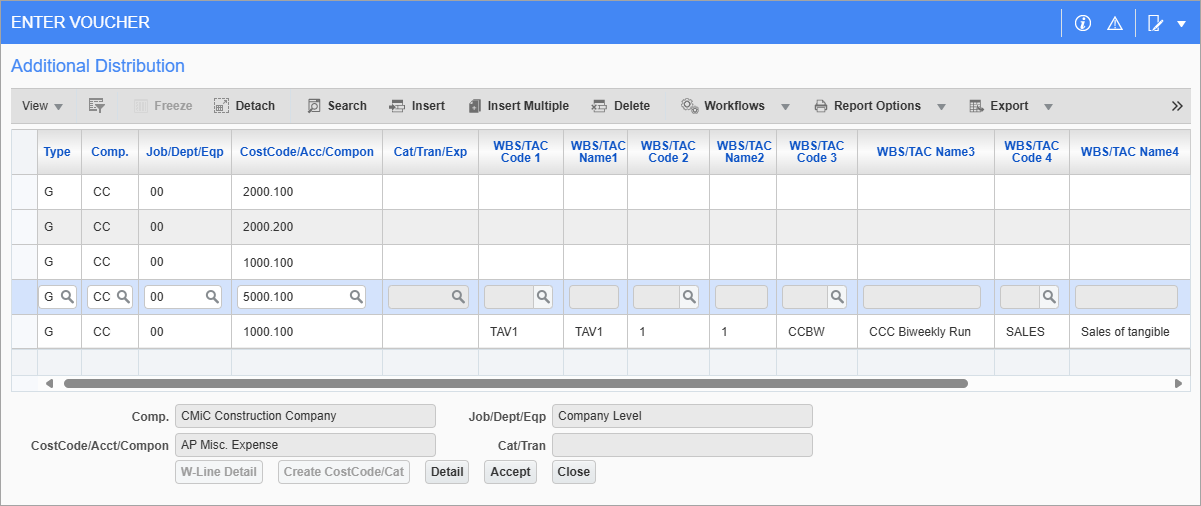
In this screen, the options and distribution types available for the distribution lines is determined by the type selected from the Distribution Type field on the Voucher Detail tab.
If the distribution is unbalanced, this screen will display a message stating so.
Type (Distribution Type Code)
The following distribution types are available:
- Equipment: Enter/select an "E" to distribute dollars to a specific piece of equipment and cost code. Enter the company code for which this entry is to apply. The company will default from the voucher header, but it may be changed to a company that is set-up to allow inter-company transactions. Enter the code for the equipment, category, and transaction code that will incur the cost indicated by the amount on this distribution line. Enter the code “ALL” if an equipment category is not required. When posted, the department will come from the home location of the equipment, and the account will come from the equipment transaction code. If there is a transaction code that you know exists, but is not appearing in the LOV, check the equipment transaction code setup under ‘Cost Transaction Code Used’, and verify that the checkbox under AP is checked. If unchecked, the transaction code is not allowed in the AP distribution.
- General Ledger: Enter/select a "G" to distribute dollars to a specific General Ledger department and account. Enter the company code for which this entry is to apply. Enter the department and account code to be affected by the cost indicated by the amount on this distribution line. The account must have been set-up previously within the General Ledger chart of accounts. An LOV is available on these fields to view and select the appropriate account. The G-line created by the system for the Accounts Payable Control account only allows the department code to be altered. The G-line created for retainage does not allow the department or account to be modified.
- Job: Enter/select a "J" to distribute dollars to a specific job, cost code, and category. If the job field has been entered in the voucher header and a “J” distribution is either defaulted or selected the job will default into the Job field in the distribution screen. Enter the code for the job, cost code and category that will incur the cost indicated by the amount on this distribution line. If a subcontract has been entered in the Voucher header, the cost code and category may be limited to the cost code and category assigned to the subcontract, depending on the subcontract selections on the Other tab of AP Control File. The General Ledger account associated with the job/cost code/category will be used to balance the distribution in this block. There are LOVs for each of the Job/Cost Code/Category fields that are limited to jobs the user has access to.
- Work Order: Enter/select a "W" to distribute dollars to a specific work order, work item, and expense code. Enter the work order number, work item, and expense code to be affected by the cost indicated by the amount of the distribution line. The work order must have been previously set-up with the Preventive Maintenance module. You will only see the work orders that have been created to use costing via transactions. Work orders created to have costing at close-out will not appear on the LOV. When posted, the Preventive Maintenance expense allocation setup will be checked for the distribution. If the work order was an “E” type, the transaction code entered in the Expense Allocation screen will determine the account used. If a job type, the category entered in the expense allocation will determine the account used, and if a “G” type, the account used will come directly from the Expense Allocation setup.
Comp.
The company code will default to the same company as the invoice is entered against, but there may be times when an invoice spans two or more companies. This field can be changed as required according the user's company security matrix. If the company is changed, the system will validate the department, account, job, cost code, category code, and equipment against the newly selected company.
The system will automatically create the inter-company distributions required (at posting time) to balance the transactions. An inter-company distribution requires the use of inter-company clearing accounts, so that the General Ledger distribution of each entity is in balance. Also, to distribute amounts to multiple companies, inter-company setups are required for the companies involved. This is done via the [Inter-Company Setup] button on the Maintain Companies screen in the GL module (standard Treeview path: GL > Setup > Local Tables > Maintain Companies).
When posted, the above distribution will create the following GL transactions:
* CR Company A1 Accounts Payable 100
* DR Company A1 Expense 50
* DR Company A1 Clearing 50
* DR Company A2 Expense 50
* CR Company A2 Clearing 50
Job, Dept, Eqp, WO
Depending on the distribution type, select the relevant job, department, or equipment for the distribution line.
Cost Code, Account, Compo, WI
Depending on the distribution type, select the relevant cost code, account, component, or work item for the distribution line.
NOTE: Accounts defined as subledger control accounts can’t be used in distributions.
Cat, Tran, Exp
Depending on the distribution type, select the relevant category code, transaction code, or expense code.
WBS/TAC Code 1,2,3,4
The WBS/TAC Code and Name fields are active for a G-line and then only if the account is utilizing TAC codes. This is where the user can enter/modify the transaction allocation code associated with this transaction and account. TAC codes can be updated but not deleted from this screen. For more information, please refer to General Ledger - Transaction Allocation.
These fields are hidden by default and can be added using the Lite Editor.
Distribution Units and Amount
Enter the units and amount of the invoice to be applied to the line. Units are not mandatory but the amount is. The complete amount does not have to be distributed in one line. The system will not allow the record to be saved unless the complete invoice amount has been fully distributed.
Repeat the distribution line entry as many times are required, the distribution types can be mixed as required. If for some reason the voucher needs to be removed while in the distribution block, the [Delete Voucher] button will perform this function.
[W-line Detail] – Button
This button is only active if the distribution is a “W” and it allows for more information to be entered. The type of data that can be entered varies according to the expense code of the line. labor expense codes allow for the entry of the resource, material expense codes allow the user to enter an inventory or non-stock item and the equipment expense codes allow for the entry of a tool. This information can be viewed after the voucher is posted, in the Preventive Maintenance work order budget summary screen when the radio button ‘Cost’ is used.
[Detail] – Button
This button launches a screen that displays the distribution details for the selected line. If required, a description of this particular line can be entered via this window. Also, if the selected line is a J-line, a bill rate, bill amount, and trade can be specified.
[Accept] – Button
This button will trigger some backend validation, save the distribution if no errors are found, and return you to the Entry Voucher screen. Errors are reported using red text, under the screen’s title.
[Close] – Button
This button will return you to the Enter Voucher screen without saving any changes.