Overview
Requests for information (RFIs) can be created in Construct PM in order to request and send information between project partners and contacts.
RFI Log
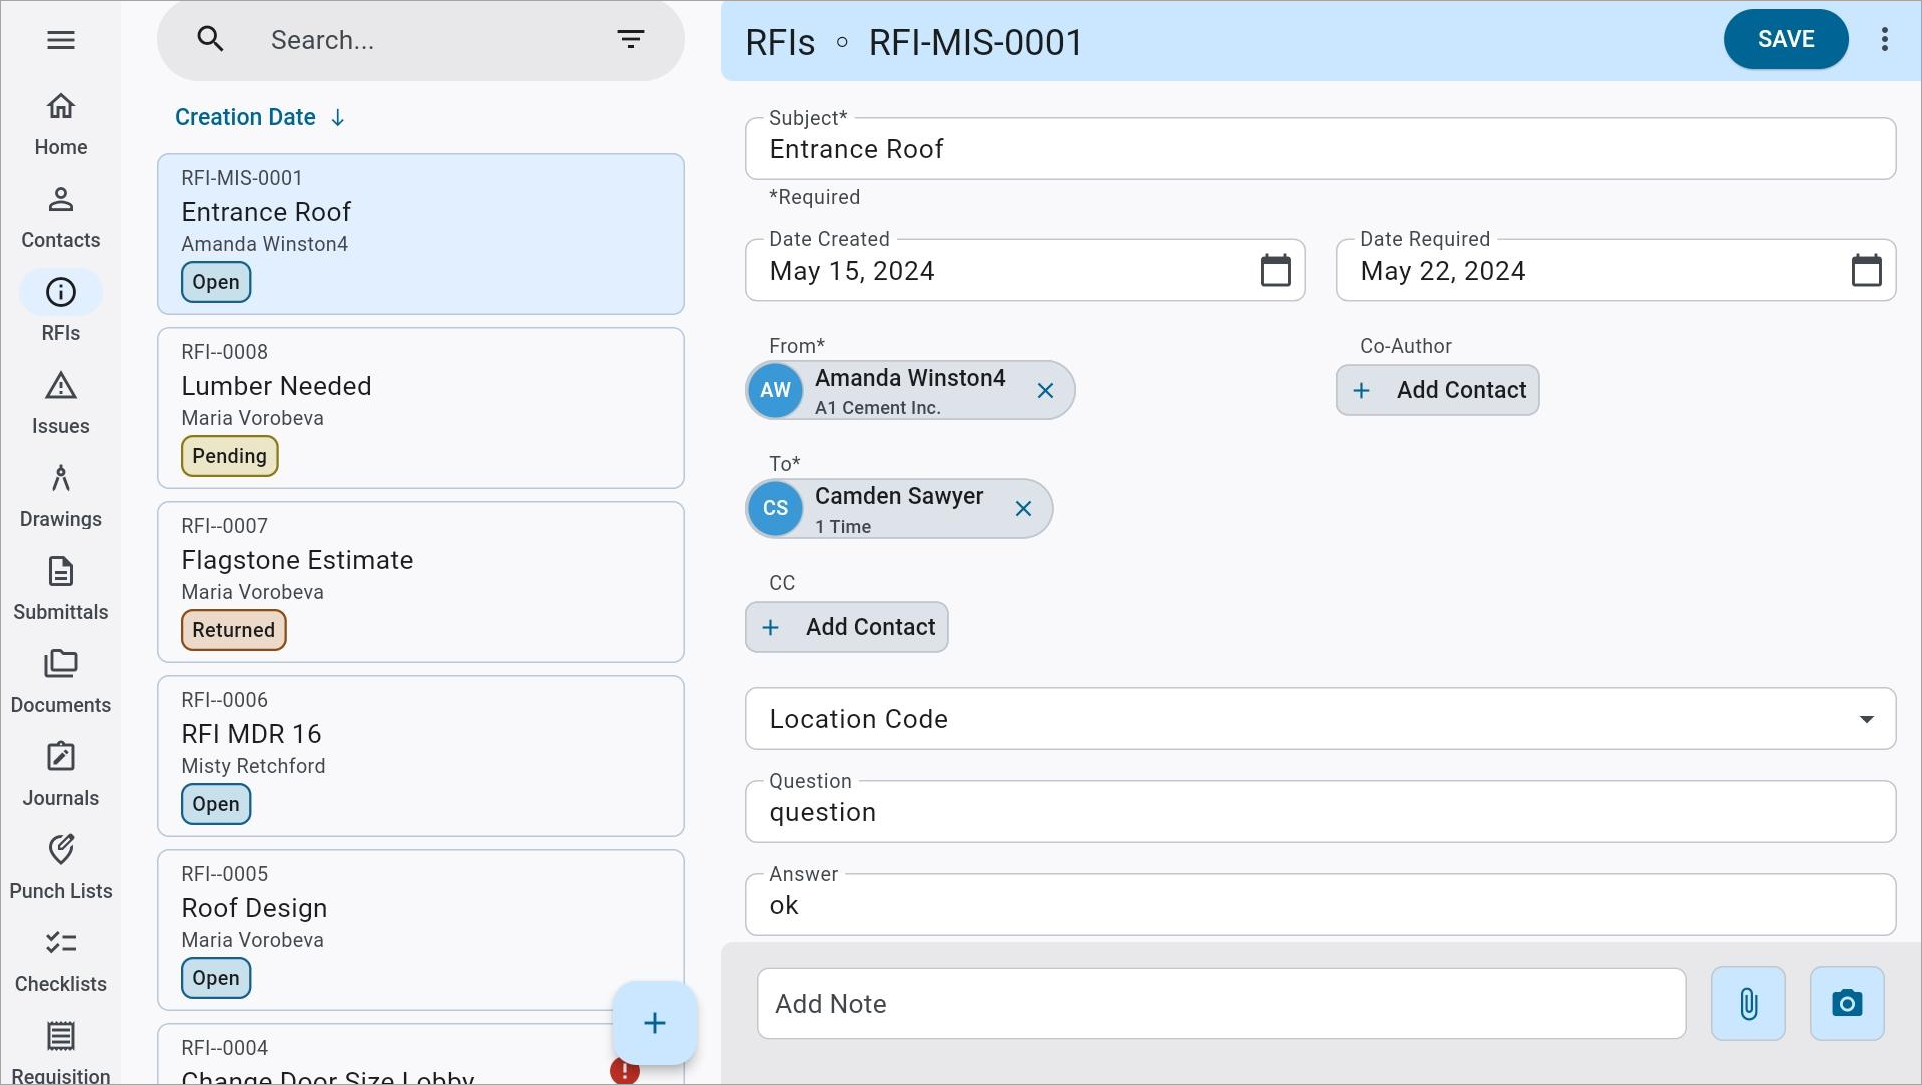
The RFIs Log screen
The RFIs log is what appears after selecting RFIs from the main menu. To view an RFI, select it from the menu on the left hand side. RFIs are labeled by their RFI number, subject, and status.
NOTE: RFI numbers are automatically assigned upon the creation of an RFI and cannot be edited from Construct PM.
The user may edit an RFI found in this screen, assuming they have the relevant security privileges enabled (please see Security for more details). Once the RFI has been edited press [Save] to confirm the changes.
Search
Press the Filter icon (![]() ) in the search bar to filter the search results. RFIs can be filtered by status.
) in the search bar to filter the search results. RFIs can be filtered by status.
NOTE: The Search feature is currently only available for the following fields: RFI ID, Subject, Question, and Answer. Please use the available filters and Group By option as alternatives where applicable.
Sort
Press the icon that reads "Creation Date" to sort RFIs by record number, creation date, due date, location, or status. Press the arrow next to the sort option to sort in ascending or descending order.
[Group By] – Button
Press this button to group the log by status, created date, required date, or answered. Press the arrow to sort the results in ascending or descending order.
NOTE: This option is available via the Search bar for mobile devices.
Creating an RFI
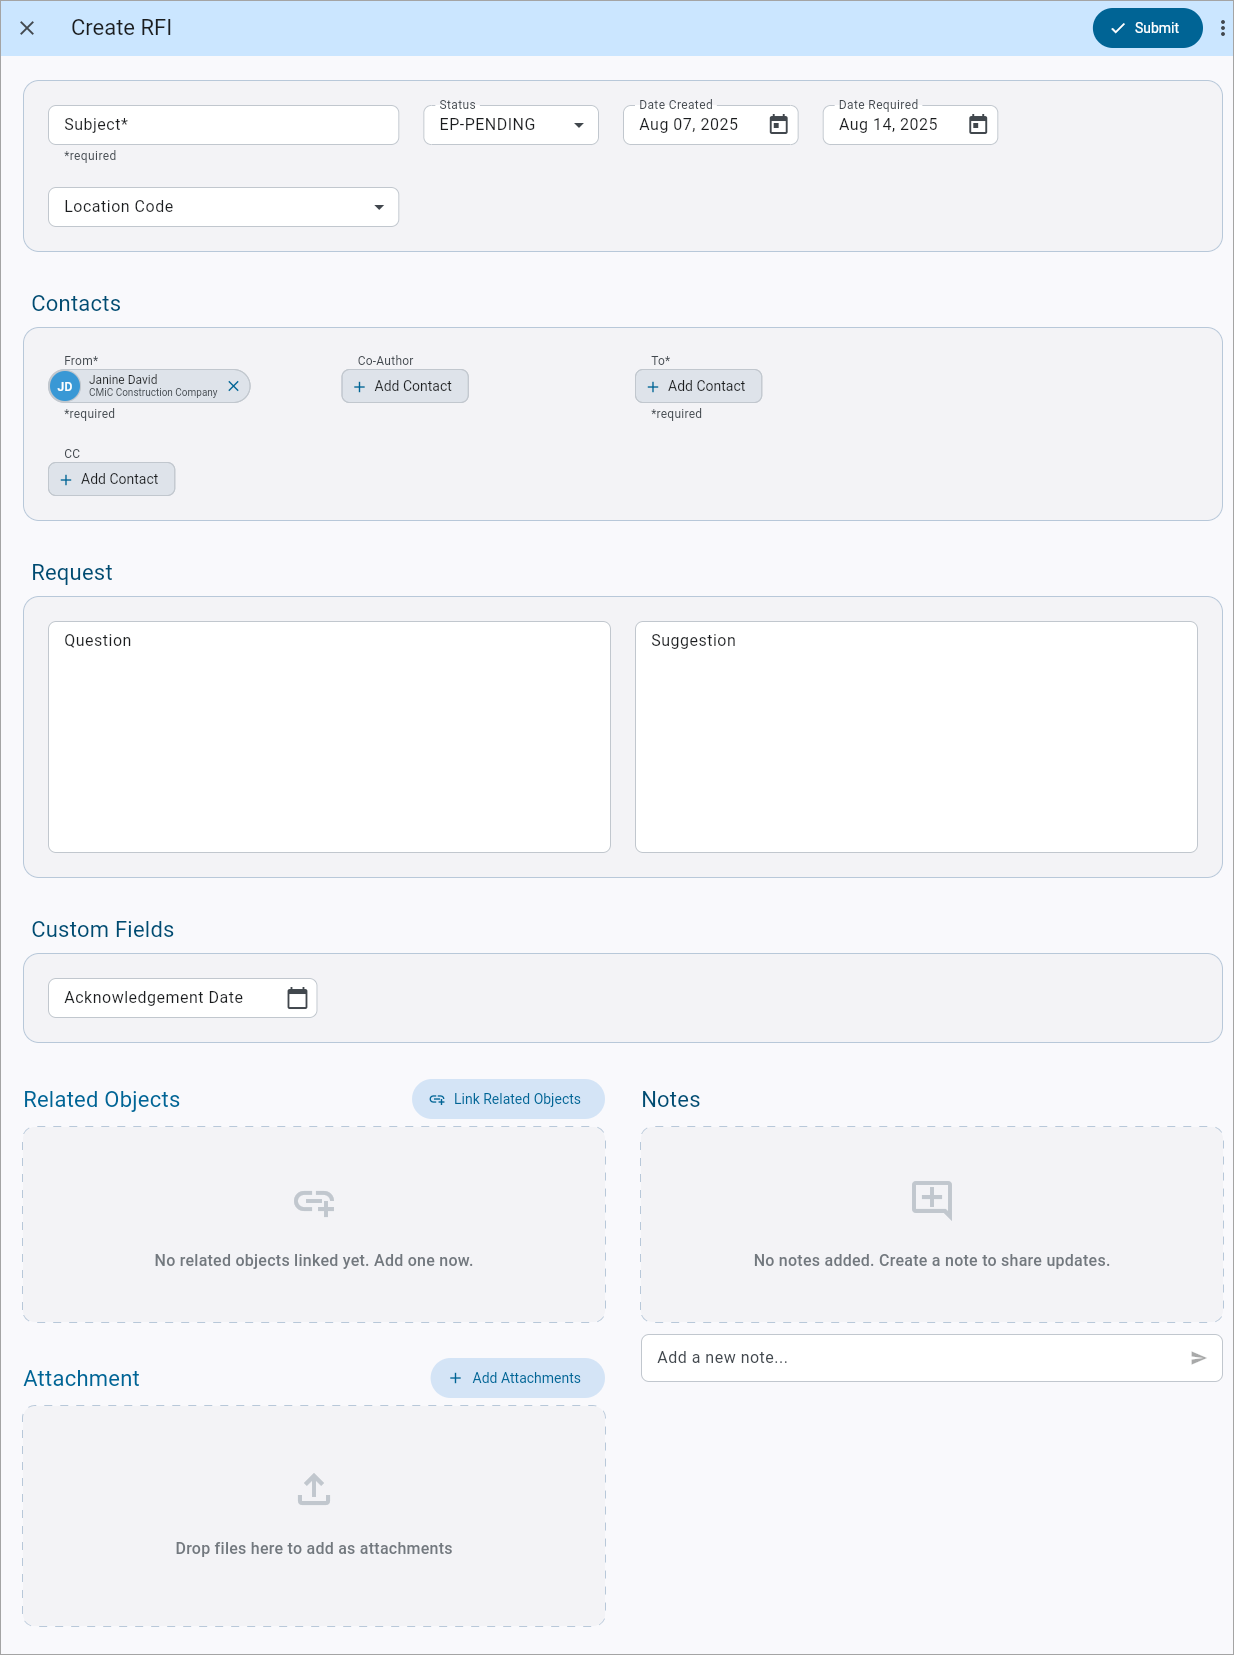
The Create RFI screen
To create an RFI from within Construct PM, press the Plus icon at the bottom of the RFI log screen. Enter the RFI's information then either press [Submit] to send the RFI to the chosen parties, or save the RFI as a draft to return to it later.
Details – Tab
Subject
Enter the subject of the RFI.
Status
Select the current status of the RFI.
Public Record– Checkbox
Check this box to make the record visible and accessible to all users who have access to the RFI module. For completed RFIs with a "Closed" status, press the [Save] button at the top of the screen to update the status of the checkbox. This grants all team members the ability to refer to specific, completed RFIs as necessary. By default, this box is unchecked on all new records.
If an RFI has the 'Public Record' flag checked, the record will be visible and accessible to all users who have both the menu and program security role privileges for the RFI module. For more information on these privileges, please refer to RFIs.
NOTE: The ability to modify this checkbox is tied to the security role privilege "RFI – Make Record Public". As well, by default, field security on the 'Public Record' checkbox is set to “Hidden” for the “ALL” role. Users must set this value as “Unrestricted” or "Read-Only" in order to make this checkbox visible. For more information, please refer to CMiC Field - Security Roles.
Date Created, Date Required
Enter the date the RFI was made and the date an answer is required. The Date Created field defaults to the current date.
Location Code
Select the location to which the RFI relates. This is often the physical area on the project site.
Contacts
From
Select the user sending the RFI. By default this field is the logged-in user.
Co-Author
If the RFI has authors other than the user in the From field, enter those users here.
To
Select the recipient of the RFI.
CC
Select any other contacts to CC on the RFI.
Request
Question
Enter the question being asked here.
Suggestion
Users with the appropriate permission may add a suggested answer to the question.
Response
Answer
The Answer field is filled by the To contact.
Cost Impact, Cost Amount
Select whether there will, will not, or will potentially be an impact to the project cost. If there is a financial cost then enter that amount in the Cost Amount field.
NOTE: These fields are enabled once the RFI is saved.
Schedule Impact, Days
Select whether there will, will not, or will potentially be a delay to the project. If there is scheduled to be a delay then enter that amount in the Days field.
NOTE: These fields are enabled once the RFI is saved.
Custom Fields
This section contains user-defined fields.
Related Objects
Press the [Link Related Objects] button in this section to link another Construct PM object to the RFI record. This object can be another RFI, a punch list item, or an issue.
Attachments
Press the [Add Attachments] button in this section to add an attachment to the RFI record. The user can either take a new photo with the device's camera, attach a file from the device library, or attach a document or drawing already saved in Construct PM. A counter will indicate the number of attachments on the record.
Notes
Enter any other related comments on the RFI here.
History – Tab
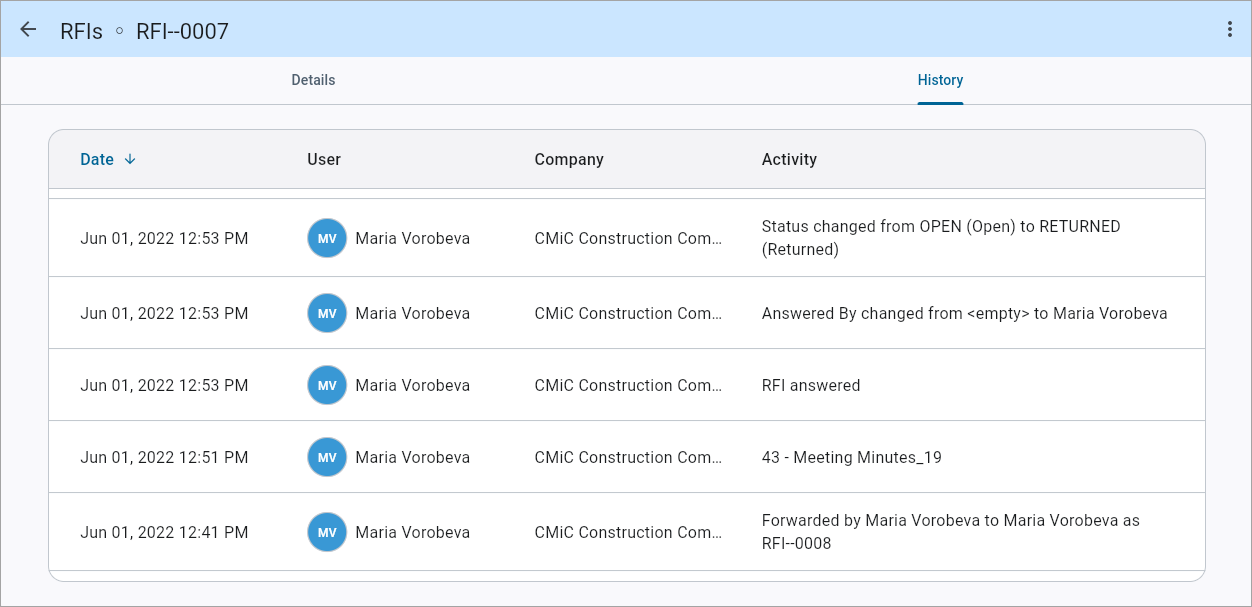
Construct PM RFIs - History tab
The History tab displays all existing trackable activities.
Emailing an RFI Report
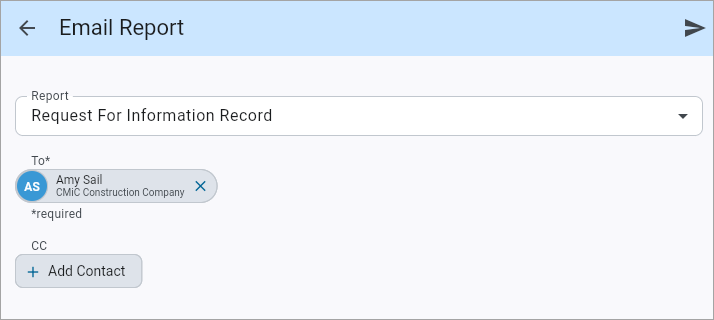
An RFI report can be shared via email. To share a report, click on the RFI Menu icon (![]() ) and select the "Email Report" option in the drop-down menu.
) and select the "Email Report" option in the drop-down menu.
NOTE: The Email Report feature requires the user’s Enterprise security role to have the ‘Report User’ flag enabled. For more information, please refer to System Data - Define Roles.
Printing an RFI Report
An RFI report can be printed by using the Email Report feature. To print a report, click on the RFI Menu icon () and select the "Email Report" option in the drop-down menu. The RFI report is emailed as a PDF document with a printed on date, as shown in the screenshot below:

Sample printed RFI report
Creating RFI Reports

The reports printing functionality in Construct PM allows users the flexibility of printing a single report (form letter), or multiple reports (form letters) and attachments, the latter option producing a single PDF file with all the reports and attachments as pages of that file. For more information, please refer to Construct PM - Using Construct Reports .
Batch Editing RFI Records
Users can perform a batch edit by selecting multiple records and updating them simultaneously. The Batch Edit option is a time-saving feature as, instead of manually editing each record separately, updates can be applied to a selection of records in a single action.
NOTE: Batch editing is only available on the web.
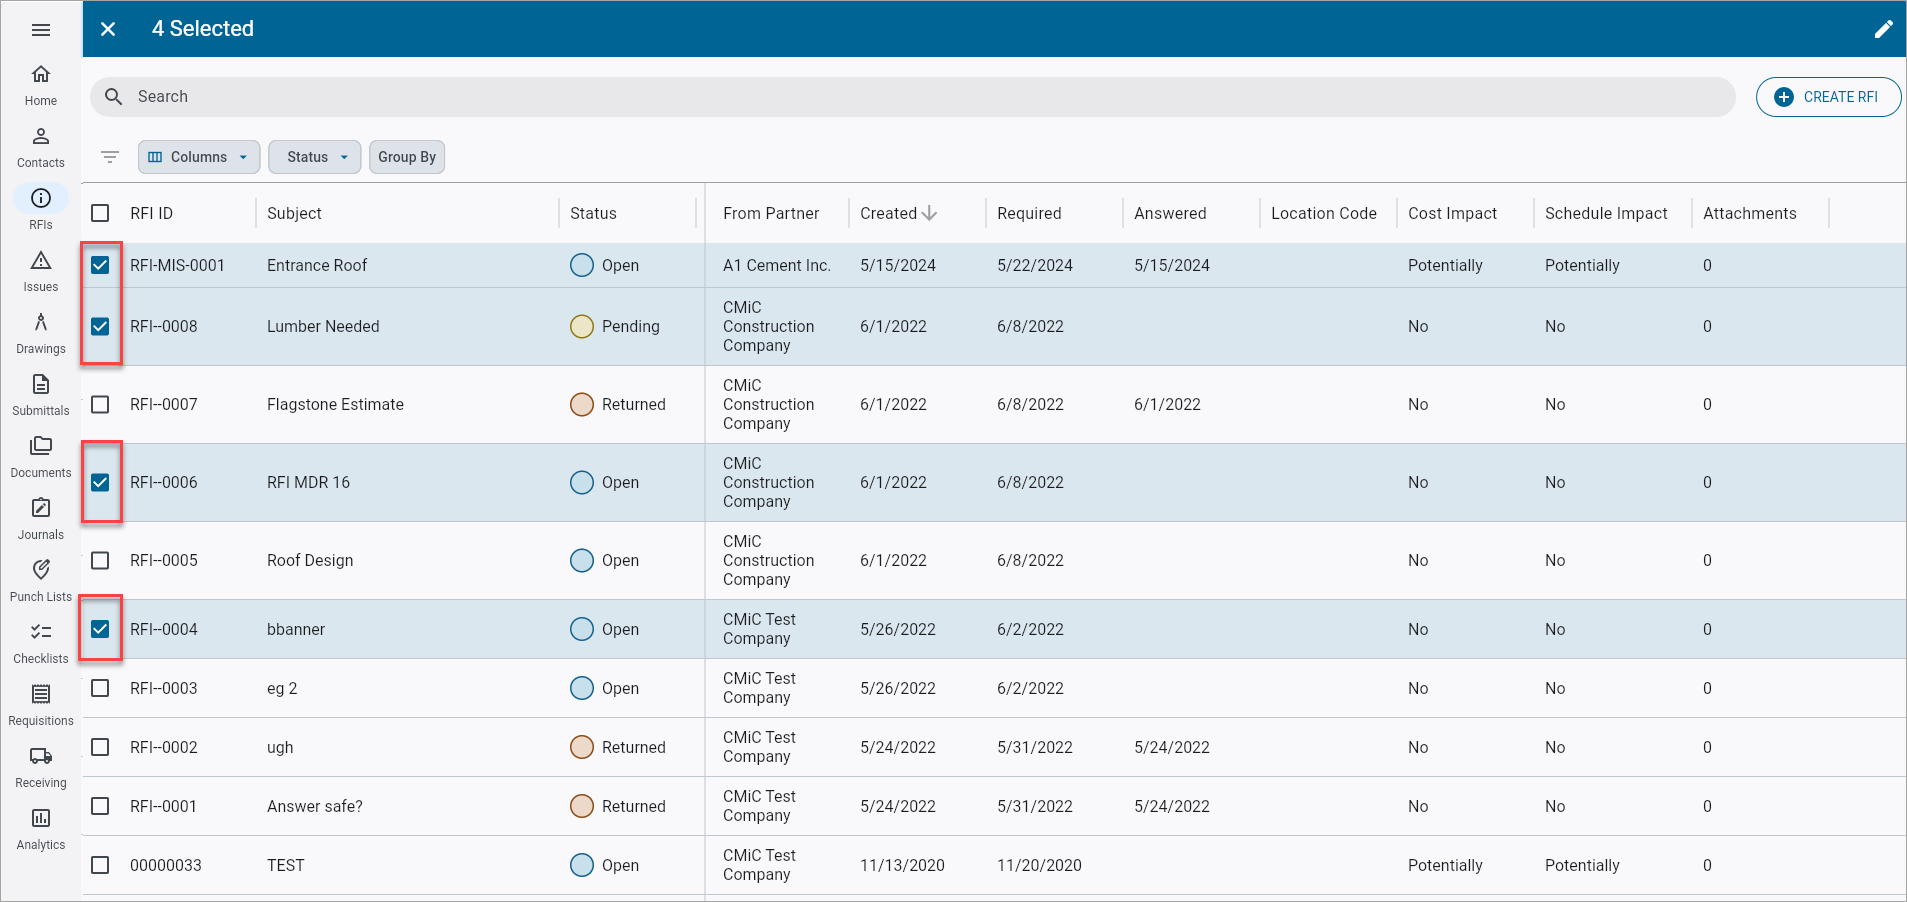
Select one or more RFI records and press the Edit icon (![]() ) to launch the Batch Edit RFI Records pop-up window.
) to launch the Batch Edit RFI Records pop-up window.
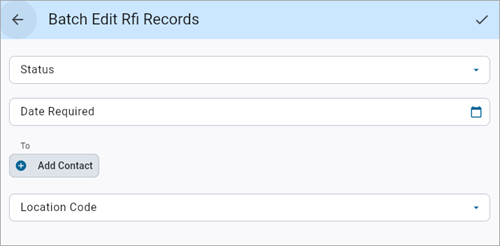
In the pop-up window, select new desired values for the available fields (e.g., Status, Date Required, To (Contact), and Location Code). When finished, press the Save icon (![]() ) to apply the updates to the selected RFI records.
) to apply the updates to the selected RFI records.
Exporting the RFI Log

NOTE: The Export Log feature is only available on the web.
To export the RFI log, click on the Options Menu icon (![]() ) and select the "Export Log" option in the drop-down menu. A CSV file is generated which contains all items that meet the current filters applied on the RFI log screen.
) and select the "Export Log" option in the drop-down menu. A CSV file is generated which contains all items that meet the current filters applied on the RFI log screen.