Imaging - Imaging Control
Imaging Controls – Tab
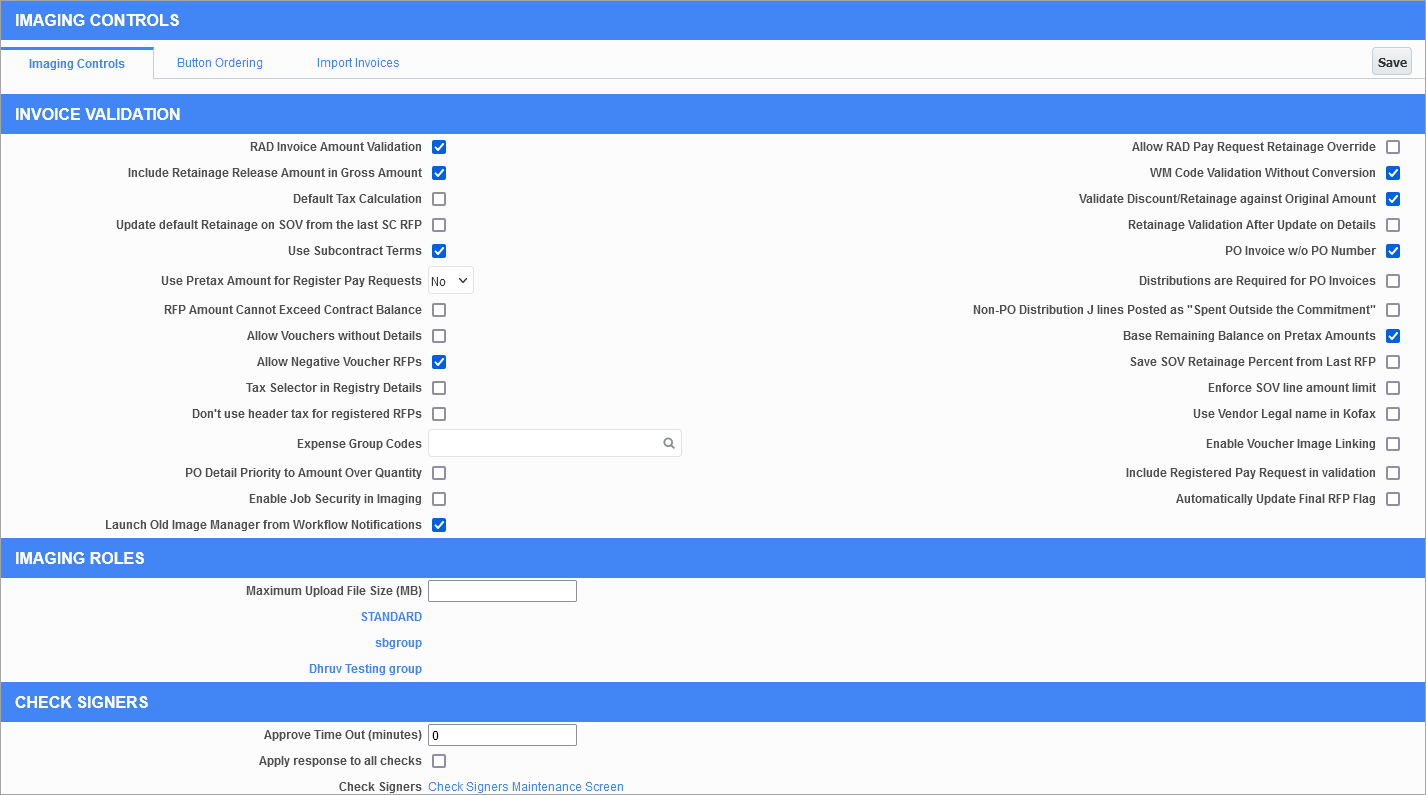
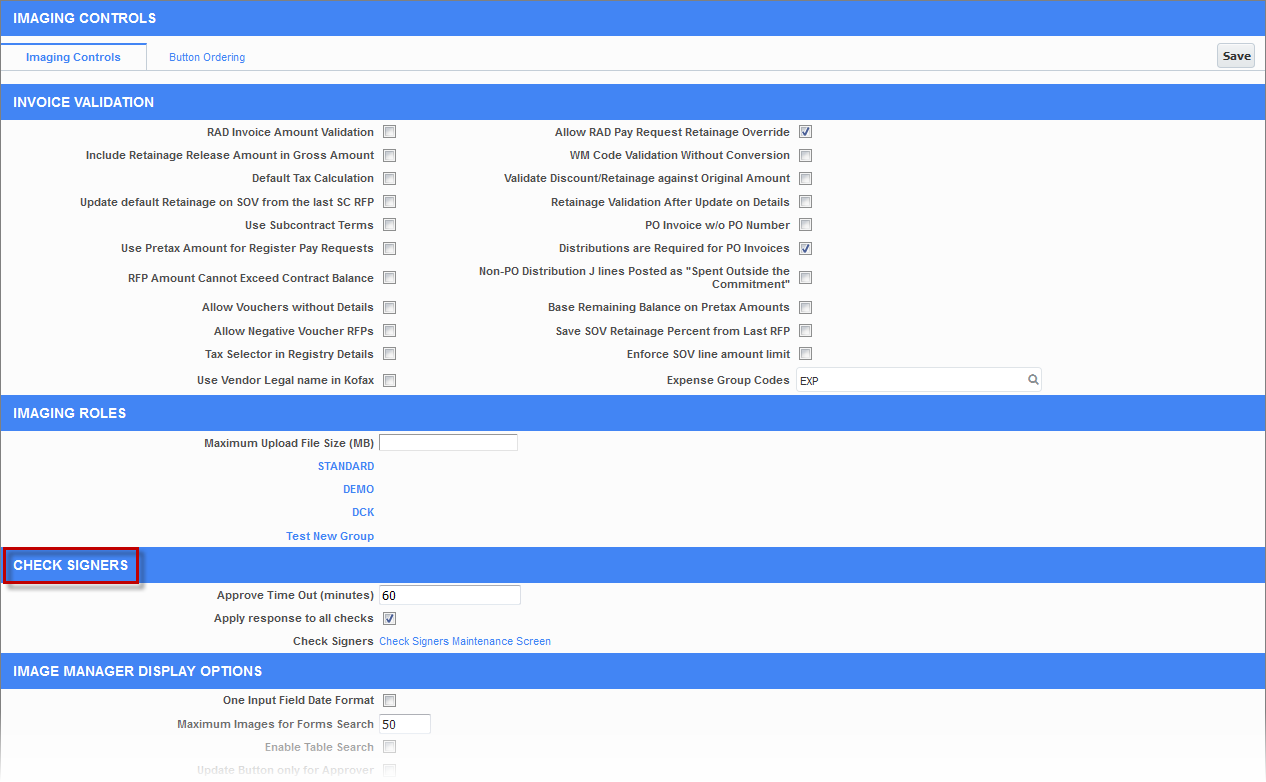
Imaging Control screen; standard Treeview path: Imaging > Setup > Imaging Control
Invoice Validation – Section
RAD Invoice Amount Validation – Checkbox
This is used when the APRI_AMT field is used in Image Manager as the control amount for the distribution. Usually the APRI_ORIG_AMT is used for the control amount and the distribution updates the APRI_AMT field.
NOTE: If you are a Cloud user and using the standard Cloud workflow to validate registered invoices, this box should not be checked. A custom workflow is required for its use.
Include Retainage Release Amount in Gross Amount – Checkbox
If checked, the module will include retainage amount in the Gross Amount field. If unchecked, do not include retainage release when calculating the gross amount of a registered invoice.
Default Tax Calculation – Checkbox
If the user has not entered tax codes for the invoice, get the default tax codes defined for the job, department, or vendor – in that order. This applies only to registered invoices.
The tax, itself, will not be calculated because a separate use tax invoice is intended to be created for it.
Update default Retainage on SOV from the last SC RFP – Checkbox
This checkbox will allow a user with security, to override the percent held for retention by line in the schedule of values within the Imaging module. This change will update the subcontract to hold the percent entered on this invoice and all subsequent invoices. This checkbox will only work if the 'Allow RAD Pay Request Retainage Override' checkbox is enabled.
If checked, and the retainage percent was changed in a SOV line in an RFP, then the next time a new RFP is created on that SOV line, the module will consider the updated retainage percent made in the last RFP.
NOTE: This checkbox is similar to the 'Save SOV Retainage Percent from Last RFP' checkbox. The main difference is that the 'Save SOV Retainage Percent from Last RFP' box can be unchecked so that the default can be used again, whereas the 'Update default Retainage on SOV from the last SC RFP' checkbox permanently affects all future RFPs.
When the 'Save SOV Retainage Percent from Last RFP' box is checked - IMGSO_SAVE_SOV_RETNG_PCT_FLAG:
-
On entry, uses the last SOV retainage percentage from the last entered RFP. Uses SCSCH_PREV_RETAINAGE_PCT.
-
Prevents updates of retainage when checked.
When the 'Update default Retainage on SOV from the last SC RFP' box is checked - IMGSO_UPD_RETAINAGE_PCT_FLAG:
-
On entry, uses the default SOV retainage percentage. Uses SCSCH_HLDBK_PCT.
-
Updates the default retainage percentage and the last SOV retainage percentage. Updates SCSCH_HLDBK_PCT and SCSCH_PREV_RETAINAGE_PCT.
If both flags are checked:
-
On entry, uses the last SOV retainage percentage from the last entered RFP and updates the default percentage to the last SOV retainage percentage. Uses SCSCH_PREV_RETAINAGE_PCT and sets SCSCH_HLDBK_PCT as SCSCH_PREV_RETAINAGE_PCT
-
Prevents retainage updates.
Use Subcontract Terms – Checkbox
By default, the due and discount dates will be calculated on a subcontract invoice based on the vendor terms. This checkbox, if enabled, will instruct the Image Manager module to use the terms specified on the subcontract. If no terms are specified on the subcontract, the module will default to the vendor terms.
Use Pretax Amount for Register Pay Requests
If this field is set to "Yes", then in the details flysheet for registered pay requests, only pre-tax amounts can be entered into the Pre-Tax Amount field and the tax included amount will be calculated in the Debit Amount field. If this field is set to "No", then the tax included amount is entered as the debit amount and the Pre-Tax Amount field is not used. When the "Mix" option is selected and there is a direct tax SOV line, then the amounts entered in the Pre-Tax Amount column will be accepted and the debit amount will be calculated. Similarly, when there is an indirect tax SOV line, then the amounts entered in the Debit Amount column will be accepted and the pre-tax amount will be calculated.
RFP Amount Cannot Exceed Contract Balance – Checkbox
Imaging will adhere to the control settings for Subcontract Management when it comes to overpaying a subcontract. The invoice will automatically go on-hold if that is the setting in that control file and a notice will be entered into the warning box on the imaging subcontract invoice header. If this checkbox is enabled however, it will instruct the Image Manager to ignore those settings and will not allow a subcontract invoice to exceed the contract balance. For voucher RFPs, the invoiced amount will automatically be reduced to the total remaining if the remaining is exceeded and cannot be overridden in the Image Manager module.
For Registered RFPs, if this box is checked, the invoice validation checking against the contract balance will be done on any subsequent saves following the initial save made after distributing an amount greater than the contract balance allows. This means the first time the distributed detail lines amount exceeds the contract balance it is being applied against, the error will not appear. However, it will appear on any attempts to save, or submit following that. Once the error appears, it can only be corrected by changing the details distribution, as well as the Amount field (APRI_AMT), in the header to abide to the contract balance.
Allow Vouchers Without Details – Checkbox
It is not normally possible to enter vouchers without details. With this checked it is possible. This is intended to be used when vouchers are being imported. It should not normally be used.
Allow Negative Voucher RFPs – Checkbox
Allow negative RFPs where there is no negative SOV amount. Usually, when this checkbox is unchecked and negative RFP is needed, then the process is to put in an initial positive amount and then change it in the SOV to the desired negative amount (this will work only if there is at least one negative SOV line). If there isn’t a negative SOV line and negative RFP still needs to be processed, then this checkbox should be checked.
Tax Selector in Registry Details – Checkbox
When this box is checked, the system will not perform original tax calculation. Instead, it will calculate the tax line by line in the registry details provided the Tax Selector field for the detail line is set to "YES".
Don’t Use Header Tax for Registered RFPs – Checkbox
This box can be checked when tax codes are defined in the SOV lines and the system will use those tax codes (not the header flysheet tax codes) to calculate the taxes. If the SOV line does not have a tax code defined, tax will not be calculated for that line.
If this box is unchecked, the system will use tax codes that are defined on the header flysheet and will update the amount with the calculated taxed amount.
Use Vendor Legal Name in Kofax – Checkbox
If this box is checked, the vendor legal name will show in Kofax. If unchecked, it will use the vendor name.
Enable Voucher Image Linking – Checkbox
This box enables a feature where images with names formatted to specify the company, vendor, and invoice number of a voucher, delimited by underlines, are linked in Imaging to a flysheet showing that voucher. Please see Imaging - Backfilling Images for Existing Transactions for further details.
Include Registered Pay Request in Validation – Checkbox
If this box is checked, the previously certified amount is included in the contract amount comparison. Validation includes all other registered RFPs for the same contract that have not been converted to vouchers (not status 9).
Payroll Expense Document Type
This is used in conjunction with the new eXpense mobile app. This is the document type used for storing invoices entered via the app.
Allow RAD Pay Request Retainage Override – Checkbox
When this checkbox is enabled it will allow a user (with security) to override the amount being held by SOV line either by Retainage Percentage or Current Retainage fields. This change will only affect the current invoice unless the update default retainage on SOV from the last SC RFP box is checked (described earlier).
WM Code Validation Without Conversion – Checkbox
This checkbox was added to allow the system to not look at the weight measure conversion table and just allow any WM code for registered invoice details.
Validate Discount/Retainage against Original Amount – Checkbox
If checked, the module will calculate the discount and retainage against the original amount (APRI_ORIG_AMT) instead of the invoice amount (APRI_AMT).
The Distributed Amount field in the registered invoice header is updated from the amount entered in the registered invoice details flysheet. The discount amount or percent is calculated using the amount in the Distributed Amount field so in some cases although there is a discount setup on the vendor or entered into the flysheet header, the amount of the discount shown will be $0 until the distribution is entered. In order to show the amount of the discount prior to entering distribution, enabling this checkbox will instruct the system to read the Original Invoice Amount field of the registered invoice header instead of the Distributed Amount field.
Retainage Validation After Update on Details – Checkbox
If this is unchecked then that means it will remove retainage validation from the actions taken after each detail record gets updated for registered RFP. If checked, the module will validate retainage after update.
PO Invoice w/o PO Number – Checkbox
This is used to enter PO invoices without the PO number in the header. This is not recommended and if it is to be used, a custom workflow with checking for PO details should be implemented.
Distributions Are Required For PO Invoices – Checkbox
This is used in workflow validation of PO invoices. If this is not checked, the workflow allows invoices that have not been allocated to the PO to be approved through workflow. By default, it is assumed to be checked.
Non-PO Distribution J-Lines Posted As “Spent Outside The Commitment” – Checkbox
If this is checked, the non-PO distribution J-lines will be posted as spent outside the commitment.
Base Remaining Balance On Pretax Amounts – Checkbox
If this is checked, the value of the Remaining Balance field of the registered invoice or registered RFP flysheet header is based on the pre-tax amount. Otherwise, the remaining balance is based on the tax-included amount.
Save SOV Retainage Percent from Last RFP – Checkbox
If the user overrides the default retainage percent, this checkbox tells the program to use this value as the default in the future. Please see the information on the 'Update default Retainage on SOV from the last SC RFP' checkbox above for more details.
Enforce SOV Line Amount Limit – Checkbox
If checked, this does not allow users to specify a total amount in any SOV line that is larger than the amount allocated to that line in the subcontract.
Expense Group Codes
This is used in conjunction with the new eXpense mobile app. This is the invoice group code used for storing invoices entered via the app.
PO Detail Priority to Amount Over Quantity – Checkbox
If this box is checked, when both an amount and a quantity are entered in PO invoice details, use the amount entered rather than calculate the amount from the quantity.
Enable Job Security in Imaging − Checkbox
When checked, this checkbox allows users to view only the images tied to the jobs they have access to, and only applies to the images in the Imaging module. It does not apply to images with flysheets that are blank.
The images that appear in the treeview on the left in the Image Manager are determined by a database view that filters them based on the security setup.
NOTE:
-
Only users in the Submitters imaging security group will see non-invoice document types and invoice documents with blank flysheets.
-
If the flysheet has been filled in for a registered invoice, and no routing job was specified, then only users in the ‘Submitters’ imaging security group will see these images.
-
The flysheet has been filled in for a registered invoice or registered RFP, and the routing job is specified and found in the secured job view. The secured job view is used to filter the list.
-
If the flysheet has been filled in for a voucher-based RFP, and the routing job is specified and found in the secured job view, then the secured job view is used to filter the list.
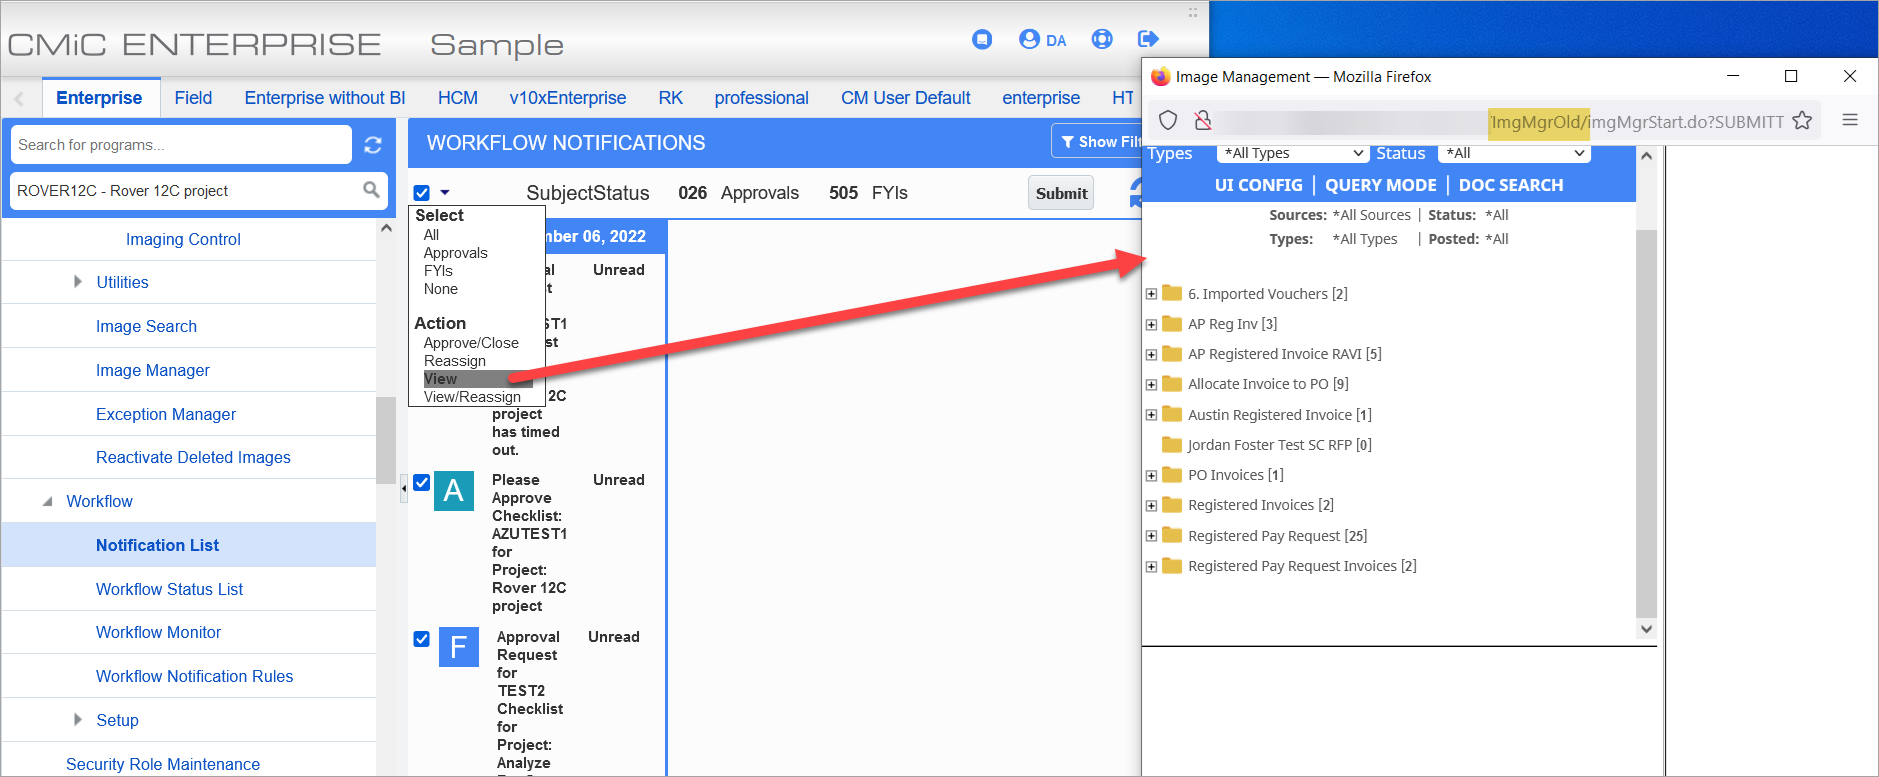
Launch Old Image Manager from Workflow Notifications
The classic version of Image Manager can be called from the Notification List, Construct Approvals, and when users run searches via ECM documents in the UI Console. Any of the three versions of Image Manager can be launched from these screens by selecting one of the options from the drop-down list: Classic, New, and Nexus Image Manager.
For further details, please see Imaging - Running the Classic Version of Image Manager.
Automatically Update Final RFP Flag − Checkbox
When this box is checked, the system will automatically check the 'Final RFP' box in the voucher to indicate that it's the final RFP for the subcontract. When the box is unchecked, users manually need to check the 'Final RFP' box in the voucher to indicate that it's the final RFP for the subcontract.
Imaging Roles – Section
The default groups setup within Imaging will, by default, have access to different Imaging document types. By clicking on a group, it will expand to show the list of document types assigned. The Imaging Roles section of Imaging Control is used to control the uploading function within the Image Manager module.
If set, the maximum upload file size on the Imaging Roles section will restrict the size of files uploaded into the Image Manager module to a size in MB that has been chosen. If left blank, it is unlimited.
By clicking on a document type name next to an Imaging group name, it will open a new dialog box.
As highlighted below, the dialog box will show the name of the Imaging group at the top and the name of the document type on the left. The security that can be set in here will control access to upload options within Image Manager based on the group and document type.
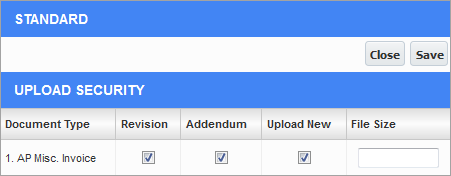
In Image Manager, the Upload pop-up window is opened via the [Upload] button and provides a selection of upload options for the user to choose from.
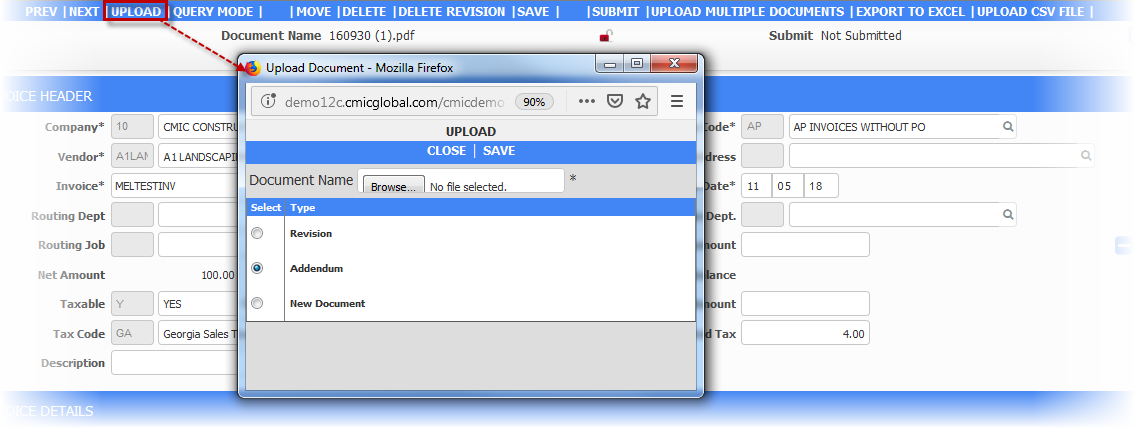
Revision
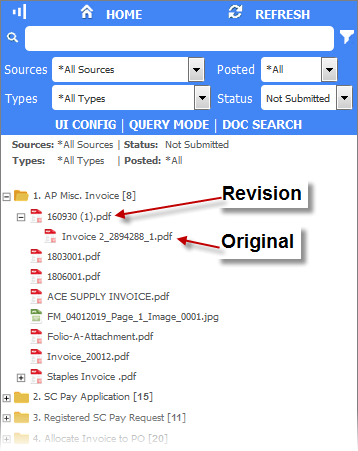
This option will allow the users in the group to upload a revised document to an already existing document in Image Manager in that document type. If a revision is uploaded, the current document will be attached below the revised document.
Addendum
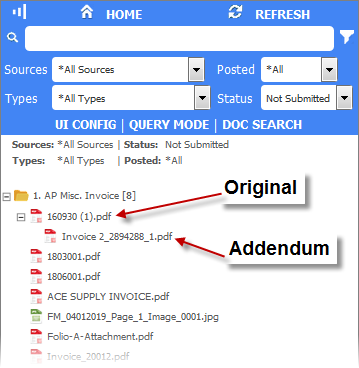
This option will allow the users in the group to attach one or more documents to the original file.
Upload New
The upload new functionality allows the group members to upload brand new documents into the document type. This upload ability will allow a user to right-click on the document type in the treeview and this will produce an Upload pop-up window, as well as being able to use the [Upload] button option.
Check Signers – Section
Imaging Control screen; standard Treeview path: Imaging > Setup > Imaging Control – Check Signers section
This section is used to configure the Approve Time Out field and 'Apply Response To All Checks' checkbox for check signers and to set up users as check signers. The following are descriptions of these two settings.
Approve Time Out (Minutes)
This is the amount of time, in minutes, that the status (approve/unapproved) of the check can be changed manually on the flysheet.
If a check signer, set up through the Check Signers Maintenance screen (refer to the following Set Up User as Check Signer section in this guide), has the ‘Override Timer’ checkbox checked, this timer does not apply to the user.
Apply Response to all Checks – Checkbox
If checked, the system will update all of the approved statuses for all of the invoices on the check to the last entered response. As an example, if there are 50 invoices on the check, and the check signer updates any of the invoices with a void response - all 50 invoices will be updated with the void response.
Set Up User as Check Signer
Part 1: Add User to Imaging Security Group
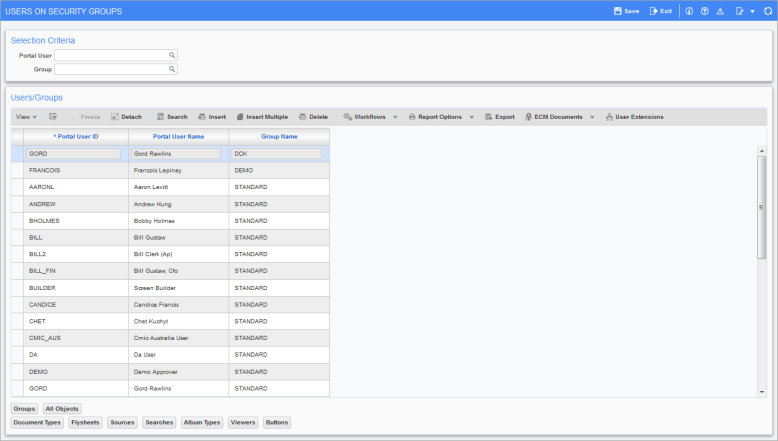
Pgm: IMGUSRGP – Users on Groups; standard Treeview path: Imaging > Utilities > Security > Users on Groups
First, the user to be set up as a check signer needs to be added to a security group through the Users On Security Groups screen (shown above with standard Treeview path). This adds the user to the LOV used by the Check Signers Maintenance screen.
To add a user to an Imaging security group, click the Block Toolbar’s [Insert] button. Use the new row to select the user’s user ID and group name, then click [Save].
Part 2: Set Up User as Check Signer – Check Signers Maintenance Screen
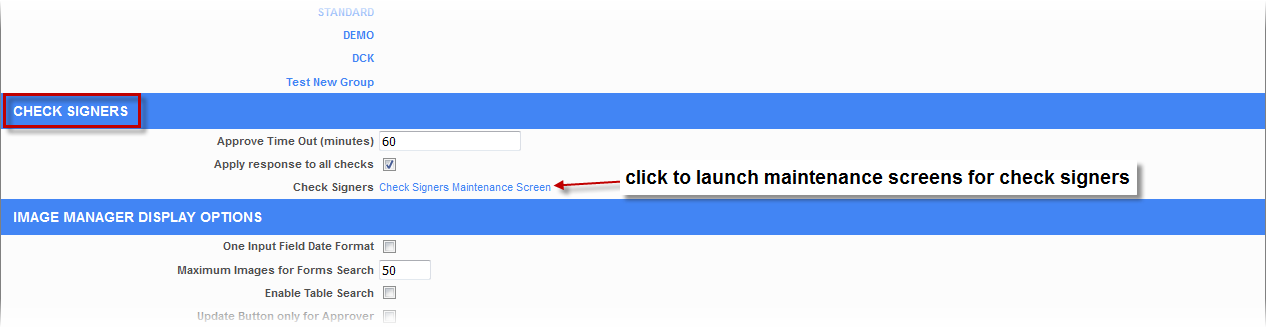
To set up a user as a check signer, launch the Imaging Control screen. Under the Check Signers section (framed above), click the Check Signers Maintenance Screen link.
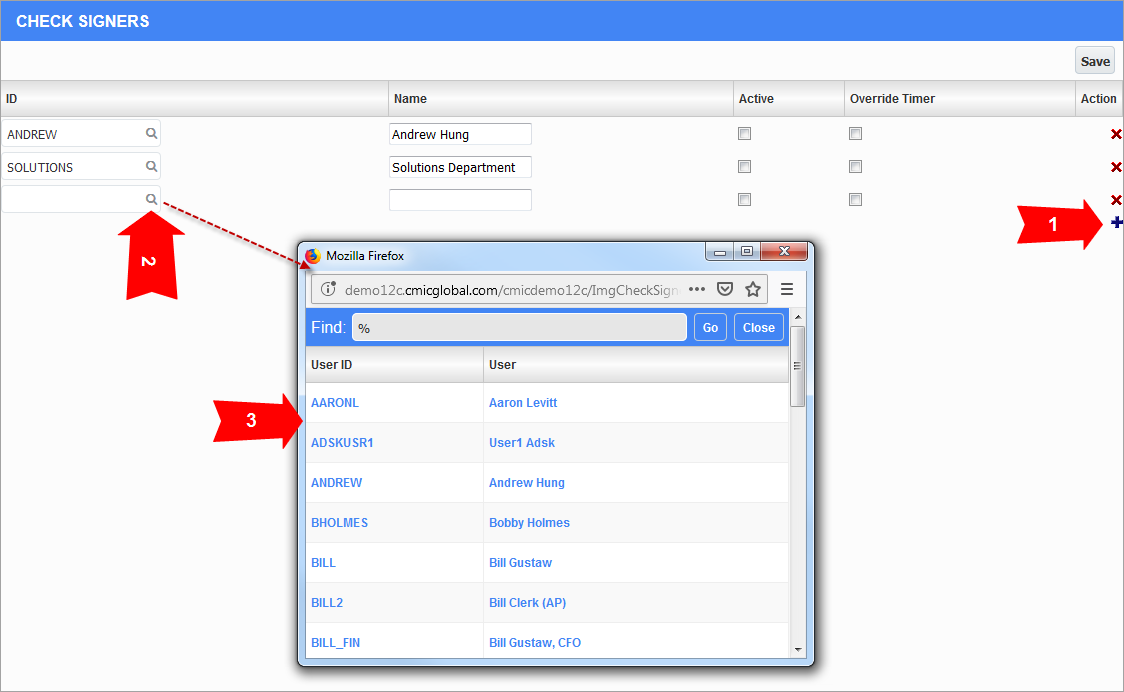
Sample of Check Signers Maintenance screen with a pop-up window used to select users from Imaging security groups.
In the Check Signers Maintenance screen, shown above, click the  icon (red arrow 1) to add a new row. For the new row, click the arrow on the ID column’s list of values field (red arrow 2) to launch a pop-up window to select a user from the list of Imaging security group members (red arrow 3).
The following provides details about the checkbox settings for each check signer.
Active – Checkbox
Set if the check signer is currently active or not.
Override Timer – Checkbox
If checked, the Approve Time Out field that is set up under the Check Signers section does not apply to the corresponding user.
To finish, click [Save].
Related Information: Add Signature Image to Bank Account
To add a user’s signature image to the bank account for which checks are to be debited against and signed with the image, please refer to the Bank Account Maintenance – Screen section of the System Data guide.
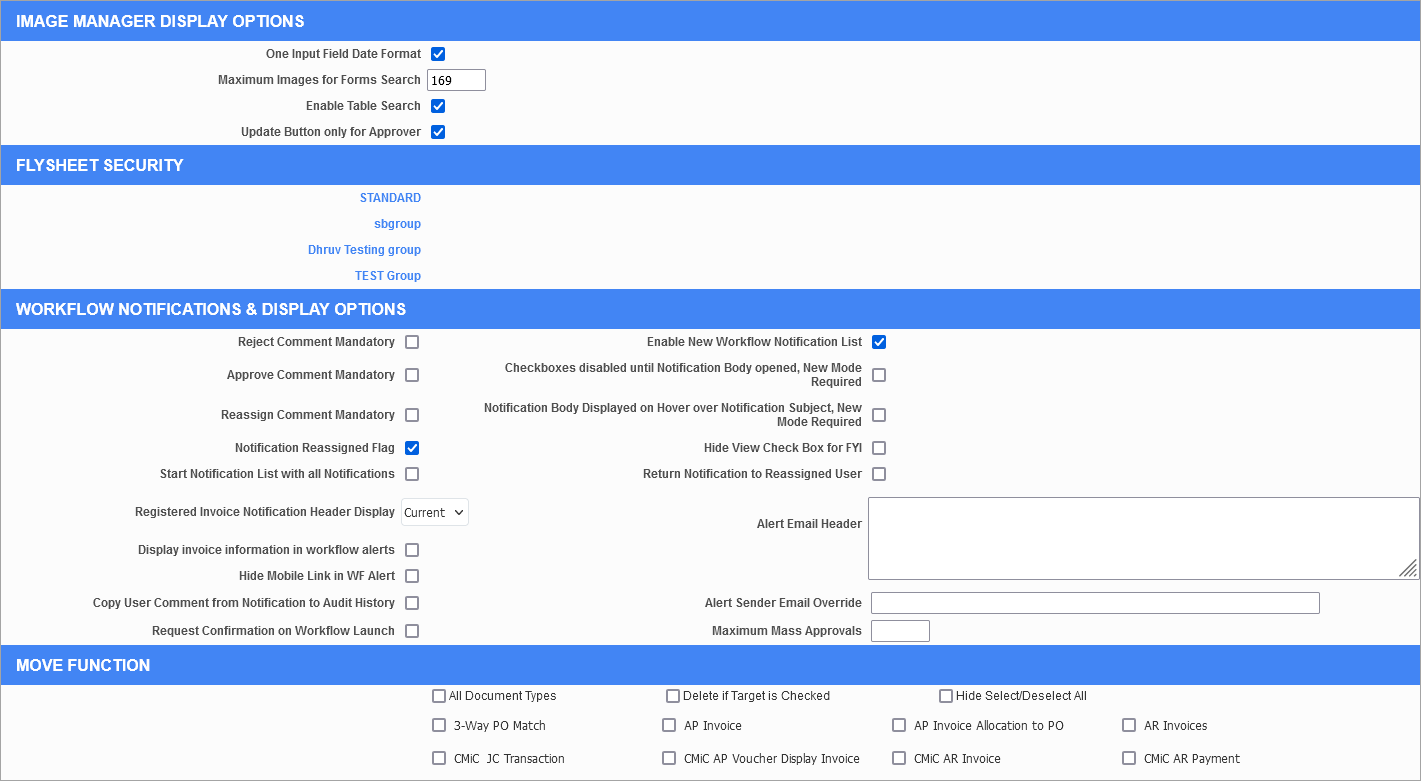
Image Manager Display Options – Section

The following provides details on the fields found in this section.
One Input Field Date Format – Checkbox
Date fields can be specified using a single field or three separate fields for day, month, and year. The latter is usually preferred by data entry clerks, but this checkbox allows the single field optionally.
Maximum Images For Forms Search
When searching for images from forms, this limits the number displayed. This prevents some browsers from overflowing their buffers and failing to display anything.
Enable Table Search − Checkbox
Checking this box enables the "Search" option in Image Manager which opens the Image Search screen. For more details, see the Image Search – Screen section of Imaging - Searching for Images.
Update Button Only For Approver – Checkbox
If checked, this allows only the users currently responsible for approving a pending invoice to update that invoice. Only users currently assigned to the invoice will be able update it, except if 'Non Approver Update' checkboxes in the Flysheet Security pop-up are checked (located in the Flysheet Security section of the Imaging Control screen), then other users will be able to update specific fields.
Flysheet Security – Section
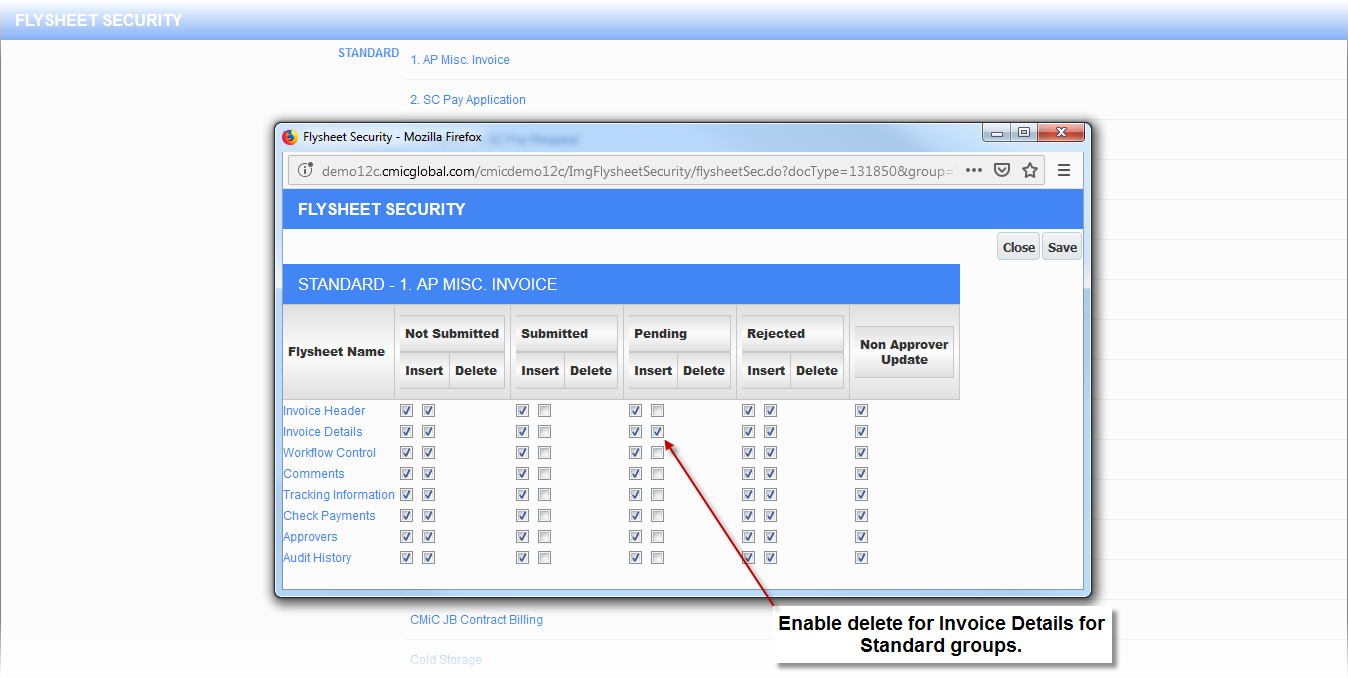
This area will allow the user to set security access to flysheets and drill down into the associated fields and set security at that level to determine if it can be edited or not under different Imaging statuses. The following screenshot is an example of drilling down to associated fields.
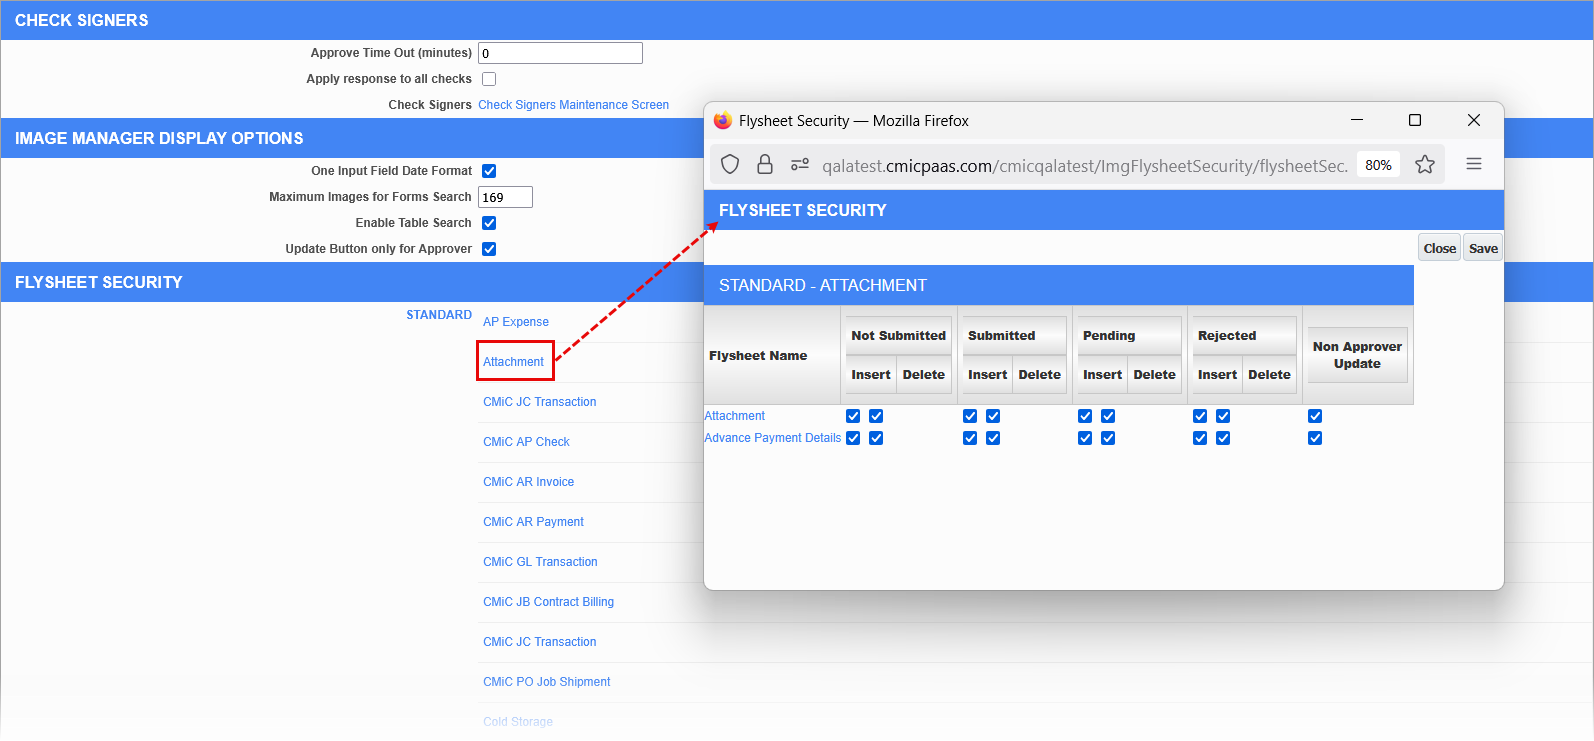
Flysheet security is set by Imaging group and document type. Generally, this area should not be manipulated too tightly unless the person administering it is fully aware of what the security settings may do.
Generally, the only setting that should be made is shown in the above screenshot. This will allow users to delete incorrect lines of distribution in the Invoice Details flysheet. If necessary, users can drill down further by clicking on the Flysheet Name in the Flysheet Security pop-up window shown above to open the Flysheet Field Security pop-up window and make changes to field security for the selected flysheet.
If the 'Update Button Only For Approver' box is checked in the Image Manager Display Options section of the Imaging Control screen, then the 'Non Approver Update' checkboxes in the Flysheet Security pop-up window can be used to override the 'Update Button Only For Approver' checkbox setting and allow other users to update specific fields.
Workflow Notifications & Display Options – Section
Reject Comment Mandatory − Checkbox
This will force every user that rejects a workflow to enter a comment as to why. The comment will appear within the Audit History flysheet in Image Manager or within the Review/Approval tab of CMiC Field objects that are workflowed.
Approve Comment Mandatory – Checkbox
This will force every user that approves a workflow to enter a comment. The comment will appear within the Audit History flysheet in Image Manager or within the Review/Approval tab of CMiC Field objects that are workflowed.
Reassign Comment Mandatory − Checkbox
If checked, the recipient of a notification must enter a comment when reassigning the notification to someone else.
Notification Reassigned Flag − Checkbox
Checking this box will enable the Return to Me field in the Notification Reassignment pop-up window in the Workflow Notifications screen.
NOTE: Workflow must support this feature. If Workflow does not support it, then whatever value is passed to the Return to Me field will not do anything.
Hide View Check Box For FYI − Checkbox
This should be enabled if there are users that are invoice approvers as well as workflow timeout handlers for invoices. This checkbox will not allow the user the ‘View’ checkbox in Image Manager for any timeout notifications. This will allow the user to select all notification for viewing (to code an invoice for instance) without also opening up invoices in view mode that they are not currently responsible to code and approve/reject.
Start Notification List with all Notifications − Checkbox
This option will clear the filter of every notification list when the user closes it. With this option unchecked, the filtered view in the workflow notification list will be remembered, by user, and that filter will still be active when the workflow notification list is reopened.
Registered Invoice Notification Header Display
By default, this will show the current information in the header of registered invoices within the notification list when an invoice is selected and will update when changes are made that affect the header. If "Original" is chosen, the information presented will remain static as to when the invoice was sent into the workflow.
Display Invoice Information in Workflow Alerts − Checkbox
Checking this box will display the invoice number, vendor, invoice amount, etc. in the Workflow alert summary email.
NOTE: This feature only works if the notification subject format meets specific criteria.
Hide Mobile Link in WF Alert − Checkbox
If this box is checked, a link to the Mobile Approvals app will not be included in the daily email sent out showing open notifications. This can be used if the recipients of the alerts are not using mobile devices to handle them.
Copy User Comment from Notification to Audit History − Checkbox
When a user enters a comment in the notification without approving or rejecting it, the comment only goes into the user comments flysheet table, not the audit history. Checking this box allows the comments to also go into the audit history.
Enable New Workflow Notification List − Checkbox
There are two skins for the workflow notification list. Try them out and see which is preferred.
Checkboxes disabled until Notification Body opened − Checkbox
If choosing to use the new workflow notification list, this option will disable the ability for users to choose the select all and approve (or reject) all option, but will force them to click on every notification that they have. This is designed to ensure that approvers are reviewing their items.
Notification Body Displayed on Hover over Notification Subject − Checkbox
If checked, this will show the body of the subject for each notification if the user places their mouse pointer on the subject.
Return Notification to Reassigned User − Checkbox
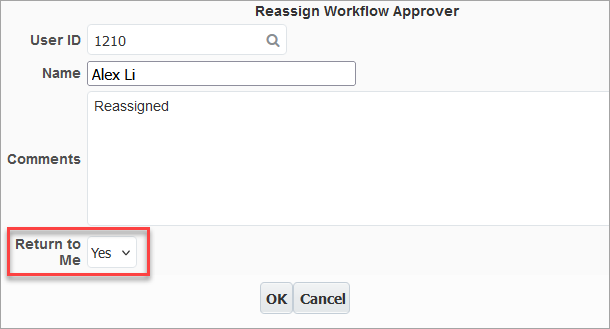
If checked, this tells the workflow to unconditionally return the notification to the person who reassigned it after the assignee approves or rejects the notification. This is done without requiring the reassigner to explicitly request it via the Return to Me field in the Reassign Workflow Approver pop-up window, as shown below. Whether the Return to Me field is set to "Yes" or "No", the notification will be returned.
Alert Email Header
This is the text that is to appear in the header of the emailed alerts sent to approvers every day to tell them that they have outstanding notifications.
Alert Sender Email Override
The Workflow notification emails that are sent out to users will use this email as the from address. The email entered in this field will override the sender email that would otherwise default based on the Workflow Email Notifications Hierarchy. Refer to System Data - Alerts for more information.
Maximum Mass Approvals
The number entered here is the maximum number of notifications that can be approved at one time. This is to prevent the program from losing its connection to the database and crashing because the update is taking too long.
Move Function – Section
Within Image Manager, there exists the ability to move images between document types. The ability to move is only allowed when an image is in "Not Submitted" or "Rejected" status. If there is information saved in the header when an image is moved, that information should be deleted prior to moving as flysheets are unique in each document type and the moving of an image does not remove, for instance, a request for payment that may have been entered against it. If enabled, the move function checkboxes will automatically delete the header information from the flysheet of any moved image to ensure that any transaction entered is removed and that the image does not become tied to two or more entered transactions. If the user decides to hide the [Deselect All Documents] and [Select All Documents] button from the Move Documents screen in Image Manager, the 'Hide Select/Deselect All' checkbox can be checked in this section.
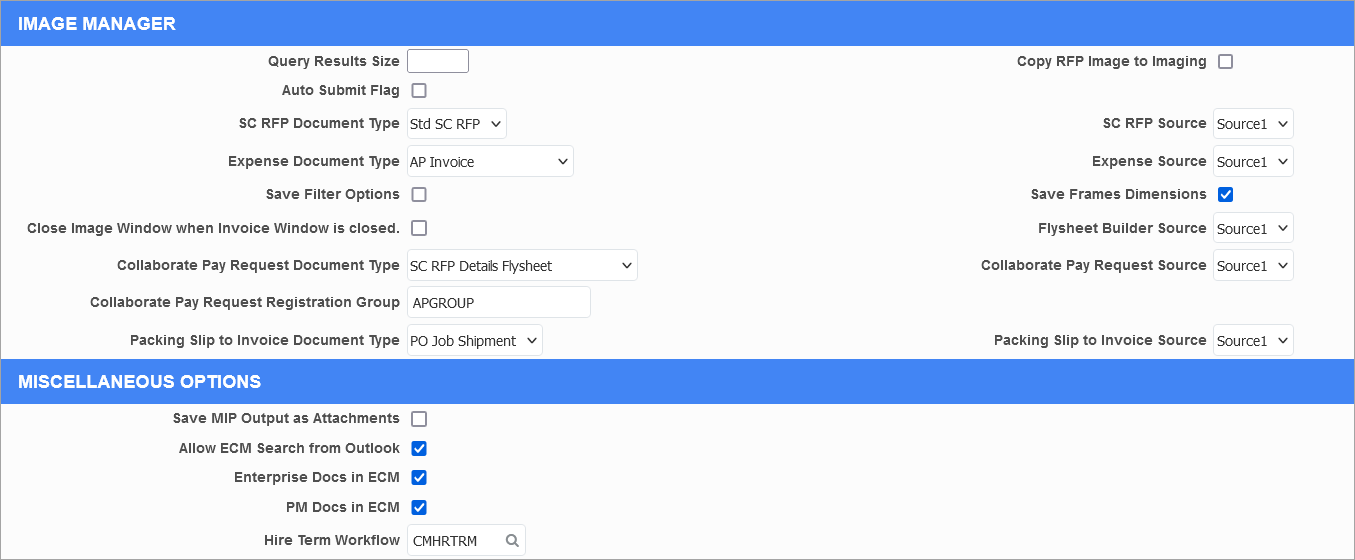
Image Manager – Section
Query Results Size
When using query mode limit the number of documents displayed to this number.
Copy RFP Image To Imaging − Checkbox
NOTE: The 'Unsubmit' box must be checked for the document type in the Document Types screen for the Copy RFP Image to Imaging functionality to work.
If enabled, when a request for payment is entered in CMiC Field and then submitted, the header and distribution will be copied to the Imaging document type specified in the SC RFP Document Type field in Imaging Controls.
Auto Submit Flag − Checkbox
This is used in conjunction with the 'Copy PM RFP to Imaging' checkbox. If a request for payment is copied in from CMiC Field, this checkbox enabled will automatically submit the invoice.
Program Type
Select the program type from the LOV. This will change the Document Type and Source fields to correspond with the selected program type. For example, if "SC RFP" is selected, the SC RFP Document Type and SC RFP Source fields will display.
NOTE: Users must select an option from the drop-down menu for all associated fields (including Document Type and Source) and click [Save] to ensure that the values are registered in the database. Even if a default value is showing in the field, it may not have been saved.
SC RFP Document Type
NOTE: The 'Unsubmit' box must be checked for the document type in the Document Types screen for the Copy RFP Image to Imaging functionality to work.
This is used in conjunction with the 'Copy RFP Image to Imaging' checkbox. This area is used to specify which document type is to be used for RFP invoices to be copied to from CMiC Field. The document type must use the RAD_VOUCHER_V header flysheet.
SC RFP Source
The Imaging source is used in conjunction with the value in the SC RFP Document Type field.
Expense Source
This is used in conjunction with the new eXpense mobile app. This is the source used for storing invoices entered via the app.
Collaborate Pay Request Document Type
This is the document type used when uploading RFPs from the GCS Collaboration server. Please see
Collaborate Pay Request Source
This is the imaging source used when uploading RFPs from the GCS Collaboration server. Please see
Collaborate Pay Request Registration Group
This is the AP registration group used when uploading RFPs from the GCS Collaboration server. Please see
Packing Slip to Invoice Document Type, Packing Slip to Invoice Source
This is required for the 3-Way Match process. For further details, see Imaging - Understanding the 3-Way Match Process in Image Manager.
Packing slips are uploaded to the document type and source selected in these fields. When entering the PO Invoice later, matching slips will link to the Allocate Invoice to PO flysheet.
Save Filter Options − Checkbox
Save the current setting of the filters above the tree view between sessions for each user. However, it is not possible to save the status setting if it is “All” or “Submitted” because they query too many documents and affect system performance.
Save Frames Dimensions − Checkbox
If the user has adjusted the widths of the framed in the image manager, save those values for each user between sessions.
Close Image Window When Invoice Window is Closed − Checkbox
When checked, this box allows users to close the image as well as the Image Manager Flysheet screen. When unchecked, the image will remain opened, even if the flysheet window is closed, allowing for any changes to be made.
Flysheet Builder Source
This is the imaging source used when creating flysheets using the Flysheet Builder screen.
Miscellaneous Options – Section
Save MIP Output as Attachments − Checkbox
This checkbox will add MIP output as an attachment to the object it was created from. Unchecking the box will stop this behavior.
NOTE: This functionality currently does not work for ADF screens.
Hire Term Workflow
The field is used to determine what workflow to call when the Employee Status Notifications screen is used. It is not necessary to change this field unless a custom Hire Alert workflow is being used.
NOTE: The following checkboxes have been deprecated in Patch 22, but are still available in Cloud, which is currently in Patch 21.
If this box is checked, it allows searches to be run in the ECM Outlook plugin.
Enterprise Docs in ECM − Checkbox
If this is checked, the Outlook plug-in will show Imaging document types.
PM Docs in ECM − Checkbox
If this is checked, the Outlook plug-in will show PM document types.
Button Ordering – Tab
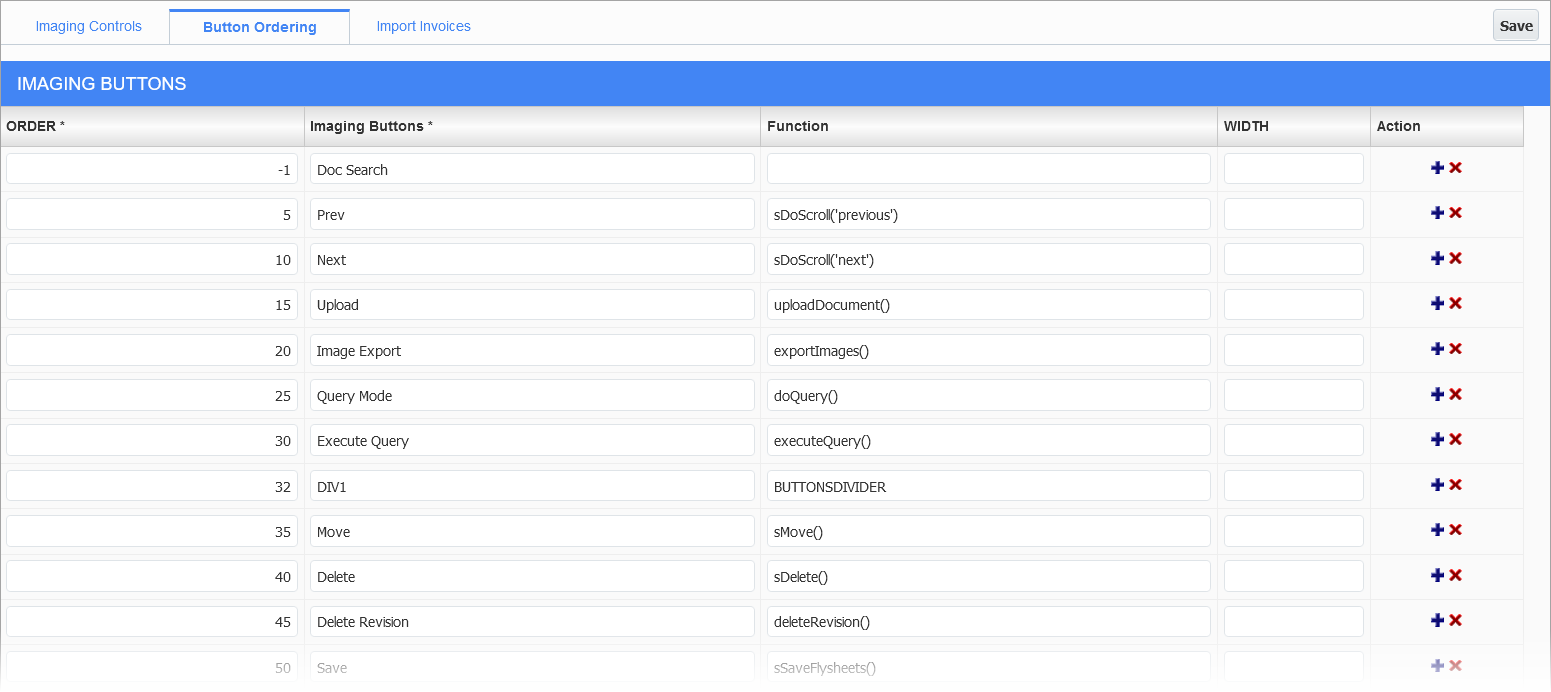
Imaging Control; standard Treeview path: Imaging > Setup > Imaging Control – Button Ordering tab
This tab lists all of the Image Manager buttons and allows the user to change their order by specifying the new order in the Order column. It also allows for the inclusion of new functionality by allowing the user to specify the function to be called when the button is clicked using the Function column. Users should not touch this column for existing buttons. The only exception is the special value "BUTTONSDIVIDER", which can be used with new entries to provide spacing between groups of buttons. The width column is used to override the default width of the button. The Imaging buttons can be activated by checking the 'Active' box and new buttons can be created by clicking on the Add ( ) icon under the Action column. To delete a button, click on the Delete (
 ) icon under the Action column. Once changes have been made, click the [Save] button to save the changes.
Import Invoices – Tab
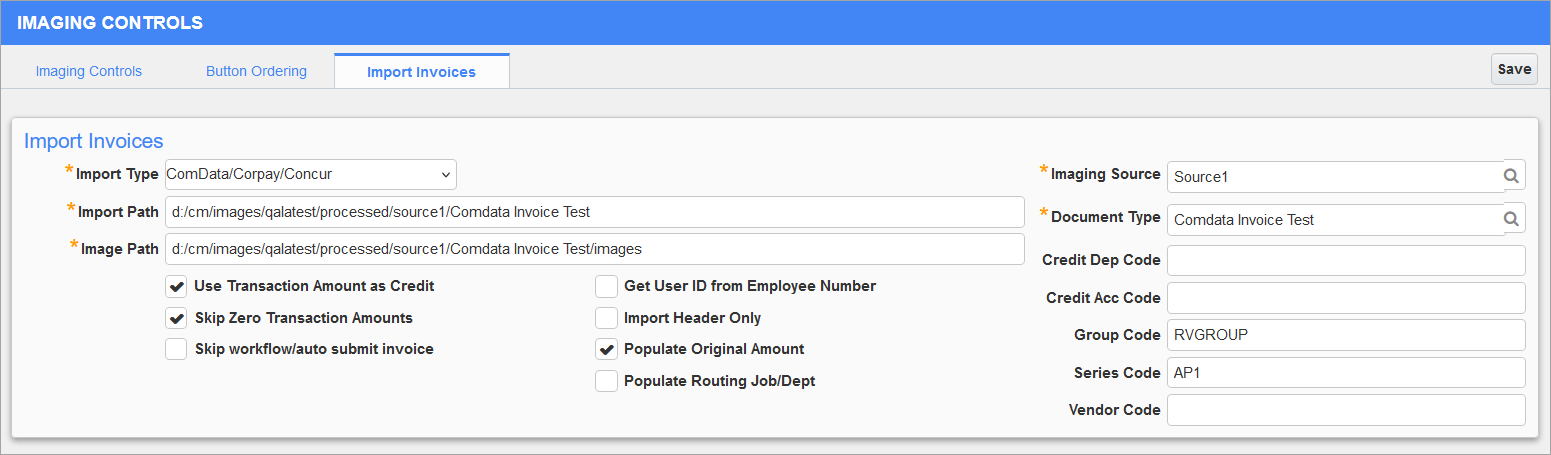
Imaging Controls; standard Treeview path: Imaging > Setup > Imaging Control - Import Invoices tab
Users can import Comdata or Concur invoice data using the Import Invoices tab on the Imaging Controls screen in the Imaging module. For more information, please see Importing Comdata/Concur Invoice Data into Imaging.
The fields on the Import Invoices tab are described below.
Import Type
Select the type of import file CMiC will be reading. Options available are "Comdata" or "Concur". Depending on the import type selected, some of the fields on this tab will differ. The variation in fields is described below.
Import Path
This is the location where the txt file resides that was generated by your importing company. This location must be accessible from the JSP server where image registration resides.
Imaging Path
This is the location where the images are placed to be imported. This location must be accessible from the JSP server where image registration resides.
Imaging Source
Enter/select the source we are going to be importing to. This source needs to have the parsing flag on.
Document Type
Enter/select the document type in Imaging that we will be importing to. This document type must use the registered invoice flysheets.
Use Transaction Amount as Credit − Checkbox
If checked, this option will balance the transaction lines.
Skip Zero Transaction Amounts − Checkbox
If checked, any zero transaction lines will not be uploaded.
Skip Workflow/Auto Submit Invoice − Checkbox
If checked, invoice will not be automatically submitted.
Import Header Only − Checkbox
If checked, no detail transaction lines will be imported into the Invoice Detail flysheet, therefore the value will be $0.00 and will need to be populated manually after import.
Populate Original Amount − Checkbox, Populate Routing Job Department − Checkbox
By default, these will be unchecked. When both boxes are checked, it will populate the original amount and routing job/deptartment when the Comdata Imaging invoices are imported.
Credit Dep Code, Credit Acc Code
These fields become enabled when the 'Use Transaction Amount as Credit' box is checked. This is the department code and the account code that will be used to make the transaction line.
Group Code
The group code entered here will be the default group code that the import will use.
Series Code
The series code entered here will be the default series code that the import will use.
Get User ID from Employee Number, Vendor Code (ComData Import Type Only)

If "ComData" is selected in the Import Type field, then these two fields are enabled.
If checked, the 'Get User ID from Employee Number' checkbox acquires the user ID using the employee number that was provided in the import. If no user ID is found, then the employee number is still used.
The Vendor Code field contains the default vendor code for Comdata.
Get EFT from Vendor, EFT Flag (Concur Import Type Only)

If "Concur" is selected in the Import Type field, then these two fields are enabled.
If 'Get EFT from Vendor' is checked, the EFT will be retrieved from the vendor in Enterprise.
The EFT Flag field is ignored if the 'Get EFT from Vendor' checkbox above is checked, otherwise the value entered in this field will be used as the default.
[Save] - Button
When all fields on the tab have been completed, click on [Save]. The settings will be saved and the upload feature can now be used.
NOTE: Please note that this process is already started with image registration. If the data is filled in, the process will run at the same time as image registration is being run.