Overview
This process describes how to upload expenses (AP invoices and their images) from Comdata, Corpay, or Concur into the Imaging module.
NOTE: Comdata and Corpay share the same columns for import.
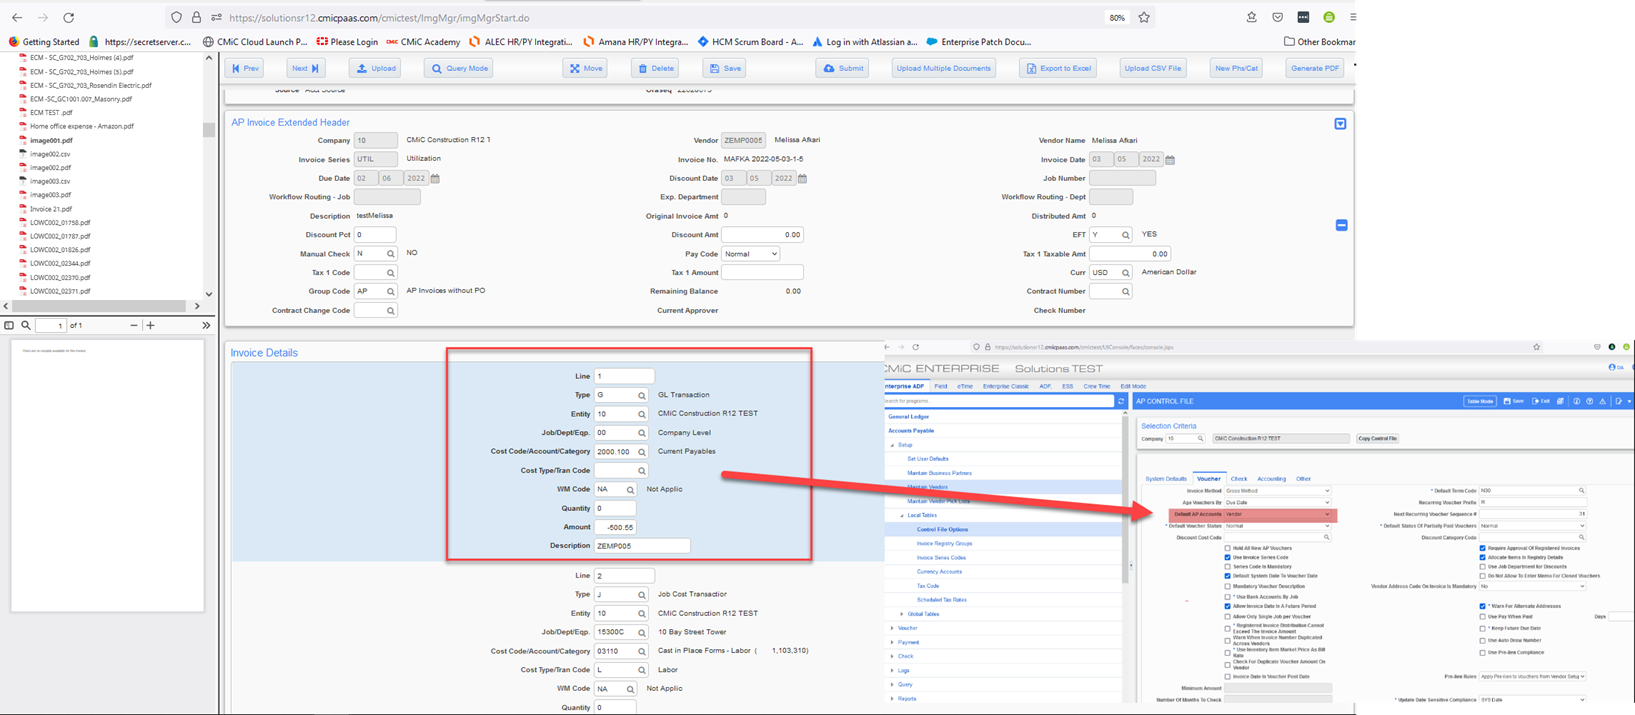
This process usually involves high volumes of transactions and photos backing up the transactions. It allows users to upload expense transactions in a (comma delimited) data file, and the associated images in a zip file. Imaging will create AP invoices based on the Control file settings, then load and associate the photos from the zip file to the transactions.
In summary, Imaging creates AP invoices with their images for high-volume (expense) transactions.
Import File Format
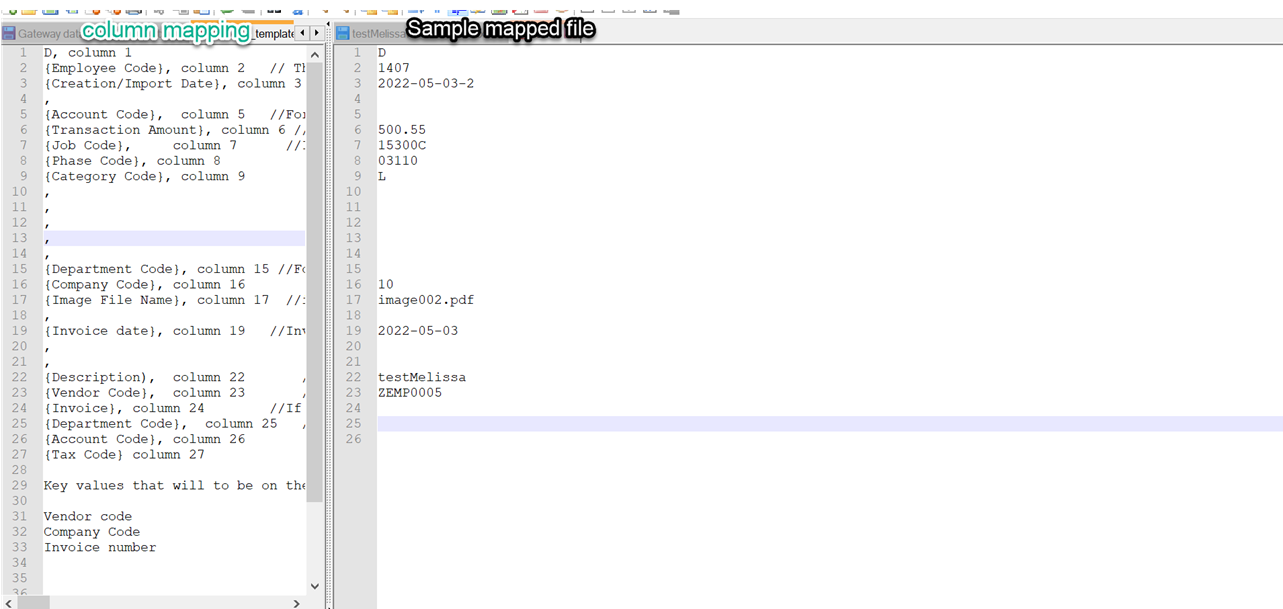
Example of Comdata import file format:
H,,081521,I,08152021,08152021,081521,,O,,,,,412.66,,,MC#-9211,,,
D,,081521,I,6280,399.58,,,,INDEED,,,,,00,01,16328722-1.png,0.0000,08/01/2021,Indeed-July 2021 Inv # 47521771,1,,,,00,6280
D,,081521,I,6050,13.08,,,,AMAZON PRIME*2P9J65DI1,,,,,00,01,16328725-1.pdf,0.0000,08/04/2021,monthly membership fee. no receipt,1,,,,00,6050
The latest Comdata import file format can also be downloaded using the following link:
Process
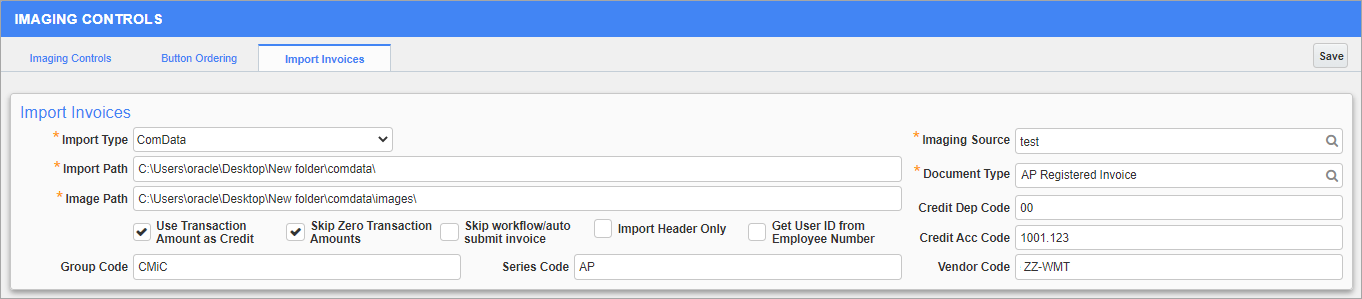
Imaging Control; standard Treeview path: Imaging > Setup > Imaging Control - Import Invoices
Users can import Comdata or Concur invoice data using the Import Invoices tab on the Imaging Controls screen in the Imaging module.
NOTE: Users upload a ZIP file that contains all the images, and the image registration process extracts it. (ZIP file or single PDF). If an image ZIP file needs to be uploaded based on the Scheduler, the file needs to be assigned on the file server.
The fields on the Import Invoices tab are described below.
Import Type
Select the type of import file CMiC will be reading. The available options are "Comdata" or "Concur". Depending on the import type selected, some of the fields on this tab will differ. The variation in fields is described below.
Import Path
This is the location where the txt file resides that was generated by your importing company. This location must be accessible from the JSP server where image registration resides.
Image Path
This is the location where the images are placed to be imported. This location must be accessible from the JSP server where image registration resides.
Imaging Source
Enter/select the source to import to. The 'Parse' checkbox on the Image Source screen is editable once a valid ComData license is applied and the selected source must have the 'Parse' box checked to use the Comdata/Concur Upload functionality.
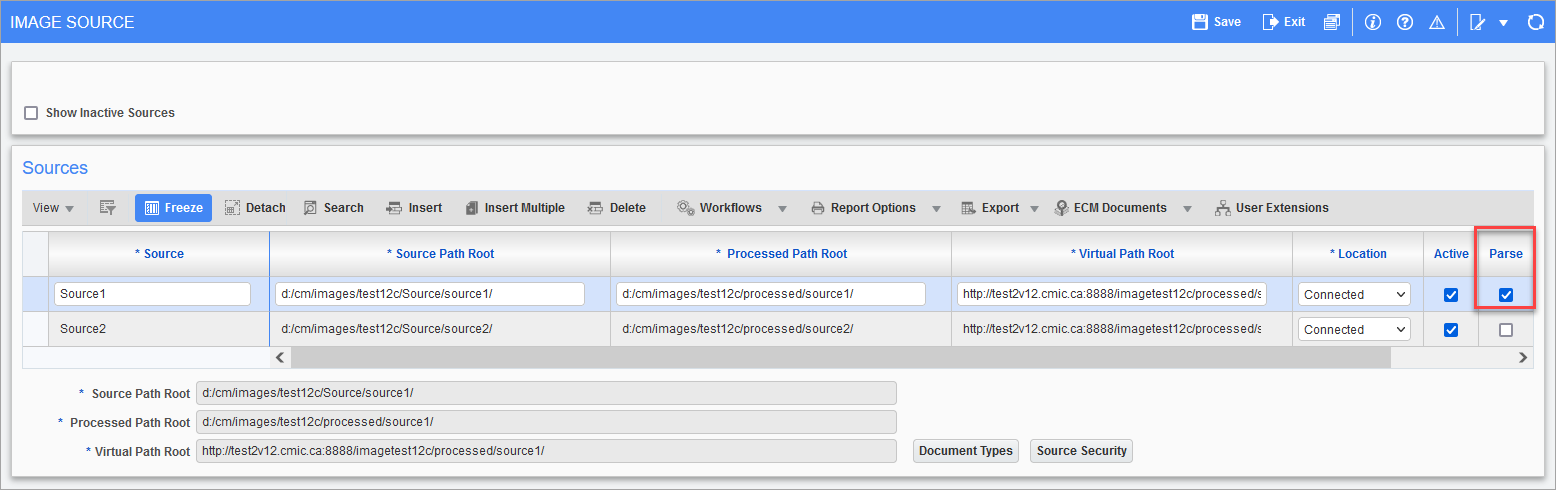
Pgm: IMGSRC - Image Source; standard Treeview path: Imaging > Setup > Sources
Document Type
Enter/select the document type in Imaging that we will be importing to. This document type must use the registered invoice flysheets.
If the document type drop down is blank:
-
Check that the user has access and can see the Imaging source.
-
Check the user's security settings found under Imaging > Utilities > Users on Groups. The user should be part of a group which has access to the document type.
Use Transaction Amount as Credit − Checkbox
If checked, this option will balance the transaction lines.
When the 'Use Transaction Amount as Credit' checkbox is checked, the Credit Dep Code and Credit Acc Code fields will appear. When a job line is created, it will be offset by this General Ledger account.
If this checkbox is unchecked, the invoice amount on the detail card shows as a positive number. However, it causes issues on the registered Accounts Payable side as the account code used is not populated on the department referenced.
Skip Zero Transaction Amounts − Checkbox
If checked, any zero transaction lines will not be uploaded. When this checkbox is checked, it means there will be a zero dollar invoice and if there is a detail line in the text file with a 0 amount it will simply skip it.
Skip Workflow/Auto Submit Invoice − Checkbox
If checked, the invoice will not be automatically submitted.
Import Header Only − Checkbox
If checked, no detail transaction lines will be imported into the Invoice Detail flysheet, therefore the value will be $0.00 and will need to be populated manually after import.
From the detail lines in the file, the header will be created. Listed below are also the natural keys needed so the file validates in Imaging and parses accordingly to create the invoice header. This is why a header line is not necessary on the import .txt file.
-
Vendor
-
Company
-
Invoice code
-
Invoice date
Populate Original Amount − Checkbox, Populate Routing Job Department − Checkbox
By default, these will be unchecked. When both boxes are checked, it will populate the original amount and routing job/deptartment when the Comdata Imaging invoices are imported.
Credit Dep Code, Credit Acc Code
These fields become enabled when the 'Use Transaction Amount as Credit' checkbox is checked. This is the department code and the account code that will be used to make the transaction line.
Group Code
The group code entered here will be the default group code that the import will use (AP Local Tables Registry Group Code).
Series Code
The series code entered here will be the default series code that the import will use (AP Local Tables Series Code).
Get User ID from Employee Number − Checkbox (ComData Import Type Only)
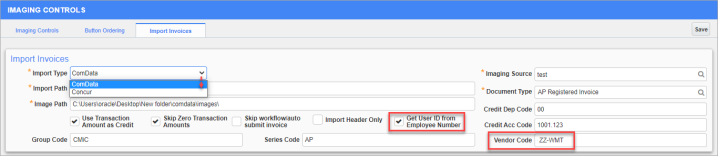
If "ComData" is selected in the Import Type field, then this field is enabled.
If checked, the 'Get User ID from Employee Number' checkbox acquires the user ID using the employee number that was provided in the import. If no user ID is found, then the employee number is still used. This comes from the Payroll py employee_table.
Vendor Code (ComData Import Type Only)
If "ComData" is selected in the Import Type field, then this field is enabled.
The Vendor Code field contains the default vendor code for Comdata. It's the default vendor code that is going to be used if no vendor code is specified in the txt file.
Get EFT from Vendor, EFT Flag (Concur Import Type Only)
![]()
If "Concur" is selected in the Import Type field, then these two fields are enabled.
If 'Get EFT from Vendor' is checked, the EFT will be retrieved from the vendor in Enterprise.
The EFT Flag field is ignored if the 'Get EFT from Vendor' checkbox above is checked, otherwise the value entered in this field will be used as the default.
[Save] - Button
When all fields on the tab have been completed, click on [Save]. The settings will be saved and the upload feature can now be used.
NOTE: Please note that this process is already started with image registration. If the data is filled in, the process will run at the same time as image registration is being run.

The screenshot above shows an example of text file template for Comdata.
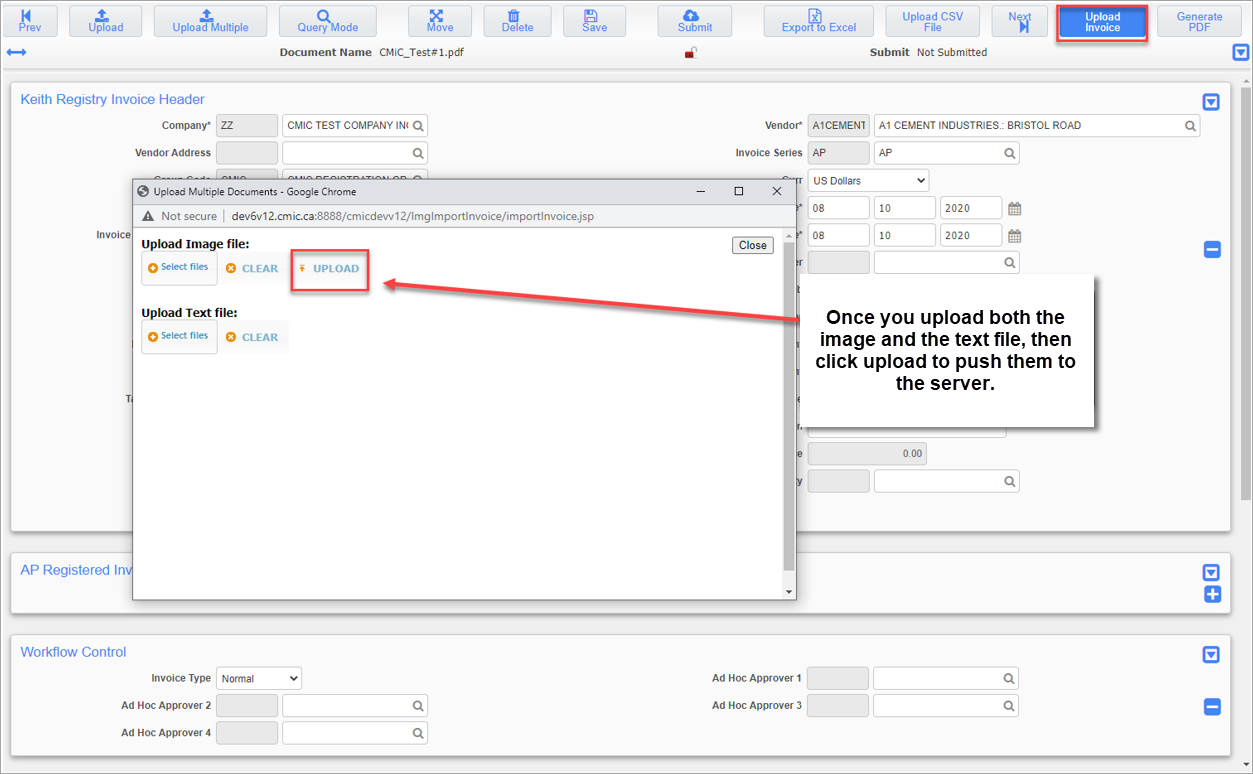
After the image and the text files are pushed to the server, the image registration program handles parsing the file. This can take up to 5 minutes in most client’s environments to load the images into the treeview. However, this parameter isn’t fixed and processing times can vary depending on the client’s environment.
Field Mapping
Comdata’s Column to Field Mapping:
NOTE: No header line is needed on the upload file. The Header Invoice flysheet will be created based on the detail lines uploaded.
| Column | Notes |
|---|---|
| Column 2: Description | Header description to use if Employee Code is not in the format. |
| Column 2: Employee Code | The Employee Code found under Image Control. The employee name associated to the Employee Code goes into the header flysheet description. If the 'Get User ID from Employee Number' checkbox is turned on, the user account assigned to the employee code entered on this column will be used in the header flysheet. |
| Column 3: Creation/ Import Date | This must be in the Comdata file if you don't want the system to create the invoice code from Invoice Code Prefix + Invoice Date. For example, INV202205110. |
| Column 2+3: Invoice Code | |
| Column 5: Account Code | The account code will be read from column 26. This column is ignored by CMiC when imported. |
| Column 6: Transaction Amount | If 'Import Header Only' checkbox is unchecked, then this amount will populate APRi_ORIG_AMT, otherwise it will populate APRI_AMT. |
| Column 7: Job Code | If the job code is in the Comdata file and the 'Import Header Only' checkbox is unchecked, then Phase Code (Column 8) and Category Code (Column 9) should also be in the Comdata file. |
| Column 8: Phase Code | |
| Column 9: Category Code | |
| Column 15: Department Code | The department code will be read from column 25. This column is ignored by CMiC when imported. |
| Column 16: Company Code | Valid CMiC company code. |
| Column 17: Image File Name | The image backup file name needs to be added here in order for it to upload with the correct detail line into Imaging. If no image file will be imported with the transaction record, please enter "noimage.pdf" as a placeholder in this column. |
| Column 19: Invoice Date |
This is the invoice date. Accepted date formats are as follows: MM/dd/yyyy yyyy-MM-dd yyyy/MM/dd dd-MMM-yyyy yyyy-MMM-dd dd/MMM/yyyy yyyy/MMM/dd dd MMM yyyy yyyy MMM dd
Where dd = day of month with leading zero MM = month in numbers with leading zero MMM = month in 3 letters yyyy = 4 digit year |
| Column 22: Description | Header description to use if the employee code is not in the file format. |
| Column 23: Vendor Code | Must have Vendor Code defined in Column 23, otherwise the vendor code will default from the Imaging Control setup. |
| Column 24: Invoice Code Prefix | If the invoice code should start with the Invoice Prefix and then the Invoice Date, then the Comdata file must have an Invoice Code Prefix entered in Column 24. |
| Column 25: Department Code | If the department code is in the Comdata file and the 'Import Header Only' checkbox is unchecked, then account code on column 26 must also be populated. |
| Column 26: Account Code | This column needs to be populated if column 25 department code is populated. |
| Column 27: TaxCode1 | This must be a valid CMiC tax code. This is the tax code to be used for the imported invoice. It is optional. |
Concur’s Column to Field Mapping:
Column 18: Transaction Amount
Column 19: Image Name
Column 20: Invoice Code
Column 22: Currency Code
Column 25: Invoice Date
Column 27: Description
Column 32: Original Amt
Column 77: Company Code
Column 78: Department Code
Column 84: Company Code 2
Column 85: Job Code
Column 86: Phase Code
Column 87: Category Code
Column 167: Account Code
Column 169: Transaction Amount 2
Column 282: Vendor Code
Sample: