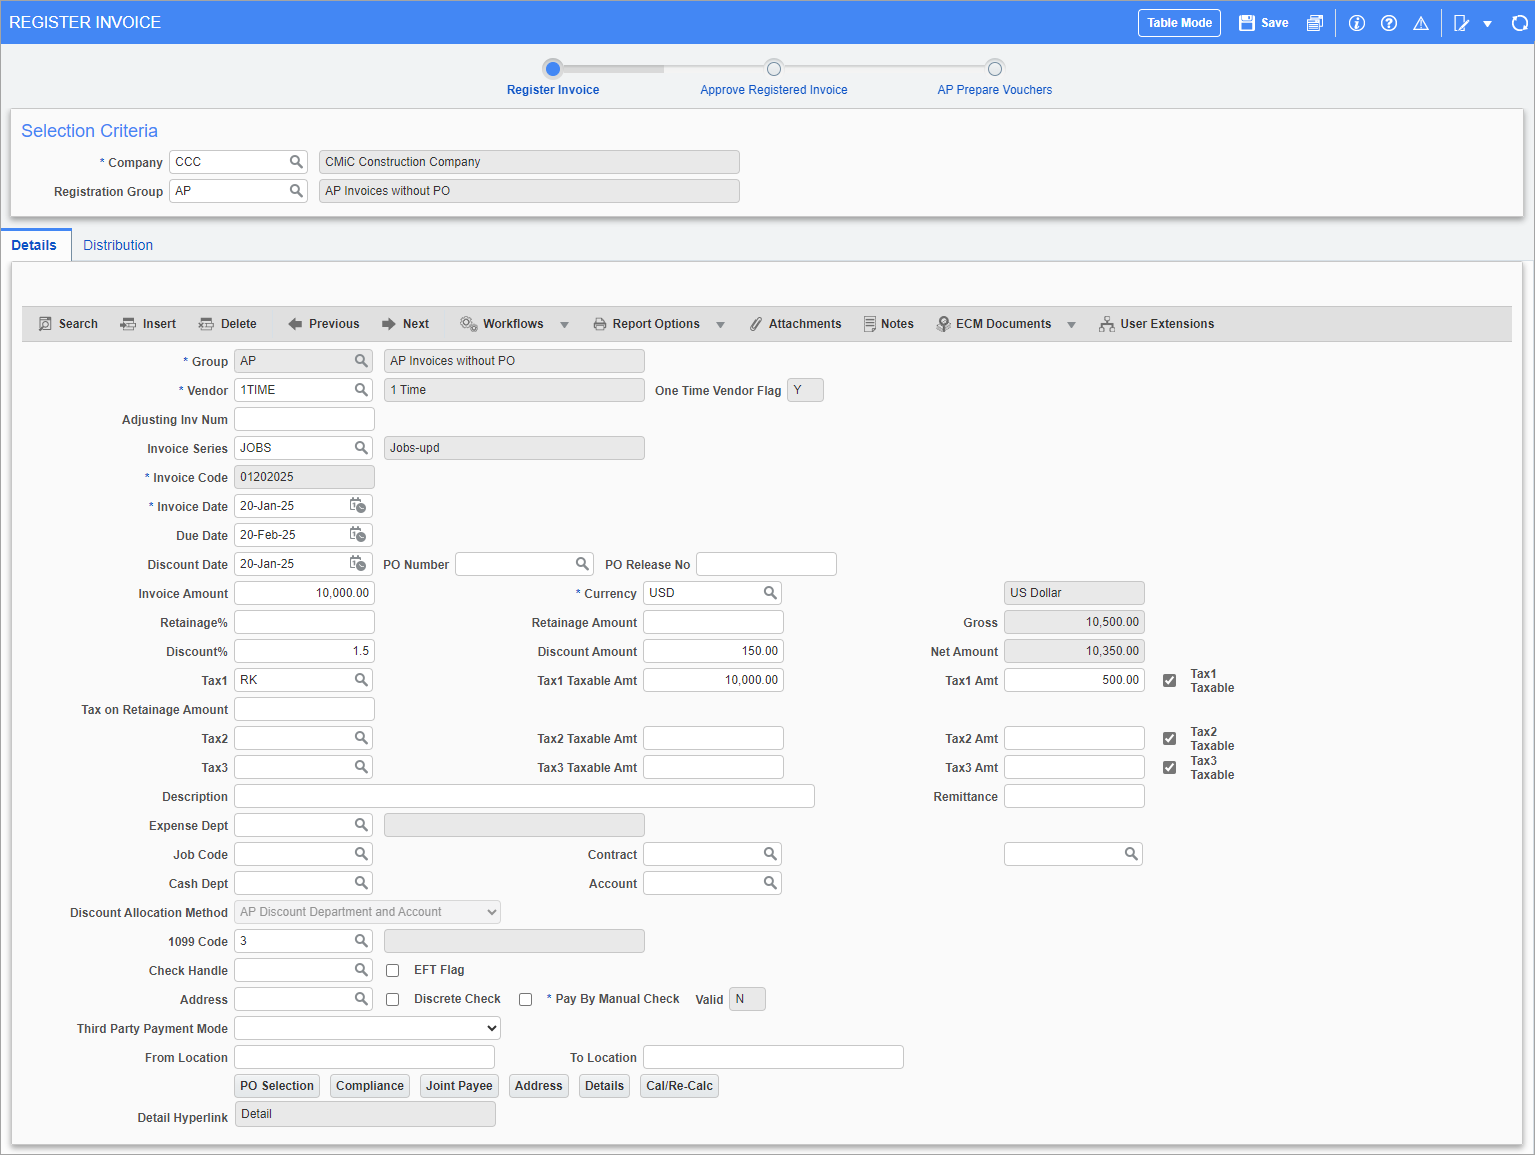
Pgm: APREGINV – Register Invoice; standard Treeview path: Accounts Payable > Voucher > Register Invoices – Details tab
By using the Invoice Registry, users can enter invoices into the system as registered invoices, without having to enter all the required information and distribution. These registered invoices are then held in suspense until their required information and distribution is known.
Invoices maintained in the Invoice Registry screen must be entered against a registration group to which the user has access. Once assigned to a group, the details of the invoice can be entered. Invoices entered into the registry require the entry of basic information, such as the registration group, vendor, invoice number, invoice date, and currency, but additional details, such as the description, check handling code, job code, and retainage percentage, can be entered later.
If the screen is in Form Mode, as shown in the above screenshot, it can be switched to Table Mode to view the list of Registered Invoices in the registry via the [Table Mode] button.
Selection Criteria
Company
Select the relevant company from this field’s LOV.
Registration Group
Select the code for the Registration Group to which this invoice belongs, or leave this field blank to not filter invoices by a Registration Group. Registration Groups are defined in the Local Tables (standard Treeview path: Accounts Payable > Setup > Local Tables > Invoice Registry Groups).
Details – Tab
Group
Enter/select the registration group for the invoice.
Vendor
Enter/select the vendor for the invoice being entered. This field’s LOV contains all the active vendors currently on the system.
Adjusting Inv Num
Enter the posted invoice number that will be adjusted with this entry. This is to provide a reversal of the original posted invoice values, with the new values being posted.
Invoice Series
Enter the series codes for the invoice being entered. The invoice series code provides a means of sorting and sequencing registered invoices as well as providing for the automatic distribution (whether partial or whole) of those invoices.
EFT Payment Type
By default this field is hidden and can be added via the Lite Editor if needed. All active payment types in the Payment Types screen are available in the EFT Payment Type drop-down list. The payment type selected in the Maintain Vendors screen is defaulted to the Image Manager, Registered Invoice, and Enter Voucher screens. Please see Accounts Payable - AP Payment Types for further details.
Invoice Number
Enter the invoice number associated with this invoice. This number appears on the vendors’ invoice and it is not the same as the voucher number. A voucher number will be automatically generated by the system when the registered invoice is converted to a voucher. A voucher’s voucher number is used in the backend, and its invoice number is used to identify the voucher in the various AP screens.
Invoice Date
Enter the date associated with the invoice being entered. The system date will default into this field if the AP Control file setting ‘Default System Date to Voucher Date’ is active. The system will calculate the discount date and the due date based on the terms code associated with the vendor. Invoices posted in the system can be aged based on either the invoice date or the invoice due date. If the invoice date is used for aging, the date entered in this field will determine the aging for this invoice.
Due Date
Enter/select the date this invoice is due for payment. This date is usually printed on the invoice by the supplier, indicating the final date that payment must be received. The system will default the due date based on the payment terms associated with this vendor. Adjust this date if it does not match the date appearing on the vendors’ invoice.
Discount Date
Enter/select discount date associated with this invoice. The system will default the due date based on the payment terms you have associated with this vendor. Adjust this date if it does not match the date appearing on the vendors’ invoice.
PO Number
Enter purchase order number or use the [PO Select] button if the voucher is to be matched to a purchase order. The purchase order selection follows the same rules as the voucher entry screen, with the exception that an invalid registered invoice may be created and pulled into voucher entry. If a variance exists upon pressing the [Create Registered Invoice] button, when the answer is ‘Yes’ an invalid AP invoice will be created. This invoice can be pulled into voucher entry, but not pushed.
Invoice Amount
Enter the amount of the invoice, in the currency of the invoice. A number between ‑9,999,999,999 and 99,999,999,999 can be entered. If entering Invoice Line Item details, then leave all amounts blank and use the [Details] button to enter amounts. After using this field, the system will calculate and display the holdback amount, the tax amounts, and the gross amount of the invoice, any discount amount applicable, and the net invoice amount due.
Currency
Enter/select the currency code for this invoice. The system will default the currency code defined on the Vendor Company Detail screen to this field. Change this currency if it does not match the currency appearing on the vendors’ invoice.
Retainage %, Retainage Amount
Enter/select the retainage percentage and amount. If a retainage percentage has been entered on the Vendor Company Detail screen, that percentage value will default to this field. If retainage is not calculated on this vendor invoice, the system will default a value of 0.00 to this field. The retainage amount field will be updated automatically if the retainage percentage is changed here. The amount rather than the percent field can also be updated.
Gross
This is a display-only field that displays the calculated gross amount.
Discount %, Discount Amount
Enter/select the discount percentage and amount if applicable to this invoice. If a discount percentage has been entered on the Vendor Company Detail screen that percentage will default to this field. The discount amount field will be updated automatically based on the discount percentage in this field. Either the amount or the percent field can be modified.
Net Amount
This is a display-only field, displaying the calculated net amount.
Tax1, Tax2, Tax3
These fields are used to select the taxes that apply to the invoice. Depending on the type of tax selected in the Tax1 field, the system may calculate Tax 1 Retainage if Tax 1 is a GST/VAT style tax.
Keep in mind, the system calculates taxes sequentially. Hence, if a tax is calculated on another tax, it is important to enter the tax codes in the order of calculation, and that the ‘Tax# Taxable’ box be checked.
Tax1 Taxable Amt, Tax2 Taxable Amt, Tax3 Taxable Amt
These fields are used to enter the amount that is taxable for the corresponding tax code. If the tax code has its ‘Freight’ and ‘Tax on Tax’ boxes checked, the freight amount and all preceding tax charges are included. These fields are automatically calculated when a tax code is selected, but its calculated value can be overridden with a user-specified amount.
Tax1 Amt, Tax2 Amt, Tax3 Amt
If tax codes are used, these fields are automatically populated with the tax’s amount. These fields can be used as an alternative to the Tax Code fields by entering tax amounts manually.
Tax1 Taxable, Tax2 Taxable, Tax3 Taxable – Checkboxes
These checkboxes are used to indicate that the tax amount is taxable.
Retainage Amount
This is the amount of Tax 1 that is being withheld due to retainage. This is only applicable for tax credit style taxes such as VAT and GST taxes.
Description
Enter a description of the invoice. This field is mandatory if the ‘Mandatory Voucher Description’ box is checked on the Voucher tab of the AP Control File.
Remittance
Enter the remittance description, if required.
Expense Dept
Enter an expense department when the distribution is to be to this department only. The AP taxes will be picked up from the department rather than from the vendor. You may not enter both an expense department and a job code.
Job Code
Enter a job code:
-
To have the job default in the distribution by entering a ‘J’ type distribution. By doing this, only the controlling job and sub-jobs will be allowed to be entered in the distribution.
-
If the voucher is to be distributed to a subcontract payable via accounts payable.
-
If the voucher will be entered using the Details entry and should be distributed to this job.
-
If the AP control checkbox ‘Only Allow Single Job Per Voucher’ is checked and this invoice will be entered through Details to the controlling and sub-jobs.
-
If this registered invoice is pulled into a subcontract pay request using the [Registration] button on the Enter Voucher screen.
-
If the Paid When Paid option will be used in voucher entry. PWP will not be used if there is no job code on the voucher header.
Contract
If there is a subcontract associated with this vendor, you can select it from the LOV. This will then attach itself to the voucher for editing and posting. The LOV will only show contracts that are marked as Invoiced via AP. The LOV will show the contract, the change order code, the original contract amount, and the remaining amount to be paid (the difference between the original contract and any amounts that have already been paid).
In conjunction with the associated subcontract is the change order number, which is selected via the field to the right of the Contract field. If a subcontract and change order number are entered, the Distribution Detail screens will be restricted to only the job, cost code, and categories assigned to the subcontract, if the ‘Validate Subcontract CostCode/Category Structure’ box is checked on the Other tab of the AP Control File.
Cash Dept
When users change the default currency, they may enter an appropriate cash department for the currency. This is not a required field at the time of invoice registration. But when preparing invoices (push program), validations for currency, department and account will be run and if the voucher currency does not match the cash account department, then users will be required to go back to the registration and change accordingly.
Account
Enter a valid cash account, if the voucher currency is changed at the time of registration entry. The cash department and cash account must together match the voucher currency. As explained under the cash department, the same rules apply here.
Discount Allocation Method
Select a discount allocation method.
1099 Code
If relevant, enter the 1099 code for the invoice. The display-only field to the right of this field displays the code’s full name.
Check Handle
Select a check handle if the vendor’s address to print on the payment is to be the address associated with a check handle; otherwise, select the vendor’s address via the Address field.
The check handling code may have defaulted from the company’s default setup.
EFT Flag – Checkbox
If the vendor is set-up to be paid by EFT (electronic funds transfer) payments, this box should be checked. This checkbox can be unchecked if required, indicating that this particular invoice is to be paid by check.
Address
Used to select an address record for the vendor.
Discrete Check – Checkbox
Check this box if a separate check is required for this invoice. Typically, the system will combine all outstanding invoices for a vendor onto a single check. Using the discrete check feature, a single vendor may have multiple checks generated on a single check run. Leave this box blank if this invoice can be combined with other outstanding invoices to generate a single check for this vendor during payment selection and check printing.
Pay by Manual Check – Checkbox
Check this box if this invoice must be paid by manual check.
Valid
This field displays “Y” if the distribution entered via the Distribution tab is correct and matches the invoice header amount, and it displays “N” otherwise. This field’s default value is “N”, and it changes to “Y” after the distribution has been entered, saved, and validated via the [Validate] button on the Distribution tab.
Third Party Payment Mode
If the vendor is set-up for third party payment mode, and if this invoice needs to be paid by third party payment mode, then select a valid value from the list.
From Location, To Location
Enter a trip starting and ending location. These fields are used to calculate distance for mileage expenses.
[PO Selection] – Button
For details, please refer to the following subsection: Processing Invoices > Enter Vouchers – Screen > [PO Selection] – Button.
[Compliance] – Button
For details, please refer to the following subsection: Processing Invoices > Enter Vouchers – Screen > [Compliance] – Button.
[Joint Payee] – Button
If at the time of entering the voucher, it is known that the payment will either be split among multiple payees or that the check will be written to co-signatures, this information can be entered via this button’s pop-up.
Via the pop-up, enter the payee’s name and the dollar amount to be paid. The pop-up will not allow entry of an amount greater than the net amount of the voucher or a null value.
NOTE: The joint payee will be validated against the Business Partner LOV if the 'Enable Joint Payee Validation' box is checked on the Financials tab of the System Options screen. For more information, please refer to System Data - System Options - Financials - Tab.
For further details about joint payees, please refer to the Pre-Lien Vendors & Joint Payees section in this guide.
[Address] – Button
Only use this button to select an address code for this invoice if the ‘remit to’ address is different from the vendor’s main address.
[Details] – Button
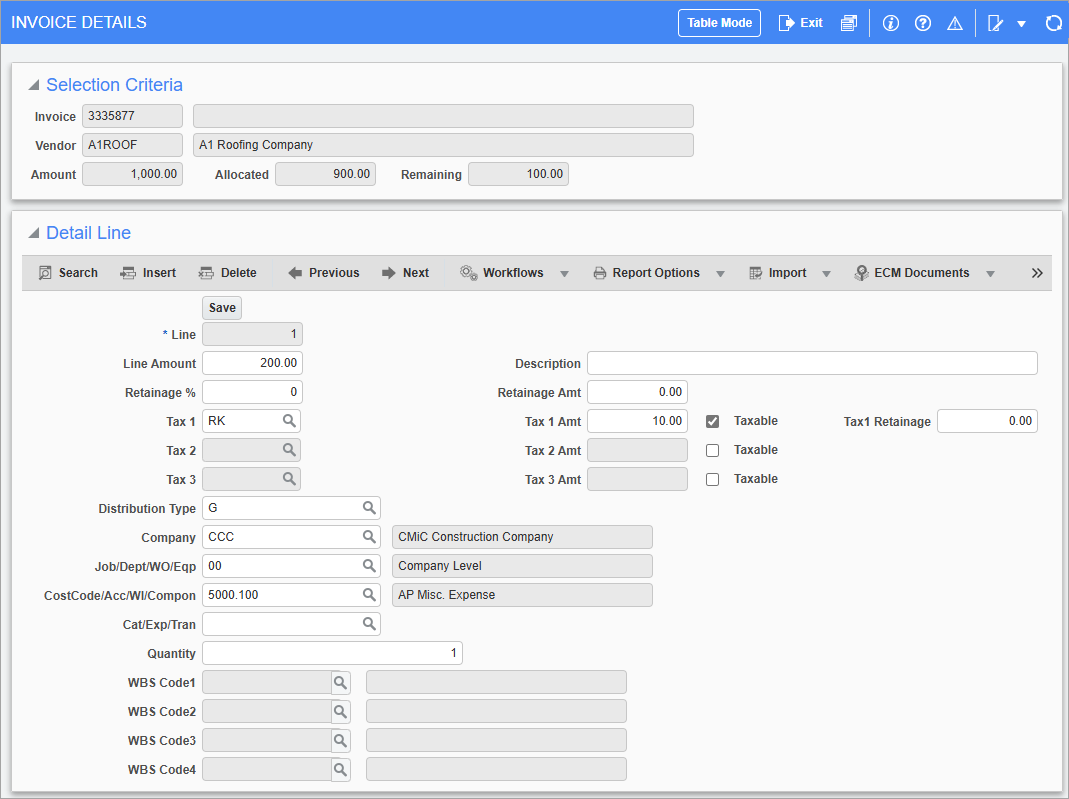
Pgm: APINVOICEDETAILS – Invoice Registry Details popup; standard Treeview path: Accounts Payable > Voucher > Register Invoices – Details tab – [Details] button
This button’s pop-up is used to view the details of a line item. This option must be used before any amounts have been entered, as this option will calculate backwards, and fill in the invoice header from the details entered here. This option allows entry to the Retainage%, Tax Codes, and Tax Amounts field applicable on each line of the invoice rather than as overall for the complete invoice.
The Quantity field is hidden by default and can be added using Lite Editor. The default value for this field is "1".
Depending on the ‘Allocate Items in Registry Details’ checkbox on the Control screen, this window may require that inventory items be entered. The taxes will default depending on the flag setting. If this box is checked, then inventory item taxes will default for inventory items and non-stock items, and will default from the vendor for the free-form items. Inventory item taxes supersede all other tax setups. If no taxes are set at the inventory level, the tax fields will report as null. If the ‘Allocate Items In Registry Details’ box is unchecked, the tax will default from the job for a ‘J’-type line, from the vendor for a ‘G’-type line, from the dept. associated with the home location of the equipment for an ‘E’-type line. A ‘W’-type distribution line will default the taxes as based on the work order type of ‘J’, ‘G’ or ‘E’ type.
If the ‘Allow Only Single Job per Voucher’ box is checked on the Voucher tab of the AP Control File, the invoice must be entered using the Invoice Registry Details pop-up.
[Cal/Re-Cal] – Button
If the voucher has been distributed, but an amount change requires that it be re-calculated, use this button. A prompt will ask whether to delete the existing distribution. Click [Yes] to re-calculate.
Advance Amount Paid, Advance Amount Being Recovered, Advance Amount Outstanding, Advance Payment
These fields can be added to the screen using the Lite Editor if needed. Details for Advance Payment fields can be found in Accounts Payable - Enter Vouchers.
Distribution – Tab
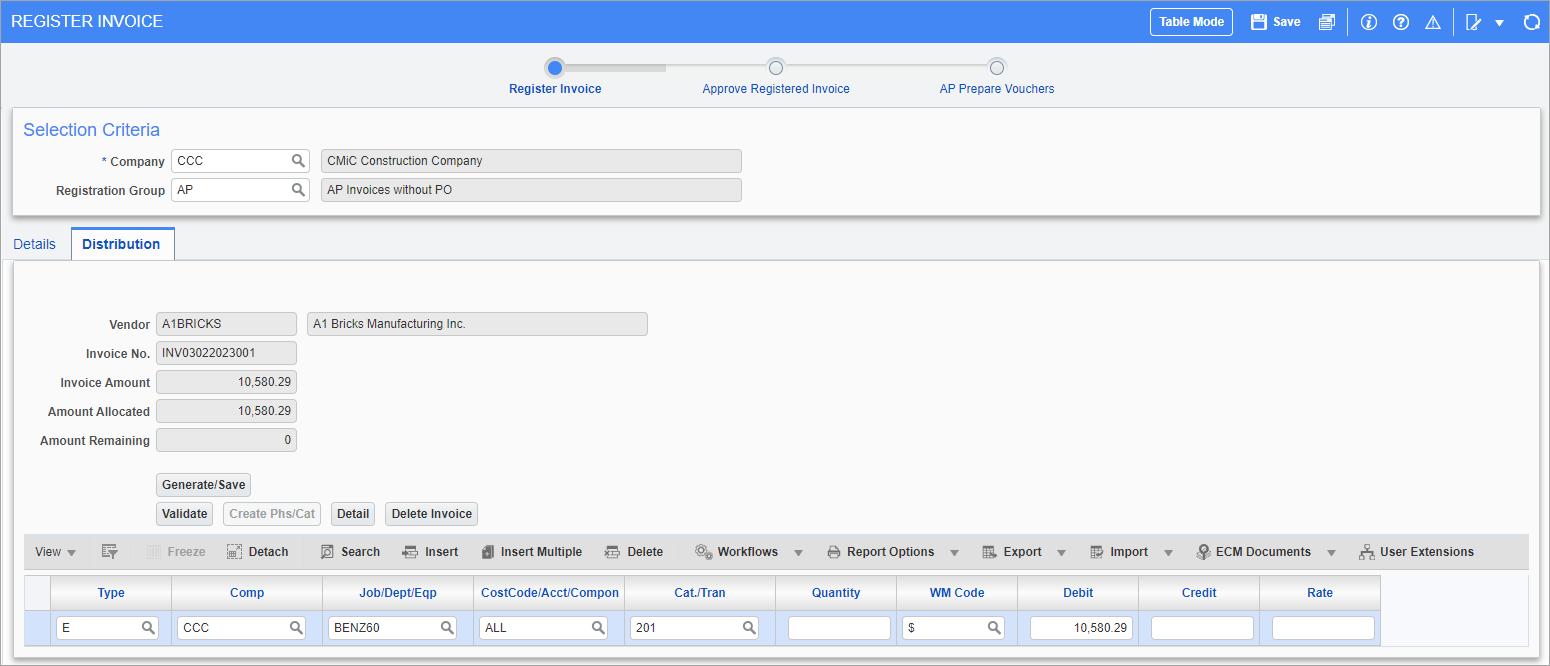
Pgm: APREGINV – Register Invoice; standard Treeview path: Accounts Payable > Voucher > Register Invoices – Distribution tab
This tab can’t be used to enter the distribution for this invoice until its line item details have been entered and saved via the [Details] button on the Details tab.
You do not have to make any entries on this tab in order to register an invoice. The invoice allocation is only required when you convert the invoice into a voucher. Distribution types allowed in the Invoice Registry screen are ‘G,’J’,’E’, and ‘W’.
For details on entering an allocation, please refer to the following: Accounts Payable - Enter Vouchers - [Distribution] - Button.
[Generate/Save] – Button
Used to generate and save the entered distribution.
[Validate] – Button
Use this button to ensure that the entered distribution is correct and matches the invoice header amount. If the validation passed, the ‘Valid’ box on the registry header will be set to “Y”. If the validation fails, the system will display a message indicating the cause.
[Create Phs/Cat] – Button
This button can be used to create new cost codes and categories.
[Detail] – Button
This button’s pop-up is used to view the distribution details and to edit the Bill Rate, Bill Amount, and Trade Code fields of the distribution.
[Delete Invoice] – Button
To remove the invoice while on this tab, press this button.
Rate
This field is used to define the mileage rate. Mileage expenses are calculated in the Construct ESS app.